CyberArk EPM
| Version | 1.7.1 (View all) |
| Managed integration release status | GA |
| Subscription level What's this? |
Basic |
| Developed by What's this? |
Elastic |
| Ingestion method(s) | API |
| Minimum Kibana version(s) | 9.0.5 8.19.2 |
You can use this integration as an Elastic Managed integration on Elastic Cloud Hosted deployments running this version or later.
CyberArk Endpoint Privilege Manager (EPM) enforces least privilege and enables organizations to block and contain attacks on endpoint computers, reducing the risk of information being stolen or encrypted and held for ransom. A combination of privilege security, application control and credential theft prevention reduces the risk of malware infection.
The CyberArk EPM integration collects events (raw and aggregated), policy audit events (raw and aggregated), and admin audit logs using the REST API.
Elastic Managed integrations allow you to collect data without having to manage Elastic Agent in your cloud. They make manual agent deployment unnecessary, so you can focus on your data instead of the agent that collects it. For more information, refer to Elastic Managed integrations and the Elastic Managed integrations FAQ. Elastic Managed deployments are only supported in Elastic Serverless and Elastic Cloud environments. This functionality is in beta and is subject to change. Beta features are not subject to the support SLA of official GA features.
This module has been tested against the CyberArk EPM version 24.12.0.4372.
This integration collects the following logs:
- Raw Event - This method enables users to retrieve raw events from EPM.
- Policy Audit Raw Event - This method enables users to retrieve policy audit raw events from EPM.
- Aggregated Event - This method enables users to retrieve aggregated events from EPM.
- Policy Audit Aggregated Event - This method enables users to retrieve aggregated policy audit events from EPM.
- Admin Audit - This method enables users to retrieve the full list of actions carried out by EPM administrators in a specific set.
Elastic Agent must be installed. For more details, check the Elastic Agent installation instructions.
The integration supports two authentication methods against the CyberArk EPM REST API. Complete the CyberArk-side setup for the method you intend to use.
This method uses the native EPM logon API with an EPM username and password. It is the default and remains supported for tenants that are not connected to the CyberArk Identity Security Platform Shared Services (ISPSS).
- Navigate to Administration → Account Management and create a user. While creating the user, check the Allow to manage Sets option and provide ViewOnlySetAdmin for all the required sets.
- Log in with the newly created user and navigate to Administration → Account Configuration.
- Update the Timeout for inactive session parameter, which is a prerequisite for creating an integration in Elastic.
Set a high value for the Timeout for inactive session parameter to minimize multiple authentication calls.
This method uses the OAuth2 client credentials flow with a CyberArk Identity service user. Use it when your EPM tenant is connected to ISPSS. For the full procedure, refer to Set up API authentication for EPM REST APIs using Identity.
- In Identity Administration, create a service user with Is service user and Is OAuth confidential client enabled. Note its login name, for example
svc_elastic@cyberark.cloud.1234, and its password. These are used as[Identity] Client IDand[Identity] Client Secret. - Add the service user as a member of an EPM role that grants the EPM API permissions required for the data streams you want to collect.
- In Identity Administration, go to Apps & Widgets → Web Apps, click Add Web Apps, and add the CyberArk EPM API Client app. Configure the required fields under the Settings tab and note the Application ID, which is used as
[Identity] Application ID. - On the Tokens tab of the web app, define the token expiration period. On the Permissions tab, add the service user.
- Note your Identity ID: click your user name, select About, and copy the ID shown under Identity, for example
ACF4874. This is used as[Identity] Identity ID. - Note your EPM server name, which is the subdomain of your EPM console URL. For example, if the console URL is
https://na101.epm.cyberark.com/management-options, then[Identity] EPM Server URLishttps://na101.epm.cyberark.com.
- In Kibana navigate to Management → Integrations.
- In the search bar, type CyberArk EPM.
- Select the CyberArk EPM integration and add it.
- Select the Authentication Method and fill in the parameters prefixed with the matching label. Parameters prefixed with the other label can be left empty.
- EPM:
[EPM] URL,[EPM] Username,[EPM] Passwordand[EPM] Session Timeout. - CyberArk Identity:
[Identity] EPM Server URL,[Identity] Identity ID,[Identity] Application ID,[Identity] Client IDand[Identity] Client Secret.
- EPM:
- Add the remaining configuration parameters, including the Interval and Initial Interval, to enable data collection.
- Save the integration.
Note:
- The default
[EPM] URLishttps://login.epm.cyberark.com, but this can vary depending on your region. Refer to the Documentation to find the correct URL for your region. This URL is the EPM dispatcher server and is only used with the EPM authentication method. The CyberArk Identity method uses[Identity] EPM Server URLinstead. - If you encounter an error indicating that the usage limit has been reached, consider lowering the "Resource Rate Limit" parameter in the advanced section. For more details, refer to the documentation.
The Raw Event, Policy Audit Raw Event, Aggregated Event and Policy Audit Aggregated Event data streams collect events by their CyberArk EPM arrival time (arrivalTime), which is when the EPM service received the event, not when it occurred on the endpoint. EPM agents upload events in batches, so an event can reach EPM long after it occurred. The @timestamp field is set from the arrival time.
Consecutive polling windows overlap by the Lookback parameter in the advanced section (default 2m). Events collected twice because of the overlap are deduplicated.
To collect events from further back after setup, for example after upgrading from a version that filtered by event time and missed late-arriving events, add a new integration policy with a larger Initial Interval, such as 1440h for 60 days. The Initial Interval only applies on the first run of a policy. Events already stored in older backing indices of the data stream may be indexed again.
This is the raw_event dataset.
Example
{
    "@timestamp": "2024-11-28T05:24:15.693Z",
    "agent": {
        "ephemeral_id": "7ea3fe76-e396-467a-9306-9275e62581cb",
        "id": "40c0cba3-776f-463a-a365-f3fe72c61452",
        "name": "elastic-agent-95612",
        "type": "filebeat",
        "version": "8.19.2"
    },
    "cyberark_epm": {
        "raw_event": {
            "access_action": "false",
            "access_target_type": "Internet",
            "agent_event_count": 1,
            "agent_id": "109f521d-2ee1-450b-9f71-3cc56d8ebf37",
            "arrival_time": "2024-11-28T05:24:15.693Z",
            "company": "Microsoft Corporation",
            "computer_name": "TEST-PC",
            "count": 1,
            "deception_type": 0,
            "display_name": "Windows host process (Rundll32) (rundll32.exe)",
            "file_description": "Windows host process (Rundll32)",
            "file_name": "rundll32.exe",
            "file_owner_domain": "NT SERVICE",
            "file_owner_name": "TrustedInstaller",
            "file_path": "C:\\Windows\\System32\\rundll32.exe",
            "file_path_without_filename": "C:\\Windows\\System32\\",
            "file_qualifier": "-6929158130464282036",
            "file_size": 71168,
            "file_version": "10.0.17763.1697",
            "first_event_date": "2024-11-28T05:03:10.094Z",
            "hash": "A40886F98905F3D9DBDD61DA1D59CCB4F4854758",
            "last_event_date": "2024-11-28T05:03:10.094Z",
            "logon_attempt_type_id": 5,
            "logon_attempt_value": "Service (Service startup)",
            "logon_status_id": 3221225779,
            "logon_status_value": "Clocks between DC and other computer too far out of sync",
            "modification_time": "2024-10-29T05:24:15.618Z",
            "operating_system_type": "Windows",
            "original_file_name": "RUNDLL32.EXE",
            "package_name": "Windows host process (Rundll32) (rundll32.exe)",
            "policy_name": "test-rule2",
            "process_command_line": "Startupscan.dll,SusRunTask",
            "product_name": "Microsoft® Windows® Operating System",
            "product_version": "10.0.17763.1697",
            "publisher": "Microsoft Windows",
            "skipped_count": 0,
            "source_name": "Microsoft Windows",
            "source_type": "Windows",
            "threat_protection_action": "ALL",
            "threat_protection_action_id": "0",
            "type": "Launch",
            "user_domain": "TEST-PC",
            "user_is_admin": true,
            "user_name": "Administrator",
            "win_event_record_id": 0,
            "win_event_type": 0
        }
    },
    "data_stream": {
        "dataset": "cyberark_epm.raw_event",
        "namespace": "46289",
        "type": "logs"
    },
    "ecs": {
        "version": "8.11.0"
    },
    "elastic_agent": {
        "id": "40c0cba3-776f-463a-a365-f3fe72c61452",
        "snapshot": false,
        "version": "8.19.2"
    },
    "event": {
        "action": "all",
        "agent_id_status": "verified",
        "category": [
            "process"
        ],
        "dataset": "cyberark_epm.raw_event",
        "end": "2024-11-28T05:03:10.094Z",
        "ingested": "2026-07-06T11:53:54Z",
        "kind": "event",
        "original": "{\"accessAction\":\"false\",\"accessTargetName\":null,\"accessTargetType\":\"Internet\",\"agentEventCount\":1,\"agentId\":\"109f521d-2ee1-450b-9f71-3cc56d8ebf37\",\"applicationSubType\":null,\"arrivalTime\":\"2024-11-28T05:24:15.693Z\",\"authorizationRights\":null,\"bundleId\":null,\"bundleName\":null,\"bundleVersion\":null,\"company\":\"Microsoft Corporation\",\"computerName\":\"TEST-PC\",\"deceptionType\":0,\"displayName\":\"Windows host process (Rundll32) (rundll32.exe)\",\"eventCount\":1,\"eventType\":\"Launch\",\"evidences\":null,\"exposedUsers\":null,\"fatherProcess\":null,\"fileAccessPermission\":null,\"fileDescription\":\"Windows host process (Rundll32)\",\"fileName\":\"rundll32.exe\",\"filePath\":\"C:\\\\Windows\\\\System32\\\\rundll32.exe\",\"filePathWithoutFilename\":\"C:\\\\Windows\\\\System32\\\\\",\"fileQualifier\":\"-6929158130464282036\",\"fileSize\":71168,\"fileVersion\":\"10.0.17763.1697\",\"firstEventDate\":\"2024-11-28T05:03:10.094Z\",\"hash\":\"A40886F98905F3D9DBDD61DA1D59CCB4F4854758\",\"interpreter\":null,\"justification\":null,\"justificationEmail\":null,\"lastEventDate\":\"2024-11-28T05:03:10.094Z\",\"logonAttemptTypeId\":5,\"logonStatusId\":3221225779,\"lureUser\":null,\"modificationTime\":\"2024-10-29T05:24:15.618Z\",\"operatingSystemType\":\"Windows\",\"originUserUID\":null,\"originalFileName\":\"RUNDLL32.EXE\",\"owner\":\"NT SERVICE\\\\TrustedInstaller\",\"packageName\":\"Windows host process (Rundll32) (rundll32.exe)\",\"policyCategory\":null,\"policyName\":\"test-rule2\",\"processCertificateIssuer\":null,\"processCommandLine\":\"Startupscan.dll,SusRunTask\",\"productCode\":null,\"productName\":\"Microsoft® Windows® Operating System\",\"productVersion\":\"10.0.17763.1697\",\"publisher\":\"Microsoft Windows\",\"runAsUsername\":null,\"skippedCount\":0,\"sourceName\":\"Microsoft Windows\",\"sourceProcessCertificateIssuer\":null,\"sourceProcessCommandLine\":null,\"sourceProcessHash\":null,\"sourceProcessPublisher\":null,\"sourceProcessSigner\":null,\"sourceProcessUsername\":null,\"sourceType\":\"Windows\",\"sourceWSIp\":null,\"sourceWSName\":null,\"symLink\":null,\"threatProtectionAction\":\"ALL\",\"threatProtectionActionId\":0,\"upgradeCode\":null,\"userIsAdmin\":true,\"userName\":\"TEST-PC\\\\Administrator\",\"winEventRecordId\":0,\"winEventType\":0,\"workingDirectory\":null}",
        "start": "2024-11-28T05:03:10.094Z",
        "type": [
            "info"
        ]
    },
    "file": {
        "directory": "C:\\Windows\\System32\\",
        "hash": {
            "sha1": "A40886F98905F3D9DBDD61DA1D59CCB4F4854758"
        },
        "mtime": "2024-10-29T05:24:15.618Z",
        "name": "rundll32.exe",
        "owner": "TrustedInstaller",
        "path": "C:\\Windows\\System32\\rundll32.exe",
        "size": 71168
    },
    "host": {
        "name": "TEST-PC",
        "os": {
            "type": "windows"
        }
    },
    "input": {
        "type": "cel"
    },
    "observer": {
        "product": "Endpoint Privilege Manager",
        "vendor": "CyberArk"
    },
    "organization": {
        "name": "Microsoft Corporation"
    },
    "package": {
        "checksum": "A40886F98905F3D9DBDD61DA1D59CCB4F4854758",
        "name": "Windows host process (Rundll32) (rundll32.exe)",
        "size": 71168,
        "version": "10.0.17763.1697"
    },
    "related": {
        "hash": [
            "A40886F98905F3D9DBDD61DA1D59CCB4F4854758"
        ],
        "hosts": [
            "TEST-PC"
        ],
        "user": [
            "TrustedInstaller",
            "Administrator"
        ]
    },
    "rule": {
        "name": "test-rule2"
    },
    "tags": [
        "preserve_original_event",
        "preserve_duplicate_custom_fields",
        "forwarded",
        "cyberark_epm-raw_event"
    ],
    "user": {
        "domain": "TEST-PC",
        "name": "Administrator"
    }
}
Exported fields
| Field | Description | Type |
|---|---|---|
| @timestamp | Event timestamp. | date |
| cyberark_epm.raw_event.access_action | Whether the restrict event action is allow or restrict. | keyword |
| cyberark_epm.raw_event.access_target_name | The location of the accessed resource. | keyword |
| cyberark_epm.raw_event.access_target_type | Accessed resource type. | keyword |
| cyberark_epm.raw_event.agent_event_count | The number of identical events that happened during the aggregation period. | long |
| cyberark_epm.raw_event.agent_id | AgentId that is used to determine the computerName from the GetComputers API. | keyword |
| cyberark_epm.raw_event.application_sub_type | The sub-type of the application that triggers the event. | keyword |
| cyberark_epm.raw_event.arrival_time | The date and time when the event audit was received by the EPM service. | date |
| cyberark_epm.raw_event.authorization_right | The authorization rights that are needed during runtime to run the specified executable on macOS. | keyword |
| cyberark_epm.raw_event.authorization_rights | keyword | |
| cyberark_epm.raw_event.bundle_id | Bundle id of the file that triggered the event. | keyword |
| cyberark_epm.raw_event.bundle_name | Bundle name of the file that triggered the event. | keyword |
| cyberark_epm.raw_event.bundle_version | Bundle version of the file that triggered the event. | keyword |
| cyberark_epm.raw_event.command_info | File command information. | keyword |
| cyberark_epm.raw_event.company | Company name of the file that triggered the event. | keyword |
| cyberark_epm.raw_event.computer_name | keyword | |
| cyberark_epm.raw_event.count | The total number of raw events, including skipped events. | long |
| cyberark_epm.raw_event.deception_type | The type of deception policy. | long |
| cyberark_epm.raw_event.deception_type_value | keyword | |
| cyberark_epm.raw_event.defence_action_id | The defense action ID of the last event. | long |
| cyberark_epm.raw_event.defence_action_value | keyword | |
| cyberark_epm.raw_event.display_name | The file display name. | keyword |
| cyberark_epm.raw_event.evidences | The evidence related to a Threat Protection event. | flattened |
| cyberark_epm.raw_event.exposed_users | The users who were exposed in the threat protection event. | flattened |
| cyberark_epm.raw_event.file_access_permission | The file access permission. | keyword |
| cyberark_epm.raw_event.file_description | File description of the file that triggered the event. | keyword |
| cyberark_epm.raw_event.file_name | The name of the event file that triggered the event. | keyword |
| cyberark_epm.raw_event.file_owner_domain | keyword | |
| cyberark_epm.raw_event.file_owner_name | Owner of the file that triggered the event. | keyword |
| cyberark_epm.raw_event.file_path | File path of the file that triggered the event. | keyword |
| cyberark_epm.raw_event.file_path_without_filename | keyword | |
| cyberark_epm.raw_event.file_qualifier | keyword | |
| cyberark_epm.raw_event.file_size | The size of the file. | long |
| cyberark_epm.raw_event.file_version | File version of the file that triggered the event. | keyword |
| cyberark_epm.raw_event.first_event_date | The first time that the event was triggered. | date |
| cyberark_epm.raw_event.hash | Hash value (SHA1) of the application that triggered the event. | keyword |
| cyberark_epm.raw_event.interpreter | keyword | |
| cyberark_epm.raw_event.justification | Justification provided by the user. | keyword |
| cyberark_epm.raw_event.justification_email | keyword | |
| cyberark_epm.raw_event.last_event_computer_name | The name of the computer where the most recent event was detected. | keyword |
| cyberark_epm.raw_event.last_event_date | The last time that the event was triggered. | date |
| cyberark_epm.raw_event.logon_attempt_type_id | Type of logon attempt. | long |
| cyberark_epm.raw_event.logon_attempt_value | keyword | |
| cyberark_epm.raw_event.logon_status_id | The reason why the logon attempt failed. | long |
| cyberark_epm.raw_event.logon_status_value | keyword | |
| cyberark_epm.raw_event.lure_user | The lure user used for the attack attempt. | keyword |
| cyberark_epm.raw_event.modification_time | Last time the file that triggered the event was changed. | date |
| cyberark_epm.raw_event.operating_system_type | keyword | |
| cyberark_epm.raw_event.origin_user_uid | The unique name of the user. | keyword |
| cyberark_epm.raw_event.original_file_name | The original name of the event file that triggered the event. | keyword |
| cyberark_epm.raw_event.package_name | Installation package or executable that created the file that triggered the event. | keyword |
| cyberark_epm.raw_event.policy_category | keyword | |
| cyberark_epm.raw_event.policy_name | The policy that triggered the event. | keyword |
| cyberark_epm.raw_event.process_certificate_issuer | keyword | |
| cyberark_epm.raw_event.process_command_line | The process creation command line. | keyword |
| cyberark_epm.raw_event.product_code | The product code of the file that triggered the most recent event. | keyword |
| cyberark_epm.raw_event.product_name | Product name of the file that triggered the event. | keyword |
| cyberark_epm.raw_event.product_version | Product version of the file that triggered the event. | keyword |
| cyberark_epm.raw_event.publisher | Digital signature of the application that triggered the event (if applicable). | keyword |
| cyberark_epm.raw_event.run_as_username | The name of the user that was used to run the executable/command. | keyword |
| cyberark_epm.raw_event.skipped_count | The number of skipped events. | long |
| cyberark_epm.raw_event.source_name | Point of origin from which the file that triggered the event was acquired. | keyword |
| cyberark_epm.raw_event.source_process_certificate_issuer | keyword | |
| cyberark_epm.raw_event.source_process_command_line | The initiating process creation command line from which the event was triggered. | keyword |
| cyberark_epm.raw_event.source_process_hash | The hash of the initiating process from which the event was triggered. | keyword |
| cyberark_epm.raw_event.source_process_publisher | The publisher of the initiating process from which the event was triggered. | keyword |
| cyberark_epm.raw_event.source_process_signer | The signer of the initiating process from which the event was triggered. | keyword |
| cyberark_epm.raw_event.source_process_username | The username of the initiating process from which the event was triggered. | keyword |
| cyberark_epm.raw_event.source_type | The type of origin from where the file that triggered the event was acquired. | keyword |
| cyberark_epm.raw_event.source_ws_ip | Source workstation IPv4/v6 address. | ip |
| cyberark_epm.raw_event.source_ws_name | Source workstation from where the attack attempt/login attempt originated. | keyword |
| cyberark_epm.raw_event.sym_link | The Linux/UNIX link that points to another file or folder. | keyword |
| cyberark_epm.raw_event.threat_protection_action | The action was performed by EPM when the event occurred - Block or Detect. | keyword |
| cyberark_epm.raw_event.threat_protection_action_id | keyword | |
| cyberark_epm.raw_event.type | Type of event. | keyword |
| cyberark_epm.raw_event.upgrade_code | The upgrade code of the file that triggered the most recent event. | keyword |
| cyberark_epm.raw_event.user_domain | keyword | |
| cyberark_epm.raw_event.user_is_admin | Whether the user who triggered the event is a local administrator. | boolean |
| cyberark_epm.raw_event.user_name | User who triggered the event. | keyword |
| cyberark_epm.raw_event.win_event_record_id | Microsoft Windows event viewer report number that indicates the logged OS event. | long |
| cyberark_epm.raw_event.win_event_type | Microsoft Windows Event viewer event type. | long |
| cyberark_epm.raw_event.working_directory | The working directory of the event. | keyword |
| data_stream.dataset | Data stream dataset. | constant_keyword |
| data_stream.namespace | Data stream namespace. | constant_keyword |
| data_stream.type | Data stream type. | constant_keyword |
| event.dataset | Event dataset. | constant_keyword |
| event.module | Event module. | constant_keyword |
| input.type | Type of filebeat input. | keyword |
| log.offset | Log offset. | long |
This is the policyaudit_raw_event dataset.
Example
{
    "@timestamp": "2024-11-25T14:27:54.054Z",
    "agent": {
        "ephemeral_id": "b433f865-1940-4642-a125-41c29ecae6bb",
        "id": "5a493f2c-7eeb-4ab6-83c7-1aa1fd9f0c6c",
        "name": "elastic-agent-87286",
        "type": "filebeat",
        "version": "8.19.2"
    },
    "cyberark_epm": {
        "policyaudit_raw_event": {
            "access_target_name": "C:\\Oracle\\oemmw\\OPatch\\version.txt",
            "access_target_type": "ransomware",
            "agent_event_count": 2,
            "agent_id": "48b4bf28-5257-4460-a384-9aac70fb7db2",
            "arguments": "status sshd",
            "arrival_time": "2024-11-25T14:27:54.054Z",
            "computer_name": "k8sworker1-50-2-19",
            "display_name": "systemctl",
            "file_access_permission": "-rwxr-xr-x",
            "file_description": "systemctl",
            "file_name": "systemctl",
            "file_owner_name": "root",
            "file_path": "/usr/bin/systemctl",
            "file_qualifier": "2375697114193346955",
            "file_size": 1115760,
            "first_event_date": "2024-11-25T10:31:12.018Z",
            "hash": "5f344897632b50114a8ff649054599c6f7fa8a69",
            "last_event_date": "2024-11-25T10:37:58.431Z",
            "modification_time": "2024-10-26T14:27:54.041Z",
            "operating_system_type": "Linux",
            "origin_user_uid": "0",
            "package_name": "systemctl",
            "policy_action": "Elevate",
            "policy_name": "Test-elastic",
            "product_name": "SQL*PLUS",
            "run_as_username": "root",
            "skipped_count": 0,
            "source_name": "/usr/bin/systemctl",
            "source_type": "LocalDisk",
            "type": "StartElevated",
            "user_is_admin": true,
            "user_name": "root",
            "working_directory": "/home/serviceuser"
        }
    },
    "data_stream": {
        "dataset": "cyberark_epm.policyaudit_raw_event",
        "namespace": "33261",
        "type": "logs"
    },
    "ecs": {
        "version": "8.11.0"
    },
    "elastic_agent": {
        "id": "5a493f2c-7eeb-4ab6-83c7-1aa1fd9f0c6c",
        "snapshot": false,
        "version": "8.19.2"
    },
    "event": {
        "agent_id_status": "verified",
        "category": [
            "iam"
        ],
        "dataset": "cyberark_epm.policyaudit_raw_event",
        "end": "2024-11-25T10:37:58.431Z",
        "ingested": "2026-07-06T11:52:53Z",
        "kind": "event",
        "original": "{\"accessTargetName\":\"C:\\\\Oracle\\\\oemmw\\\\OPatch\\\\version.txt\",\"accessTargetType\":\"ransomware\",\"agentEventCount\":2,\"agentId\":\"48b4bf28-5257-4460-a384-9aac70fb7db2\",\"applicationSubType\":null,\"arguments\":\"status sshd\",\"arrivalTime\":\"2024-11-25T14:27:54.054Z\",\"authorizationRights\":null,\"bundleName\":\"\",\"bundleVersion\":\"\",\"codeURL\":\"\",\"commandInfo\":\"\",\"company\":\"\",\"computerName\":\"k8sworker1-50-2-19\",\"displayName\":\"systemctl\",\"eventType\":\"StartElevated\",\"fileAccessPermission\":\"-rwxr-xr-x\",\"fileDescription\":\"systemctl\",\"fileName\":\"systemctl\",\"filePath\":\"/usr/bin/systemctl\",\"fileQualifier\":\"2375697114193346955\",\"fileSize\":1115760,\"fileVersion\":\"\",\"firstEventDate\":\"2024-11-25T10:31:12.018Z\",\"hash\":\"5f344897632b50114a8ff649054599c6f7fa8a69\",\"interpreter\":\"\",\"justification\":\"\",\"justificationEmail\":\"\",\"lastEventDate\":\"2024-11-25T10:37:58.431Z\",\"mimeType\":\"\",\"modificationTime\":\"2024-10-26T14:27:54.041Z\",\"operatingSystemType\":\"Linux\",\"originUserUID\":\"0\",\"originalFileName\":\"\",\"owner\":\"root\",\"packageName\":\"systemctl\",\"parentProcess\":\"\",\"policyAction\":\"Elevate\",\"policyName\":\"Test-elastic\",\"productCode\":\"\",\"productName\":\"SQL*PLUS\",\"productVersion\":\"\",\"publisher\":\"\",\"runAsUsername\":\"root\",\"skippedCount\":0,\"sourceName\":\"/usr/bin/systemctl\",\"sourceType\":\"LocalDisk\",\"symLink\":\"\",\"upgradeCode\":\"\",\"userIsAdmin\":true,\"userName\":\"root\",\"workingDirectory\":\"/home/serviceuser\"}",
        "start": "2024-11-25T10:31:12.018Z",
        "type": [
            "info"
        ]
    },
    "file": {
        "hash": {
            "sha1": "5f344897632b50114a8ff649054599c6f7fa8a69"
        },
        "mode": "755",
        "mtime": "2024-10-26T14:27:54.041Z",
        "name": "systemctl",
        "owner": "root",
        "path": "/usr/bin/systemctl",
        "size": 1115760
    },
    "host": {
        "name": "k8sworker1-50-2-19",
        "os": {
            "type": "linux"
        }
    },
    "input": {
        "type": "cel"
    },
    "observer": {
        "product": "Endpoint Privilege Manager",
        "vendor": "CyberArk"
    },
    "package": {
        "checksum": "5f344897632b50114a8ff649054599c6f7fa8a69",
        "name": "systemctl",
        "size": 1115760
    },
    "process": {
        "working_directory": "/home/serviceuser"
    },
    "related": {
        "hash": [
            "5f344897632b50114a8ff649054599c6f7fa8a69"
        ],
        "hosts": [
            "k8sworker1-50-2-19"
        ],
        "user": [
            "0",
            "root"
        ]
    },
    "rule": {
        "name": "Test-elastic"
    },
    "tags": [
        "preserve_original_event",
        "preserve_duplicate_custom_fields",
        "forwarded",
        "cyberark_epm-policyaudit_raw_event"
    ],
    "user": {
        "id": "0",
        "name": "root"
    }
}
Exported fields
| Field | Description | Type |
|---|---|---|
| @timestamp | Event timestamp. | date |
| cyberark_epm.policyaudit_raw_event.access_target_name | keyword | |
| cyberark_epm.policyaudit_raw_event.access_target_type | The type of the accessed resource. | keyword |
| cyberark_epm.policyaudit_raw_event.agent_event_count | The number of identical events happened during the aggregation period. | long |
| cyberark_epm.policyaudit_raw_event.agent_id | AgentId that is used to determine the computerName from the GetComputers API. | keyword |
| cyberark_epm.policyaudit_raw_event.application_sub_type | The sub-type of the application that triggers the event. | keyword |
| cyberark_epm.policyaudit_raw_event.arguments | A list of the file arguments. | keyword |
| cyberark_epm.policyaudit_raw_event.arrival_time | The date and time when the event audit was received by the EPM service. This is not the time when the event occurred, but the time when the EPM service received the event audit. | date |
| cyberark_epm.policyaudit_raw_event.authorization_right | The authorization rights that are needed during runtime to run the specified executable on macOS. | keyword |
| cyberark_epm.policyaudit_raw_event.authorization_rights | keyword | |
| cyberark_epm.policyaudit_raw_event.bundle_name | Bundle name of the file that triggered the event. | keyword |
| cyberark_epm.policyaudit_raw_event.bundle_version | Bundle version of the file that triggered the event. | keyword |
| cyberark_epm.policyaudit_raw_event.code_url | The code URL of the file that triggered the most recent event. | keyword |
| cyberark_epm.policyaudit_raw_event.command_info | Details of the file command. | keyword |
| cyberark_epm.policyaudit_raw_event.company | Company name of the file that triggered the event. | keyword |
| cyberark_epm.policyaudit_raw_event.computer_name | The name of the computer where the event was detected. | keyword |
| cyberark_epm.policyaudit_raw_event.count | The total number of events. | long |
| cyberark_epm.policyaudit_raw_event.display_name | The file display name. | keyword |
| cyberark_epm.policyaudit_raw_event.file_access_permission | Details of the file access permissions. | keyword |
| cyberark_epm.policyaudit_raw_event.file_description | File description of the file that triggered the event. | keyword |
| cyberark_epm.policyaudit_raw_event.file_name | The name of the event file that triggered the event (files with the same hash can have different names). | keyword |
| cyberark_epm.policyaudit_raw_event.file_owner_domain | keyword | |
| cyberark_epm.policyaudit_raw_event.file_owner_name | Owner of the file that triggered the event. | keyword |
| cyberark_epm.policyaudit_raw_event.file_path | File path of the file that triggered the event. | keyword |
| cyberark_epm.policyaudit_raw_event.file_qualifier | The unique file identifier. | keyword |
| cyberark_epm.policyaudit_raw_event.file_size | The file size. If the size is zero, consider not returning this parameter. | long |
| cyberark_epm.policyaudit_raw_event.file_version | File version of the file that triggered the event. | keyword |
| cyberark_epm.policyaudit_raw_event.first_event_date | The first time that the event was triggered. | date |
| cyberark_epm.policyaudit_raw_event.hash | Hash value (SHA1) of the application that triggered the event. | keyword |
| cyberark_epm.policyaudit_raw_event.interpreter | The file interpreter. | keyword |
| cyberark_epm.policyaudit_raw_event.justification | Justification provided by the user. | keyword |
| cyberark_epm.policyaudit_raw_event.justification_email | The email of the requester. | keyword |
| cyberark_epm.policyaudit_raw_event.last_event_date | The last time that the event was triggered. | date |
| cyberark_epm.policyaudit_raw_event.mime_type | The mime type of the file that triggered the most recent event. | keyword |
| cyberark_epm.policyaudit_raw_event.modification_time | Last time the file that triggered the event was changed. | date |
| cyberark_epm.policyaudit_raw_event.operating_system_type | The operating system type of the file. | keyword |
| cyberark_epm.policyaudit_raw_event.origin_user_uid | The user's unique name. | keyword |
| cyberark_epm.policyaudit_raw_event.original_file_name | The name of the original file. | keyword |
| cyberark_epm.policyaudit_raw_event.package_name | Installation package or executable that created the file that triggered the event. | keyword |
| cyberark_epm.policyaudit_raw_event.parent_process | keyword | |
| cyberark_epm.policyaudit_raw_event.policy_action | The detected policy action. | keyword |
| cyberark_epm.policyaudit_raw_event.policy_name | The name of the policy that triggered the event. | keyword |
| cyberark_epm.policyaudit_raw_event.product_code | The product code of the file that triggered the most recent event. | keyword |
| cyberark_epm.policyaudit_raw_event.product_name | Product name of the file that triggered the event. | keyword |
| cyberark_epm.policyaudit_raw_event.product_version | Product version of the file that triggered the event. | keyword |
| cyberark_epm.policyaudit_raw_event.publisher | Digital signature of the application that triggered the event (if applicable). | keyword |
| cyberark_epm.policyaudit_raw_event.run_as_username | The username that was used to run the executable/command. | keyword |
| cyberark_epm.policyaudit_raw_event.set_id | The ID of the Set where this event was detected. | keyword |
| cyberark_epm.policyaudit_raw_event.skipped_count | The number of skipped events. | long |
| cyberark_epm.policyaudit_raw_event.source_name | Point of origin from which the file that triggered the event was acquired. | keyword |
| cyberark_epm.policyaudit_raw_event.source_type | The type of origin from where the file that triggered the event was acquired. | keyword |
| cyberark_epm.policyaudit_raw_event.sym_link | A Linux/UNIX link that points to another file or folder. | keyword |
| cyberark_epm.policyaudit_raw_event.type | Type of event. | keyword |
| cyberark_epm.policyaudit_raw_event.upgrade_code | The upgrade code of the file that triggered the most recent event. | keyword |
| cyberark_epm.policyaudit_raw_event.user_domain | keyword | |
| cyberark_epm.policyaudit_raw_event.user_is_admin | Whether the user who triggered the event is a local administrator. | boolean |
| cyberark_epm.policyaudit_raw_event.user_name | User who triggered the event. | keyword |
| cyberark_epm.policyaudit_raw_event.working_directory | The directory where the file ran. | keyword |
| data_stream.dataset | Data stream dataset. | constant_keyword |
| data_stream.namespace | Data stream namespace. | constant_keyword |
| data_stream.type | Data stream type. | constant_keyword |
| event.dataset | Event dataset. | constant_keyword |
| event.module | Event module. | constant_keyword |
| input.type | Type of filebeat input. | keyword |
| log.offset | Log offset. | long |
This is the aggregated_event dataset.
Example
{
    "@timestamp": "2024-11-25T11:25:18.712Z",
    "agent": {
        "ephemeral_id": "d7ea9f7e-3c32-4ab5-95c9-3a466e728db9",
        "id": "2706ecc4-8a14-4ae7-ab62-4e01d6315282",
        "name": "elastic-agent-81923",
        "type": "filebeat",
        "version": "8.19.2"
    },
    "cyberark_epm": {
        "aggregated_event": {
            "affected_computers": 1,
            "affected_users": 1,
            "agent_id": "109f521d-2ee1-450b-9f71-3cc56d8ebf37",
            "aggregated_by": "0E4B8652719D84B66BFBFCF195C43513AF8459D8,2048",
            "application_type": "Executable",
            "application_type_id": 3,
            "arrival_time": "2024-11-25T11:25:18.712Z",
            "deception_type": 0,
            "defence_action_id": 0,
            "defence_action_value": "No action",
            "exposed_users": 0,
            "file_location": "C:\\Oracle\\oemmw\\oracle_common\\ccr\\bin\\",
            "file_qualifier": "-1035712369269809536",
            "file_size": 13312,
            "first_event_computer_name": "TEST",
            "first_event_date": "2024-11-25T11:25:17.114Z",
            "first_event_user_domain": "TEST",
            "first_event_user_name": "Administrator",
            "hash": "SHA1##0E4B8652719D84B66BFBFCF195C43513AF8459D8",
            "last_agent_id": "109f521d-2ee1-450b-9f71-3cc56d8ebf37",
            "last_event_computer_name": "TEST",
            "last_event_date": "2024-11-25T11:25:17.114Z",
            "last_event_display_name": "setupCCR.exe -a -d -S...",
            "last_event_exposed_users_count": 0,
            "last_event_file_name": "setupCCR.exe",
            "last_event_id": "ZpURY5MBdDBWucfdnK1j",
            "last_event_source_name": "ouiSFX (setup_em13200p1_win64.exe)",
            "last_event_source_type": "LocalDisk",
            "last_event_user_domain": "TEST",
            "last_event_user_name": "Administrator",
            "operating_system_type": "Windows",
            "package_name": "ouiSFX (setup_em13200p1_win64.exe)",
            "skipped": false,
            "skipped_count": 0,
            "total_events": 1,
            "type": "Launch",
            "type_id": 2048
        }
    },
    "data_stream": {
        "dataset": "cyberark_epm.aggregated_event",
        "namespace": "10671",
        "type": "logs"
    },
    "ecs": {
        "version": "8.11.0"
    },
    "elastic_agent": {
        "id": "2706ecc4-8a14-4ae7-ab62-4e01d6315282",
        "snapshot": false,
        "version": "8.19.2"
    },
    "event": {
        "agent_id_status": "verified",
        "category": [
            "process"
        ],
        "dataset": "cyberark_epm.aggregated_event",
        "end": "2024-11-25T11:25:17.114Z",
        "ingested": "2026-07-06T11:50:56Z",
        "kind": "event",
        "original": "{\"CLSID\":\"\",\"affectedComputers\":1,\"affectedUsers\":1,\"agentId\":\"109f521d-2ee1-450b-9f71-3cc56d8ebf37\",\"aggregatedBy\":\"0E4B8652719D84B66BFBFCF195C43513AF8459D8,2048\",\"appPackageDisplayName\":\"\",\"applicationType\":\"Executable\",\"applicationTypeId\":3,\"arrivalTime\":\"2024-11-25T11:25:18.712Z\",\"deceptionType\":0,\"defenceActionId\":0,\"eventType\":\"Launch\",\"eventTypeId\":2048,\"exposedUsers\":0,\"fileLocation\":\"C:\\\\Oracle\\\\oemmw\\\\oracle_common\\\\ccr\\\\bin\\\\\",\"fileQualifier\":\"-1035712369269809536\",\"fileSize\":13312,\"firstEventComputerName\":\"TEST\",\"firstEventDate\":\"2024-11-25T11:25:17.114Z\",\"firstEventUserName\":\"TEST\\\\Administrator\",\"hash\":\"SHA1##0E4B8652719D84B66BFBFCF195C43513AF8459D8\",\"lastAgentId\":\"109f521d-2ee1-450b-9f71-3cc56d8ebf37\",\"lastEventAccessTargetName\":\"\",\"lastEventAccessTargetType\":null,\"lastEventAgentId\":null,\"lastEventAuthorizationRights\":\"\",\"lastEventComputerName\":\"TEST\",\"lastEventDate\":\"2024-11-25T11:25:17.114Z\",\"lastEventDisplayName\":\"setupCCR.exe -a -d -S...\",\"lastEventExposedUsers\":null,\"lastEventExposedUsersCount\":0,\"lastEventFileName\":\"setupCCR.exe\",\"lastEventId\":\"ZpURY5MBdDBWucfdnK1j\",\"lastEventInitiatedProcess\":null,\"lastEventInitiatedProcessLocation\":null,\"lastEventJustification\":\"\",\"lastEventOriginalFileName\":\"\",\"lastEventPackageName\":null,\"lastEventSourceName\":\"ouiSFX (setup_em13200p1_win64.exe)\",\"lastEventSourceType\":\"LocalDisk\",\"lastEventSymLink\":\"\",\"lastEventUserName\":\"TEST\\\\Administrator\",\"mimeType\":\"\",\"operatingSystemType\":\"Windows\",\"packageName\":\"ouiSFX (setup_em13200p1_win64.exe)\",\"productCode\":null,\"publisher\":\"\",\"skipped\":false,\"skippedCount\":0,\"threatDetectionAction\":\"\",\"totalEvents\":1,\"upgradeCode\":null,\"url\":\"\"}",
        "start": "2024-11-25T11:25:17.114Z",
        "type": [
            "info"
        ]
    },
    "file": {
        "directory": "C:\\Oracle\\oemmw\\oracle_common\\ccr\\bin\\",
        "hash": {
            "sha1": "0E4B8652719D84B66BFBFCF195C43513AF8459D8"
        },
        "name": "setupCCR.exe",
        "size": 13312
    },
    "host": {
        "os": {
            "type": "windows"
        }
    },
    "input": {
        "type": "cel"
    },
    "observer": {
        "product": "Endpoint Privilege Manager",
        "vendor": "CyberArk"
    },
    "package": {
        "checksum": "0E4B8652719D84B66BFBFCF195C43513AF8459D8",
        "name": "ouiSFX (setup_em13200p1_win64.exe)",
        "size": 13312
    },
    "related": {
        "hash": [
            "0E4B8652719D84B66BFBFCF195C43513AF8459D8"
        ],
        "hosts": [
            "TEST"
        ],
        "user": [
            "Administrator"
        ]
    },
    "tags": [
        "preserve_original_event",
        "preserve_duplicate_custom_fields",
        "forwarded",
        "cyberark_epm-aggregated_event"
    ]
}
Exported fields
| Field | Description | Type |
|---|---|---|
| @timestamp | Event timestamp. | date |
| cyberark_epm.aggregated_event.affected_computers | long | |
| cyberark_epm.aggregated_event.affected_users | long | |
| cyberark_epm.aggregated_event.agent_id | The agent id of the first event, taken from the first event aggregation. | keyword |
| cyberark_epm.aggregated_event.aggregated_by | The aggregatedBy value of the hash and eventType. Each type has its own aggregation logic. | keyword |
| cyberark_epm.aggregated_event.app_package_display_name | Microsoft Universal Windows Platform app package display name. | keyword |
| cyberark_epm.aggregated_event.application_type | The type of application that triggers the event. | keyword |
| cyberark_epm.aggregated_event.application_type_id | long | |
| cyberark_epm.aggregated_event.arrival_time | The date and time when the event audit was received by the EPM service. This is not the time when the event occurred, but the time when the EPM service received the event audit. | date |
| cyberark_epm.aggregated_event.authorization_right | The authorization rights that are needed during runtime to run the specified executable on macOS. | keyword |
| cyberark_epm.aggregated_event.clsid | keyword | |
| cyberark_epm.aggregated_event.deception_type | Deception type of the last event. | long |
| cyberark_epm.aggregated_event.deception_type_value | keyword | |
| cyberark_epm.aggregated_event.defence_action_id | Defence action ID of the last event. | long |
| cyberark_epm.aggregated_event.defence_action_value | keyword | |
| cyberark_epm.aggregated_event.exposed_users | long | |
| cyberark_epm.aggregated_event.file_location | Location of the last event. | keyword |
| cyberark_epm.aggregated_event.file_qualifier | Unique file identifier. | keyword |
| cyberark_epm.aggregated_event.file_size | The file size. | long |
| cyberark_epm.aggregated_event.first_event_computer_name | keyword | |
| cyberark_epm.aggregated_event.first_event_date | The first date of the first event in the aggregation. | date |
| cyberark_epm.aggregated_event.first_event_user_domain | keyword | |
| cyberark_epm.aggregated_event.first_event_user_name | Name of the first user who triggered first event in the aggregation. | keyword |
| cyberark_epm.aggregated_event.hash | Hash value (SHA1) of the application that triggered the event. | keyword |
| cyberark_epm.aggregated_event.last_agent_id | Last event in the aggregation agent id. | keyword |
| cyberark_epm.aggregated_event.last_event_access_target_name | keyword | |
| cyberark_epm.aggregated_event.last_event_access_target_type | Accessed resource type for the most recent detected event. | keyword |
| cyberark_epm.aggregated_event.last_event_agent_id | keyword | |
| cyberark_epm.aggregated_event.last_event_authorization_rights | keyword | |
| cyberark_epm.aggregated_event.last_event_computer_name | The name of the computer where the most recent event was detected. | keyword |
| cyberark_epm.aggregated_event.last_event_date | The last time that the event was triggered. | date |
| cyberark_epm.aggregated_event.last_event_display_name | Display name of the event. | keyword |
| cyberark_epm.aggregated_event.last_event_exposed_users | A list of the top five users who were exposed in the most recent detected event. | keyword |
| cyberark_epm.aggregated_event.last_event_exposed_users_count | The number of users who were exposed in the most recent detected event. | long |
| cyberark_epm.aggregated_event.last_event_file_name | The name of the event file that triggered the most recent detected event. Files with the same hash can have different names. | keyword |
| cyberark_epm.aggregated_event.last_event_id | Event unique identifier (used to create policies). | keyword |
| cyberark_epm.aggregated_event.last_event_initiated_process | The name of the process where the most recent event was detected. | keyword |
| cyberark_epm.aggregated_event.last_event_initiated_process_location | The path of the process where the most recent event was detected. | keyword |
| cyberark_epm.aggregated_event.last_event_justification | Justification provided by the user in the last event. | keyword |
| cyberark_epm.aggregated_event.last_event_original_file_name | The original name of the event file that triggered the most recent detected event. | keyword |
| cyberark_epm.aggregated_event.last_event_package_name | Installation package or executable that created the file which triggered the last event. | keyword |
| cyberark_epm.aggregated_event.last_event_source_name | Point of origin from where the file that triggered the last event was acquired. | keyword |
| cyberark_epm.aggregated_event.last_event_source_type | The type of origin from where the file that triggered the last event was acquired. | keyword |
| cyberark_epm.aggregated_event.last_event_sym_link | A Linux/UNIX link that points to another file or folder. | keyword |
| cyberark_epm.aggregated_event.last_event_user_domain | keyword | |
| cyberark_epm.aggregated_event.last_event_user_name | User who triggered the last event. | keyword |
| cyberark_epm.aggregated_event.mime_type | The type of the file. (i.e., application, media, etc.). | keyword |
| cyberark_epm.aggregated_event.operating_system_type | The endpoint operating system. | keyword |
| cyberark_epm.aggregated_event.package_name | keyword | |
| cyberark_epm.aggregated_event.policy_name | The name of the policy that triggers the event. | keyword |
| cyberark_epm.aggregated_event.product_code | The product code of the file that triggered the detected events. | keyword |
| cyberark_epm.aggregated_event.publisher | Digital signature of the application that triggered the event (if applicable). | keyword |
| cyberark_epm.aggregated_event.skipped | Indicates whether this is a skipped event. | boolean |
| cyberark_epm.aggregated_event.skipped_count | The number of skipped events. | long |
| cyberark_epm.aggregated_event.threat_detection_action | The action performed by EPM when the event occurred - Block or Detect. | keyword |
| cyberark_epm.aggregated_event.total_events | The number of events that occurred in the given time period (per aggregation). | long |
| cyberark_epm.aggregated_event.type | Type of event. | keyword |
| cyberark_epm.aggregated_event.type_id | long | |
| cyberark_epm.aggregated_event.upgrade_code | The upgrade code of the file that triggered the detected events. | keyword |
| cyberark_epm.aggregated_event.url | The URL of the ActiveX code. This field is only returned when the applicationType is ActiveX. | keyword |
| data_stream.dataset | Data stream dataset. | constant_keyword |
| data_stream.namespace | Data stream namespace. | constant_keyword |
| data_stream.type | Data stream type. | constant_keyword |
| event.dataset | Event dataset. | constant_keyword |
| event.module | Event module. | constant_keyword |
| input.type | Type of filebeat input. | keyword |
| log.offset | Log offset. | long |
This is the policyaudit_aggregated_event dataset.
Example
{
    "@timestamp": "2022-12-19T05:51:06.024Z",
    "agent": {
        "ephemeral_id": "8cbdbba2-9c50-4854-9c2a-075ebcae2e70",
        "id": "b6227a62-bc3a-4a3d-8a4c-e2ea82486928",
        "name": "elastic-agent-56821",
        "type": "filebeat",
        "version": "8.19.2"
    },
    "cyberark_epm": {
        "policyaudit_aggregated_event": {
            "affected_computers": 1,
            "affected_users": 1,
            "aggregated_by": "C340EFFBAED989E7F8FFC6F7574856CD8ED0D18B,QQQ",
            "application_type": "Executable",
            "arrival_time": "2022-12-19T05:51:06.024Z",
            "authorization_right": "com.apple.AOSNotification.FindMyMac.modify",
            "file_location": "C:\\Program Files (x86)\\Google\\Update\\1.3.36.152\\",
            "file_qualifier": "-5566271857083130002",
            "file_size": 408536,
            "first_event_agent_id": "b074b7d4-664a-40d1-b929-69e89bbd254c",
            "first_event_date": "2022-12-14T21:06:44.756Z",
            "first_event_user_domain": "NT AUTHORITY",
            "first_event_user_name": "SYSTEM",
            "hash": "SHA1##C340EFFBAED989E7F8FFC6F7574856CD8ED0D18B",
            "last_event_access_target_type": "Registry",
            "last_event_agent_id": "b074b7d4-664a-40d1-b929-69e89bbd254c",
            "last_event_date": "2022-12-19T01:04:47.284Z",
            "last_event_display_name": "Google Crash Handler (GoogleCrashHandler64.exe)",
            "last_event_file_name": "GoogleCrashHandler64.exe",
            "last_event_id": "QtvvKIUB8k35oa3KjVf7",
            "last_event_package_name": "Google Update (GoogleUpdate.exe)",
            "last_event_source_name": "Updater (Google Updater)",
            "last_event_source_type": "Updater",
            "last_event_user_domain": "NT AUTHORITY",
            "last_event_user_name": "SYSTEM",
            "operating_system_type": "Windows",
            "policy_id": "11161",
            "policy_name": "QQQ",
            "publisher": "Google LLC",
            "skipped": false,
            "skipped_count": 0,
            "total_events": 8,
            "type": "Launch"
        }
    },
    "data_stream": {
        "dataset": "cyberark_epm.policyaudit_aggregated_event",
        "namespace": "33531",
        "type": "logs"
    },
    "ecs": {
        "version": "8.11.0"
    },
    "elastic_agent": {
        "id": "b6227a62-bc3a-4a3d-8a4c-e2ea82486928",
        "snapshot": false,
        "version": "8.19.2"
    },
    "event": {
        "agent_id_status": "verified",
        "category": [
            "process"
        ],
        "dataset": "cyberark_epm.policyaudit_aggregated_event",
        "end": "2022-12-19T01:04:47.284Z",
        "ingested": "2026-07-06T11:51:54Z",
        "kind": "event",
        "original": "{\"CLSID\":\"\",\"adminTaskId\":\"\",\"affectedComputers\":1,\"affectedUsers\":1,\"aggregatedBy\":\"C340EFFBAED989E7F8FFC6F7574856CD8ED0D18B,QQQ\",\"appPackageDisplayName\":\"\",\"applicationType\":\"Executable\",\"arrivalTime\":\"2022-12-19T05:51:06.024Z\",\"authorizationRight\":\"com.apple.AOSNotification.FindMyMac.modify\",\"eventType\":\"Launch\",\"fileLocation\":\"C:\\\\Program Files (x86)\\\\Google\\\\Update\\\\1.3.36.152\\\\\",\"fileQualifier\":\"-5566271857083130002\",\"fileSize\":408536,\"firstEventAgentId\":\"b074b7d4-664a-40d1-b929-69e89bbd254c\",\"firstEventDate\":\"2022-12-14T21:06:44.756Z\",\"firstEventUserName\":\"NT AUTHORITY\\\\SYSTEM\",\"hash\":\"SHA1##C340EFFBAED989E7F8FFC6F7574856CD8ED0D18B\",\"lastEventAccessTarget\":null,\"lastEventAccessTargetType\":\"Registry\",\"lastEventAgentId\":\"b074b7d4-664a-40d1-b929-69e89bbd254c\",\"lastEventDate\":\"2022-12-19T01:04:47.284Z\",\"lastEventDisplayName\":\"Google Crash Handler (GoogleCrashHandler64.exe)\",\"lastEventFileName\":\"GoogleCrashHandler64.exe\",\"lastEventId\":\"QtvvKIUB8k35oa3KjVf7\",\"lastEventJustification\":\"\",\"lastEventPackageName\":\"Google Update (GoogleUpdate.exe)\",\"lastEventSourceName\":\"Updater (Google Updater)\",\"lastEventSourceType\":\"Updater\",\"lastEventSymlink\":\"\",\"lastEventUserName\":\"NT AUTHORITY\\\\SYSTEM\",\"mimeType\":\"\",\"operatingSystemType\":\"Windows\",\"policyAction\":null,\"policyId\":11161,\"policyName\":\"QQQ\",\"productCode\":null,\"publisher\":\"Google LLC\",\"skipped\":false,\"skippedCount\":0,\"totalEvents\":8,\"upgradeCode\":null,\"url\":\"\"}",
        "start": "2022-12-14T21:06:44.756Z",
        "type": [
            "info"
        ]
    },
    "file": {
        "directory": "C:\\Program Files (x86)\\Google\\Update\\1.3.36.152\\",
        "hash": {
            "sha1": "C340EFFBAED989E7F8FFC6F7574856CD8ED0D18B"
        },
        "name": "GoogleCrashHandler64.exe",
        "size": 408536
    },
    "host": {
        "os": {
            "type": "windows"
        }
    },
    "input": {
        "type": "cel"
    },
    "observer": {
        "product": "Endpoint Privilege Manager",
        "vendor": "CyberArk"
    },
    "package": {
        "checksum": "C340EFFBAED989E7F8FFC6F7574856CD8ED0D18B",
        "name": "Google Update (GoogleUpdate.exe)",
        "size": 408536
    },
    "related": {
        "hash": [
            "C340EFFBAED989E7F8FFC6F7574856CD8ED0D18B"
        ],
        "user": [
            "SYSTEM"
        ]
    },
    "rule": {
        "id": "11161",
        "name": "QQQ"
    },
    "tags": [
        "preserve_original_event",
        "preserve_duplicate_custom_fields",
        "forwarded",
        "cyberark_epm-policyaudit_aggregated_event"
    ]
}
Exported fields
| Field | Description | Type |
|---|---|---|
| @timestamp | Event timestamp. | date |
| cyberark_epm.policyaudit_aggregated_event.admin_task_id | Id of an application that needs administrator permission to run, from the last policy audit event. | keyword |
| cyberark_epm.policyaudit_aggregated_event.affected_computers | Count of affected computers in the event. | long |
| cyberark_epm.policyaudit_aggregated_event.affected_users | Count of affected users in the event. | long |
| cyberark_epm.policyaudit_aggregated_event.aggregated_by | The aggregatedBy value of the last policy audit event. | keyword |
| cyberark_epm.policyaudit_aggregated_event.app_package_display_name | Name of the Microsoft Windows internal app in the last policy audit event. | keyword |
| cyberark_epm.policyaudit_aggregated_event.application_type | The type of application that triggered the event. | keyword |
| cyberark_epm.policyaudit_aggregated_event.arrival_time | The date and time when the event audit was received by the EPM service. | date |
| cyberark_epm.policyaudit_aggregated_event.authorization_right | The authorization rights that are needed during runtime to run the specified executable on macOS. | keyword |
| cyberark_epm.policyaudit_aggregated_event.clsid | clsid of last policy audit event. | keyword |
| cyberark_epm.policyaudit_aggregated_event.file_location | Location of the file of the last policy audit event. | keyword |
| cyberark_epm.policyaudit_aggregated_event.file_qualifier | Unique file identifier. | keyword |
| cyberark_epm.policyaudit_aggregated_event.file_size | The file size of the last policy audit event. | long |
| cyberark_epm.policyaudit_aggregated_event.first_event_agent_id | The agentId specified in the first policy audit event. | keyword |
| cyberark_epm.policyaudit_aggregated_event.first_event_date | The first time that the event was triggered. | date |
| cyberark_epm.policyaudit_aggregated_event.first_event_user_domain | keyword | |
| cyberark_epm.policyaudit_aggregated_event.first_event_user_name | Name of the first user who triggered the event. | keyword |
| cyberark_epm.policyaudit_aggregated_event.hash | Hash value (SHA1) of the application that triggered the event. | keyword |
| cyberark_epm.policyaudit_aggregated_event.interpreter | keyword | |
| cyberark_epm.policyaudit_aggregated_event.last_event_access_target | keyword | |
| cyberark_epm.policyaudit_aggregated_event.last_event_access_target_type | Accessed resource type for the most recent event that was detected. | keyword |
| cyberark_epm.policyaudit_aggregated_event.last_event_agent_id | The agentId specified in the last policy audit event. | keyword |
| cyberark_epm.policyaudit_aggregated_event.last_event_authorization_rights | keyword | |
| cyberark_epm.policyaudit_aggregated_event.last_event_computer_name | The name of the computer where the most recent event was detected. | keyword |
| cyberark_epm.policyaudit_aggregated_event.last_event_date | The last time that the event was triggered. | date |
| cyberark_epm.policyaudit_aggregated_event.last_event_display_name | Display name of the event. | keyword |
| cyberark_epm.policyaudit_aggregated_event.last_event_file_name | The name of the event file that triggered the event (files with the same hash can have different names). | keyword |
| cyberark_epm.policyaudit_aggregated_event.last_event_id | Event unique identifier (used to create policies). | keyword |
| cyberark_epm.policyaudit_aggregated_event.last_event_justification | Justification provided by the user in the last event. | keyword |
| cyberark_epm.policyaudit_aggregated_event.last_event_package_name | keyword | |
| cyberark_epm.policyaudit_aggregated_event.last_event_source_name | Point of origin from where the file that triggered the last event was acquired. | keyword |
| cyberark_epm.policyaudit_aggregated_event.last_event_source_type | The type of origin from where the file that triggered the last event was acquired. | keyword |
| cyberark_epm.policyaudit_aggregated_event.last_event_symlink | A Linux/UNIX link that points to another file or folder. | keyword |
| cyberark_epm.policyaudit_aggregated_event.last_event_user_domain | keyword | |
| cyberark_epm.policyaudit_aggregated_event.last_event_user_name | User who triggered the event. | keyword |
| cyberark_epm.policyaudit_aggregated_event.mime_type | The type of the file (i.e., application, media etc.) of the last policy audit event. | keyword |
| cyberark_epm.policyaudit_aggregated_event.operating_system_type | The endpoint operating system. | keyword |
| cyberark_epm.policyaudit_aggregated_event.parent_process | keyword | |
| cyberark_epm.policyaudit_aggregated_event.policy_action | The policy action that triggered the last event. | keyword |
| cyberark_epm.policyaudit_aggregated_event.policy_id | The ID of the policy that triggered the event. | keyword |
| cyberark_epm.policyaudit_aggregated_event.policy_name | The name of the policy that triggered the event. | keyword |
| cyberark_epm.policyaudit_aggregated_event.product_code | The product code of the file that triggered the most recent event. | keyword |
| cyberark_epm.policyaudit_aggregated_event.product_version | The product version of the file that triggered the most recent event. | keyword |
| cyberark_epm.policyaudit_aggregated_event.publisher | Digital signature of the application that triggered the event (if applicable). | keyword |
| cyberark_epm.policyaudit_aggregated_event.skipped | boolean | |
| cyberark_epm.policyaudit_aggregated_event.skipped_count | The number of skipped events. | long |
| cyberark_epm.policyaudit_aggregated_event.total_events | The number of events that occurred in the given time period (per aggregation). | long |
| cyberark_epm.policyaudit_aggregated_event.type | Type of event. | keyword |
| cyberark_epm.policyaudit_aggregated_event.upgrade_code | The upgrade code of the file that triggered the most recent event. | keyword |
| cyberark_epm.policyaudit_aggregated_event.url | The URL of the last policy audit event. | keyword |
| data_stream.dataset | Data stream dataset. | constant_keyword |
| data_stream.namespace | Data stream namespace. | constant_keyword |
| data_stream.type | Data stream type. | constant_keyword |
| event.dataset | Event dataset. | constant_keyword |
| event.module | Event module. | constant_keyword |
| input.type | Type of filebeat input. | keyword |
| log.offset | Log offset. | long |
This is the admin_audit dataset.
Example
{
    "@timestamp": "2024-11-25T05:37:28.373Z",
    "agent": {
        "ephemeral_id": "4b45a5c1-7b38-434f-8f17-a8d605c63e7d",
        "id": "75ccfaff-309d-4cc7-aad7-4b2e4a3e99ef",
        "name": "elastic-agent-41944",
        "type": "filebeat",
        "version": "8.19.2"
    },
    "cyberark_epm": {
        "admin_audit": {
            "administrator": "bob@example.com",
            "description": "Enter Set Elastic/test",
            "event_time": "2024-11-25T05:37:28.373Z",
            "feature": "Sets",
            "internal_session_id": "876",
            "logged_at": "2024-11-25T05:25:13.167Z",
            "logged_from": "175.16.199.1",
            "permission_description": "None",
            "role": "SetAdmin",
            "set_name": "Elastic/test"
        }
    },
    "data_stream": {
        "dataset": "cyberark_epm.admin_audit",
        "namespace": "32767",
        "type": "logs"
    },
    "ecs": {
        "version": "8.11.0"
    },
    "elastic_agent": {
        "id": "75ccfaff-309d-4cc7-aad7-4b2e4a3e99ef",
        "snapshot": false,
        "version": "8.19.2"
    },
    "event": {
        "agent_id_status": "verified",
        "category": [
            "iam"
        ],
        "dataset": "cyberark_epm.admin_audit",
        "ingested": "2026-07-06T11:49:47Z",
        "kind": "event",
        "original": "{\"Administrator\":\"bob@example.com\",\"Description\":\"Enter Set Elastic/test\",\"EventTime\":\"2024-11-25T05:37:28.373Z\",\"Feature\":\"Sets\",\"InternalSessionId\":876,\"LoggedAt\":\"2024-11-25T05:25:13.167Z\",\"LoggedFrom\":\"175.16.199.1\",\"PermissionDescription\":\"None\",\"Role\":\"SetAdmin\",\"SetName\":\"Elastic/test\"}",
        "type": [
            "admin"
        ]
    },
    "input": {
        "type": "cel"
    },
    "message": "Enter Set Elastic/test",
    "observer": {
        "product": "Endpoint Privilege Manager",
        "vendor": "CyberArk"
    },
    "related": {
        "ip": [
            "175.16.199.1"
        ],
        "user": [
            "bob",
            "bob@example.com"
        ]
    },
    "source": {
        "geo": {
            "city_name": "Changchun",
            "continent_name": "Asia",
            "country_iso_code": "CN",
            "country_name": "China",
            "location": {
                "lat": 43.88,
                "lon": 125.3228
            },
            "region_iso_code": "CN-22",
            "region_name": "Jilin Sheng"
        },
        "ip": "175.16.199.1"
    },
    "tags": [
        "preserve_original_event",
        "preserve_duplicate_custom_fields",
        "forwarded",
        "cyberark_epm-admin_audit"
    ],
    "user": {
        "domain": "example.com",
        "email": "bob@example.com",
        "name": "bob",
        "roles": [
            "SetAdmin"
        ]
    }
}
Exported fields
| Field | Description | Type |
|---|---|---|
| @timestamp | Event timestamp. | date |
| cyberark_epm.admin_audit.administrator | The administrator's user name. | keyword |
| cyberark_epm.admin_audit.description | The activity carried out by the administrator. | keyword |
| cyberark_epm.admin_audit.event_time | The audit time. | date |
| cyberark_epm.admin_audit.feature | The activity grouping. | keyword |
| cyberark_epm.admin_audit.internal_session_id | The administrator login session id that is used for grouping activities in the session. | keyword |
| cyberark_epm.admin_audit.logged_at | The time when the administrator logged on. | date |
| cyberark_epm.admin_audit.logged_from | The IP address of the machine where the request was initiated. | ip |
| cyberark_epm.admin_audit.permission_description | The permission needed by the admin in order to perform the activity. | keyword |
| cyberark_epm.admin_audit.role | The role assigned to the administrator in this Set. | keyword |
| cyberark_epm.admin_audit.set_name | Set Name. | keyword |
| data_stream.dataset | Data stream dataset. | constant_keyword |
| data_stream.namespace | Data stream namespace. | constant_keyword |
| data_stream.type | Data stream type. | constant_keyword |
| event.dataset | Event dataset. | constant_keyword |
| event.module | Event module. | constant_keyword |
| input.type | Type of filebeat input. | keyword |
| log.offset | Log offset. | long |
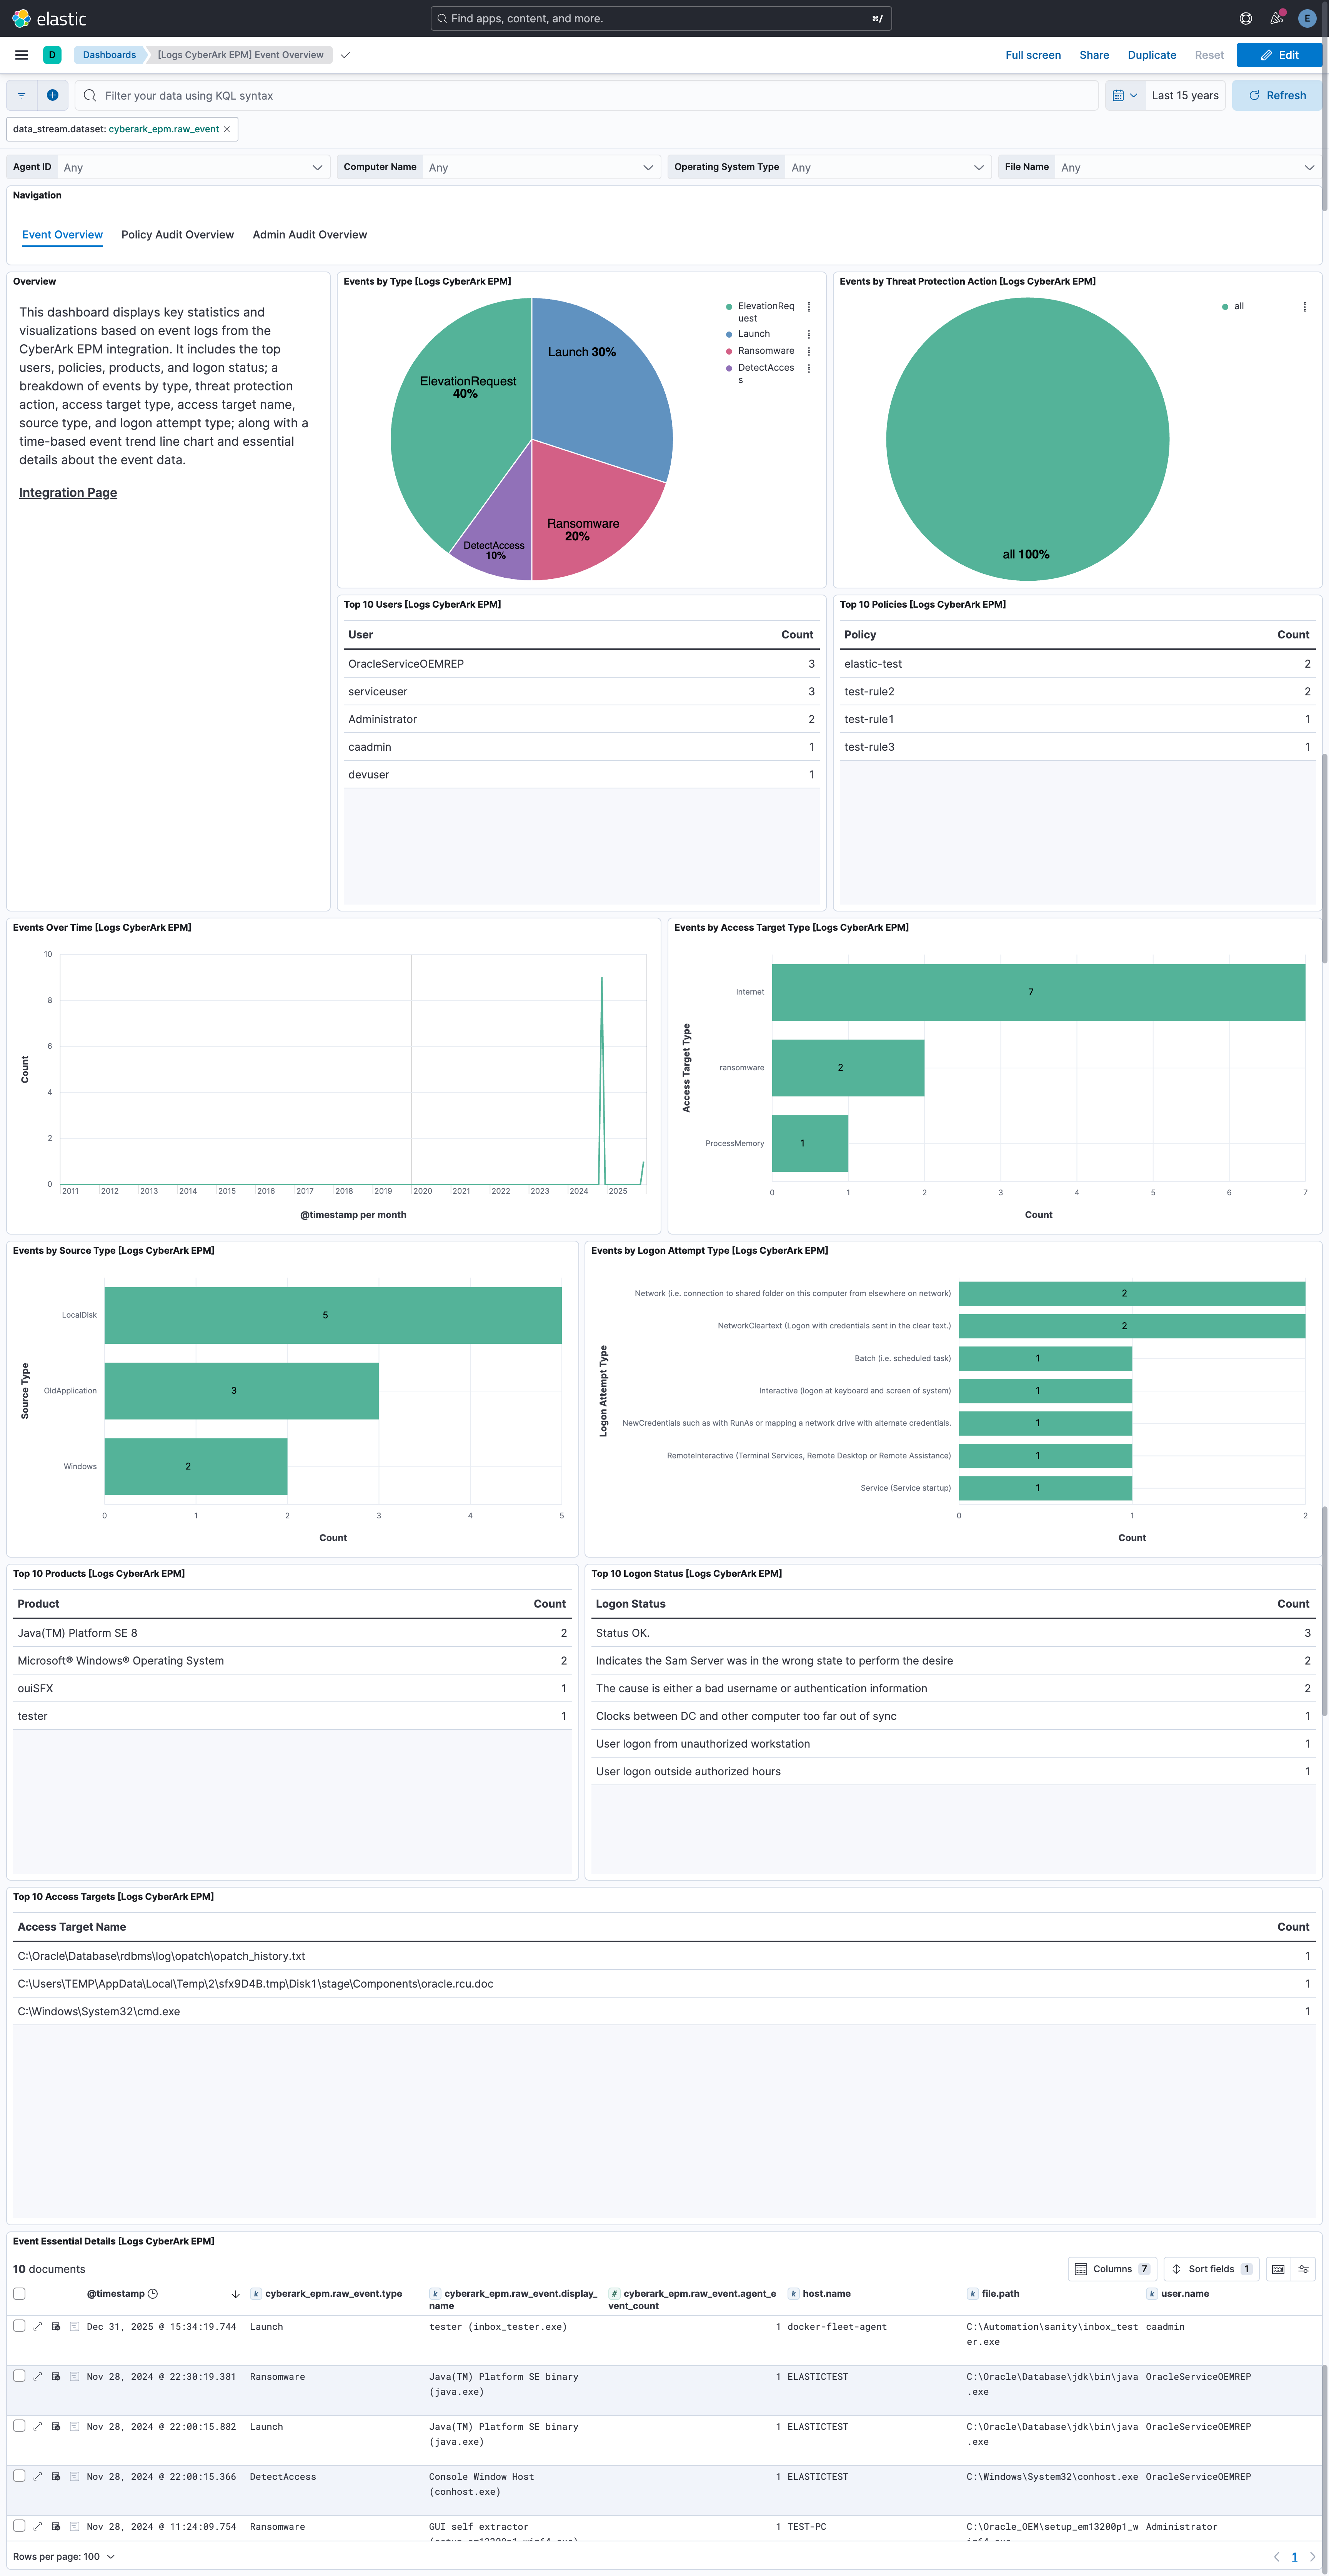
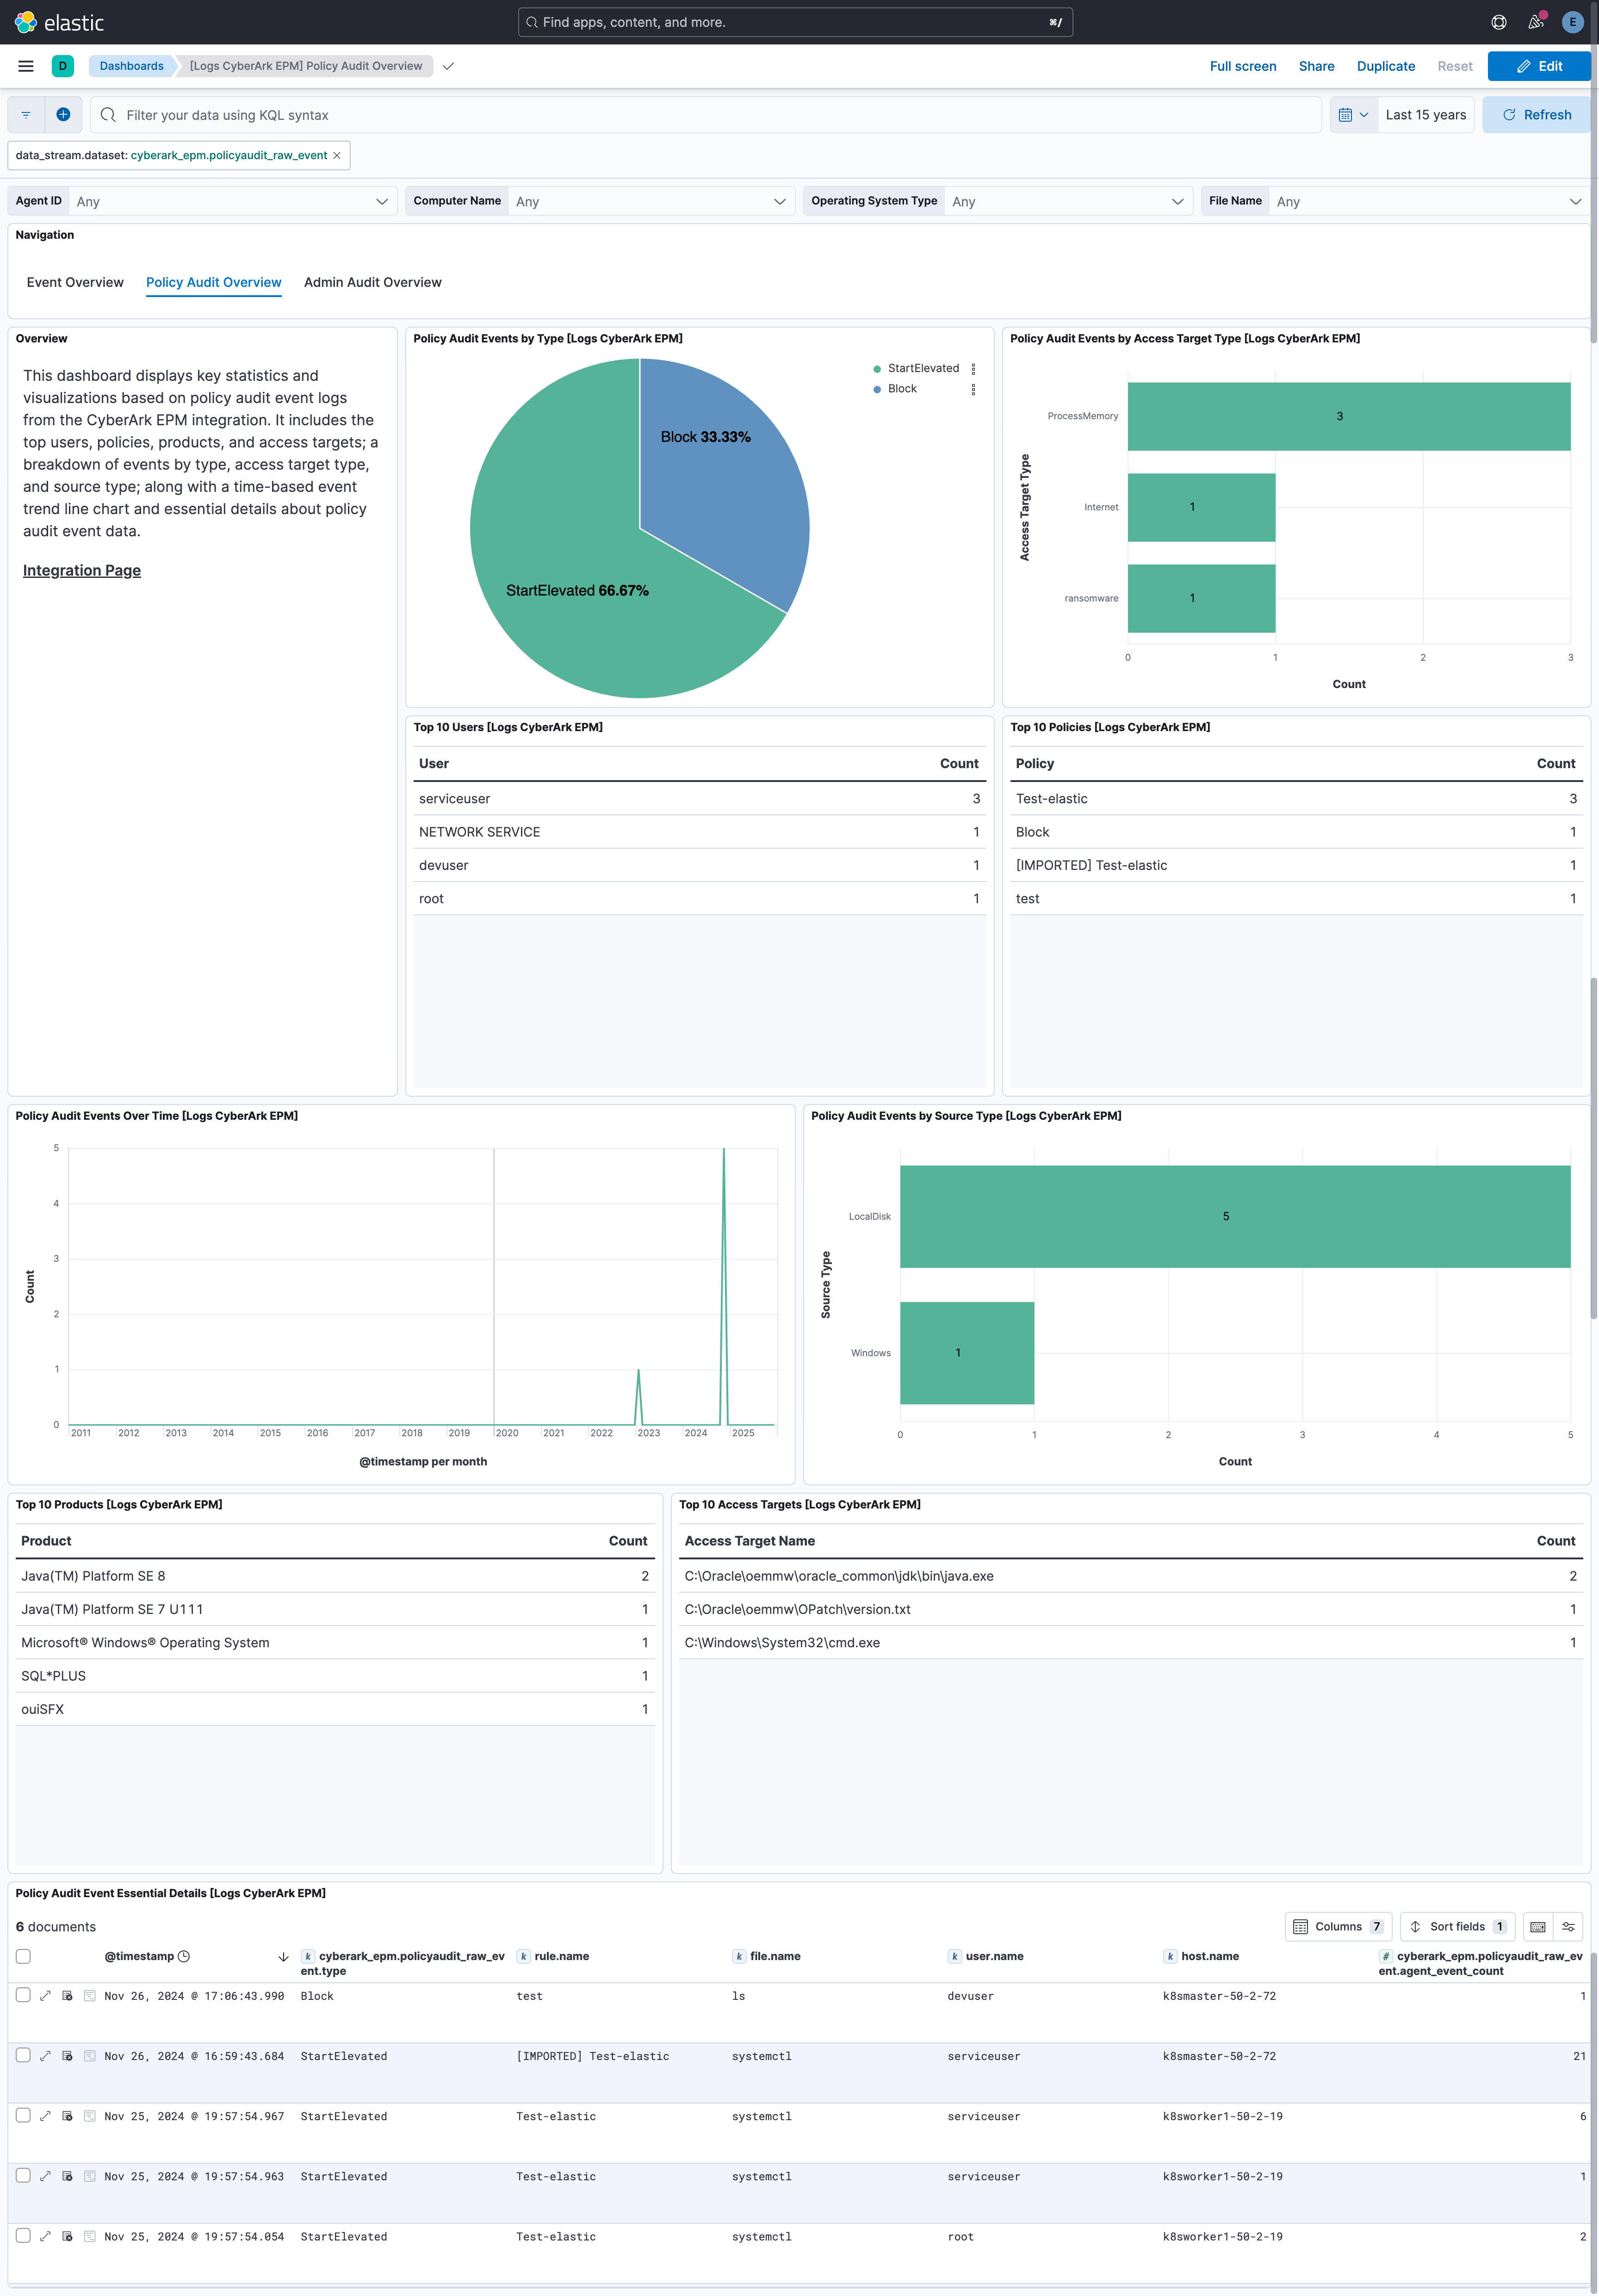
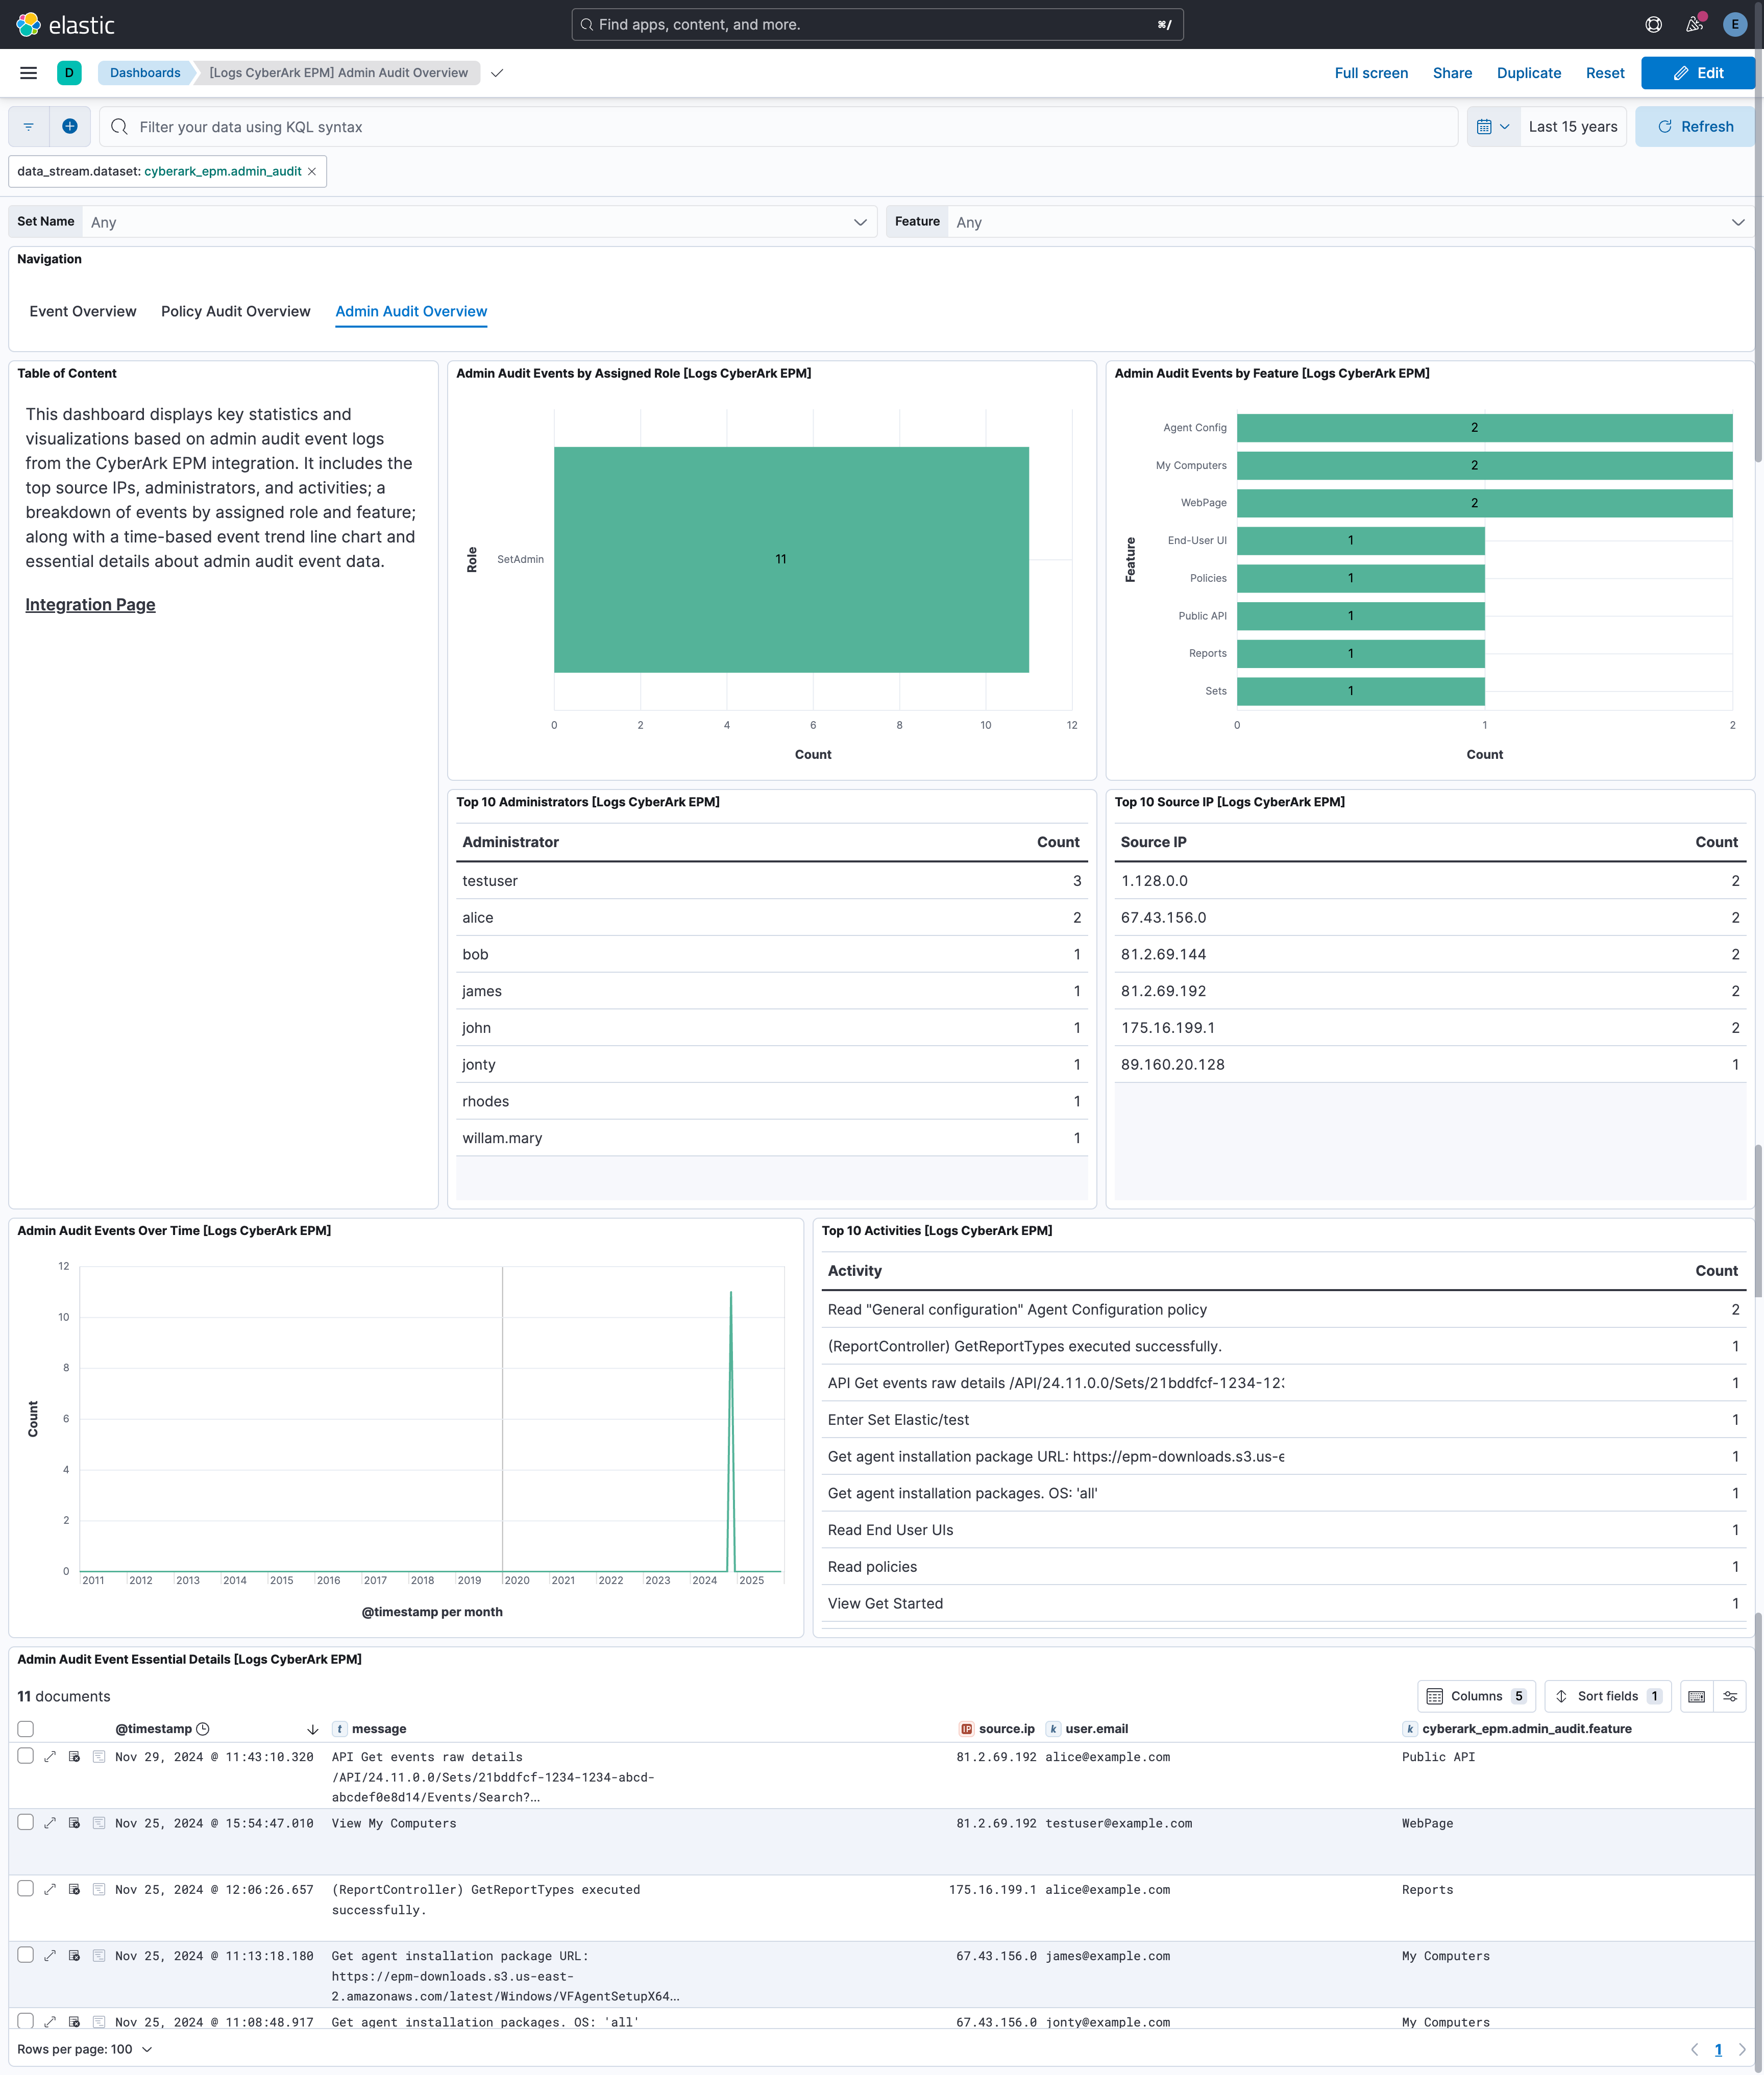
This integration includes one or more Kibana dashboards that visualizes the data collected by the integration. The screenshots below illustrate how the ingested data is displayed.
Changelog
| Version | Details | Minimum Kibana version |
|---|---|---|
| 1.7.1 | Bug fix (View pull request) Filter events by arrival time instead of event date so that late-arriving events are not missed, and add a lookback overlap between polling windows. |
9.0.5 8.19.2 |
| 1.7.0 | Enhancement (View pull request) Add CyberArk Identity (OAuth2) as an authentication method alongside the existing EPM logon. |
9.0.5 8.19.2 |
| 1.6.0 | Enhancement (View pull request) Add tags to ingest pipeline processors. |
9.0.5 8.19.2 |
| 1.5.2 | Enhancement (View pull request) Set agentless deployment mode release field to ga. |
9.0.5 8.19.2 |
| 1.5.1 | Bug fix (View pull request) Fix login failure when username or password contains quotes, slashes, or backslashes. |
9.0.5 8.19.2 |
| 1.5.0 | Enhancement (View pull request) Use new release field for agentless deployment mode to establish as beta. |
9.0.5 8.19.2 |
| 1.4.1 | Bug fix (View pull request) Change page_size/batch_size variable type from text to integer for Fleet input validation. |
9.0.5 8.19.2 |
| 1.4.0 | Enhancement (View pull request) Enable Agentless deployment. |
9.0.5 8.19.2 |
| 1.3.3 | Bug fix (View pull request) Map cyberark_epm.raw_event.exposed_users as flattened. |
9.0.0 8.16.0 |
| 1.3.2 | Bug fix (View pull request) Map cyberark_epm.raw_event.evidences as flattened. |
9.0.0 8.16.0 |
| 1.3.1 | Bug fix (View pull request) Remove duplicate security-solution-default tag references |
9.0.0 8.16.0 |
| 1.3.0 | Enhancement (View pull request) Use links panel in Dashboards. |
9.0.0 8.16.0 |
| 1.2.2 | Bug fix (View pull request) Downgrade the format_version to the minimum version that supports all the necessary features for the package. |
9.0.0 8.16.0 |
| 1.2.1 | Bug fix (View pull request) Enhanced error handling in the CEL program for API calls to prevent "no such key: version" errors by ensuring proper propagation of the version configuration during failures. |
9.0.0 8.16.0 |
| 1.2.0 | Enhancement (View pull request) Use terminate processor instead of fail processor to handle agent errors. |
9.0.0 8.16.0 |
| 1.1.0 | Enhancement (View pull request) Standardize user fields processing across integrations. |
9.0.0 8.16.0 |
| 1.0.0 | Enhancement (View pull request) Release package as GA. |
9.0.0 8.16.0 |
| 0.3.0 | Enhancement (View pull request) Remove redundant installation instructions. |
9.0.0 8.16.0 |
| 0.2.1 | Bug fix (View pull request) Fix default request trace enabled behavior. |
9.0.0 8.16.0 |
| 0.2.0 | Enhancement (View pull request) Update Kibana constraint to support 9.0.0. |
9.0.0 8.16.0 |
| 0.1.1 | Bug fix (View pull request) Updated SSL description in package manifest.yml to be uniform and to include links to documentation. |
8.16.0 |
| 0.1.0 | Enhancement (View pull request) Initial release. |
8.16.0 |