Connect to Amazon S3 with static credentials for ES|QL Data Federation
Static credentials let Elasticsearch read a private Amazon S3 data source using an AWS access key and secret key. You grant an IAM identity read-only access to your objects, generate a long-lived access key for it, and enter that key when you connect the data source.
Setup involves steps in both AWS and Elastic: create the IAM identity and access key in AWS, then enter the key when connecting the data source in Elastic.
You can use this page in two ways:
- Work through the following steps to understand each AWS resource and how the pieces fit together.
- Jump to the complete AWS CLI example to set it up hands-on and learn it by doing.
Refer to the AWS IAM documentation as the authoritative reference for the commands shown here.
To follow this guide, you need:
- An Elastic project or deployment with ES|QL Data Federation available.
- An AWS account with permissions to create IAM policies, users, and access keys.
- An S3 bucket containing the file or files you want to query.
- A role with the cluster manage privilege, or a
global.data_sourceprivilege, to create the data source. Refer to Manage access.
Follow these steps to create and use dedicated credentials for use with Data Federation.
-
Create a read-only IAM policy
Elasticsearch reads your objects through an IAM identity, so first create an IAM policy that grants read-only access to only the objects you want to query in AWS. This policy is the part specific to this integration.
The following policy allows reading your objects with
s3:GetObject, and listing the bucket withs3:ListBucketands3:GetBucketLocationfor prefix or glob queries:{ "Version": "2012-10-17", "Statement": [ { "Effect": "Allow", "Action": [ "s3:GetObject" ], "Resource": [ "arn:aws:s3:::<bucket-name>/<path>/*" ] }, { "Effect": "Allow", "Action": [ "s3:ListBucket", "s3:GetBucketLocation" ], "Resource": [ "arn:aws:s3:::<bucket-name>" ] } ] }- Object-level actions apply to object ARNs. Narrow this to a prefix or a single file to grant the least access needed.
- Bucket-level actions apply to the bucket ARN, not object ARNs. Include this statement only if you query by prefix or glob rather than a single fixed file.
Example: create the policy with the AWS CLIRefer to the AWS IAM documentation for the authoritative steps and for console-based setup.
POLICY_ARN=$(aws iam create-policy \ --policy-name parquet-sample-policy \ --policy-document file://permissions-policy.json \ --query 'Policy.Arn' --output text)- A local file holding the preceding permissions policy.
create-policyreturns the policy ARN, which you attach to an identity in the next step.
-
Attach the policy to an IAM identity
Elasticsearch authenticates to S3 as an IAM user. Attach the policy from the previous step to a dedicated user you create for Elasticsearch, or to an existing identity. Refer to the AWS IAM documentation for guidance on managing IAM users.
Example: create a user and attach the policy with the AWS CLICreate a user for Elasticsearch and attach the policy from the previous step:
# Create a dedicated IAM user for Elasticsearch aws iam create-user --user-name esql-user # Attach the read-only policy to the user aws iam attach-user-policy \ --user-name esql-user \ --policy-arn "${POLICY_ARN}"- The policy ARN returned in the previous step. Attaching the policy authorizes the user to read your data.
-
Create an access key
Generate a long-lived access key for the user you authorized.
aws iam create-access-key --user-name esql-userThe response includes an access key ID and a secret access key. The secret is shown only once, so copy it now. These credentials do not expire on their own. They stay valid until you deactivate or delete them in AWS. This is the access key and secret key pair you enter in Elastic.
-
Connect the data source and create a dataset
Back in Elastic:
Step 1. Connect the S3 data source with the Access and Secret Keys method.
In Kibana:
- Go to Data management > ES|QL Data Federation.
- Click Connect data source.
- Set Data source type to Amazon S3.
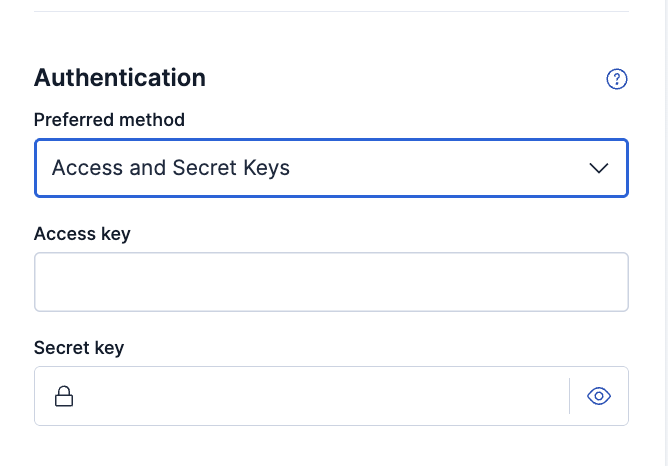
- Under Authentication, select Access and Secret Keys.
- Enter the access key and secret key from the previous step.
For the full field reference, refer to Connect external data sources.
PUT /_query/data_source/prod_s3_static{ "type": "s3", "settings": { "auth": "static_credentials", "access_key": "<AWS_ACCESS_KEY_ID>", "secret_key": "<AWS_SECRET_ACCESS_KEY>" } }- The access key ID and secret access key you created. Elasticsearch encrypts these before storing them. Refer to manage credentials and privileges for details.
curl -X PUT "${ELASTICSEARCH_URL}/_query/data_source/prod_s3_static" \
  -H "Authorization: ApiKey ${API_KEY}" \
  -H "Content-Type: application/json" \
  -d '{
  "type": "s3",
  "settings": {
    "auth": "static_credentials",
    "access_key": "<AWS_ACCESS_KEY_ID>",
    "secret_key": "<AWS_SECRET_ACCESS_KEY>"
  }
}'
Step 2. Create a dataset that points at your files, for example
s3://amzn-s3-demo-bucket/some/sample.parquetin Parquet format.You can now query the remote data with ES|QL.
The preceding steps explain each AWS resource on its own. The following is an end-to-end AWS example of that setup, using sample values for one scenario. It is illustrative, not a script to run as-is: replace the example bucket, file, and names with your own before you run it. As with the individual steps, AWS is the authoritative reference for these commands.
Show the complete AWS CLI example
This example grants read access to a single Parquet file at s3://amzn-s3-demo-bucket/some/sample.parquet and creates a long-lived access key for a dedicated IAM user. Run the commands in order in AWS CloudShell or any shell with the AWS CLI configured.
Step 1. Set the variables for your environment:
export BUCKET_NAME="amzn-s3-demo-bucket"
export FILE_NAME="some/sample.parquet"
export POLICY_NAME="parquet-sample-policy"
export IAM_USER="esql-user"
Step 2. Create a read-only IAM policy scoped to your objects, and capture the policy ARN it returns:
POLICY_ARN=$(aws iam create-policy \
  --policy-name "${POLICY_NAME}" \
  --policy-document "$(cat <<EOF
{
  "Version": "2012-10-17",
  "Statement": [
    {
      "Effect": "Allow",
      "Action": [ "s3:GetObject" ],
      "Resource": [ "arn:aws:s3:::${BUCKET_NAME}/${FILE_NAME}" ]
    },
    {
      "Effect": "Allow",
      "Action": [ "s3:ListBucket", "s3:GetBucketLocation" ],
      "Resource": [ "arn:aws:s3:::${BUCKET_NAME}" ]
    }
  ]
}
EOF
)" \
  --query 'Policy.Arn' --output text)
Step 3. Create a dedicated IAM user for Elasticsearch:
aws iam create-user --user-name "${IAM_USER}"
Step 4. Attach the policy to the user:
aws iam attach-user-policy \
  --user-name "${IAM_USER}" \
  --policy-arn "${POLICY_ARN}"
Step 5. Generate a long-lived access key. Copy the access key ID and secret access key from the output, because the secret is shown only once:
aws iam create-access-key --user-name "${IAM_USER}"
Continue with the following dataset and security tasks:
- Query your data with
FROM, including metadata columns and current limitations. - Create and manage datasets over this data source, then review file formats and dataset settings.
- Manage credentials and privileges to control who can access your data sources and datasets.