Connect to Amazon S3 with federated identity for ES|QL Data Federation
Federated identity lets Elasticsearch read an Amazon S3 data source without you storing any static AWS credentials. You configure AWS to trust the identities that Elastic Cloud issues for your project or deployment, and AWS grants Elasticsearch temporary, scoped read access to your bucket.
Setup involves steps in both AWS and Elastic: collect values from Elastic, configure AWS to trust them, then register the data source back in Elastic.
You can use this page in two ways:
- Work through the following steps to understand each AWS resource and how the pieces fit together.
- Jump to the complete AWS CLI example to set it up hands-on and learn it by doing.
Refer to the AWS IAM documentation as the authoritative reference for the commands shown here.
To follow this guide, you need:
- An Elastic project or deployment with ES|QL Data Federation available.
- An AWS account with permissions to create IAM OpenID Connect identity providers, roles, and policies.
- An S3 bucket containing the file or files you want to query.
Follow these steps to set up federated identity authentication for your project or deployment.
-
Get the trust values from Elastic
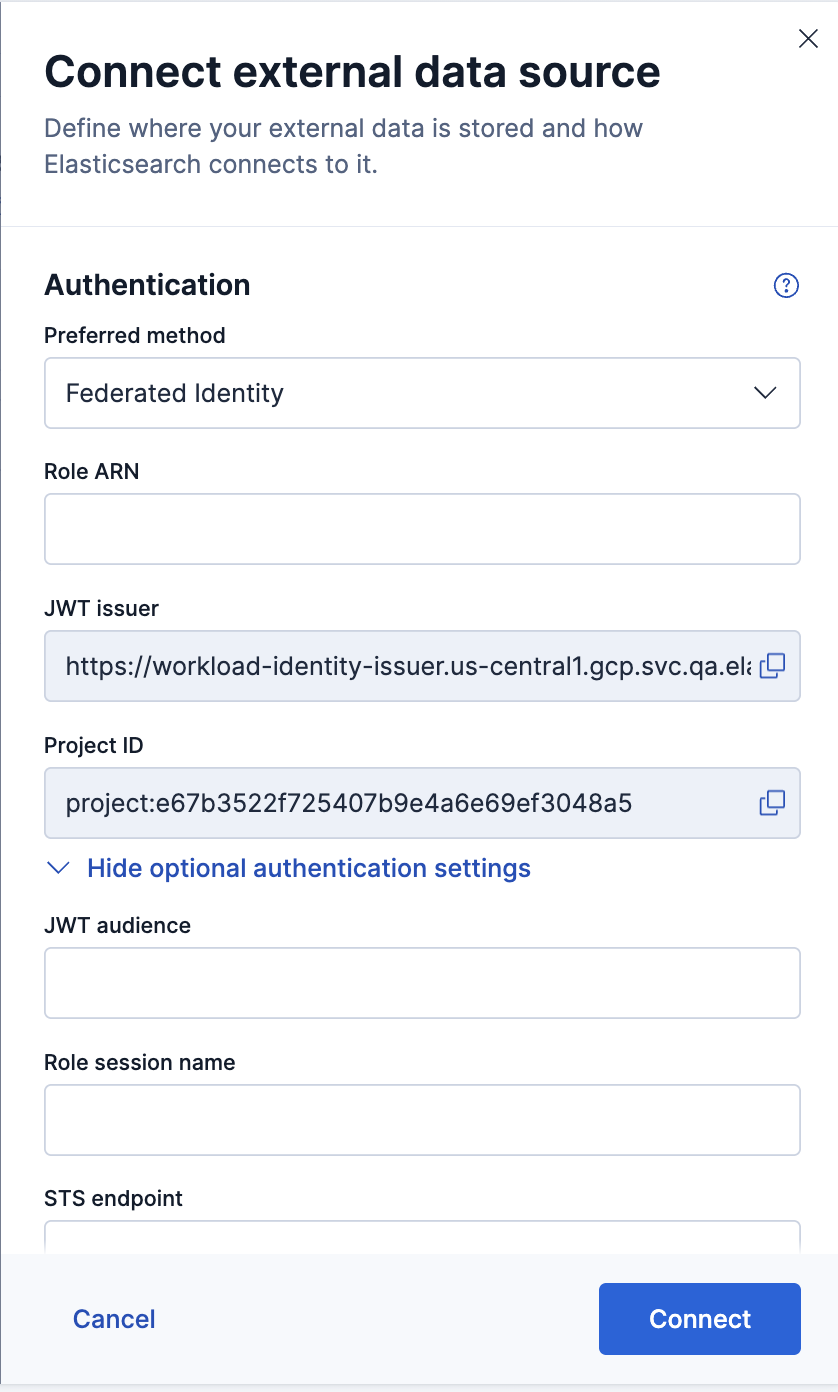
Federated identity works by having AWS trust the tokens that Elastic issues for your project or deployment. Before you configure AWS, collect the values that identify those tokens from Elastic.
In Kibana:
- Go to Data management > ES|QL Data Federation.
- Click Connect data source.
- Set Data source type to Amazon S3.
- Under Authentication, select Federated Identity.
The flyout shows the two values you need for the AWS setup:
Value Description Used in AWS as JWT issuer The Elastic Cloud workload identity service URL for your org and region. The identity provider URL Project ID or Deployment ID The unique identifier for your project or deployment. The sub(subject) conditionShow the Federated Identity authentication fieldsYou use the issuer and subject to configure AWS in the next steps. After AWS creates the role, you enter its role ARN back in Elastic.
-
Create an OpenID Connect identity provider
Create an IAM identity provider that trusts the tokens Elastic issues. Set its URL to the JWT issuer and its client ID to
sts.amazonaws.com. If you choose a custom audience instead, use the same value in AWS and in the Elastic data source'sjwt_audiencesetting.Example: create the provider with the AWS CLIRefer to the AWS IAM documentation for the authoritative steps and for console-based setup.
aws iam create-open-id-connect-provider \ --url "<elastic-jwt-issuer>" \ --client-id-list "sts.amazonaws.com"- If you choose a different value, you must use the same here, in the role's trust policy, and in the Elastic data source audience fields.
Note the provider ARN that AWS returns. You reference it in the role's trust policy next.
-
Create an IAM role
Create an IAM role that the identity provider can assume through
sts:AssumeRoleWithWebIdentity. The trust policy below restricts who can assume the role by matching the audience and subject from the Elastic-issued token.The following trust policy lets your identity provider assume the role, but only when the token's audience and subject match your values. Replace the placeholders with the values for your environment:
{ "Version": "2012-10-17", "Statement": [ { "Effect": "Allow", "Principal": { "Federated": "arn:aws:iam::<account-id>:oidc-provider/<issuer-host>/<path>" }, "Action": "sts:AssumeRoleWithWebIdentity", "Condition": { "StringEquals": { "<issuer-host>/<path>:aud": "sts.amazonaws.com", "<issuer-host>/<path>:sub": "project:<project-id>" } } } ] }- The ARN of the identity provider you created in the previous step.
- The condition key is the JWT issuer with the
https://scheme removed, followed by:aud. The value must match theclient-idyou set on the provider and theaudienceset in Elastic. - The condition key is the same issuer prefix followed by
:sub. The value is the subject exactly as shown in the Connect data source flyout, including its prefix:project:<project-id>on serverless ordeployment:<deployment-id>on Elastic Cloud Hosted. This restricts the role to your project or deployment.
Example: create the role with the AWS CLISave the preceding trust policy to a file, then create the role:
aws iam create-role \ --role-name parquet-sample-role \ --assume-role-policy-document file://trust-policy.json- A local file holding the preceding trust policy.
create-rolereturns the role ARN.
Note the role ARN that AWS returns. You enter it, along with the audience, in Elastic in the final step.
-
Grant the role read access
Attach a permissions policy to the role that grants the minimum access Elasticsearch needs to read your data.
The following policy allows reading your objects with
s3:GetObject, and listing the bucket withs3:ListBucketands3:GetBucketLocationfor prefix or glob queries:{ "Version": "2012-10-17", "Statement": [ { "Effect": "Allow", "Action": [ "s3:GetObject" ], "Resource": [ "arn:aws:s3:::<bucket-name>/<path>/*" ] }, { "Effect": "Allow", "Action": [ "s3:ListBucket", "s3:GetBucketLocation" ], "Resource": [ "arn:aws:s3:::<bucket-name>" ] } ] }- Object-level actions apply to object ARNs. Narrow this to a prefix or a single file to grant the least access needed.
- Bucket-level actions apply to the bucket ARN, not object ARNs. Include this statement only if you query by prefix or glob rather than a single fixed file.
Example: create and attach the policy with the AWS CLISave the preceding permissions policy to a file, then create it and attach it to the role:
# Create the permissions policy POLICY_ARN=$(aws iam create-policy \ --policy-name parquet-sample-policy \ --policy-document file://permissions-policy.json \ --query 'Policy.Arn' --output text) # Attach it to the role aws iam attach-role-policy \ --role-name parquet-sample-role \ --policy-arn "${POLICY_ARN}"- The policy ARN returned by
create-policy. Attaching the policy authorizes the role to read your data.
-
Connect the data source and create a dataset
Back in Elastic:
Step 1. In the Connect data source flyout from the first step, select Federated Identity and enter the role ARN you created.
Enter the role ARN in the flyout. For the full field reference, refer to connect external data sources.
PUT /_query/data_source/prod_s3_federated{ "type": "s3", "settings": { "auth": "federated_identity", "role_arn": "arn:aws:iam::112233445566:role/parquet-sample-role", "jwt_audience": "sts.amazonaws.com" } }- The ARN of the role you created in AWS.
- If you use a custom audience, set
jwt_audienceto match theaudcondition in the role's trust policy.
curl -X PUT "${ELASTICSEARCH_URL}/_query/data_source/prod_s3_federated" \
  -H "Authorization: ApiKey ${API_KEY}" \
  -H "Content-Type: application/json" \
  -d '{
  "type": "s3",
  "settings": {
    "auth": "federated_identity",
    "role_arn": "arn:aws:iam::112233445566:role/parquet-sample-role",
    "jwt_audience": "sts.amazonaws.com"
  }
}'
Step 2. Create a dataset. Create a dataset that points at your files, for example
s3://amzn-s3-demo-bucket/some/sample.parquetin Parquet format.Noteregionis a dataset-level setting, not a data source setting. Set it on the dataset when your bucket is not in the default commercial AWS partition. Forauth: federated_identity,regionalso determines the AWS region used for the STS role-assumption request. If omitted, Elasticsearch auto-detects the bucket region for S3 calls, and STS defaults tous-east-1— which works for standard commercial AWS. Seests_regionon the data source to override the STS region independently.You can now query the remote data with ES|QL.
The preceding steps explain each AWS resource on its own. The following is an end-to-end example of that setup, using sample values for one scenario. It is illustrative, not a script to run as-is: replace the example values with your own before you run it. Refer to the AWS IAM documentation as the authoritative reference for these commands.
Show the complete AWS CLI example
This example sets up federated identity for reading a single Parquet file at s3://amzn-s3-demo-bucket/some/sample.parquet. Run the commands in order in AWS CloudShell or any shell with the AWS CLI configured.
Step 1. Set the variables for your environment:
export JWT_ISSUER="https://<your-jwt-issuer>"
export SUBJECT="project:<your-project-id>"
export BUCKET_NAME="amzn-s3-demo-bucket"
export FILE_NAME="some/sample.parquet"
export ROLE_NAME="parquet-sample-role"
export POLICY_NAME="parquet-sample-policy"
- Copy from the Connect data source flyout.
- Copy from the flyout. Use
project:<id>for serverless ordeployment:<id>for Elastic Cloud Hosted.
Step 2. Create the OpenID Connect identity provider, then capture its ARN and the issuer host that the trust policy needs (the issuer without its https:// scheme):
PROVIDER_ARN=$(aws iam create-open-id-connect-provider \
  --url "${JWT_ISSUER}" \
  --client-id-list "sts.amazonaws.com" \
  --query 'OpenIDConnectProviderArn' --output text)

ISSUER_HOST="${JWT_ISSUER#https://}"
Step 3. Create the IAM role with a trust policy that lets only your provider, audience, and subject assume it:
ROLE_ARN=$(aws iam create-role \
  --role-name "${ROLE_NAME}" \
  --assume-role-policy-document "$(cat <<EOF
{
  "Version": "2012-10-17",
  "Statement": [
    {
      "Effect": "Allow",
      "Principal": { "Federated": "${PROVIDER_ARN}" },
      "Action": "sts:AssumeRoleWithWebIdentity",
      "Condition": {
        "StringEquals": {
          "${ISSUER_HOST}:aud": "sts.amazonaws.com",
          "${ISSUER_HOST}:sub": "${SUBJECT}"
        }
      }
    }
  ]
}
EOF
)" \
  --query 'Role.Arn' --output text)
Step 4. Create the permissions policy that grants read access to your file:
POLICY_ARN=$(aws iam create-policy \
  --policy-name "${POLICY_NAME}" \
  --policy-document "$(cat <<EOF
{
  "Version": "2012-10-17",
  "Statement": [
    {
      "Effect": "Allow",
      "Action": [ "s3:GetObject" ],
      "Resource": [ "arn:aws:s3:::${BUCKET_NAME}/${FILE_NAME}" ]
    },
    {
      "Effect": "Allow",
      "Action": [ "s3:ListBucket", "s3:GetBucketLocation" ],
      "Resource": [ "arn:aws:s3:::${BUCKET_NAME}" ]
    }
  ]
}
EOF
)" \
  --query 'Policy.Arn' --output text)
Step 5. Attach the policy to the role:
aws iam attach-role-policy \
  --role-name "${ROLE_NAME}" \
  --policy-arn "${POLICY_ARN}"
Step 6. Print the role ARN. Enter it, along with the audience, when you connect the data source in Elastic:
echo "${ROLE_ARN}"
Continue with the following dataset and security tasks:
- Query your data with
FROM, including metadata columns and current limitations. - Create and manage datasets over this data source, then review file formats and dataset settings.
- Manage credentials and privileges to control who can access your data sources and datasets.