Elastic SIEM for home and small business: Securing cluster access
Note: The “SIEM for home and small business” blog series contains configurations relevant to the beta release of Elastic SIEM using Elastic Stack 7.4. We recommend using Elastic Stack 7.6 and newer, as Elastic SIEM was made generally available in 7.6. Please also note the Elastic SIEM solution mentioned in this post is now referred to as Elastic Security.
Hey, there. This is part two of the Elastic SIEM for home and small business blog series. In the Getting started blog, we created our Elasticsearch Service deployment and started collecting data from one of our computers using Winlogbeat. If you haven't read the first blog, you may want to before going any further. In this blog, we will secure access to our cluster by restricting privileges for users and Beats.
Securing access to our Elasticsearch Service deployment
Before we configure all of our systems to send data to our Elasticsearch Service deployment, we should make sure we are not using the elastic superuser account in our configurations. Instead, we will create separate accounts that have only the access they need to do their job. We also will create roles and users for view-only access to our Beats data. We will start by signing into the Kibana instance of our Elasticsearch Service deployment using the elastic superuser account credentials.
By default, our Elasticsearch Service deployment does not have roles or users to properly restrict access for Beats to ship data, and we don’t want to always use the elastic superuser (only us). We also need to decide if we will use one account for every system and location, or if we will use separate accounts.
In order to make sure we assign the correct privileges, we need to look at the requirements for each of the Beats we will be using. We need to review the documentation for each Beat (specifically Auditbeat, Filebeat, Packetbeat, and Winlogbeat) before we continue. We determine that we will need to create roles first and then create our users. While we can use Elasticsearch to define roles, we will use the Role Management UI in Kibana in this blog. For our roles, we will make a setup role and a writer role.
Configuring roles for Beats
For the setup role, we need to have the following cluster privileges: monitor, manage_ilm, and manage_ml. Since we will use an ingest pipeline in a later blog, we will need to include the manage_ingest_pipelines cluster privilege as well. We also need to grant manage and read access to our Beats indices (for now they will be auditbeat-*, filebeat-*, packetbeat-*, and winlogbeat-*).
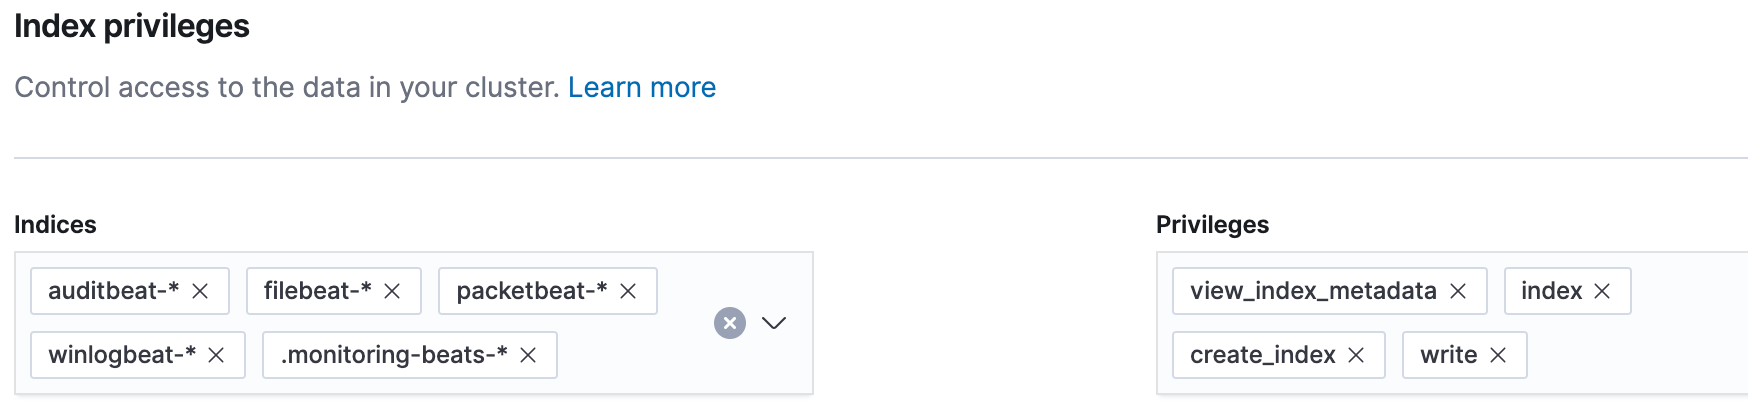
For the writer role, we need to have the following cluster privileges: monitor, read_ilm, and manage_pipeline. Since we will use an ingest pipeline in a later blog, we will need to include the manage_ingest_pipelines cluster privilege as well. We also need to grant view_index_metadata, index, create_index, and write access to our Beats indices (for now they will be auditbeat-*, filebeat-*, packetbeat-*, winlogbeat-*, and .monitoring-beats-*).
We will create our setup and writer roles. In Kibana, click Management, then under Security, click Roles. On the Roles page, click Create role.
Configuring the Beats setup role
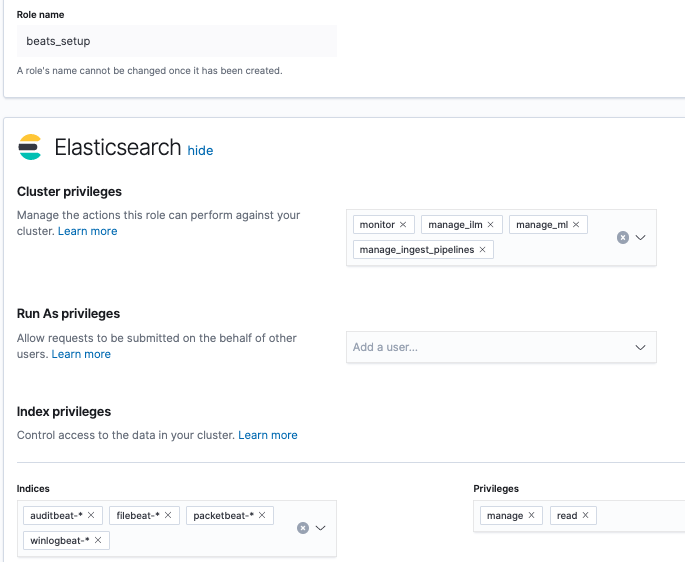
For the setup role, we will use beats_setup for our role name. In the Elasticsearch section, we will assign the following cluster privileges (as shown below):
monitormanage_ilmmanage_mlmanage_ingest_pipelines
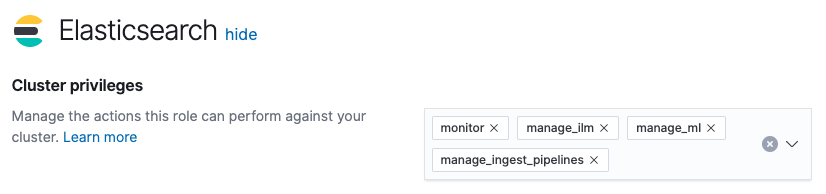
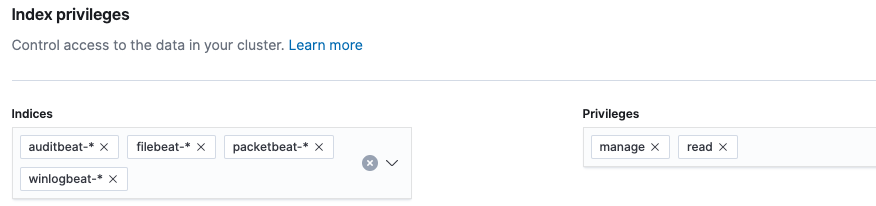
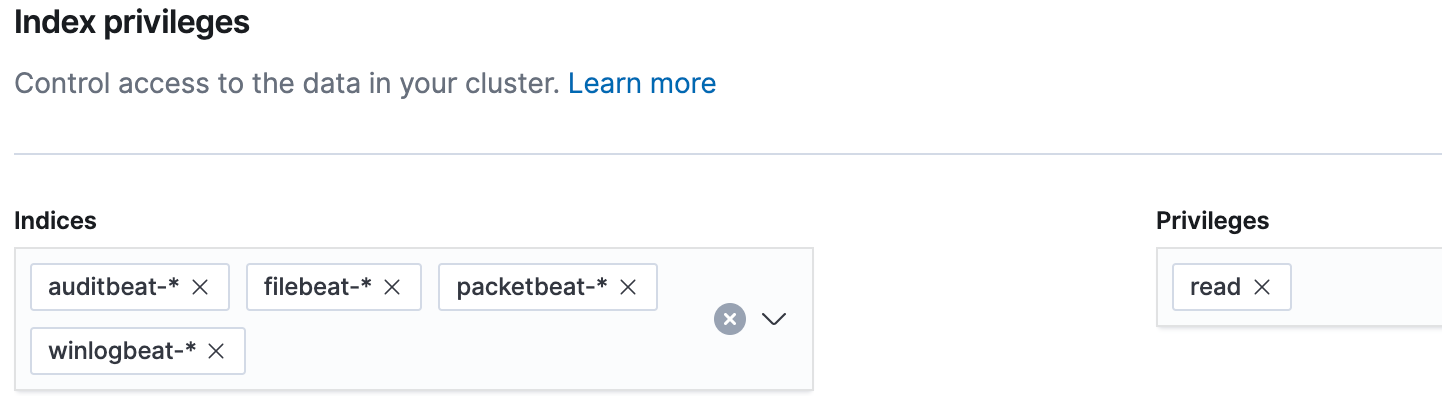
Then, in the “Index privileges” section, we will grant manage and read privileges to the following indices (as shown below):
auditbeat-*filebeat-*packetbeat-*winlogbeat-*
Now that our privileges have been assigned for our beats_setup role, click Create role at the bottom of the page. Click the beats_setup role to confirm the privileges are set correctly:
Configuring the Beats writer role
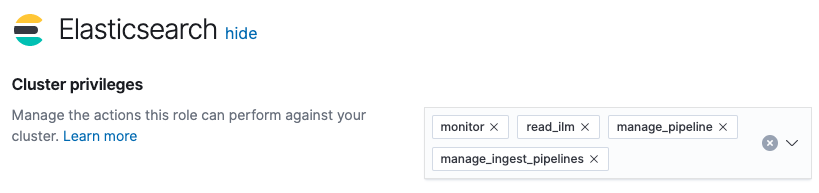
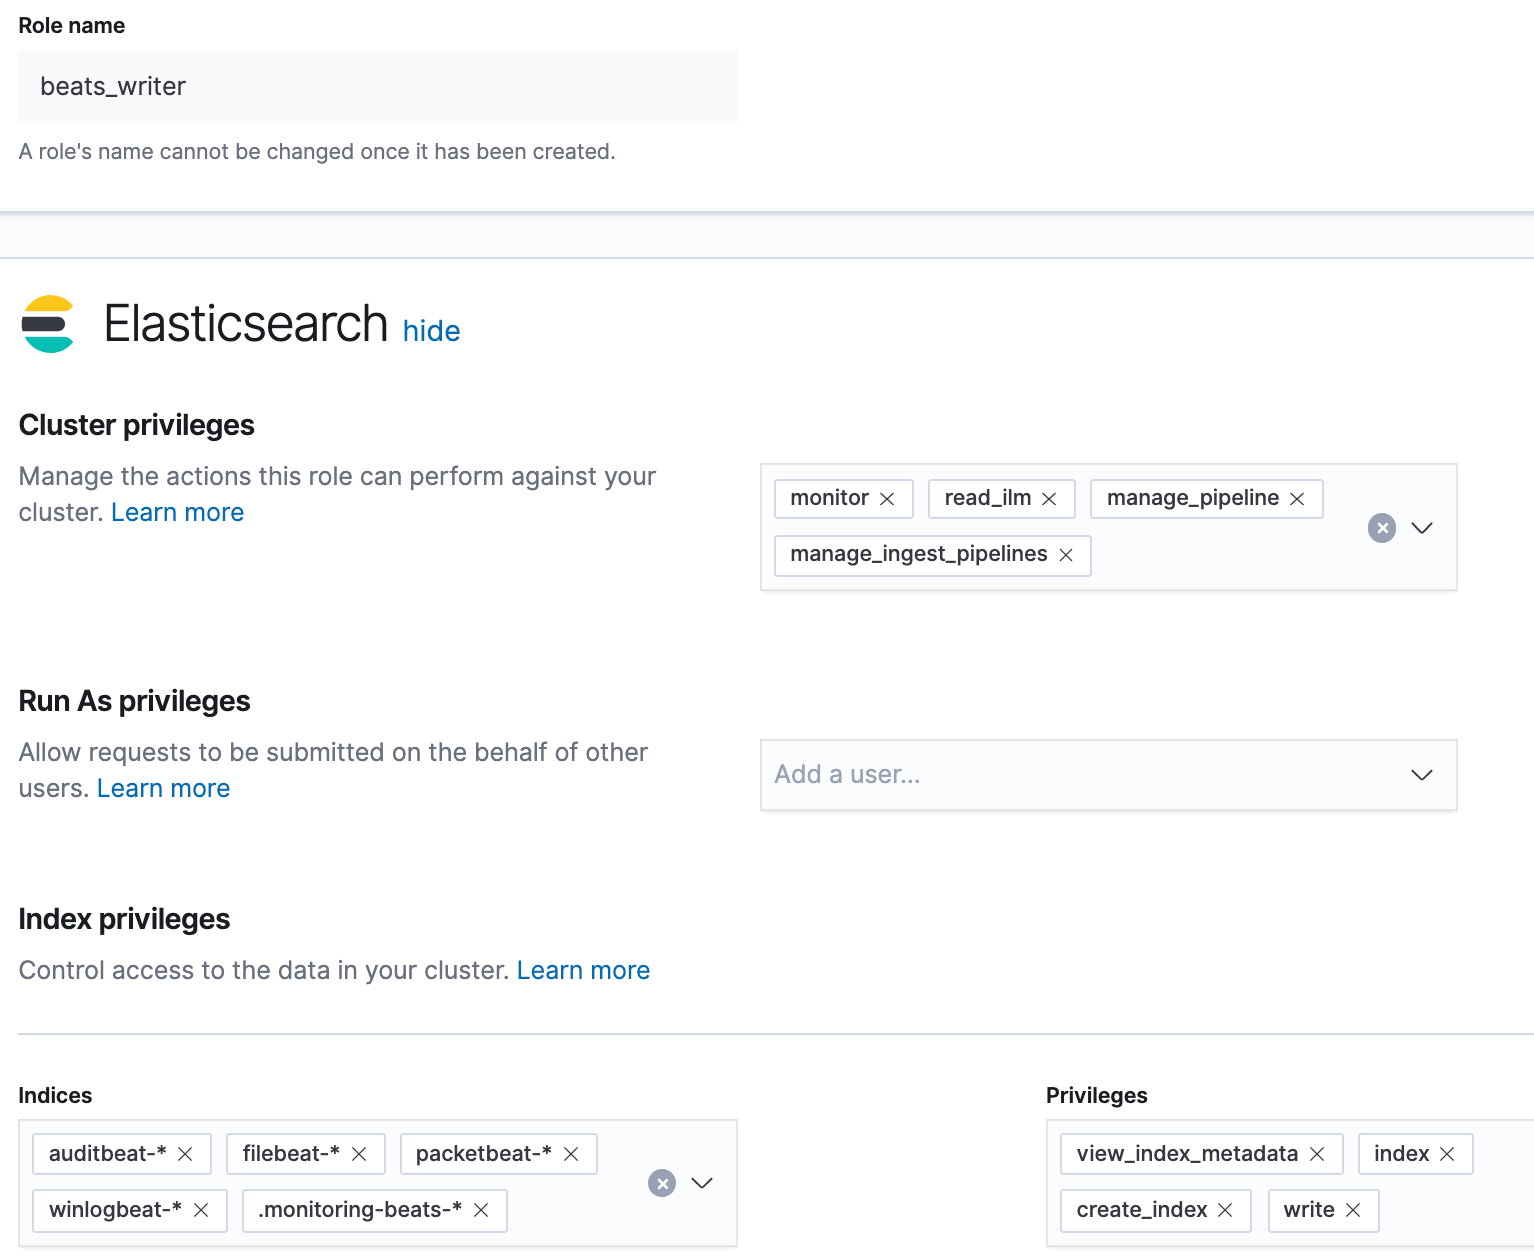
For the writer role, we will use beats_writer for our role name. In Kibana, click Management, then under Security click Roles. On the Roles page, click Create role. In the Elasticsearch section, we will assign the following cluster privileges (as shown below):
monitorread_ilmmanage_pipelinemanage_ingest_pipelines
Then, in the “Index privileges” section, we will grant view_index_metadata, index, create_index, and write privileges to the following indices (as shown below):
auditbeat-*filebeat-*packetbeat-*winlogbeat-*.monitoring-beats-*
Now that our privileges have been assigned for our beats_writer role, click Create role at the bottom of the page. Then click the beats_writer role to confirm the privileges are set correctly:
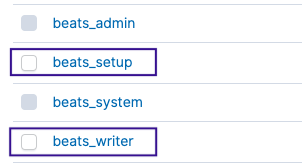
Let’s go back to the Roles page and make sure our new roles are available:
Now that the roles have been created, we will make our user accounts.
Configuring accounts for Beats
As a good security practice, we are making these accounts so Beats can authenticate to our Elasticsearch Service deployment using the least amount of privilege as possible. After reviewing the documentation, we determine that we will need to grant our user accounts different roles based on their function. Any account that needs to set up Beats also needs the beats_setup role we created, plus the kibana_user, ingest_admin, and beats_admin built-in roles. Any account that only needs to ship data to our Elasticsearch Service deployment only needs the beats_writer role we created.
The very first time we set up Beats to ship to our Elasticsearch Service deployment, or anytime we upgrade to a new version of Beats (including a new patch version, for example to 7.4.1), we will need to have the required privileges to make changes to the cluster, and we can do that using the setup role. For accounts that will only ship data (a computer for a family member who lives out of town, or the front office computer for our small business), we will only grant the required roles needed to ship data to our Elasticsearch Service deployment.
We will create separate accounts because the small business will use an account for servers and a separate account for workstations. The home user will use separate accounts for family members who live out of town. Since we are creating separate accounts, we have the option to grant all required access when we create the account, and later we can remove the roles or privileges that are not needed (in this scenario, we can remove the privileges for setup later).
- For our small business, we will name the accounts
beats_serversandbeats_workstations. We will give thebeats_serversaccount the privileges to run the setup command. - For our home, we will name the accounts
home_beatsandalbany_beats(for a family member who lives in Albany, NY). We will give thehome_beatsaccount the privileges to run the setup command. - We will make accounts for home. If you are going through this for a small business, you can substitute
home_beatsforbeats_serversand substitutealbany_beatsforbeats_workstations.
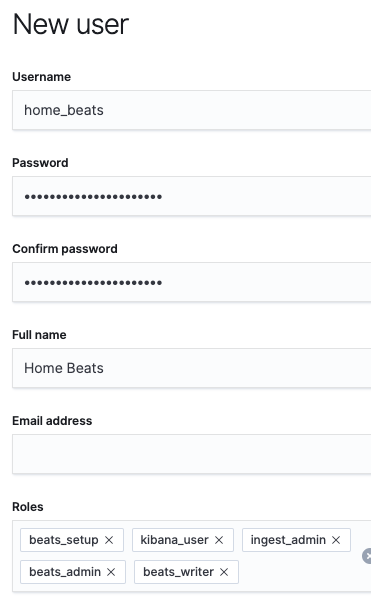
In Kibana, click Management, then under Security, click Users. On the Users page, click Create user. Our first user will be the home_beats account, so we will set home_beats for the username. We need to make sure to set a strong password (keep the password available, since we need it when we configure Beats later). You may optionally set a Full name and Email address (I’ll call mine Home Beats). In the Roles section, we need to assign the following roles (as shown below):
beats_setup(the role we created to run Beats setup)kibana_user(built-in role to load Kibana dashboards)ingest_admin(built-in role to set up index templates and ingest pipelines)beats_admin(built-in role to manage Beats configurations)beats_writer(the role we created to ship data to our cluster)
Click Create user at the bottom of the page.
In the Users page, let’s review the home_beats account to confirm the roles are set correctly:
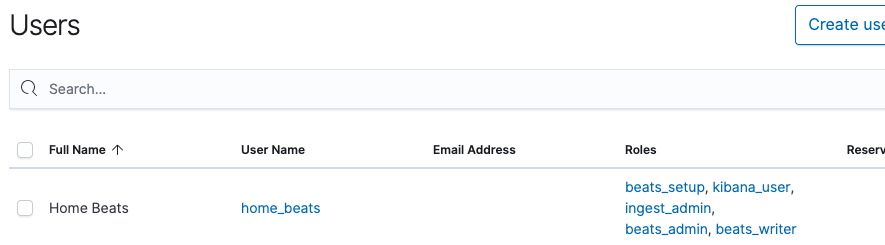
Excellent, our new home_beats user is ready.
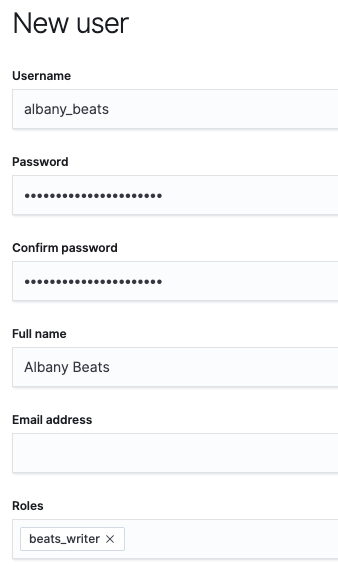
For the albany_beats account, we will set albany_beats for the username, and set a strong password (keep the password available, since we need it when we configure Beats later). You may optionally set a Full name and Email address (I’ll call mine Albany Beats). In the Roles section, we need to assign the beats_writer role (the role we created to ship data to our cluster):
Click Create user at the bottom of the page.
In the Users page, let’s review the albany_beats account to confirm the roles are set correctly:

Now that we have our roles and user accounts created, we can configure our home systems without using the elastic superuser account. Let’s make sure we have our home_beats and albany_beats credentials and our Cloud ID available, since we need those to configure our home devices to ship data to our Elasticsearch Service deployment.
Updating our initial Winlogbeat configuration
Remember the computer we configured in the first blog, the Kids PC? We need to update the winlogbeat.yml configuration file to use the home_beats account instead of the elastic superuser account. We only need to update the cloud.auth setting, but we will also need to restart Winlogbeat after we save the file in order to verify that the change is updated and the account works.
I’ve updated the cloud.auth setting to use the home_beats account. Now my winlogbeat.yml configuration file is:
#=== Winlogbeat specific options ===
winlogbeat.event_logs:
  - name: Application
    ignore_older: 72h
  - name: System
  - name: Security
    processors:
      - script:
          lang: javascript
          id: security
          file: ${path.home}/module/security/config/winlogbeat-security.js
#=== General ===
name: KidsPC
tags: ["Home", "KidsPC"]
fields:
  env: home
#=== Top Level Processor ===
processors:
  - add_host_metadata:
      netinfo.enabled: false
      Geo: # These Geo configurations are optional
       location: 40.7128, -74.0060
        continent_name: North America
        country_iso_code: US
        region_name: New York
        region_iso_code: US-NY
        city_name: New York City
        name: myHomeLocation
  - add_locale: ~
  - add_cloud_metadata: ~
  - add_fields:
      #when.network.source.ip: 10.101.101.0/24
      when.network.source.ip: private
      fields:
        source.geo.location:
          lat: 40.7128
          lon: -74.0060
        source.geo.continent_name: North America
        source.geo.country_iso_code: US
        source.geo.region_name: New York
        source.geo.region_iso_code: US-NY
        source.geo.city_name: New York City
        source.geo.name: myHomeLocation
      target: ''
  - add_fields:
      #when.network.destination.ip: 10.101.101.0/24
      when.network.destination.ip: private
      fields:
        destination.geo.location:
          lat: 40.7128
          lon: -74.0060
        destination.geo.continent_name: North America
        destination.geo.country_iso_code: US
        destination.geo.region_name: New York
        destination.geo.region_iso_code: US-NY
        destination.geo.city_name: New York City
        destination.geo.name: myHomeLocation
      target: ''
#=== Elastic Cloud ===
# Use the Cloud ID to ship data from Beats to Elasticsearch Service
# https://www.elastic.co/guide/en/cloud/current/ec-cloud-id.html#ec-cloud-id
# You can find the `cloud.id` in the Elasticsearch Service web UI.
cloud.id: “My_Elastic_Cloud_Deployment:abcdefghijklmnopqrstuvwxyz1234567890ABCDEFGHIJKLMNOPQRSTUVWXYZ”
# The cloud.auth format is `<user>:<pass>`
# For production, we should NOT use the elastic superuser
cloud.auth: “home_beats:abcDEF0987654321” # example: “username:password”
#=== Xpack Monitoring ===
monitoring.enabled: true
We will open an Administrative PowerShell session so we can validate Winlogbeat will run with the home_beats account. Instead of restarting the service, we will stop the service, test the “setup” command, then start Winlogbeat using the command line (by issuing .\winlogbeat.exe -e, so we can verify Winlogbeat connects to our cluster with the home_beats account. Once we verify that Winlogbeat connects, we will stop Winlogbeat in the command line then start the service.
Make sure you have updated winlogbeat.yml before continuing. Once you confirm Winlogbeat has connected to the cluster and is shipping data, you can close Winlogbeat by issuing Ctrl+C in PowerShell. A good way to confirm data is being shipped is to look for EventLog[System] successfully published # events or EventLog[Security] successfully published # events messages:
PS C:\Program Files\Elastic> Stop-Service winlogbeat; Get-Service winlogbeat
Status   Name           DisplayName
------   ----           -----------
Stopped  winlogbeat         winlogbeat
PS C:\Program Files\Elastic> cd .\winlogbeat-7.4.0
PS C:\Program Files\Elastic\winlogbeat-7.4.0> .\winlogbeat.exe setup
Index setup finished.
Loading dashboards (Kibana must be running and reachable)
Loaded dashboards
PS C:\Program Files\Elastic\winlogbeat-7.4.0> Write-Host "#setup works!"
#setup works!
PS C:\Program Files\Elastic\winlogbeat-7.4.0> .\winlogbeat.exe -e
[...] startup logs
INFO    pipeline/output.go:95   Connecting to backoff(publish(elasticsearch(https://ourElasticsearchServiceDeployment.region.provider.cloud.es.io:443)))
INFO    beater/eventlogger.go:76        EventLog[System] successfully published 50 events
INFO    elasticsearch/client.go:743     Attempting to connect to Elasticsearch version 7.4.0
INFO    pipeline/output.go:105  Connection to backoff(publish(elasticsearch(https://ourElasticsearchServiceDeployment.region.provider.cloud.es.io:443))) established
# issue Ctrl+C to stop Winlogbeat
INFO    instance/beat.go:432    winlogbeat stopped.
PS C:\Program Files\Elastic\winlogbeat-7.4.0> Start-Service winlogbeat; Get-Service winlogbeat
Status   Name           DisplayName
------   ----           -----------
Running  winlogbeat         winlogbeat
PS C:\Program Files\Elastic\winlogbeat-7.4.0
Now that we have confirmed the home_beats account works, we can move on to configuring view-only access to our cluster. At this time, you can optionally test shipping data using the albany_beats account by following the same steps listed above (with the exception of the Beats setup command).
Configuring view-only access to our data
As a good security practice, we don’t want to use our elastic superuser account on a regular basis (and I recommend you change the password), so we will make an account that has restricted access for viewing our data. We will start with creating roles in the Kibana Role Management UI first, similar to how we configured access for Beats. Then we can create users and grant proper access to our cluster.
Note: For our small business use case we may consider configuring Spaces in Kibana, you can read more about it here, but that will not be covered in this blog.
Configuring the SIEM user role
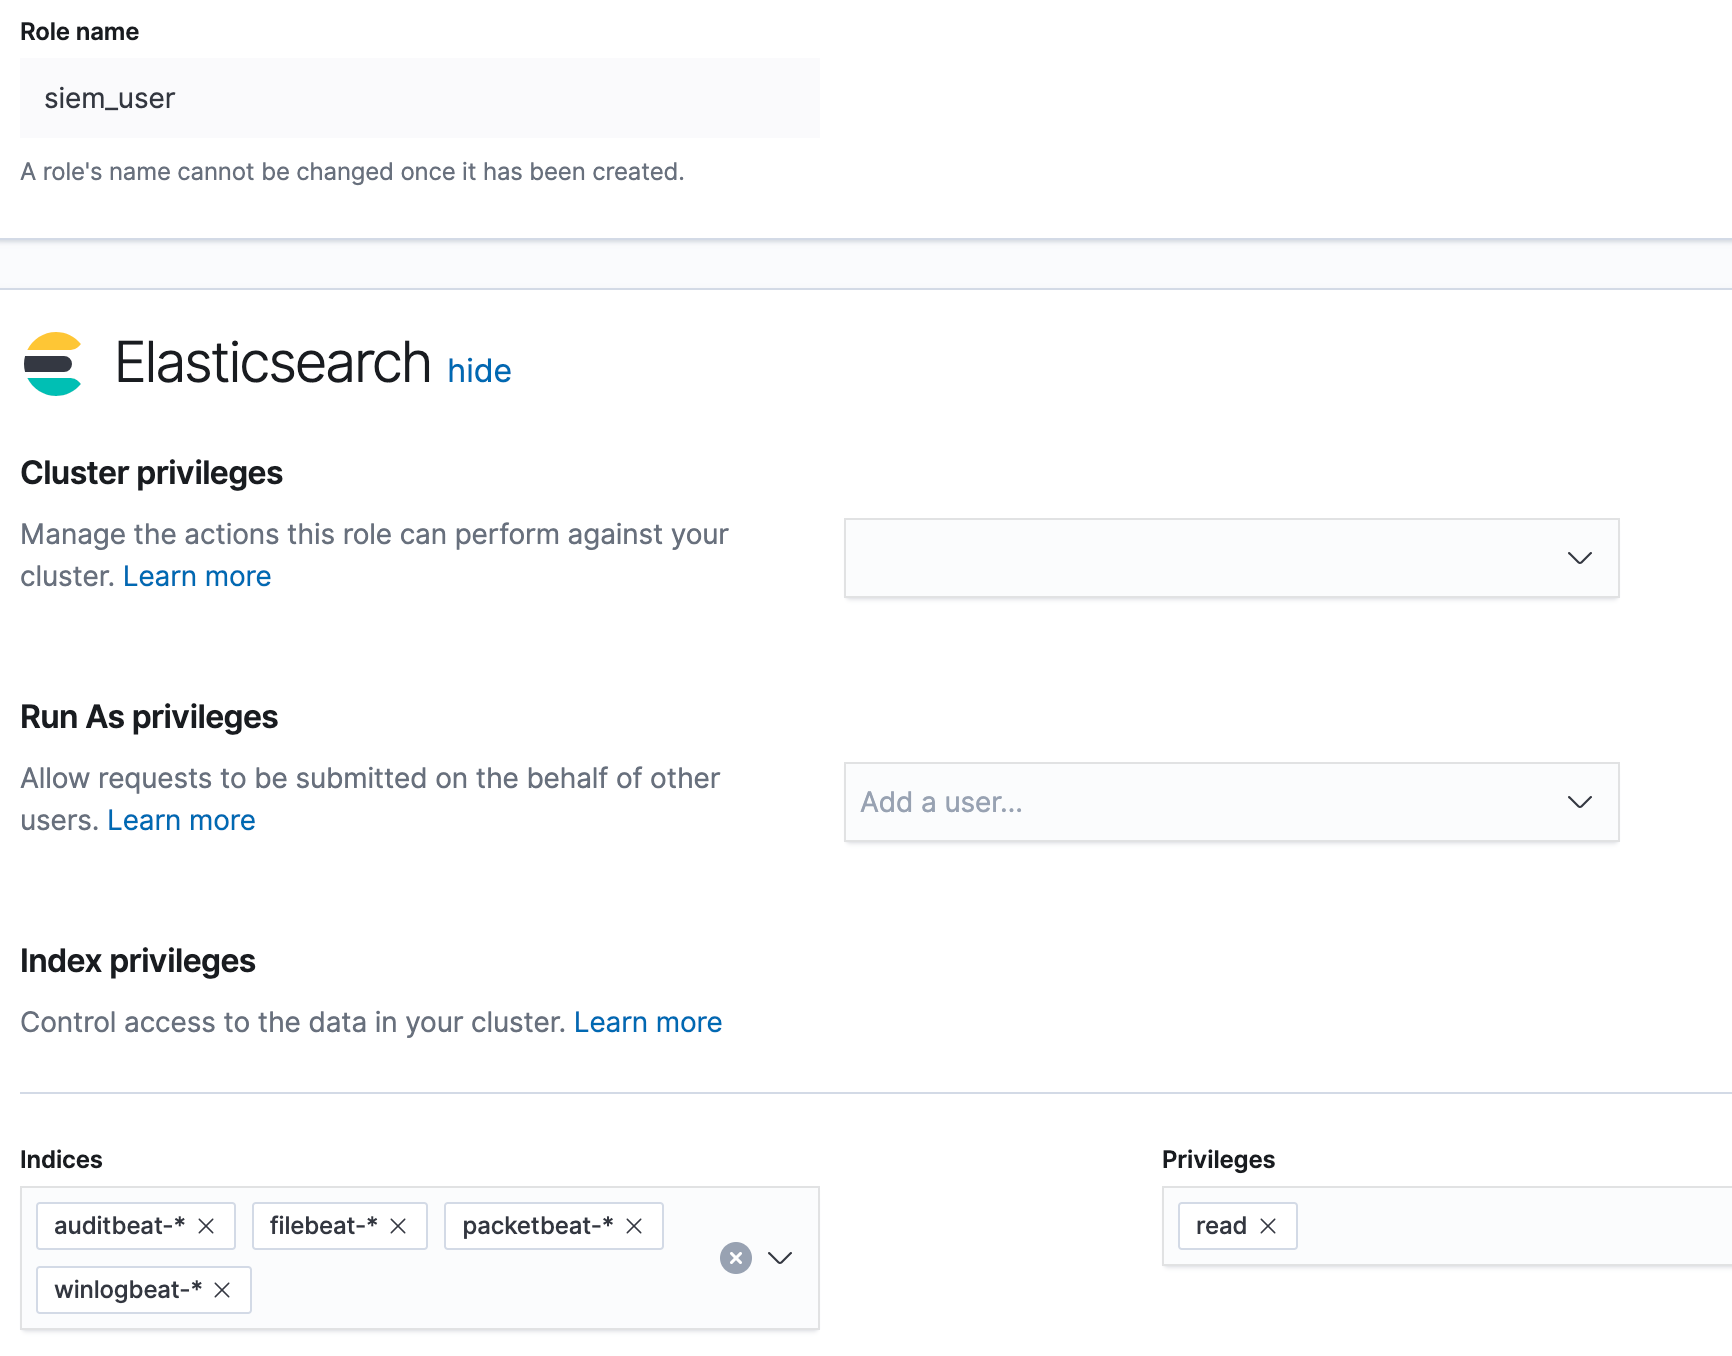
We will start by creating a siem_user role. In Kibana, click Management, then under Security, click Roles. On the Roles page, click Create role. In the Elasticsearch section, we will not assign any cluster privileges since we will use the built-in kibana_user role in this blog. In the “Index privileges” section, we will grant read privileges to the following indices (as shown below):
auditbeat-*filebeat-*packetbeat-*winlogbeat-*
Now that our privileges have been assigned for our siem_user role, click Create role at the bottom of the page. Then click the siem_user role to confirm the privileges are set correctly:
Now that the role has been created, we will make our user account.
Creating a SIEM user account
Since we want to be able to sign in to our Elasticsearch Service deployment without superuser access, we will make our own account to use on a regular basis. If there are other people you want to have access to your deployment, you can follow the same steps to create additional users — just grant them the same access as your own personal account. In Kibana, click Management, then under Security, click Users. On the Users page, click Create user.
Our first SIEM user account will be for me, and I will use my first name as the username. We will set rob for the username, and choose a strong password. I am also going to set my full name (you may optionally set an email address). In the Roles section, we need to assign the following roles (as shown below):
kibana_user(built-in role that grants access to all features in Kibana)siem_user(the role we created with read access to our Beats indices)
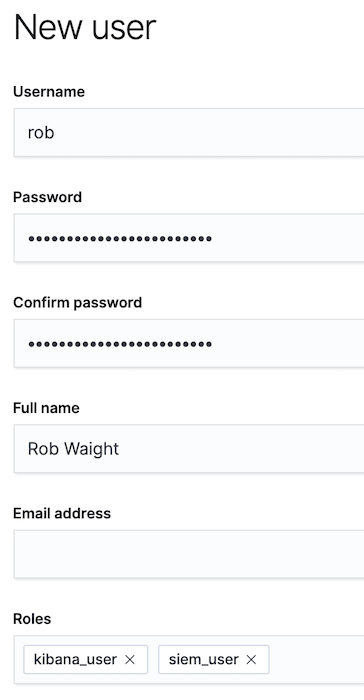
Click Create user at the bottom of the page. In the Users page, let’s review the rob account to confirm the roles are set correctly:

Remember, if there are other people you want to have access to your deployment, you can follow the same steps to create additional users — just grant them the same access as your own personal account.
Verifying access with our SIEM user account
Before we move on, we should sign in with our SIEM user account and verify we have access to our data. We will sign out of Kibana as the elastic superuser account, then sign in as our SIEM user account (in this example, we are using the rob account). After signing in as rob, click the SIEM app (the lock icon). If we see data here, then we have verified that we have access to our Beats data. As an example, here is the Hosts page from my cluster:

Next, we will take a look at our profile and see what options are available. Click the account icon in the upper-right corner (it will be an abbreviation of the full name), then click Edit profile:
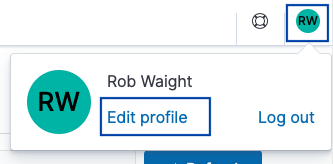
In the Account Management page, we have the option to change our password. Note that we do not have any cluster privileges beyond what is defined in the built-in kibana_user role. This information is useful, especially if you create an account for someone else. This will allow them to change their password in our Elasticsearch Service deployment.
Remember, if there are other people you want to have access to your deployment, you can follow the same steps in the ‘Creating a SIEM user account’ section to create additional users. Just grant them the same access as your own personal account. Now that we have restricted privileges for users and Beats, we can move on to the remaining prerequisites.
Coming up in Part 3: GeoIP data and Beats configuration review
Our next steps are to complete the remaining prerequisites, which will allow us to view our data in the SIEM Map as well in Elastic Maps. We will configure our cluster to enrich data with GeoIP information. After that, we’ll review our Beats configurations. Once those items are complete, we will install and configure Beats on the rest of our systems so we can see what is happening throughout our network.
Follow this Elastic SIEM for home and small business blog series as we develop a powerful, yet simple, security solution at home (or for your small business).
- Part 1: Getting started
- Part 2: Securing cluster access
- Part 3: GeoIP data and Beats config
- Part 4: Beats on Windows
- Part 5: Beats on CentOS
- Part 6: Beats on macOS
- Part 7: SIEM overview
A few last things...
If you run into any issues, the first place we’d recommend turning is to our documentation. It can help with many common issues. If you still have outstanding questions, check out our Elastic forums for additional help. Or, if you want to talk to the Elastic Support team directly, you have direct access to a team of experts if you’ve deployed on Elasticsearch Service. If you are self-hosting, you can start an Elastic subscription today and have direct access to a team of experts. Be safe out there!