Get started with semantic search
Semantic search is a type of AI-powered search that enables you to use natural language in your queries. It returns results that match the meaning of a query, as opposed to literal keyword matches. For example, if you want to search for workplace guidelines on a second income, you could search for "side hustle", which is not a term you're likely to see in a formal HR document.
Semantic search uses Elasticsearch vector database and vector search technology. Each vector (or vector embedding) is an array of numbers that represent different characteristics of the text, such as sentiment, context, and syntactics. These numeric representations make vector comparisons very efficient.
In this quickstart guide, you'll create vectors for a small set of sample data, store them in Elasticsearch, then run a semantic query. By playing with a simple use case, you'll take the first steps toward understanding whether it's applicable to your own data.
- If you're using Elasticsearch Serverless, you must have a
developeroradminpredefined role or an equivalent custom role to add the sample data. - If you're using Elastic Cloud Hosted or running Elasticsearch locally, start Elasticsearch and Kibana. To add the sample data, log in with a user that has the
superuserbuilt-in role.
To learn about role-based access control, check out User roles.
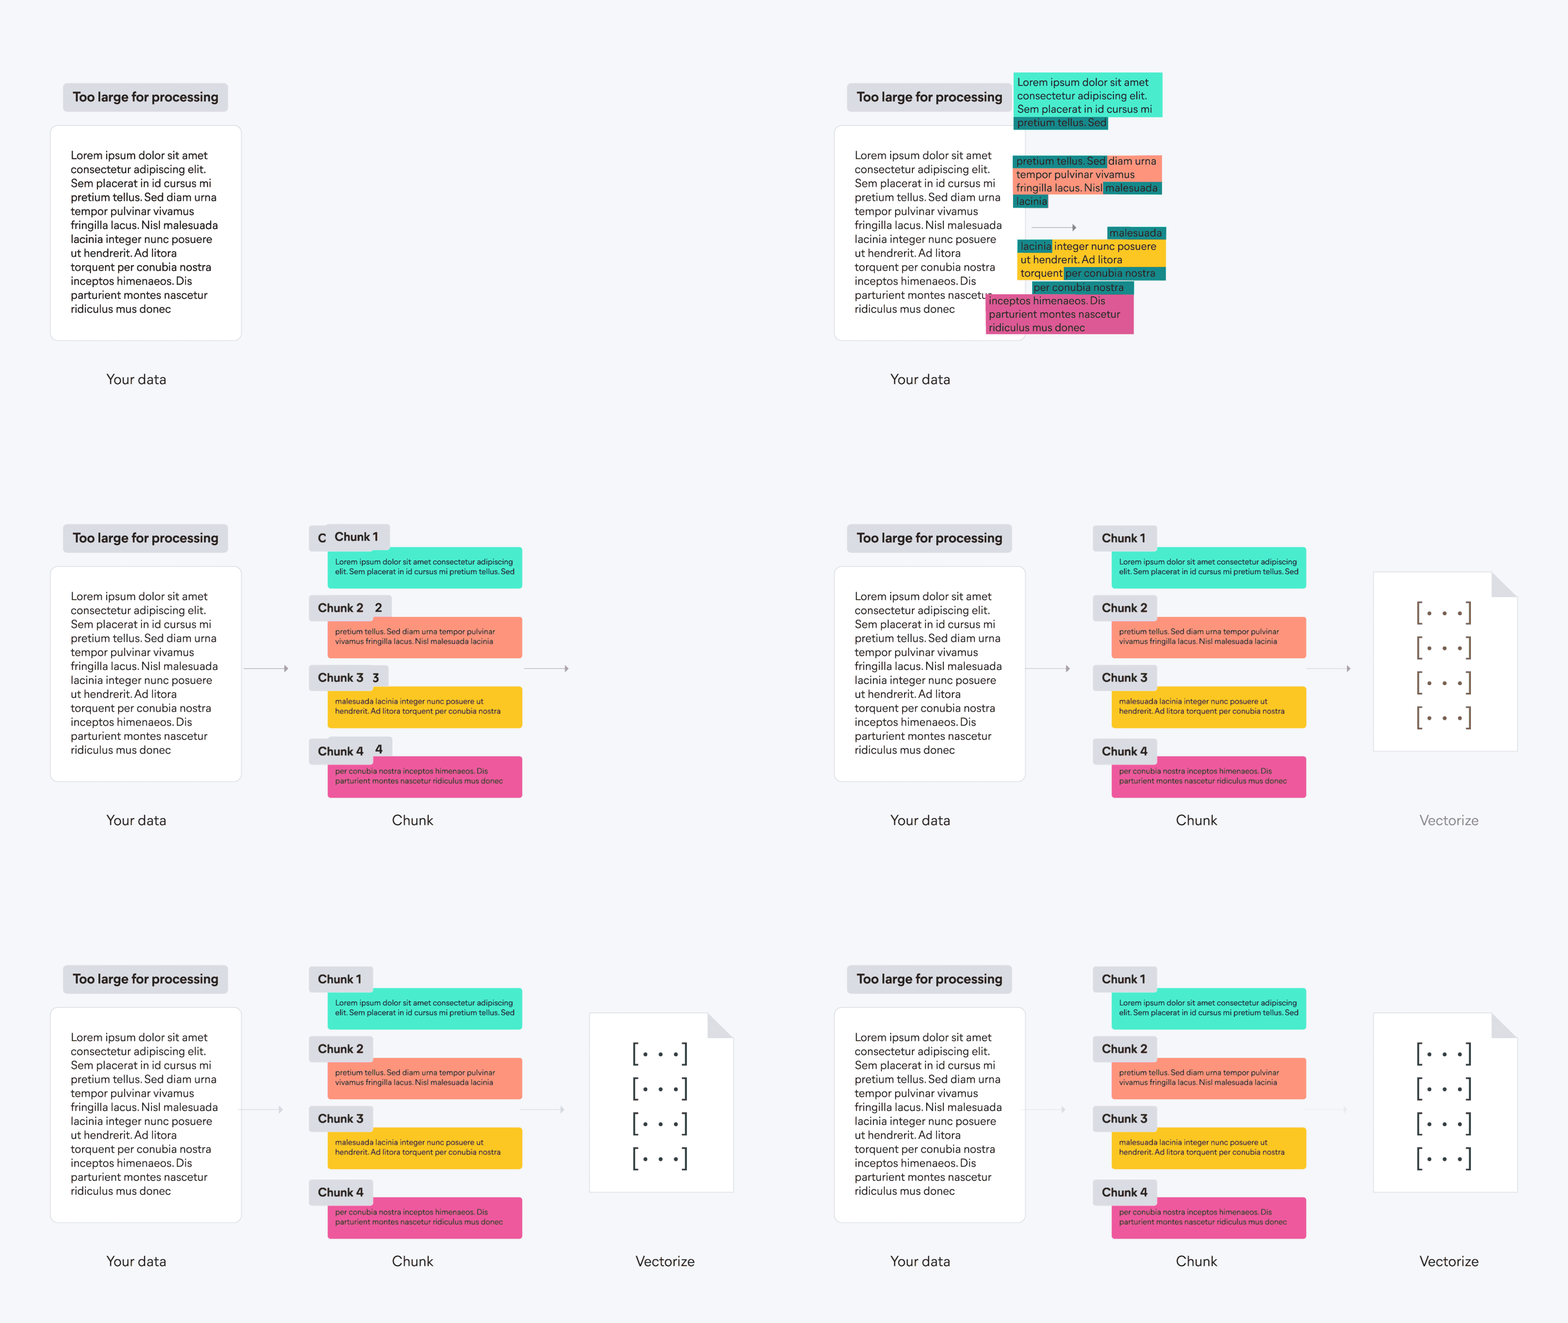
When you create vectors (or vectorize your data), you convert complex and nuanced documents into multidimensional numerical representations. You can choose from many different vector embedding models. Some are extremely hardware efficient and can be run with less computational power. Others have a greater understanding of the context, can answer questions, and lead a threaded conversation. The examples in this guide use the default Learned Sparse Encoder (ELSER) model, which provides great relevance across domains without the need for additional fine tuning.
The way that you store vectors has a significant impact on the performance and accuracy of search results. They must be stored in specialized data structures designed to ensure efficient similarity search and speedy vector distance calculations. This guide uses the semantic text field type, which provides sensible defaults and automation.
-
Create an index
An index is a collection of documents uniquely identified by a name or an alias. You can follow the guided index workflow:
- If you're using Elasticsearch Serverless, Elastic Cloud Hosted, or running Elasticsearch locally:
- Go to the Index Management page using the navigation menu or the global search field.
- Select Create index, select Semantic Search, and follow the guided workflow.
When you complete the workflow, you will have sample data and can skip to the steps related to exploring and searching it. Alternatively, run the following API request in Console:
PUT /semantic-indexTipFor an introduction to the concept of indices, check out Index basics.
- If you're using Elasticsearch Serverless, Elastic Cloud Hosted, or running Elasticsearch locally:
-
Create a semantic_text field mapping
Each index has mappings that define how data is stored and indexed, like a schema in a relational database. The following example creates a mapping for a single field ("content"):
PUT /semantic-index/_mapping{ "properties": { "content": { "type": "semantic_text" } } }When you use
semantic_textfields, the type of vector is determined by the vector embedding model. In this case, the default ELSER model will be used to create sparse vectors.For a deeper dive, check out Mapping embeddings to Elasticsearch field types: semantic_text, dense_vector, sparse_vector.
-
Add documents
You can use the Elasticsearch bulk API to ingest an array of documents:
POST /_bulk?pretty{ "index": { "_index": "semantic-index" } } {"content":"Yellowstone National Park is one of the largest national parks in the United States. It ranges from the Wyoming to Montana and Idaho, and contains an area of 2,219,791 acress across three different states. Its most famous for hosting the geyser Old Faithful and is centered on the Yellowstone Caldera, the largest super volcano on the American continent. Yellowstone is host to hundreds of species of animal, many of which are endangered or threatened. Most notably, it contains free-ranging herds of bison and elk, alongside bears, cougars and wolves. The national park receives over 4.5 million visitors annually and is a UNESCO World Heritage Site."} { "index": { "_index": "semantic-index" } } {"content":"Yosemite National Park is a United States National Park, covering over 750,000 acres of land in California. A UNESCO World Heritage Site, the park is best known for its granite cliffs, waterfalls and giant sequoia trees. Yosemite hosts over four million visitors in most years, with a peak of five million visitors in 2016. The park is home to a diverse range of wildlife, including mule deer, black bears, and the endangered Sierra Nevada bighorn sheep. The park has 1,200 square miles of wilderness, and is a popular destination for rock climbers, with over 3,000 feet of vertical granite to climb. Its most famous and cliff is the El Capitan, a 3,000 feet monolith along its tallest face."} { "index": { "_index": "semantic-index" } } {"content":"Rocky Mountain National Park is one of the most popular national parks in the United States. It receives over 4.5 million visitors annually, and is known for its mountainous terrain, including Longs Peak, which is the highest peak in the park. The park is home to a variety of wildlife, including elk, mule deer, moose, and bighorn sheep. The park is also home to a variety of ecosystems, including montane, subalpine, and alpine tundra. The park is a popular destination for hiking, camping, and wildlife viewing, and is a UNESCO World Heritage Site."}The bulk ingestion might take longer than the default request timeout. If it times out, wait for the ELSER model to load (typically 1-5 minutes) then retry it. You can check the model state by going to the Trained Models page from the navigation menu or the global search field.
First, the content is divided into smaller, manageable chunks to ensure that meaningful segments can be more effectively processed and searched. Each chunk of text is then transformed into a sparse vector by using the ELSER model's text expansion techniques.

The vectors are stored in Elasticsearch and are ready to be used for semantic search.
-
Explore the data
To familiarize yourself with this data set, open Discover from the navigation menu or the global search field.
In Discover, you can click the expand icon to show details about documents in the table:

For more tips, check out Explore fields and data with Discover.
When you run a semantic search, the text in your query must be turned into vectors that use the same embedding model as your vector database.
This step is performed automatically when you use semantic_text fields.
You therefore only need to pick a query language and a method for comparing the vectors.
-
Choose a query language
Elasticsearch provides a variety of query languages for interacting with your data. For an overview of their features and use cases, check out Query languages. The Elasticsearch Query Language (ES|QL) is designed to be easy to read and write. It enables you to query your data directly in Discover, so it's a good one to start with.
Go to Discover and select ES|QL or Try ES|QL from the application menu.
-
Choose a vector comparison method
You can search data that is stored in
semantic_textfields by using a specific subset of queries, includingknn,match,semantic, andsparse_vector. For the definitive list of supported queries, refer to Semantic text field type.In ES|QL, you can perform semantic searches on
semantic_textfield types using the same match syntax as full-text search. For example:FROM semantic-index | WHERE content: "what's the biggest park?" | LIMIT 10- The FROM source command returns a table of data from the specified index.
- A simplified syntax for the MATCH search function, this command performs a semantic query on the specified field. Think of some queries that are relevant to the documents you explored, such as finding the biggest park or the best for rappelling.
- The LIMIT processing command defines the maximum number of rows to return.
When you click ▶Run, the results appear in a table. Each row in the table represents a document.
To learn more about these commands, refer to ES|QL syntax reference and ES|QL for search.
-
Analyze the results
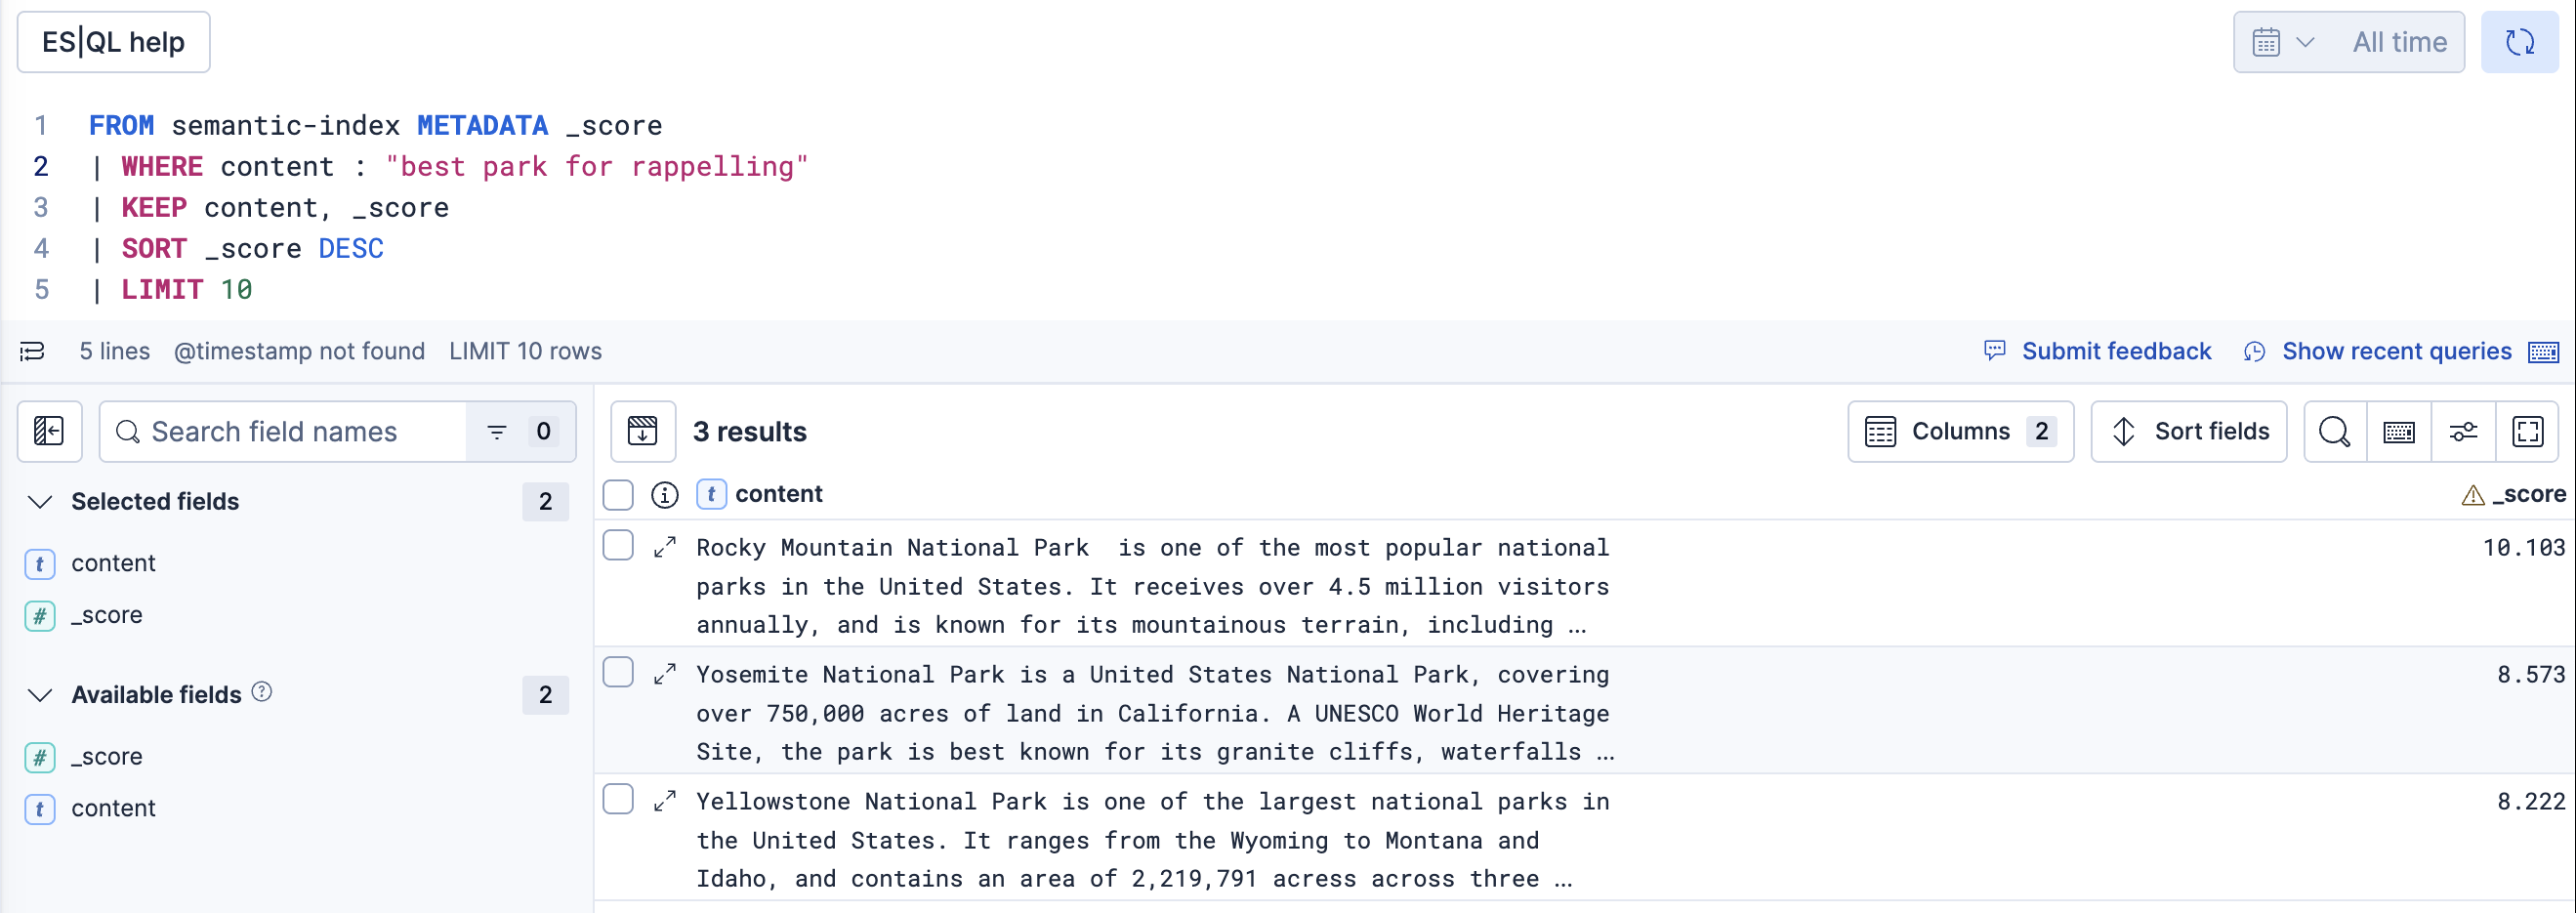
To have a better understanding of how well each document matches your query, add commands to include the relevance score and sort the results based on that value. For example:
FROM semantic-index METADATA _score | WHERE content: "best spot for rappelling" | KEEP content, _score | SORT _score DESC | LIMIT 10- The
METADATAclause provides access to the query relevance score, which is a metadata field. - The KEEP processing command affects the columns and their order in the results table.
- The results are sorted in descending order based on the
_score.
TipClick the ES|QL help button to open the in-product reference documentation for all commands and functions or to get recommended queries. For more tips, check out Using ES|QL in Discover.
In this example, the first row in the table is the document related to Rocky Mountain National Park, which had the highest relevance score for the query:

Optionally, try out the same search as an API request in Console:
POST /_query?format=txt{ "query": """ FROM semantic-index METADATA _score | WHERE content: "best spot for rappelling" | KEEP content, _score | SORT _score DESC | LIMIT 10 """ }When you finish your tests and no longer need the sample data set, delete the index:
DELETE /semantic-index - The
Thanks for taking the time to try out semantic search. For a deeper dive, go to Semantic search.
If you want to extend this example, try an index with more fields.
For example, if you have both a text field and a semantic_text field, you can combine the strengths of traditional keyword search and advanced semantic search.
A hybrid search provides comprehensive search capabilities to find relevant information based on both the raw text and its underlying meaning.
To learn about more options, such as vector and keyword search, go to Search approaches. For a summary of the AI-powered search use cases, go to AI-powered search.