Using Spring Boot with Elastic App Search


 Share on Twitter
Share on Twitter

 Share on LinkedIn
Share on LinkedIn

 Share on Facebook
Share on Facebook

 Share by Email
Share by Email

 Print this page
Print
In this article we will go from nothing to a fully running Spring Boot application querying Elastic App Search, which has crawled the contents of a website. We will start up the cluster and configure the application step by step.
Spinning up a cluster
In order to follow the example, the easiest way is to clone the sample GitHub repository. It’s ready for you to run terraform and get up and running in no time.
git clone https://github.com/spinscale/spring-boot-app-searchIn order to have an example up and running, we have to create an API key in Elastic Cloud as described in the terraform provider setup.
Once that is done, run
terraform init
terraform validate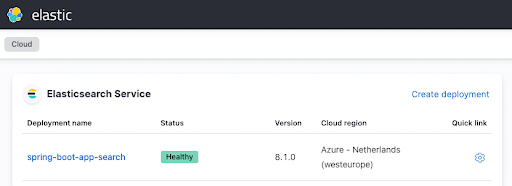
terraform applyand grab a coffee before the serious work begins. After a few minutes you should see your instance in the Elastic Cloud UI up and running like this
Configuring the Spring Boot application
Before we continue, let's make sure we can build and run the Java application. All you need is Java 17 installed, and you can go ahead and run
./gradlew clean checkThis will download all the dependencies, run the tests and fail. This is expected, as we have not indexed any data into our app search instance.
Before we can do that we have to change the configuration and index some data. Let's start with changing the configuration by editing the src/main/resources/application.properties file (the snippet below only shows the parameters that require changing!):
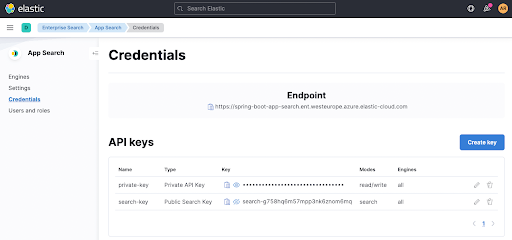
appsearch.url=https://dc3ff02216a54511ae43293497c31b20.ent-search.westeurope.azure.elastic-cloud.com
appsearch.engine=web-crawler-search-engine
appsearch.key=search-untdq4d62zdka9zq4mkre4vv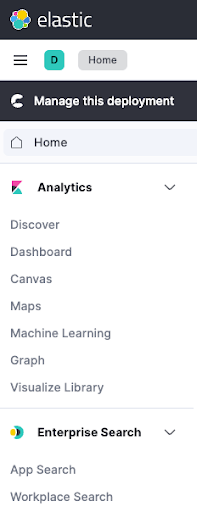
feign.client.config.appsearch.defaultRequestHeaders.Authorization=Bearer search-untdq4d62zdka9zq4mkre4vvIf you do not want to enter any password to log into Kibana, you log into the Kibana instance via the Elastic Cloud UI and then go to Enterprise Search > App Search
You can extract the appsearch.key and feign... search parameter from the Credentials page within App Search. The same applies for the Endpoint which is shown right at the top.
Now, when running ./gradlew clean check the correct App Search endpoint is
hit, but the tests keep failing as we still have not indexed any data. Let's do that now!
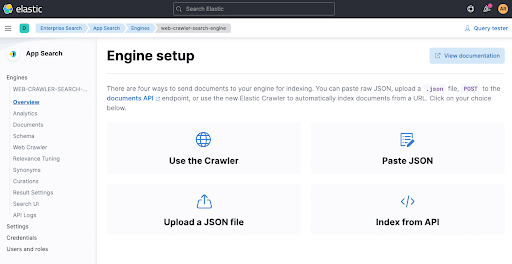
Configuring the Crawler
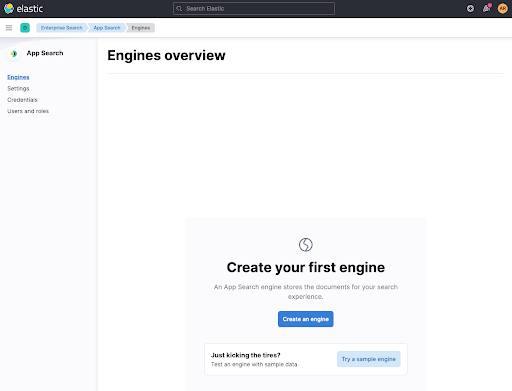
Before setting up a crawler, we need to create a container for our documents. This is called an engine right now, so let's create one. Name your engine web-crawler-search-engine, so it matches with the application.conf file.
After that let's configure a crawler by clicking Use The Crawler
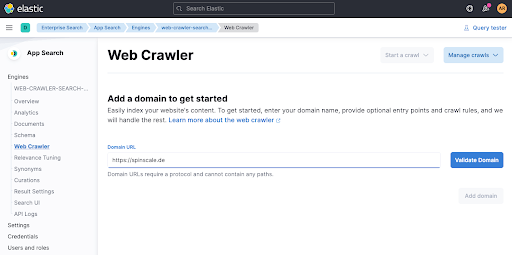
Now add a domain. You can add your own domain here, I went with my personal blog spinscale.de as I know I am not stepping on anyone's toes there.
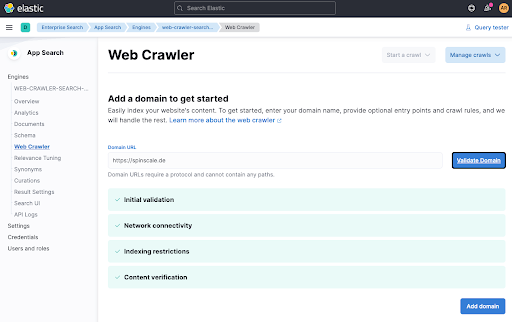
When clicking on Validate Domain a few checks are done, and then the domain gets added to the engine.
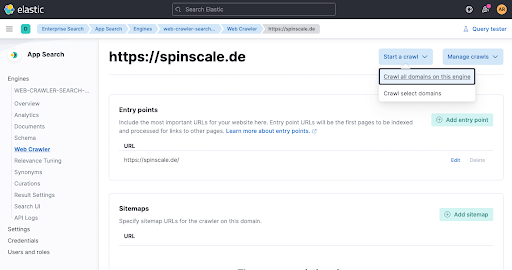
The final step is to trigger a crawl manually so data gets indexed right now. Click on Start a crawl.
Now wait a minute and check on the engine overview if documents have been added.
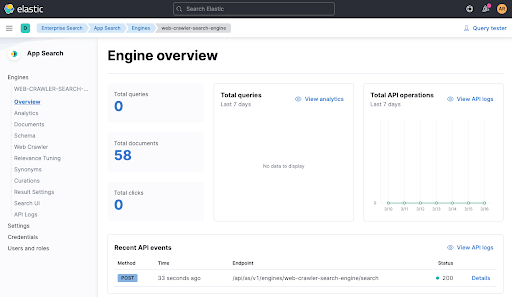
Now with data indexed into our engine, let's rerun the test and see if it passes via ./gradlew check. It should pass now, you can also see a recent API call in the engine overview coming from the test (see above at the bottom).
Before starting our app, let's take a quick look at the test code
@SpringBootTest(classes = SpringBootAppSearchApplication.class, webEnvironment = SpringBootTest.WebEnvironment.NONE)
class AppSearchClientTests {
  @Autowired
  private AppSearchClient appSearchClient;
  @Test
  public void testFeignAppSearchClient() {
    final QueryResponse queryResponse = appSearchClient.search(Query.of("seccomp"));
    assertThat(queryResponse.getResults()).hasSize(4);
    assertThat(queryResponse.getResults().stream().map(QueryResponse.Result::getTitle))
        .contains("Using seccomp - Making your applications more secure",
                  "Presentations",
                  "Elasticsearch - Securing a search engine while maintaining usability",
                  "Posts"
        );
    assertThat(queryResponse.getResults().stream().map(QueryResponse.Result::getUrl))
        .contains("https://spinscale.de/posts/2020-10-27-seccomp-making-applications-more-secure.html",
                  "https://spinscale.de/presentations.html",
                  "https://spinscale.de/posts/2020-04-07-elasticsearch-securing-a-search-engine-while-maintaining-usability.html",
                  "https://spinscale.de/posts/"
        );
  }
}This tests fires up the spring application without binding to a port, auto injects the AppSearchClient class and runs a test that searches for seccomp.
Starting up the application
Time to get up and running and check if our applications starts up
./gradlew bootRunYou should see a few logging messages, most importantly that your application has started like this
2022-03-16 15:43:01.573 INFO 21247 --- [ restartedMain] d.s.s.SpringBootAppSearchApplication : Started SpringBootAppSearchApplication in 1.114 seconds (JVM running for 1.291)You can now open the app in a browser and take a look, but I would like to take a look at the Java code first.
Defining an interface only for our search client
In order to be able to query the App Search endpoint within Spring Boot, all that is needed to be implemented is an interface due to using Feign. We do not have to care for JSON serialization or creating HTTP connections, we can work with POJOs only. This is our definition for our app search client
@FeignClient(name = "appsearch", url="${appsearch.url}")
public interface AppSearchClient {
    @GetMapping("/api/as/v1/engines/${appsearch.engine}/search")
    QueryResponse search(@RequestBody Query query);
}The client uses the application.properties definitions for the url and engine so that nothing of this needs to be specified as part of the API call. Also, this client uses the headers defined in the application.properties file. This way, no application code contains URLs, engine names or custom auth headers.
The only classes requiring more implementation are Query to model the request body and QueryResponse modelling the request response. I have opted to only model the absolutely needed fields in the response, even though it usually contains much more JSON. Whenever I need more data, I could add it to the QueryResponse class.
The query class only consists of the query field for now
public class Query {
    private final String query;
    public Query(String query) {
        this.query = query;
    }
    public String getQuery() {
        return query;
    }
    public static Query of(String query) {
        return new Query(query);
    }
}So, finally, let's run some searches from within the application.
Server side queries and rendering
The sample application implements three models of querying the App Search instance and integrating it within the Spring Boot Application. The first one sends a search term to the Spring Boot App, which sends the query to App Search and then renders the results via thymeleaf, the standard rendering dependency in Spring Boot. This is the controller
@Controller
@RequestMapping(path = "/")
public class MainController {
  private final AppSearchClient appSearchClient;
  public MainController(AppSearchClient appSearchClient) {
    this.appSearchClient = appSearchClient;
  }
  @GetMapping("/")
  public String main(@RequestParam(value = "q", required = false) String q,
                     Model model) {
    if (q != null && q.trim().isBlank() == false) {
      model.addAttribute("q", q);
      final QueryResponse response = appSearchClient.search(Query.of(q));
      model.addAttribute("results", response.getResults());
    }
    return "main";
  }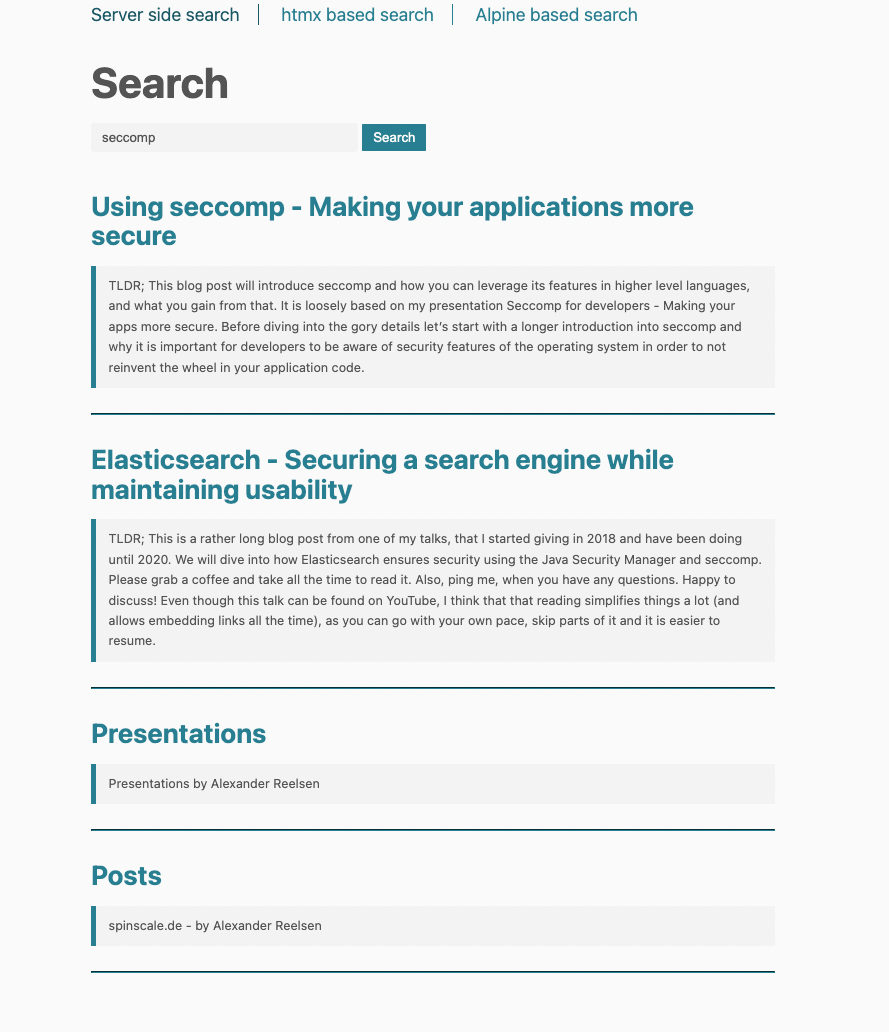
}Looking at the main() method there is a check for the q parameter. If it exists, the query is sent to App Search and the model is enriched with the results. Then the main.html thymeleaf template is rendered. It looks like this:
<!DOCTYPE html>
<html xmlns:th="http://www.thymeleaf.org"
      xmlns:layout="http://www.ultraq.net.nz/thymeleaf/layout"
      layout:decorate="~{layouts/base}">
<body>

<div layout:fragment="content">

  <div>
    <form action="/" method="get">
      <input autocomplete="off" placeholder="Enter search terms..."
          type="text" name="q" th:value="${q}" style="width:20em" >
      <input type="submit" value="Search" />
    </form>
  </div>

  <div th:if="${results != null && !results.empty}">
    <div th:each="result : ${results}">
      <h4><a th:href="${result.url}" th:text="${result.title}"></a></h4>
      <blockquote style="font-size: 0.7em" th:text="${result.description}"></blockquote>
      <hr>
    </div>
  </div>
</div>

</body>
</html>The template checks for the results variable, and if it is set, iterates through that list. For every result the same template is rendered, which looks like this:
Using htmx for dynamic page updates
As you can see in the top navigation, we can change the way of searching between three alternatives. When clicking on the second one named htmx based search, the execution model is slightly changed.
Instead of reloading the whole page, only the part with the results is replaced with what the server returns. The nice part about this is, that it can be done without writing any javascript. This is possible due to the awesome htmx library. Citing the description > htmx gives you access to AJAX, CSS Transitions, WebSockets and Server Sent Events directly in HTML, using attributes, so you can build modern user interfaces with the simplicity and power of hypertext
In this example only a tiny subset of htmx is used. Let's take a look at the two endpoint definitions first. One for rendering the HTML and one for only returning the required HTML snippet to update the part of the page.
htmx gives you access to AJAX, CSS Transitions, WebSockets and Server Sent Events directly in HTML, using attributes, so you can build modern user interfaces with the simplicity and power of hypertext
The first renders the htmx-main template, where as the second endpoint renders the results. The htmx-main template looks like this:
<!DOCTYPE html>
<html xmlns:th="http://www.thymeleaf.org"
      xmlns:layout="http://www.ultraq.net.nz/thymeleaf/layout"
      layout:decorate="~{layouts/base}">
<body>

<div layout:fragment="content">

  <div>
    <form action="/search" method="get">
      <input type="search"
             autocomplete="off"
             id="searchbox"
             name="q" placeholder="Begin Typing To Search Articles..."
             hx-post="/htmx-search"
             hx-trigger="keyup changed delay:500ms, search"
             hx-target="#search-results"
             hx-indicator=".htmx-indicator"
             style="width:20em">

      <span class="htmx-indicator" style="padding-left: 1em;color:red">Searching... </span>
    </form>
  </div>

  <div id="search-results">
  </div>
</div>

</body>
</html>The magic happens in the hx- attributes of the <input> HTML element. Reading this out loud, this translates to
- Trigger a HTTP request only, if there was no typing activity for 500ms
- Then send a HTTP POST request to
/htmx-search - While you are waiting, show the
.htmx-indicatorelement. - The response should be rendered into the element with the ID
#search-results
Just think about the sheer amount of javascript you would need for all the logic regarding key listeners, displaying elements to wait for a response or sending the AJAX request.
The other big advantage is the fact of being able to use your favourite server side rendering solution to create the HTML being returned. This means, we can stay in the thymeleaf ecosystem instead of having to implement some client side templating language. This makes the htmx-search-results template very simple by just iterating through the results:
<div th:each="result : ${results}">
  <h4><a th:href="${result.url}" th:text="${result.title}"></a></h4>
  <blockquote style="font-size: 0.7em" th:text="${result.description}"></blockquote>
  <hr>
</div>One difference to the first example is, that the URL of this search never gets changed, so you cannot bookmark it. Even though there is history support in htmx, I left it out for the sake of this example, as it requires some more careful implementation to do it right.
Searching via the browser against App Search
Now on to the last example. This is vastly different, because it does not involve the Spring Boot server side at all. Everything is done in the browser. This is done using Alpine.js. The server side endpoint looks as simple as possible:
@GetMapping("/alpine")
public String alpine() {
  return "alpine-js";
}The alpine-js.html template requires some more explanation, but let's take a look first:
<!DOCTYPE html>
<html
    xmlns:layout="http://www.ultraq.net.nz/thymeleaf/layout"
    layout:decorate="~{layouts/base}">
<body>

<div layout:fragment="content" x-data="{ q: '', response: null }">

  <div>
    <form @submit.prevent="">
      <input type="search" autocomplete="off" placeholder="Begin Typing To Search Articles..." style="width:20em"
             x-model="q"
             @keyup="client.search(q).then(resultList => response = resultList)">
    </form>
  </div>

  <template x-if="response != null && response.info.meta != null && response.info.meta.request_id != null">
    <template x-for="result in response.results">
      <template x-if="result.data != null && result.data.title != null && result.data.url != null && result.data.meta_description != null ">
        <div>
          <h4><a class="track-click" :data-request-id="response.info.meta.request_id" :data-document-id="result.data.id.raw" :data-query="q" :href="result.data.url.raw" x-text="result.data.title.raw"></a></h4>
          <blockquote style="font-size: 0.7em" x-text="result.data.meta_description.raw"></blockquote>
          <hr>
        </div>
      </template>
    </template>
  </template>

<script th:inline="javascript">
var client = window.ElasticAppSearch.createClient({
  searchKey: [[${@environment.getProperty('appsearch.key')}]],
  endpointBase: [[${@environment.getProperty('appsearch.url')}]],
  engineName: [[${@environment.getProperty('appsearch.engine')}]]
});
document.addEventListener("click", function(e) {
  const el = e.target;
  if (!el.classList.contains("track-click")) return;
  client.click({
    query: el.getAttribute("data-query"),
    documentId: el.getAttribute("data-document-id"),
    requestId: el.getAttribute("data-request-id")
  });
});
</script>

</div>

</body>
</html>The first major difference is the actual use of JavaScript in order to initialize the ElasticAppSearch client - using the configured properties from the application.properties file. Once that client is initialized we can use it in the HTML attributes.
The code initializes two variables to be used
<div layout:fragment="content" x-data="{ q: '', response: null }">The q variable will contain the query of the input form and the response will contain the response from a search. The next interesting part is the form definition
<form @submit.prevent="">
  <input type="search" autocomplete="off" placeholder="Search Articles..."
         x-model="q"
         @keyup="client.search(q).then(resultList => response = resultList)">
</form>Using <input x-model="q"...> binds the q variable to the input and is updated whenever the user types. There is also an event for `keyup` to execute a search using client.search() and assign the outcome to the response variable. So once the client search returns, the response variable won't be empty anymore. Lastly, using @submit.prevent="" ensures that the form is not submitted.
Next up all the tags are rendered once the response is set and iterates through the response.results list. For each element, the following HTML snippet is rendered
<div>
  <h4><a class="track-click"
         :data-request-id="response.info.meta.request_id"
         :data-document-id="result.data.id.raw"
         :data-query="q"
         :href="result.data.url.raw"
         x-text="result.data.title.raw">
  </a></h4>
  <blockquote style="font-size: 0.7em"
              x-text="result.data.meta_description.raw"></blockquote>
  <hr>
</div>This rendering is slightly different from the two server side rendering implementations, because it contains added functionality to track clicked links. The important part to render the templates are the :href and the x-text properties to set the link and the text of the link. The other :data parameters are for tracking links.
Tracking clicks
So, why would you want to track link clicks? Well simple, it's one of the possibilities to figure out if your search results are good by measuring if your users clicked them. This is also why there is some more javascript included in this HTML snippet. Let's take a look first, how this looks in Kibana.
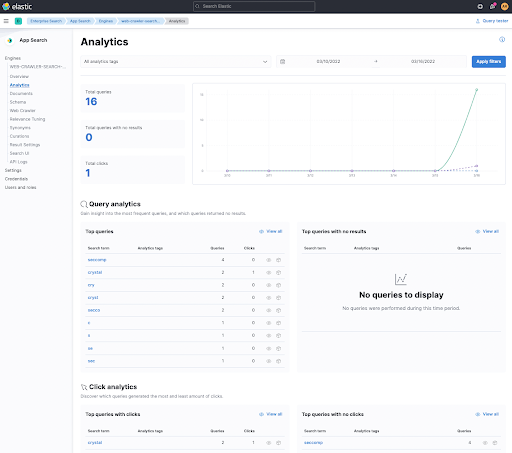
You can see the Click analytics at the bottom, that have tracked a click after I searched forcrystal in the clicked first link. By clicking on that term you can see which document has been clicked and basically follow the click trail of your users.
So, how is this implemented in our little app? By using a click javascript listener for certain links. This is the javascript snippet
document.addEventListener("click", function(e) {
  const el = e.target;
  if (!el.classList.contains("track-click")) return;
  client.click({
    query: el.getAttribute("data-query"),
    documentId: el.getAttribute("data-document-id"),
    requestId: el.getAttribute("data-request-id")
  });
});If a clicked link has the track-click class, then send a click event using the ElasticAppSearch client. This event contains the original query term, as well as the documentId and requestId, that were part of the search response and were rendered into the <a> element in the template above.
We could also add this functionality into the server side rendering, by providing that information when a user clicks a link, so this is not exclusive for the browser at all. For the sake of simplicity I skipped the implementation here.
Summary
I hope you enjoyed getting an introduction into Elastic App Search from a developer perspective and the different possibilities of integrating this in your applications. Make sure to check out the GitHub Repository and follow the example along.
You can use terraform with the Elastic Cloud Provider to get up and running in no time in Elastic Cloud.
Share
- Share on Twitter
Share on Twitter
- Share on LinkedIn
Share on LinkedIn
- Share on Facebook
Share on Facebook
- Share by Email
Share by Email
- Print this page
Print