ProblemChild: Generate alerts to detect living-off-the-land attacks
In an earlier blog post, we spoke about building your own ProblemChild framework from scratch in the Elastic Stack to detect living off the land (LOtL) activity. As promised, we have now also released a fully trained detection model, anomaly detection configurations, and detection rules that you can use to get ProblemChild up and running in your environment in a matter of minutes.
This blog provides a high-level breakdown of the steps to enrich your Windows process event data using the released model to generate alerts when LOtL activity is detected in your environment. A more detailed documentation of the steps to be followed can be found in our publicly available detection-rules repository.
ProblemChild: A brief history
ProblemChild is a framework built using the Elastic Stack to detect LOtL activity. LOtL attacks are generally tricky to detect, given that attackers leverage seemingly benign software already present in the target environment to fly under the radar. The lineage of processes spawned in your environment can provide a strong signal in the event of an ongoing attack.
The supervised ML component of ProblemChild leverages process lineage information present in your Windows process event metadata to classify events as malicious or benign using Inference at the time of ingest. Anomaly detection is then applied to detect rare processes among those detected as malicious by the supervised model. Finally, detection rules alert on rare parent-child process activity as an indication of LOtL attacks.
The sheer volume and variety of events seen in organizations poses a challenge for detecting LOtL attacks using rules and heuristics, making an ML-based framework such as ProblemChild a great solution.
Getting started
To get started with ProblemChild in your environment, we have released not only the supervised model and related artifacts, but also the necessary tooling to assist with importing the model, anomaly detection datafeeds, configurations, and the rules into your Elastic cluster. The model and the other artifacts have been released to the detection-rules repository in two separate GitHub releases: ML-ProblemChild-* and ML-experimental-detections-*. We will be maintaining this format moving forward.
If you don’t have an Elastic Cloud cluster but would like to start experimenting with the released ProblemChild package, you can start a free 14-day trial of Elastic Cloud.
The detection rules repository has a command line interface (CLI) that, until recently, was used only to make rule development and testing easier. With the advent of models like DGA and ProblemChild, however, it now also has tooling to interact with the Elastic Stack. For instance, it has various Python libraries to interact with the Kibana API. This has made the process of importing ML models and their dependencies into the Stack significantly easier.
Let us now look at the steps to generate alerts for LOtL activity in your environment using the released ProblemChild models, experimental jobs, and rules.
Step 1: Importing the model
For the supervised model to perform Inference on incoming Windows process events, you must first import the relevant scripts, ingest pipelines, and the model itself into your Elastic cluster. All of these are packaged as a GitHub release in the detection rules repository. Assuming you have cloned the detection-rules repository, run the following CLI command to upload the model and related artifacts to your cluster:
python -m detection_rules es <args_or_config> experimental ml setup -t <release-tag>
Please refer to the documentation for more details on usage of the above CLI command.
Once you have uploaded the model and the related artifacts to your Elastic cluster, update the settings of the index/indices containing your event data using the following API call in the Kibana Dev Tools console:
PUT your-index-pattern/_settings
{“index”: {“default_pipeline”: “ML_ProblemChild_ingest_pipeline”}}
If you already have an ingest pipeline associated with your indices, you can use a pipeline processor to integrate the ProblemChild ingest pipeline into your existing pipeline.
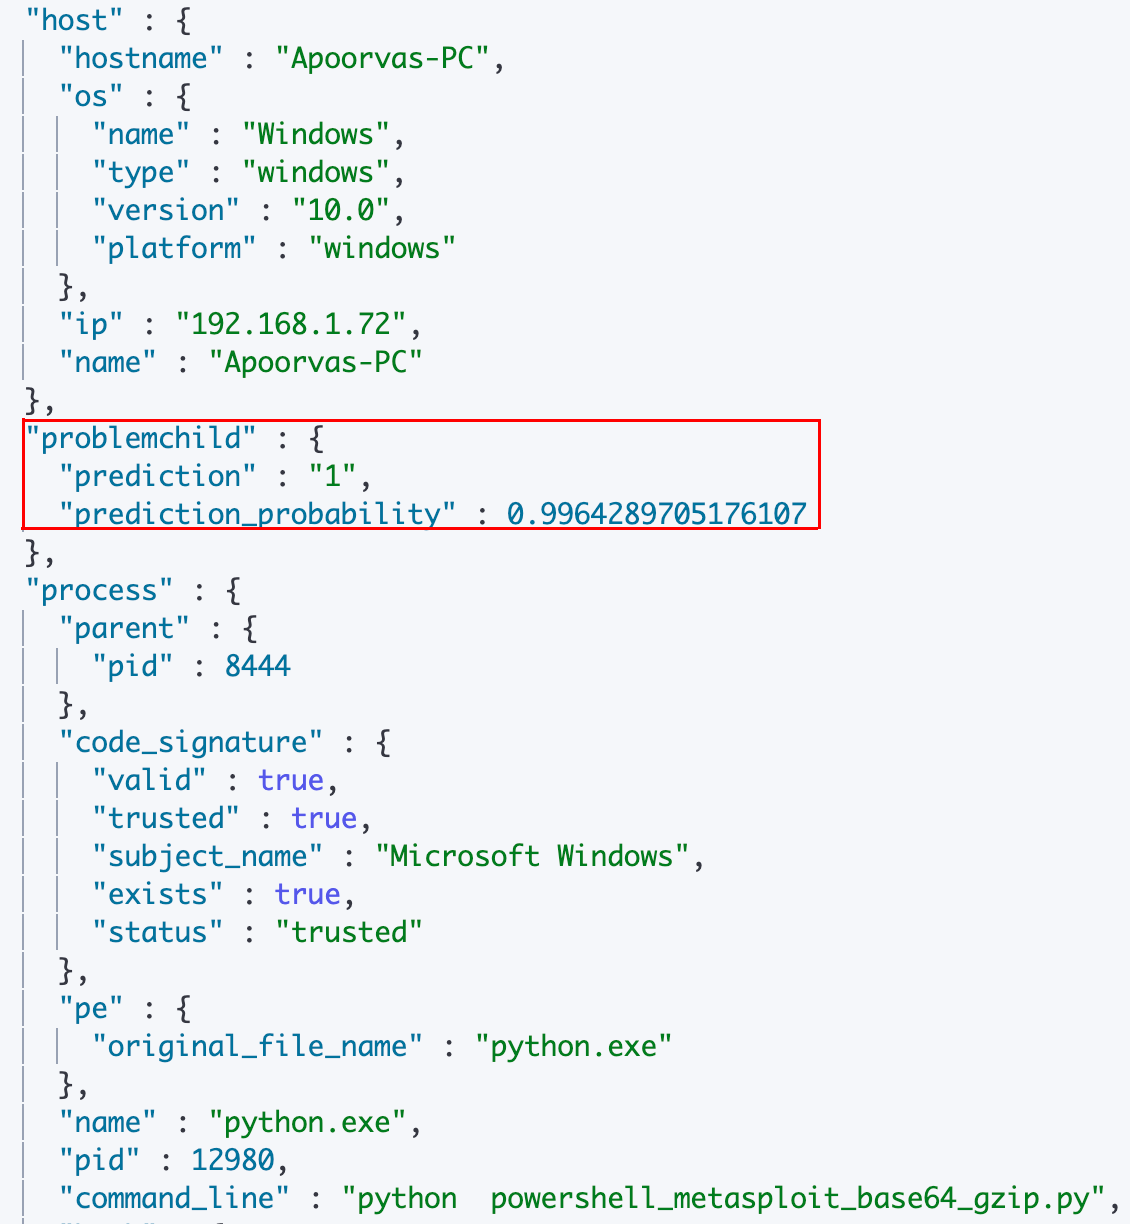
You should now see that the model enriches incoming Windows process events with the following fields:
|
Field |
Description |
|
problemchild.prediction |
A value of 1 indicates that the event is predicted to be malicious and a value of “0” indicates that the event is predicted to be benign. |
|
problemchild.prediction_probability |
A value between 0 and 1 indicating the confidence of the model in its prediction. The higher the value, the higher the confidence. |
If you have the blocklist for the model enabled, you might also see the field blocklist_label appear in certain documents.
A sample enriched document is as follows:
Step 2 (optional): Uploading the Anomaly Detection jobs
As with any detection capability, there will be false positives. In this case, you might want to find the rarest events among those detected as malicious by the supervised model in order to decide which events require immediate attention from your analysts. For this, we have created several pre-configured anomaly detection jobs that you can enable depending on what makes the most sense for your environment:
Job name | Description |
problem_child_high_sum_by_parent | Looks for a set of one or more malicious processes spawned by the same parent. |
problem_child_high_sum_by_host | Looks for a set of one or more malicious processes spawned on the same host. |
problem_child_high_sum_by_user | Looks for a set of one or more malicious processes spawned by the same user. |
problem_child_rare_process_by_parent | Looks for rare malicious processes spawned by a parent process. |
problem_child_rare_process_by_host | Looks for rare malicious processes being spawned on a host that does not commonly manifest malicious activity. |
problem_child_rare_process_by_user | Looks for malicious processes where the user context is unusual. |
The datafeeds and configurations for the above mentioned jobs are available in the latest experimental detections GitHub release in the detection-rules repository. To upload these to your Elastic cluster, unzip the detections package and run the following CLI command to upload the jobs and their respective datafeeds individually:
python -m detection_rules es <args> experimental ml upload-job <ml_job.json>
Step 3: Importing detection rules
In order to maximize the benefit of the ProblemChild framework, you might consider activating detection rules that are triggered when certain conditions for the supervised model or anomaly detection jobs are satisfied.
A complete list of experimental rules can be found in the latest experimental detections release as well. Note that there are search rules as well as ML job rules. The search rules are triggered by the supervised model, for example this rule:
problemchild.prediction:1 or blocklist_label:1
The above rule matches on any Windows process event for which the supervised model or its blocklist has a prediction value of 1 (malicious).
The ML job rules are triggered by anomalies found by the anomaly detection jobs that you set up in Step 2 — for example, this rule:
[rule]
anomaly_threshold = 75
author = ["Elastic"]
description = """
A machine learning job has detected a suspicious Windows process. This
process has been classified as malicious in two ways. It was predicted to be malicious
by the ProblemChild supervised ML model, and it was found to be an unusual child process name,
for the parent process, by an unsupervised ML model. Such a process may be an instance of
suspicious or malicious activity, possibly involving LOLbins, that may be resistant to
detection using conventional search rules.
"""
from = "now-45m"
interval = "15m"
license = "Elastic License"
machine_learning_job_id = "problem_child_rare_process_by_parent"
name = "Unusual Process Spawned By a Parent Process"
references = ["https://www.elastic.co/guide/en/security/current/prebuilt-ml-jobs.html"]
risk_score = 21
rule_id = "ae7c2f69-0c51-4b02-ad54-d3d75023da8b"
severity = "low"
tags = ["Elastic", "Windows", "Process", "Threat Detection", "ML"]
type = "machine_learning"
version = 1
The above rule is triggered each time the anomaly detection job problem_child_rare_process_by_parent detects an anomaly with an anomaly score greater than or equal to 75.
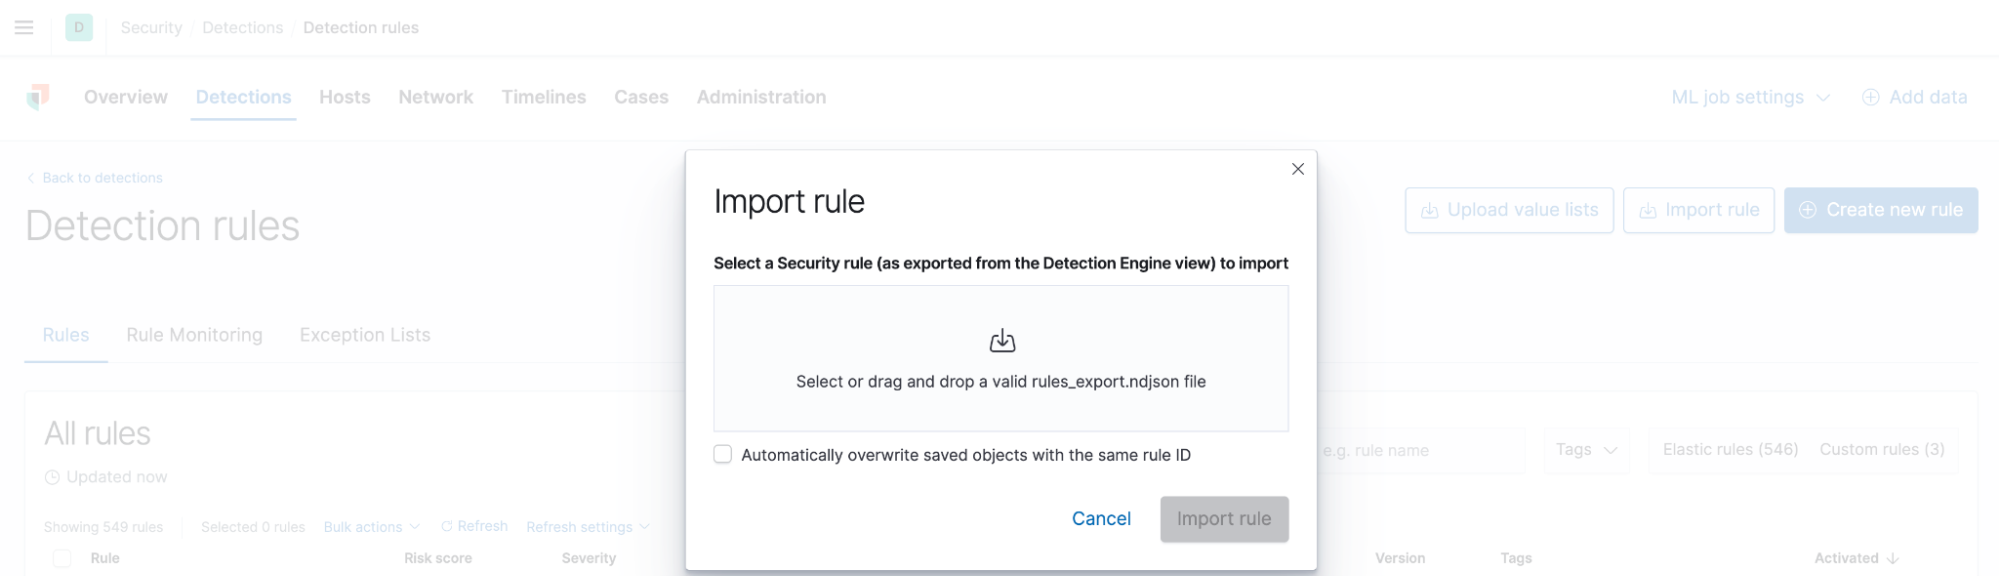
The rules are already in .ndjson format and can be imported directly into Kibana. In order to do this, navigate to the Detections page in the Security App and click “Manage Detection Rules.” You should now see an option to “Import Rule,” which allows you to drag and drop your .ndjson rule files.
Keep in mind that you can modify the rules at any point to suit your local environment. For example, you can:
- Change the risk scores of the ProblemChild rules depending on whether you want to suppress or elevate the priority of these alerts
- Change the anomaly score thresholds in the ML job rules to make them trigger on a lower or higher threshold
- Add exceptions to the rules to ignore known false positives in your environment
The opportunities are endless!
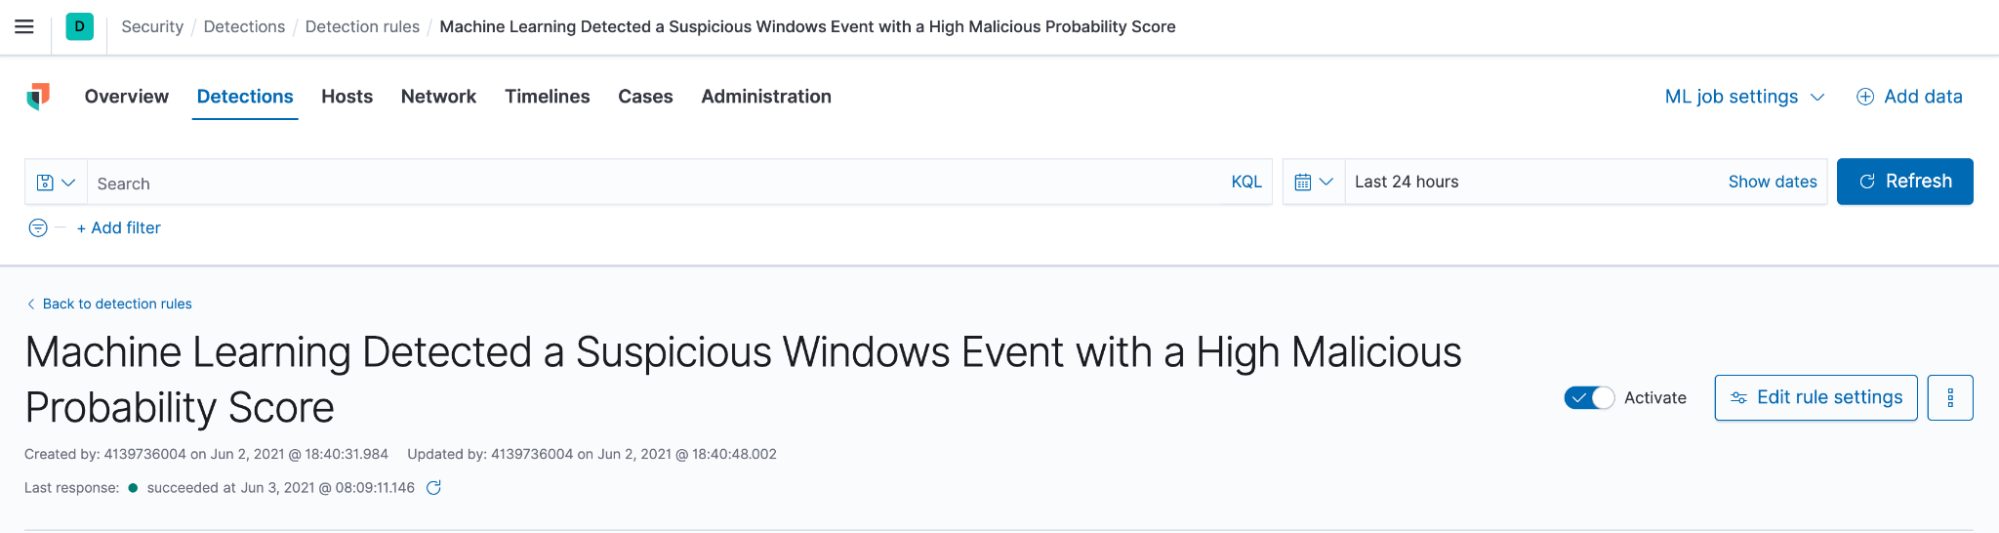
Step 4: Enabling the rules
Once you have imported the rules, you will see that they have been activated in your environment:
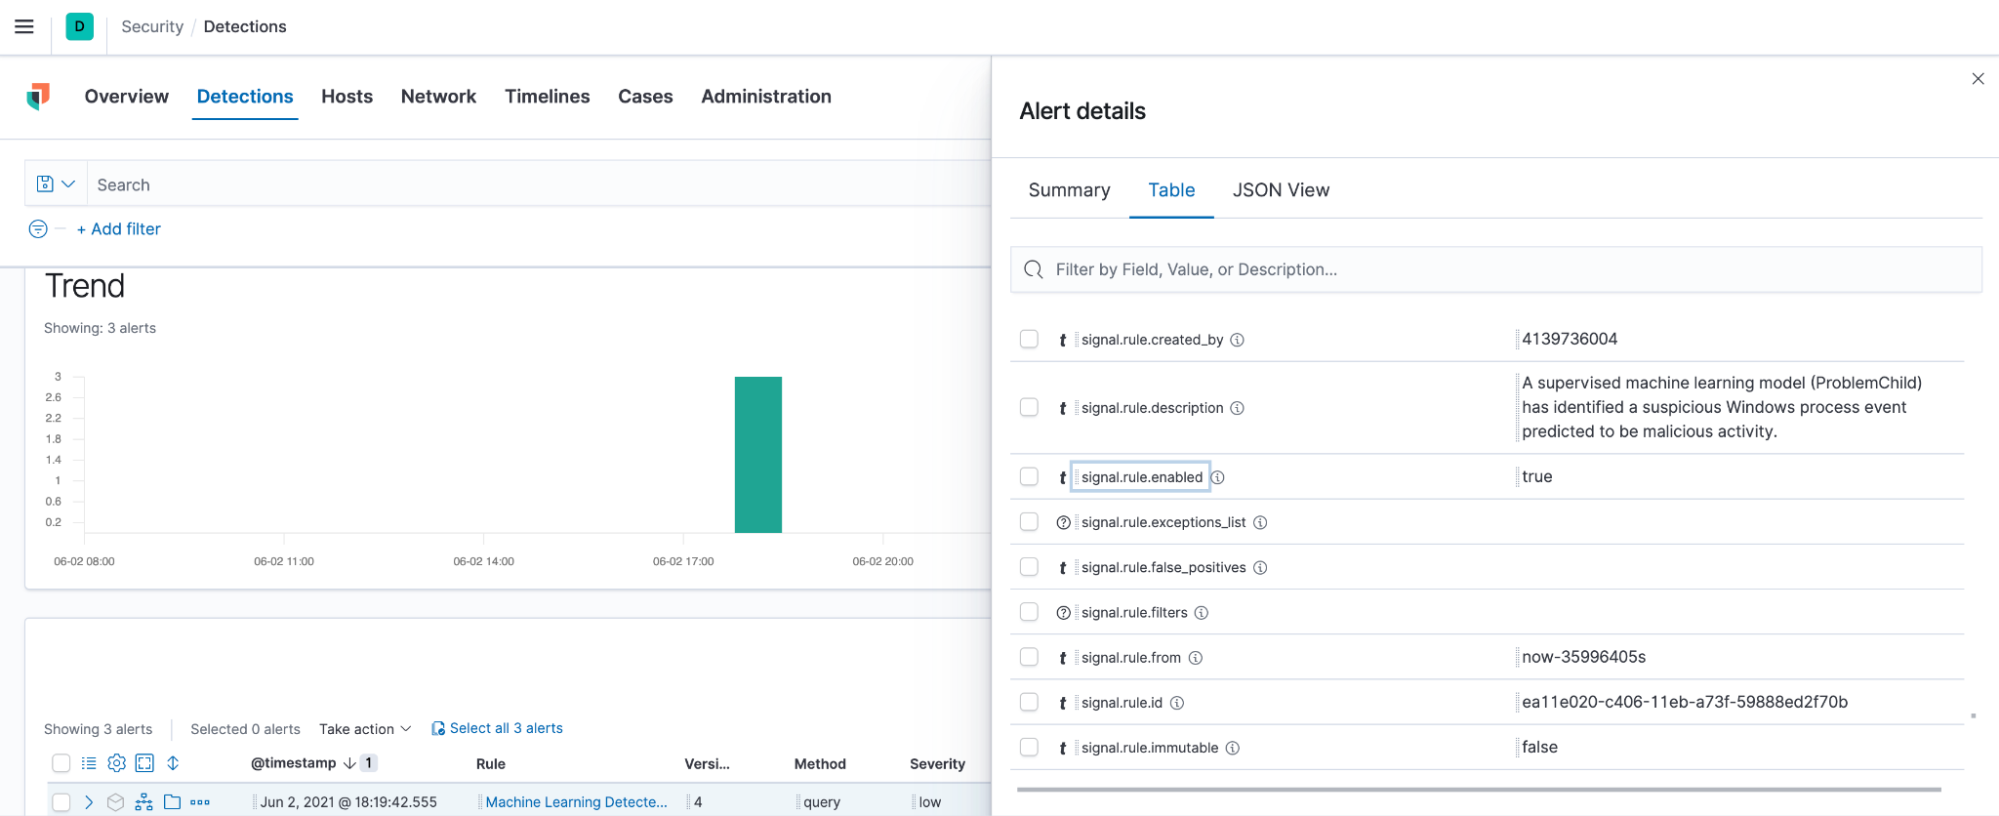
You should then see alerts appear as rules are triggered by incoming documents. Once you have the alerts, you can use other features like Timelines in the Security App to start an attack investigation.
Tips for choosing the right configuration for your environment
The supervised ML component of ProblemChild is trained to predict a value of 1 (malicious) on processes or command line arguments that can be used for LOtL attacks. This does not mean that everything that the supervised model predicts with a value 1 indicates LOtL activity. The prediction value of 1 should be interpreted more as “this could be potentially malicious,” instead of “this is definitely LOtL activity.”
The real beauty of ProblemChild is in the anomaly detection, wherein it surfaces rare parent-child process relationships from among the events the supervised model marked as suspicious. This not only helps in reducing the number of false positives, but also helps security analysts focus on a smaller, more targeted list for triage.
You could of course start with the search rules, which will alert directly on the results of the supervised model. If the number of alerts from these rules is manageable and you have the time and resources to drill into these alerts, you might not need to enable the anomaly detection jobs. However, if you then notice that these rules are producing too many alerts (which is usually the case in most large organizations), you may benefit from enabling the anomaly detection jobs and their corresponding rules.
Get in touch with us
We’d love for you to try out ProblemChild and give us feedback as we work on adding new capabilities to it. If you run into any issues during the process, please reach out to us on our community Slack channel, discussion forums or even our open detections repository.
You can always experience the latest version of Elasticsearch Service on Elastic Cloud and follow along with this blog to set up the ProblemChild framework in your environment for your Windows process event data. And take advantage of our Quick Start training to set yourself up for success. Happy experimenting!