Configuring a SAML realm for role-based access control in ECE
Elastic Cloud Enterprise (ECE) makes it easy to manage your Elastic Stack deployments, just like role-based access control (RBAC) makes it easy to manage your users. Combining the two can really make an administrator's life much simpler.
The intent of this blog post is to provide instructions for configuring a SAML realm for RBAC in ECE environments where Auth0 is used as an identity provider (IdP). We will set up a basic configuration that can be used as a baseline for more advanced configurations tuned for your specific use case. Additional configuration options that are not discussed in this blog post are available in the ECE SAML providers documentation, which was used to generate required information discussed in prerequisites.
Prerequisites
- Elastic Cloud Enterprise (ECE) version 2.3+ (v2.5 is used for this blog)
- Auth0 account (the free version is used in this blog)
Configuration
For the ECE-related portion of SAML configuration, FQDN and port are environment-dependent, while trailing /api/v1/users/auth/saml/_callback in ECE ACS URL and trailing /api/v1/users/auth/_logout in ECE Logout URL are not. For the purposes of this blog, the following configuration was used:
- ECE URL: https://ece.elastic.lab:12443
- ECE ACS URL: https://ece.elastic.lab:12443/api/v1/users/auth/saml/_callback
- ECE Logout URL: https://ece.elastic.lab:12443/api/v1/users/auth/_logout
- ECE service provider entity ID: https://ece.elastic.lab:12443
- Auth0 identity provider entity ID: urn:ece-lab.eu.auth0.com
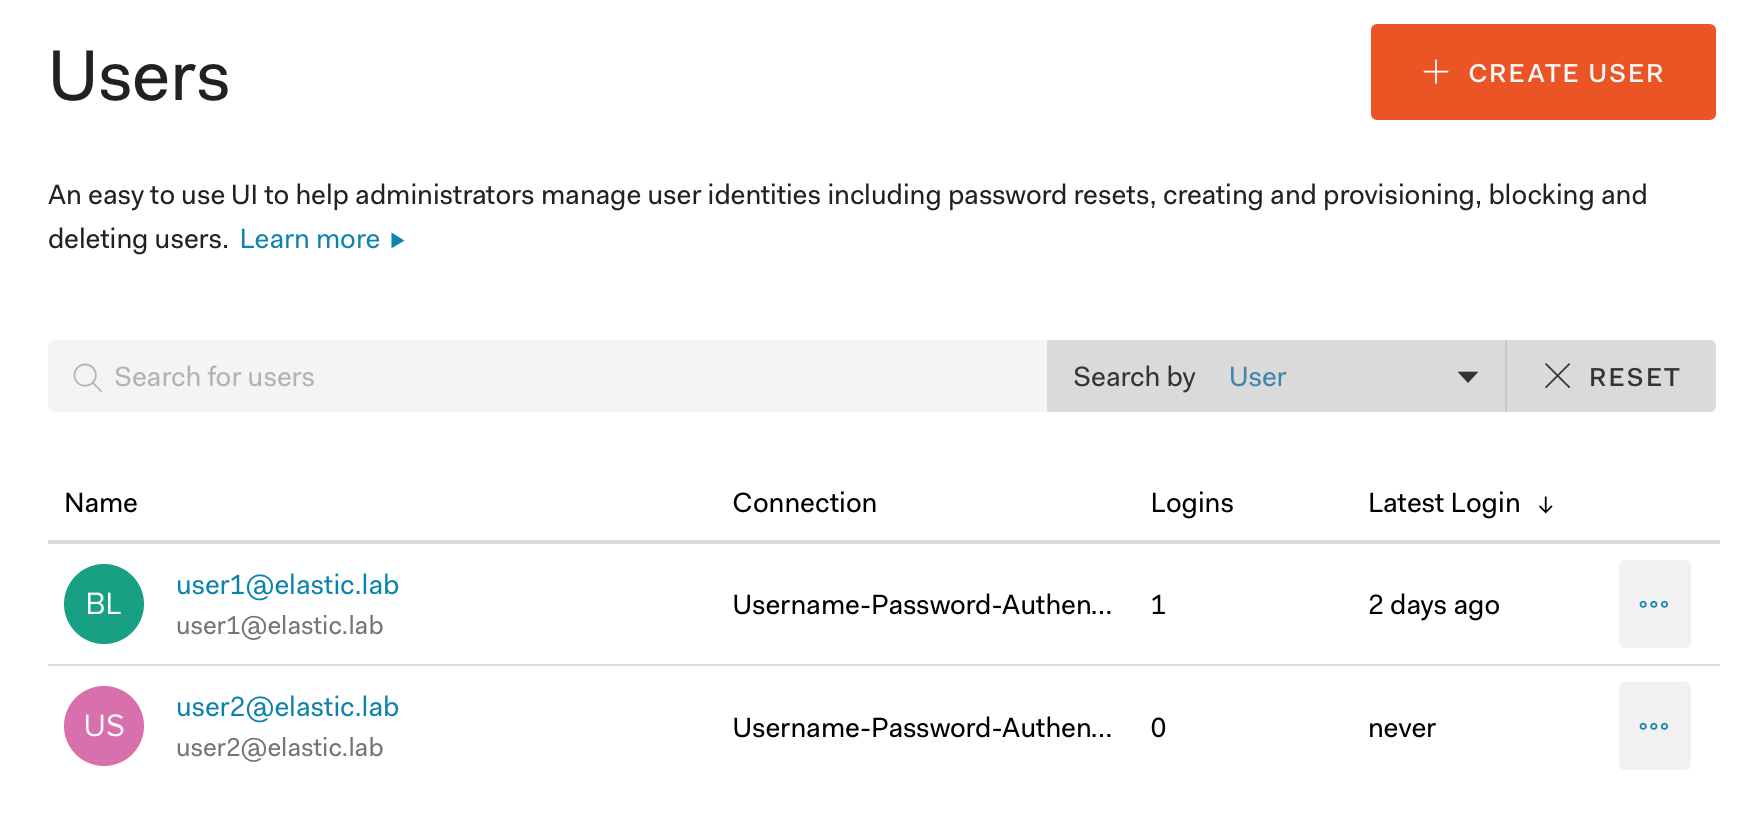
- Auth0 users:
- User 1: user1@elastic.lab
- User 2: user2@elastic.lab
Create a new application in Auth0
Before we can configure the SAML realm in ECE, we need to retrieve information about the metadata download URL and identity provider ID from Auth0. This information is specific to the application created in Auth0, so we need to create one for our ECE deployment.
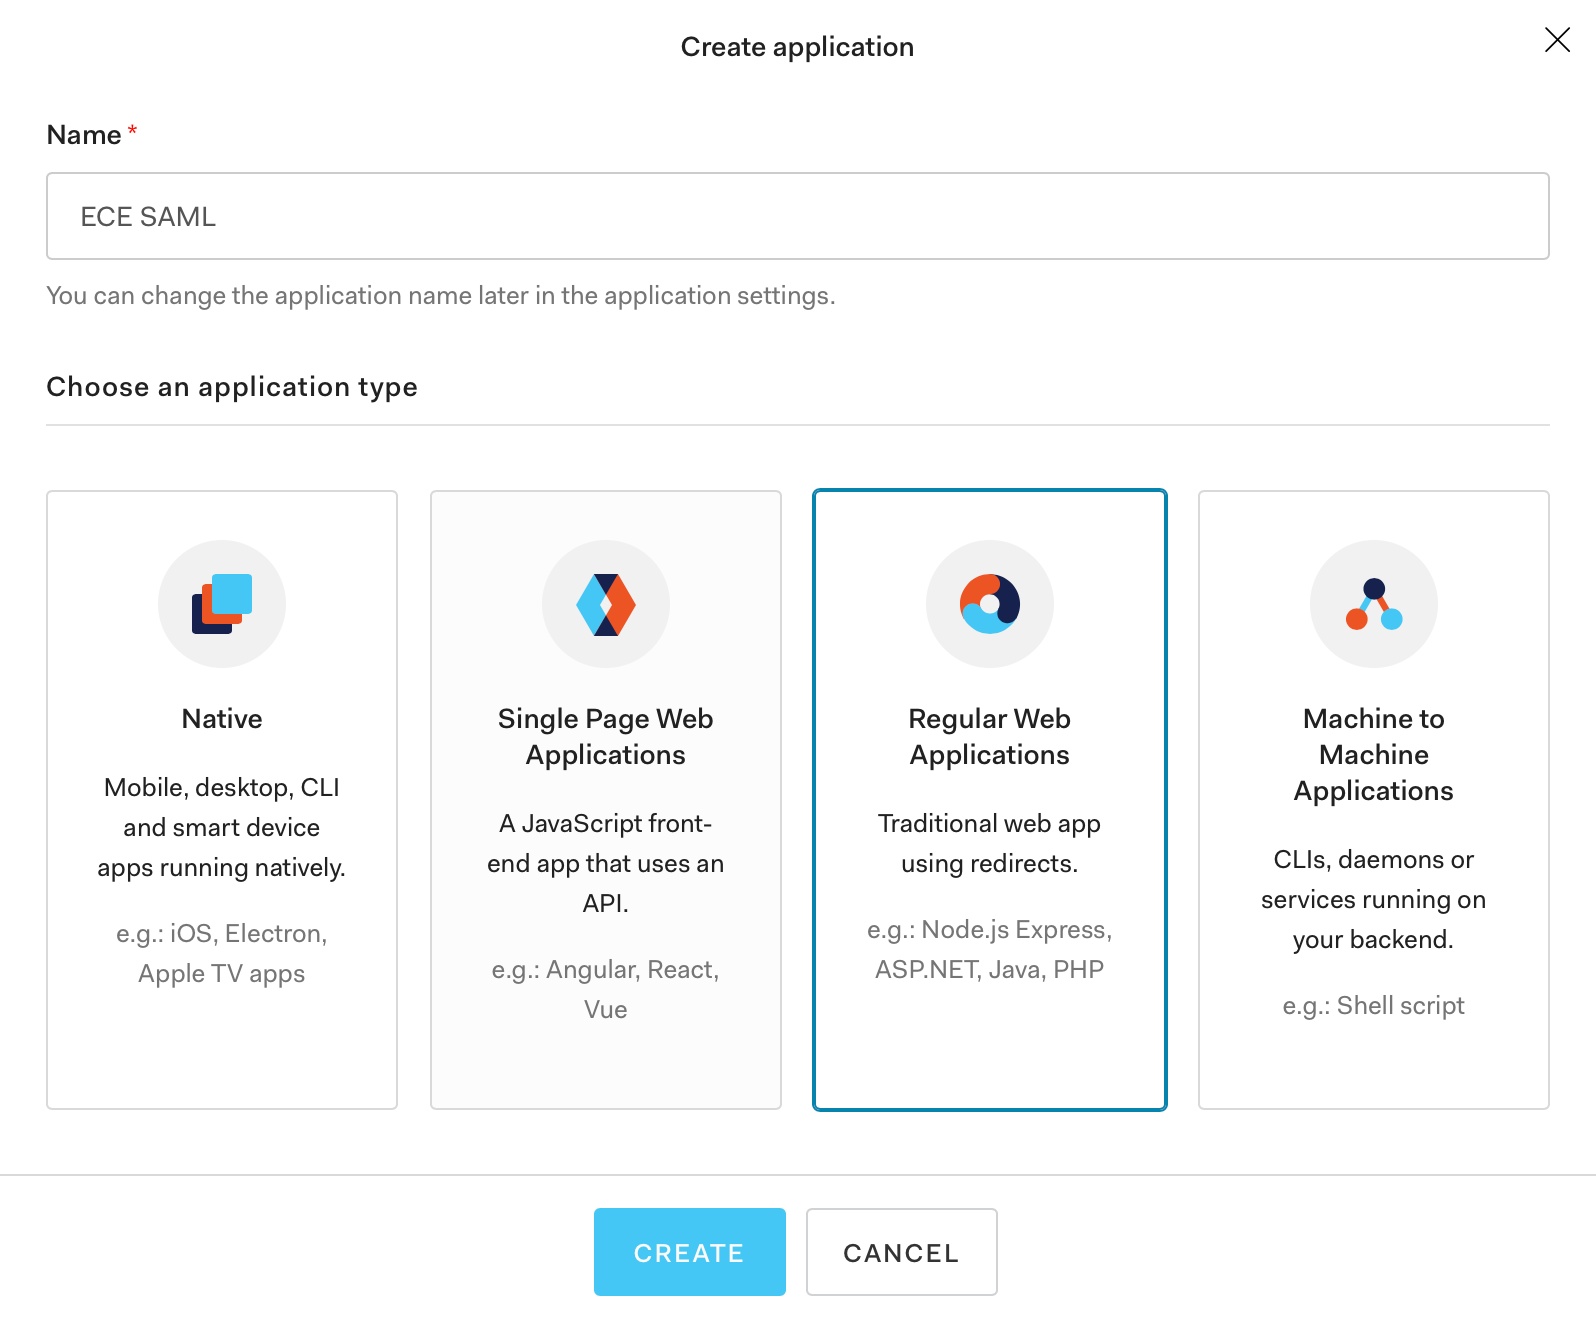
Step 1: Navigate to Applications and click on Create Application.

Step 2: Enter a name for the new application (ECE SAML in this example), select Regular Web Applications, and click Create.
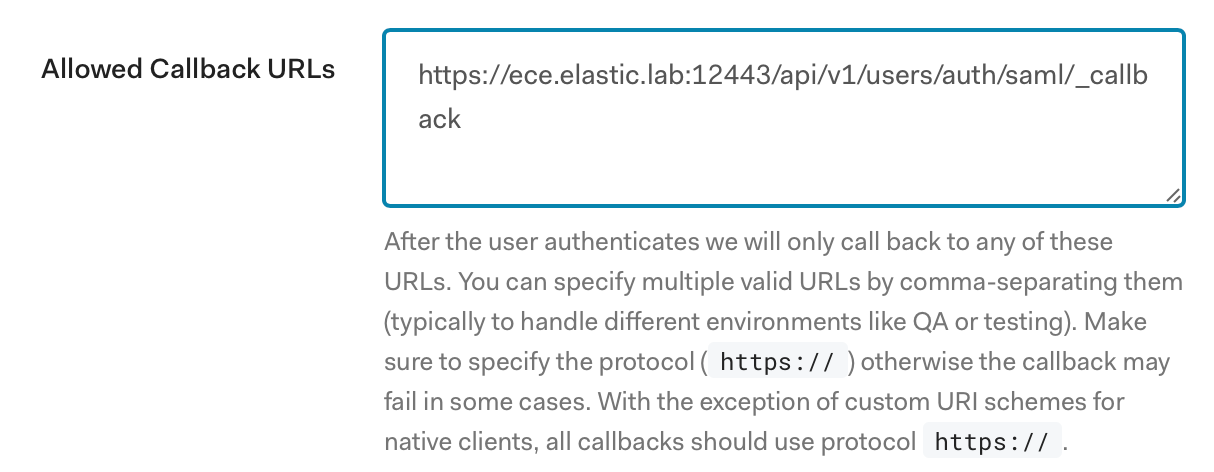
Step 3: A new frame will open; click on Settings and scroll down to Application URIs. Enter a value in Allowed Callback URLs that matches the one for your ECE deployment.
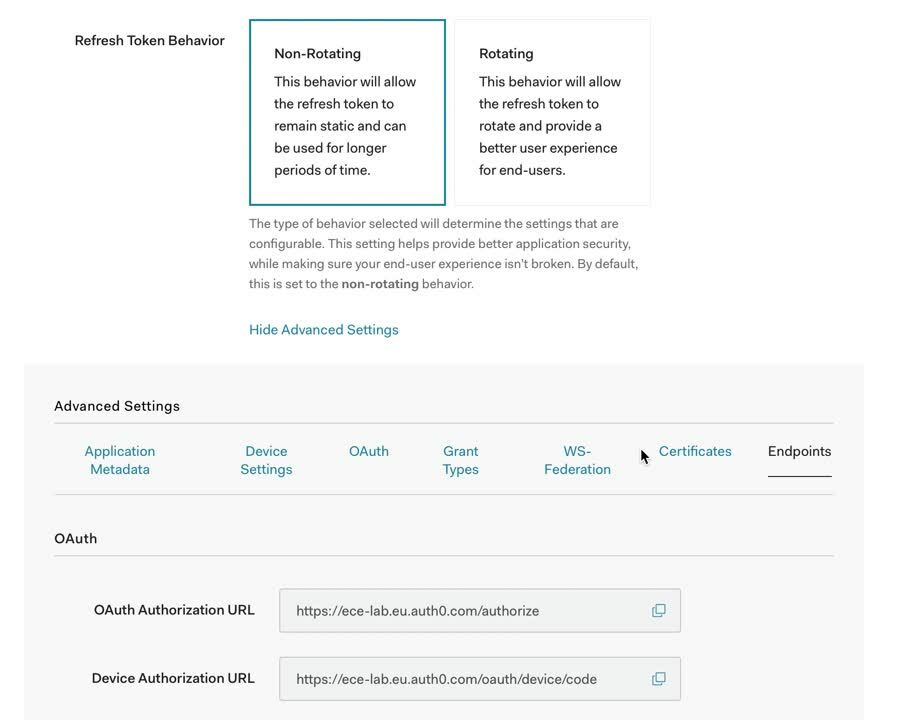
Step 4: Navigate to the bottom of the page and click on Show advanced settings, then select Endpoints and copy the SAML Metadata URL from the SAML frame:
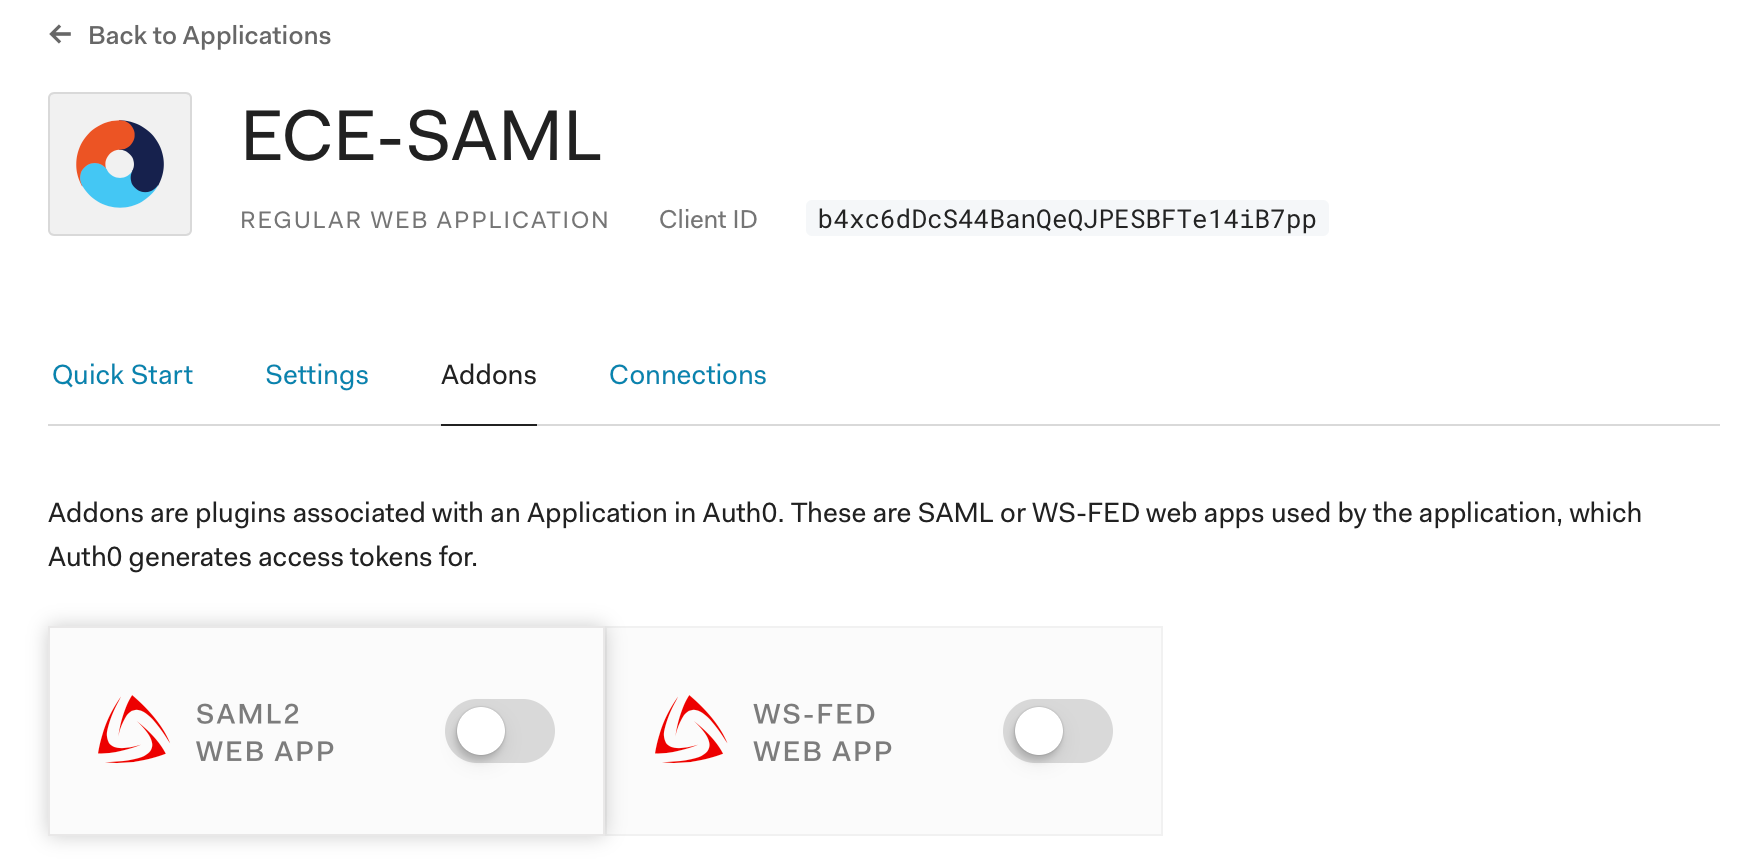
Step 5: Enable Auth0’s SAML2 addon and configure it. To enable the addon, navigate to Addons and change the switch on the SAML 2 Web App tile:
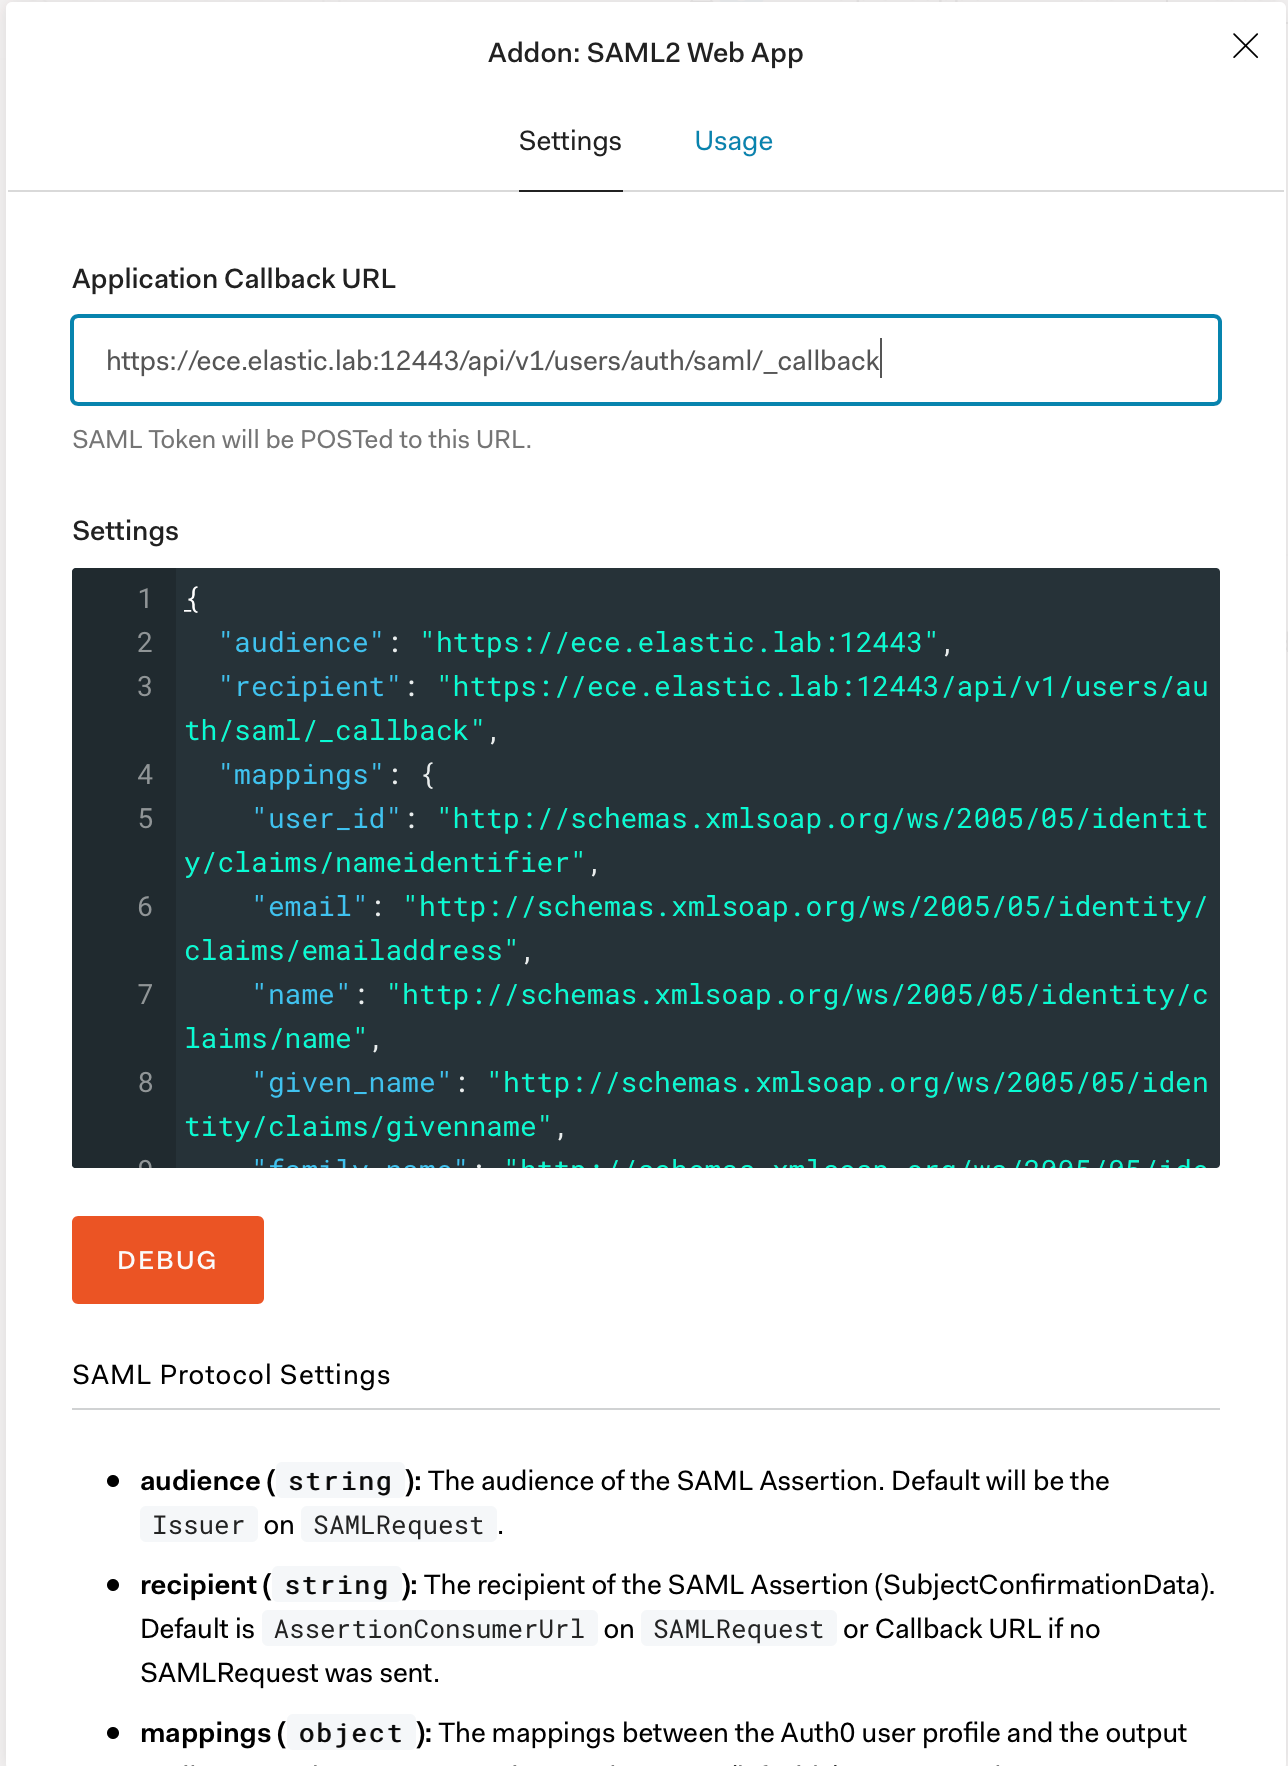
Step 6: A new window will open where we need to configure the addon. We first need to add an application callback URL, which in our case is: https://ece.elastic.lab:12443/api/v1/users/auth/saml/_callback.
Then we need to copy the contents of the Settings frame to a text editor, modify it, and copy it back. For the purposes of this blog we are only changing:
- audience: The ECE Service Provider SAML Entity ID
- recipient: The ECE Service Provider SAML Assertion Consumer URL
- destination: The ECE Service Provider SAML Assertion Consumer URL
- logout callback: The ECE Service Provider SAML Single Logout URL
- nameIdentifierFormat: The NameID format that Auth0 will use, we select persistent here
- binding: The binding that Auth0 will use for Logout Request messages
- signResponse: Setting this to true instructs Auth0 to sign the whole SAML Response instead of just the SAML Assertion, which is a security best practice.
The configuration should match the Elasticsearch requirements as explained in the IdP documentation. Here is the example configuration we’ll use:
{
  "audience": "https://ece.elastic.lab:12443",
  "recipient": "https://ece.elastic.lab:12443/api/v1/users/auth/saml/_callback",
   "destination": "https://ece.elastic.lab:12443/api/v1/users/auth/saml/_callback",
  "signResponse": true,
  "typedAttributes": true,
   "nameIdentifierFormat": "urn:oasis:names:tc:SAML:2.0:nameid-format:persistent",
  "logout": {
    "callback": "https://ece.elastic.lab:12443/api/v1/users/auth/_logout",
    "slo_enabled": true
  },
  "binding": "urn:oasis:names:tc:SAML:2.0:bindings:HTTP-Redirect"
}
Once the settings configuration is updated we copy it back in the settings frame in the addon configuration page and click on Enable.
This concludes the Auth0 configuration and the majority of the heavy lifting is done. The only remaining thing is to configure a SAML provider in ECE, which is pretty straightforward.
Configuring the SAML realm in ECE
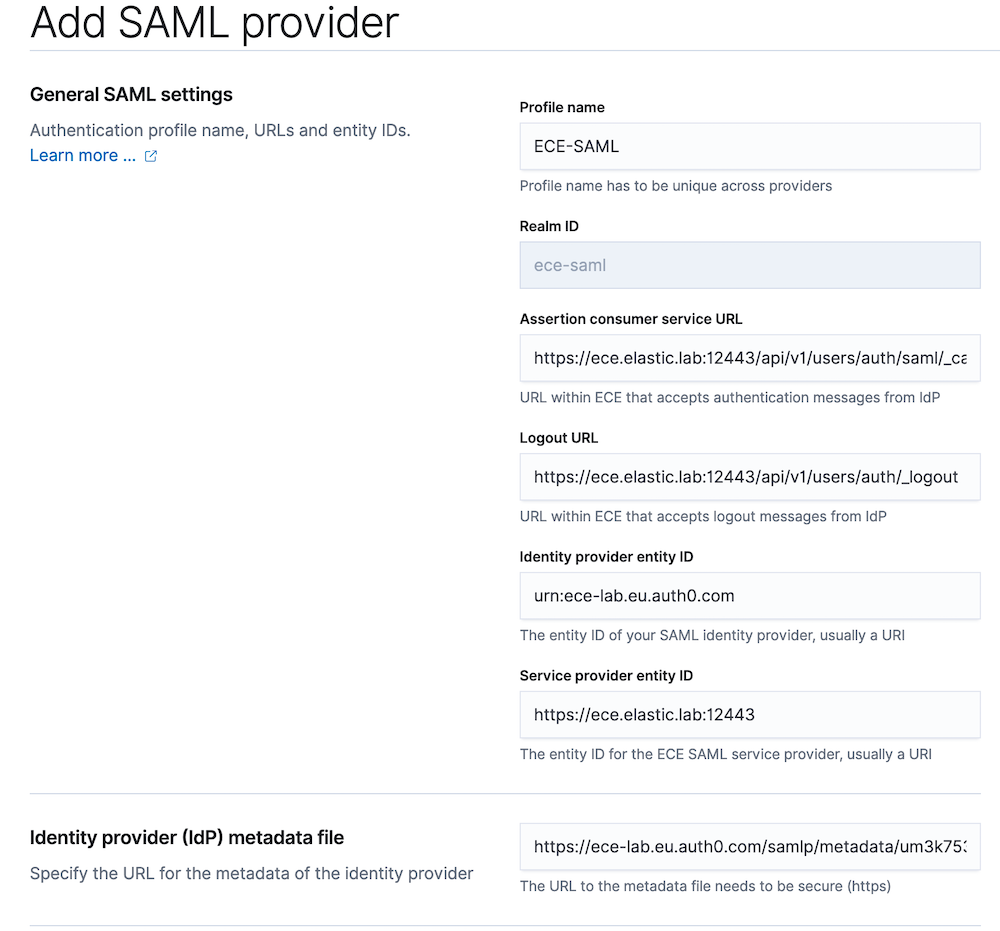
Step 1: To configure the SAML realm for RBAC in ECE, you will first open the Users UI in the main ECE UI, then select Authentication Providers and click on Add provider. A dropdown window will appear where we select SAML:

Step 2: A new page will open where we need to enter information. We will first add the profile name for the new provider which in this example we call “ECE-SAML.” After that we enter the following information:
- ECE SAML service provider Assertion Consumer Service URL
- ECE SAML service provider Logout URL
- SAML identity provider entity ID
- ECE SAML service provider entity ID
- SAML identity provider metadata URL
We discussed those in prerequisites, so we can just copy them in:
- Profile name: ECE-SAML
- ECE ACS URL: https://ece.elastic.lab:12443/api/v1/users/auth/saml/_callback
- ECE Logout URL: https://ece.elastic.lab:12443/api/v1/users/auth/_logout
- ECE service provider entity ID: https://ece.elastic.lab:12443
- Identity provider entity ID: urn:ece-lab.eu.auth0.com
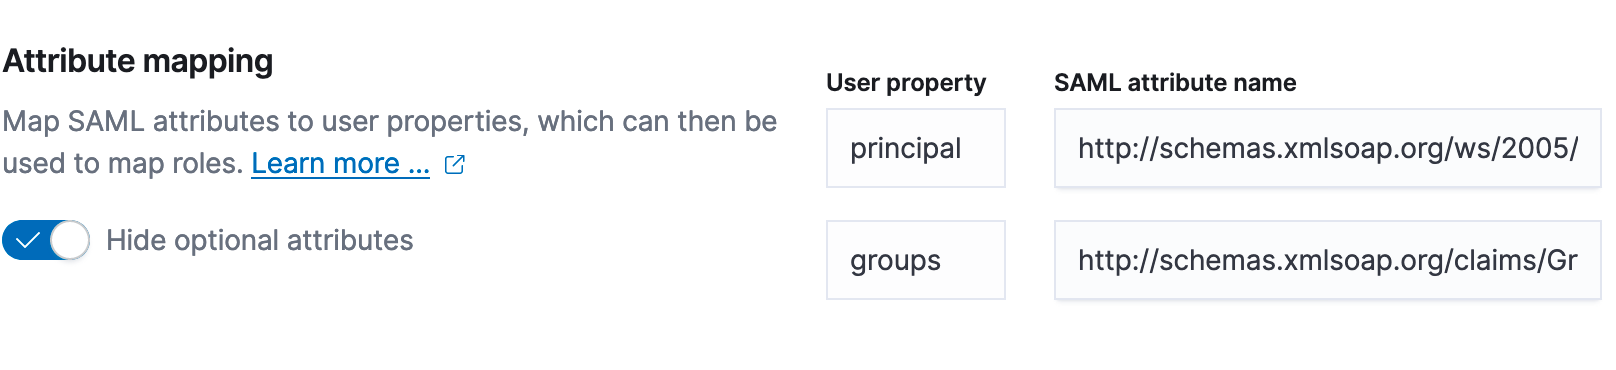
Step 3: Once the basic information is added we need to configure the attribute mapping between SAML attributes and ECE user properties so that it matches the configuration of the IdP. We left this configuration to use the default values when we were configuring Auth0:
 "mappings": {
    "user_id": "http://schemas.xmlsoap.org/ws/2005/05/identity/claims/nameidentifier",
    "email": "http://schemas.xmlsoap.org/ws/2005/05/identity/claims/emailaddress",
    "name": "http://schemas.xmlsoap.org/ws/2005/05/identity/claims/name",
    "given_name": "http://schemas.xmlsoap.org/ws/2005/05/identity/claims/givenname",
    "family_name": "http://schemas.xmlsoap.org/ws/2005/05/identity/claims/surname",
    "upn": "http://schemas.xmlsoap.org/ws/2005/05/identity/claims/upn",
    "groups": "http://schemas.xmlsoap.org/claims/Group"
  },
Based on this, we will use:
- Principal: "http://schemas.xmlsoap.org/ws/2005/05/identity/claims/emailaddress"
- Groups: "http://schemas.xmlsoap.org/claims/Group"
To learn more about user attributes, see the ECE RBAC documentation.
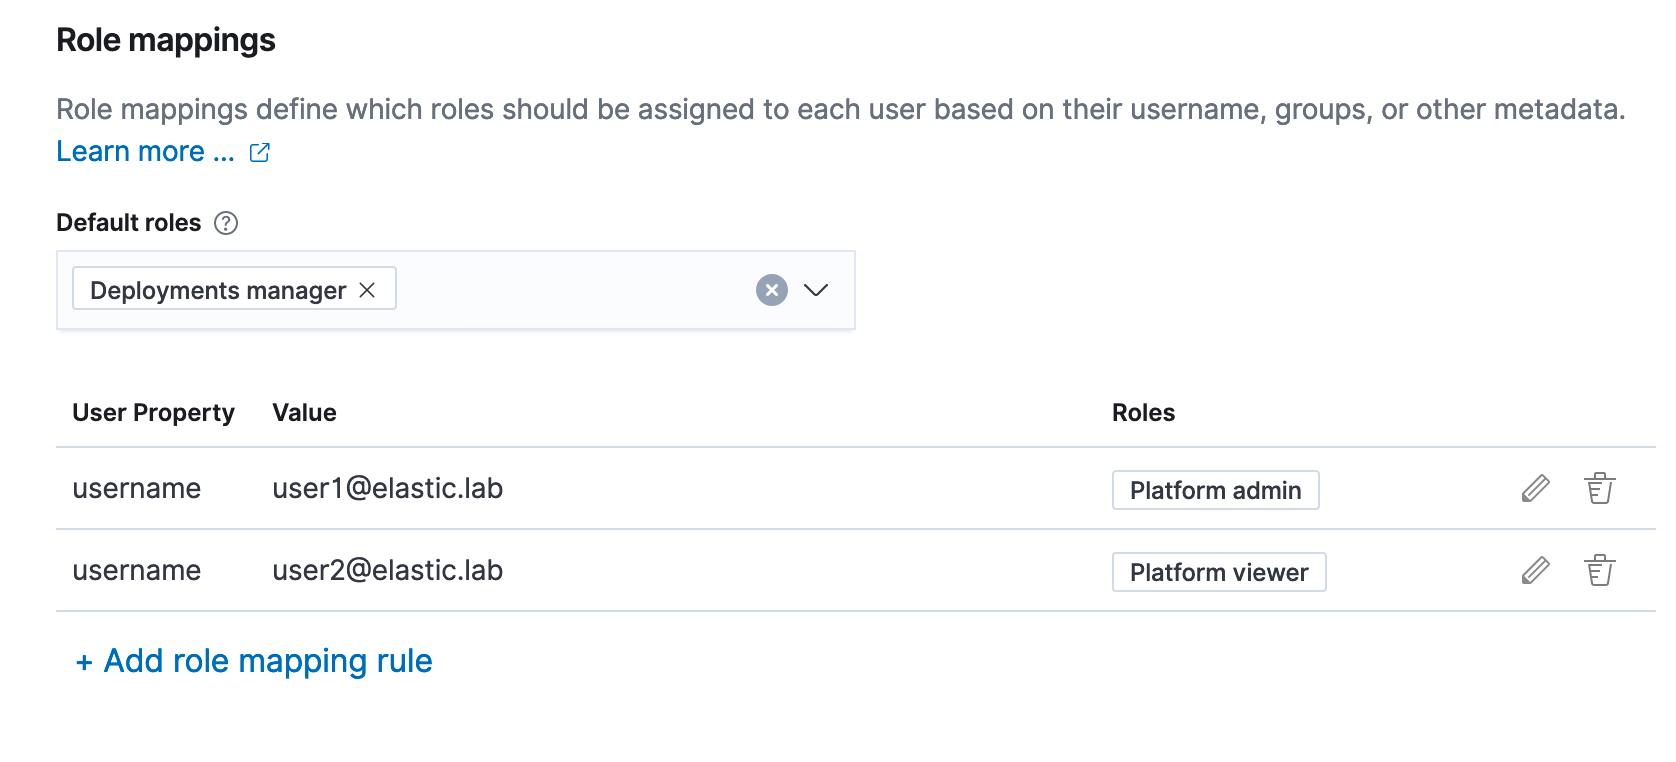
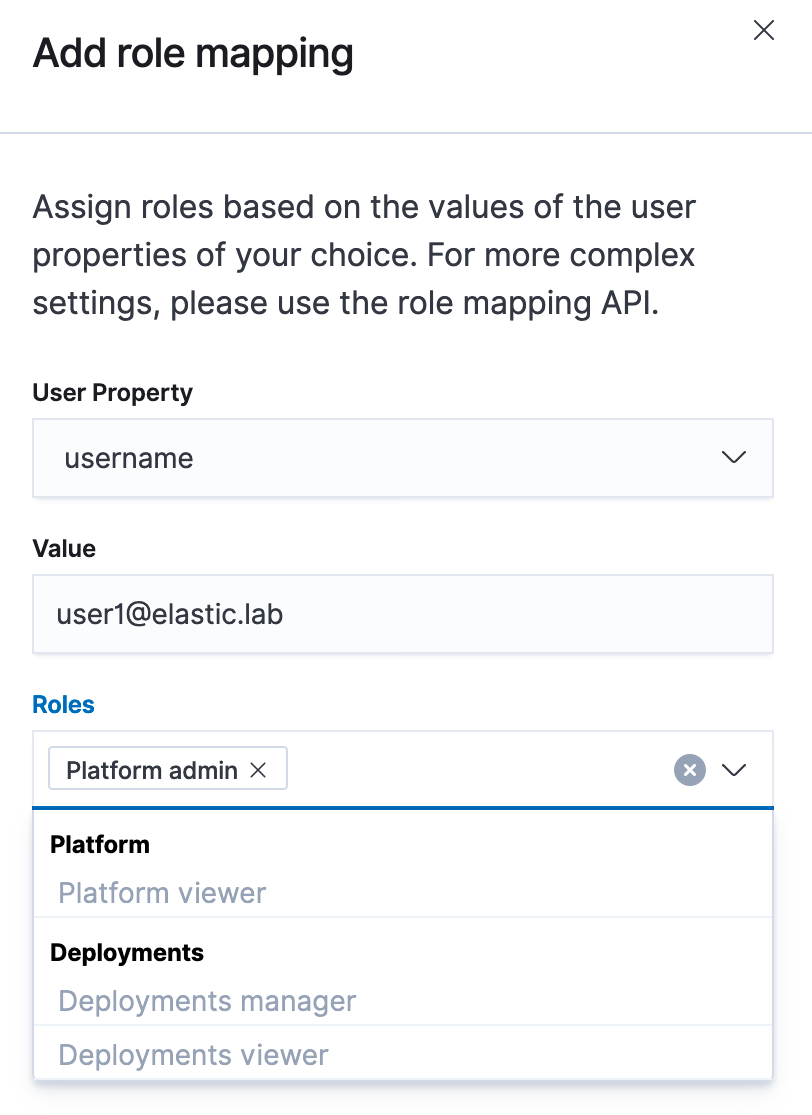
Step 4: The last remaining configuration is role mappings for SAML users. ECE has four different levels of access:
- Platform admin: Same access as the admin system user.
- Platform viewer: Same access as the read-only system user, which includes being able to view secret and sensitive settings.
- Deployment manager: Can create and manage non-system deployments, specify keystore security settings, and establish cross-cluster remote relationships. Can also reset the elastic password.
- Deployment viewer: Can view non-system deployments, including their activity. Can prepare the diagnostic bundle, inspect the files, and download the bundle as a ZIP file.
We will configure all SAML users as Deployment viewer (default role) and then add two additional mappings for user1@elastic.lab - Platform admin and user2@elastic.lab - Platform viewer:
Adding a role mapping:
Once this is done, all that we need to do is click on Create profile and configuration will take place. This will take some time, as it is effectively changing the configuration of the security-cluster system-owned deployment.
Try it out
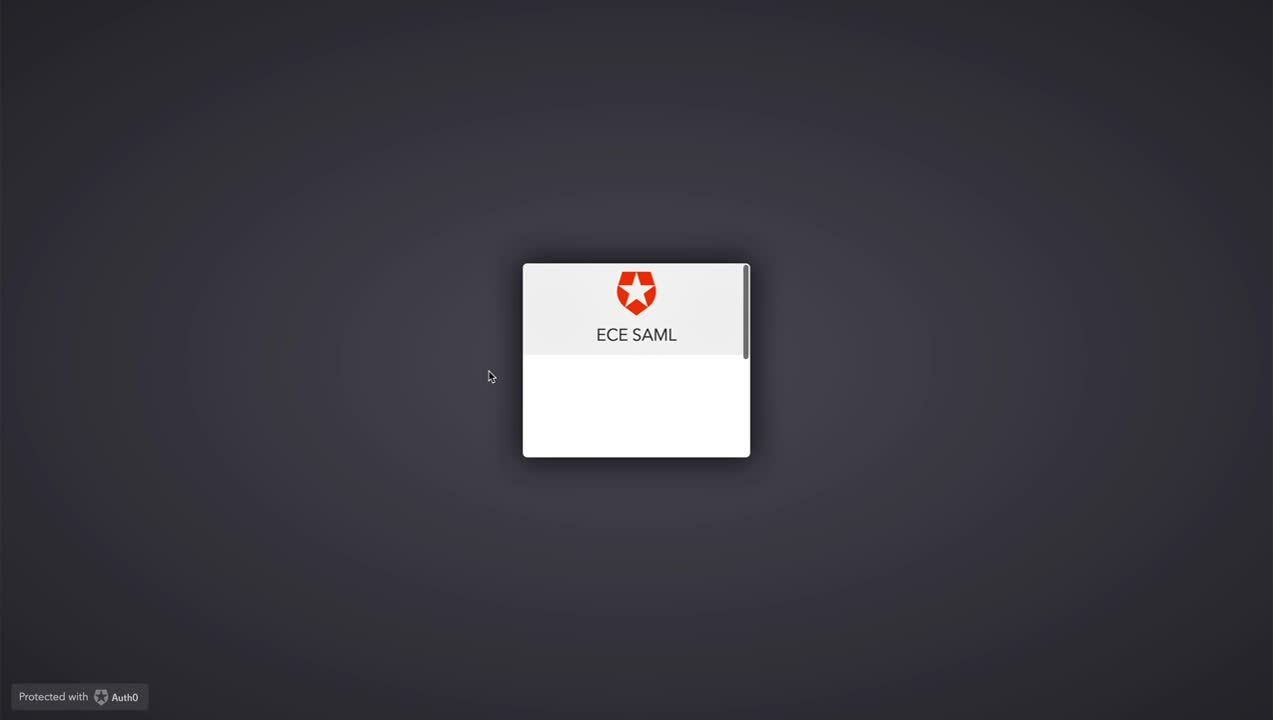
After the configuration is done, we can log out of the ECE UI. The login screen will change, and instead of a username and password form, there will be a new Log in with ECE-SAML button. After clicking it, we will be redirected to the Auth0 login page and if we enter correct credentials we will be logged into ECE with SAML credentials.
Troubleshooting
SAML authentication for ECE consists of many different components, so a good troubleshooting plan enables us to resolve issues quickly. In ECE, SAML authentication is handled by the security cluster that ships logs into the logging and metrics cluster, where they can be reviewed. By default, level of SAML logging is set to info, and sometimes we will need to increase the logging level, which can be done by configuring the following cluster setting on the security cluster:
PUT /_cluster/settings
{
  "transient": {
    "logger.org.elasticsearch.xpack.security.authc.saml": "trace"
  }
}
Please note that this will provide a large number of logs, which can lead to disk space problems, so once a couple of SAML events are captured, logging should be reverted back to normal. Once you have some logs to look at, the common SAML issues documentation page might come in handy.
Final thoughts
In this blog we discussed how to configure SAML for ECE RBAC functionality in order to log in to your ECE platform using an external identity provider. If you would like, you can also add SAML authentication to your ECE deployments. More information on how to configure SAML authentication for deployment can be found on this documentation page.