Demystifying authentication and authorization in Elasticsearch
I’ve been with Elastic for more than 4 years — 3.5 of those years working in support and consulting and the last half year in sales. Regardless of the department I’m in, the most common questions I’ve gotten from users are about securing Elasticsearch. What type of authentication does Elasticsearch support? How do I set it up? How can I make sure users don’t see data they’re not supposed to? My goal for this blog is to answer those questions, as well as provide some guidance for resolving some common issues while configuring security.
First, some history. If you’ve been using Elasticsearch for a while, you’ll know that security was once provided by a plugin called Shield that was offered through X-Pack. Nowadays, that security functionality has been moved into the Elastic Stack (along with the rest of X-Pack), with the most commonly used features available free with the default distribution. Security includes encrypted communication (TLS/SSL), authentication (native, LDAP, SSO, etc), authorization (RBAC, ABAC, etc.), IP filtering, audit logging, and much more. The focus of this blog will be on the two “auths”.
Authentication in Elasticsearch
Simply put, if a user or API wants to access Elasticsearch, it needs to be authenticated.
Elasticsearch supports various security methods natively, such as:
- Native user authentication
- Active Directory user authentication
- File-based user authentication
- LDAP user authentication
- PKI user authentication
- SAML authentication
- Kerberos authentication
You can even create your own integration if one of these doesn’t apply to you. However, we typically recommend that you use one of the existing integrations, as they are validated and we keep developing with them to ensure proper support.
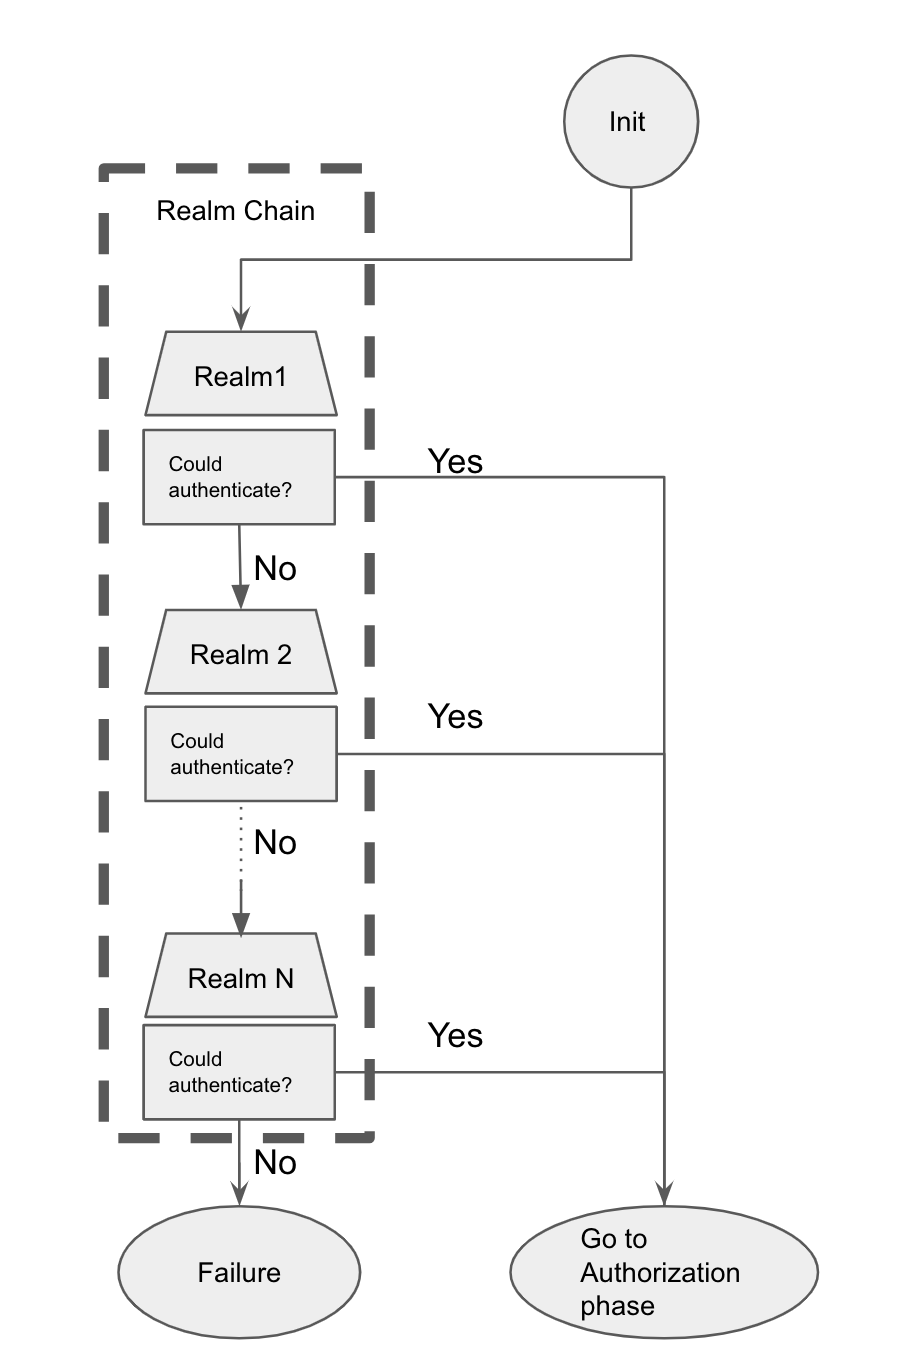
The most basic component of security within the Elasticsearch is a realm, which is what resolves and authenticates users. Each of the above listed authentication methods would be considered a realm. And in order to function, Elasticsearch works with a realm chain. A realm chain is a prioritized list of configured realms (from 1 to N realms) in ascending order of preference. When a user tries to access Elasticsearch, the request will step through the list sequentially until authentication succeeds or it runs out of realms to try.
Essentially, the process will try the first realm configured in the list and, if it fails, it will continue with the next until either succeeding with one of the realm items or running exhaustively through the entire list. This first step into accessing Elasticsearch is called authentication.
Once a user is authenticated, Elasticsearch will then attempt to assign one or more roles to them. Roles can be assigned to users statically or dynamically during authentication, based on some of the user properties. Depending on the realm type that authenticated the user, the user properties used to assign a role can be the group membership they have in an external system, or the suffix of their username in Elasticsearch, etc. Additionally, Elasticsearch also features run as functionality, which allows users to submit requests on behalf of other users without requiring re-authentication.
With the authentication phase complete, the next step is authorization.You can check the entire workflow in the following chart:
Authorization in Elasticsearch
Once authentication is successful, the user will be moved onto the second security checkpoint: authorization. Authorization is the process of determining whether the user is allowed to execute a request, and it is done through mapping users to predefined and/or user-defined roles. There are roles that come by default with Elasticsearch, but you can also create specific roles for your use case.
A role is comprised of:
- A list of users that can access
- Cluster privileges
- Global privileges
- Indices privileges
- Application privileges
In this second phase, Elasticsearch will be using one of the following:
- The role_mapping API, which is the preferred method because you can manage each role’s mapping in an API-driven and centralized way. This is the only way to configure role mappings in Elasticsearch Service on Elastic Cloud.
- The role-mapping file (role_mapping.yml) that exists in each node inside the configuration folder
The role_mapping API needs to be invoked by a user with appropriate rights to manage roles. The superuser role that the Elastic user has is an example of it — however, you can create a specific role for this, too.
Realms and roles are completely different by definition. Realms and realm chains are what we use to get authenticated, and after the authentication phase we end up using roles to map to users. While a user will be only authenticated using a single realm from the realm chain, in the second phase the user can be mapped from 1 to many roles. This is also known as role-based access control.
Troubleshooting steps for authentication and authorization issues
Now that we’ve gone over the basics behind authentication and authorization, let’s take a look at some of the troubleshooting steps you can take if you run into any issues.
401 Unauthorized
If you can’t be authenticated using any of the realms, you will get a response with 401 Unauthorized status code. The easiest way to try your credentials against the list of configured realms is to use cURL with a flag that allows inspection (for example, -v). You may get a response like the following:
curl https://xxxxxx:9200 -u test:test -v
> User-Agent: curl/7.54.0
> Accept: */*
>
< HTTP/1.1 401 Unauthorized
< Content-Type: application/json; charset=UTF-8
< Date: Tue, 10 Sep 2019 15:59:33 GMT
< Www-Authenticate: Bearer realm="security"
< Www-Authenticate: ApiKey
< Www-Authenticate: Basic realm="security" charset="UTF-8"
< Content-Length: 455
< Connection: keep-alive
<
* Connection #0 to host 06618318cff64c829af1cd5a2beb91a5.us-east-1.aws.found.io left intact
{"error":{"root_cause":[{"type":"security_exception","reason":"unable to authenticate user [test] for REST request [/]","header":{"WWW-Authenticate":["Bearer realm=\"security\"","ApiKey","Basic realm=\"security\" charset=\"UTF-8\""]}}],"type":"security_exception","reason":"unable to authenticate user [test] for REST request [/]","header":{"WWW-Authenticate":["Bearer realm=\"security\"","ApiKey","Basic realm=\"security\" charset=\"UTF-8\""]}},"status":401}%
This error message can help you get to the root cause of your issue. For example, there are specific realms such as SAML that require Kibana or a custom web application to do the interaction with Elasticsearch and the Identity Provider.
Enabling error logging
After setting up the realms, realm chain, roles, and role mapping, if you still have issues, you can easily configure some extra logging to get further information around the process of authentication and authorization that we covered previously.
Using the logging configuration within the cluster settings API, you can define any level of logging for any of the realms.
Let's take a look at an example with the LDAP realm. If the user authentication or authorization is failing, you can set up the following logging level to get more information about it:
PUT /_cluster/settings
{
  "transient": {
     "logger.org.elasticsearch.xpack.security.authc.ldap":"DEBUG",
     "logger.org.elasticsearch.xpack.security.authz":"DEBUG"
   }
}
This will increase the logging level for the LDAP package from default to DEBUG. You can also enable TRACE logging to get even more information such as every LDAP call done to the server and the response from it. You can find the package name for enabling on each specific REALM using our GitHub repository. For example, here is the code for the LDAP realm. Using the first line of code you can see the package to be used for the logging level:
package org.elasticsearch.xpack.security.authc.ldap;
Once this is enabled, you will get a lot of log lines, such as the following example:
[2019-09-12T08:41:20,628][DEBUG][o.e.x.s.a.l.LdapRealm   ] [xxxxxxx] user not found in cache, proceeding with normal authentication
[2019-09-12T08:41:21,180][TRACE][o.e.x.s.a.l.s.LdapUtils ] LDAP Search SearchRequest(baseDN='dc=xxx,dc=xxxx,dc=domain,dc=com', scope=SUB, deref=NEVER, sizeLimit=0, timeLimit=5, filter='(cn=vchatzig)', attrs={1.1}) => SearchResult(resultCode=0 (success), messageID=2, entriesReturned=1, referencesReturned=0) ([SearchResultEntry(dn='cn=xxxxxxx,ou=xxxxx,dc=intc,dc=xxxx,dc=domain,dc=com', messageID=2, attributes={}, controls={})])
Here we can see the LDAP realm trying to get the user from the cache (which could be out of date), and then doing the LDAP Search request to the server using the specific configurations we have provided. This is just an example of many log lines you will get.
|
Note: Enabling logging is great for diagnostics, but not for performance. We recommend setting the logging level back to its default value once you know everything is working, using the following: PUT /_cluster/settings
{
"transient": {
"logger.org.elasticsearch.xpack.security.authc.ldap": null,
"logger.org.elasticsearch.xpack.security.authz": null
}
}
|
Please note that some of these packages could change across versions, so we recommend that you double-check the documentation links for your specific Elasticsearch version you are using, along with the GitHub classes links for that specific release.
Common SAML issues
The SAML realm requires an Identity Provider (such as Okta or Auth0) and a web application (Kibana is the default) that, together with Elasticsearch, acts as the Service Provider. Some of the issues we commonly see are:
- Incorrect Assertion Consumer Service URL setting in the Identity Provider (IdP) configuration. The endpoint that you usually need to configure at the Identity Provider is https://kibana.xxxx.com/api/security/v1/saml
- The metadata of the Identity Provider is not accessible through internet. The value of idp.metadata.path configuration in Elasticsearch either on-premise or in Elastic Cloud should be accessible through the network where Elasticsearch/Kibana are running. If that’s not the case, you need to download the metadata from a host that can access it, or ask an IdP administrator for the metadata and add it as a local file in Elasticsearch and reference it. The error shown will be similar to the following:
Caused by: net.shibboleth.utilities.java.support.resolver.ResolverException: net.shibboleth.utilities.java.support.resolver.ResolverException: Non-ok status code 404 returned from remote metadata source https://xxxx.xxxx/xxx/yyyyyyyy/sso/saml/metadata - You can get authenticated but the user is unable to open Kibana. For this we usually recommend double-checking the role mappings for the users to verify that at least one of their roles has access to Kibana.
The Identity Provider configuration is as important as the Elasticsearch/Kibana configuration, and we should always look for typos and mismatches between the expected and configured settings. Although each specific IdP has his own settings, we recommend to take a closer look at the documentation for each specific setting needed.
For more common issues and troubleshooting steps for SAML you can visit our troubleshooting documentation that is maintained with each release.
Wrapping up
Authentication in Elasticsearch is a very easy thing to set up once we understand all the concepts behind it. Also, getting an understanding around what things are working, what are not, and why can sometimes be hard but in this post we covered many options to gain a closer look. You can use our documentation to get started with security in Elasticsearch, or use our troubleshooting guide for security in our documentation. Check out our Senior Product Manager for Elastic Security explaining in detail the getting started experience.
We also recommend double-checking our Subscriptions page to learn more around features included in each level. Finally, if you have any specific questions you can reach out to your Support rep or use our Discuss forums.
Happy security!