Automatic Import
Automatic Import parses, ingests, and maps data to ECS for sources that don’t yet have prebuilt Elastic integrations. It works with Elastic Security, Observability, and other solutions that rely on Elastic Agent and integrations. This lets you onboard custom or niche data sources without building a full integration manually.
Automatic Import uses a large language model (LLM) with specialized instructions to analyze source data and generate a custom integration.
Elastic integrations, including those created by Automatic Import, normalize data to the Elastic Common Schema (ECS). This standardization provides consistent use across dashboards, search, alerts, and machine learning features.
Refer to prebuilt data integrations for a full list of Elastic’s 400+ integrations.
- A working LLM connector.
- Elastic Stack users: An Enterprise subscription.
- Serverless Elastic Security Serverless projects: the Security Analytics Complete feature tier.
- Serverless Elastic Observability Serverless projects: the Observability Complete feature tier.
- A sample of the data you want to import.
To use Automatic Import, you must provide a sample of the data you want to import. An LLM processes that sample and creates an integration suitable for the data represented by the sample. Automatic Import supports the following sample formats: JSON, NDJSON, CSV, and syslog (structured and unstructured).
You can upload a sample of any size. The LLM detects its format and selects up to 1000 documents for detailed analysis.
NoteThe LLM selects up to 100 documents for detailed analysis, not 1000.
The more variety in your sample, the more accurate the pipeline is. For best results, include a wide range of unique log entries in your sample instead of repeating similar logs.
When you upload a CSV, a header with column names is automatically recognized. If the header is not present, the LLM attempts to create descriptive field names based on field formats and values.
For JSON and NDJSON samples, each object in your sample should represent an event. Avoid deeply nested object structures.
When you select API (CEL input)as one of the sources, you’re prompted to provide the associated OpenAPI specification (OAS) file to generate a CEL program that consumes this API.
CEL generation in Automatic Import is in beta and is subject to change. The design and code is less mature than official GA features and is being provided as-is with no warranties. Beta features are not subject to the support SLA of official GA features.
You can use Automatic Import with any LLM. Model performance varies. Model performance for Automatic Import is similar to model performance for Attack Discovery: models that perform well for Attack Discovery perform well for Automatic Import. Refer to the large language model performance matrix for Elastic Security. For Observability workloads, refer to the LLM performance matrix for Observability.
Using Automatic Import allows users to create new third-party data integrations through the use of third-party generative AI models (“GAI models”). Any third-party GAI models that you choose to use are owned and operated by their respective providers. Elastic does not own or control these third-party GAI models, nor does it influence their design, training, or data-handling practices. Using third-party GAI models with Elastic solutions, and using your data with third-party GAI models is at your discretion. Elastic bears no responsibility or liability for the content, operation, or use of these third-party GAI models, nor for any potential loss or damage arising from their use. Users are advised to exercise caution when using GAI models with personal, sensitive, or confidential information, as data submitted can be used to train the models or for other purposes. Elastic recommends familiarizing yourself with the development practices and terms of use of any third-party GAI models before use. You are responsible for ensuring that your use of Automatic Import complies with the terms and conditions of any third-party platform you connect with.
The integration creation flow changed in Elastic Stack 9.4 to support multiple data streams per integration and a new approve-then-install workflow. Serverless already uses the updated flow.
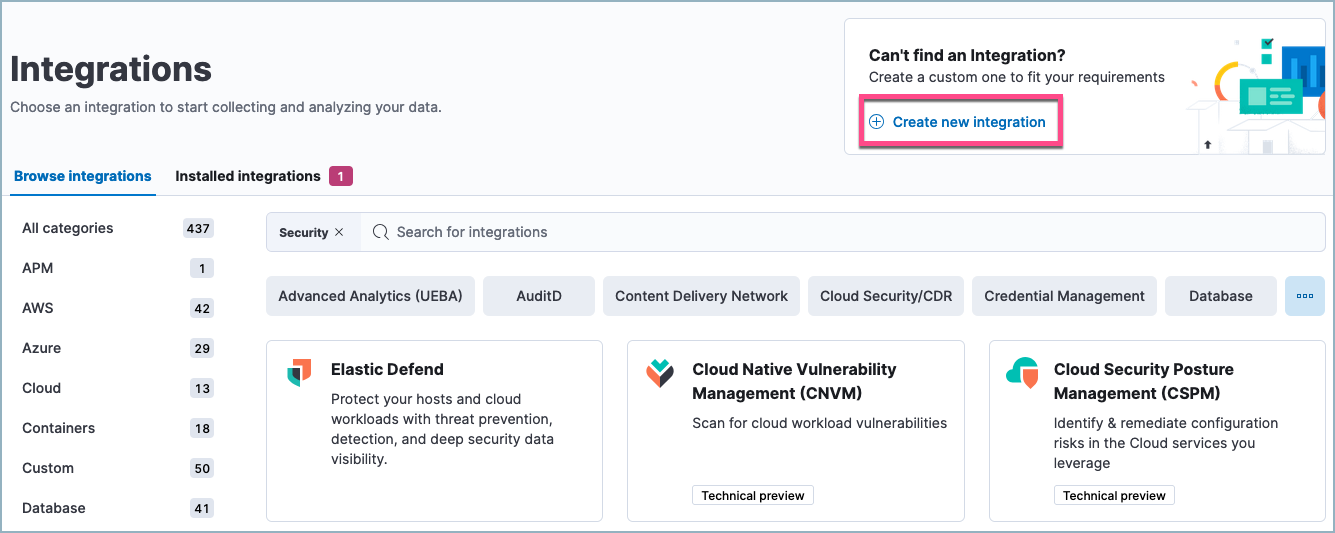
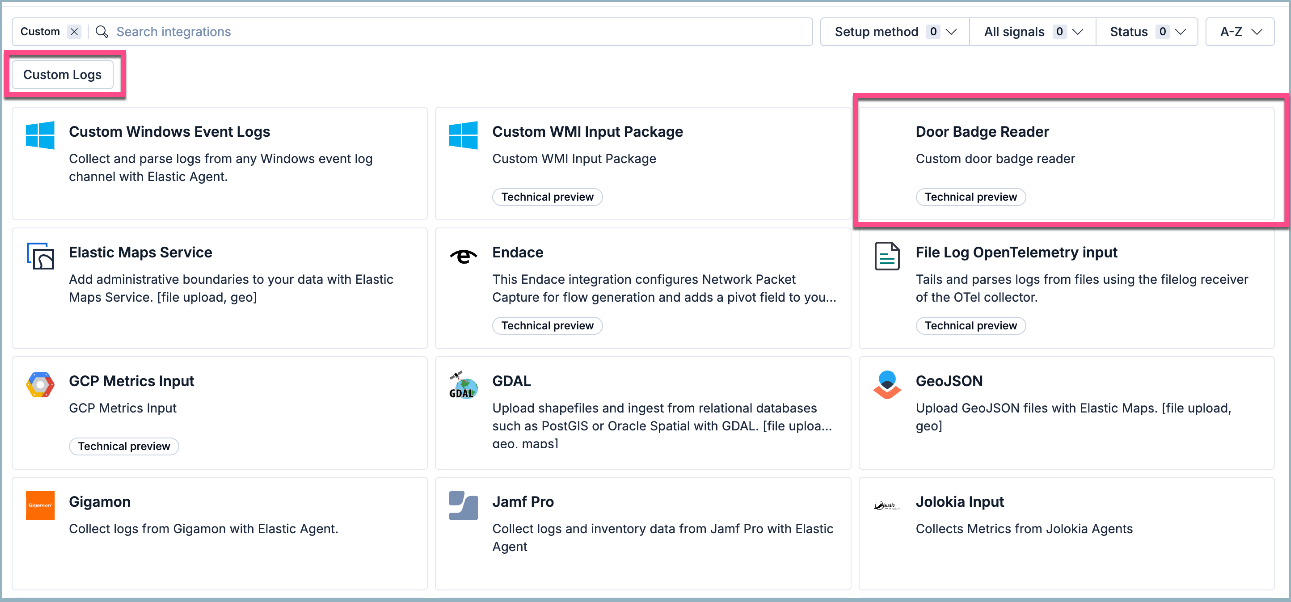
In Kibana, open Integrations. You can use the main menu, the global search field, or your solution's entry point (for example, Add integrations in Elastic Security, or Add data in Observability).
Under Can't find an integration? click Create integration.
Select an LLM connector in the top right.
Under Integration Details, provide a Title (required), Description (required), and Logo (optional).
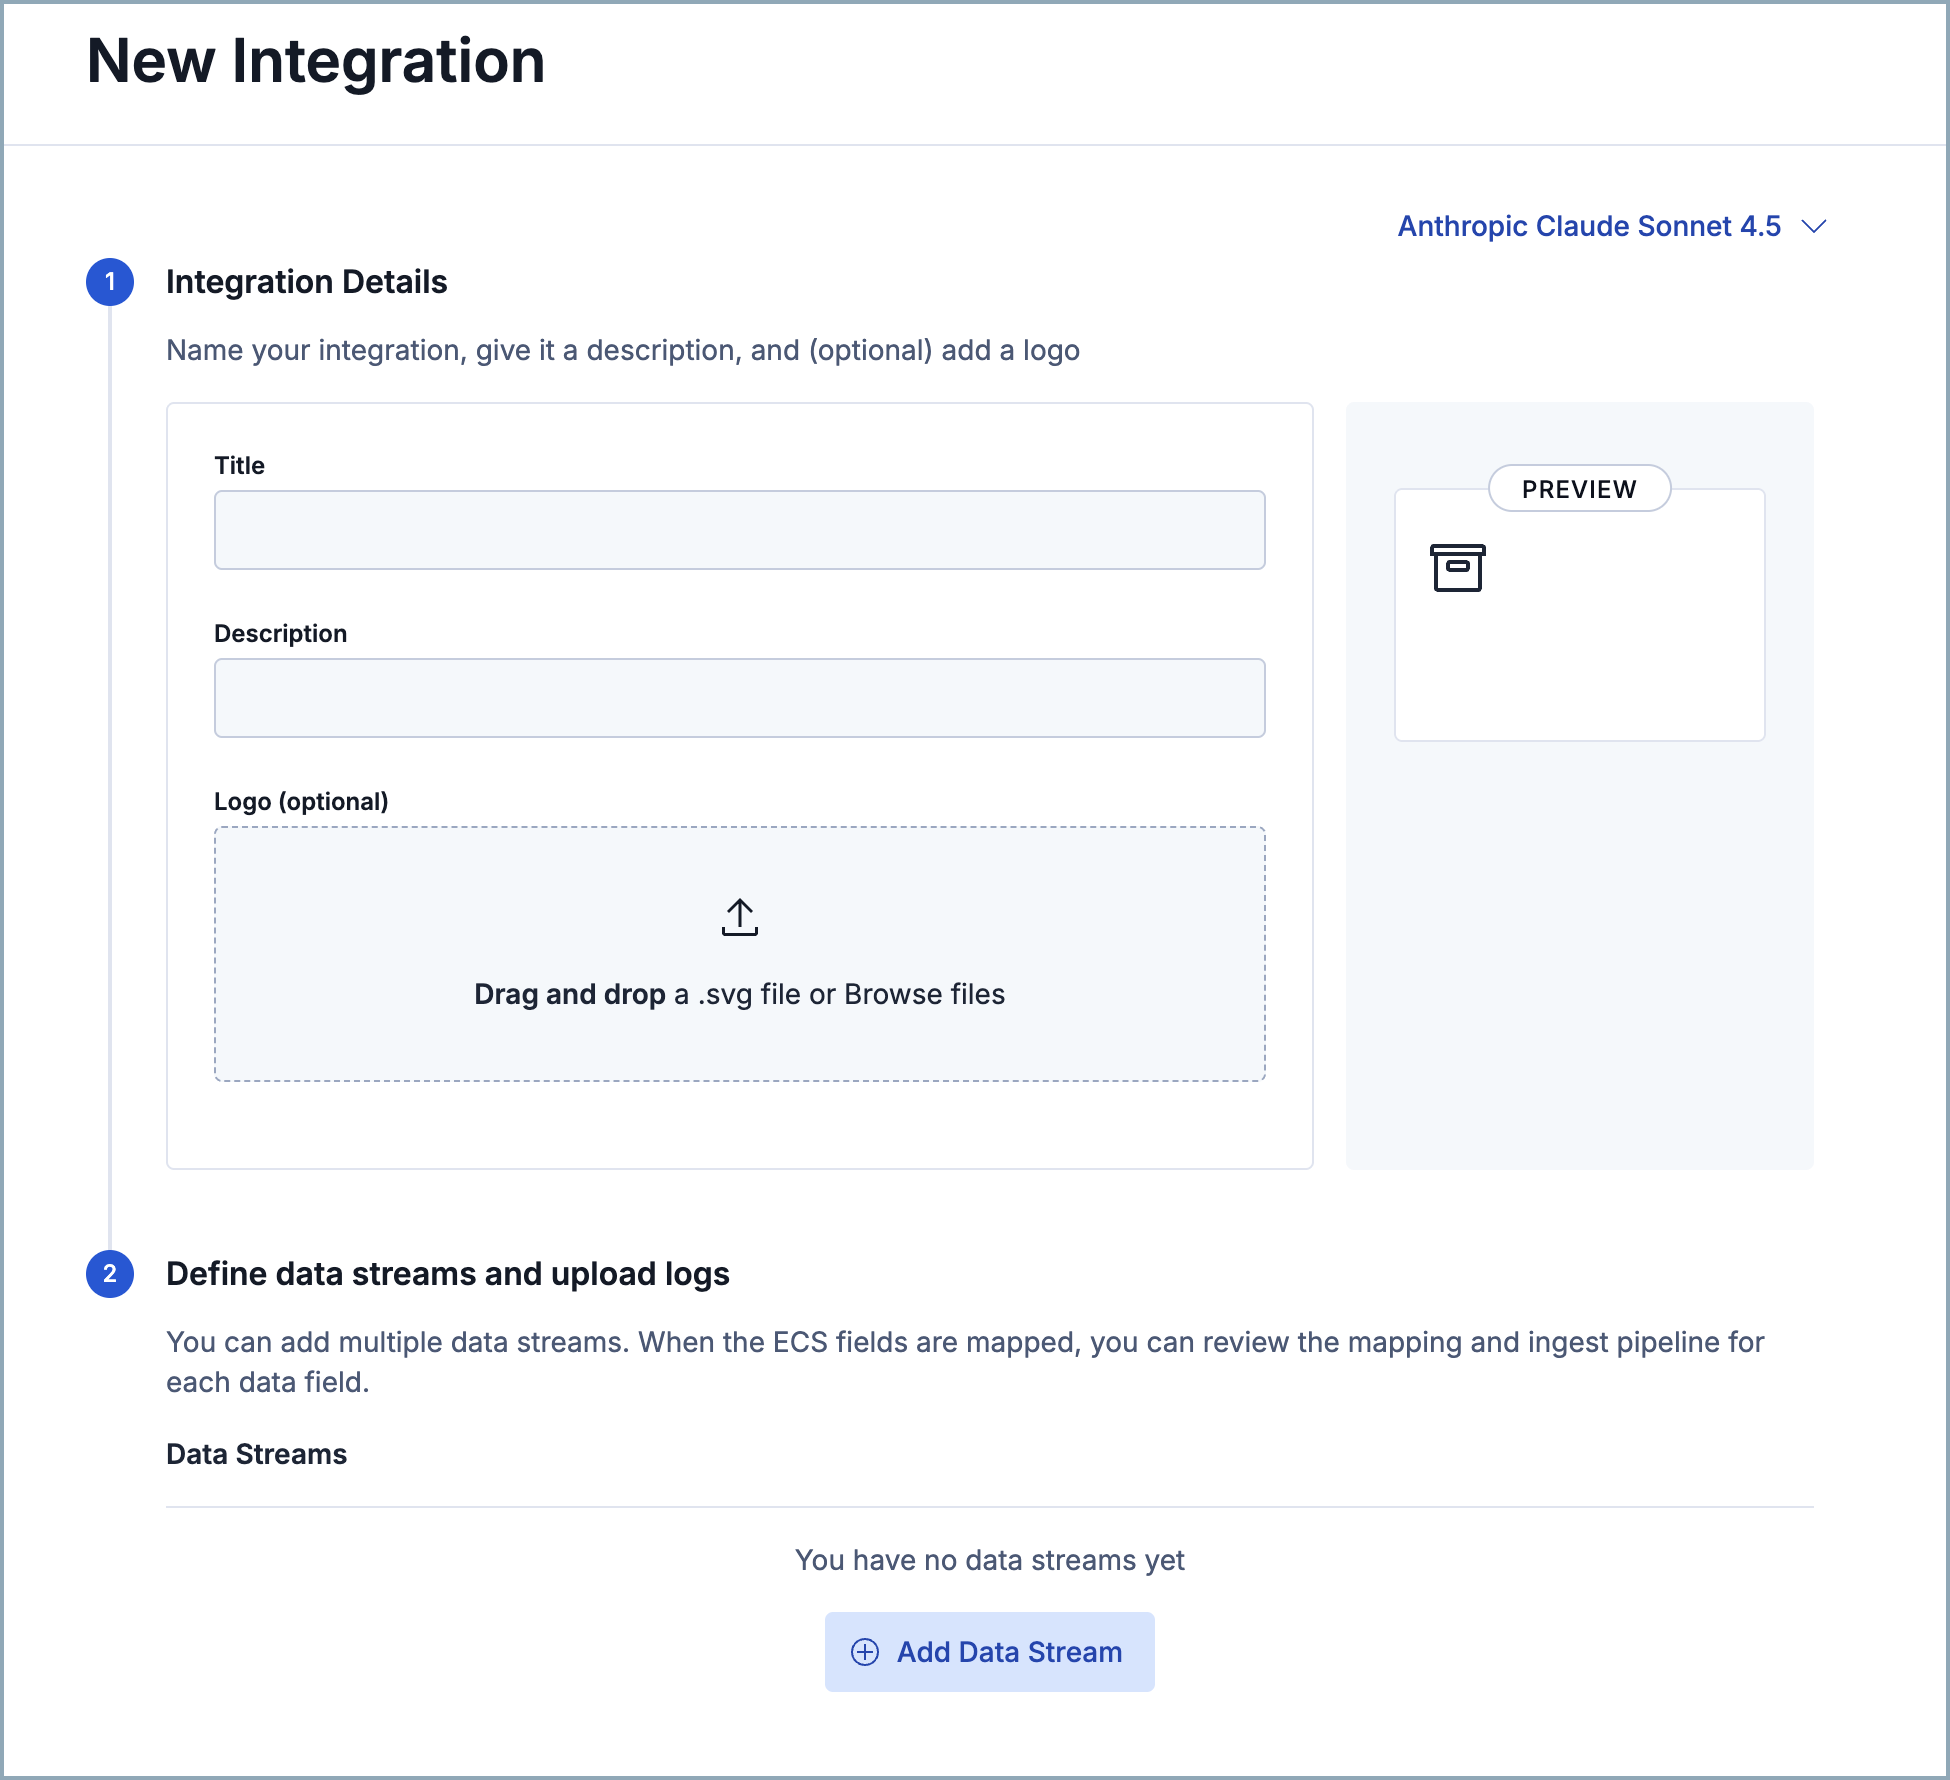
Under Define data streams and upload logs, click Add Data Stream. You can add multiple data streams to a single integration.
In the Data Stream panel, provide a Data stream title and Data stream description. These fields appear on the integration's configuration page to help identify the data stream it writes to.
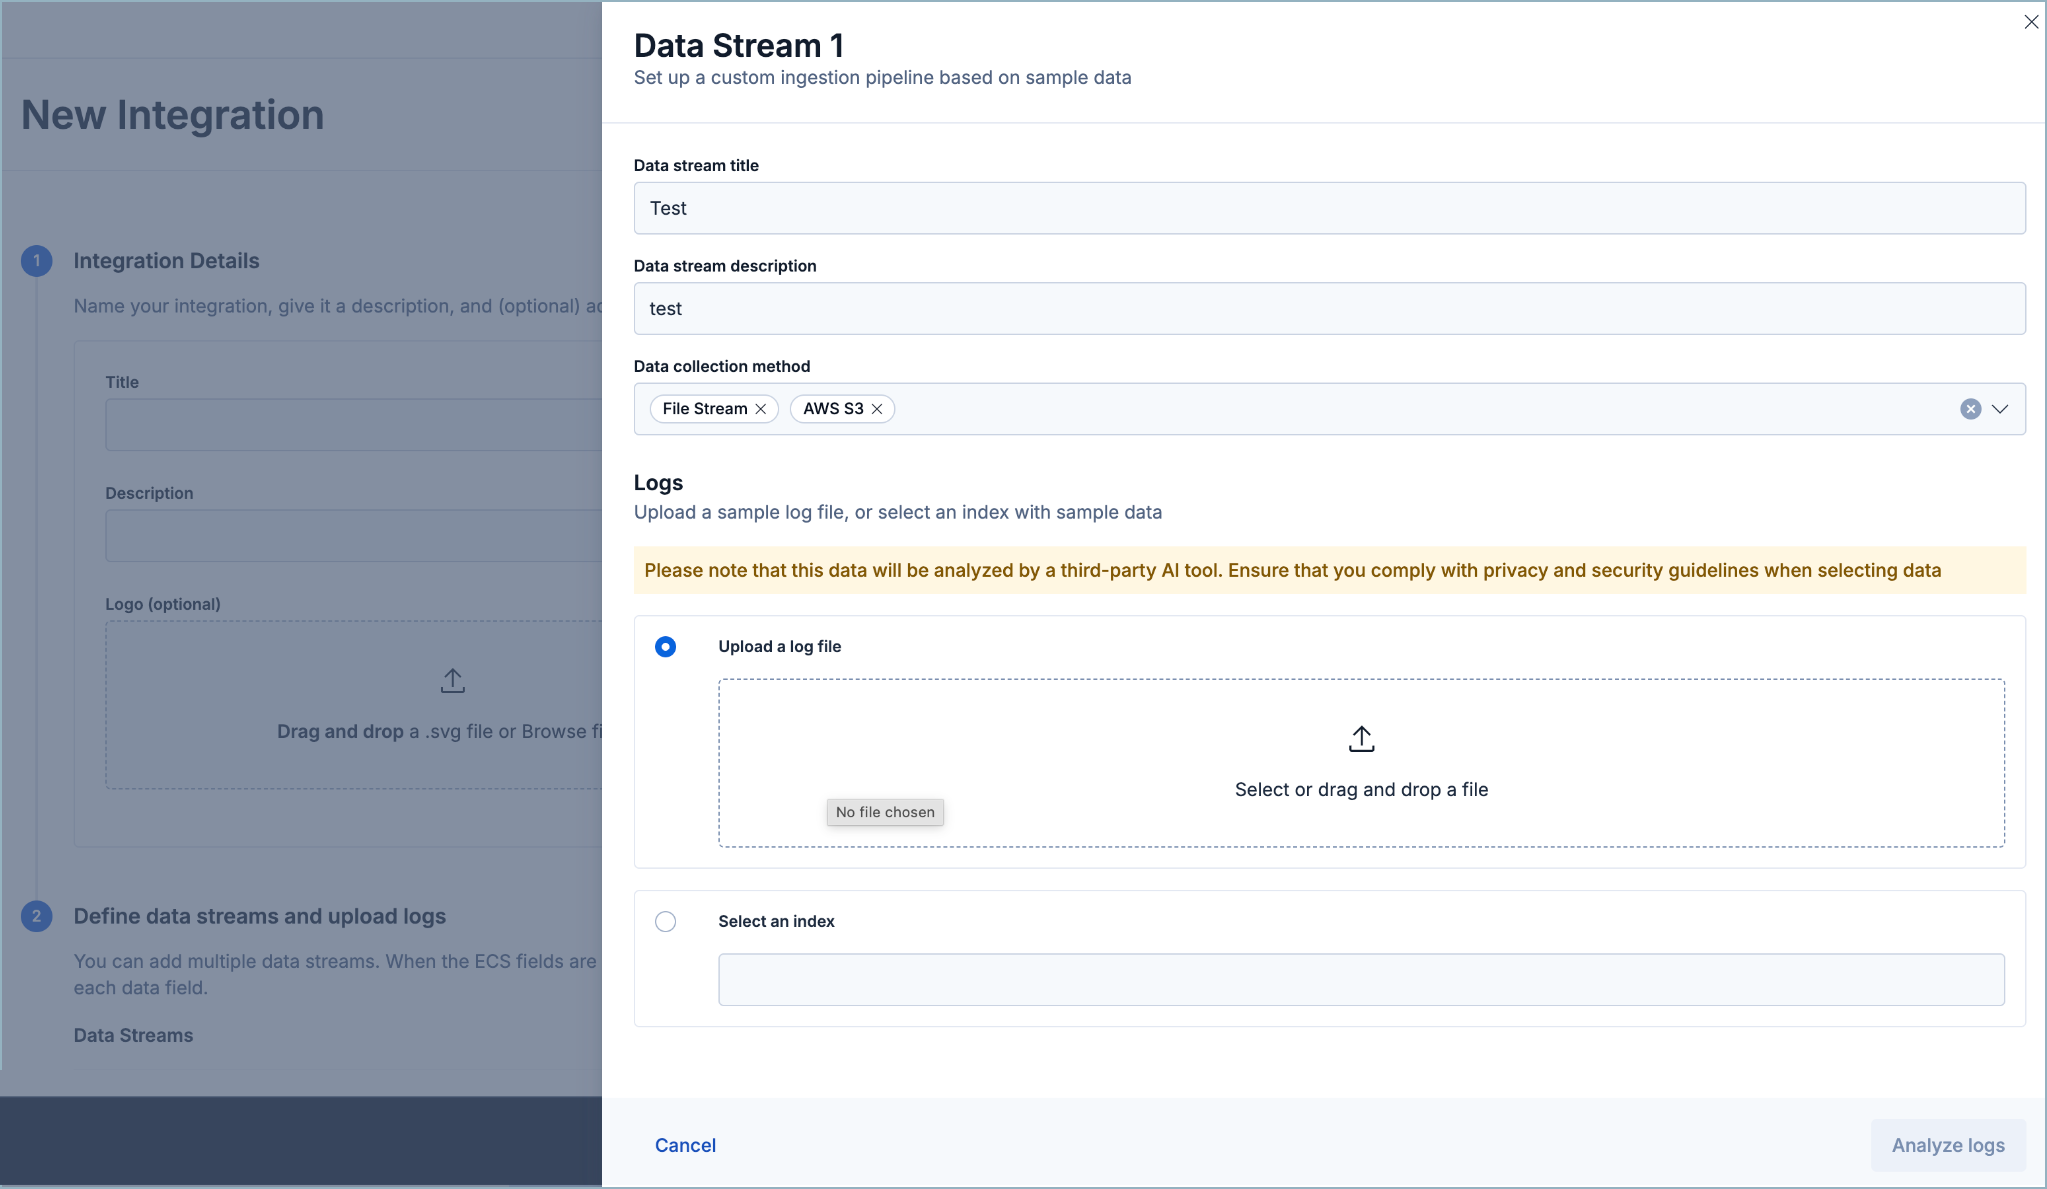
Select a Data collection method to determine how the integration ingests the data. Supported methods:
- File Stream
- AWS S3
- AWS Cloudwatch
- Azure Blog Storage
- Azure Event Hub
- GCP Pub/Sub
- Google Cloud Storage
- HTTP Endpoint
- Kafka
- TCP
- UDP
Under Logs, either upload a sample of your data or select an existing index. Only indexes that include the
event.originalfield are supported. Make sure your sample includes all the types of events that you want the integration to handle.Click Analyze logs and wait for processing to complete. This can take several minutes. The data stream(s) continue to process as shown by the status on the Manage my integrations menu, so you can navigate away and come back later.
NoteThe Manage my integrations menu lists only integrations created with Automatic Import on versions 9.4+.
Manually created custom integration
.zips get installed from the Installed integrations tab and aren't tracked on the Manage my integrations menu. For more information about user-created custom integrations, refer to Upload a new integration.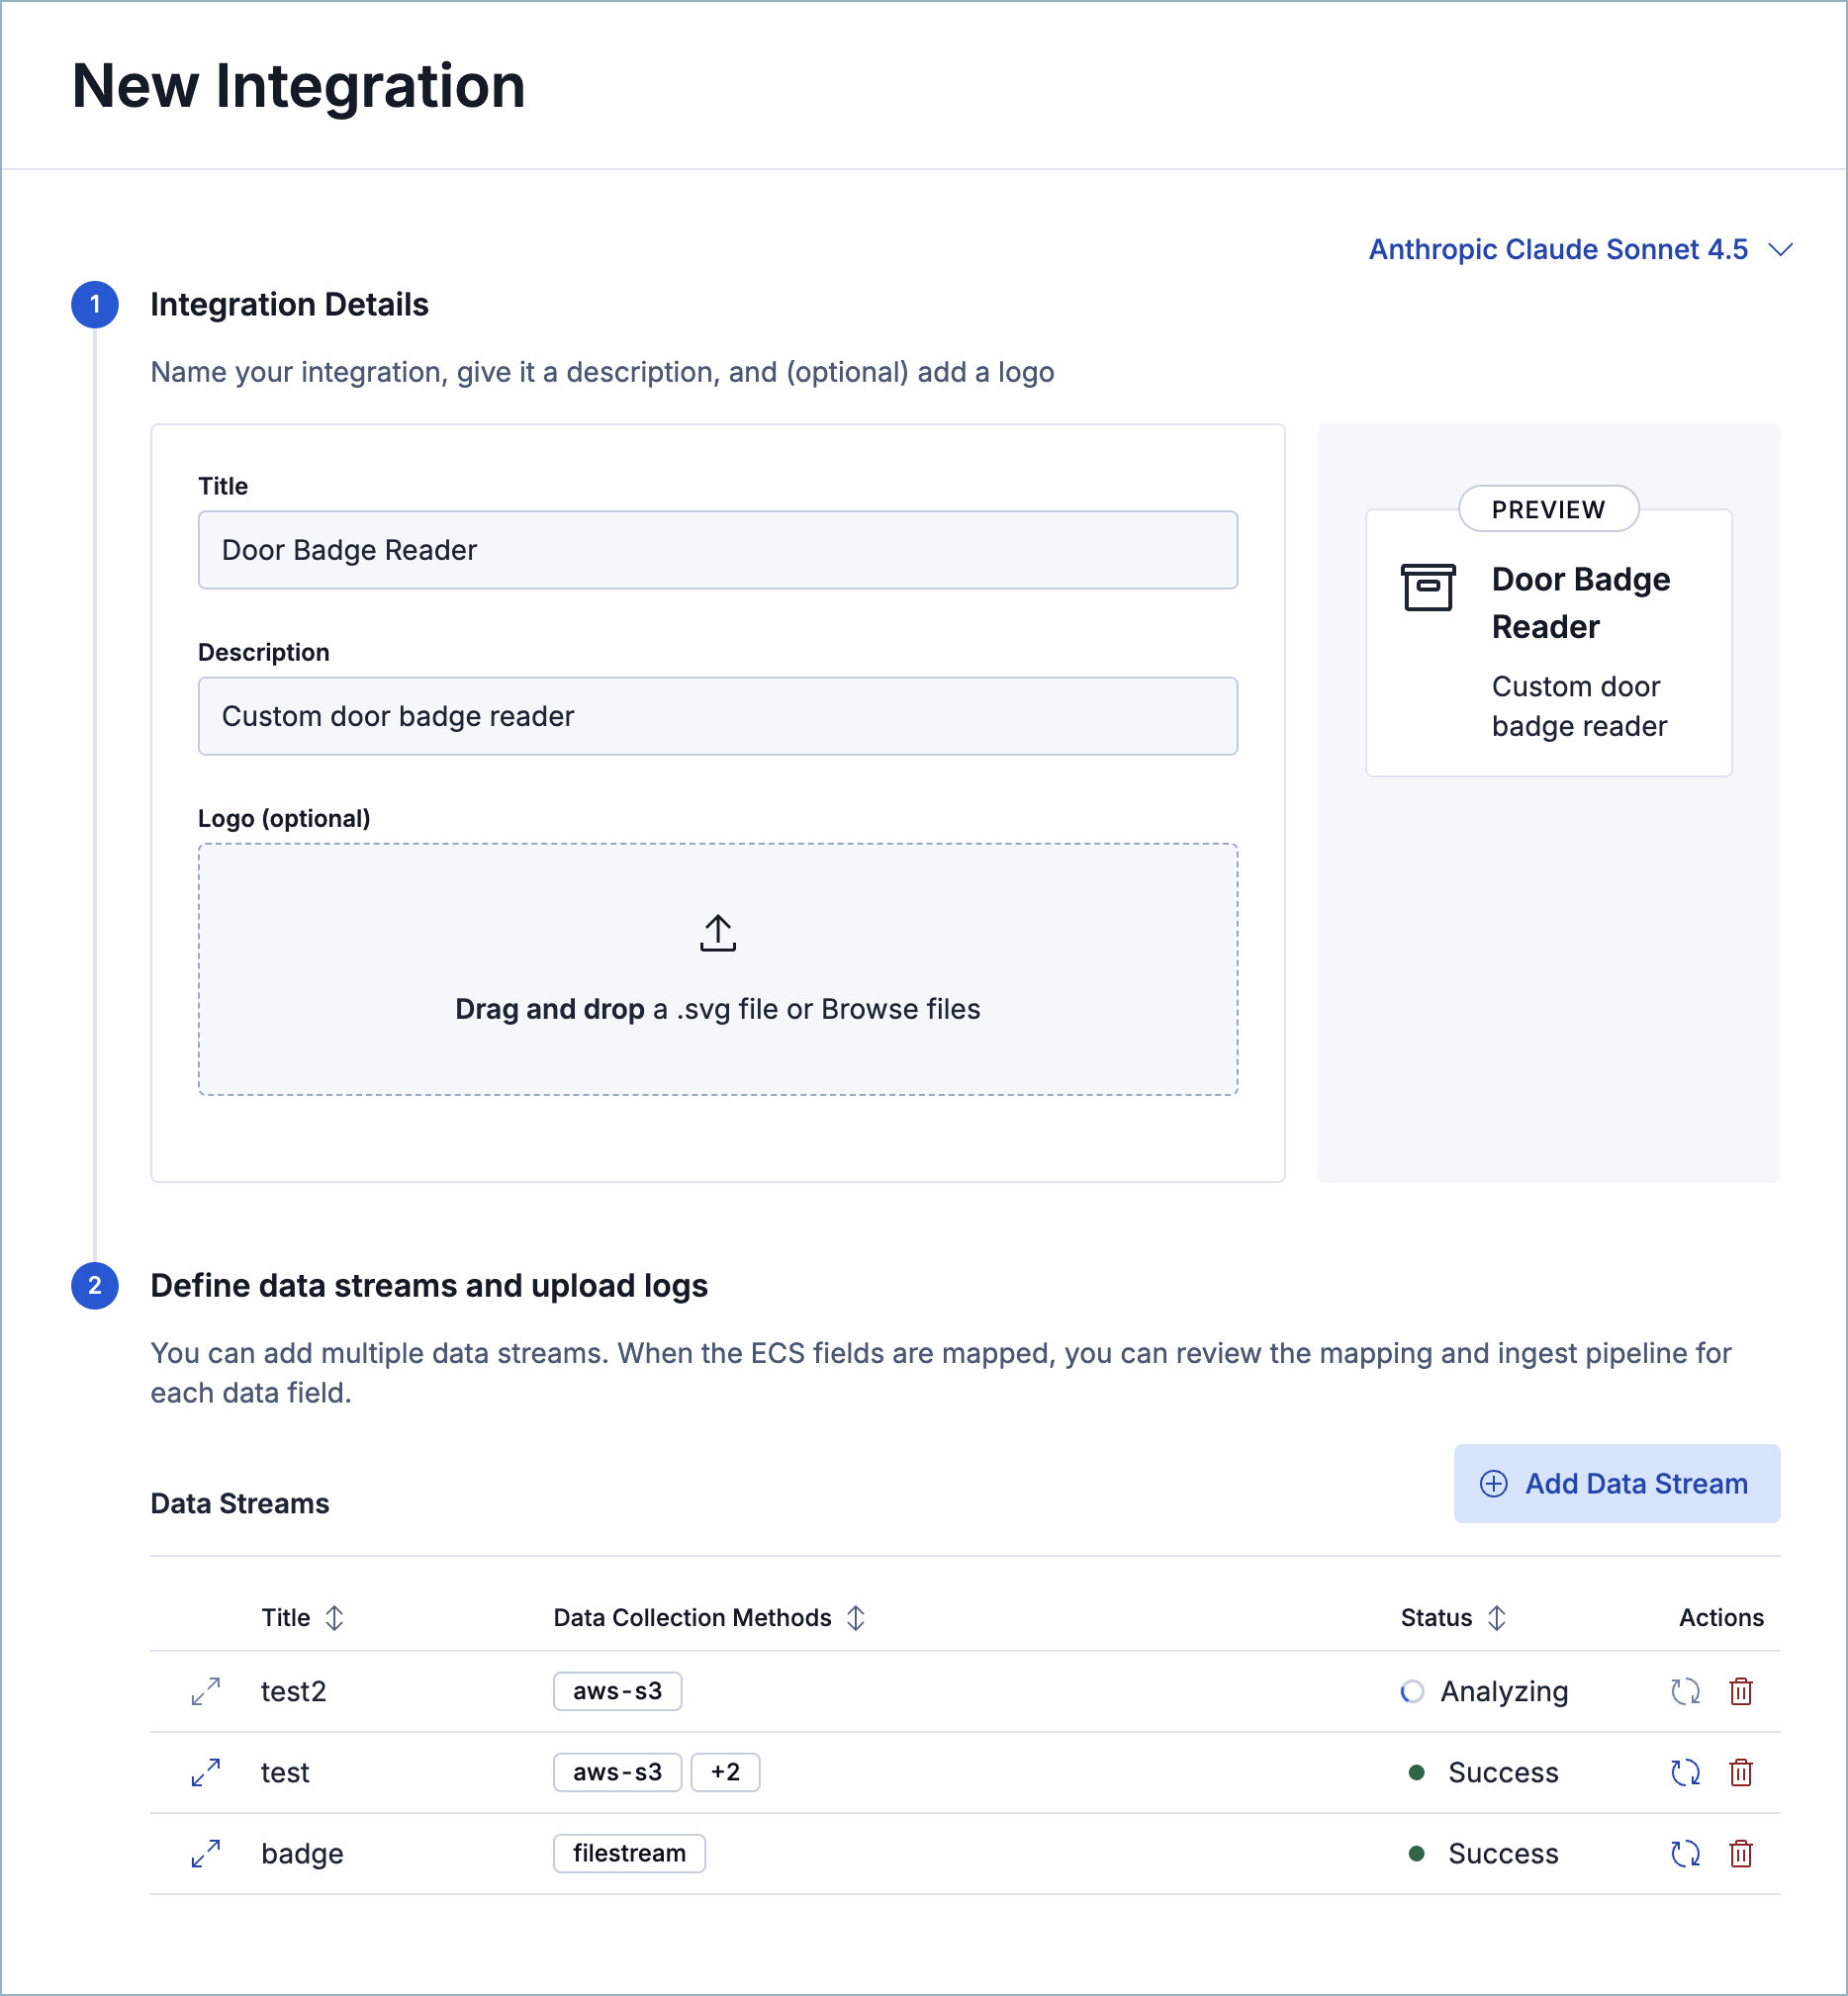
When all data streams reach a Success status, the integration is ready to approve.
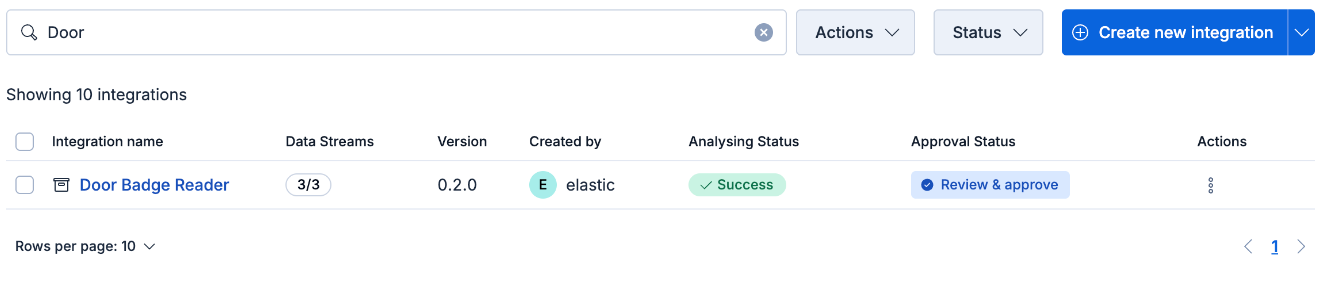
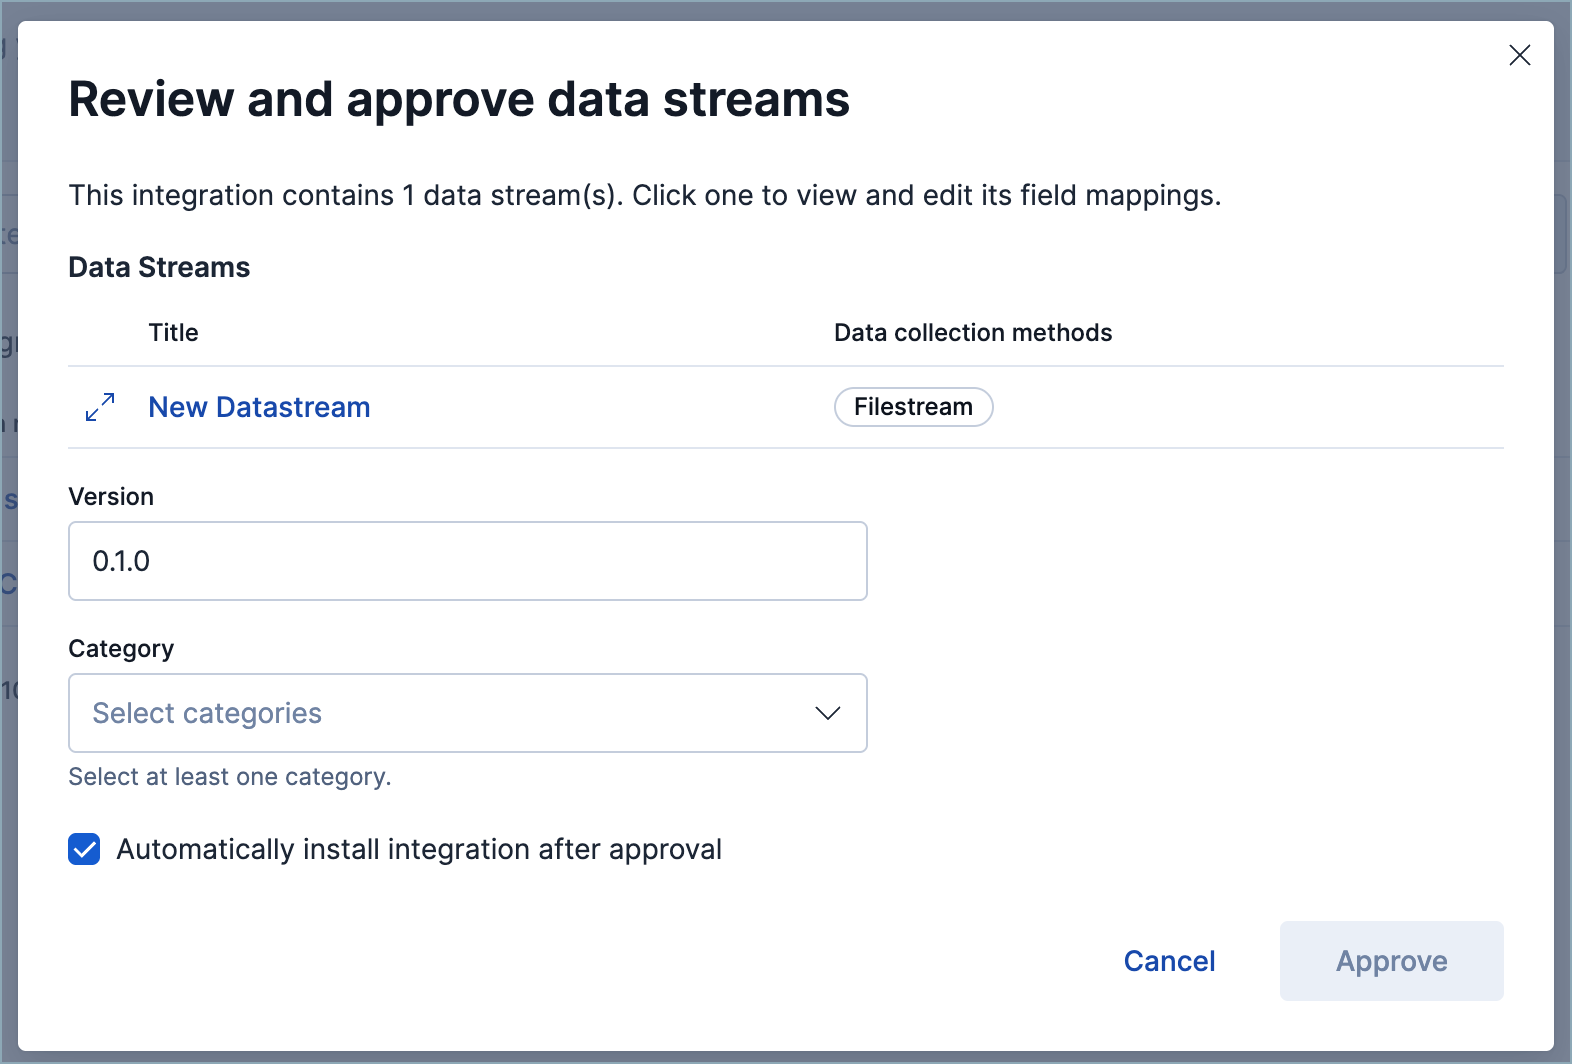
From the integration's Actions menu, click Review & approve. Select a category to help identify the integration on the Integrations page, then review the field mappings and the ingest pipeline.
Integration versions automatically increase when more data streams are added after the integration is approved.
(Optional) To fine-tune the ingest pipeline, open it from the Review & approve panel and make your changes. Refer to the Elastic Security ECS reference for field-mapping guidance. Click Save when you're done.
When you approve an integration, by default it's also installed, which makes it available for assignment to a policy. To approve an integration without installing it, turn off the automatic installation option on its approval confirmation popup. Then, to install it later, click Install on the Actions menu.
Once you've installed an integration, you can find it using its category.
Click Add to start collecting data and assign the integration to an agent policy.

- (Optional) After you've added an integration, you can edit the ingest pipeline from the Ingest Pipelines page using the navigation menu or the global search field.
In Kibana, open Integrations. You can use the main menu, the global search field, or your solution's entry point (for example, Add integrations in Elastic Security, or Add data in Observability).
Under Can't find an integration? click Create new integration.
Click Create integration.
Select an LLM connector.
Define how your new integration appears on the Integrations page by providing a Title, Description, and Logo. Click Next.
Define your integration's package name, which prefixes the imported event fields.
Define your Data stream title, Data stream description, and Data stream name. These fields appear on the integration's configuration page to help identify the data stream it writes to.
Select your Data collection method. This determines how your new integration ingests the data (for example, from an S3 bucket, an HTTP endpoint, or a file stream).
NoteIf you select API (CEL input) (Common Expression Language via the CEL input in Filebeat), you have the additional option to upload the API's OAS file here. After you do, the LLM uses it to determine which API endpoints (GET only), query parameters, and data structures to use in the new custom integration. You then select which API endpoints to consume and your authentication method before uploading your sample data.
Upload a sample of your data. Make sure to include all the types of events that you want the new integration to handle.
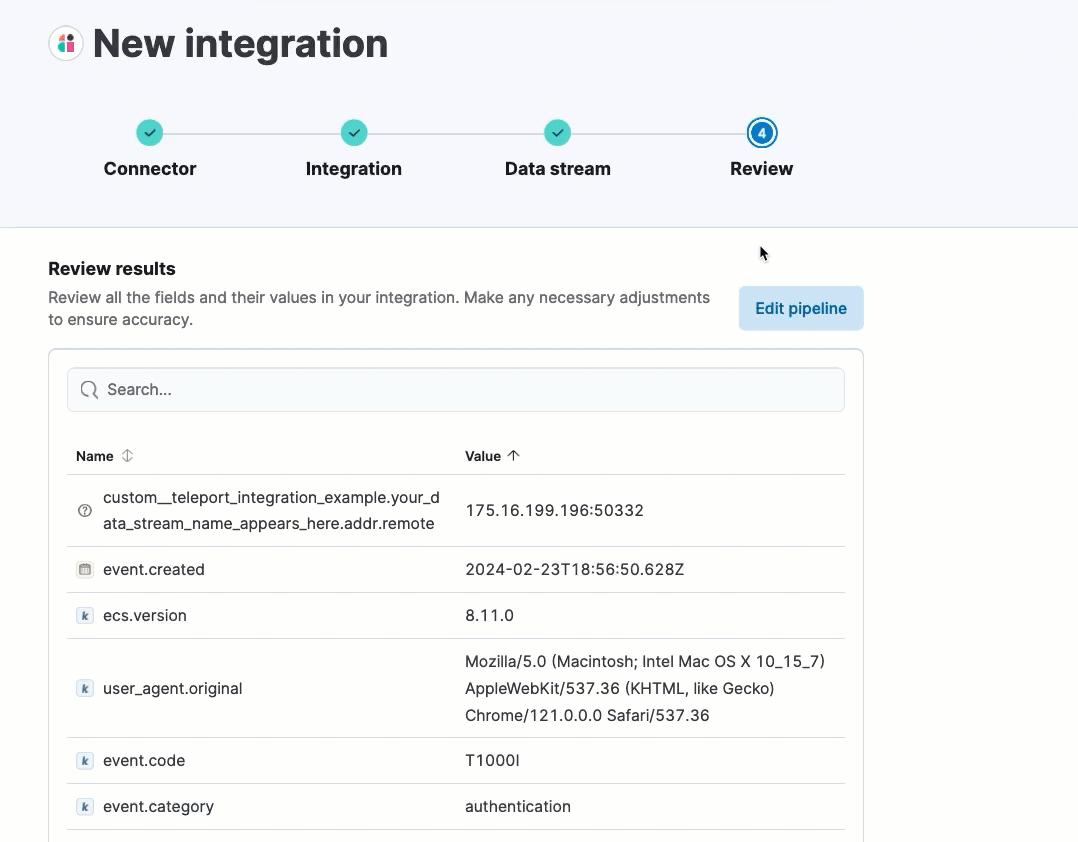
Click Analyze logs, then wait for processing to complete. This may take several minutes.
After processing is complete, the pipeline's field mappings appear, including ECS and custom fields.

(Optional) After reviewing the proposed pipeline, you can fine-tune it by clicking Edit pipeline. Refer to the Elastic Security ECS reference to learn more about formatting field mappings. When you're satisfied with your changes, click Save.
NoteIf your new integration collects data from an API, you can update the CEL input configuration (program and API authentication information) from the new integration's integration policy.
Click Add to Elastic. After the Success message appears, your new integration is available on the Integrations page.
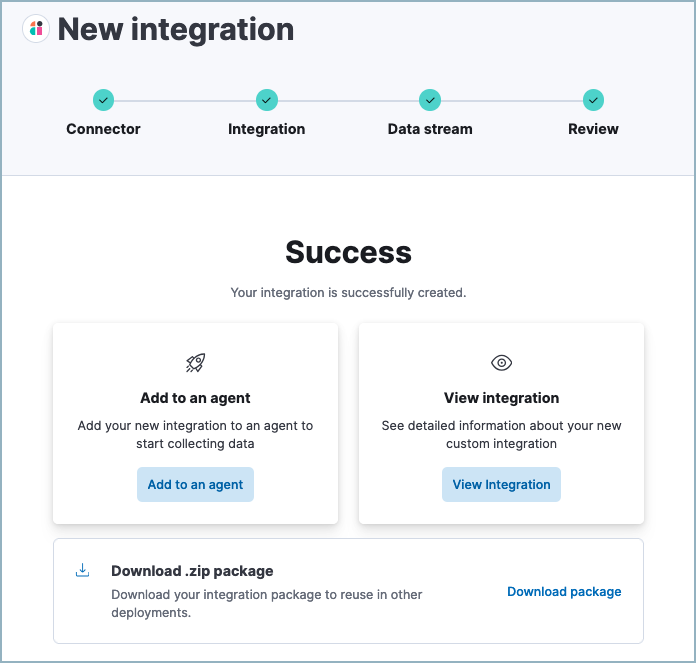
- Click Add to an agent to deploy your new integration and start collecting data, or click View integration to view detailed information about your new integration.
- (Optional) After you've added an integration, you can edit the ingest pipeline from the Ingest Pipelines page using the navigation menu or the global search field.
If you use Elastic Security, you can use the Data Quality dashboard to check the health of your data ingest pipelines and field mappings.