Search UI 1.10 makes building search experiences for Elasticsearch even easier


 Share on Twitter
Share on Twitter

 Share on LinkedIn
Share on LinkedIn

 Share on Facebook
Share on Facebook

 Share by Email
Share by Email

 Print this page
Print
We just published Search UI version 1.10, and we're excited to share it with you.
Search UI 1.10 adds two important features that make building search even easier:
- First-class support for Elasticsearch
- Typescript support
Read on to learn more.
What is Search UI again?
There are two essential parts of building a search experience; managing your data (indexing, relevance tuning, analytics) and creating an interface so that users can search your data. Elastic's Search UI is a purpose-built library that helps you build user-facing search experiences.
Search UI is not a new project. In fact, we introduced our 1.0 and 1.2 releases back in 2019.
One fact that remains as true today as it was in 2019 – Search UI is by far the fastest way to build a Search Experience with Elastic, and we’re re-investing in it this year. We want to enhance the developer experience and expand the breadth of use cases we're able to help with. To that end, we're kicking it off with a 1.10 release that’s chock full of useful features. For future reference, bookmark the Search UI tutorial in our documentation for additional detail.
Search UI now has first-class support for Elasticsearch
When we built Search UI, we saw a tremendous opportunity to pair it with Elastic's App Search, which gives you a highly streamlined toolkit for building end-to-end search.
The reality is that our customers have varying needs with different grades of complexity. Some development teams use App Search for search applications. Some also use Workplace Search for internal enterprise search, and Elasticsearch for its performance and complete customizability.
The particular search solution you're using is just an implementation detail as far as search experience is concerned. We like to think of Elastic as a single search solution, and we want the same to be true of Search UI. It shouldn't dictate the experience that you deliver to end-users.
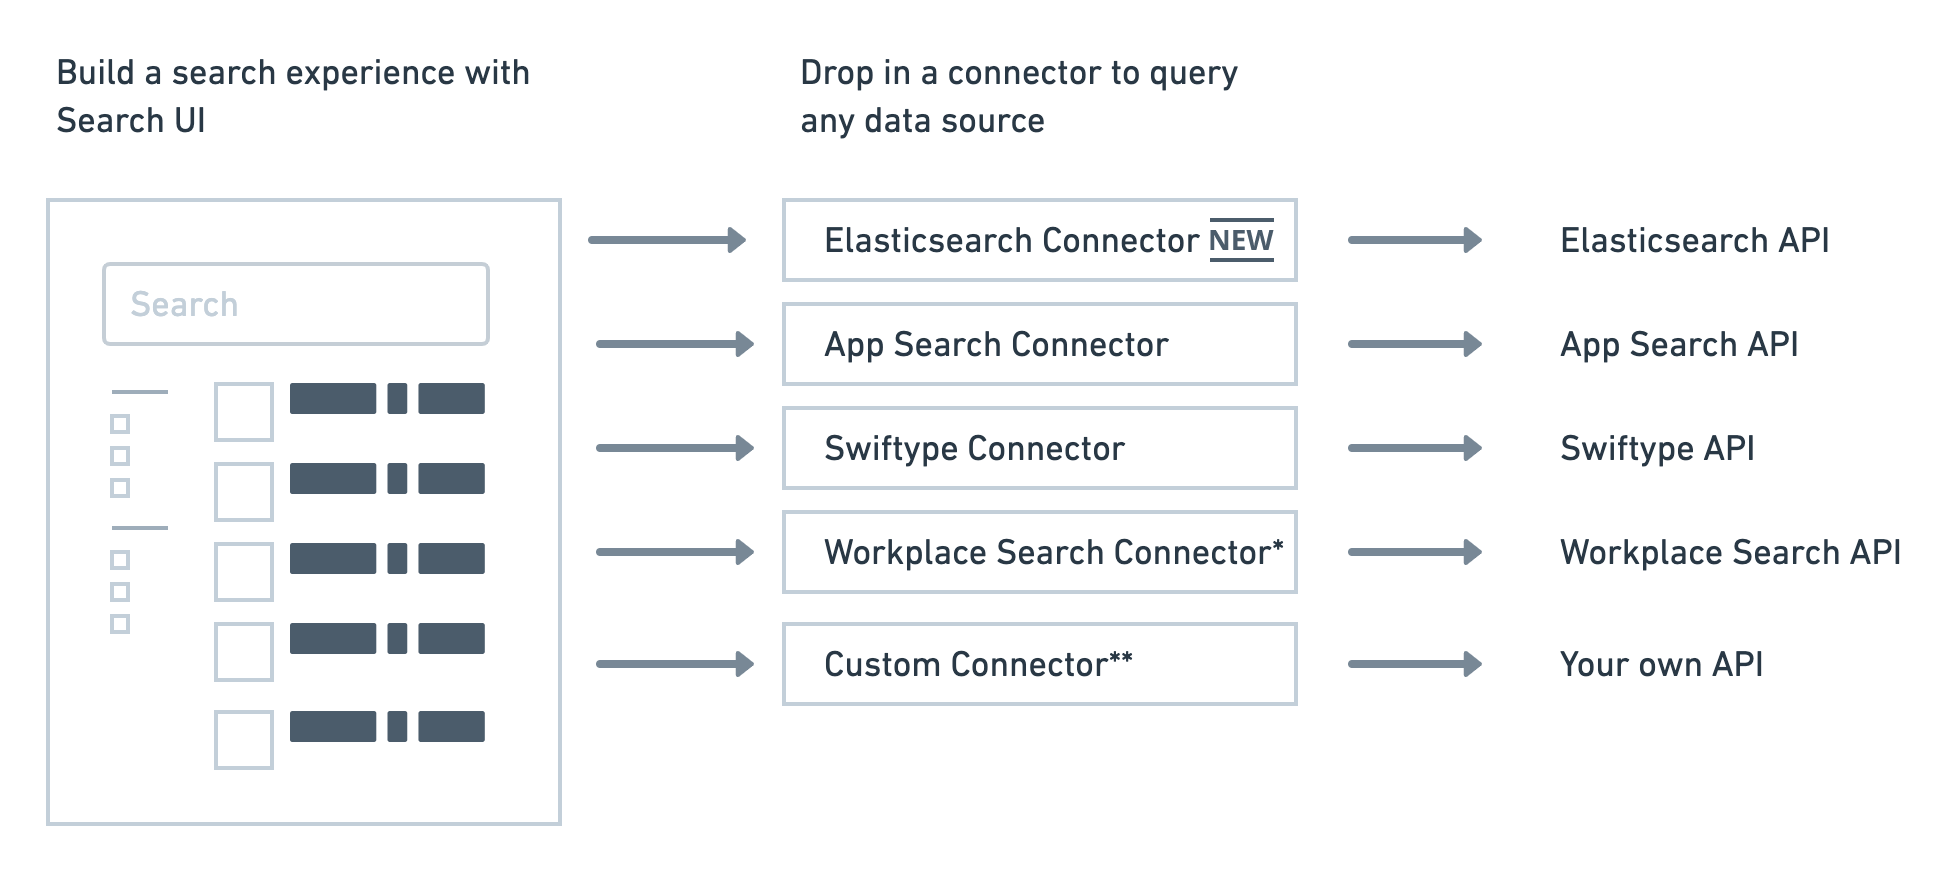
To that end, Search UI includes the concept of connectors.
Connectors let Search UI connect to different backends
Connectors are pluggable components that connect your search experience to various backends. They tell Search UI how to query your data. So regardless of your backend, you can build your search experience with Search UI and just pop in the appropriate connector.
Example of the Elasticsearch connector in action
Here's an example of a simple search experience built with Search UI that shows a search box and results. It uses an AppSearchAPIConnector to query App Search for search results:
import AppSearchAPIConnector from "@elastic/search-ui-app-search-connector";
import { SearchProvider, Results, SearchBox } from "@elastic/react-search-ui";

const connector = new AppSearchAPIConnector({
  searchKey: "search-371auk61r2bwqtdzocdgutmg",
  engineName: "search-ui-examples",
  endpointBase: "http://127.0.0.1:3002"
});

export default function App() {
  return (
    <SearchProvider
      config={{
        apiConnector: connector
      }}
    >
      <div className="App">
        <SearchBox />
        <Results />
    </SearchProvider>
  );
}
Using Elasticsearch? No problem, simply change your connector:
import ElasticsearchAPIConnector from "@elastic/search-ui-elasticsearch-connector";
import { SearchProvider, Results, SearchBox } from "@elastic/react-search-ui";

const connector = new ElasticsearchAPIConnector({
  host: "http://localhost:9200",
  index: "search-ui-examples",
  apiKey: "apiKeyExample"
});

export default function App() {
  return (
    <SearchProvider
      config={{
        apiConnector: connector
      }}
    >
      <div className="App">
        <SearchBox />
        <Results />
    </SearchProvider>
  );
}
The way you build your Search Experience doesn't need to change. Build your search experience and then configure a connector to tell it where to get your data.
Easy, right?
Moving to production
What's the catch?
No catch, really! But there are a couple of considerations you might want to make.
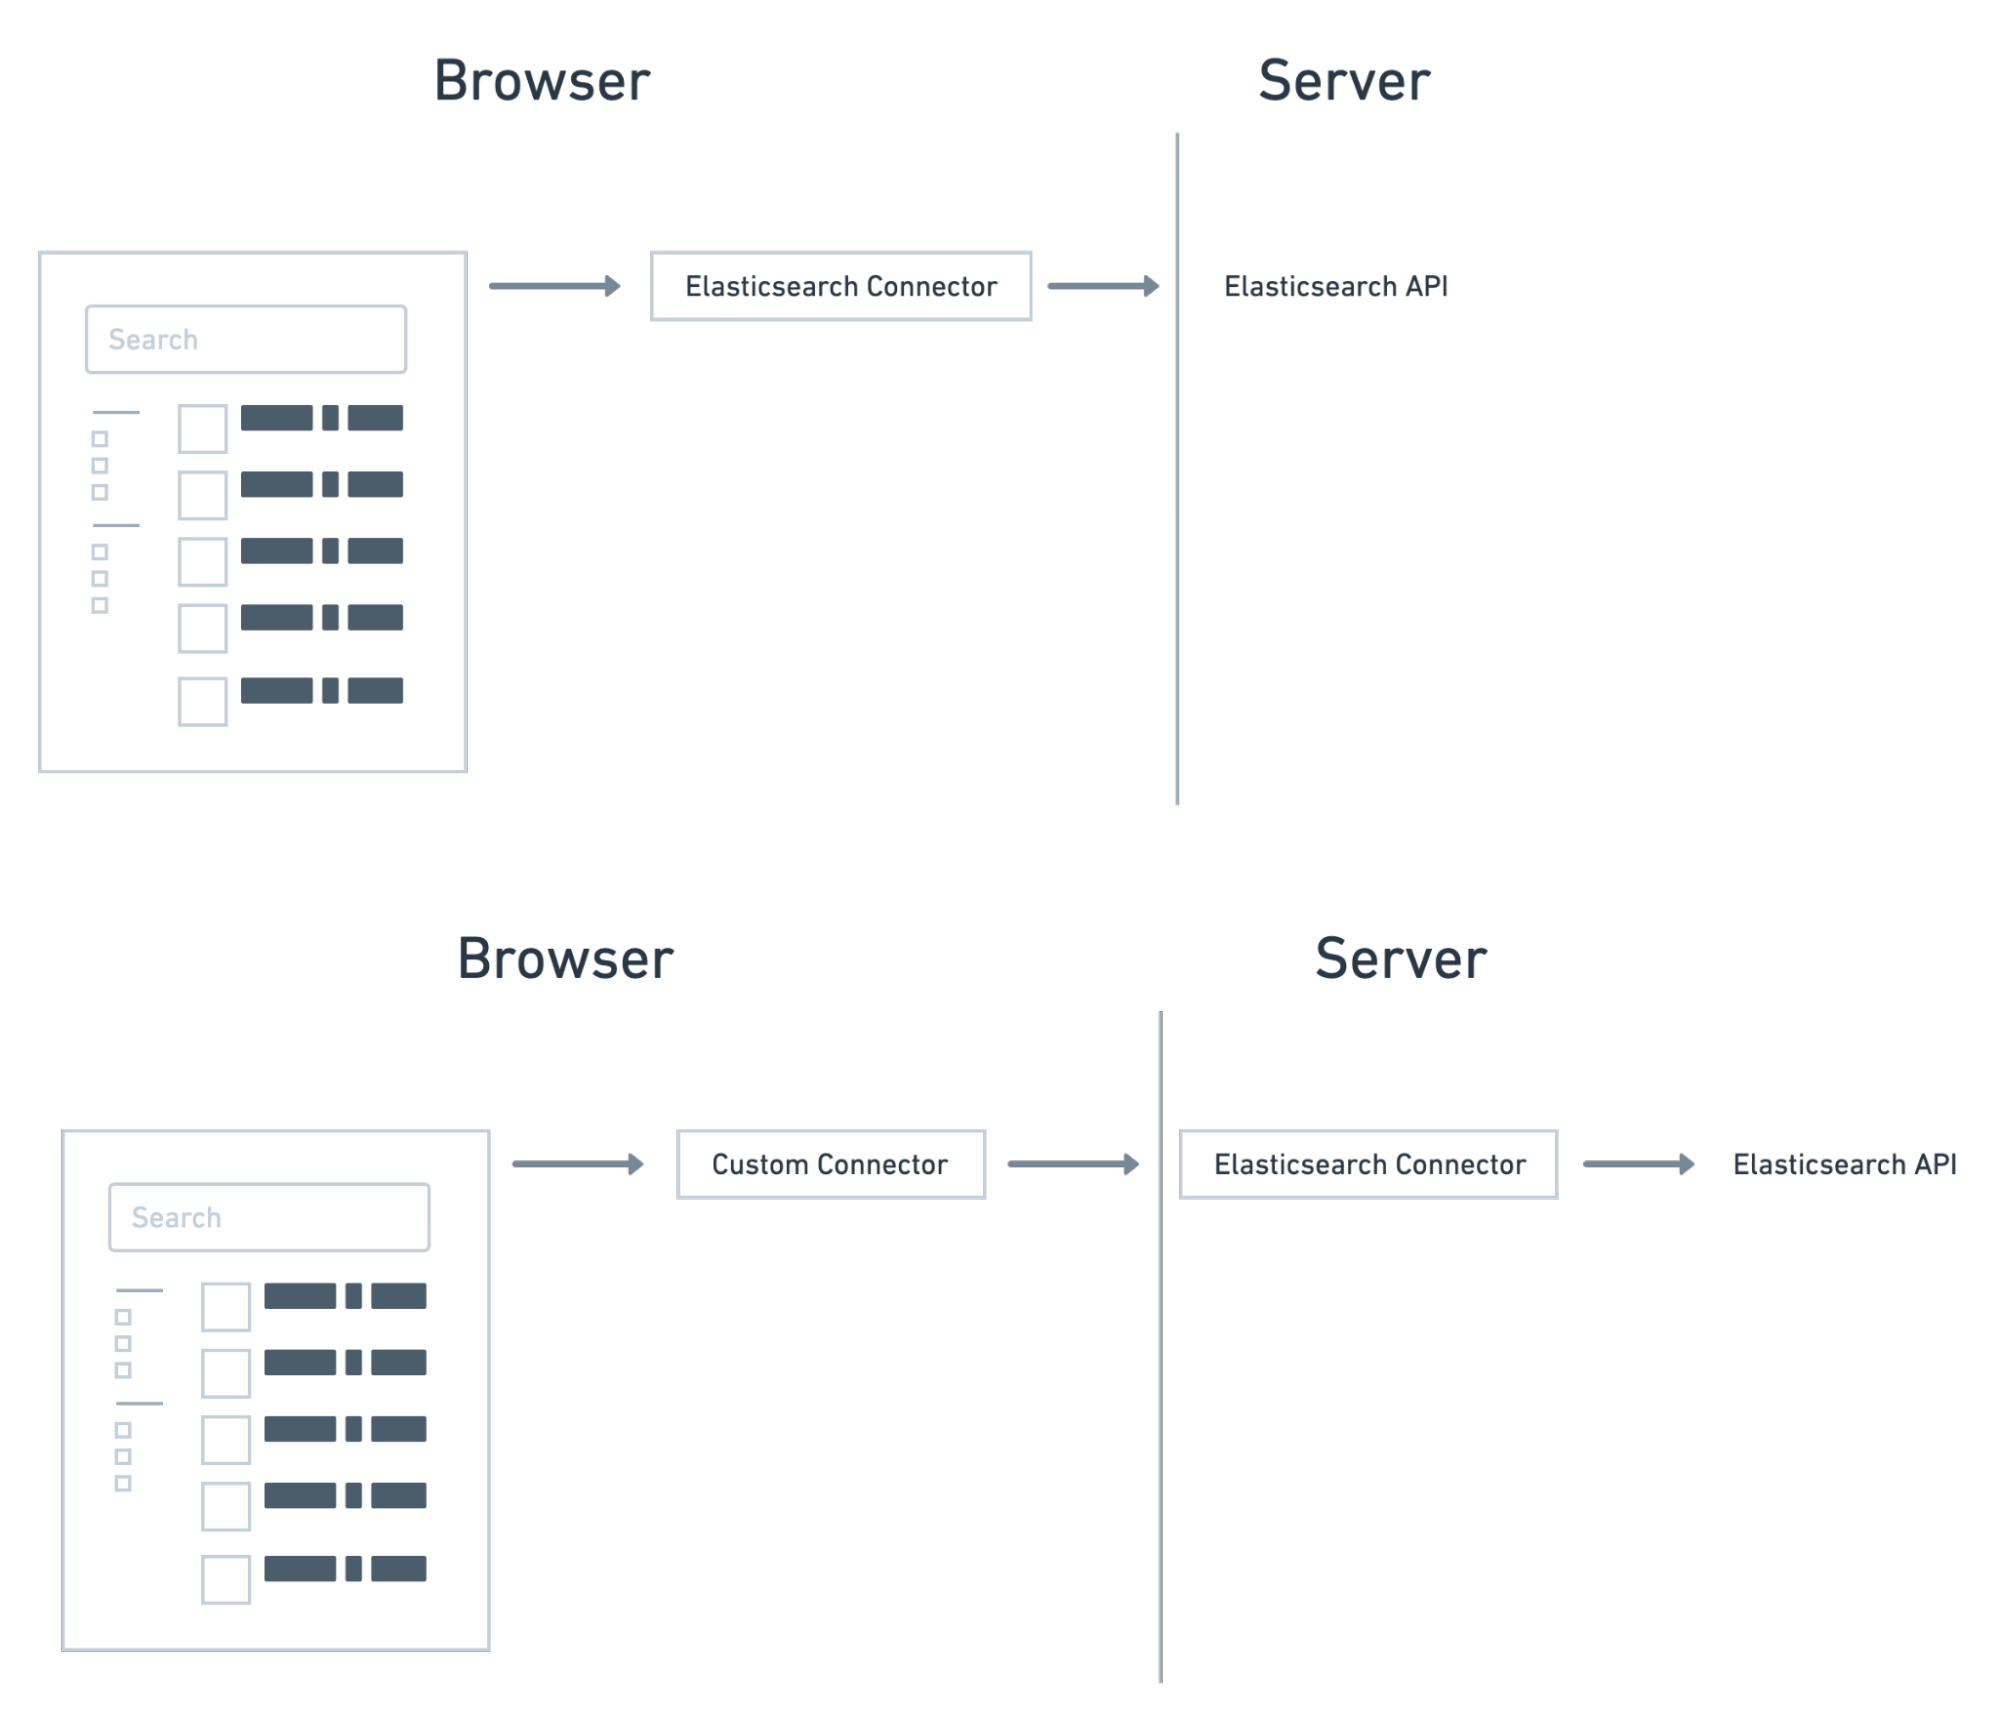
Firstly, this connector code above makes calls directly to Elasticsearch's search endpoint from the browser.
This is great because it can get you up and running quickly since it doesn't require you to set up any kind of server application. It's just your front-end code making calls directly to an Elasticsearch server that only takes a moment to set up on Elastic Cloud.
For many use cases like internal or non-public applications, this is sufficient. However, there are some precautions that Elastic recommends you consider before taking this setup public. They're outlined here.
For public-facing search use cases, you generally want an application layer to obscure your /_search endpoint so you can restrict queries to Elasticsearch.
Thankfully, this connector can also run on the server with node.js, so you can easily use it as a base for an application layer.
Run it on the server
A "connector" in Search UI is just a pure function that accepts the search state (i.e., user input, selected filters, the current page number) and converts that state into an Elasticsearch query.
The Elasticsearch connector is JavaScript. As described above, JavaScript can run in a browser, but it can also run on a server.
This means that you can create a simple REST API that accepts search state as a parameter and uses this library to convert that search state to Elasticsearch queries on the server.
Server Code, using Express
You could, for example, create a small Express application that exposes the connector's operations as a REST API.
var express = require("express");
var APIConnector =
  require("@elastic/search-ui-elasticsearch-connector").default;
require("cross-fetch/polyfill");
var app = express();
app.use(express.json());
app.use(express.urlencoded({ extended: false }));
const connector = new APIConnector(
  {
    host: "http://localhost:9200", // host url for the elasticsearch instance
    index: "search-ui-examples", // index name where the search documents are contained
    apiKey: "apiKeyExample" // Optional. apiKey used to authorize a connection to Elasticsearch instance.
  }
);
app.post("/search", async (req, res) => {
  const { query, options } = req.body;
  const response = await connector.onSearch(query, options);
  res.json(response);
});
app.post("/autocomplete", async (req, res) => {
  const { query, options } = req.body;
  const response = await connector.onAutocomplete(query, options);
  res.json(response);
});
var listener = app.listen(8080, function () {
  console.log("Listening on port " + listener.address().port);
});
Client Code - using Search UI
Once you've exposed your connector on the server with our new REST API, you'll need to consume it in Search UI.For this, you need to use custom connectors. A custom connector lets you implement a connector interface so that you can connect Search UI to any search API.
We'll modify our previous example and a custom connector to connect to our new REST API.
import { SearchProvider, Results, SearchBox } from "@elastic/react-search-ui";

class CustomConnector {
  constructor(host) {
    this.host = host;
  }

  async onSearch(query, options) {
    const response = await fetch(this.host + "/search", {
      method: "POST",
      headers: {
        "Content-Type": "application/json"
      },
      body: JSON.stringify({
        query,
        options
      })
    });
    return response.json();
  }

  async onAutocomplete(query, options) {
    const response = await fetch(this.host + "/autocomplete", {
      method: "POST",
      headers: {
        "Content-Type": "application/json"
      },
      body: JSON.stringify({
        query,
        options
      })
    });
    return response.json();
  }
}

const connector = new CustomConnector("https://my-api-host/");

export default function App() {
  return (
    <SearchProvider
      config={{
        apiConnector: connector
      }}
    >
      <div className="App">
        <SearchBox />
        <Results />
    </SearchProvider>
  );
}
That's it!. You should see the `CustomConnector` executing requests to the server, providing the search state and configuration in the body. The node.js server will use the Elasticsearch connector to perform a search in Elasticsearch and return results to the client.
Since you now perform the queries server-side, you've added an additional layer of security and alleviated some of the concerns associated with calling Elasticsearch directly from a browser.
Share your feedback with us for the Elasticsearch connector Technical Preview
While the Elasticsearch connector is now published and available for use, it is still in Technical Preview. As a result, you'll find a few features that are still unimplemented, and you may even find a bug or two. Rest assured, we’ll continue to improve on it as it reaches maturity.
Please help us by directing your feedback, questions, or bug reports here.
Typescript support and other quality of life improvements
Last but not least, this is 2022, not 2019 anymore; Typescript is a modern, scalable way to build frontend applications. To that end, we've converted this project from a JavaScript framework to Typescript with Typescript definitions.
Better late than never, right?
Give it a try in our CodeSandbox.
Developer productivity is important to us. We'll continue to release bug fixes and introduce other quality of life features in the future. Stay tuned for more!
Share
- Share on Twitter
Share on Twitter
- Share on LinkedIn
Share on LinkedIn
- Share on Facebook
Share on Facebook
- Share by Email
Share by Email
- Print this page
Print