Installing Rally: Running your first Elasticsearch performance benchmark and air-gapped


 Share on Twitter
Share on Twitter

 Share on LinkedIn
Share on LinkedIn

 Share on Facebook
Share on Facebook

 Share by Email
Share by Email

 Print this page
Print
Rally, also known as ES Rally, is the benchmarking tool that Elastic® relies on to identify Elasticsearch® performance improvements, regressions, and more. It is run nightly against a nightly build of Elasticsearch. You can also use it to benchmark your Elasticsearch cluster and identify any performance issues related to your setup. If you want to ingest 5TB of data daily, follow this blog post and the entire series to identify how you can ensure that your hardware is capable of this. If your workload is more on the search side, we will also cover that!
Elastic does not recommend running Rally against a cluster that is in production. Rally tracks feature destructive actions and can lead to data loss. Additionally, benchmarking a cluster receiving load from somewhere else is not that useful since Rally metrics cannot be adequately interpreted.
Installing Rally
All of the installation steps are described in the official Rally documentation. You don’t need a Java installation when not benchmarking source build. This blog post series focuses on benchmarking an Elasticsearch running in our cloud.
Alternatively, you can use the official Docker image instead of installing it locally.
You need:
Preferably the latest Git version, at least higher than 1.8
Pbzip2
Preferably the latest Python version, at least higher than 3.8
Python’s pip
Once all these prerequisites are installed, you can move forward with or without virtual environments within Python. To keep it simpler throughout, we are not going down that road.
Install Rally using the following command: pip3 install esrally. Now it will install all the required packages, and you are nearly ready. In my case, I didn’t install Rally as root, and therefore, my installation path was not part of the $PATH.
Installing Rally air-gapped
There are two different types of air-gapped installations. We refer to air-gapped installations as servers that don’t have a public internet connection. The first variant to install involves having your own PiPy hosted. The alternative is to use a proxy. The other one involves no internet connection and no local PiPy. In the first case, you can just follow the instructions from above when installing Rally. More information on all steps can be taken from the official documentation.
Prepare the machine the same as above. Install all the necessary packages.
Download the latest release, and copy it to your machine. Download esrally-dist-linux-$VERSION.tar.gz from https://github.com/elastic/rally/releases/tag/2.10.0.
Untar it using tar -xzvf esrally-dist-linux-$VERSION.tar.gz.
Depending on your setup, you should run chmod +x install.sh to allow it to execute the script.
Execute the script. This will install Rally. No dependencies are needed for downloading.
Configuring Rally
Regardless of the installation method, we must configure Rally before running our first benchmark. Let’s execute the esrally command. We should be greeted with a message about all the options.
$ esrally
usage: esrally [-h] [--version] {race,list,delete,info,create-track,compare,build,download,install,start,stop,add} ...

    ____        ____
   / __ \____ _/ / /_  __
  / /_/ / __ `/ / / / / /
 / _, _/ /_/ / / / /_/ /
/_/ |_|\__,_/_/_/\__, /
                /____/

 You Know, for Benchmarking Elasticsearch.

options:
  -h, --help            show this help message and exit
  --version             show program's version number and exit

subcommands:
  {race,list,delete,info,create-track,compare,build,download,install,start,stop,add}
    race                Run a benchmark
    list                List configuration options
    delete              Delete records
    info                Show info about a track
    create-track        Create a Rally track from existing data
    compare             Compare two races
    build               Builds an artifact
    download            Downloads an artifact
    install             Installs an Elasticsearch node locally
    start               Starts an Elasticsearch node locally
    stop                Stops an Elasticsearch node locally
    add                 Add records

Find out more about Rally at https://esrally.readthedocs.io/en/2.10.0/If we are running any command like race then we will get an error that looks like this and is expected.
$ esrally race

    ____        ____
   / __ \____ _/ / /_  __
  / /_/ / __ `/ / / / / /
 / _, _/ /_/ / / / /_/ /
/_/ |_|\__,_/_/_/\__, /
                /____/

usage: esrally [-h] [--version] {race,list,delete,info,create-track,compare,build,download,install,start,stop,add} ...
esrally: error: argument --track is required
[ERROR] Cannot race. 2.

Getting further help:
*********************
* Check the log files in /home/philippkahr/.rally/logs for errors.
* Read the documentation at https://esrally.readthedocs.io/en/2.10.0/.
* Ask a question on the forum at https://discuss.elastic.co/tags/c/elastic-stack/elasticsearch/rally.
* Raise an issue at https://github.com/elastic/rally/issues and include the log files in /home/philippkahr/.rally/logs.

-------------------------------
[INFO] FAILURE (took 0 seconds)
-------------------------------
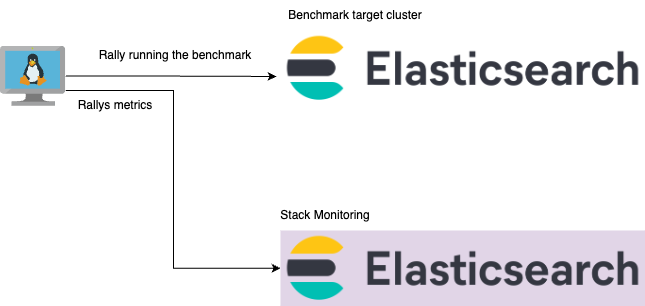
We are about to configure everything we need. What do we want to configure? Let us start with a diagram so it’s more straightforward to understand our setup.
We have a target cluster that we want to benchmark and a stack monitoring cluster. In Rally, there are two ways to configure the metrics collection. That does not mean metrics around Elasticsearch, as you know from Stack monitoring. Its metrics are collected and generated during the benchmark. Rally tracks how long each task takes, the latencies, etc. This can be exported to Elasticsearch, allowing us to visualize it.
Since we also have the Stack Monitoring data, we can do overlays and see the CPU usage of the cluster versus the latency of each call. We would discourage sending the metrics to the same cluster that you are benchmarking since you add an additional uncontrolled load on this cluster. Check out the official documentation.
To alter the metrics exporter, we need to change the Rally configuration file located in the installed user's home directory. In my case, it’s /home/philippkahr/.rally/rally.ini. A blank configuration looks like this:
[meta]
config.version = 17

[system]
env.name = local

[node]
root.dir = /home/philippkahr/.rally/benchmarks
src.root.dir = /home/philippkahr/.rally/benchmarks/src

[source]
remote.repo.url = https://github.com/elastic/elasticsearch.git
elasticsearch.src.subdir = elasticsearch

[benchmarks]
local.dataset.cache = /home/philippkahr/.rally/benchmarks/data

[reporting]
datastore.type = in-memory
datastore.host =
datastore.port =
datastore.secure = False
datastore.user =
datastore.password =


[tracks]
default.url = https://github.com/elastic/rally-tracks

[teams]
default.url = https://github.com/elastic/rally-teams

[defaults]
preserve_benchmark_candidate = false

[distributions]
release.cache = true
The important configuration section is the reporting part. Here we are going to put the Stack Monitoring cluster. We are going to create a new superuser called “rallymetrics.” We use this superuser since Rally can alter the permissions needed in any release.
[reporting]
datastore.type = elasticsearch
datastore.host = monitoring.elastic.cloud.com
datastore.port = 443
datastore.secure = True
datastore.user = rallymetrics
datastore.password = abc
For anyone using an OnPremise cluster and having self-signed certificates and errors because of that, there is a setting available: `datastore.ssl.verification_mode`. You can disable this by setting it to none or add your local certificates to the certificate store and point it toward this setting: `datastore.ssl.certificate_authorities`. Learn more about these settings.
Understanding what is a race
First, many out-of-the-box tracks are available, and not all will suit your use case. The first command you want to run is esrally list tracks. This will show all tracks available. This list contains the track name, compressed and uncompressed sizes, and challenges. The size is essential because that is what you will download, and the uncompressed is needed on the local disk. We didn’t modify the configuration where Rally places its track data. Once you have run the esrally list tracks command, you see a folder inside ls ~/.rally called benchmarks. Within this, we store the data inside tracks with a folder for each track. This is just a copy of the GitHub repository.
A race is run on a track. Every track needs at least one challenge. A challenge describes a certain workload in terms of API calls. An ingest-only challenge would only perform ingest-related API calls. A default challenge is configured. We want to use the http_logs track with the challenge append-no-conflicts-index-only.
The command you want to use is this:
esrally race --user-tags={"benchmark_id": "1.1-http_logs-w20p1r1"} --track=http_logs --kill-running-processes --target-hosts=https://to-benchmark.elastic.co:9200 --pipeline=benchmark-only --client-options="verify_certs:false,basic_auth_user:'rally',basic_auth_password:'rally123'" --track-params='{"bulk_indexing_clients":20,"number_of_shards":1,"number_of_replicas":1}'
--challenge=append-no-conflicts-index-only
I will break it down step by step.
esrally race
Just calls esrally and tells it to perform a race.
--user-tags={"benchmark_id": "1.1-http_logs-w20p1r1"}
Is used to identify any race uniquely, not every execution. I want the same race, with the same settings, to have the same tags. In this case, I just called it 1.1-http_logs-w20p1r1. Depending on what I do, I have used countless different namings. When you create a benchmarking playbook, you can use that number. It needs to be unique to compare different races against each other. Something like 1.1-http_logs-w20p1r1 is nice. You run task 1.1 from your benchmarking playbook, the track, and how many primaries and replicas 10 workers. You can specify them in a key-value pair similar to the client-options argument. Read more.
--track=http_logs
That is the track you are running. The track is called HTTP logs, which are the logs from the Web servers for the 1998 Football world cup. Some modifications to the original logs were done, all described on the GitHub for the track: http_logs . Here is a quick peek at the example document we are ingesting:
{
  "@timestamp": 898459201,
  "clientip": "211.11.9.0",
  "request": "GET /english/index.html HTTP/1.0",
  "status": 304,
  "size": 0
}
--kill-running-processes
This one is usually not needed. Sometimes when you cancel a track because you had an issue, esrally might not exit gracefully, and you have some esrally processes around. Rally will refuse to start until you kill all running processes. If this flag is specified, Rally will instead kill these processes itself.
--target-hosts=https://to-benchmark.elastic.co:9200
This is just where you set the target hosts. It can be one or more, depending on your setup. Always test the real data flow; if you have a load balancer in front of it, test it with the load balancer endpoint. Give your load balancer team a heads-up.
--pipeline=benchmark-only
Here you can tell Rally to spin up a cluster for you or just benchmark the cluster you pointed to. In most cases, benchmark-only is what you want to use.
--client-options="verify_certs:false,basic_auth_user:'rally',basic_auth_password:'rally123'"
The client options are always tricky to figure out without an example. It needs to be in the form of key:value and when more settings are needed, you separate them with a ,. Since this is a command line argument, don’t forget to escape special characters like !. The verify_certs is a nice little tool to tell Rally to ignore the certificates, which might be helpful for on-premise testing. In this case, I just write the user + password in cleartext in the command. You can also use an environment variable if you like. More about this can be found here: https://esrally.readthedocs.io/en/stable/command_line_reference.html#client-options.
--track-params='{"bulk_indexing_clients":20,"number_of_shards":1,"number_of_replicas":1}'
The last one is the meat and potatoes of any track. You can specify the track parameters like the client options above. The reason to pick JSON and get familiar with it is because more complex tracks, such as the Elastic Logs or Security track, have loads of options. Depending on the track, more or less parameters can be set. All possible parameters are described here: https://github.com/elastic/rally-tracks/tree/master/http_logs. Any default settings are explained. It needs to be in the form of a json. It can be a command line argument like this or a local parameters file.
In a table representation, we are using the following settings. A couple more settings must be described here, as they do not apply to us.
| Parameter name | Default value | Overwritten value |
| bulk_indexing_clients | 8 | 20 |
| number_of_shards | 5 | 1 |
| number_of_replicas | 0 | 1 |
| bulk_size | 5000 | Not altered |
| ingest_percentage | 1000 | Not altered |
--challenge=append-no-conflicts-index-only
We explicitly define the challenge taken from the esrally list tracks output. Otherwise, Rally will run all the challenges a track has. This challenge is an append-no-conflicts-index-only and, therefore, a pure ingestion-related task.
Once the first run is completed, you see all the tasks Rally did in the console output. This output and more details are also collected in the Rally log file next to the configuration file in .rally/logs. In this blog post, we won’t go into detail about each of those outputs and explain how to interpret them. More information on all the steps is found in the official documentation.
What is a challenge?
We touched on the topic very quickly above and explained that every track has a default challenge. Running the http_logs track without any challenge command line argument, we run the append-no-conflicts-index-only. This is the second output of the rally command [INFO] Racing on track [http_logs], challenge [append-no-conflicts-index-only] and car ['external'] with version [8.12.1].
The intent behind every challenge is to write a specification of the benchmark. Therefore, every challenge can have different parameters, as described above, and different tasks assigned. A challenge is described in a JSON file enhanced with Jinja. The append-no-conflicts-index-only and each task associated with that is detailed in GitHub.
Let us grab this file and see what we need to understand what is happening.
{
  "operation": "delete-index"
},
{
  "operation": {
    "operation-type": "create-index",
    "settings": {{index_settings | default({}) | tojson}}
  }
},
{
  "name": "check-cluster-health",
  "operation": {
    "operation-type": "cluster-health",
    "index": "logs-*",
    "request-params": {
      "wait_for_status": "{{cluster_health | default('green')}}",
      "wait_for_no_relocating_shards": "true"
    },
    "retry-until-success": true
  }
},
{%- if runtime_fields is defined %}
  {
    "operation": "create-timestamp-pipeline"
  },
  {
    "operation": "index-append-with-timestamp-pipeline",
    "warmup-time-period": 240,
    "clients": {{bulk_indexing_clients | default(8)}},
    "ignore-response-error-level": "{{error_level | default('non-fatal')}}"
  },
{%- else %}
  {
    "operation": "index-append",
    "warmup-time-period": 240,
    "clients": {{bulk_indexing_clients | default(8)}},
    "ignore-response-error-level": "{{error_level | default('non-fatal')}}"
  },
{%- endif %}
{
  "name": "refresh-after-index",
  "operation": "refresh"
},
{
  "operation": {
    "operation-type": "force-merge",
    "request-timeout": 7200
  }
},
{
  "name": "refresh-after-force-merge",
  "operation": "refresh"
},
{
  "name": "wait-until-merges-finish",
  "operation": {
    "operation-type": "index-stats",
    "index": "_all",
    "condition": {
      "path": "_all.total.merges.current",
      "expected-value": 0
    },
    "retry-until-success": true,
    "include-in-reporting": false
  }
},
...
The original file is much longer than this excerpt, but this helps us understand what is happening and how to deal with it.
The first task in every track is the delete-index. We want to delete any existing index — otherwise, we cannot calculate correctly if all documents were indexed successfully, any segments, force merging durations, and so on are not representable values. The reasons for performing this as the first step and not at the end of the benchmark “as a cleanup” phase, if you will. Maybe you want to inspect the data in the cluster after the run, and you cannot do this if we delete it as a last step. Or when you cancel a running benchmark, this ensures that we always start fresh.
The second task is usually to create the index that is associated with this. We just do a PUT indexname.
The third task is very important as it is check-cluster-health, and it waits for the cluster to become green, signaling that all shards are assigned and the cluster is in a good healthy state. If you benchmark a single-node cluster, this cluster is never green, except when you make some changes to set all replicas to 0.
This part: {{cluster_health | default('green')}} shows you that there is a parameter called cluster_health that you can override as we did with bulk_indexing_clients. Pass cluster_health: ‘yellow’ if you want to benchmark a yellow state cluster. I would not recommend it, though. This task will also be retried until the success criteria are reached.
Something interesting is coming up next, and that is an if condition. In this case, when we run with runtime_fields parameter, we run a different index-append task, more specifically: index-append-with-timestamp-pipeline. We have not used this parameter yet, therefore we land in the else portion and run the normal index-append. That is how those track files are built up and how they work.
Running your first race air-gapped
In an air-gapped environment, running the tracks is a bit more complicated since Rally cannot just pull it from GitHub and download the required files. Let’s go through it step by step. We want to run the same http_logs track. This track is part of this GitHub repository. Run esrally list tracks, and it will error and tell you it couldn’t clone this repository.
Always run esrally list tracks. Regardless of the errors, it sets up the folder structure and config file you need later.
Download the current master as a zip from the GitHub repository.
Copy the zip file onto your Rally host.
Then unzip master.zip.
There is now a folder called rally-tracks-master — go inside. Then you should see a list of folders. Now those folders must go into the $HOME/.rally/benchmarks/tracks/default. Best is to use cp -r * ~/.rally/benchmarks/tracks/default.
Now run esrally list tracks --offline. This should give you an error that the repository is not a git repository. There is also the option to use the --track-path=~/Projects/tracks/app-logs and point to the directory that contains your track description and the data.
Go into the ~/.rally/benchmarks/tracks/default and run git init.
Run git add --all and then git commit -m “init”.
Now esrally list tracks --offline should work and list all the tracks and give you a warning message [WARNING] Local changes in [/home/philipp/.rally/benchmarks/tracks/default] prevent tracks update from remote. Please commit your changes.
Try running a race using the command from above: esrally race --track=http_logs --kill-running-processes --target-hosts=https://to-benchmark.elastic.co:9200 --pipeline=benchmark-only --client-options="verify_certs:false,basic_auth_user:'rally',basic_auth_password:'rally123'" --track-params='{"bulk_indexing_clients":20,"number_of_shards":1,"number_of_replicas":1}' but append an --offline at the end. As pointed out at 6, you can switch this to --track-path instead of --track.
This will cause an error with: [ERROR] Cannot race. Error in task executor Cannot find [/home/philipp/.rally/benchmarks/data/http_logs/documents-181998.json.bz2]. Please disable offline mode and retry.
Now we know we are missing the benchmark data and where to place it. The benchmarking data directory can be changed inside the rally.ini using the `local.dataset.cache` setting.
There are two ways to do this. The first variant is to use the offline downloader. The second variant might be used when offline downloaders don’t work for a particular track.
- First: use the offline downloader like:
- curl -O https://raw.githubusercontent.com/elastic/rally-tracks/master/download.sh && chmod u+x download.sh
./download.sh http_logs
- Copy the created tar file over to your air-gapped Rally host.
- You can now untar this file, and it will give you the track description and the benchmarking data. However, since we already have the track description. You only need to copy what is inside the extracted benchmarks/data directory to your data path per default .rally/benchmarks/data/.
Start the track again, like in step 10, and it will work without issues.
The fallback variant can be used when the downloader doesn’t work. You can run ES Rally with the track you want on a machine that has internet. Run the track, and wait until it starts with DELETE index or similar. This means all data has been downloaded and extracted. You can now go to the data folder of ES Rally and copy it, as it is over to the air-gapped host. I do not recommend this approach, though!
What’s next?
In this blog, we achieved quite a bit together! We installed Rally, ran our first race, and had the first benchmarking output. In the next blog, we’ll look at the output of Rally to understand what this means for our Elasticsearch performance.
Read this next: A step-by-step guide to creating custom ES Rally tracks
The release and timing of any features or functionality described in this post remain at Elastic's sole discretion. Any features or functionality not currently available may not be delivered on time or at all.
Share
- Share on Twitter
Share on Twitter
- Share on LinkedIn
Share on LinkedIn
- Share on Facebook
Share on Facebook
- Share by Email
Share by Email
- Print this page
Print