How to Build Great React Search Experiences Quickly
Nov 15, 2019: The code in this post has been updated to include missing brackets. The flow was also adjusted to avoid runtime errors. |
Building search experiences is hard work. It can seem easy at a glance: build a search bar, put data into a database, then have user input fuel queries against the database. But there are many things to consider in the data modeling, underlying logic and — of course — the overall design and user experience.
We’ll walk through how to build excellent, React-based search experiences using Elastic’s open source Search UI library. It’ll take about 30 minutes, and afterwards you’ll be ready to bring search to any application which needs it.
But first, what is it that makes building search so challenging?
Search is hard
A great article made the rounds a few weeks ago titled Falsehoods Programmers Believe About Search. It contains an exhaustive list of false assumptions developers take into the development of search.
Among the many believed falsehoods:
- “Customers who know what they are looking for will search for it in the way you expect.”
- “You can write a query parser that will always parse the query successfully.”
- “Once set up, search will work the same way for the next week.”
- “Synonyms are easy.”
- … And many others gems — you should give it a read!
The takeaway is that search has many challenges — and they aren’t just under-the-hood. You need to think about how to manage state, build components for filtering, faceting, sorting, pagination, synonyms, language processing, and much, much… much more. But, in summary:
Building great search requires two sophisticated parts: (1) the search engine, which provides APIs to power search and (2) the search library, which paints the search experience.
For the search engine, we’ll look at Elastic App Search.
For the search experience, we’ll introduce an OS search library: Search UI.
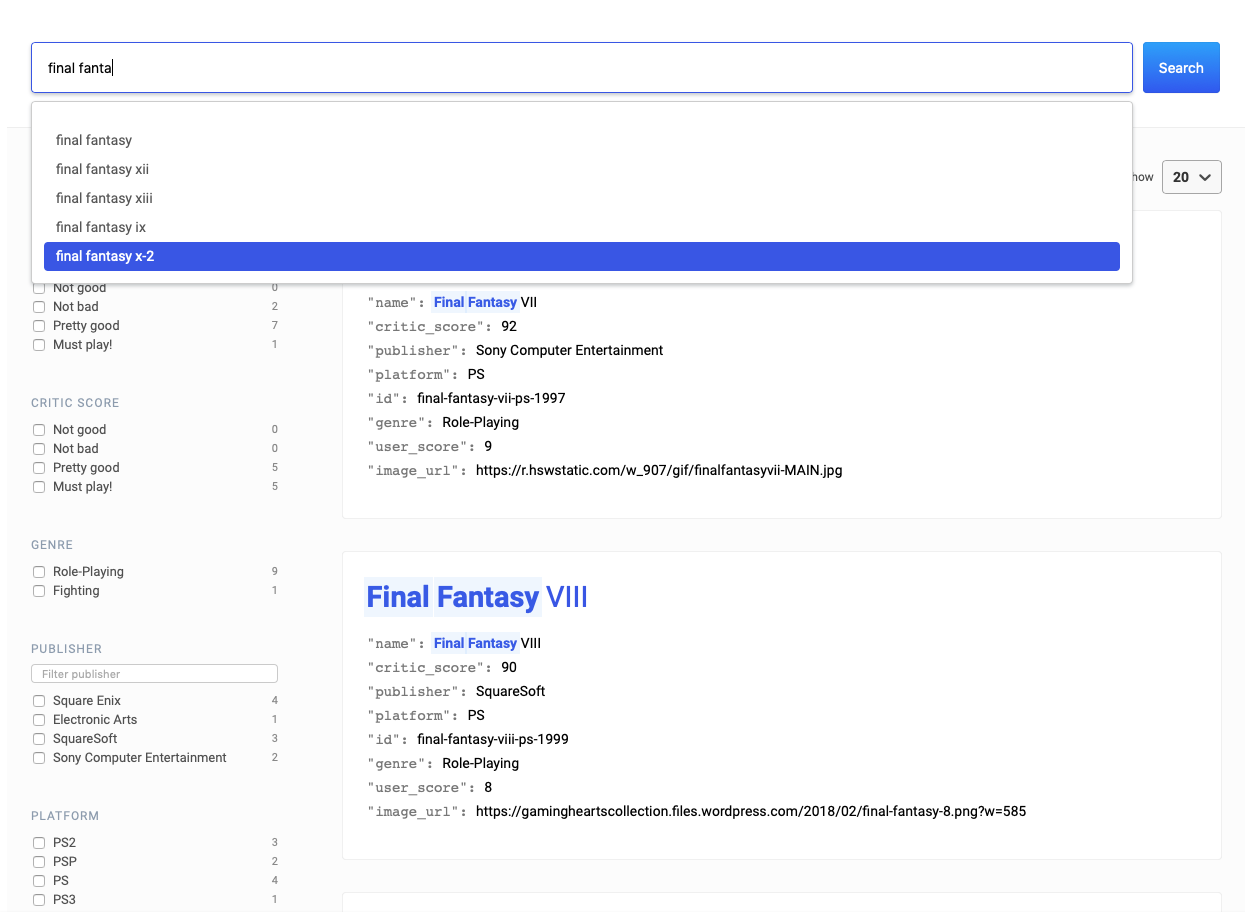
When we’re done, it’ll look just like this:
Search engine: Elastic App Search
App Search is available as either a paid, managed service, or a free, self-managed distribution. We’ll use the managed service for this tutorial, but remember that your team can use Search UI and App Search with a basic license at no cost if you host it yourself.
The plan: Index documents which represent the best video games of all time into a search engine, then design and optimize a search experience to search through them.
First, sign up for a 14-day trial — no credit card needed.
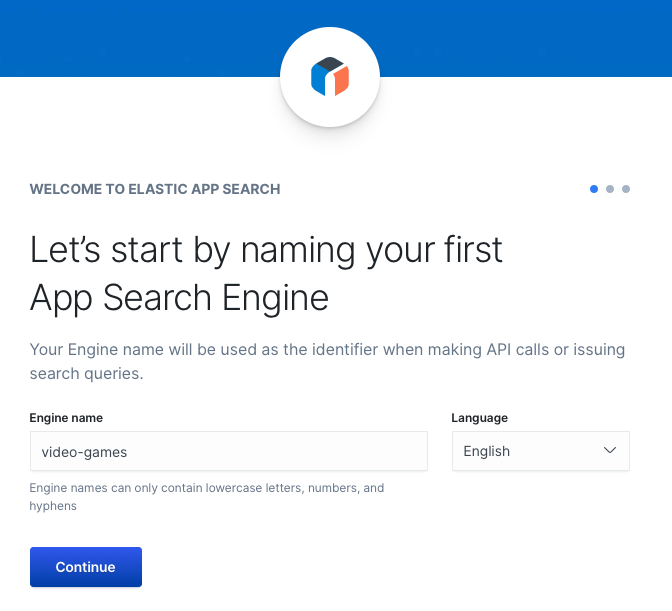
Create an Engine. You can pick from 13 different languages.
Let’s name it video-games and set the language to English.
Download the best video games data set and then upload it to App Search using the importer.
Next, click into the Engine, then select the Credentials tab.
Create a new Public Search Key with Limited Engine Access to only the video-games engine.
Retrieve the new Public Search Key and your Host Identifier.
Even though it didn’t look like much, we now have a fully functioning search engine that’s ready to search through our video game data using a refined search API.
Here’s what we’ve done so far:
- Created a search engine
- Ingested documents
- Created a default schema
- Retrieved a scoped, disposable credential that we can expose to the browser
That’s it for App Search, for now.
Let’s get to building our search experience using Search UI.
Search library: Search UI
We’re going to use the create-react-app scaffolding utility to create a React app:
npm install -g create-react-app
create-react-app video-game-search --use-npm
cd video-game-search
Within this foundation, we’ll install Search UI and the App Search connector:
npm install --save @elastic/react-search-ui @elastic/search-ui-app-search-connector
And start the app in development mode:
npm start
Open up src/App.js in your favorite text editor.
We’ll start with some boilerplate code, and then unpack it.
Mind the comments!
// Step #1, import statements
import React from "react";
import AppSearchAPIConnector from "@elastic/search-ui-app-search-connector";
import { SearchProvider, Results, SearchBox } from "@elastic/react-search-ui";
import { Layout } from "@elastic/react-search-ui-views";
import "@elastic/react-search-ui-views/lib/styles/styles.css";
// Step #2, The connector
const connector = new AppSearchAPIConnector({
  searchKey: "[YOUR_SEARCH_KEY]",
  engineName: "video-games",
  hostIdentifier: "[YOUR_HOST_IDENTIFIER]"
});
// Step #3: Configuration options
const configurationOptions = {
  apiConnector: connector
  // Let's fill this in together.
};
// Step #4, SearchProvider: The finishing touches
export default function App() {
  return (
    <SearchProvider config={configurationOptions}>
      <div className="App">
        <Layout
        // Let's fill this in together.
        />
      </div>
    </SearchProvider>
  );
}
Step 1: import statements
We’ll need to import our Search UI dependencies and React.
The core components, connector, and view components are contained within three different packages:
- @elastic/search-ui-app-search-connector
- @elastic/react-search-ui
- @elastic/react-search-ui-views
We’ll learn more about each of them as we proceed.
import React from "react";
import AppSearchAPIConnector from "@elastic/search-ui-app-search-connector";
import { SearchProvider, Results, SearchBox } from "@elastic/react-search-ui";
import { Layout } from "@elastic/react-search-ui-views";
We’ll also be importing a default stylesheet for this project, which will give us a nice look and feel without writing a line of our own CSS:
import "@elastic/react-search-ui-views/lib/styles/styles.css";
Step 2: The connector
We have our Public Search Key and Host Identifier from App Search.
Time to put them to work!
The connector object within Search UI uses the credentials to hook into App Search and power search:
const connector = new AppSearchAPIConnector({
  searchKey: "[YOUR_SEARCH_KEY]",
  engineName: "video-games",
  hostIdentifier: "[YOUR_HOST_IDENTIFIER]"
});
Search UI works with any search API. But connectors make it so that a search API will just work, without any deeper configuration.
Step 3: configurationOptions
Before we dig into configurationOptions, let’s take a moment to reflect.
We imported a set of data into our search engine. But what kind of data is it?
The more we know about our data, the better we’ll understand how to present that data to searchers. And that’ll inform how to configure the search experience.
Let’s look at one object, the best object of all within this data set:
{
  "id":"final-fantasy-vii-ps-1997",
  "name":"Final Fantasy VII",
  "year":1997,
  "platform":"PS",
  "genre":"Role-Playing",
  "publisher":"Sony Computer Entertainment",
  "global_sales":9.72,
  "critic_score":92,
  "user_score":9,
  "developer":"SquareSoft",
  "image_url":"https://r.hswstatic.com/w_907/gif/finalfantasyvii-MAIN.jpg"
}
We see that it has several text fields like name, year, platform, and so on and some number fields like critic_score, global_sales, and user_score.
If we ask three key questions, we’ll know enough to build a solid search experience:
- How will most people search? By the name of the video game.
- What will most people want to see in a result? The name of the video game, its genre, publisher, scores, and its platform.
- How will most people filter, sort, and facet? By score, genre, publisher, and platform.
We then can translate those answers into our configurationOptions:
const configurationOptions = {
  apiConnector: connector,
  searchQuery: {
    search_fields: {
      // 1. Search by name of video game.
      name: {}
    },
    // 2. Results: name, genre, publisher, scores, and platform.
    result_fields: {
      name: {
        // A snippet means that matching search terms will be wrapped in <em> tags.
        snippet: {
          size: 75, // Limit the snippet to 75 characters.
          fallback: true // Fallback to a "raw" result.
        }
      },
      genre: {
        snippet: {
          size: 50,
          fallback: true
        }
      },
      publisher: {
        snippet: {
          size: 50,
          fallback: true
        }
      },
      critic_score: {
        // Scores are numeric, so we won't snippet.
        raw: {}
      },
      user_score: {
        raw: {}
      },
      platform: {
        snippet: {
          size: 50,
          fallback: true
        }
      },
      image_url: {
        raw: {}
      }
    },
    // 3. Facet by scores, genre, publisher, and platform, which we'll use to build filters later.
    facets: {
      user_score: {
        type: "range",
        ranges: [
          { from: 0, to: 5, name: "Not good" },
          { from: 5, to: 7, name: "Not bad" },
          { from: 7, to: 9, name: "Pretty good" },
          { from: 9, to: 10, name: "Must play!" }
        ]
      },
      critic_score: {
        type: "range",
        ranges: [
          { from: 0, to: 50, name: "Not good" },
          { from: 50, to: 70, name: "Not bad" },
          { from: 70, to: 90, name: "Pretty good" },
          { from: 90, to: 100, name: "Must play!" }
        ]
      },
      genre: { type: "value", size: 100 },
      publisher: { type: "value", size: 100 },
      platform: { type: "value", size: 100 }
    }
  }
};
We’ve connected Search UI to our search engine and now we have options that govern how we’re going to search through data, display our results, and then explore those results. But we need something to tie everything to the dynamic frontend components of Search UI.
Step 4: SearchProvider
This is the object that rules them all. The SearchProvider is where all other components are nested.
Search UI provides a Layout component, which is used to paint a typical search layout. There are deep customization options, but we won’t go into those in this tutorial.
We will do two things:
- Pass in configurationOptions to SearchProvider.
- Place some structural building blocks into Layout and add two basic components: SearchBox and Results.
export default function App() {
  return (
    <SearchProvider config={configurationOptions}>
      <div className="App">
        <Layout
          header={<SearchBox />}
          // titleField is the most prominent field within a result: the result header.
          bodyContent={<Results titleField="name" urlField="image_url" />}
        />
      </div>
    </SearchProvider>
  );
}
At this point, we have the basics set up on the front-end. There's a few more details to work out on the back-end before we can run this. We should also work on the relevance model so that search is fine tuned for the unique needs of this project.
Off to App Search...
Back to the lab
App Search has powerful and refined search engine features. It makes once-sophisticated tuning much more enjoyable. We can perform fine-grained relevance adjustments and seamless schema changes in a few clicks.
We'll adjust the schema first to see it in action.
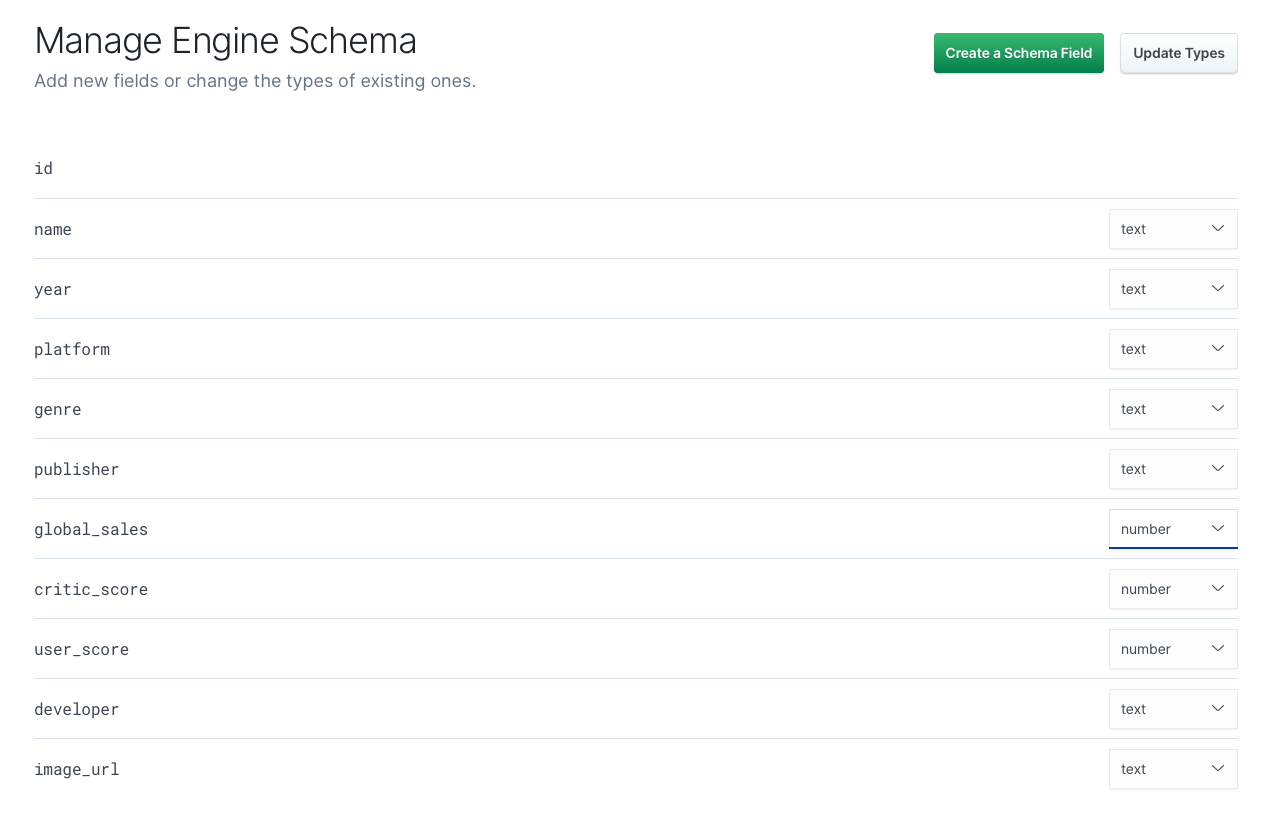
Log in to App Search, enter the video-games Engine, and then click Schema under the Manage section.
The schema appears. Each of the 11 fields is considered text by default.
In the configurationOptions object, we’ve defined two range facets to help us search through numbers: user_score and critic_score. For a range facet to work as expected, the field type needs to be a number.
Click the drop-down menu next to each field, change it to number, then click Update Types:
The Engine reindexes on the fly. And later on — when we add the faceting components to our layout — the range filters will function as we expect. And now, onto the real nifty stuff.
This section is highly relevant
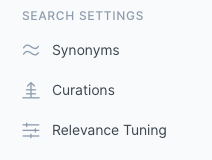
There are three key relevance features: Synonyms, Curations, and Relevance Tuning.
Select each feature under the Search Settings section in the sidebar:
Synonyms
Some people drive cars, some automobiles, others might drive a jalopy. The internet is global and people around the globe use different words to describe things. Synonyms help you create sets of terms that are considered one and the same.
In the case of a video game search engine, we know people will want to find Final Fantasy. But maybe they’ll type FF instead.
Click into Synonyms, then select Create a Synonym Set and enter the terms:
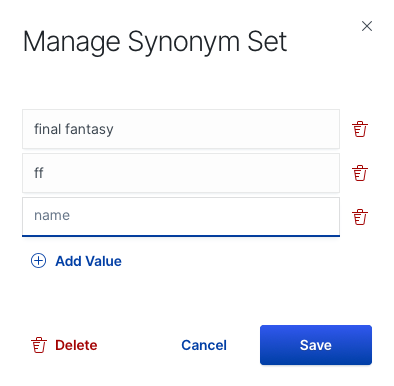
Click Save. You can add as many synonym sets as you’d like.
Searches for FF will now carry the same weight as searches for Final Fantasy.
Curations
Curations are a favorite. What if someone does search for Final Fantasy or FF? There are many games in the series — which will they get?
By default, the top five results looks like so:
1. Final Fantasy VIII
2. Final Fantasy X
3. Final Fantasy Tactics
4. Final Fantasy IX
5. Final Fantasy XIII
That doesn’t seem right… Final Fantasy VII was the best Final Fantasy game of all. And Final Fantasy XIII wasn’t very good! 😜
Can we make it so that someone searching for Final Fantasy will receive Final Fantasy VII as the first result? And can we remove Final Fantasy XIII from our search results?
We can!
Click into Curations and enter a query: Final Fantasy.
Next, drag the Final Fantasy VII document up to the Promoted Documents section by grabbing the handlebar on the leftmost side of the table. And then click the Hide Result button on the Final Fantasy XIII document — the eye with the line going through it:
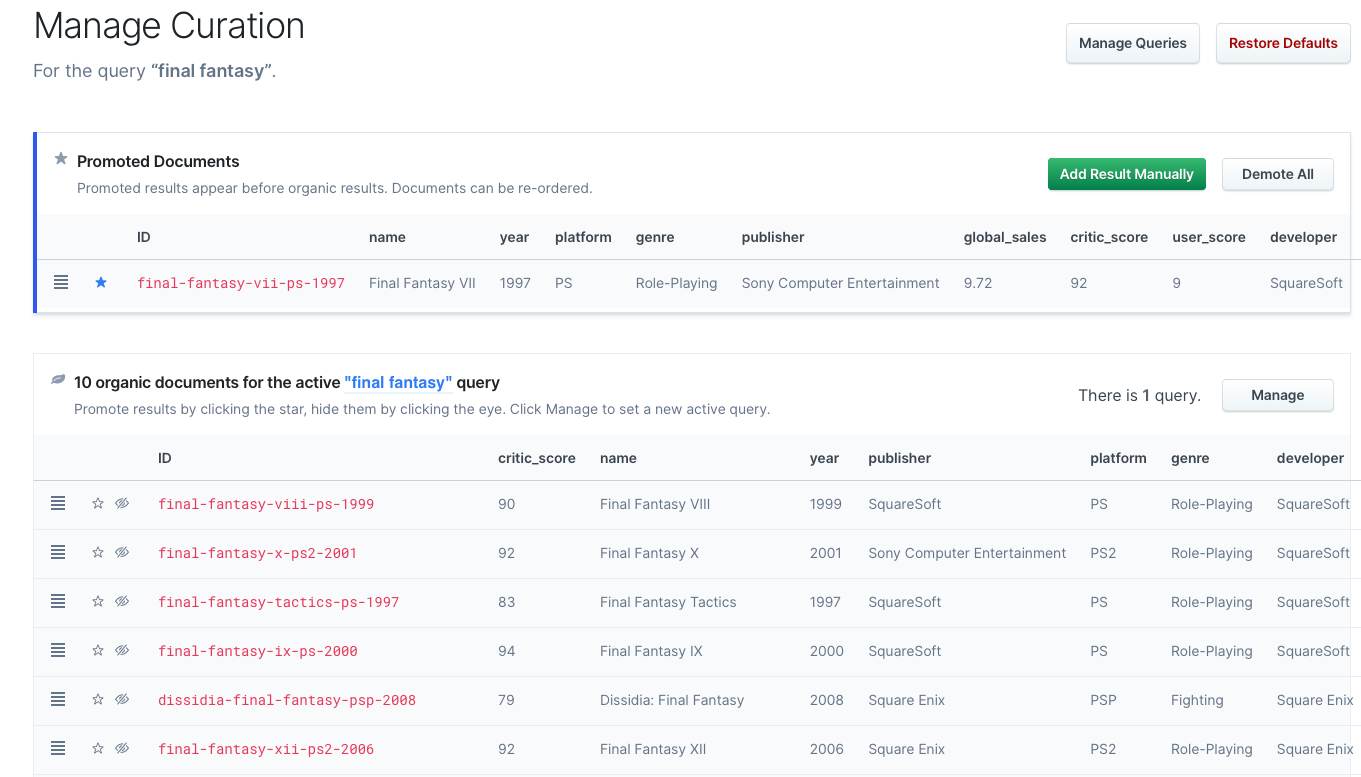
Anyone performing a search for Final Fantasy or FF will now see Final Fantasy VII first.
And they won’t see Final Fantasy XIII at all. Ha!
We can promote and hide many documents. We can even sort promoted documents so we maintain full control over what appears at the top of each query.
Relevance tuning
Click Relevance Tuning in the sidebar.
We search into one text field: the name field. But what if we have multiple text fields people will search through, like a name field and a description field? The video game data set we’re using does not contain a description field, so we’ll fake some documents to think through it.
Say our documents looked similar to this:
{
  "name":"Magical Quest",
  "description": "A dangerous journey through caves and such."
},
{
  "name":"Dangerous Quest",
  "description": "A magical journey filled with magical magic. Highly magic."
}
If someone wanted to find the game Magical Quest, they would enter that as the query. But the first result would be Dangerous Quest:
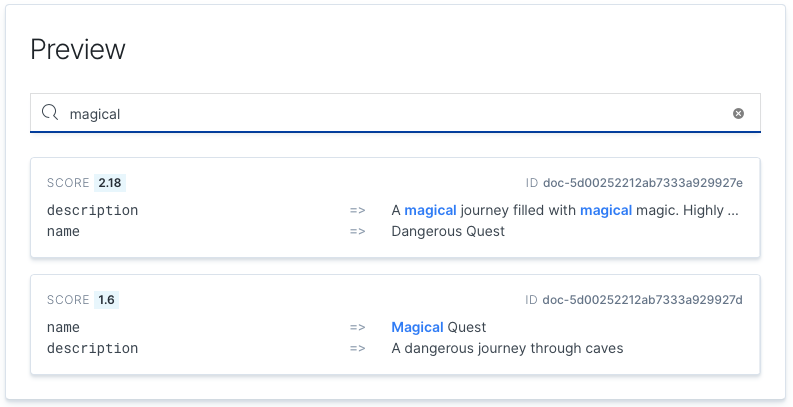
Why? Because the word “magical” is present three times in the description of Dangerous Quest, and the search engine will not know that one field is more important than another. It will then rank Dangerous Quest higher. This conundrum is why Relevance Tuning exists.
We can select a field and — among other things — increase the weighting of its relevance:
We see that when we scale up weight, the right item — Magical Quest — rises to the top because the name field becomes more significant. All we need to do is drag the slider to a higher value and click Save.
We’ve now used App Search to:
- Adjust the schema and change user_score and critic_score to number fields.
- Fine-tune the relevance model.
And that concludes the fancy “dashboard” features — each one has a matching API endpoint which you can use to make things work programmatically if GUIs aren’t your thing.
Now, let’s finish off the UI.
Finishing touches
At this point your UI should be functional. Try some queries and poke around. The first thing that jumps out is that we’re missing tools to explore our results, like filtering, faceting, sorting, and so on, but search works. We’ll need to flesh out the UI.
Within the initial src/App.js file, we imported three basic components:
import { SearchProvider, Results, SearchBox } from "@elastic/react-search-ui";
Let’s add some more, given what we’ve defined for our configuration options.
Importing the following components will enable the missing abilities within the UI:
- PagingInfo: Display information on the current page.
- ResultsPerPage: Configure how many results appear on each page.
- Paging: Navigate through different pages.
- Facet: Filter and explore data in ways unique to the type of data.
- Sorting: Re-orient results for a given field.
import {
  PagingInfo,
  ResultsPerPage,
  Paging,
  Facet,
  SearchProvider,
  Results,
  SearchBox,
  Sorting
} from "@elastic/react-search-ui";
Once imported, components can be placed into the Layout.
The Layout component divides the page into sections, and components can be placed into these sections via props.
It contains sections for the:
- header: Search box/bar
- bodyContent: Result container
- sideContent: Sidebar, which contains facets and sorting options
- bodyHeader: “Wrapper” around results with context-rich information like current page and number of results per page
- bodyFooter: Paging options for quick navigation between pages
Components render data. Data is fetched based on the search settings we provided in the configurationOptions. Now, we’ll place each component in the appropriate Layout section.
For example, we described five faceting dimensions in configurationOptions, so we'll create five Facet components. Each Facet component will use a "field" prop as a key back to our data.
We'll put them in the sideContent section, along with our Sorting component, then place the Paging, PagingInfo, and ResultsPerPage components in the sections that best suit them:
<Layout
  header={<SearchBox />}
  bodyContent={<Results titleField="name" urlField="image_url" />}
  sideContent={
    <div>
      <Sorting
        label={"Sort by"}
        sortOptions={[
          {
            name: "Relevance",
            value: "",
            direction: ""
          },
          {
            name: "Name",
            value: "name",
            direction: "asc"
          }
        ]}
      />
      <Facet field="user_score" label="User Score" />
      <Facet field="critic_score" label="Critic Score" />
      <Facet field="genre" label="Genre" />
      <Facet field="publisher" label="Publisher" isFilterable={true} />
      <Facet field="platform" label="Platform" />
    </div>
  }
  bodyHeader={
    <>
      <PagingInfo />
      <ResultsPerPage />
    </>
  }
  bodyFooter={<Paging />}
/>
Now let’s have a look at the search experience in the local development environment.
Much better! We have rich options to explore the search results.
We threw in a couple extra goodies like multiple sort options, and we’ve made the publisher facet filterable by adding a single flag. Try a search with a blank query and explore all the options.
Finally… let’s look at one last feature of the search experience. It’s a popular one…
Autocomplete.
You autocomplete me
Searchers love autocomplete because it provides instant feedback. Its suggestions come in two flavors: result and query. Depending on which flavor, a searcher will receive relevant results or potential queries that can lead to results.
We’re going to focus on autocomplete as a form of query suggestion.
This requires two quick changes.
First, we need to add autocomplete to the configurationOptions object:
const configurationOptions = {
  autocompleteQuery: {
    suggestions: {
      types: {
        documents: {
          // Which fields to search for suggestions
          fields: ["name"]
        }
      },
      // How many suggestions appear
      size: 5
    }
  },
  ...
};
Second, we need to enable autocomplete as a function of the SearchBox:
...
        <Layout
          ...
          header={<SearchBox autocompleteSuggestions={true} />}
/>
...
Yep — that’s it.
Try searching — as you type, autocomplete query suggestions appear.
Summary
We now have a good-looking, functional search experience. And we’ve avoided a whole mess of pitfalls that often catch people as they try to implement search. Not bad for 30 minutes, wouldn’t you say?
Search UI is a flexible, modern React framework for the quick development of search experiences. Elastic App Search is a robust search engine built atop Elasticsearch. It’s a paid, managed service, or you can run it yourself free with an ample basic license.
We’d love to see what you build with Search UI. Stop by Gitter and consider contributing to the project!