Cross-Datacenter Replication with Elasticsearch Cross-Cluster Replication
Cross-datacenter replication has been a requirement for mission-critical applications on Elasticsearch for some time, and was previously solved partially with additional technologies. With the introduction of cross-cluster replication in Elasticsearch 6.7, no additional technologies are needed to replicate data across datacenters, geographies, or Elasticsearch clusters.
Cross-cluster replication (CCR) enables replication of specific indices from one Elasticsearch cluster to one or more Elasticsearch clusters. In addition to cross-datacenter replication, there are a variety of additional use cases for CCR, including data locality (replicating data to live closer to a user/application server, such as replicating a product catalog to 20 different datacenters around the world) or replicating data from an Elasticsearch cluster to a central reporting cluster (e.g. 1000 bank branches around the world all writing to their local Elasticsearch cluster, and replicating back to a cluster in HQ for reporting purposes).
In this tutorial for cross-datacenter replication with CCR, we’ll briefly touch on CCR basics, highlight architecture options and tradeoffs, configure a sample cross-datacenter deployment, and highlight administrative commands. For a technical introduction to CCR, please see Follow the Leader: An Introduction to Cross-Cluster Replication in Elasticsearch.
CCR is a platinum level feature, and is available through 30-day trial license that can be activated through the start trial API or directly from Kibana.
Cross-Cluster Replication (CCR) Basics
Replication is configured at the index level (or based on an index pattern)
CCR is configured at the index level in Elasticsearch. By configuring replication at the index level, there are a large number of replication strategies available, including replicating some indices in one direction, other indices in another direction, and granular cross-datacenter architectures.
Replicated indices are read-only
An index can be replicated by one or more Elasticsearch clusters. Each cluster that is replicating the index maintains a read-only copy of the index. The active index capable of accepting writes is called the leader. The passive read-only copies of that index are called the followers. There is no concept of an election for a new leader, when a leader index is not available (such as a cluster/datacenter outage), another index must be explicitly chosen for writes by the application or cluster administrator (most likely in another cluster).
CCR defaults were chosen for a wide-variety of high-throughput use cases
It is not recommended to change the default values without a thorough understanding of how adjusting a value will affect the system. Most options can be found within the Create follower API, such as "max_read_request_operation_count" or "max_retry_delay". We’ll soon publish a post on tuning these parameters for unique workloads.
Security requirements
As outlined in the CCR Getting Started Guide, the user on the source cluster must have the “read_ccr” cluster privilege, “monitor” and “read” index privileges. Within the target cluster, the user must have the “manage_ccr” cluster privilege, and “monitor”, “read”, “write”, and “manage_follow_index” index privileges. Centralized authentication systems may also be used, such as LDAP.
Sample Cross-Datacenter CCR Architectures
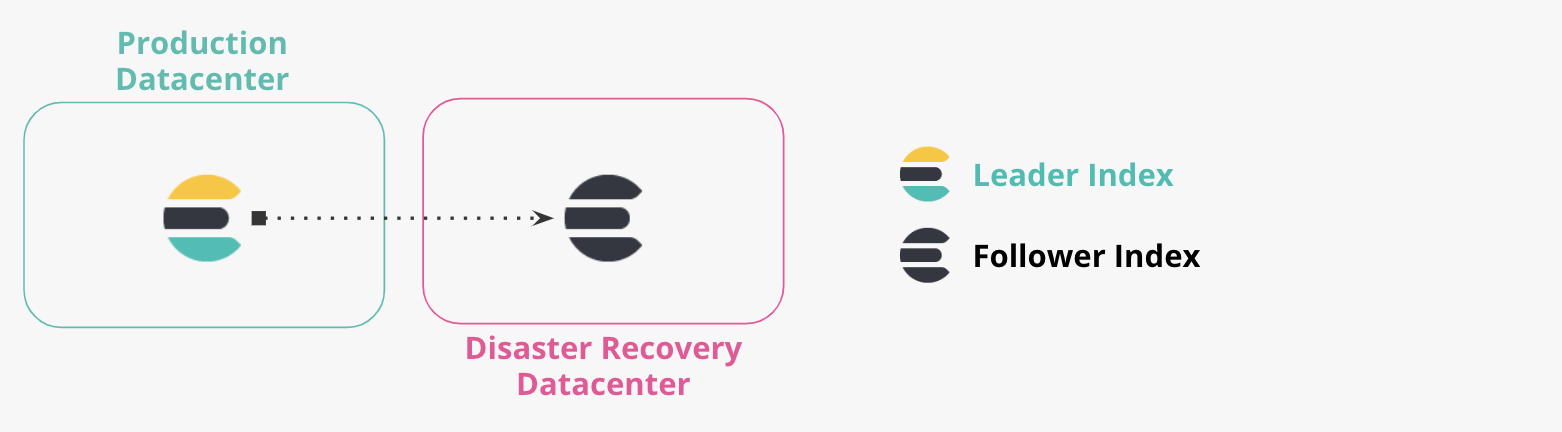
Production and DR Datacenters
More Than Two Datacenters
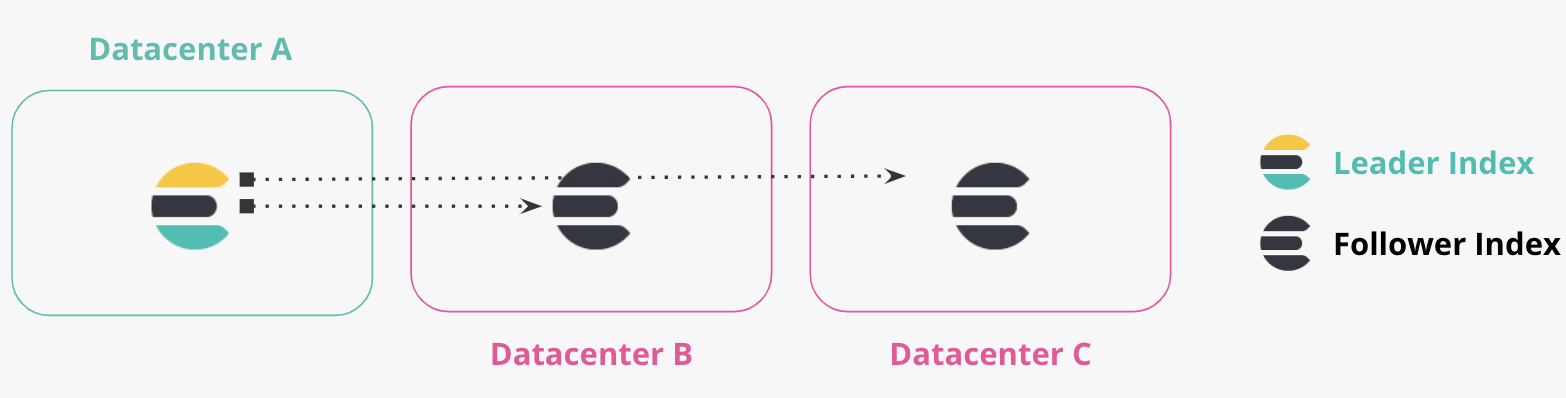
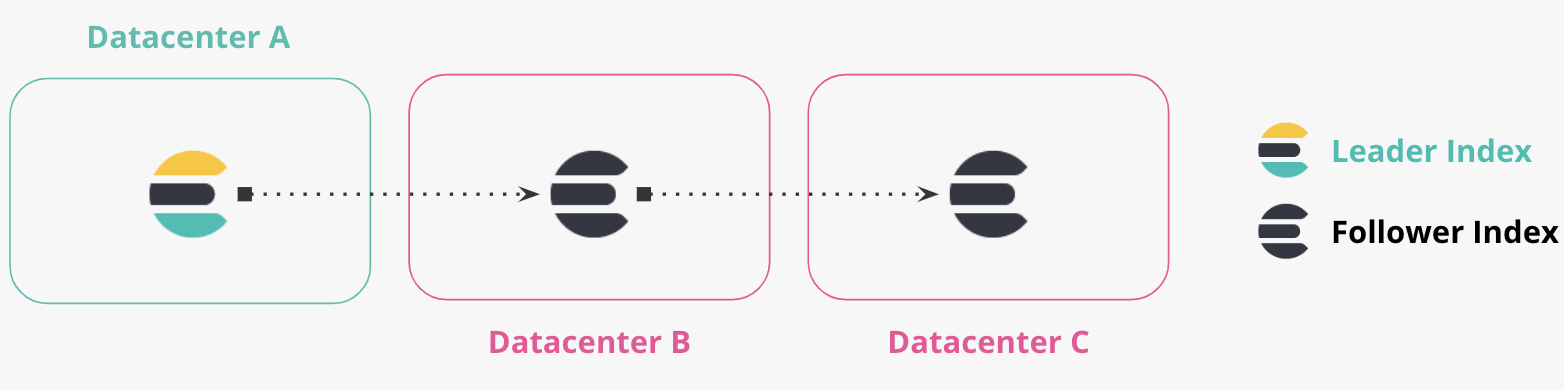
Chained Replication
Bi-directional Replication

Cross-datacenter Deployment Tutorial
1. Setup
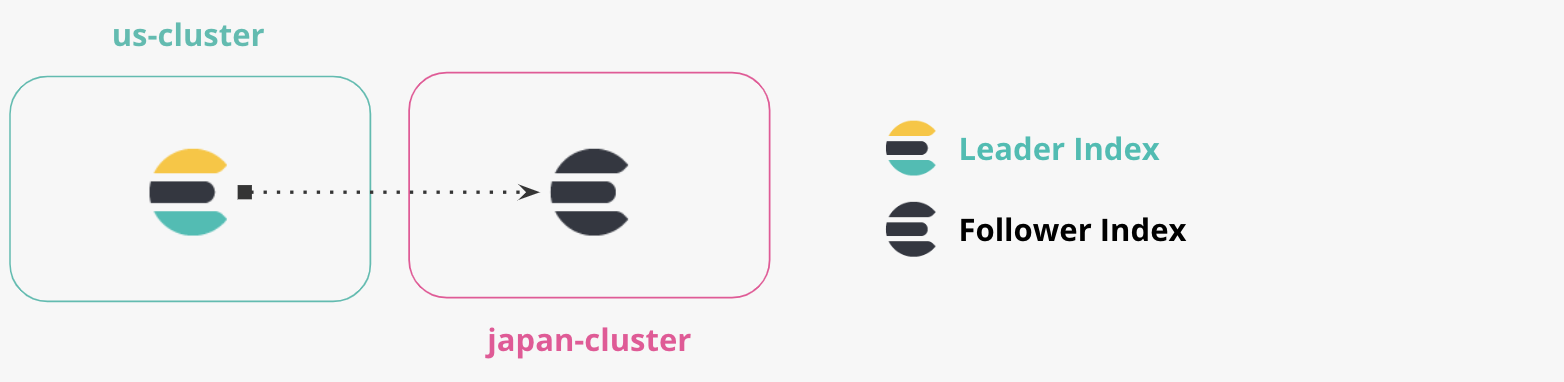
For this tutorial, we’ll use two clusters, both clusters will be on our local computer. Feel free to locate the clusters anywhere you would like.
- ‘us-cluster’ : this is our “US cluster”, and we’ll run locally on port 9200. We’ll replicate documents from the US cluster to the Japan Cluster.
- ‘japan-cluster’ : this is our "Japan cluster”, we’ll run locally on port 8200. The Japan cluster will maintain a replicated index from the US cluster.
2. Define Remote Clusters
When setting up CCR, Elasticsearch clusters must know about other Elasticsearch clusters. This is a uni-directional requirement, where the target cluster will maintain uni-directional connections to the source cluster. We define other Elasticsearch clusters as remote clusters, and specify an alias to describe them.
We want to make sure our ‘japan-cluster’ knows about the ‘us-cluster’. Replication in CCR is pull based, and doesn’t require us to specify a connection from the ‘us-cluster’ to the ‘japan-cluster’.
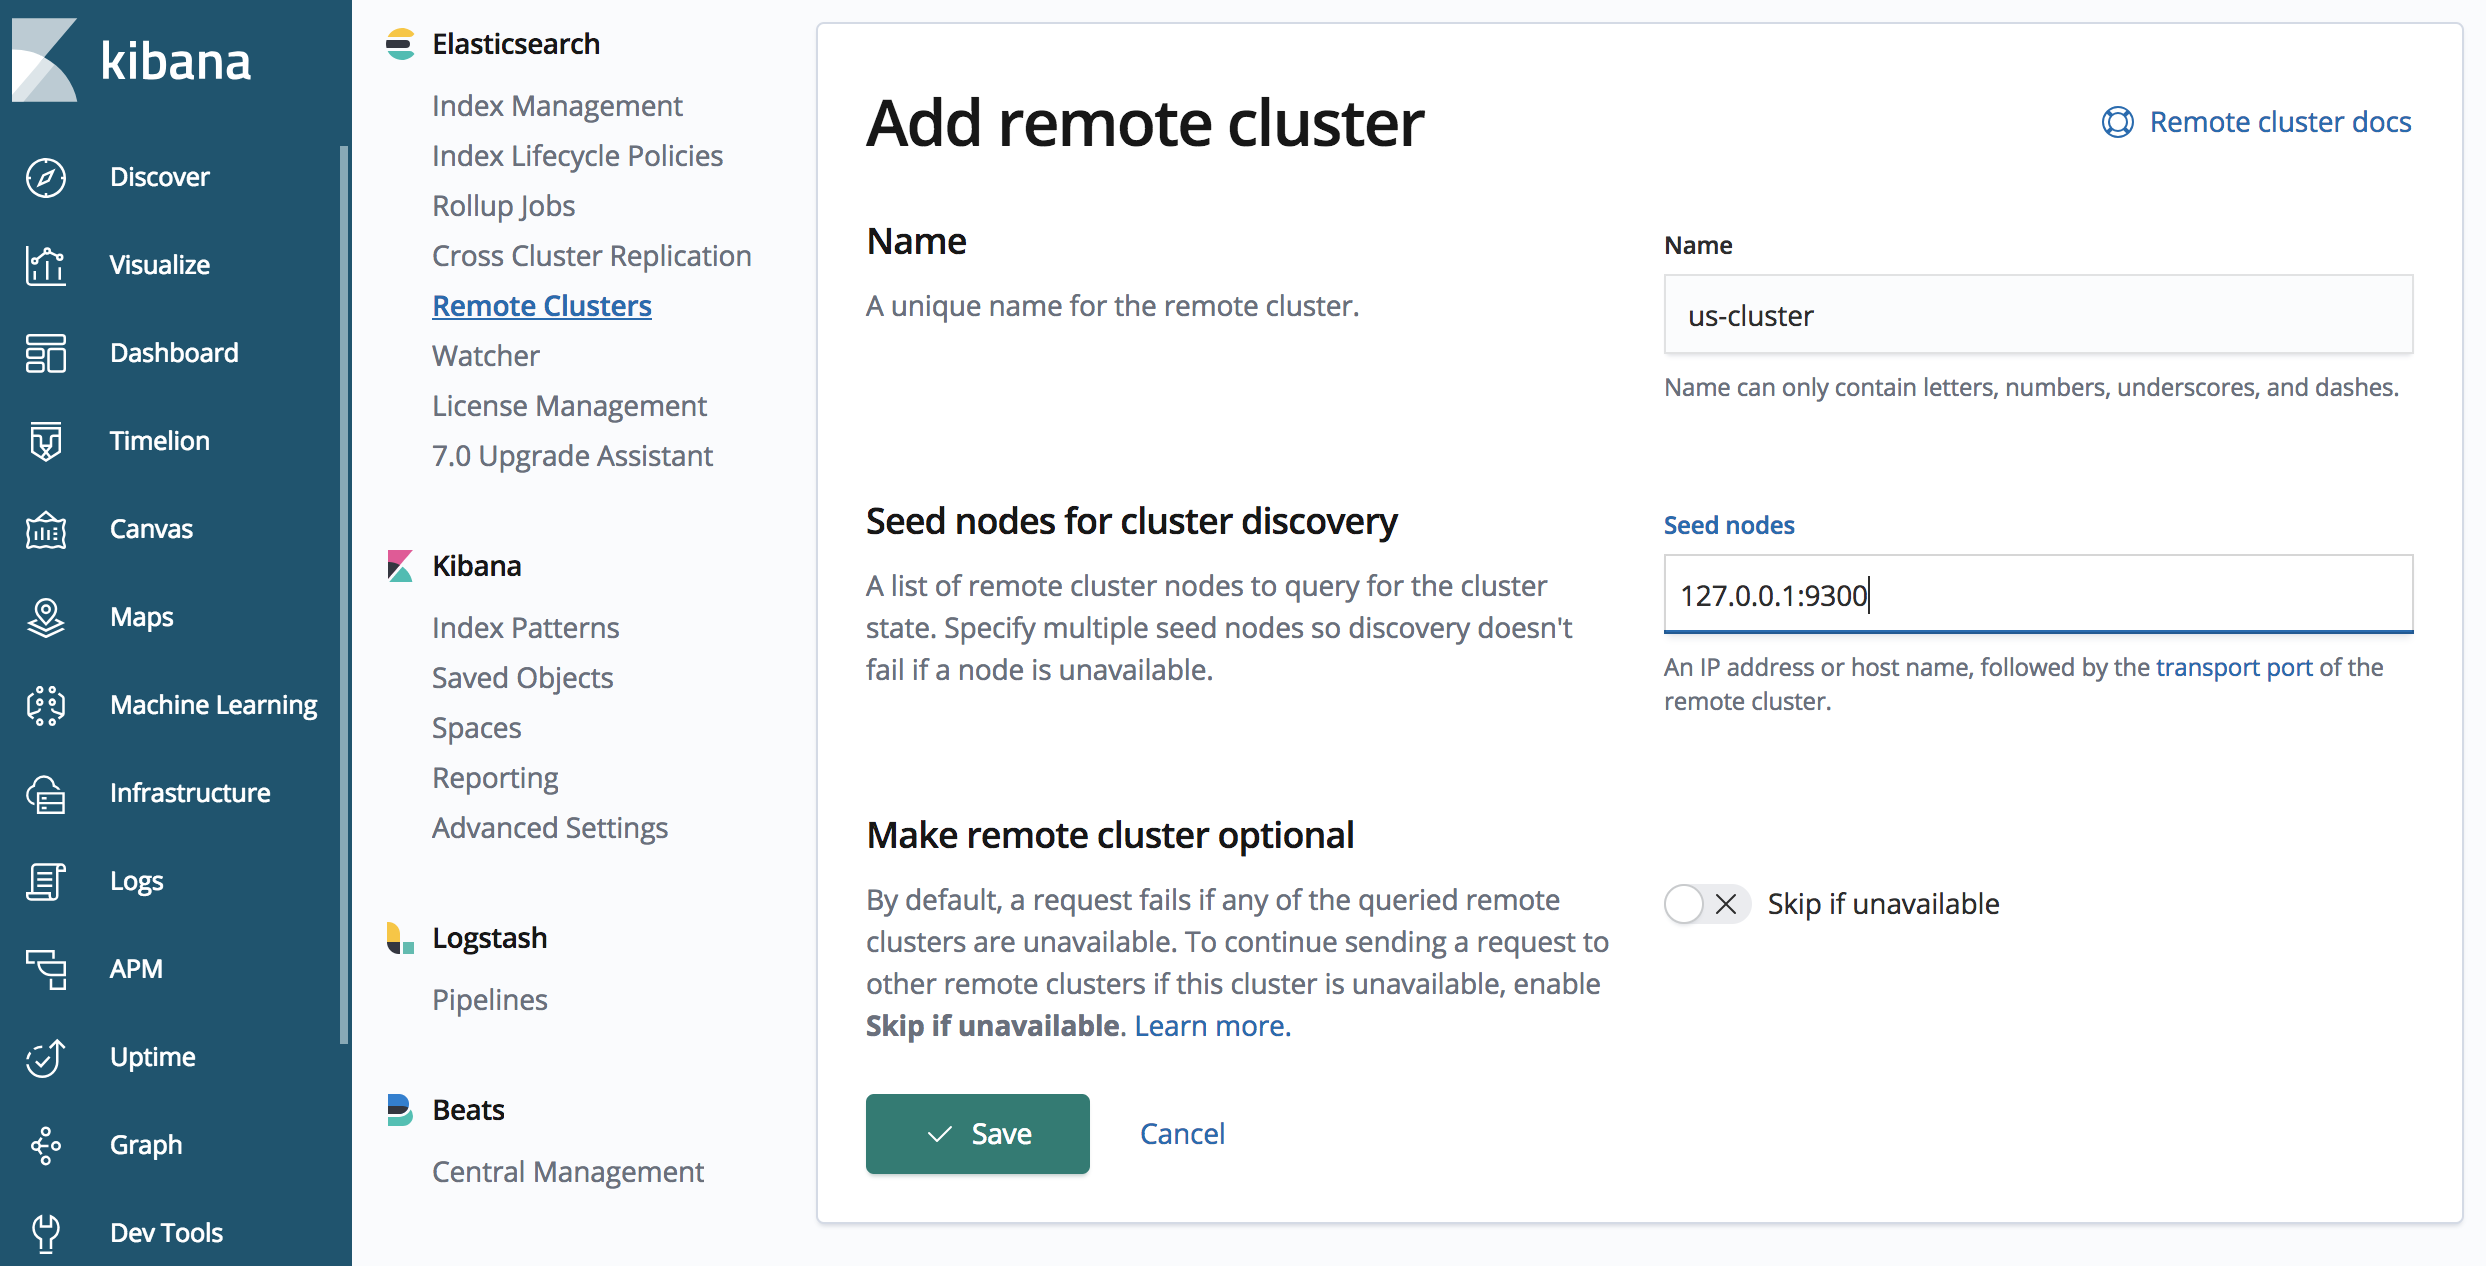
Let’s define the ‘us-cluster’ via an API call on the ‘japan-cluster’
# From the japan-cluster, we’ll define how the us-cluster can be accessed
PUT /_cluster/settings
{
  "persistent" : {
    "cluster" : {
      "remote" : {
        "us-cluster" : {
          "seeds" : [
            "127.0.0.1:9300"
          ]
        }
      }
    }
  }
}
(For API based commands, we recommend using the dev tools console within Kibana, this can be found via Kibana -> Dev tools -> Console)
The above API call defines a remote cluster with alias “us-cluster”, that can be accessed at "127.0.0.1:9300". One or more seeds can be specified, and it is generally recommended to specify more than one, in case a seed is not available during the handshake phase.
More details on configuring remote clusters can be found in our reference documentation on defining a remote cluster.
It is also important to note port 9300 for connecting to the ‘us-cluster’, the ‘us-cluster’ is listening for the HTTP protocol on port 9200 (as is the default, and specified in the elasticsearch.yml file for our 'us-cluster'). However, replication occurs using the Elasticsearch transport protocol (for node-to-node communication); the default is port 9300.
There is a management UI for remote clusters within Kibana, we’ll walk through both the UI and the API for CCR in this tutorial. To access the Remote Cluster UI in Kibana, click the “Management” (gear icon) within the left navigation panel, then navigate to “Remote Clusters” within the Elasticsearch section.
3. Create an Index for Replication
Let’s create an index called ‘products’ on our ‘us-cluster’, we’ll replicate this index from our source ‘us-cluster’ to our target ‘japan-cluster’:
On the ‘us-cluster’:
# Create product index
PUT /products
{
  "settings" : {
    "index" : {
      "number_of_shards" : 1,
      "number_of_replicas" : 0,
      "soft_deletes" : {
        "enabled" : true
      }
    }
  },
  "mappings" : {
    "_doc" : {
      "properties" : {
        "name" : {
          "type" : "keyword"
        }
      }
    }
  }
}
You may have noticed the “soft_deletes” setting. Soft deletes are required for an index to serve as a leader index for CCR (see Those Who Don’t Know History to learn more):
soft_deletes: A soft delete occurs whenever an existing document is deleted or updated. By retaining these soft deletes up to configurable limits, the history of operations can be retained on the leader shards and made available to the follower shard tasks as it replays the history of operations.
As a follower shards replicates operations from the leader, it will leave markers on the leader shards so the leader knows where in history its followers are. Soft deleted operations below these markers are eligible to be merged away. Above these markers, the leader shards will retain these operations for up to the period of a shard history retention lease, which defaults to twelve hours. This period determines the amount of time that a follower can be offline before it is at risk of falling fatally far behind and needing to be re-bootstrapped from the leader.
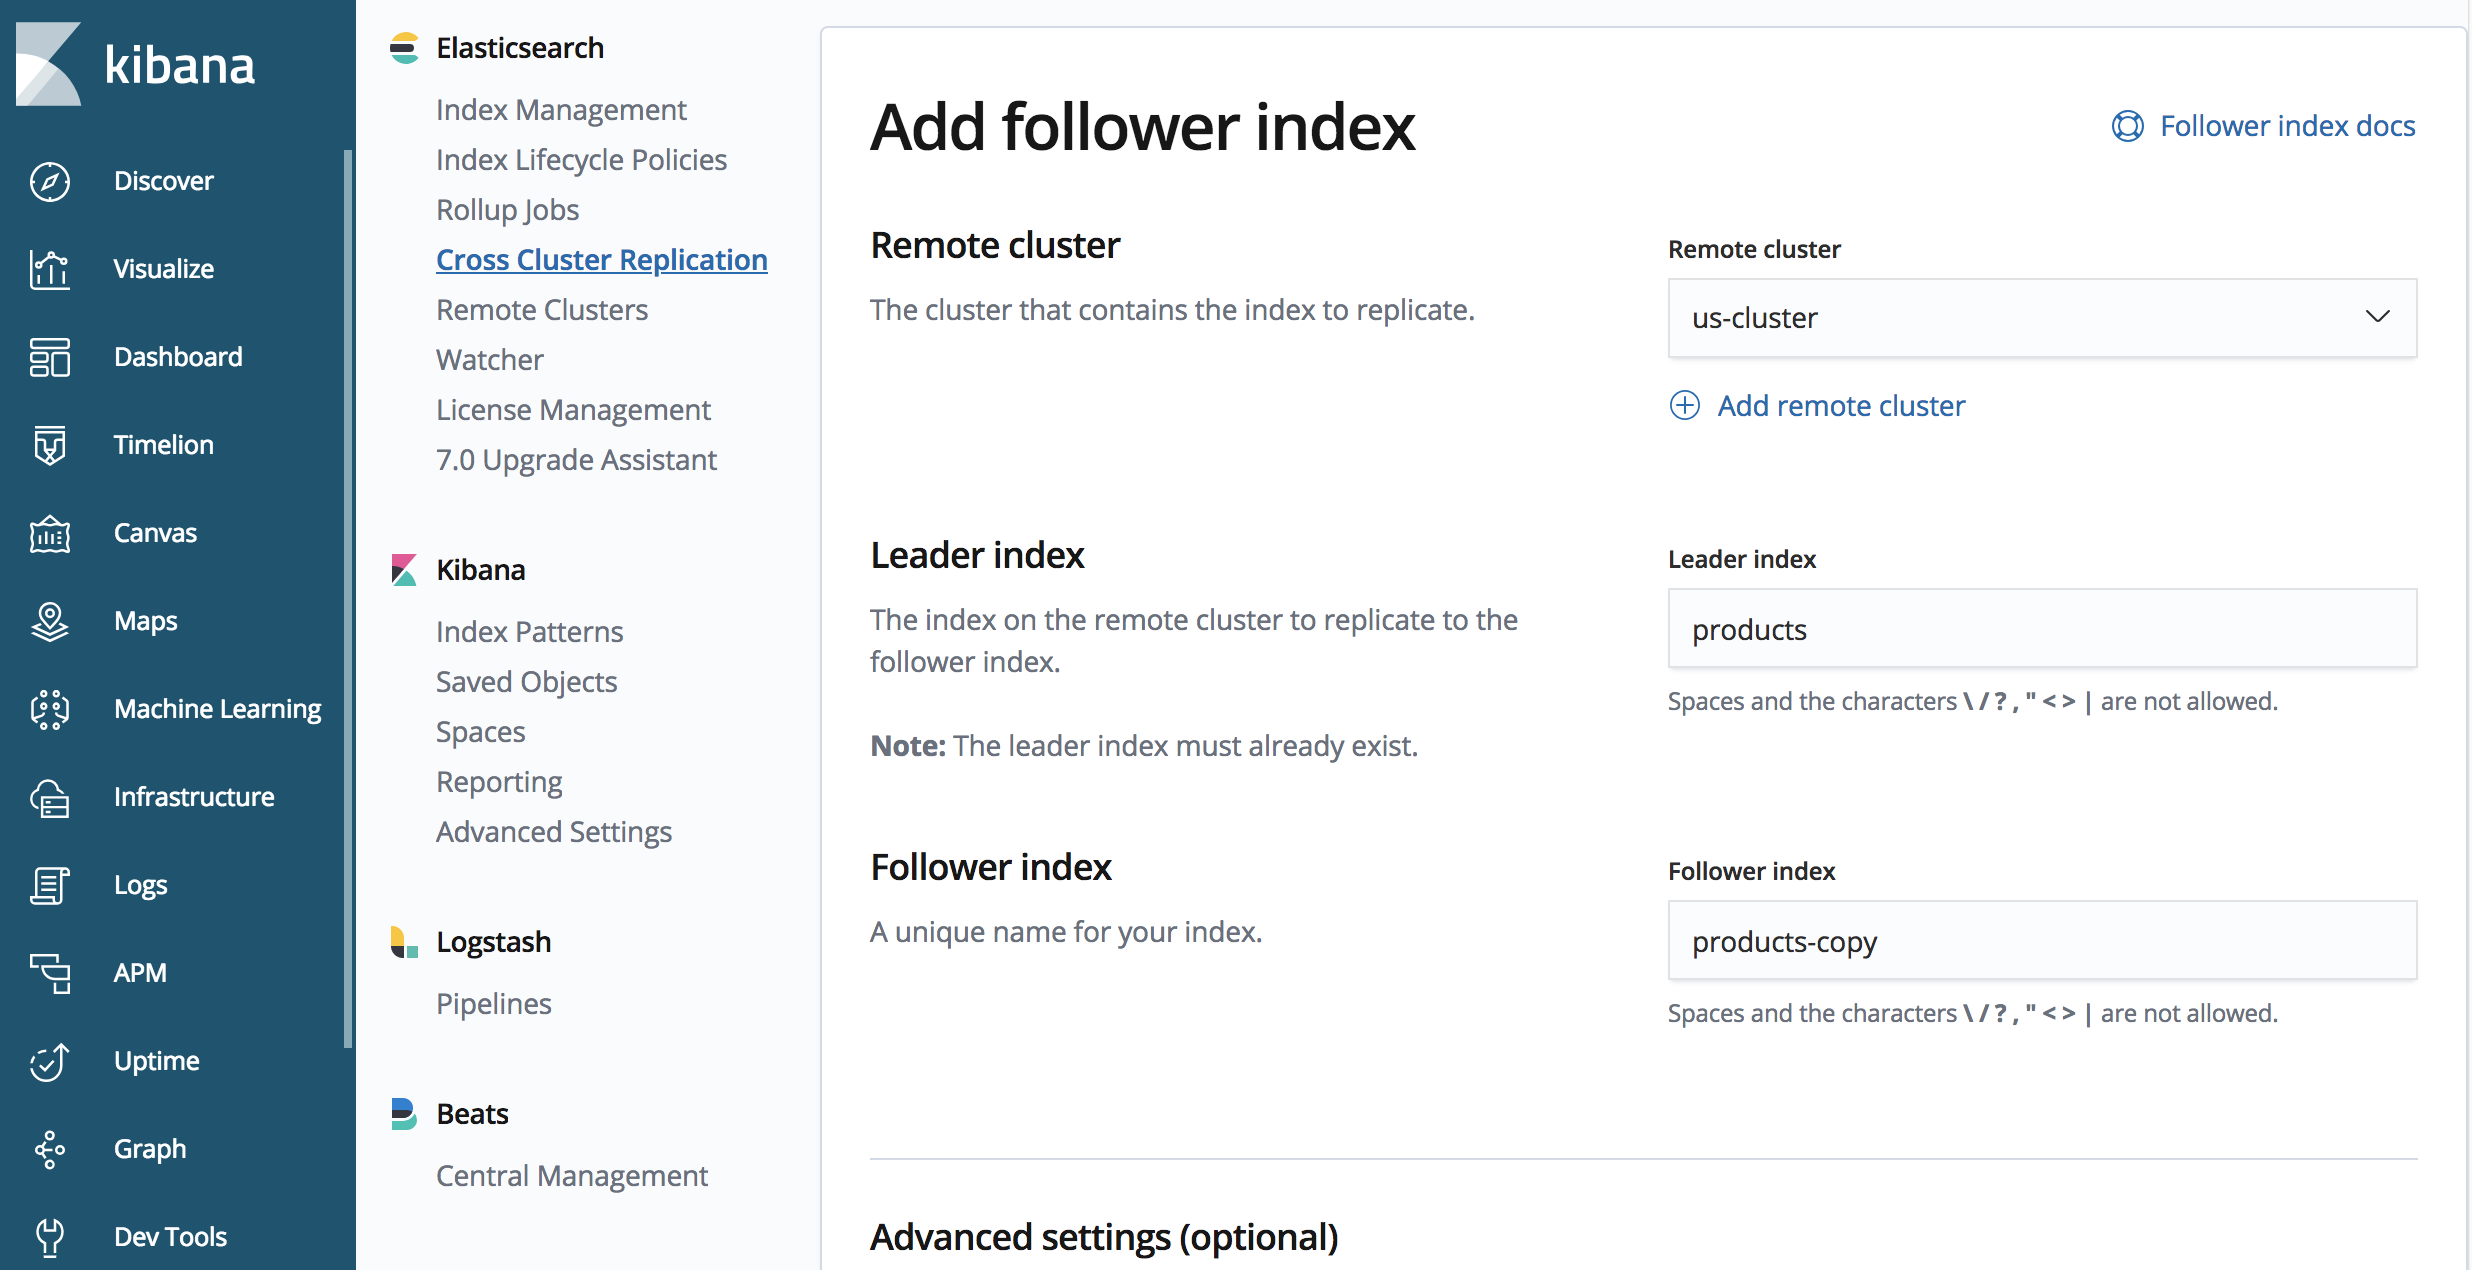
4. Initiate Replication
Now that we’ve created an alias for our remote cluster and created an index we would like to replicate, let’s initiate replication.
On our ‘japan-cluster’:
PUT /products-copy/_ccr/follow
{
  "remote_cluster" : "us-cluster",
  "leader_index" : "products"
}
The endpoint contains ‘products-copy’, this is the name of the replicated index within the ‘japan-cluster’ cluster. We’re replicating from the ‘us-cluster’ cluster we defined previously, and the name of the index we’re replicating is called ‘products’ on the ‘us-cluster’ cluster.
It’s important to note that our replicated index is read-only, and cannot accept write operations.
That’s it! We’ve configured an index to replicate from one Elasticsearch cluster to another!
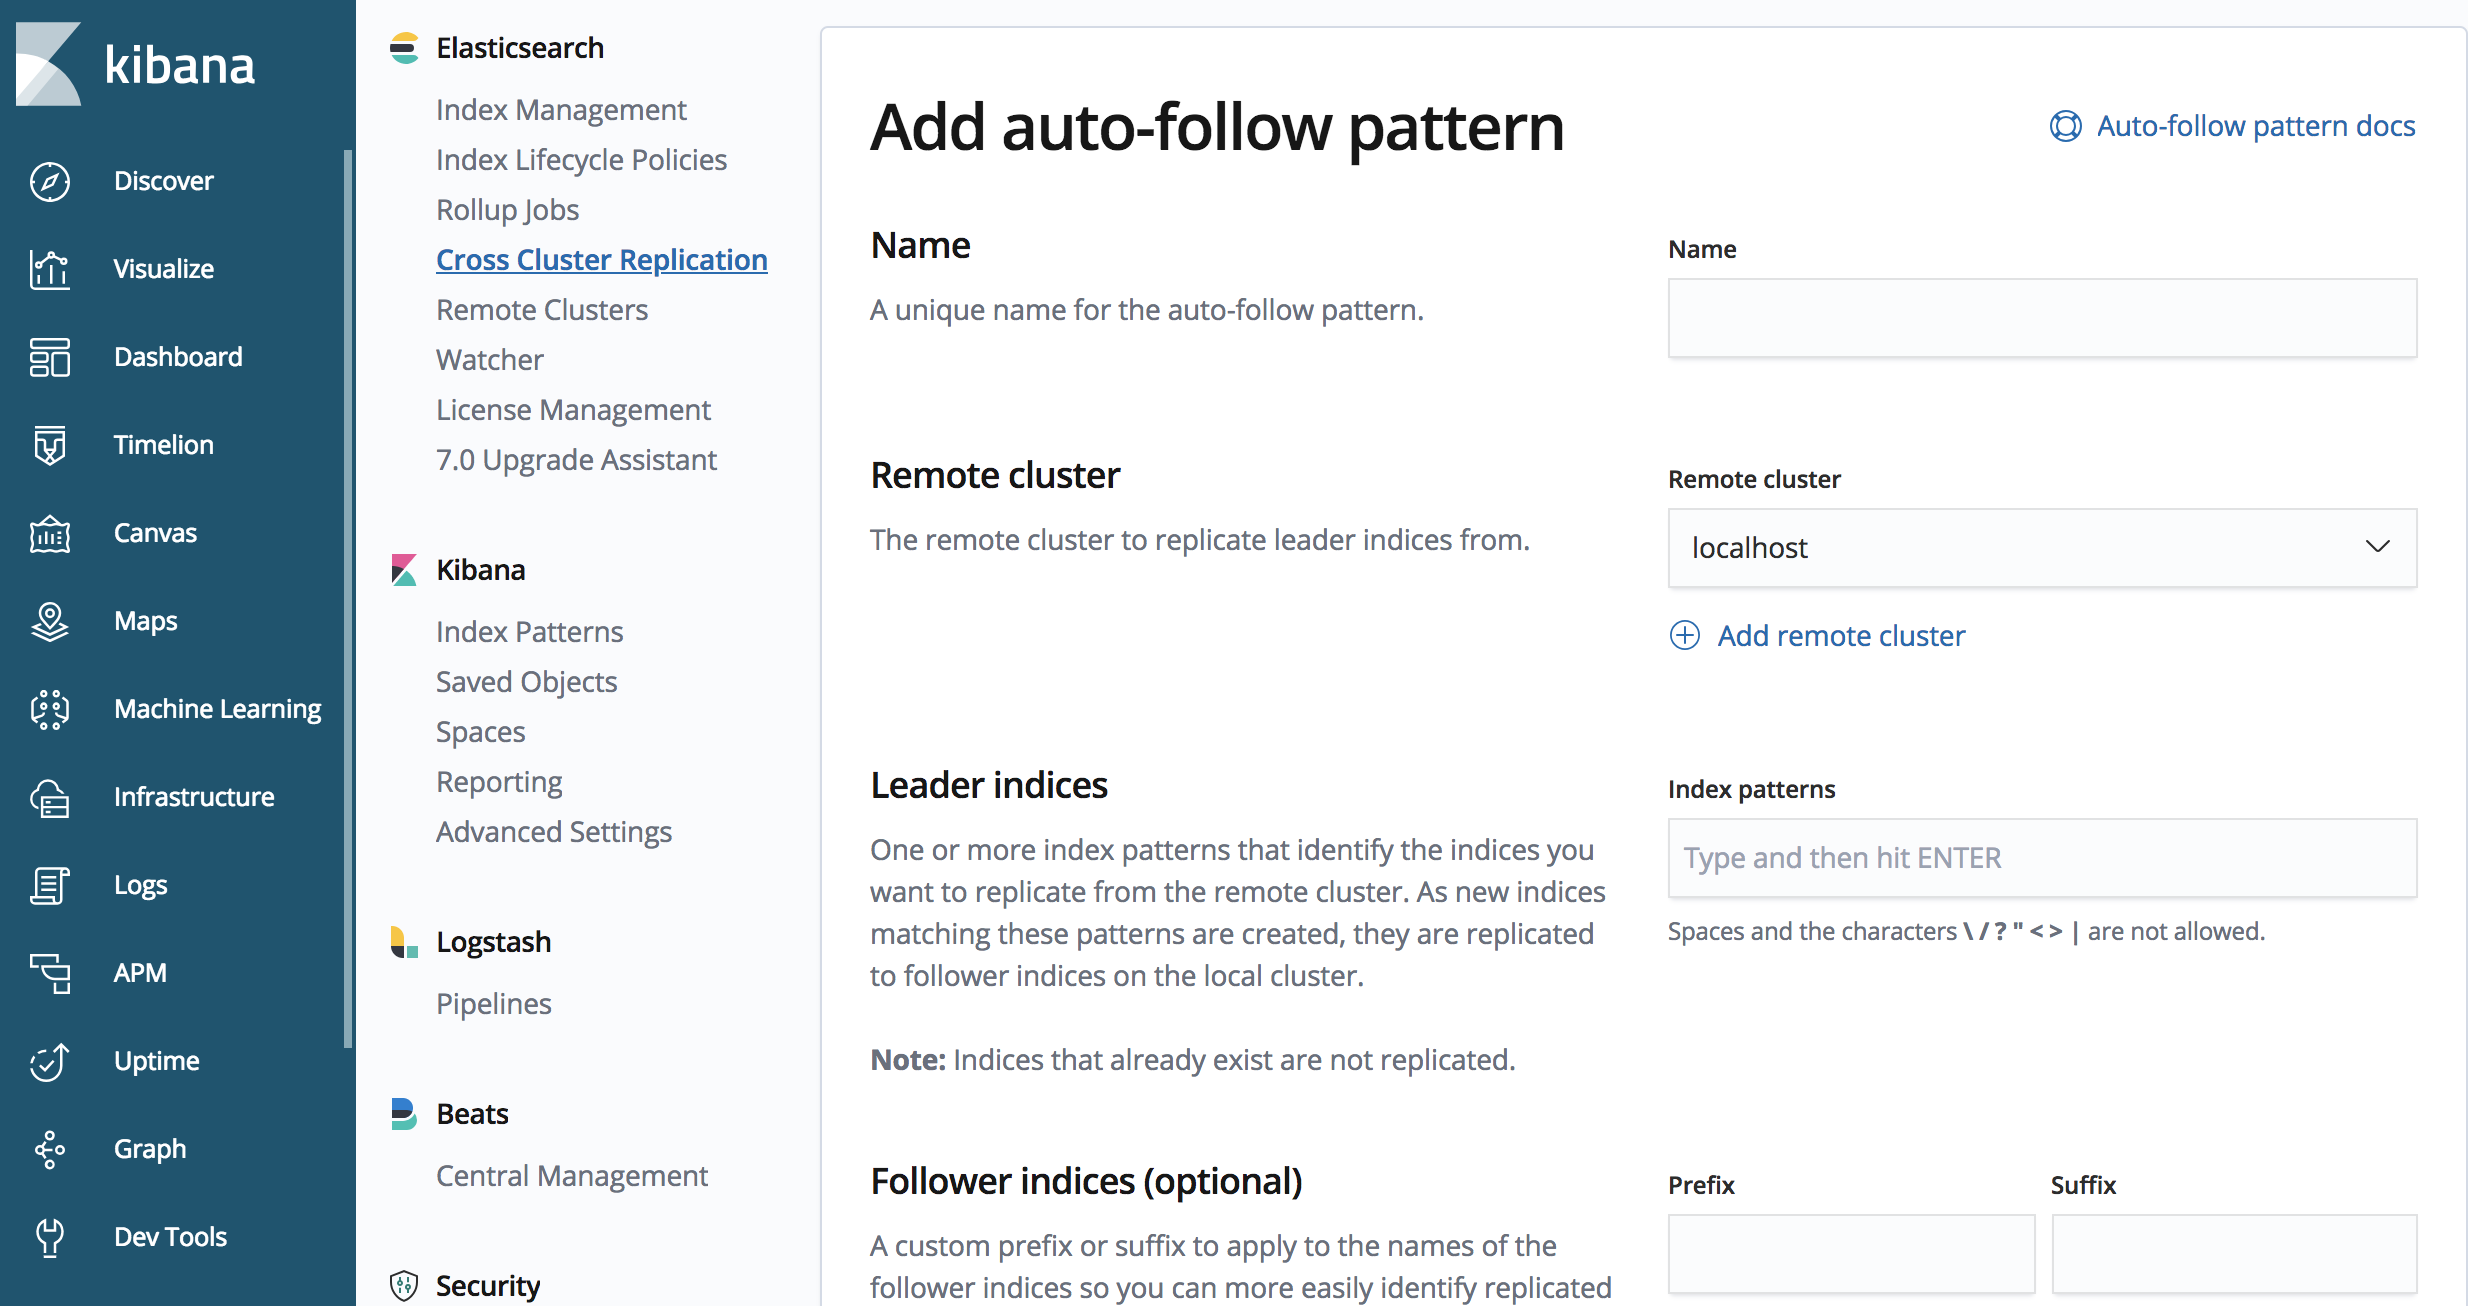
Initiate Replication for Index Patterns
You may have noticed the example above won’t work very well for time-based use-cases, where there is an index per day, or for an amount of data. The CCR API also contains methods for defining auto-follow patterns, i.e., which index patterns should be replicated.
We can use the CCR API to define an auto follow pattern
PUT /_ccr/auto_follow/beats
{
  "remote_cluster" : "us-cluster",
  "leader_index_patterns" :
  [
    "metricbeat-*",
    "packetbeat-*"
  ],
  "follow_index_pattern" : "{{leader_index}}-copy"
}
The sample API call above will replicate an index that begins with ‘metricbeat’ or ‘packetbeat’.
We can also use the CCR UI in Kibana for defining an auto-follow pattern.
5. Test Replication Setup
Now that we have our products index replicated from ‘us-cluster’ to ‘japan-cluster’, let’s insert a test document and verify it has been replicated.
On the ‘us-cluster’ cluster:
POST /products/_doc
{
  "name" : "My cool new product"
}
Now let’s query the ‘japan-cluster’ to ensure the document was replicated:
GET /products-copy/_search
We should have a single document present, that was written on the ‘us-cluster’ and replicated to the ‘japan-cluster’.
{
  "took" : 1,
  "timed_out" : false,
  "_shards" : {
    "total" : 1,
    "successful" : 1,
    "skipped" : 0,
    "failed" : 0
  },
  "hits" : {
    "total" : 1,
    "max_score" : 1.0,
    "hits" : [
      {
        "_index" : "products-copy",
        "_type" : "_doc",
        "_id" : "qfkl6WkBbYfxqoLJq-ss",
        "_score" : 1.0,
        "_source" : {
          "name" : "My cool new product"
        }
      }
    ]
  }
}
Cross-Datacenter Administration Notes
Let’s walk through some of the administrative APIs for CCR, tunable settings, and outline the method for converting a replicated index into a normal index in Elasticsearch.
Administrative APIs for Replication
There are a number of useful administrative APIs for CCR in Elasticsearch. They may be helpful in debugging replication, modifying replication settings, or gathering detailed diagnostics.
# Return all statistics related to CCR
GET /_ccr/stats
# Pause replication for a given index
POST //_ccr/pause_follow
# Resume replication, in most cases after it has been paused
POST //_ccr/resume_follow
{
}
# Unfollow an index (stopping replication for the destination index), which first requires replication to be paused
POST //_ccr/unfollow
# Statistics for a following index
GET //_ccr/stats
# Remove an auto-follow pattern
DELETE /_ccr/auto_follow/
# View all auto-follow patterns, or get an auto-follow pattern by name
GET /_ccr/auto_follow/
GET /_ccr/auto_follow/
More details on the CCR administrative APIs are available in the Elasticsearch reference documentation.
Converting a follower index to a normal index
We can use a subset of the administrative APIs above to walk though converting a follower index to a normal index in Elasticsearch, capable of accepting writes.
In our example above, we had a fairly simple setup. Remember that the replicated ‘products-copy’ index on our ‘japan-cluster’ is read-only, it cannot accept any writes. In the event we would like to convert the ‘products-copy’ index to a normal index in Elasticsearch (capable of accepting writes), we can then perform the following commands. Keep in mind, writes on our original index ('products') can continue, and we might want to restrict writes to our ‘products’ index first, before converting our ‘products-copy’ index to a normal Elasticsearch index.
# Pause replication
POST //_ccr/pause_follow
# Close the index
POST /my_index/_close
# Unfollow
POST //_ccr/unfollow
# Open the index
POST /my_index/_open
Continue Exploring Cross Cluster Replication (CCR) in Elasticsearch
We’ve written this guide to help you get started with CCR in Elasticsearch, hopefully it is enough to get you acquainted with CCR, learn about the various CCR APIs (include the UIs available in Kibana), and experiment with the feature. Additional resources include the Getting started with cross cluster replication guide and the Cross Cluster Replication APIs reference guide.
As always, please leave us feedback in our discuss forums with any questions, we’ll be sure to answer them as soon as we can.