Building a Searchbot using Slack, Zapier, and Elastic App Search
Wouldn’t it be helpful to build your own Searchbot that you can query from Slack? Imagine looking through thousands and thousands of customer records, articles, server logs, or Helpdesk tickets, from within a Slack channel. We will build such a helpful Searchbot by weaving together Elastic App Search and Slack using Zapier.
No coding required!
Searchbot: Assemble
We will need:
- An Elastic App Search account or free 14 day trial. Elastic App Search is a toolbox for building world class search experiences. You can fine-tune relevance using Weights and Boosts, Curations, and Synonyms, and capture deep search analytics. The best part? It’s built on top of the Elastic Stack.
- Elastic App Search documents. Each new account comes with a sample search engine field with United States National Park data. You can use that, or index your own documents and adapt the tutorial.
- A Zapier account or trial. Zapier is an automation service. Through it, you can create Zaps. A Zap is an automation pipeline. Each step in an automation chain can action and transform data.
- About 30 minutes.
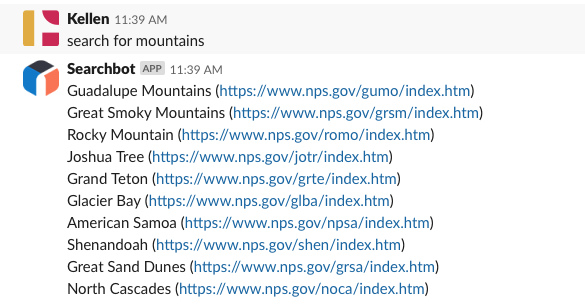
In the end, typing “search for query” within a designated Slack channel will send the query to Elastic App Search as API call:
Pick Up The Slack
Login to Zapier and click Make a Zap!
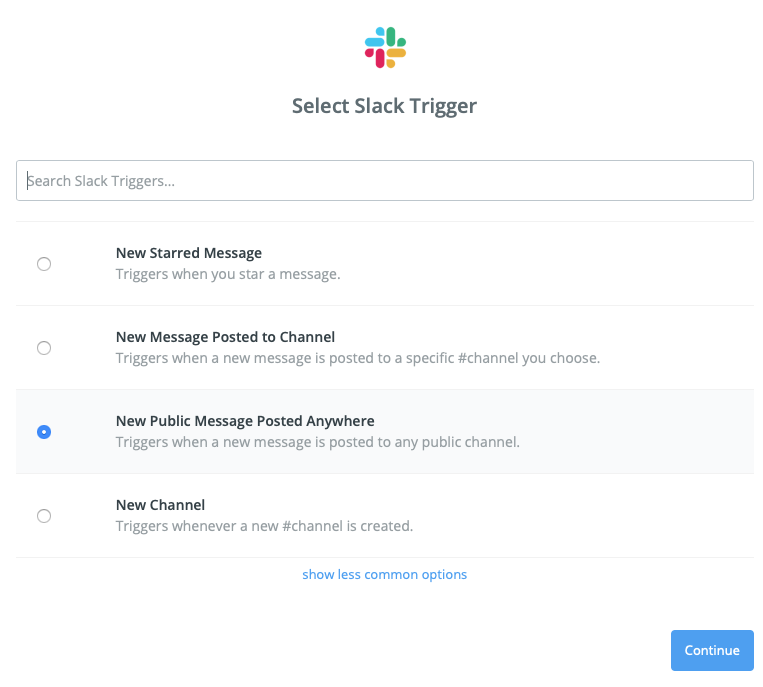
First, we need to create a Trigger.
The trigger will connect Zapier to a Slack workspace
Search for Slack, then select it.
You can choose from a set of Slack triggers.
We’d like: “New Message Posted Anywhere”
Click Continue. Zapier will ask to authenticate with Slack.
Once authenticated, associate the account instance with the Zap.
State “no” for whether or not to respond to bot filters - we won’t need that!
What we will need is a small bit of sample data from Slack. Within a testing channel in the associated Slack workspace, type “search for old growth”. The message will then be made available to Zapier during the Test This Step phase.
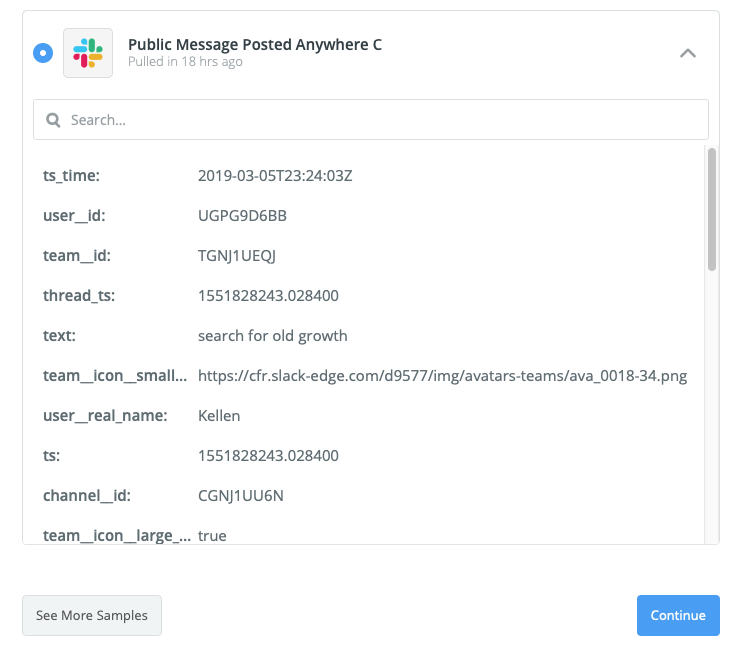
Select the message, then click Continue.
This is the first link in our automation chain - great!
Smooth Filtration
The next step is to configure the one and only Zap filter.
Under the header ADD A HELPER STEP, click Filter.
Proceed with the one option: Only continue if…
And then fill it out like so:
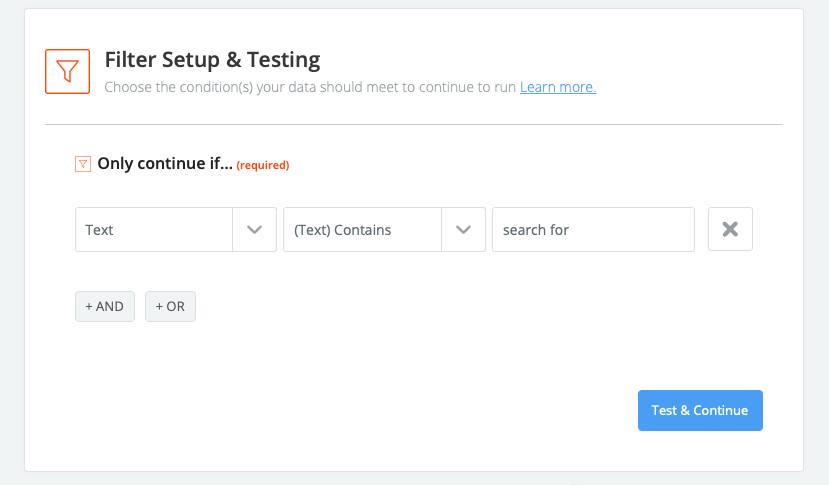
[Text] [Contains] "search for"
This will activate the Zap when someone types search for within Slack.
And… Action!
We now need to create four actions to make it so whatever follows “search for” is added as a query — and that we return well formatted results from App Search.
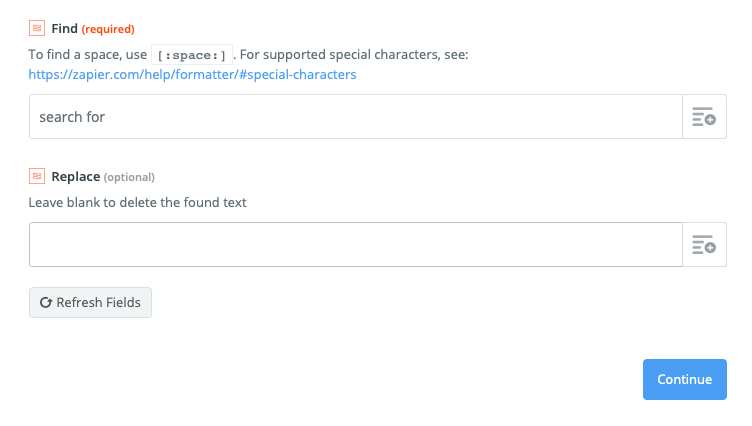
The first action is to strip the “search for” text from the search query that we will pass into App Search.
Click Add a step, then select Action/Search.
Select Formatter. It’s the first option under BUILT-IN APPS.
From there, select Text.
A Transform dropdown menu will appear. Click within it, type Replace, and select it.
The bottom two fields are Find and Replace.
Within Find, type “search for”.
Leave Replace blank, then click Continue.
Finish the step, then click Add a Step again.
Captain Webhook
The second action is our API call. This is where we’ll build the query that we send to App Search. Whatever follows “search for …” is the query parameter.
We will generate the API call using Webhooks.
Within the Choose an Action App dropdown, type Webhooks by Zapier, and select it.
Under the CREATE header, select POST, then click Continue.
Four fields are required to build the API call:
1. URL
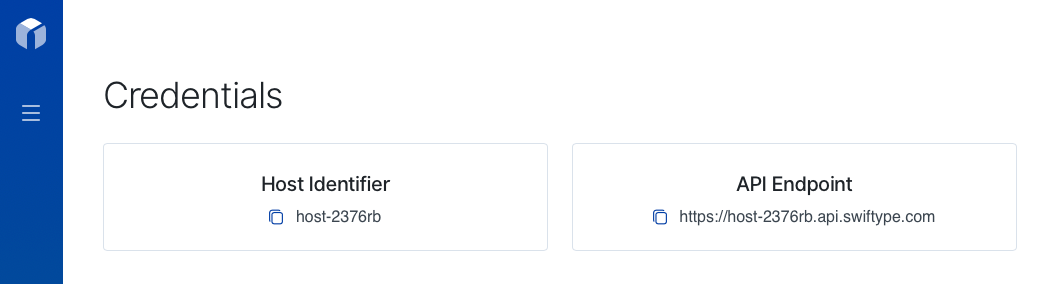
The API endpoint URL is provided within the App Search dashboard. It must contain your own Host Identifier, such as: https://host-2376rb.api.swiftype.com/api/as/v1/engines/sample-engine/search. Feel free to use the above URL to build your example - it’s public.
2. Payload Type
It defaults to Form. Select Json.
3. Data
Within the first box, enter “query” — this is the parameter that we will include within the POST. Click the icon next to the value input bar. From there, select the “search for old growth” test data from step 1:
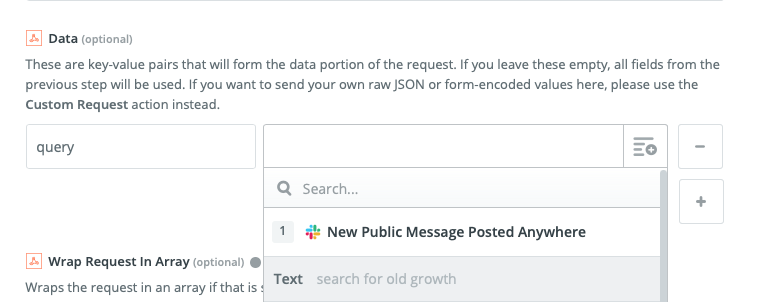
Select the Text field that contains the string from the example Slack message.
4. Headers
At the bottom of the form, there is a Headers section. In this first box, enter “Authorization”. In the box beside it, enter the word “Bearer” followed by your Public Search Key, found within the Credentials menu of the App Search dashboard:
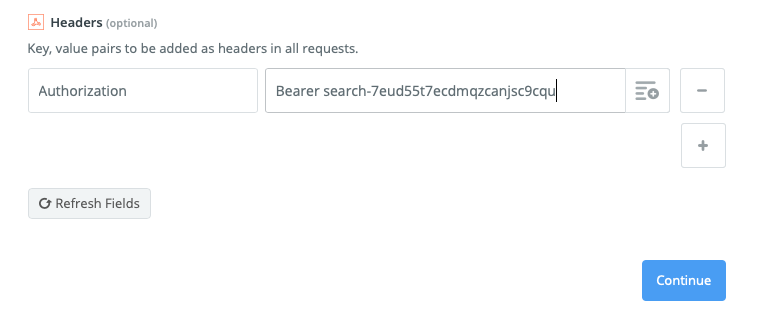
You can use this public demo key: search-7eud55t7ecdmqzcanjsc9cqu if you do not have your own.
Click Continue, then run a test. You should see an example response containing park data from the App Search Engine!
Great - so we can make an API request. But now we need to format the response.
Automagical
Click Add a Step.
Choose Action/Search, then look for and select Formatter.
Under the CREATE header, select the Utilities option, then click Continue.
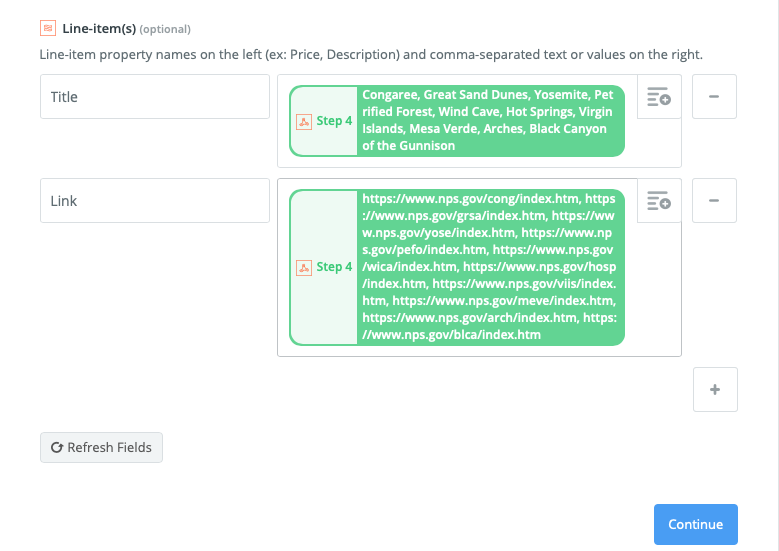
In the Transform section, type in Line Itemizer.
We want to create two items under the Line-item(s) header based on the output from the API call in step 4…
- Title: “Results Title Raw”
- Link: “Results NPS Link Raw”
We only want our results to display the name of a US national park and a link containing more information:
Test and complete the step. Then, on to our third action…
Step, Format, Step
Click Add a Step…
Select Formatter, then Utilities, as before…
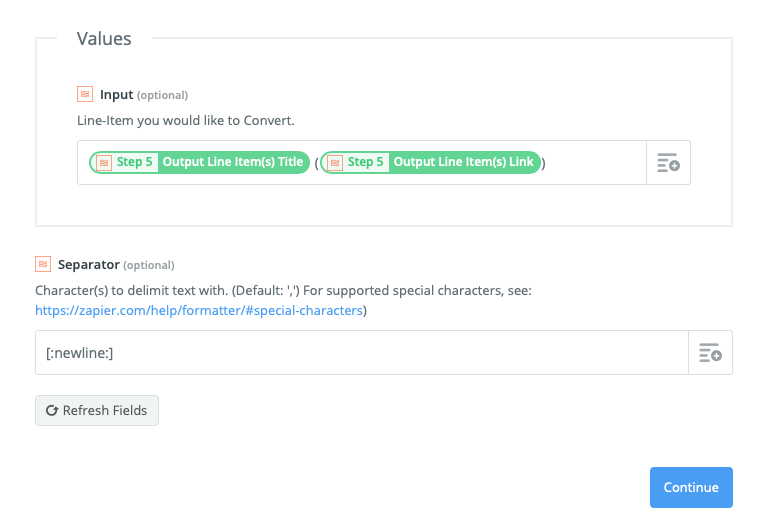
But this time look for Line-Item to Text.
There is a box titled Values, with an Input header within it. Click within the bar, then select Step 5, Utilities, and pull in both of the line-items that were created.
Note that the structure within the input box will reflect the formatting of the Slack message. We want to have the title, a space, followed by a URL in parenthesis:
[TITLE] ([LINK])
And we want to have the results appear on a separate line. For this, in the box underneath the Separator header, add the special character: [:newline:]:
[TITLE] ([LINK])
[TITLE] ([LINK])
[TITLE] ([LINK])
[TITLE] ([LINK])
Within the Zap, it looks like so:
And now, the final step! Sending the formatted search results into a specific chat Slack.
Final Transmission
… Click Add a Step, type Action/Search…
Select Slack.
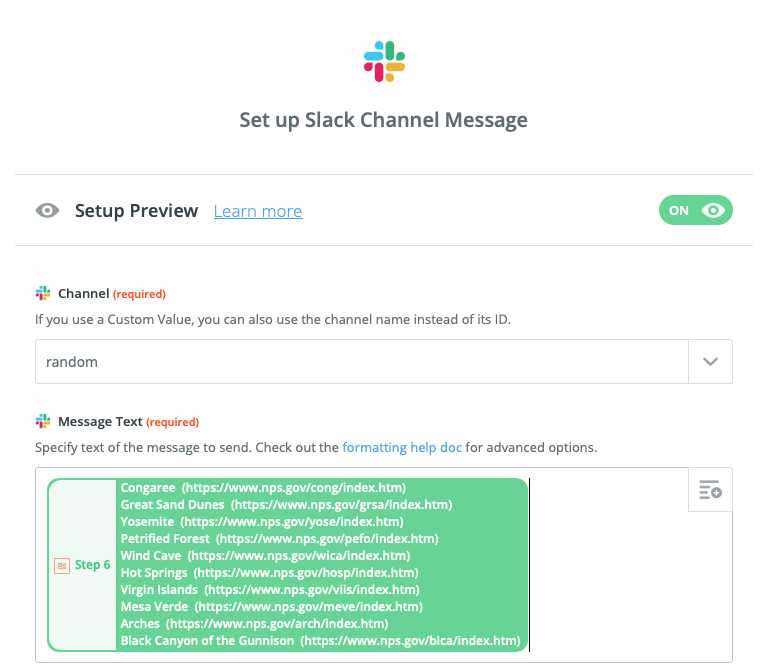
Under Create: Choose Send Channel Message, then save + continue.
Select your Slack account, click Continue…
Choose the channel within which the Zap will function: #random is a good idea, for testing.
Under the header Message Text, click into the box, then select the output of step 6:
For added flavour, you can name the bot Searchbot and provide a good looking avatar.
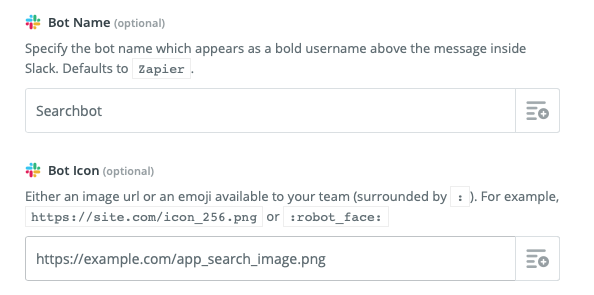
Copy the Elastic App Search image link from this blog page by right clicking on the image below, if you’d like:

RISE, SEARCHBOT!
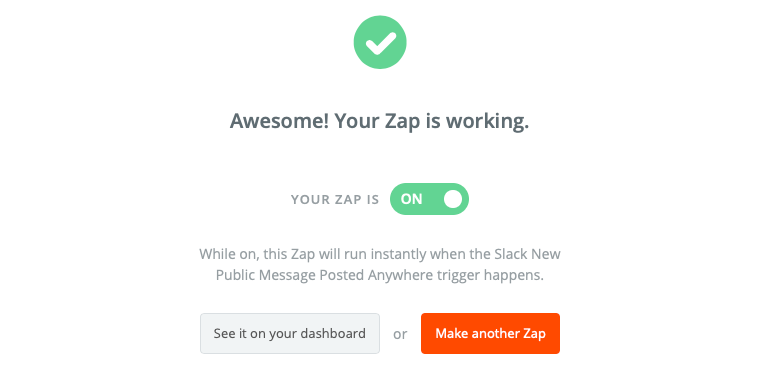
Once everything is configured, enable the Zap:
Head to Slack — type: “search for something” and try out a few queries.
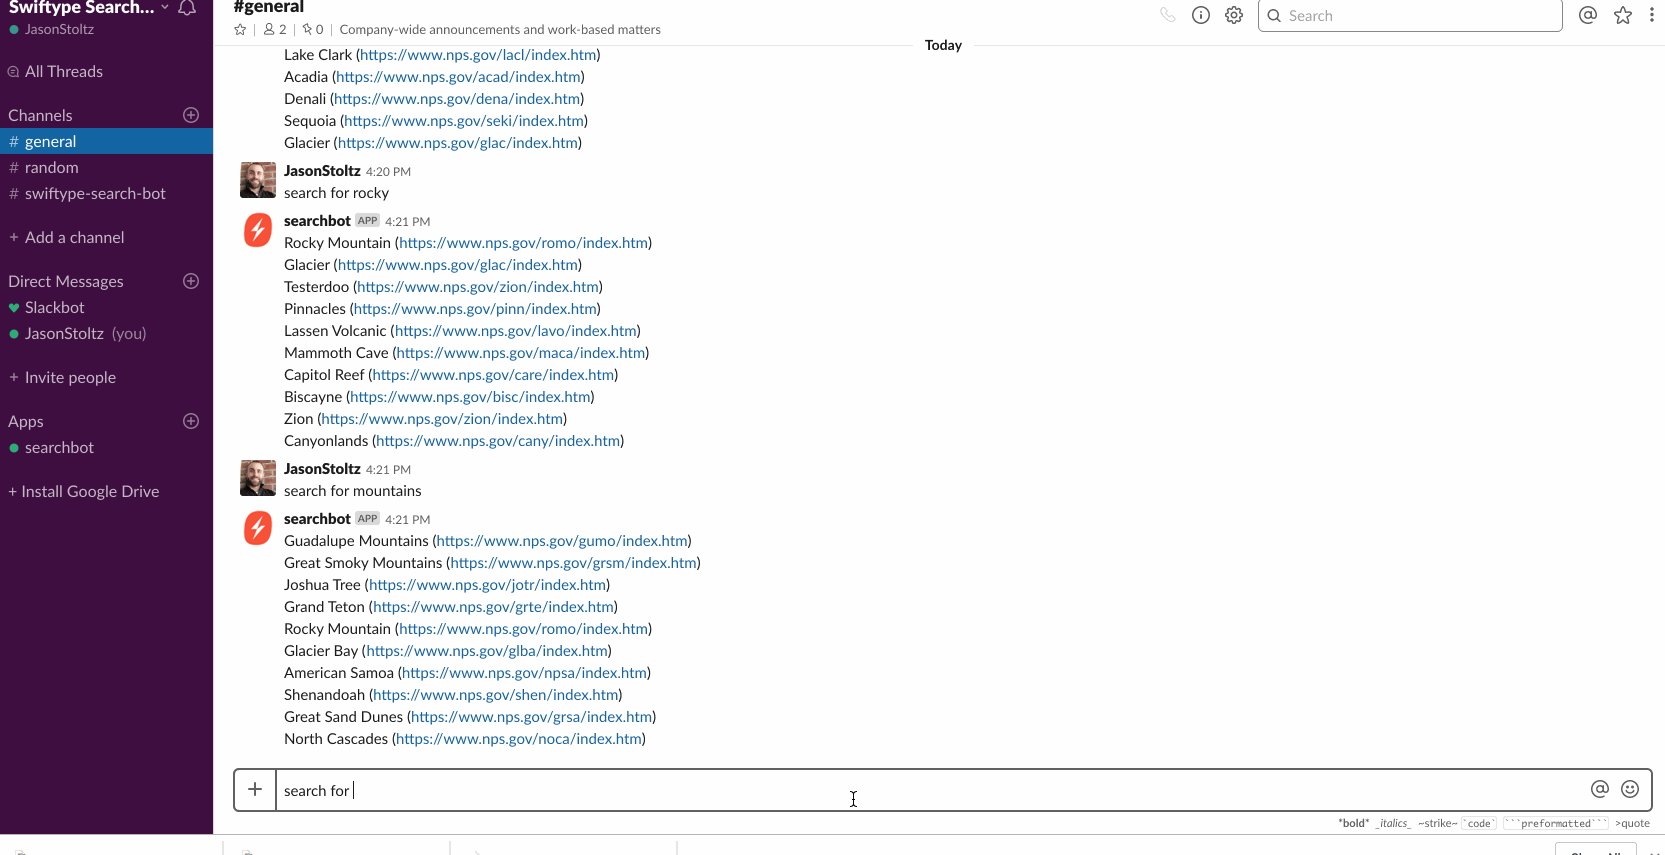
Congratulations! You now have an intelligent Searchbot within Slack.
Summary
A Searchbot bot can be useful. Perhaps you want to search an internal knowledge base for customer support, or seek an error from a large pool of server logs. Whatever the case may be, build a Searchbot on top of Elastic App Search and wire it into Slack with little stress.
You can get started with App Search today with a free 14 day trial of our hosted version or download the beta of the self-managed version. Each new trial comes preloaded with a sample data set, so you can experiment before bringing your own data.