How to implement image similarity search in Elasticsearch
Searching through images to find the right one has always been challenging. With similarity image search, you can create a more intuitive search experience. Learn how to implement image search in Elastic.
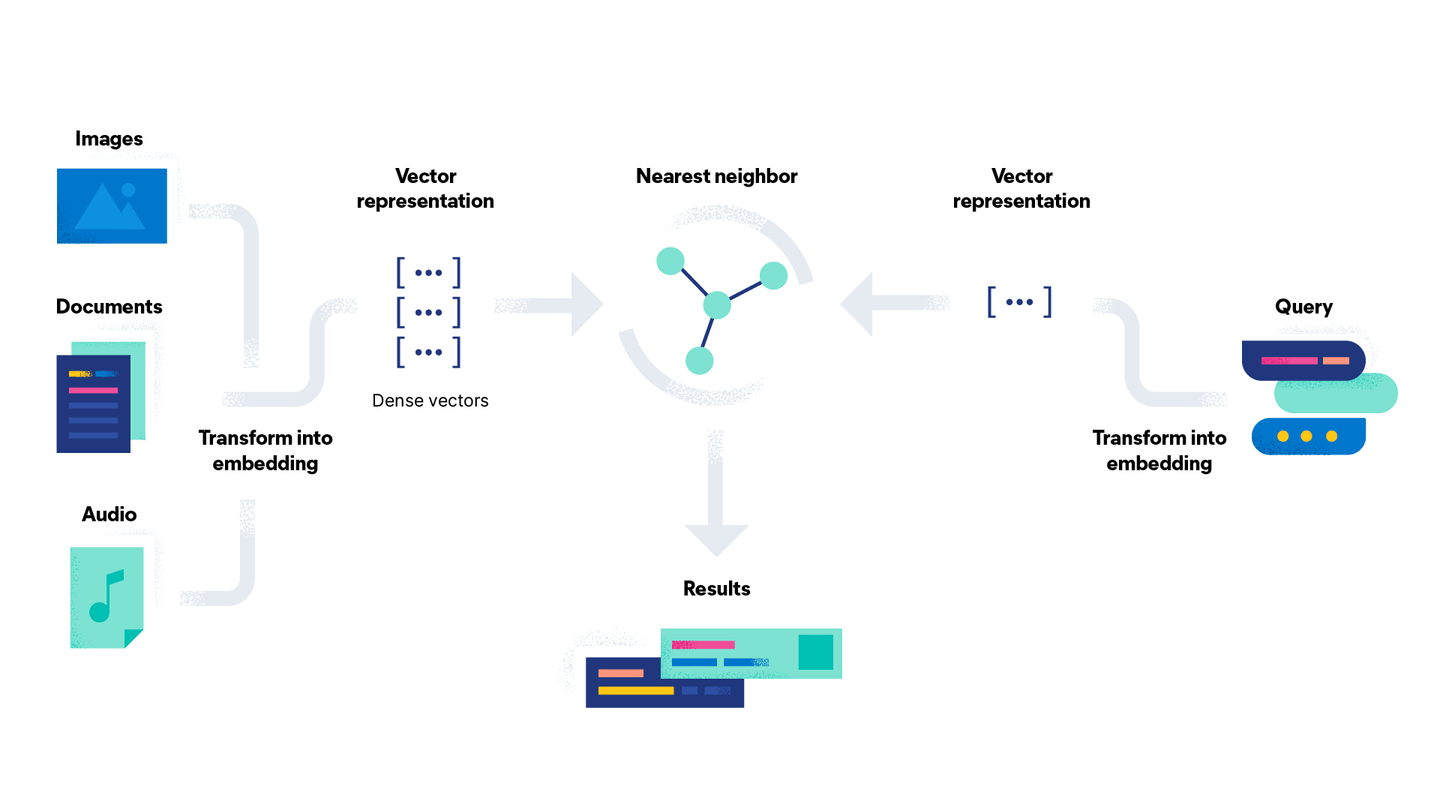
Learn how to implement similarity image search in Elastic in just a few steps. Start setting up the application environment, then import the NLP model, and finally complete generating embeddings for your set of images.
Get an overview of image similarity search with Elastic >>

How to set up your environment
The first step is setting up the environment for your application. General requirements include:
Git
Python 3.9
Docker
Hundreds of images
It is important to use hundreds of images to ensure the best results.
Go to the working folder and check out the repository code created. Then navigate to the repository folder.
$ git clone https://github.com/radoondas/flask-elastic-image-search.git
$ cd flask-elastic-image-search
Because you will be using Python to run the code, you need to make sure all requirements are met and the environment is ready. Now create the virtual environment and install all the dependencies.
$ python3 -m venv .venv
$ source .venv/bin/activate
$ pip install -r requirements.txt
Elasticsearch cluster and embedding model
Log in to your account to spin up an Elasticsearch cluster. Set up a small cluster with:
One HOT node with 2GB of memory
One ML (Machine learning) node with 4GB of memory (The size of this node is important as the NLP model you will import into Elasticsearch consumes ~1.5GB of memory.)
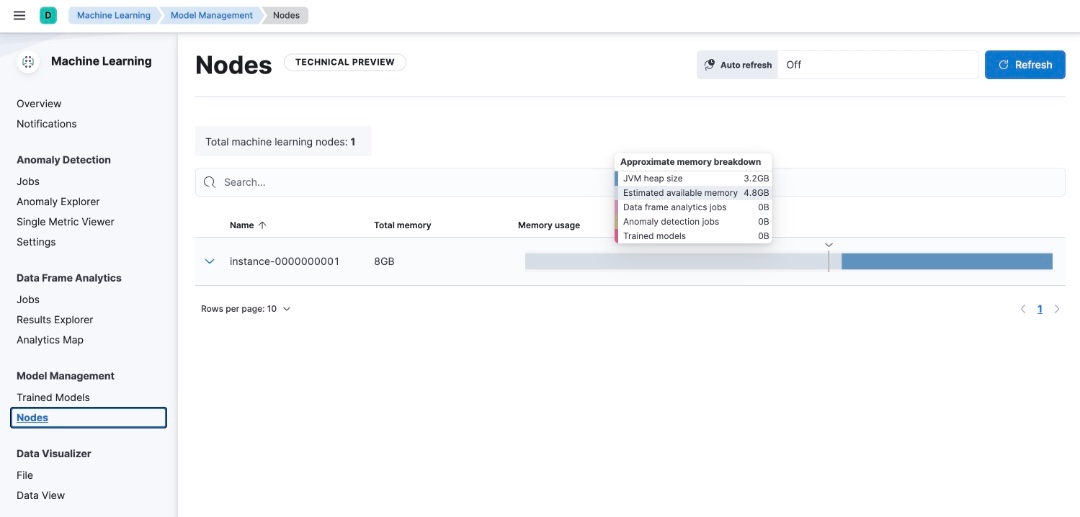
After your deployment is ready, go to Kibana and check the capacity of your machine learning nodes. You will see one machine learning node in the view. There is no model loaded at the moment.
Upload the CLIP embedding model from OpenAI using the Eland library. Eland is a Python Elasticsearch client for exploring and analyzing data in Elasticsearch and is able to handle both text and images. You'll use this model to generate embeddings from the text input and query for matching images. Find more details in the documentation of the Eland library.
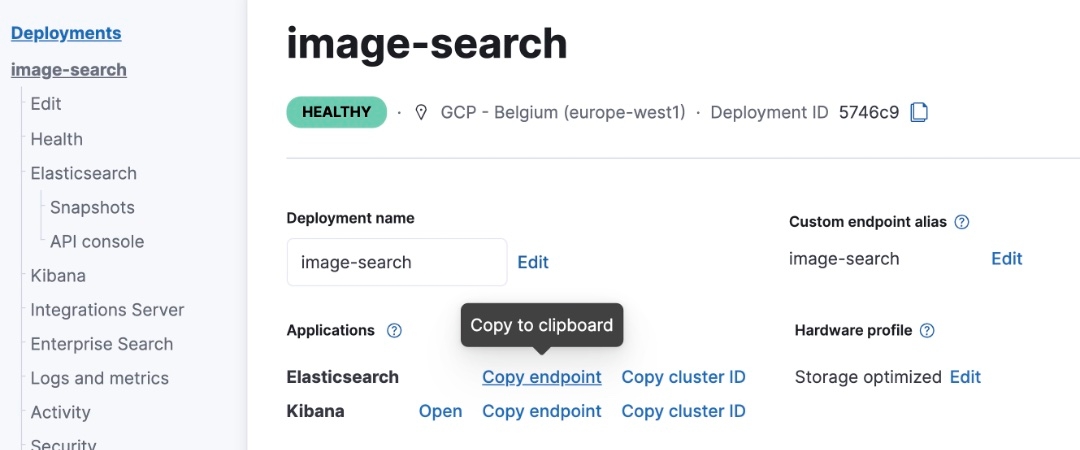
For the next step, you will need the Elasticsearch endpoint. You can get it from the Elasticsearch cloud console in the deployment detail section.
Using the endpoint URL, execute the following command in the root directory of the repository. The Eland client will connect to the Elasticsearch cluster and upload the model into the machine learning node. You refer to your actual cluster URL with the –url parameter, for example, below refers to ‘image-search.es.europe-west1.gcp.cloud.es.io’ as cluster URL.
--url https://elastic:<password>@image-search.es.europe-west1.gcp.cloud.es.io:443Enter the Eland import command.
$ eland_import_hub_model --url https://elastic:<password>@<URL>:443 \
  --hub-model-id sentence-transformers/clip-ViT-B-32-multilingual-v1 \
  --task-type text_embedding --ca-certs app/conf/ess-cloud.cer \
  --start
The output will be similar to the following:
2022-12-12 13:40:52,308 INFO : Establishing connection to Elasticsearch
2022-12-12 13:40:52,327 INFO : Connected to cluster named 'image-search-8.6.1' (version: 8.5.3)
2022-12-12 13:40:52,328 INFO : Loading HuggingFace transformer tokenizer and model 'sentence-transformers/clip-ViT-B-32-multilingual-v1'
2022-12-12 13:41:03,032 INFO : Creating model with id 'sentence-transformers__clip-vit-b-32-multilingual-v1'
2022-12-12 13:41:03,050 INFO : Uploading model definition
100%|█████████████████████████████████████████████████████████████████████████████████████████████████████████████████████████████████████████| 129/129 [00:42<00:00, 3.01 parts/s]
2022-12-12 13:41:45,902 INFO : Uploading model vocabulary
2022-12-12 13:41:46,120 INFO : Starting model deployment
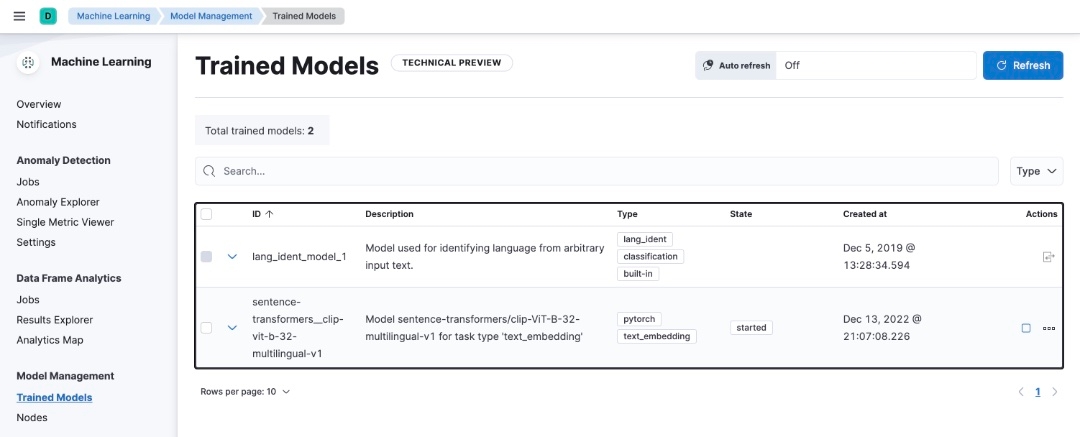
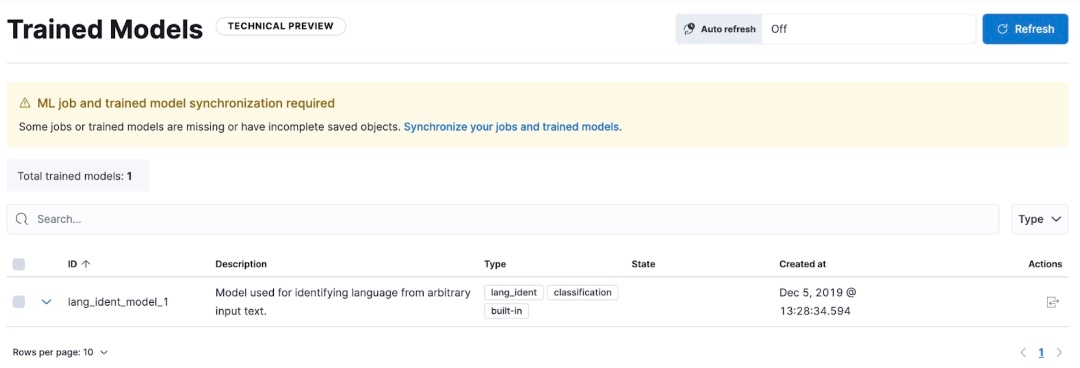
2022-12-12 13:41:52,825 INFO : Model successfully imported with id 'sentence-transformers__clip-vit-b-32-multilingual-v1'The upload might take a few minutes depending on your connection. When finished, check the list of Trained models on the machine learning Kibana page: Menu -> Analytics -> Machine Learning -> Model management ->Trained models. Verify that the NLP Clip model is in the state ‘started’.
If you receive a message on the screen — ML job and trained model synchronization required — click on the link to synchronize models.
How to create image embeddings
After setting up the Elasticsearch cluster and importing the embedding model, you need to vectorize your image data and create image embeddings for every single image in your data set.
To create image embeddings, use a simple Python script. You can find the script here: create-image-embeddings.py. The script will traverse the directory of your images and generate individual image embeddings. It will create the document with the name and relative path and save it into an Elasticsearch index ‘my-image-embeddings’ using the supplied mapping.
Put all your images (photos) into the folder ‘app%2Fstatic%2Fimages’. Use a directory structure with subfolders to keep the images organized. Once all images are ready, execute the script with a few parameters.
It is crucial to have at least a few hundred images to achieve reasonable results. Having too few images will not give the expected results, as the space you will be searching in will be very small and distances to search vectors will be very similar.
In the folder image_embeddings, run the script and use your values for the variables.
$ cd image_embeddings
$ python3 create-image-embeddings.py \
  --es_host='https://image-search.es.europe-west1.gcp.cloud.es.io:443' \
  --es_user='elastic' --es_password=<password> \
  --ca_certs='../app/conf/ess-cloud.cer'
Depending on the number of images, their size, your CPU, and your network connection, this task will take some time. Experiment with a small number of images before you try to process the full data set. After the script completes, you can verify if the index my-image-embeddings exists and has corresponding documents using the Kibana dev tools.
GET _cat/indices/my-image-embeddings?v

health status index               uuid                   pri rep docs.count docs.deleted store.size pri.store.size
green  open   my-image-embeddings vfA3wOheT1C79R-PceDyXg   1   1       1222            0     24.4mb         12.2mb
Looking at the documents, you will see very similar JSON objects (like the example). You will see the image name, image id, and the relative path inside the images folder. This path is used in the frontend application to properly display the image when searching. The most important part of the JSON document is the ‘image_embedding’ that contains the dense vector produced by the CLIP model. This vector is used when the application is searching for an image or a similar image.
{
   "_index": "my-image-embeddings",
   "_id": "_g9ACIUBMEjlQge4tztV",
   "_score": 6.703597,
   "_source": {
     "image_id": "IMG_4032",
     "image_name": "IMG_4032.jpeg",
     "image_embedding": [
       -0.3415695130825043,
       0.1906963288784027,
       .....
       -0.10289803147315979,
       -0.15871885418891907
       ],
     "relative_path": "phone/IMG_4032.jpeg"
   }
}
Use the Flask application to search images
Now that your environment is all set up, you can take the next step and actually search images using natural language and find similar images, using the Flask application that we provide as a proof of concept. The web application has a simple UI that makes image search simple. You can access the prototype Flask application in this GitHubrepo.
The application in the background performs two tasks. After you input the search string into the search box, the text will be vectorized using the machine learning _infer endpoint. Then, the query with your dense vector is executed against the index my-image-embeddings with the vectors.
You can see those two queries in the example. The first API call uses the _infer endpoint, and the result is a dense vector.
POST _ml/trained_models/sentence-transformers__clip-vit-b-32-multilingual-v1/deployment/_infer
{
  "docs" : [
    {"text_field": "endless route to the top"}
    ]
}
In the second task, search query, we will utilize the dense vector and get images sorted by score.
GET my-image-embeddings/_search
{
  "knn": {
    "field": "image_embedding",
    "k": 5,
    "num_candidates": 10,
    "query_vector": [
    -0.19898493587970734,
    0.1074572503566742,
    -0.05087625980377197,
    ...
    0.08200495690107346,
    -0.07852292060852051
  ]
  },
  "fields": [
    "image_id", "image_name", "relative_path"

  ],
  "_source": false
}
To get the Flask application up and running, navigate to the root folder of the repository and configure the .env file. The values in the configuration file are used to connect to the Elasticsearch cluster. You need to insert values for the following variables. These are the same values used in the image embedding generation.
ES_HOST='URL:PORT'
ES_USER='elastic'
ES_PWD='password'
When ready, run the flask application in the main folder and wait until it starts.
# In the main directory
$ flask run --port=5001
If the application starts, you will see an output similar to the below, which at the end indicates which URL you need to visit to access the application.
flask run --port=5001
 * Serving Flask app 'flask-elastic-image-search.py' (lazy loading)
 * Environment: production
   WARNING: This is a development server. Do not use it in a production deployment.
   Use a production WSGI server instead.
 * Debug mode: off
WARNING: This is a development server. Do not use it in a production deployment. Use a production WSGI server instead.
 * Running on http://127.0.0.1:5001
Press CTRL+C to quit
Congrats! Your application should now be up and running and accessible on http:%2F%2F127.0.0.1:5001 via the internet browser.

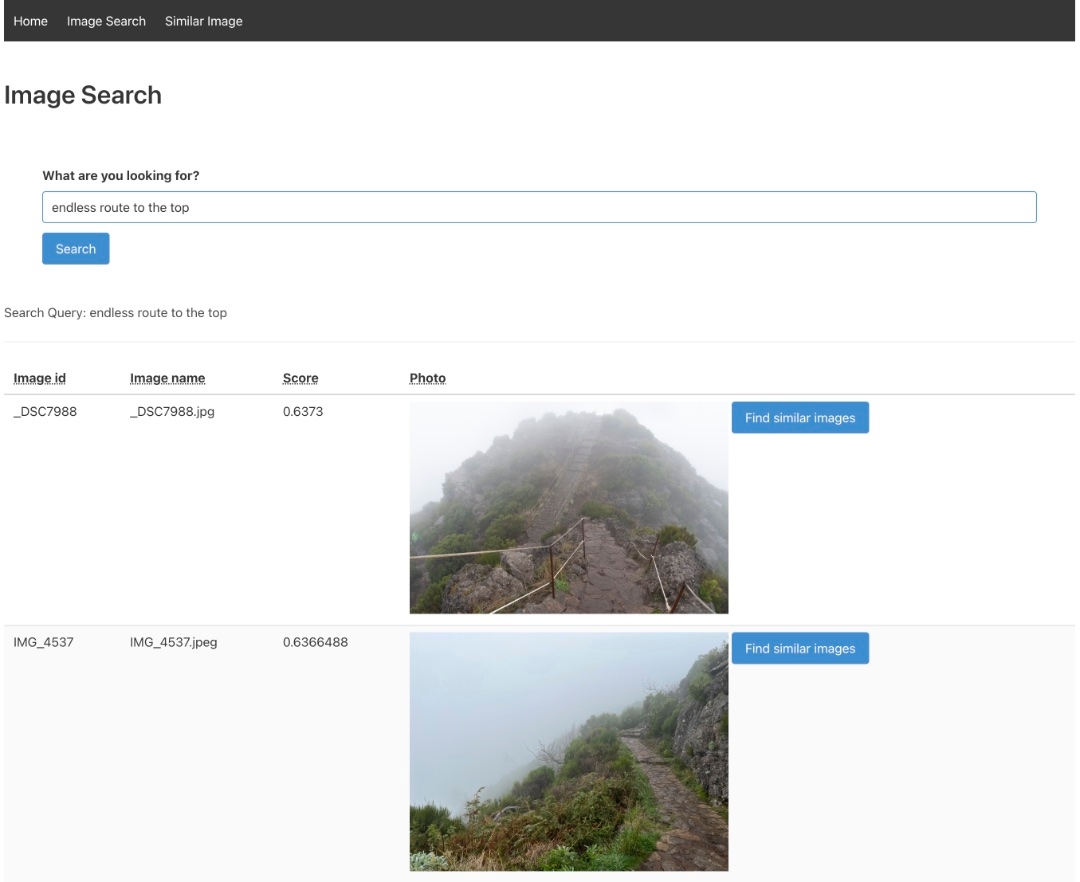
Navigate to the image search tab and input the text that describes your image best. Try to use a non-keyword or descriptive text.
In the example below, the text entered was “ endless route to the top.” The results are shown from our data set. If a user likes one particular image in the result set, simply click the button next to it, and similar images will display. Users can do this endless times and build their own path through the image data set.
The search also works by simply uploading an image. The application will convert the image into a vector and search for a similar image in the data set. To do this, navigate to the third tab Similar Image, upload an image from the disk, and hit Search.
Because the NLP (sentence-transformers%2Fclip-ViT-B-32-multilingual-v1) model we are using in Elasticsearch is multilingual and supports inference in many languages, try to search for the images in your own language. Then verify the results by using English text as well.
It’s important to note that the models used are generic models, which are pretty accurate but the results you get will vary depending on the use case or other factors. If you need higher accuracy, you will have to adapt a generic model or develop your own model — the CLIP model is just intended as a starting point.
Code summary
You can find the complete code in the GitHub repository. You may be inspecting the code in routes.py, which implements the main logic of the application. Besides the obvious route definition, you should focus on methods that define the _infer and _search endpoints ( infer_trained_model and knn_search_images ). The code that generates image embeddings is located in create-image-embeddings.py file.
Summary
Now that you have the Flask app set up, you can search your own set of images with ease! Elastic provides native integration of vector search within the platform, which avoids communication with external processes. You get the flexibility to develop and employ custom embedding models that you may have developed using PyTorch.
Semantic image search delivers the following benefits of other traditional approaches to image search:
Higher accuracy: Vector similarity captures context and associations without relying on textual meta descriptions of the images.
Enhanced user experience: Describe what you’re looking for, or provide a sample image, compared to guessing which keywords may be relevant.
Categorization of image databases: Don’t worry about cataloging your images — similarity search finds relevant images in a pile of images without having to organize them.
If your use case relies more on text data, you can learn more about implementing semantic search and applying natural language processing to text in previous blogs. For text data, a combination of vector similarities with traditional keyword scoring presents the best of both worlds. Ready to get started? Sign up for a hands-on vector search workshop at our virtual event hub and engage with the community in our online discussion forum.
Related Content


Retrieval Augmented Generation (RAG) using Cohere Command model through Amazon Bedrock and domain data in Elasticsearch