Data lifecycle management with data tiers
Elasticsearch 7.10 made configuring the lifecycle of your data less complicated. In this blog post I’ll walk through some of the changes, how to use them, and some best practices along the way.
Data lifecycle can encompass a lot of stages, so we’ll touch on:
- Dividing a cluster into tiers (hot, warm, cold), ensuring new data makes its way to the right place.
- Making use of those tiers within index lifecycle management (ILM) for migrating data between tiers.
- Increasing the data density within the cold tier using Elastic searchable snapshots.
- Putting it all together with a real example of how data flows through tiers.
Out with attributes, in with node roles
One common use case when dealing with time series data is separating the cluster topology into separate tiers. These tiers are given names like hot, where new data is ingested and queried, warm, where medium-age data is held and queried, and cold, where data is usually held for long periods of time, being queried less frequently.
It's common for users to configure these tiers with different hardware so that the most powerful, expensive hardware is used for the hot tier, while less expensive and more storage-dense hardware is used for the warm or cold tiers.
Before 7.10, one of the most common ways to configure different tiers of nodes was to use node attributes, so a user would configure something like:
# On hot nodes
node.attr.node_type: hot

# On warm nodes
node.attr.node_type: warm

# On cold nodes:
node.attr.node_type: cold
These could then be used with the cluster and index level allocation parameters. So for example, an index would be created with:
PUT /myindex
{
  "settings": {
    "index.routing.allocation.include.node_type": "hot"
  }
}
This created an index that was allocated to the hot nodes.
Let's take a look at the new way to do things.
Formalizing the process
In 7.10 configurations of this type have been formalized, and we now have specific roles that correspond to the hot, warm, and cold tiers (as well as another tier, which we'll get to). This means instead of adding the node.attr.node_type attribute, we can add one of the data_hot, data_warm, or data_cold node roles to the node.roles setting:
# On hot nodes
node.roles: ["data_hot"]

# On warm nodes
node.roles: ["data_warm"]

# On cold nodes
node.roles: ["data_cold"]
Remember to add any other roles you might need to the list! For example, for a smaller cluster, a data node may look like:
node.roles: ["master", "ingest", "ml", "data_hot", "data_content"]
(The data_content role will be explained further down in this post.)
Note: You may be wondering what happened to the existing data role. Well, the data role acts as though all of the tiers have been specified, so it’s part of the hot, warm, and cold tiers all at once. This means that nodes that have been upgraded to 7.10 or later but don't specify custom node roles with the node.roles setting are part of every data tier.
Moving data around tiers
Once these roles are set, data can be shifted around the cluster using the same cluster and index-level allocation filters as before:
- cluster.routing.allocation.require._tier
- cluster.routing.allocation.include._tier
- cluster.routing.allocation.exclude._tier
- index.routing.allocation.require._tier
- index.routing.allocation.include._tier
- index.routing.allocation.exclude._tier
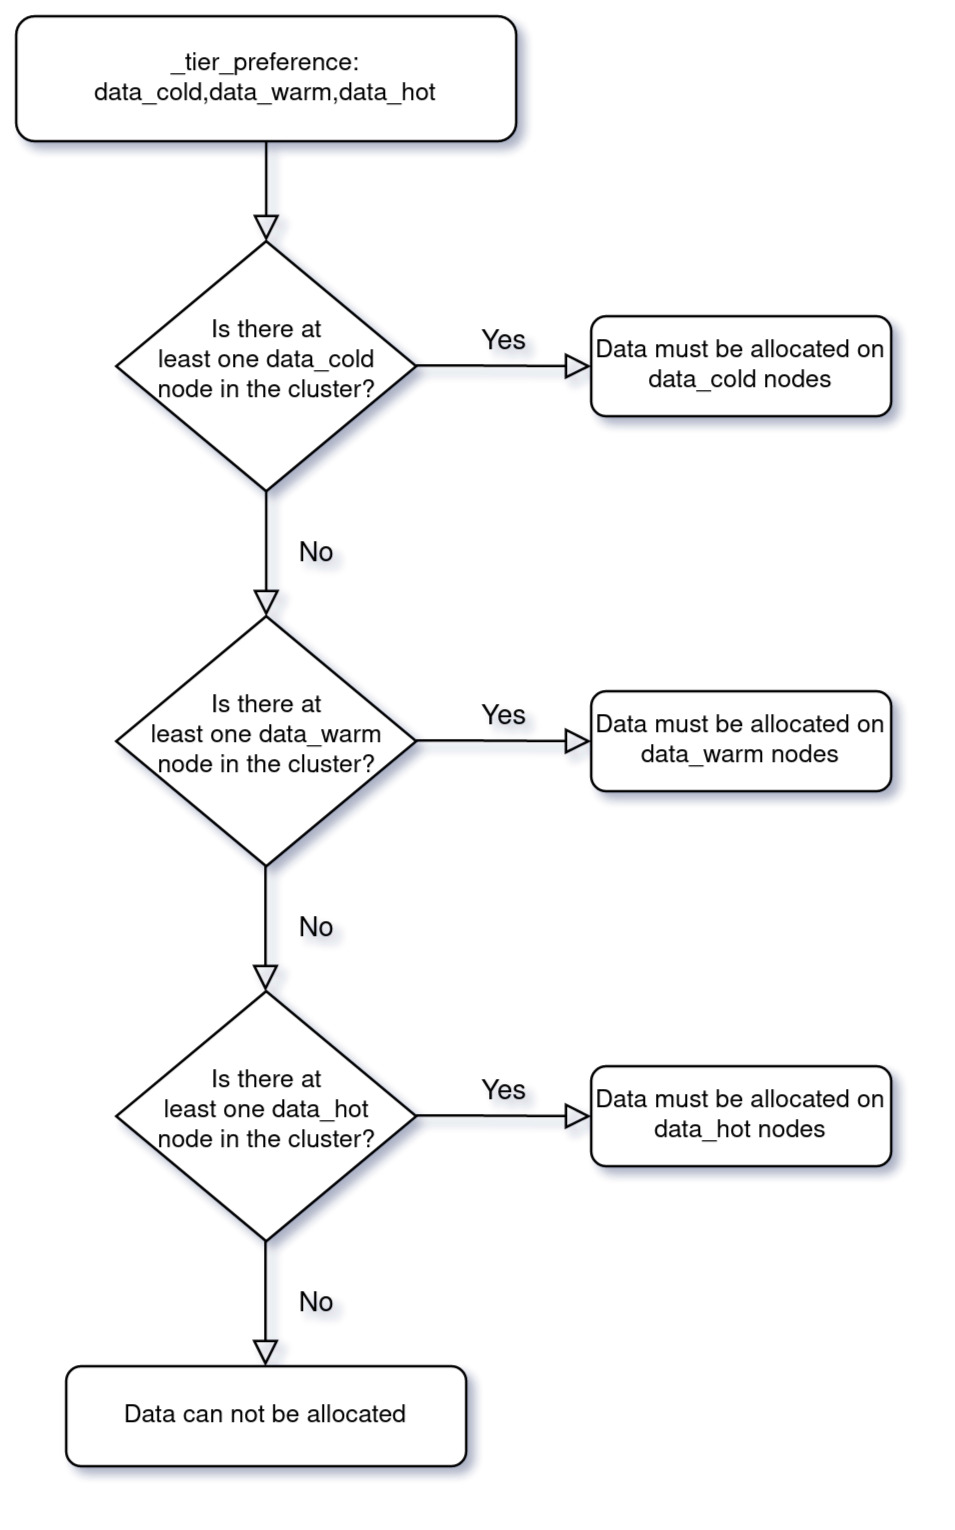
There’s also a new parameter that behaves a little differently to the regular include, exclude, and require filtering. This is the _tier_preference index-level setting: index.routing.allocation.include._tier_preference.
To see how it works, let's look at an example:
PUT /myindex
{
  "settings": {
    "index.routing.allocation.include._tier_preference": "data_cold,data_warm,data_hot"
  }
}
This snippet creates an index that prefers to be on the cold tier, then the warm tier, and finally, the hot tier.
If the cluster contains no cold nodes, then it must be allocated to a warm node. If there are no warm nodes in the cluster, then it must be allocated to a hot node. This configuration allows policies or templates to set a preference and not have to worry about each tier being part of the cluster — it can specify its preferred tiers instead.
To clarify exactly how this new setting behaves, check out this flow diagram:
There's one last difference between node attributes and formalized data tier roles — where an index is allocated when it is initially created. Here’s a simple rule that determines where an index is initially placed:
Any index that is part of a data stream automatically has a "index.routing.allocation.include._tier_preference: data_hot" setting added upon creation.
This means that all data stream backing indices will be allocated by default on hot (data_hot) nodes.
And for indices that aren’t part of data streams:
Any index that is not part of a data stream automatically has a "index.routing.allocation.include._tier_preference: data_content" setting added upon creation.
Either of these settings can be overridden. Simply set the _tier_preference index setting to null, or set any other index-level allocation filtering setting during creation.
But wait: What is this new data_content role? Let's consider another kind of data that doesn’t fit into a lifecycle model: data that does not fit the time series model.
Data that doesn't fit a time series
Some data is indexed and then only queried but doesn't have an age or timestamp in the conceptual sense. This includes enterprise search data, or ecommerce data, or a database of user information.
For that kind of data, there’s a specific role: the data_content role. This role is configured just like the other roles using the node.roles setting.
It’s worth mentioning that none of these roles are mutually exclusive, so if you wanted non-time series data and hot data to be on the same nodes, you would configure a node like so:
# This node can hold either "hot" tier data, or "content" tier data
node.roles: ["data_hot", "data_content"]
And, as you may have guessed already, the existing default data role is also part of the content tier. This means that the data role is the same as adding the data_hot, data_warm, data_cold, and data_content roles to the node.roles setting.
As was mentioned in the previous section, the way that Elasticsearch determines what is time series data versus non-time series data is whether that index belongs to a data stream.
Best practice: Make sure that your cluster always has at least one data_hot node and one data_content node, even if it’s the same node. Without both of these node roles, the different types of indices can’t be allocated.
Now that we know about all the different tiers and have configured a few, let's look at how ILM can make use of these tiers.
ILM in a data tier world
Configuring tiers by themselves doesn't change much compared to the older attribute-based allocation. However, now that we have a built-in and consistent way to identify tiers within Elasticsearch, ILM can make use of those settings to migrate data automatically between tiers.
Before 7.10, a tiered configuration may have been accomplished with a policy like the following:
{
  "phases" : {
    "hot" : {
      "actions" : {
        "rollover" : {
          "max_age" : "30d",
          "max_size" : "50gb"
        }
      }
    },
    "warm" : {
      "min_age" : "45d",
      "actions" : {
        "allocate" : {
          "include" : {
            "node_type" : "warm"
          }
        },
        "forcemerge" : {
          "max_num_segments" : 1
        }
      }
    },
    "cold" : {
      "min_age" : "60d",
      "actions" : {
        "allocate" : {
          "include" : {
            "node_type" : "cold"
          }
        }
      }
    },
    "delete" : {
      "min_age" : "90d",
      "actions" : {
        "delete" : { }
      }
    }
  }
}
This policy relied on an index template allocating data to the hot tier, then updating the node_type with "allocate" actions within each ILM phase to move the data around.
But with 7.10, there’s a better way!
Since Elasticsearch now has the ability to prefer a particular tier, ILM can make use of this preference by setting index.routing.allocation.include._tier_preference automatically when entering a new phase. Here’s an example using the same policy as above, but removing the allocate steps:
{
  "phases" : {
    "hot" : {
      "actions" : {
        "rollover" : {
          "max_age" : "30d",
          "max_size" : "50gb"
        }
      }
    },
    "warm" : {
      "min_age" : "45d",
      "actions" : {
        "forcemerge" : {
          "max_num_segments" : 1
        }
      }
    },
    "cold" : {
      "min_age" : "60d",
      "actions" : { }
    },
    "delete" : {
      "min_age" : "90d",
      "actions" : {
        "delete" : { }
      }
    }
  }
}
When a new data stream is created that uses this policy, initially the preference will be set to index.routing.allocation.include._tier_preference: data_hot.
When the index enters the warm phase, the setting will be updated to index.routing.allocation.include._tier_preference: data_warm,data_hot.
Upon entering the cold phase, it’ll be updated to index.routing.allocation.include._tier_preference: data_cold,data_warm,data_hot, and then the index will finally be deleted in the delete phase.
This automatic migration does not apply to the hot phase, as that is automatically managed on index creation.
This automatic migration allows the data location to automatically match the current ILM phase when the cluster topology also contains nodes of that tier.
This behavior is automatically applied, with two caveats:
- If a "migrate": {"enabled": false} action is added to the phase's list of actions, the automatic migration doesn’t take effect.
- If the ILM phase actions contain an allocate step that sets an include, require, or exclude filter, the automatic migration doesn’t take effect.
Both of these phases will not automatically migrate data:
"warm": {
  "actions": {
    "migrate": {
      "enabled": false
    }
  }
}
or
"warm": {
  "actions": {
    "allocate": {
      "include": {
        "node_type": "warm"
      }
    }
  }
}
Best practice: Once you have adopted the new roles in the cluster topology, make sure to remove any previous allocate actions from your ILM policies that use node attributes to rely on the default data tier migration.
Keeping data longer with searchable snapshots
Creating and maintaining the lifecycle of your data lets you control the hardware properties and performance characteristics of newer versus older data.
But how much data can your cluster actually hold?
The answer to this question almost always determines the retention period for data, as disk becomes finite and the oldest data must be expunged from the cluster to make room for newer data. It's a fine balance between keeping the amount of data necessary for insight and regulatory reasons without exhausting — or overpaying for — cluster disk resources.
But what if we could keep data around longer with only a minimal impact on the cluster's resources?
This is exactly where searchable snapshots can help. Searchable snapshots, introduced with 7.10, allow Elasticsearch to keep one copy of the data locally in the cluster, while another copy, which is acting as the replica, resides within a snapshot repository. This means no replicas are needed, as any loss of the local copy can be locally restored automatically from the repository snapshot.
We can make use of this functionality within ILM too, automatically converting an index into a searchable snapshot when it reaches the cold phase, doubling the density of data that can be stored as no replicas are required for redundancy.
Using this functionality is as simple as configuring a cold phase with the searchable_snapshot action:
"cold": {
  "min_age": "90d",
  "actions": {
    "searchable_snapshot": {
      "snapshot_repository" : "backing_repo"
    }
  }
}
Internally, when this action is reached, Elasticsearch will:
- Force merge the index to a single segment
- Create a new snapshot of the index in the backing_repo repository
- Mount the index as a searchable snapshot-backed index under a new name
- Swap the original index for the searchable snapshot-backed one
Voilà! We have now removed the need for a local replica since we have a snapshot that can be used in the event the primary copy of data is lost.
Note: If you’re an Elastic Cloud user, you can even make use of the already-configured "found-snapshots" repository within your searchable snapshot action configuration (or configure your own separate repository).
Putting it all together
Data tier configuration for the lifecycle of your data encompasses many different moving parts to make a working lifecycle. Let's put those parts together into a working example.
To start with, we'll need some nodes. In this example we'll use four nodes denoted a, b, c, and d:
NodeA:
node.name: node-a-hot
node.roles: ["master", "data_hot", "data_content", "ingest"]
NodeB:
node.name: node-b-hot
node.roles: ["master", "data_hot", "data_content", "ingest"]
NodeC:
node.name: node-c-cold
node.roles: ["master", "data_cold", "ingest"]
NodeD:
node.name: node-d-cold
node.roles: ["master", "data_cold", "ingest"]
Once the cluster is started, let's configure a snapshot repository:
PUT /_snapshot/my-repository
{
  "type": "fs",
  "settings": {
    "location": "my-backup-location"
  }
}
And add our ILM policy, making use of some common actions and the new searchable_snapshot action:
PUT /_ilm/policy/my-data-lifecycle
{
  "policy" : {
    "phases" : {
      "hot" : {
        "actions" : {
          "rollover" : {
            "max_size" : "50gb",
            "max_age" : "3d"
          }
        }
      },
      "warm" : {
        "min_age" : "5d",
        "actions" : {
          "shrink" : {
            "number_of_shards" : 1
          }
        }
      },
      "cold" : {
        "min_age" : "7d",
        "actions" : {
          "searchable_snapshot" : {
            "snapshot_repository" : "my-repository"
          }
        }
      },
      "delete" : {
        "min_age" : "365d",
        "actions" : {
          "delete" : { }
        }
      }
    }
  }
}
There’s only one more prerequisite: an index template so that an index can be a data stream and automatically use the ILM policy we previously created. Make sure you have at least two of each node to accommodate the replicas, or set index.number_of_replicas to 0 for testing.
PUT /_index_template/my-lifecycle-template
{
  "index_patterns": ["test-index"],
  "data_stream" :{},
  "template": {
    "settings": {
      "index.lifecycle.name": "my-data-lifecycle",
      "index.number_of_shards": 2
    }
  }
}
Data can now be sent to this new index by indexing documents directly to the test-index data stream:
POST /test-index/_doc?op_type=create
{
  "message": "test document",
  "@timestamp": "2020-01-12"
}
Now as more data is sent, it will automatically move from the hot nodes to the cold nodes in the cluster, eventually making its way to a searchable snapshot before finally being deleted a year later.
Get started with Elastic Cloud
We hope this walkthrough of data tiers from a technical perspective has been helpful. Please try out these features and let us know how you like them in our Discuss forums!
You can also try out these beta features with a free 14-day trial of Elastic Cloud. Stay tuned for 7.11 when our data tiers features will become generally available.