How to Capture Domain Knowledge in Elastic Machine Learning Jobs with Custom Rules
Elastic machine learning anomaly detection operates fully unsupervised. When a machine learning job is running, a dynamic, ever-learning model of the data is built and updated in real-time. This model enables our users to detect statistically anomalous events in a completely automated fashion. But there is one thing the model is not aware of: the data domain.
Whilst evaluating a statistical anomaly, questions might be raised. Is this a real point of interest? Is this actionable? The answers require expert knowledge about the specific use case and the domain of the analyzed data. To further understand this, let us run through a couple of examples that demonstrate the importance of domain knowledge.
Numerical Conditions
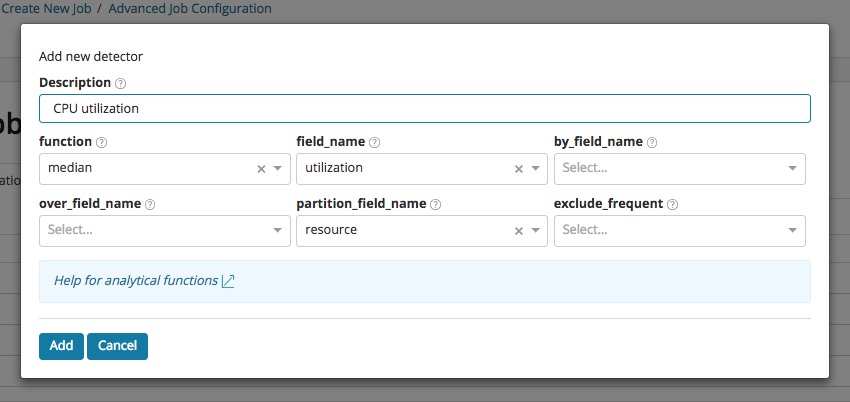
For the first use case, let us take the role of a DevOps engineer who is monitoring the machines running a service. We are interested in anomalies in CPU utilization. For this, we create a job using the Advanced Job Creation wizard. We create a detector looking at median CPU, partitioned by resource, using a 30 min bucket span interval. By using resource as the partitioning field, this will detect anomalies in CPU utilization for each resource independently:
Now let us imagine that over a long period of time the power of our infrastructure surpasses the demand of our users, which means that many of our resources will be mostly idle. What will happen if there is any light momentary activity on any of these idle resources? The model will flag any small deviations as anomalous because it has learnt to expect CPU utilization to be close to zero. This is illustrated in the example below, where a cluster of anomalies has been detected for the resource ap_409, as the CPU utilization briefly rises to values between 1% and 8%.
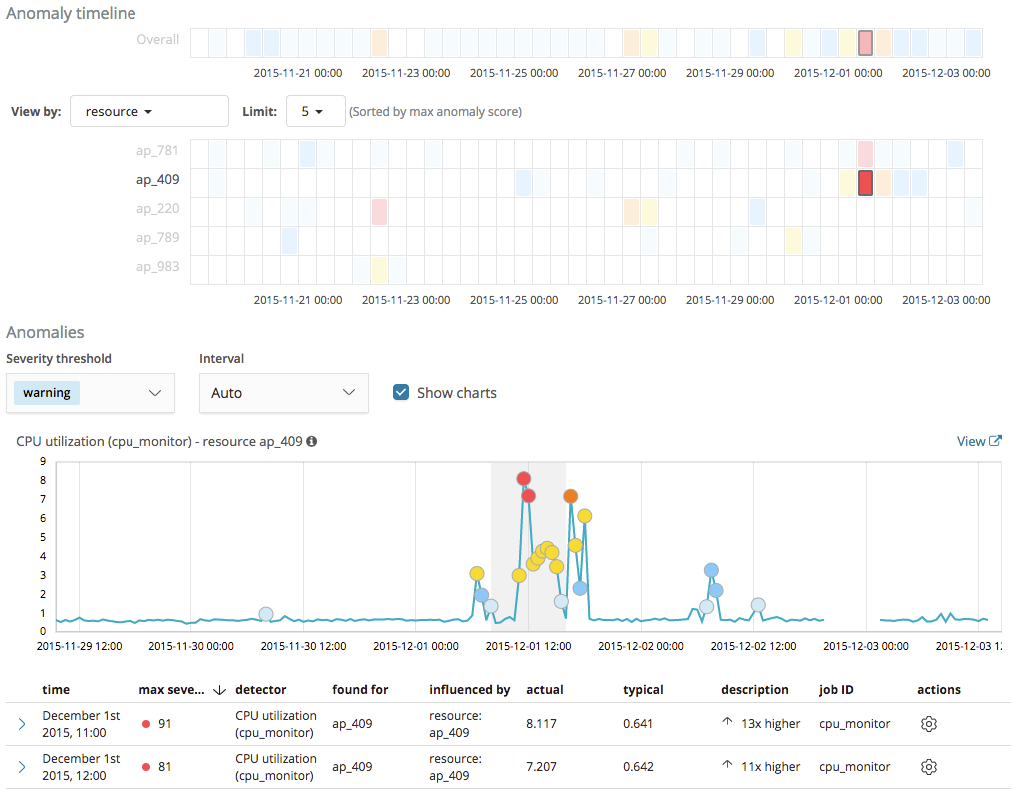
Whilst the model is right in treating this behavior as statistically anomalous, these short periods of time when the CPU utilization rises to values that we consider relatively low are of no particular interest to us.
To solve this problem, starting with version 6.4.0 of the Elastic Stack, machine learning provides custom rules functionality which enables us to change the behavior of anomaly detectors by providing domain-specific knowledge. When we create a rule, we specify conditions, scope, and actions. When the conditions of a rule are satisfied, its actions are triggered.
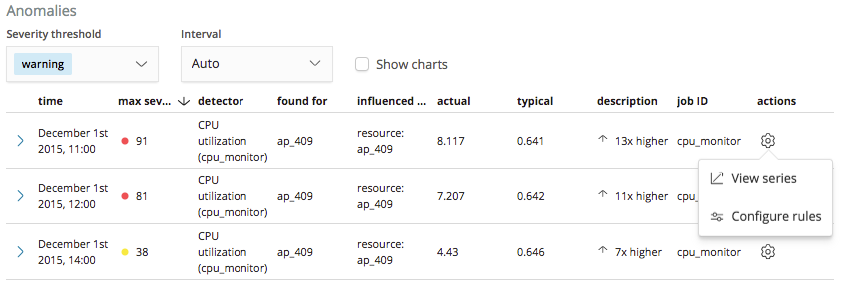
So for this first example, let’s create a rule to instruct our CPU utilization detector to refrain from generating machine learning results when there are anomalous events related to low CPU usage with a value below a threshold of 10%. Rules on a detector are configured through a new Configure rules item that has been added to the actions menu in the Anomalies table of the Anomaly Explorer and Single Metric Viewer:
Selecting this ‘Configure rules’ item will open a panel which we can use for creating a rule to tell the detector to stop generating results when the value of the anomaly is less than 10%:
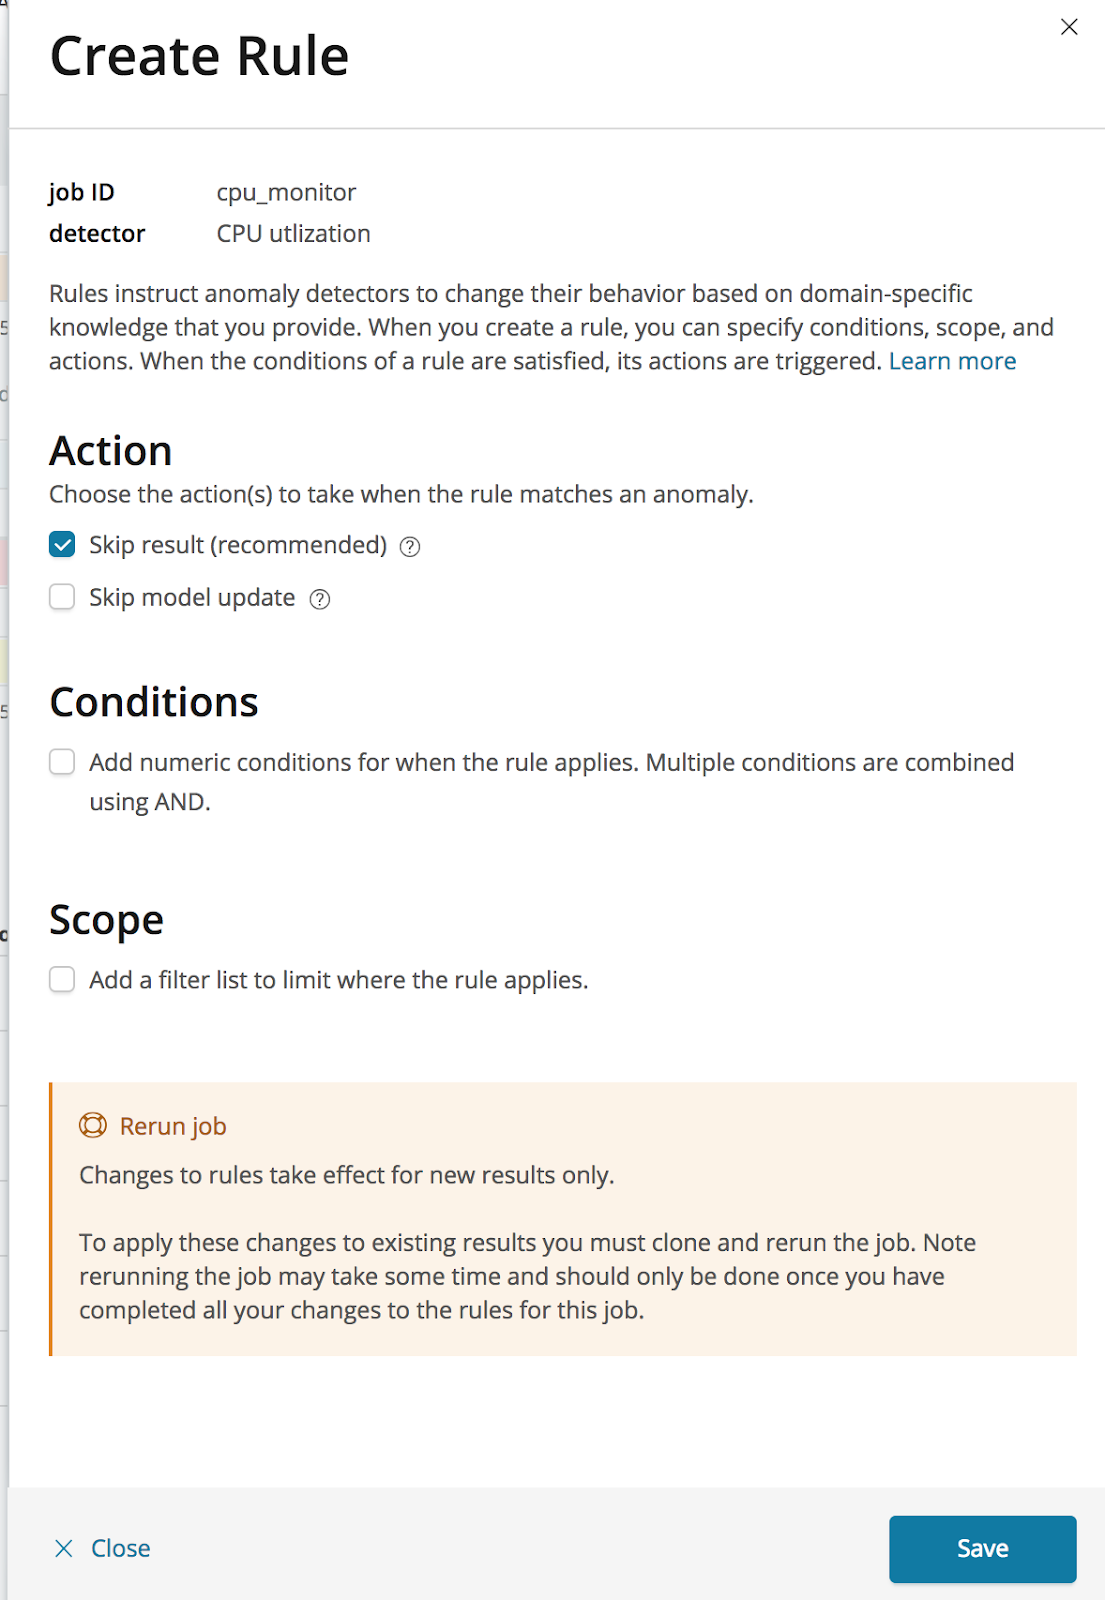
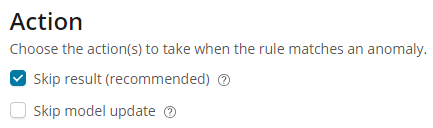
The first step in configuring a rule is to define the actions that should be triggered when the rule applies. We can choose to not create a result and to not update the model. In this case we will select just to skip the result, which is the recommended action, leaving the model to be updated as usual with the corresponding series value.
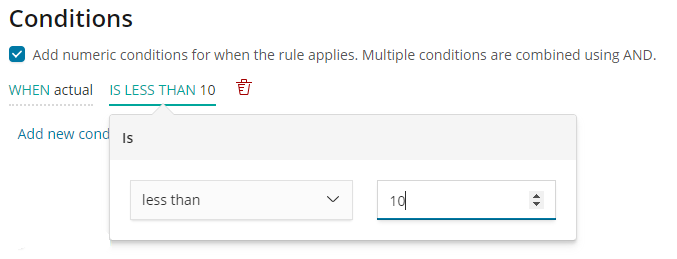
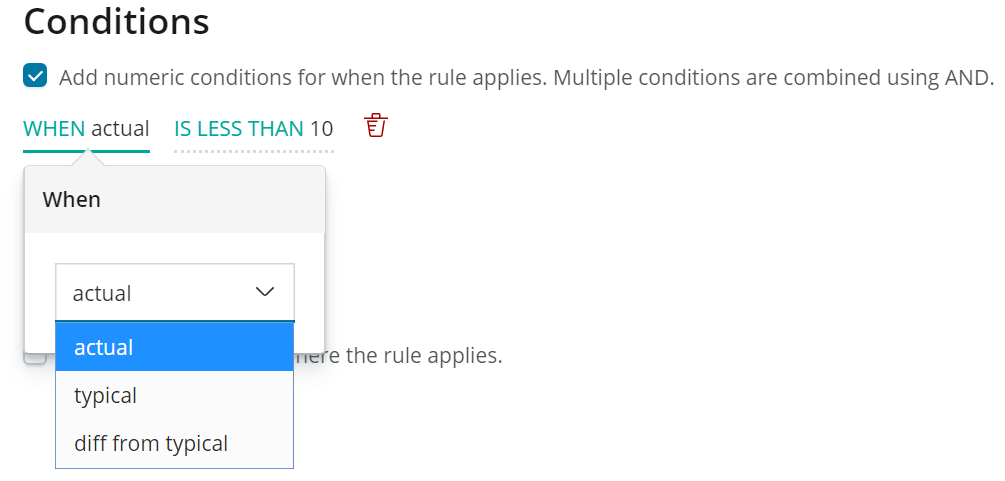
The second step is to add the numeric condition, which defines when the rule applies. Conditions can be set against the actual or typical properties of the results, or against how much the actual value differs from typical. Here we apply the condition to the actual field of the result, setting the operator to ‘less than’, and entering a value of 10.
We can now save the new rule, instructing our detector to stop creating anomaly results when the value of the CPU utilization is less than 10%.
For jobs that are currently running, changes to the rules on a detector will take effect immediately. However, to apply these changes to existing results you must clone and rerun the job from the Job Management page. Note that rerunning a job may take some time and should only be done once you have completed all your changes to the rules for this job.
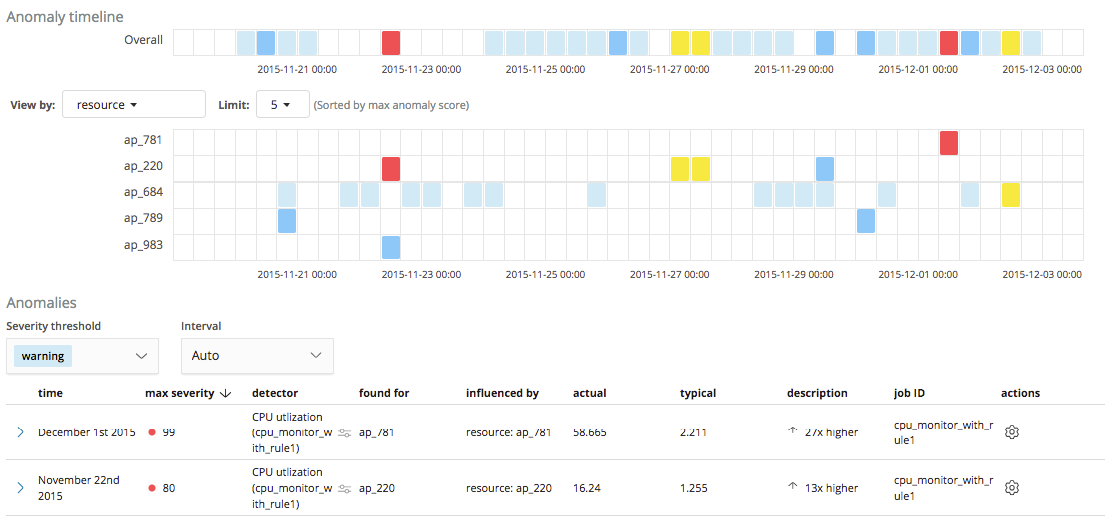
Let’s take a look at how this rule affects the results for our job. As shown in the screenshot below, we no longer see the anomalies for the ap_409 resource highlighted earlier, with results only created when the CPU utilization is above 10% as being worthy of further investigation.
Other Conditions
In the example above we used a custom rule to skip results where the actual value was less than 10. There are other conditions available which can be applied to the typical value and the difference between the typical and actual values.
JSON Configuration for Numeric Conditions
Before adding a custom rule containing a numeric condition, the analysis configuration would have originally looked like this:
{
  "analysis_config": {
    "bucket_span": "30m",
    "detectors": [
      {
        "detector_description": "CPU utilization",
        "function": "median",
        "field_name": "utilization",
        "partition_field_name": "resource"
      }
    ],
    "influencers": [
      "resource"
    ]
  },
  …
}
After adding a custom rule, it becomes:
{
  "analysis_config": {
    "bucket_span": "30m",
    "detectors": [
      {
        "detector_description": "CPU utilization",
        "function": "median",
        "field_name": "utilization",
        "partition_field_name": "resource",
        "custom_rules": [
          {
            "actions": [ "skip_result" ],
            "conditions": [
              {
                "applies_to": "actual",
                "operator": "lt",
                "value": 10.0
              }
            ]
          }
        ]
      }
    ],
    "influencers": [
      "resource"
    ]
  },
  …
}
Adding Scope
For the second use case, we will take the role of a security analyst who tries to detect whether data is being exfiltrated over the DNS protocol. We are going to use a machine learning recipe for detecting DNS tunneling that is discussed in this security analytics blog. Using Packetbeat to collect DNS data, we can split URLs between the subdomain and the highest registered domain.
Our job contains a detector using the high_info_content function to monitor for unusually high amounts of information passed in the subdomain field compared to other highest_registered_domain values.
{
    "analysis_config": {
        "detectors": [
            {
                "function": "high_info_content",
                "field_name": "subdomain",
                "over_field_name": "highest_registered_domain"
            }
        ]
    },
    ...
}
Let’s take a look at the results for this job on our data set.

The job has succeeded in identifying anomalies with regard to the amount of information sent over DNS requests among the various domains. However, many of the results are from widely used domains which we know do not relate to malicious activity. We may also see results from our own organization, such as from test infrastructure, which again we know we can trust. As with the first use case we looked at, these anomalies are of no interest to us given our knowledge of the domain.
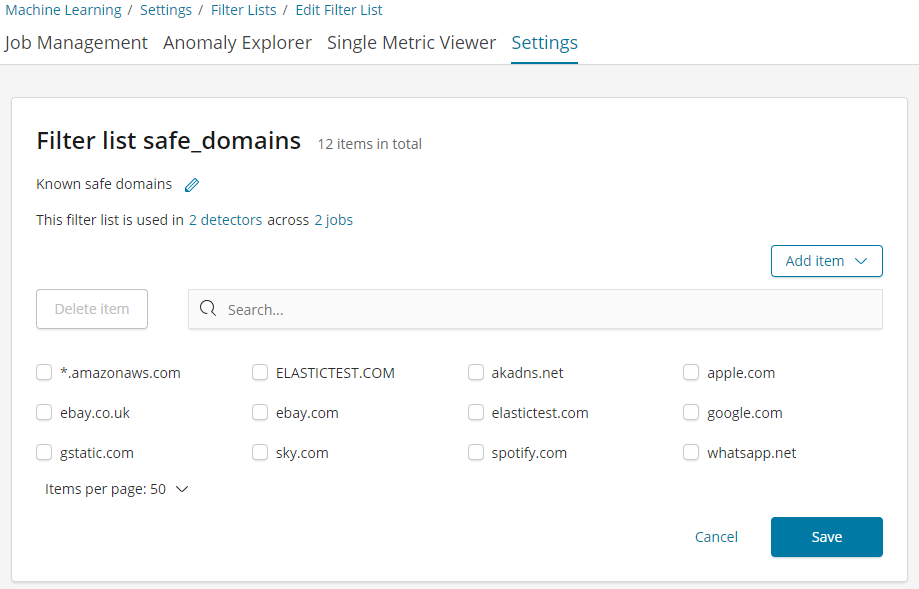
To address this issue, let’s use another rule, this time one using a scope property to skip results when the highest registered domain is one we know we can trust. The scope of a rule makes use of machine learning filters, which are lists of values that we can use to include or exclude events from the rule's application. You can configure filter lists on a new screen in the Machine Learning Settings page in Kibana which has been added in version 6.4 of the Elastic Stack. Shown below is a safe_domains filter list we’ve created containing a list of domains we consider to be safe.
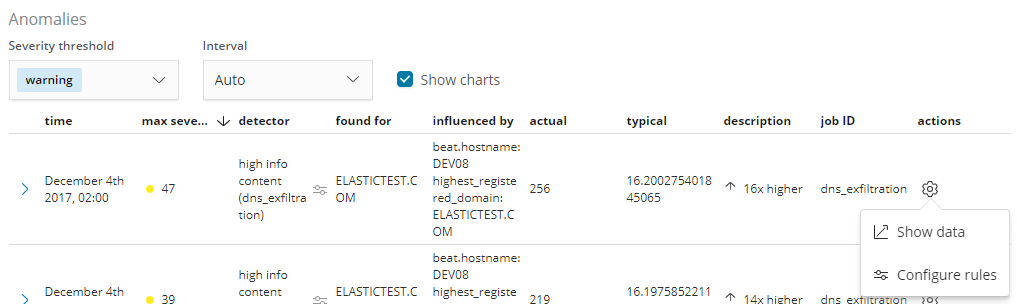
To create the rule, we open the rule editor by using the ‘Configure rules’ item from the anomalies table actions menu:
Again we choose to skip results when the rule applies, but this time rather than using a numeric condition, we use the Scope section to add a scope for the rule, such that it applies only to certain highest registered domains. We pick the in option from the scope controls, and select the safe_domains filter list which we created in the Filter Lists settings page:
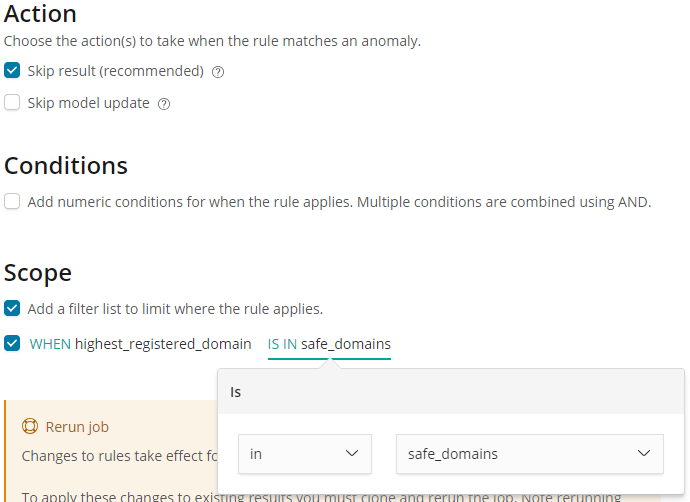
Saving these edits creates a rule which will tell the detector to stop creating results when the highest_registered_domain is in our safe_domains filter list.
The rule will take effect for new results on saving, but let’s see how the results look when we rerun the job with this rule applied. Comparing the screen below with the original job shown earlier, we no longer see anomalies for any of the domains added to our safe_domains filter list:
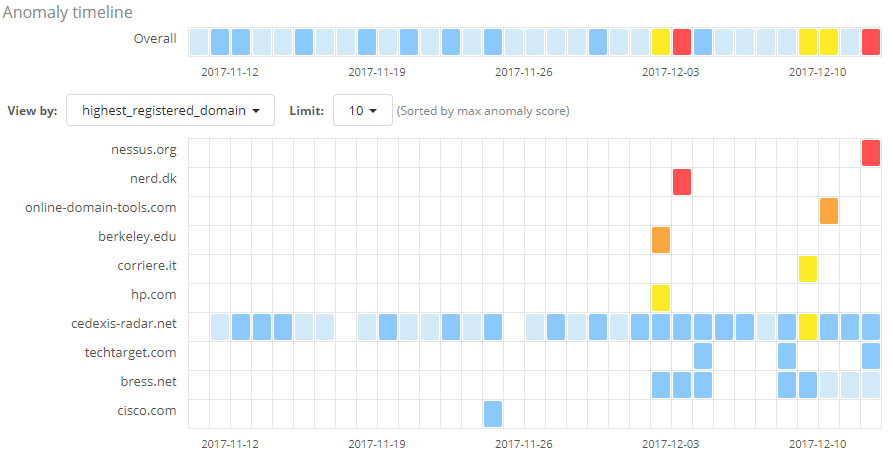
So applying our knowledge of which domains we consider to be safe has removed the uninteresting results from our view, focussing our attention on potentially suspicious activity to domains which we haven’t classified as ‘safe’.
JSON Configuration for Filter Lists
{
  "analysis_config": {
    "bucket_span": "15m",
    "detectors": [
      {
        "function": "high_info_content",
        "field_name": "subdomain",
        "over_field_name": "highest_registered_domain",
        "custom_rules": [
          {
            "actions": [ "skip_result" ],
            "scope": {
              "highest_registered_domain": {
                "filter_id": "safe_domains",
                "filter_type": "include"
              }
            }
          }
        ]
      }
    ]
  },
…
}
Diving into the Different Rule Actions
In the above examples we saw the usage of the skip_result action but another available choice is the skip_model_update action. A rule can use either of the actions or combine them both at the same time. In this section, we discuss in more detail what the available actions do and how they differ.
The skip_result action instructs the anomaly detector not to create an anomaly record when the rule applies. This means you will not see anomalies that you are not interested in. The remaining interesting anomalies will then be scored relative to each other giving you more meaningful ranking and severity categorization. (The scoring mechanism is part of the normalization process that is used by machine learning and you can learn more about it in this blog about anomaly scoring).
The skip_model_update action instructs the anomaly detector to not use a particular value when the model is updated. In other words, the model remains unaffected by that value. This is useful when we expect certain values (e.g. from a test agent) that are highly unusual and we do not want the model to be altered by these, yet we do want anomalous results for them.
The default and recommended action is skip_result. This is the action to use for instructing the detector to ignore certain results without affecting the model itself. Interfering with the way the model updates may have a negative impact on the quality of the results, and should only be used in advanced use cases.
For most use cases we recommend selecting to skip results only as this ensures the modeled data reflects the true behavior of the system. For example, in the case of underutilized resources where the CPU would be low for the majority of time, selecting to not update the model would mean most data would not excluded from the model and therefore we would not have a true model of the low usage machine.
Rules vs. Datafeed Queries
At first sight, it might appear that using rules is just another way of filtering the data that feeds into a job. For example, a rule that skips results when the partition field value is in a filter sounds equivalent to having a query that filters out such documents. But it is not. There is a fundamental difference. When the data is filtered before reaching a job it is as if they never existed for the job. With rules, the data still reaches the job and affects its behavior (depending on the rule actions).
For example, a rule with the skip_result action means all data will still be modeled. On the other hand, a rule with the skip_model_update action means results will still be created even though the model will not be updated by data matched by a rule.
If you wish to completely exclude data from an analysis, we would still recommend using a filter in the datafeed query. For example, if you wanted to analyze error messages and were not concerned with info and debug messages, then using a filter in the datafeed query would be preferable. This filters the data before reaching the machine learning analysis engine and is more efficient as it will use less resource.
It is important to understand the difference in relation to your use case and choose between simply using a datafeed query or using a custom rule with a suitable set of actions.
Summary
Using custom rules allows you to apply your domain expertise to provide more meaningful scoring and ranking of anomalies that are important to you.
Custom rules are flexible and can be applied to numerical or categorical values. When applied to a job that is running in real-time, a custom rule will affect results from this point forwards. To apply them to historical data, a job can be cloned and re-run.
The custom rules functionality has been added to machine learning in version 6.4 of the Elastic stack. Enjoy using it and let us know what you think of it on our Discuss forum.