Autoscale your Elastic Cloud data and machine learning nodes
We're excited to announce that autoscaling is now available on Elastic Cloud. In our initial release, autoscaling monitors the storage utilization of your Elasticsearch data nodes and the available memory capacity for your machine learning jobs. As your data grows, whether you’re expanding to new use cases or simply storing data for longer, autoscaling automatically adjusts resource capacity to ensure you can store your data, and that your machine learning jobs can execute — so you don’t have to worry about whether your deployment can support your requirements. Future releases will include autoscaling based on additional metrics and stack components (such as Kibana).

Scaling your data nodes
As your data grows, you need to ensure you have enough storage capacity to store the data you index. Autoscaling monitors your data as it grows and automatically scales your Elasticsearch data nodes. Autoscaling is fully integrated with your index lifecycle management (ILM) policies. As you add data to your hot, warm, and cold data tiers, autoscaling will create additional nodes in these tiers if needed, and then grow storage capacity to meet these needs.
Scaling your machine learning nodes
Your memory requirements will vary as the number of machine learning jobs you run changes. Autoscaling keeps track of the memory capacity required to run these jobs and adjusts the size and number of machine learning nodes to ensure resources are available. The ability to automatically scale memory up and down also helps to ensure you only pay for the resources your machine learning jobs use.
Scaling safeguards you control
Elastic Cloud provides preconfigured autoscaling thresholds. You can adjust these thresholds both during deployment creation, and after your deployment has been provisioned. Thresholds guarantee that automated increases don’t expand unchecked. You can configure these threshold safeguards via API and CLI, as well as in the Elastic Cloud console.
Enabling autoscaling
Getting started with autoscaling is easy with this step-by-step walkthrough. Begin by creating a new Elastic Cloud deployment using version 7.11 or above. You can also use an existing deployment that has been upgraded to version 7.11 or higher.

Log in to the Elastic Cloud console and start by selecting Create deployment. Click the Customize button at the bottom. For existing deployments, just click Edit from the left vertical menu.
.png)
Next, select the Autoscale this deployment checkbox. You’ll notice an Autoscaling badge next to the data tiers and machine learning sections, the initial or current size, as well as the Edit settings link.
Configuring limits and settings
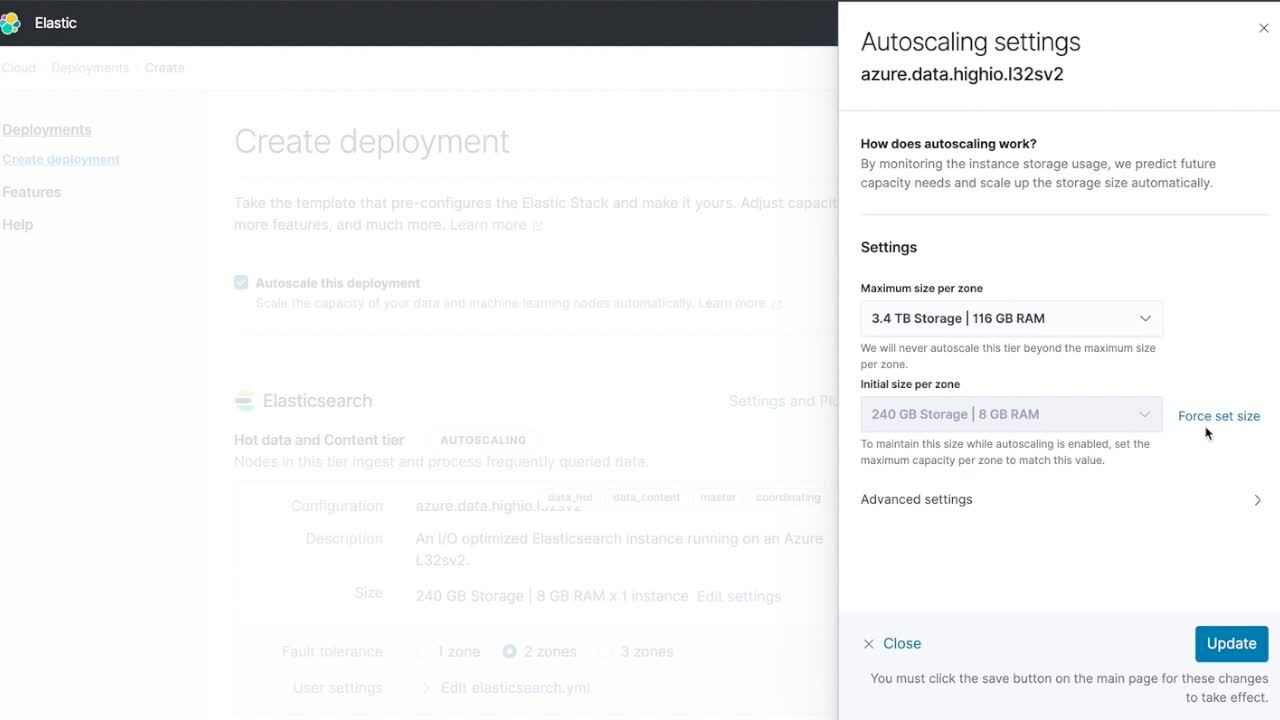
If you click on the Edit settings link a flyout will open with the following fields.
Data tiers
- Maximum size per zone to ensure autoscaling will not scale that specific data tier above the configured size.
- Initial size per zone to manually increase or decrease capacity. In existing deployments, the field name will be "Current size per zone."
.png)
Machine learning
- Minimum size per zone to ensure a minimum capacity will always be available and make sure autoscaling will not automatically scale below that threshold.
- Maximum size per zone to ensure autoscaling will not scale your machine learning nodes above the configured size.
.png)
You can use the default configurations or adjust based on your needs, and click on the Create Deployment button. As you ingest more data, autoscaling will automatically add more capacity to your data nodes and machine learning memory.
Autoscaling in action
To test autoscaling you need to ingest data into your Elastic Cloud deployment. The easiest way to do so is by using the Elastic Agent. Elastic Agent is a single, unified way to collect logs, metrics, and other types of data from your hosts. You no longer need to install multiple Beats and other agents, making it easier and faster to deploy across your infrastructure. To get started, navigate to Kibana and complete the Elastic Agent getting started guide. You can use the agent to ingest system metrics and then enable the machine learning anomaly detection in the Metrics app. You’ll notice that even though you didn’t manually enable the machine learning nodes they will be automatically added to your cluster and scale as needed.
What’s next?
Log in to the Elastic Cloud console to get started. You can also learn more about autoscaling by heading over to our user guide.
If you have any questions, be sure to connect with other users in the Elastic Community or reach out on our Discuss forums.