SAML Authentication and the Elastic Stack
So what exactly is SAML and why are we excited?
Introduction
This post aims to offer a proper introduction to SAML Authentication and give an overview of how the Elastic Stack is using SAML to enable you to secure your clusters and users. For complete and detailed instructions on how to configure your cluster for SAML Authentication, consult our Elastic Cloud, Elastic Cloud Enterprise and Elasticsearch SAML Configuration guides.
SAML demystified
SAML, which stands for Security Assertion Markup Language, is an is an XML-based standard from OASIS that deals with exchanging authentication and authorization data between parties. It consists of a number of profiles describing different use cases for the standard, but the one that is most prominently used is SAML 2.0 Web Browser Single Sign On (SSO) Profile which describes cross (security) domain web SSO.
There are three actors involved in a SAML authentication flow. The SAML Identity Provider (IdP) is a SAML authority that bears the burden of authenticating users against an identity repository and retrieving information about these users from the same or other identity repositories. It consequently passes on this information to a SAML Service Provider using SAML messages. A SAML Service Provider (SP) is most commonly a component of, or a middleware in a web application. It triggers the authentication request to a SAML Identity Provider and, after successful user authentication, consumes the SAML message that the Identity Provider sent in order to retrieve details about the authentication event and the authenticated user themselves. It finally uses this information in order to create a session in the context of the web application in which it is being used.
The last of the three actors, is the user agent, the browser that the user utilizes in order to access the application, and thus, the Service Provider and the Identity Provider. All communication in SAML 2.0 Web Browser SSO Profile is front-channel communication and is handled explicitly by the browser. The Identity Provider doesn’t need to be able to communicate directly with the Service Provider in any way.
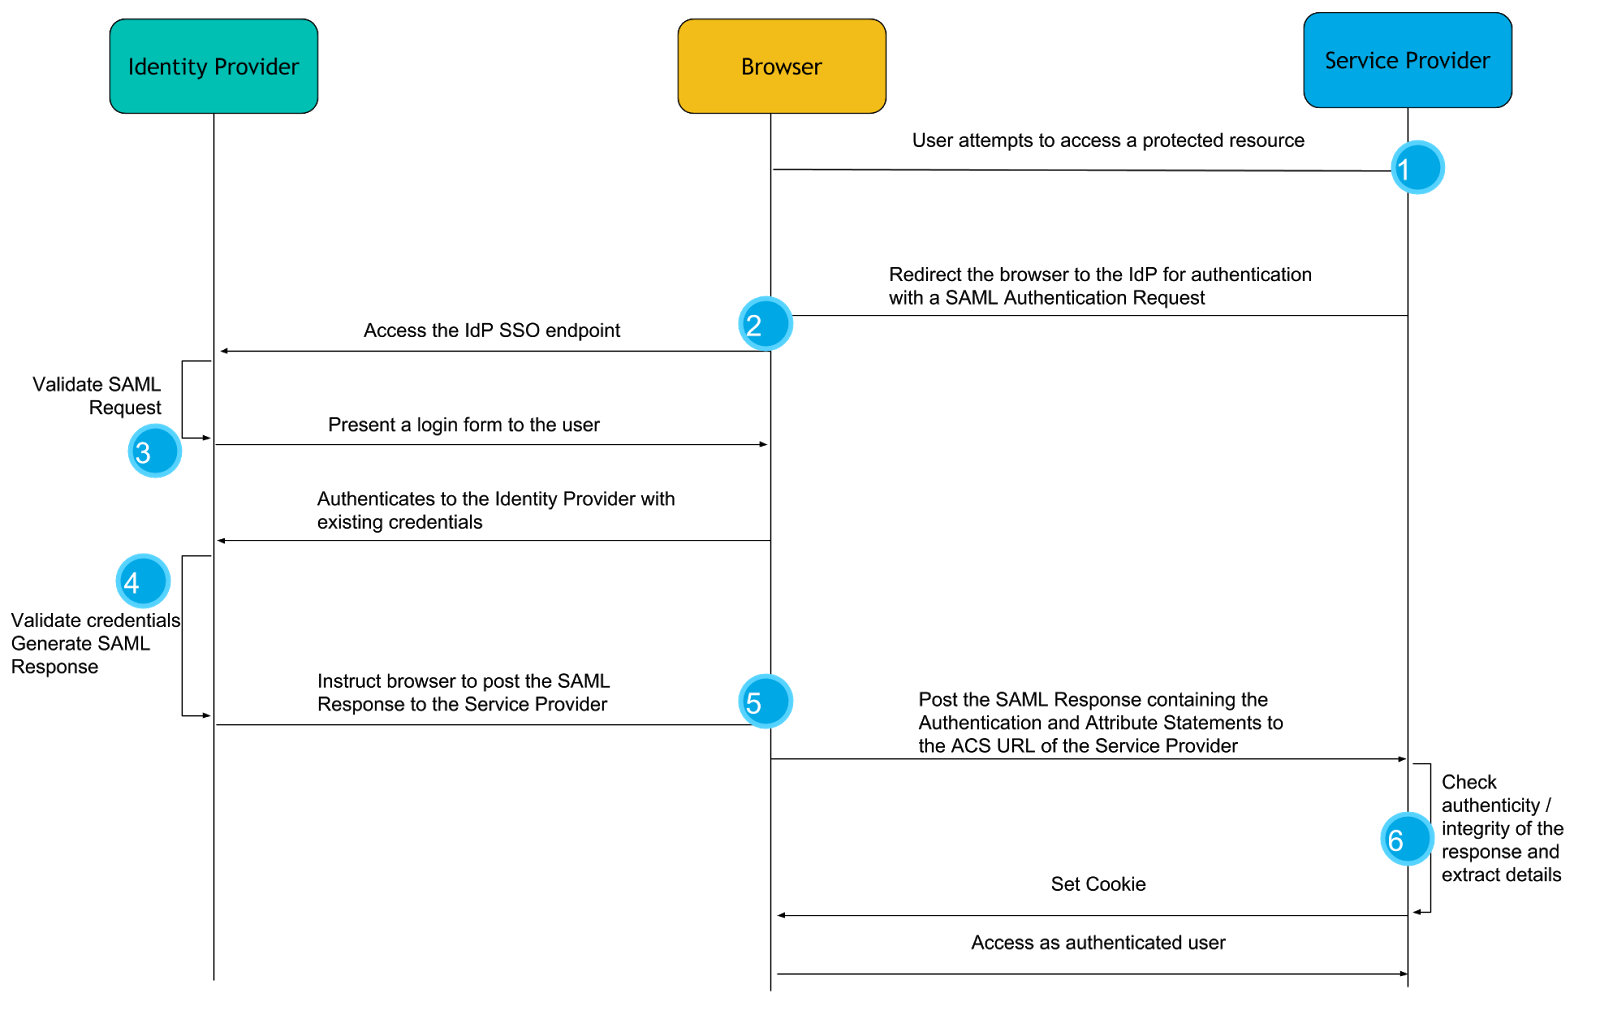
The interactions between these three main actors in a SAML 2.0 Web Browser SSO authentication flow, are illustrated in the following diagram. The legend below describes the steps involved in more detail and offers further insights to the process.

- The authentication flow usually starts with the user clicking on a login button or accessing a part of the web application that is secured. Since the web application is configured for authentication with SAML, it creates a SAML message known as a SAML Authentication Request. As the name conveys, this message is a request to an Identity Provider to authenticate this user.
- The Authentication Request message is compressed and Base64 encoded and the user’s browser is redirected to the Identity Provider with that message as an HTTP GET parameter.
- Upon receiving the Authentication Request, the Identity Provider verifies that it comes from a Service Provider it trusts, and prompts the user to authenticate, most commonly using a login form.
- The user authenticates with the Identity Provider using their existing credentials and if successful, the Identity Provider proceeds to create a SAML Response message that contains a SAML Assertion. In essence, by constructing the SAML Assertion, the Identity Provider asserts that this user has authenticated successfully and they are known to have certain characteristics that are released in the form of SAML Attributes and their values.
- The Identity Provider, then, instructs the user’s browser to make an HTTP POST request to the URL where the Service Provider expects SAML Response messages, called the Assertion Consumer Service URL, with the SAML Response Base64 and URL encoded in the body of the request.
- Finally, the Service Provider receives the SAML Response to the SAML Authentication Request it had originally created and after verifying its authenticity and integrity, “consumes” it in order to retrieve the fact that the user has been successfully authenticated and the information about that user’s identity in the form of attributes. It then passes this information to the web application for it to create a session for the user.
A couple of questions could be on your mind by now: “How does the Identity Provider verify that the Authentication Request comes from a Service Provider it trusts?” or “How can the Service Provider verify the authenticity and integrity of the SAML responses it receives from the Identity Provider?”
Well, before any messages can be exchanged between an Identity Provider and a Service Provider, one needs to know the configuration details and capabilities of the other. This configuration and the capabilities are encoded in an XML document, that is the SAML Metadata of the SAML entity. The metadata document contains a lot of information, but the most important parts are:
- A unique ID of the SAML entity, called EntityID
- A public key that other SAML entities can use in order to encrypt messages sent to this Entity
- A public key that corresponds to the private key that this entity uses to digitally sign messages sent to other entities.
- URLs to which other entities can send SAML messages and the bindings (connection details and protocol specifics) it supports.
- Information about the Organization operating this entity and the technical and support contact details.
Once the entities have mutually exchanged metadata in a secure manner, XML Digital Signatures, XML encryption and public key cryptography are used in order to safeguard the integrity, authenticity and the confidentiality of the SAML messages. For instance, an Identity Provider uses the private key that corresponds to the public key it has published in its metadata, in order to digitally sign the SAML Response it sends to a Service Provider. The Service Provider can then use that public key in the published metadata in order to verify the signature and thus the authenticity and the integrity of the response.
Why use SAML?
Apart from being one of the most requested features, why are we excited to offer you support for SAML Authentication? Or even better, why is this one of the most requested features? SSO solutions offer a range of benefits both for the organizations and their users. From the perspective of organizations, it helps with minimizing risk and assists compliance efforts as user credentials and user information needs to be stored and maintained in only one place. It is thus easier for the organization to protect and secure this user data, as well as to grant requests for data portability and requests to erase data in the context of GDPR . Furthemore, it enhances the user experience as the users need to enter their credentials and enter their details less often. It also helps to reduce password fatigue - the fewer password a user needs to remember, the better the chances are that they will use longer, more complex ones. SAML has been widely deployed and tested in many industries, and remains one of the most popular standards for implementing Web SSO solutions.
OK, I’m sold. Show me how this works with the Elastic Stack!
SAML and the Elastic Stack
In terms of SAML 2.0 nomenclature, the Elastic Stack as a whole is a SAML 2.0 compliant Service Provider, that implements the Web Browser SSO and Single Logout profiles. The two major components of the Elastic Stack that contribute to the SAML related functionality are Kibana and Elasticsearch. Kibana, as the user facing component, interacts with the user’s browser and receives all the SAML messages that the Identity Provider sends to the Elastic Stack Service Provider. Elasticsearch implements most of the functionality a SAML Service Provider needs. It holds all SAML related configuration in the form of an authentication realm and it also generates all SAML messages required and passes them to Kibana to be relayed to the user’s browser. It finally consumes all SAML Responses that Kibana relays to it, verifies them, extracts the necessary authentication information and creates the internal authentication tokens based on that.
Configuring SAML in 9 lines of configuration
SAML 2.0 offers a lot of options for the implementers of the standard, and as such, our configuration has a decent number of options that can be set and knobs that can adjusted. Having said that, significant effort has been put into offering a comprehensive guide on how to set up Elastic Stack for SAML, and into setting as many sane defaults as possible so that the minimum configuration needed for enabling SAML is, well, minimal.
The following configuration example represents a minimal functional configuration, but depending on the SAML Identity Provider used and its configuration, as well as your security requirements, you might want to read through our SAML Guide and configure things such as group attribute mappings and role mappings for authorization.
Assuming that your Identity Provider is up and running, there are only two prerequisites: TLS for the http layer and the Token Service needs to be enabled in Elasticsearch.
With that out of the way, SAML can be configured with the following 9 lines in your elasticsearch.yml file
xpack.security.authc.realms.saml1:
   type: saml
   order: 0
   idp.metadata.path: saml/idp-external.xml
   idp.entity_id: "https://idp.myorg.com/"
   sp.entity_id:  "https://kibana.myorg.com/"
   sp.acs: "https://kibana.myorg.com/api/security/v1/saml"
   sp.logout: "https://kibana.myorg.com/logout"
   attributes.principal: "nameid:persistent"
This configuration creates a SAML authentication realm with name saml1 with the following configuration properties
-
idp.metadata.pathis the the file path or the https URL where your Identity Provider metadata is available. -
idp.entity_idis the SAML EntityID of your Identity Provider. This can be read from the configuration page of the Identity Provider, or its SAML metadata. -
sp.entity_idis the SAML EntityID of our Service Provider. This can be any URI but it’s good practice to set it to the URL where Kibana is accepting connections. -
sp.acsis the Assertion Consumer Service URL where Kibana is listening for incoming SAML messages. This should be the/api/security/v1/samlendpoint of your Kibana server. -
sp.logoutis the SingleLogout endpoint where the Service Provider is listening for incoming SAML LogoutResponse and LogoutRequest messages. This should be the/logoutendpoint of your Kibana server. -
attributes.principaldefines which SAML attribute is going to be mapped to the principal (username) of the authenticated user in Kibana, in this case we use the specialnameid:persistentwhich will map the NameID withurn:oasis:names:tc:SAML:2.0:nameid-format:persistentformat from the Subject of the SAML Assertion.
If your Identity Provider can consume SAML metadata, then it can be easily created with the provided saml-metadata tool that is provided with X-Pack. Otherwise, the only pieces of configuration that your IdP would require are the Service Provider EntityID and the Assertion Consumer Service URL.
Configuring Kibana is even simpler, as only two settings need to be set:
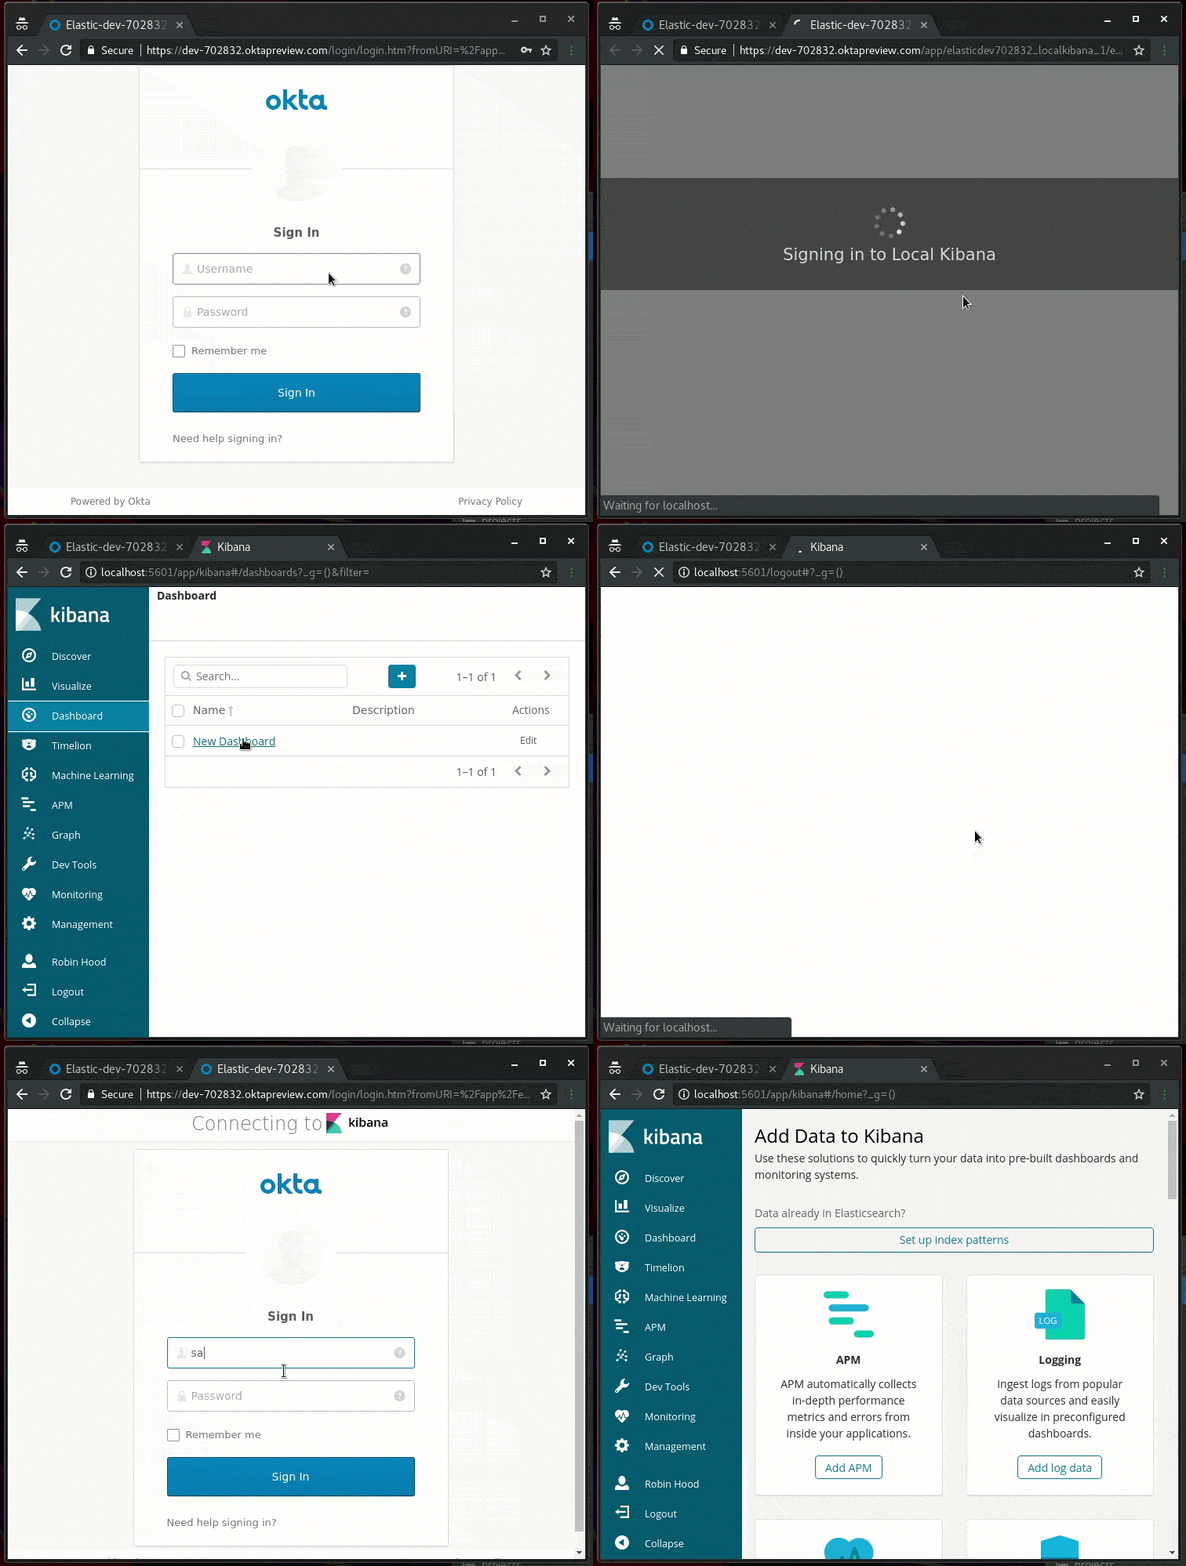
xpack.security.authProviders: [saml]
server.xsrf.whitelist: [/api/security/v1/saml]
basic can be added in the list of authProviders if we want to allow users to also login via the native realm, which might come in handy for administrative access and as a fallback authentication mechanism, in case the Identity Provider is unresponsive. Cross site request forgery protection needs to be disabled for the Assertion Consumer Service URL since the SAML response will come as a valid and legitimate cross site request ! Not to worry though, Elasticsearch will validate the request content before consuming it.That’s it! Restarting Elasticsearch and Kibana, SAML authentication will be enabled and navigating to Kibana will start the authentication flow we described above. Who said SAML was difficult?
