Bi-directional replication with Elasticsearch cross-cluster replication (CCR)
Elasticsearch cross-cluster replication (CCR) was released as a beta feature in Elasticsearch 6.5, and as a Generally Available (GA) feature in Elasticsearch 6.7. CCR allows multiple indices to be replicated to one or more Elasticsearch clusters. Replicating indices to additional Elasticsearch clusters solves several use cases, including high availability (HA) across datacenters, disaster recovery (DR), and CDN-like architectures to co-locate data closer to application servers (and users).
Elasticsearch CCR works with a leader/follower architecture. The CCR leader index accepts operations, and then data within the leader index is replicated to one or more follower indices. The CCR follower index cannot accept write operations (other than changes from the leader index). Mappings and settings changes are automatically replicated (as-needed) from the leader index.
CCR does not deal with conflict resolution, which means writes may only occur on the leader index and replicate to follower indices. Switching a follower index to a leader index is possible by pausing replication for the index, closing the index, unfollowing the leader index, and reopening the index as a normal Elasticsearch index.
CCR bi-directional replication
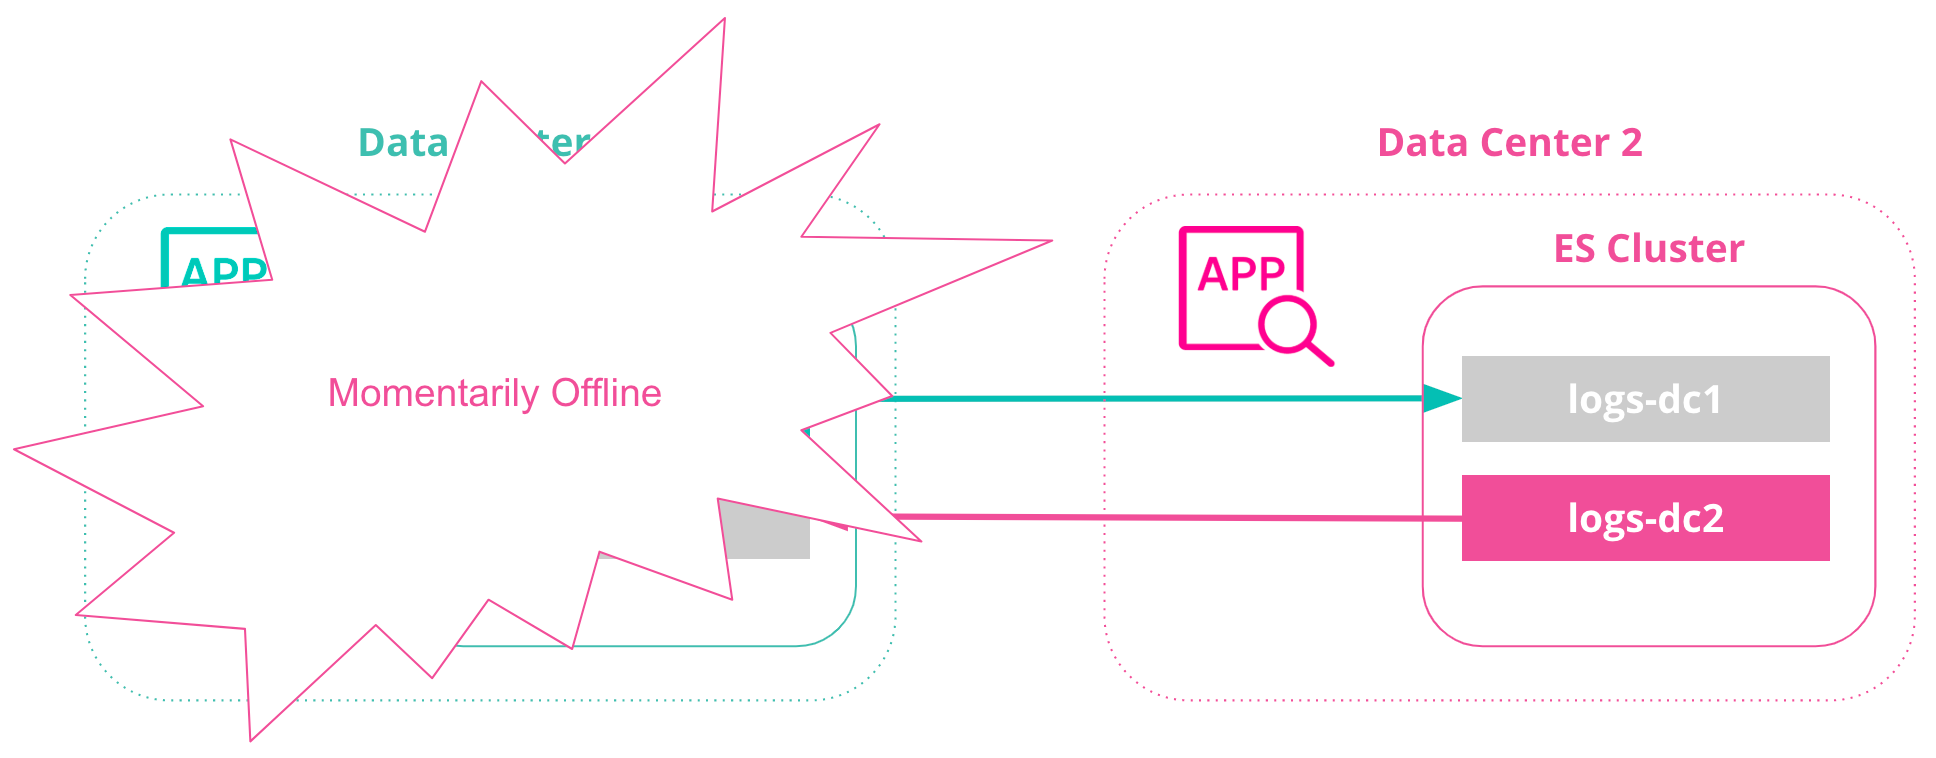
With bi-directional replication, we can create a CCR architecture that does not require any manual intervention when a cluster or datacenter is unavailable and documents indexed by Elasticsearch are immutable (no updates are performed). In this configuration, all clusters have access to view all data, and all clusters also have an index to write to (no failover steps are needed).

If the DC1 data center is unavailable, we can continue using the DC2 data center with no manual failover event. When the DC1 data center comes back online, we will not need to perform an additional failover event.
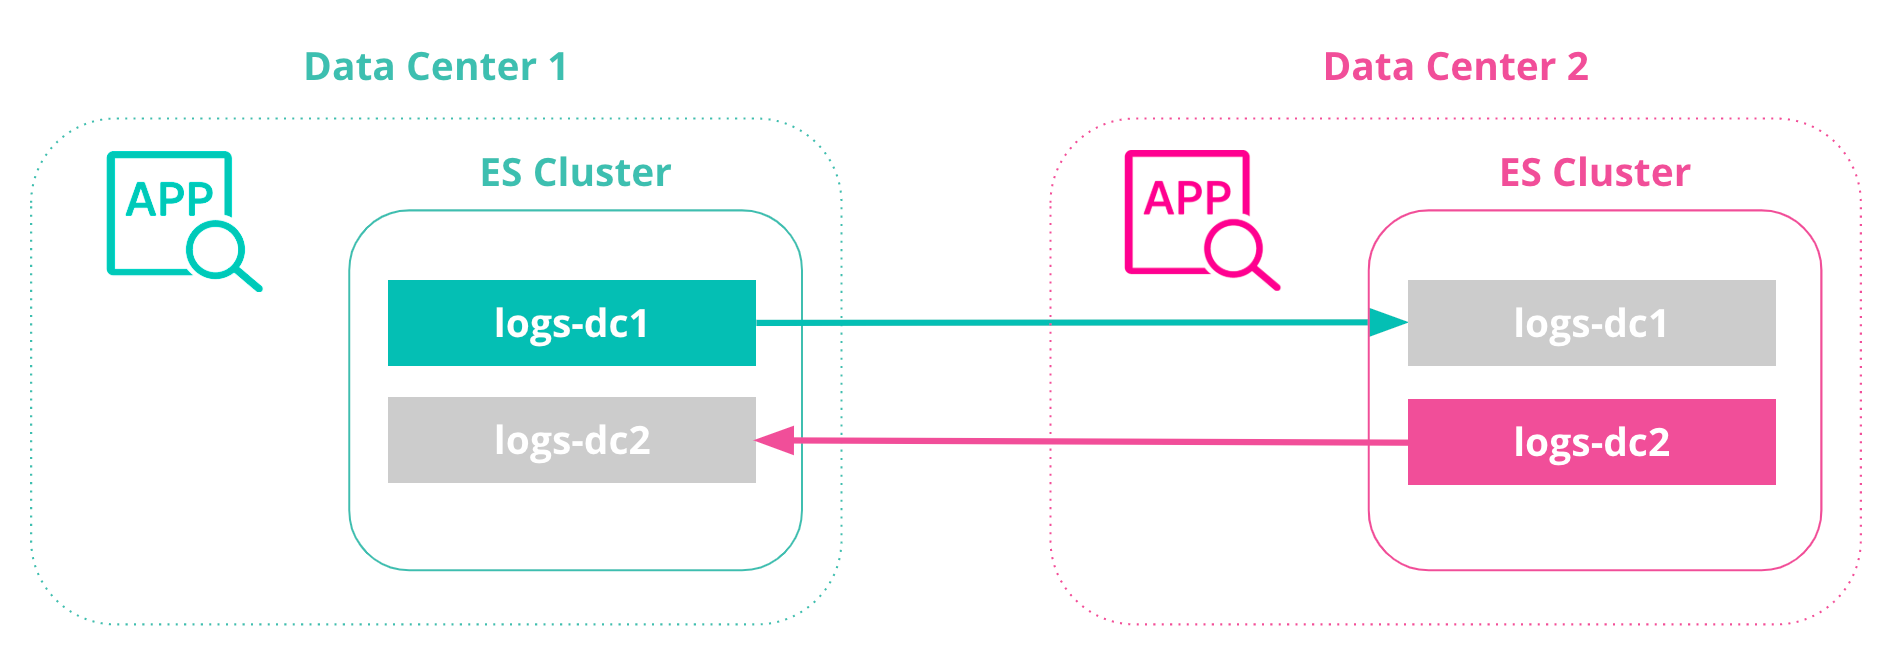
This CCR architecture using bi-directional replication is useful for index-only workloads, where no updates to document values may occur on either side of the network. Clients/ingestion tools are located in each datacenter alongside the Elasticsearch cluster, and do not communicate with Elasticsearch clusters in different datacenters.
Tutorial: Optimizing CCR for index-only workloads (e.g. logs, metrics, security events, etc.)
Bi-directional replication allows applications to write to a local Elasticsearch cluster within their datacenter, and replicate all data to all clusters, ensuring each Elasticsearch cluster (and datacenter) has a copy.
Furthermore, we can reduce application changes by configuring aliases to hide the CCR architecture from the application, and ensure we have an architecture designed for resiliency and high availability.
1. Setup
For this tutorial, we’ll use two clusters. Both clusters will be on our local computer. Feel free to locate the clusters anywhere you would like.
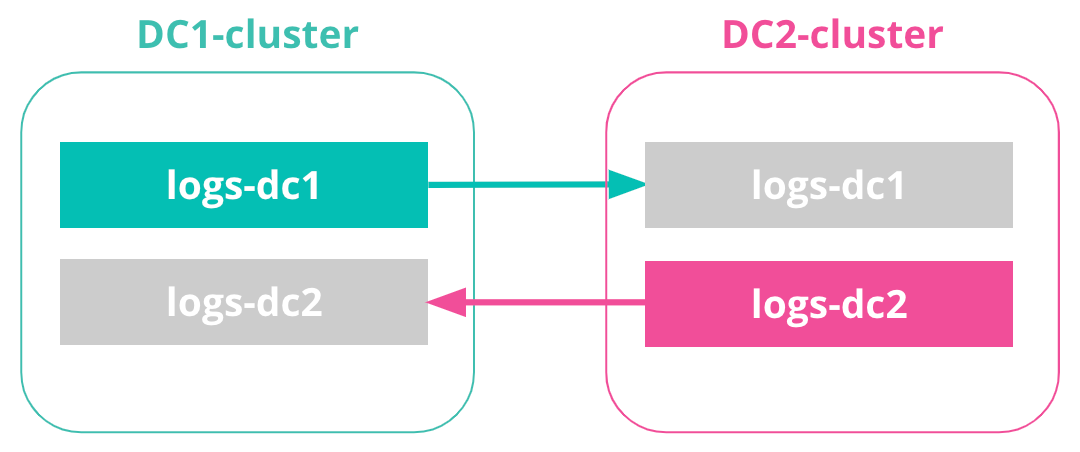
- DC1-cluster: This is our DC1 cluster, and we’ll run locally on port 9200. We’ll replicate documents from the DC1 cluster to a DC2 cluster. With bi-directional replication, the DC1 cluster will also contain replicated documents from the DC2 cluster mentioned below.
- DC2-cluster: This is our DC2 cluster, and we’ll run locally on port 9201. The DC2 cluster will maintain a replicated index from the DC1 cluster, and replicate an index back to the DC1 cluster.
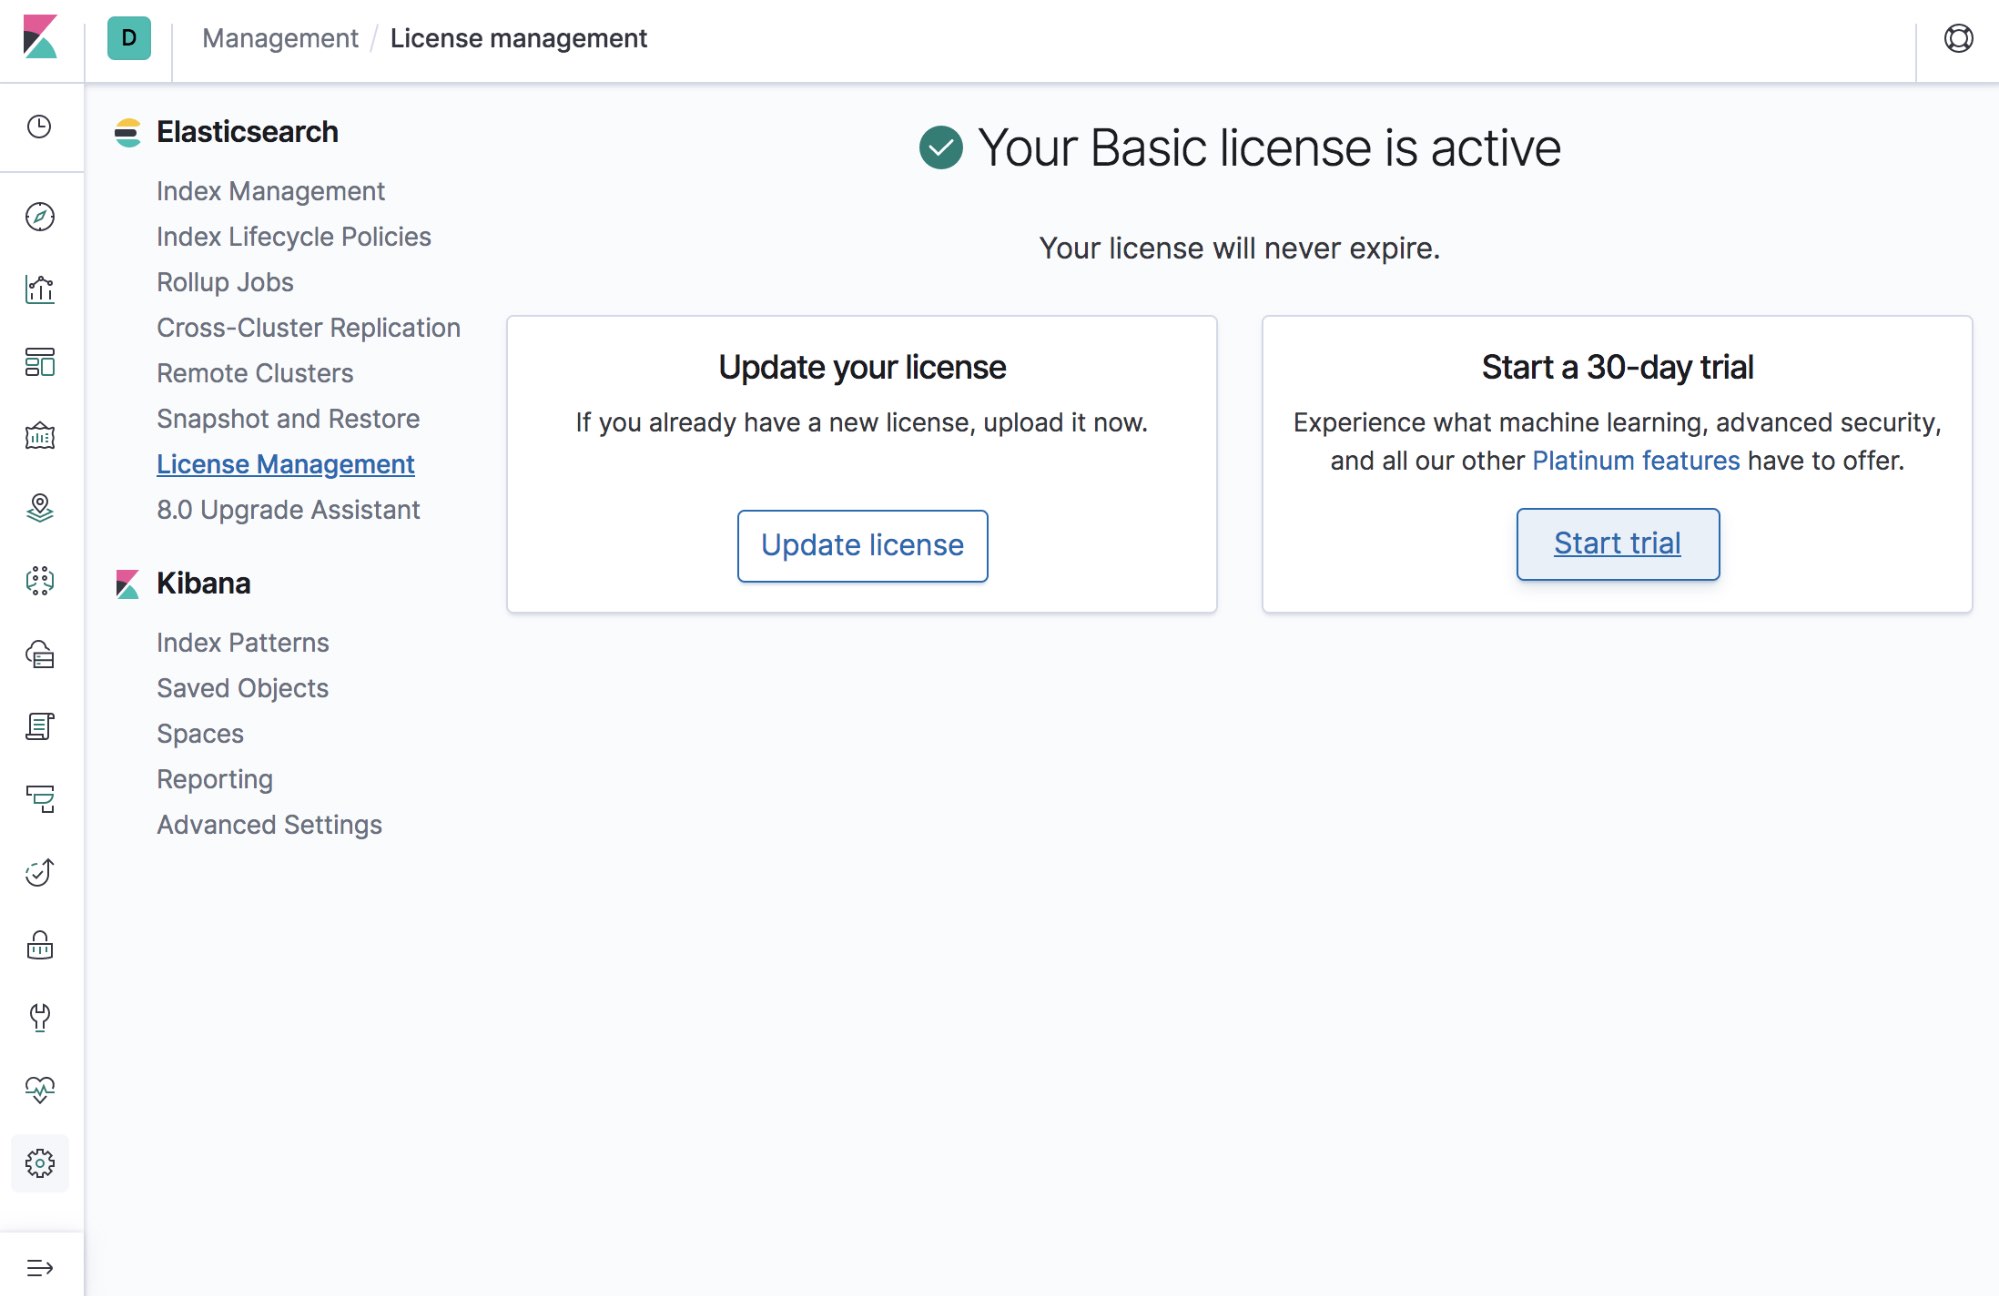
2. License (30-day free trial button in Kibana)
CCR is a Platinum licensed feature within the Elastic Stack. There is a clickable button within Kibana > Management > License Management for receiving a free, 30-day trial license instantly. Just click the button within Kibana before working through this tutorial.
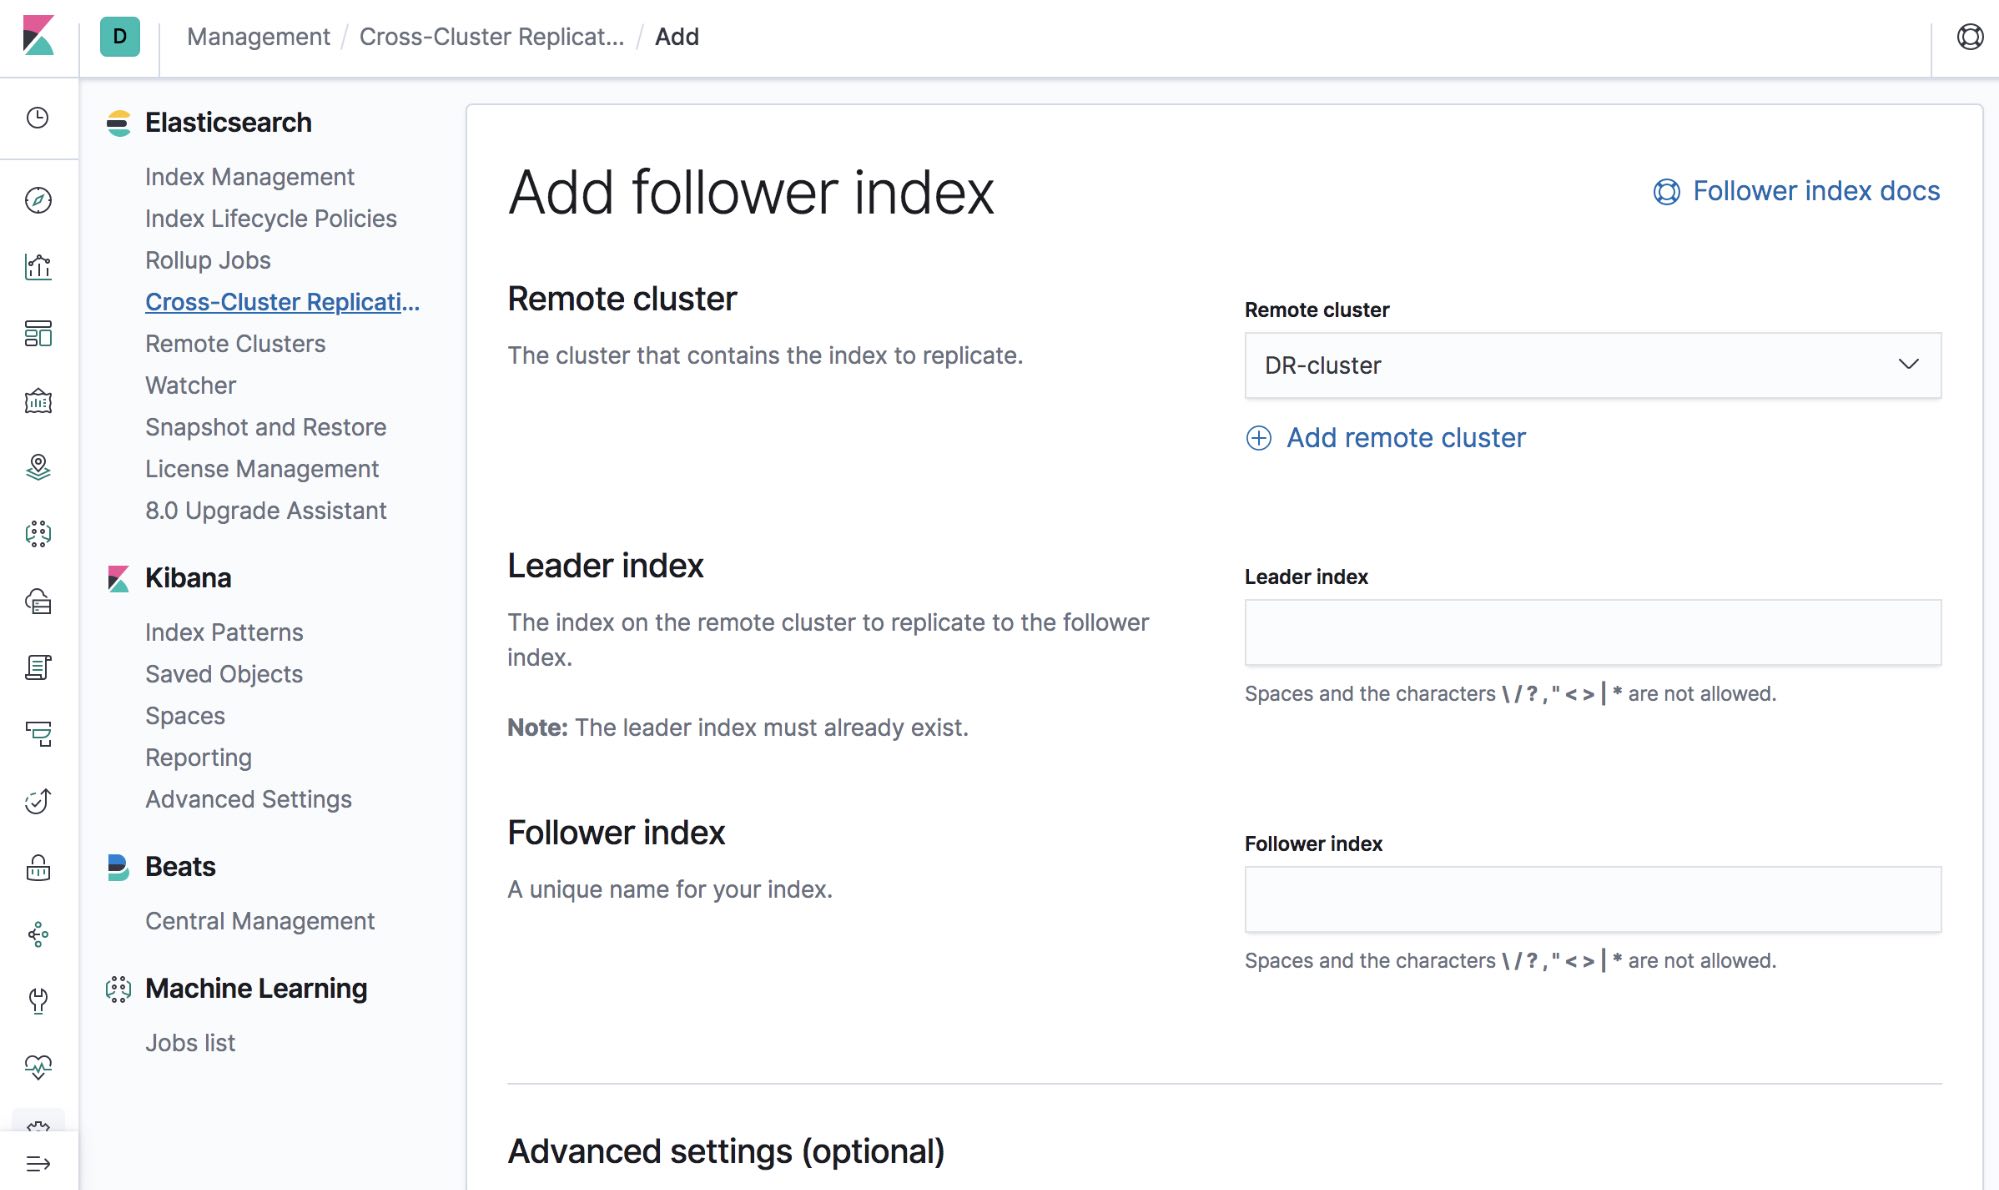
3. Define remote clusters
When setting up CCR, Elasticsearch clusters must know about other Elasticsearch clusters. With bi-directional replication, we must ensure each cluster knows about the other cluster. Remote cluster setup is required for both clusters (DC1 and DC2). We want to make sure our DC1-cluster knows about the DC2-cluster, and vice-versa.
Let’s define the DC2-cluster via an API call on the DC1-cluster.
# From the DC1-cluster (port 9200, transport port 9300), we’ll define how the DC2-cluster (port 9201, transport port 9301) can be accessed
PUT /_cluster/settings
{
  "persistent" : {
    "cluster" : {
      "remote" : {
        "DC2-cluster" : {
          "seeds" : [
            "127.0.0.1:9301"
          ]
        }
      }
    }
  }
}
(For API-based commands, we recommend using the Kibana dev tools console, found via Kibana > Dev tools > Console).
The above API call defines a remote cluster with alias “DC2-cluster”, that can be accessed at "127.0.0.1:9301". One or more seeds can be specified, and it is generally recommended to specify more than one, in case a seed is not available during the handshake phase.
More details on configuring remote clusters can be found in our reference documentation on defining a remote cluster.
It is also important to note port 9301 for connecting to the DC2-cluster, since the DC2-cluster is listening for the HTTP protocol on port 9201 (as is the default, and specified in the elasticsearch.yml file for our DC2-cluster). However, replication occurs using the Elasticsearch transport protocol (for node-to-node communication), and the default is to find the first available port between 9300-9400.
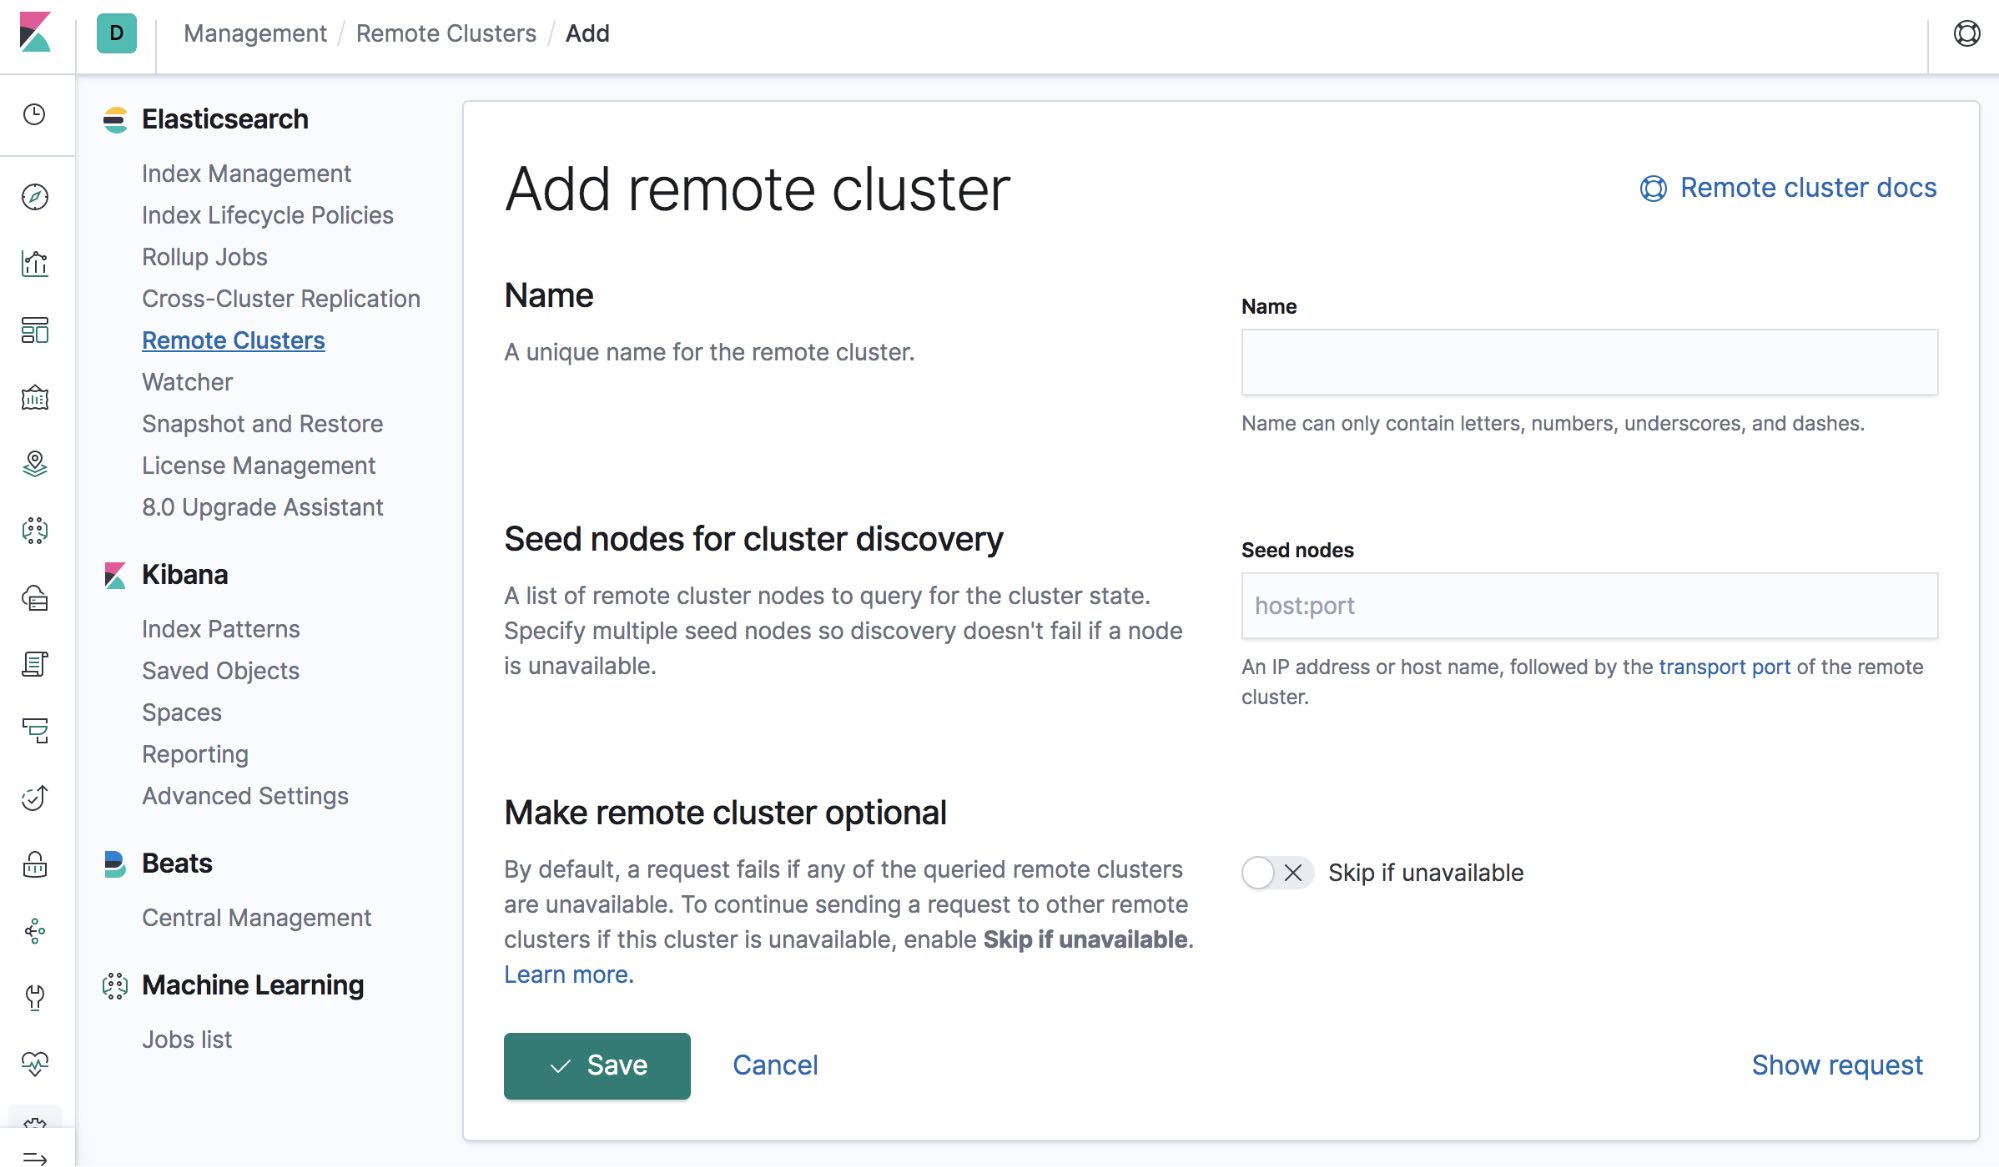
There is a management UI for remote clusters within Kibana. We’ll walk through both the UI and the API for CCR in this tutorial. To access the Remote Cluster UI in Kibana, click the Management (gear) icon in the left navigation panel, then navigate to Remote Clusters in the Elasticsearch section.
Let’s also ensure our DC2 cluster is aware of our DC1 cluster
Let’s define the DC1-cluster via an API call on the DC2-cluster
# From the DC2-cluster (port 9201, transport port 9301), we’ll define how the DC1-cluster (port 9200, transport port 9300) can be accessed
PUT /_cluster/settings
{
  "persistent" : {
    "cluster" : {
      "remote" : {
        "DC1-cluster" : {
          "seeds" : [
            "127.0.0.1:9300"
          ]
        }
      }
    }
  }
}
4. Create indices for bi-directional replication
Let’s create an index called logs-dc1 on our DC1-cluster. We’ll replicate this index from our source DC1-cluster to our target DC2-cluster:
On the DC1-cluster:
# Create a logs index in DC1
PUT /logs-dc1
Let’s create an index called logs-dc2 on our DC2-cluster. We’ll replicate this index from our source DC2-cluster to our target DC1-cluster:
On the DC2-cluster:
# Create logs index
PUT /logs-dc2
5. Initiate replication
Now that we’ve created logs-dc1 and logs-dc2 indices on both clusters, let’s replicate them bi-directionally to one-another...
On our DC2-cluster, we’ll ensure the logs-dc1 index (from the DC1-cluster) is replicated here:
PUT /logs-dc1/_ccr/follow
{
  "remote_cluster" : "DC1-cluster",
  "leader_index" : "logs-dc1"
}
The endpoint contains logs-dc1, which is the name of the replicated index within the DC2-cluster cluster. We’re replicating from the DC1-cluster cluster we defined previously, and the name of the index we’re replicating is called logs-dc1 on the DC1-cluster cluster.
It’s important to note that our replicated index is read-only, and cannot accept write operations.
We’ve configured an index to replicate from one Elasticsearch cluster to another!
Next, on our DC1-cluster, we’ll ensure the logs-dc2 index is replicated to this cluster to complete our bi-directional replication setup:
PUT /logs-dc2/_ccr/follow
{
  "remote_cluster" : "DC2-cluster",
  "leader_index" : "logs-dc2"
}
Note: Replication for index patterns
You may have noticed the example above won’t work very well for time-based use-cases, where there is an index per day. The CCR API also contains methods for defining auto-follow patterns, i.e., which index patterns should be replicated. CCR auto-follow patterns watch for new indices on the leader cluster and automatically create corresponding follower indices.
6. Define read aliases
Each cluster now has two indices, replicated from one another:
- logs-dc1
- logs-dc2
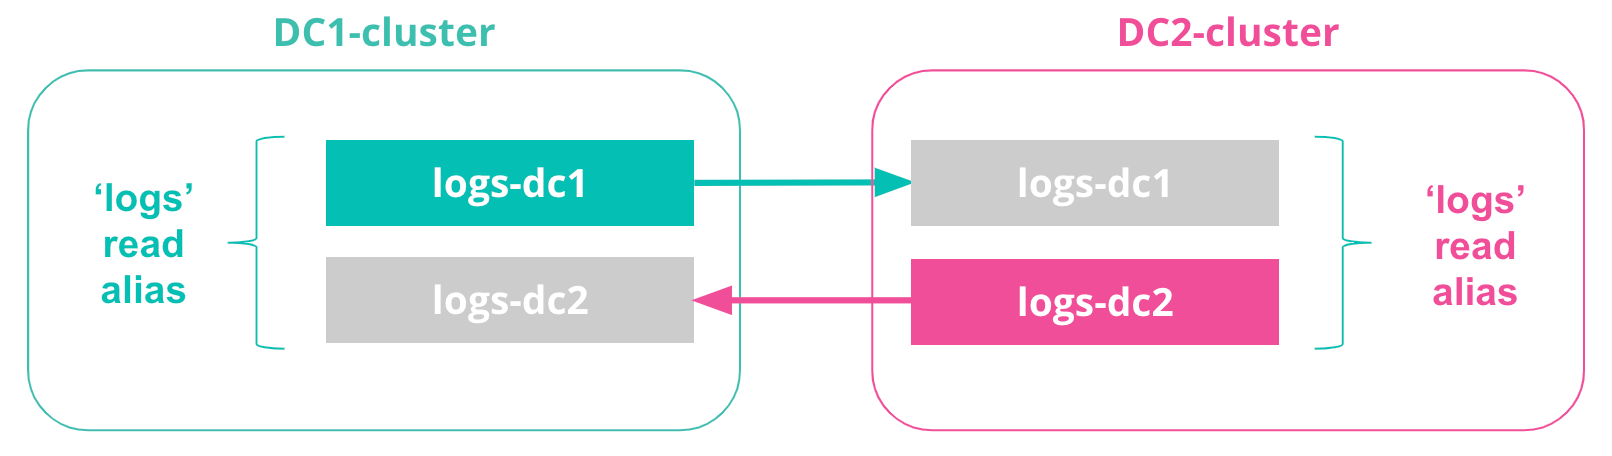
To simplify any application searching across both indices, we can define read aliases for queries to ‘logs’ as querying both logs-dc1 and logs-dc2.
Read aliases are replicated, which means we can define them on each leader index and use the replicated read alias on the follower index:
On the DC1-cluster:
POST /_aliases
{
    "actions" : [
        { "add" : { "index" : "logs-dc1", "alias" : "logs" } }
    ]
}
On the DC2-cluster:
POST /_aliases
{
    "actions" : [
        { "add" : { "index" : "logs-dc2", "alias" : "logs" } }
    ]
}
Now, searching the ‘logs’ alias in either cluster will search across both logs-dc1 and ‘logs-dc2’ indices. Our application can simply query the ‘logs’ alias (no application changes needed).
GET /logs/_search
7. Define write aliases
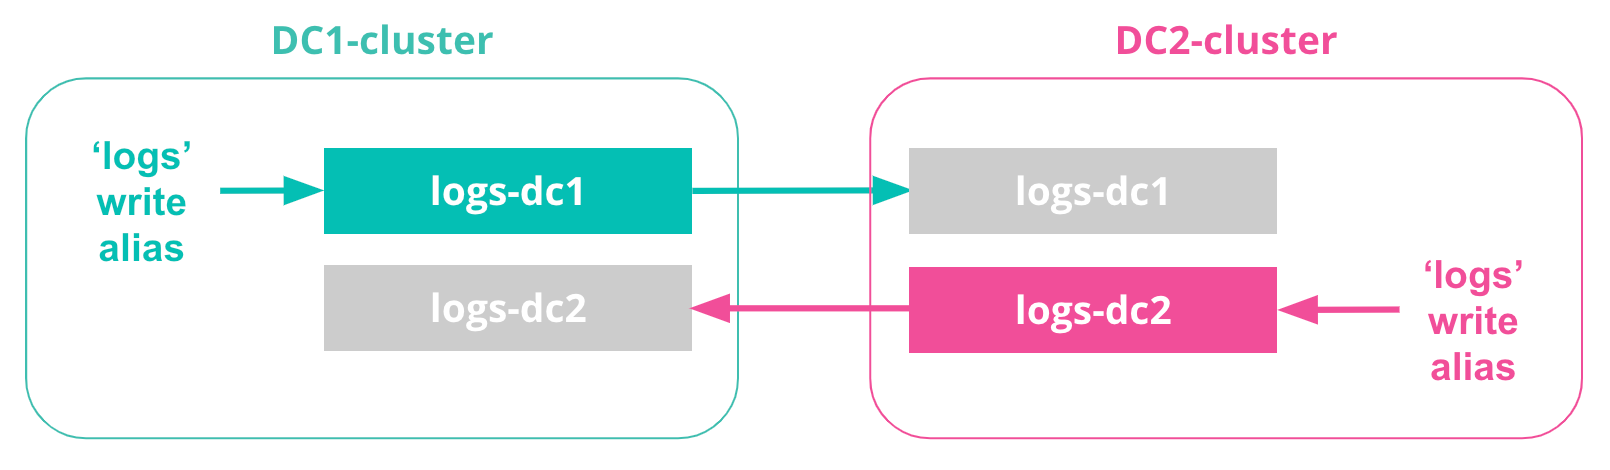
To simplify any application setup, we can also define a ‘logs’ write alias, which points to logs-dc1 on the DC1-cluster, and the same write alias can point to logs-dc2 on the DC2-cluster. This ensures there are fewer application changes needed for CCR in determining the correct index to write to (depending on the datacenter)...
On DC1-cluster:
POST /_aliases
{
    "actions" : [
        {
            "add" : {
                 "index" : "logs-dc1",
                 "alias" : "logs",
                 "is_write_index" : true
            }
        }
    ]
}
On DC2-cluster:
POST /_aliases
{
    "actions" : [
        {
            "add" : {
                 "index" : "logs-dc2",
                 "alias" : "logs",
                 "is_write_index" : true
            }
        }
    ]
}
Now the application can write to the local ‘logs’ write alias within each cluster, and perform searches from the local ‘logs’ read alias. Any cluster outage will not require any manual changes to the configuration for a failover event.
Note on configuring clients and ingestion tools: The use of a write alias (and the majority of the configuration steps in this tutorial) assume there is no cross-datacenter client/ingestion traffic. All clients and ingestion tools index data to the Elasticsearch cluster within their datacenter.
8. Test replication setup
Now that we have our logs index replicated bi-directionally between the DC1-cluster and DC2-cluster, let’s insert a test document and verify it has been replicated.
On the DC1-cluster cluster:
POST /logs/_doc
{
  "test" : "log message in DC1"
}
Now let’s run a query on the DC2-cluster to ensure the document was replicated:
GET /logs/_search
We should have a single document present, that was written on the DC1-cluster and replicated to the DC2-cluster.
{
  "took" : 1,
  "timed_out" : false,
  "_shards" : {
    "total" : 1,
    "successful" : 1,
    "skipped" : 0,
    "failed" : 0
  },
  "hits" : {
    "total" : 1,
    "max_score" : 1.0,
    "hits" : [
      {
        "_index" : "logs-dc1",
        "_type" : "_doc",
        "_id" : "6MmX0G0B6tqJE8tQWGk4",
        "_score" : 1.0,
        "_source" : {
          "message" : "log message in DC1"
        }
      }
    ]
  }
}
We can also index a document in the DC2-cluster and ensure it was replicated to the DC1-cluster:
POST /logs/_doc
{
  "test" : "log message in DC2"
}
On the DC1-cluster, the document will now appear:
GET /logs/_search
{
  "took" : 1,
  "timed_out" : false,
  "_shards" : {
    "total" : 1,
    "successful" : 1,
    "skipped" : 0,
    "failed" : 0
  },
  "hits" : {
    "total" : 2,
    "max_score" : 1.0,
    "hits" : [
      {
        "_index" : "logs-dc1",
        "_type" : "_doc",
        "_id" : "6MmX0G0B6tqJE8tQWGk4",
        "_score" : 1.0,
        "_source" : {
          "message" : "log message in DC1"
        }
      },
      {
        "_index" : "logs-dc2",
        "_type" : "_doc",
        "_id" : "iACS0G0Ba60KYTfVc8Jb",
        "_score" : 1.0,
        "_source" : {
          "test" :  "log message in DC2"
        }
      }
    ]
  }
}
Setup complete! We now have a bi-directional replication architecture with Elasticsearch CCR.
Continue exploring cross-cluster replication (CCR) in Elasticsearch
We’ve written this guide to help you get started with CCR in Elasticsearch. Hopefully it is enough to get you acquainted with CCR, learn about the various CCR APIs (including the UIs available in Kibana), and experiment with the feature. Additional resources include the Getting started with cross-cluster replication guide and the Cross-cluster replication APIs reference guide.
As always, please leave us feedback in our Discuss forums with any questions, and we’ll be sure to answer them as soon as we can.