使用 Elasticsearch 构建 ChatGPT 连接器以查询 GitHub 问题
学习如何构建自定义 ChatGPT 连接器并部署使用混合搜索查询内部 GitHub 问题的 Elasticsearch MCP 服务器。
Agent Builder 现已正式发布。开始 Elastic Cloud 试用,并在此处查看 Agent Builder 的文档。
最近,OpenAI 宣布为专业版/商务版/企业版和教育版 ChatGPT 提供自定义连接器功能。除了提供开箱即用的连接器来获取 Gmail、GitHub、Dropbox 等平台上的数据。还可以使用 MCP 服务器创建自定义连接器。
定制连接器使您能够将现有的 ChatGPT 连接器与其他数据源(如 Elasticsearch)结合,以获得全面的答案。
在本文中,我们将构建一个 MCP 服务器,将 ChatGPT 连接到包含内部 GitHub 问题和拉取请求信息的 Elasticsearch 索引。这样就可以使用 Elasticsearch 数据回答自然语言查询。
我们将在 Google Colab 上使用 FastMCP 和 ngrok 部署 MCP 服务器,以获取 ChatGPT 可以连接的公共 URL,从而省去复杂的基础架构设置。
有关 MCP 及其生态系统的全面概述,请参阅《MCP 的现状》。
准备工作
在开始之前,您需要:
Elasticsearch 集群(8.X 或更高版本)
Elasticsearch API密钥,具有对您的索引的读取访问权限
Google 账户(用于 Google Colab)
Ngrok账户 (免费套餐可用)
拥有专业版/企业版/商务版或教育版套餐的 ChatGPT 账户
了解 ChatGPT MCP 连接器的要求
ChatGPT MCP 连接器需要实现两个工具:search 和 fetch。有关更多详情,请参阅 OpenAI 文档。
搜索工具
根据用户查询,从 Elasticsearch 索引中返回相关结果列表。
接收的内容:
一个单一的字符串,包含用户的自然语言查询。
示例:“查找与 Elasticsearch 迁移相关的问题。”
返回的内容:
一个对象,其
result关键字包含一个结果对象数组。每个结果包括:id- 唯一文档标识符title- 问题或拉取请求标题url- 链接到问题或 PR
在我们的实现中:
return {
    "results": [
        {
            "id": "PR-612",
            "title": "Fix memory leak in WebSocket notification service",
            "url": "https://internal-git.techcorp.com/pulls/612"
        },
        # ... more results
    ]
}
获取工具
获取指定文档的完整内容。
接收的内容:
搜索结果中包含 Elasticsearch 文档 ID 的单个字符串
示例:“获取 PR-578 的详细信息。”
它返回的内容:
一个完整的文档对象,包含:
id- 唯一文档标识符title- 问题或拉取请求标题text- 完整的问题/PR描述和详细信息url- 链接到问题或 PRtype- 文档类型(问题、pull_request)status- 当前状态(打开、进行中、已解决)priority- 优先级别(低、中、高、关键)assignee- 负责此问题/PR 的人员created_date- 何时创建resolved_date- 何时解决(如适用)labels- 与文件相关的标签related_pr- 相关拉取请求 ID
return {
    "id": "PR-578",
    "title": "Security hotfix: Patch SQL injection vulnerabilities",
    "text": "Description: CRITICAL SECURITY FIX for ISSUE-1889. Patches SQL...",
    "url": "https://internal-git.techcorp.com/pulls/578",
    "type": "pull_request",
    "status": "closed",
    "priority": "critical",
    "assignee": "sarah_dev",
    "created_date": "2025-09-19",
    "resolved_date": "2025-09-19",
    "labels": "security, hotfix, sql",
    "related_pr": null
}注意:本示例使用扁平结构,其中所有字段都位于根级别。OpenAI 的要求非常灵活,还支持嵌套的元数据对象。
GitHub 问题和 PR 数据集
在本教程中,我们将使用包含问题和拉取请求的内部 GitHub 数据集。这代表了一个您希望通过 ChatGPT 查询私有、内部数据的场景。
数据集可以在此处找到。我们将使用批量 API 更新数据索引。
这个数据集包含:
有关描述、状态、优先级和分配人员的问题
包含代码更改、审查和部署信息的拉取请求
问题与 PR 之间的关系(例如,PR-578 修复了 ISSUE-1889)
标签、日期和其他元数据
索引映射
该索引使用以下映射来支持使用 ELSER 的混合搜索。text_semantic 用于语义搜索,而其他字段用于关键字搜索。
{
  "mappings": {
    "properties": {
      "id": {
        "type": "keyword"
      },
      "title": {
        "type": "text"
      },
      "text": {
        "type": "text"
      },
      "text_semantic": {
        "type": "semantic_text",
        "inference_id": ".elser-2-elasticsearch"
      },
      "url": {
        "type": "keyword"
      },
      "type": {
        "type": "keyword"
      },
      "status": {
        "type": "keyword"
      },
      "priority": {
        "type": "keyword"
      },
      "assignee": {
        "type": "keyword"
      },
      "created_date": {
        "type": "date",
        "format": "iso8601"
      },
      "resolved_date": {
        "type": "date",
        "format": "iso8601"
      },
      "labels": {
        "type": "keyword"
      },
      "related_pr": {
        "type": "keyword"
      }
    }
  }
}
构建MCP服务器
我们的 MCP 服务器按照 OpenAI 规范实现了两个工具,使用混合搜索将语义和文本匹配相结合,以获得更好的结果。
搜索工具
利用 RRF(倒数排序融合)进行混合搜索,将语义搜索与文本匹配相结合:
@mcp.tool()
    async def search(query: str) -> Dict[str, List[Dict[str, Any]]]:
        """
        Search for internal issues and PRs using hybrid search (semantic + text with RRF).
        Returns list with id, title, and url per OpenAI spec.
        """
        if not query or not query.strip():
            return {"results": []}

        logger.info(f"Searching for: '{query}'")

        try:
            # Hybrid search with RRF (Reciprocal Rank Fusion)
            response = es_client.search(
                index=ELASTICSEARCH_INDEX,
                size=10,
                source=["id", "title", "url", "type", "priority"],
                retriever={
                    "rrf": {
                        "retrievers": [
                            {
                                # Semantic search with ELSER
                                "standard": {
                                    "query": {
                                        "semantic": {
                                            "field": "text_semantic",
                                            "query": query
                                        }
                                    }
                                }
                            },
                            {
                                # Text search (BM25) for keyword matching
                                "standard": {
                                    "query": {
                                        "multi_match": {
                                            "query": query,
                                            "fields": [
                                                "title^3",
                                                "text^2",
                                                "assignee^2",
                                                "type",
                                                "labels",
                                                "priority"
                                            ],
                                            "type": "best_fields",
                                            "fuzziness": "AUTO"
                                        }
                                    }
                                }
                            }
                        ],
                        "rank_window_size": 50,
                        "rank_constant": 60
                    }
                }
            )

            results = []
            if response and 'hits' in response:
                for hit in response['hits']['hits']:
                    source = hit['_source']
                    results.append({
                        "id": source.get('id', hit['_id']),
                        "title": source.get('title', 'Unknown'),
                        "url": source.get('url', '')
                    })

            logger.info(f"Found {len(results)} results")
            return {"results": results}

        except Exception as e:
            logger.error(f"Search error: {e}")
            raise ValueError(f"Search failed: {str(e)}")
要点:
使用 RRF 的混合搜索:结合语义搜索 (ELSER) 和文本搜索 (BM25),以获得更好的结果。
多匹配查询:在多个字段中进行搜索,并使用增强功能(标题^3、文本^2、分配人员^2)。插入符号 (^) 会乘以相关性分数,优先考虑标题中的匹配项而非内容中的匹配项。
模糊匹配:
fuzziness: AUTO通过允许近似匹配来处理错别字和拼写错误。RRF 参数调整:
rank_window_size: 50- 指定在合并之前从每个检索器(语义和文本)中考虑最靠前结果的数量。rank_constant: 60- 该值决定了单个结果集中的文档对最终排序结果的影响程度。
仅返回必填字段:根据 OpenAI 规范返回
id、title、url,避免不必要地暴露其他字段。
获取工具
按文档 ID(如果存在)检索文档详细信息:
@mcp.tool()
    async def fetch(id: str) -> Dict[str, Any]:
        """
        Retrieve complete issue/PR details by ID.
        Returns id, title, text, url.
        """
        if not id:
            raise ValueError("ID is required")

        logger.info(f"Fetching: {id}")

        try:
            # Search by the 'id' field (not _id) since IDs are stored as a field
            response = es_client.search(
                index=ELASTICSEARCH_INDEX,
                body={
                    "query": {
                        "term": {
                            "id": id  # Search by your custom 'id' field
                        }
                    },
                    "size": 1
                }
            )

            if not response or not response['hits']['hits']:
                raise ValueError(f"Document with id '{id}' not found")

            hit = response['hits']['hits'][0]
            source = hit['_source']

            result = {
                "id": source.get('id', id),
                "title": source.get('title', 'Unknown'),
                "text": source.get('text', ''),
                "url": source.get('url', ''),
                "type": source.get('type', ''),
                "status": source.get('status', ''),
                "priority": source.get('priority', ''),
                "assignee": source.get('assignee', ''),
                "created_date": source.get('created_date', ''),
                "resolved_date": source.get('resolved_date', ''),
                "labels": source.get('labels', ''),
                "related_pr": source.get('related_pr', '')
            }

            logger.info(f"Fetched: {result['title']}")
            return result

        except Exception as e:
            logger.error(f"Fetch error: {e}")
            raise ValueError(f"Failed to fetch '{id}': {str(e)}")
要点:
按文档 ID 字段进行搜索:使用自定义
id字段上的术语查询返回完整文档:包含完整的
text字段及其所有内容扁平结构:所有字段均位于根级别,与 Elasticsearch 的文档结构相匹配。
在 Google Colab 上部署
我们将使用 Google Colab 来运行 MCP 服务器,并使用 ngrok 将其公开,以便 ChatGPT 可以连接到它。
步骤 1:打开 Google Colab 笔记本
访问我们预配置的笔记本适用于 ChatGPT 的 Elasticsearch MCP。
步骤 2:配置您的凭据
您需要三项信息:
Elasticsearch URL:您的 Elasticsearch 集群 URL。
Elasticsearch API 密钥:具有索引读取权限的 API 密钥。
Ngrok 身份验证令牌:来自 ngrok 的免费令牌。我们将使用 ngrok 将 MCP URL 公开到互联网,以便 ChatGPT 可以连接到它。
获取 ngrok 令牌
为 Google Colab 添加机密
在 Google Colab 笔记本中:
点击左侧边栏中的“密钥图标”以打开“机密”。
添加这三个秘密:
ELASTICSEARCH_URL=https://your-cluster.elastic.com:443
ELASTICSEARCH_API_KEY=your-api-key
NGROK_TOKEN=your-ngrok-token
3. 为每个机密启用笔记本访问权限
步骤 3:运行 Notebook
点击“运行时”,然后点击“全部运行”,以执行所有单元格
等待服务器启动(约30秒)
查找显示您的公开 ngrok URL 的输出
4. 该输出将显示如下内容:
连接 ChatGPT
现在我们将 MCP 服务器连接到您的 ChatGPT 账户。
打开 ChatGPT,前往“设置”。
导航到“连接器”。如果您使用的是专业版账户,则需要在连接器中打开“开发者模式”。
如果您使用的是 ChatGPT 企业版或商业版,您需要将连接器发布到您的工作场所。
3. 点击“创建”。
注意:在商业版、企业版和教育版工作区中,只有工作区所有者、管理员和已启用相应设置(针对企业版/教育版)的用户才能添加自定义连接器。具有普通成员角色的用户无法自行添加自定义连接器。
一旦连接器被所有者或管理员用户添加并启用,工作区中的所有成员即可使用该连接器。
4. 输入所需信息和以 /sse/ 结尾的 ngrok URL。请注意“sse”后面的“/”。没有它就无法正常工作:
名字: Elasticsearch MCP
描述:用于搜索和获取 GitHub 内部信息的自定义 MCP。
5. 按下“创建”保存自定义 MCP。
如果您的服务器正在运行,则连接是即时的。无需额外的身份验证,因为 Elasticsearch API 密钥已在服务器中配置。
测试 MCP 服务器
在提问之前,您需要先选择 ChatGPT 应该使用的连接器。
提示 1: 搜索问题
提问:“查找与 Elasticsearch 迁移相关的问题”并确认操作工具调用。
ChatGPT 将调用search 工具处理您的查询。你可以看到它正在查找可用工具,并准备调用 Elasticsearch 工具,在对该工具执行任何操作之前与用户确认。
工具调用请求:
{
  "query": "Elasticsearch migration issues"
}
工具响应:
{
  "results": [
    {
      "id": "PR-598",
      "title": "Elasticsearch 8.x migration - Application code changes",
      "url": "https://internal-git.techcorp.com/pulls/598"
    },
    {
      "id": "ISSUE-1712",
      "title": "Migrate from Elasticsearch 7.x to 8.x",
      "url": "https://internal-git.techcorp.com/issues/1712"
    },
    {
      "id": "RFC-045",
      "title": "Design Proposal: Microservices Migration Architecture",
      "url": "https://internal-git.techcorp.com/rfcs/045"
    }
    // ... 7 more results
  ]
}
ChatGPT 会处理这些结果,并以自然对话的形式呈现。
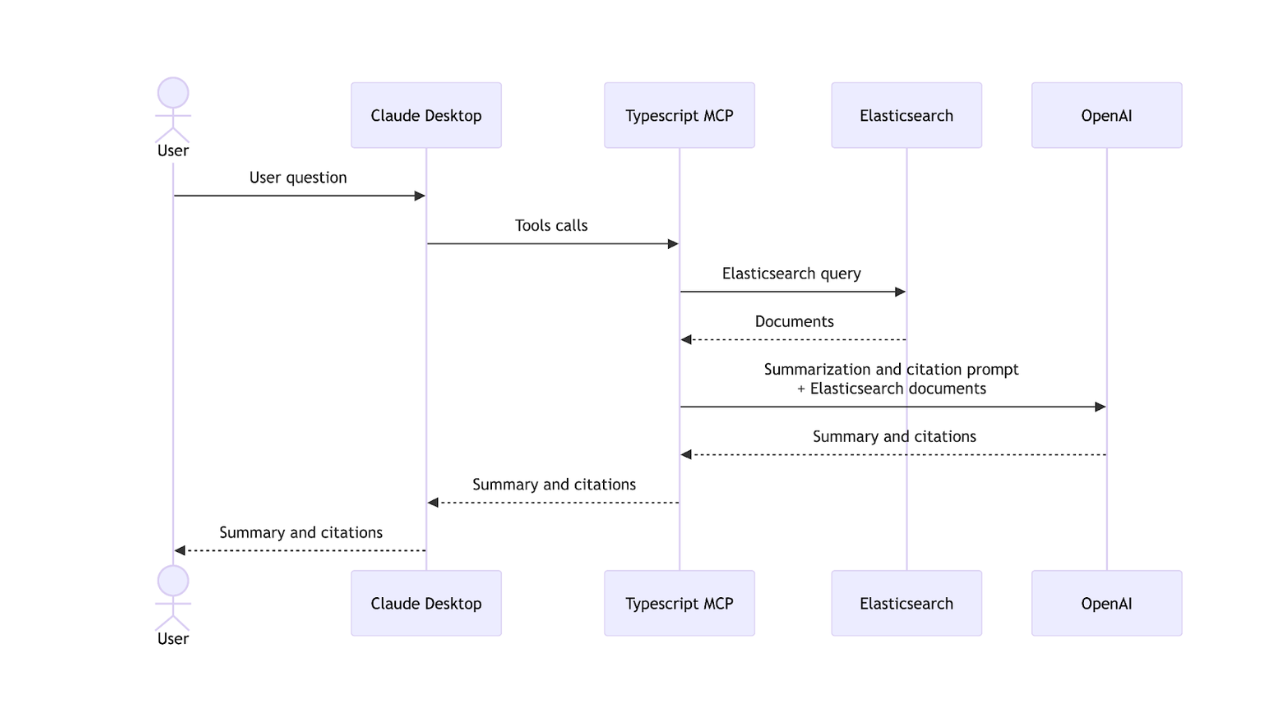
幕后
提示:“查找与 Elasticsearch 迁移相关的问题”
1. ChatGPT 调用 search(“Elasticsearch migration”)
2. Elasticsearch 执行混合搜索。
语义搜索能理解“升级”和“版本兼容性”等概念。
文本搜索可查找与“Elasticsearch”和“迁移”完全匹配的内容。
RRF 将两种方法的结果进行合并和排序
3. 返回与 id、title 匹配度最高的 10 个事件。 url
4. ChatGPT 将“ISSUE-1712:从 Elasticsearch 7.x 迁移到 8.x”作为最相关的结果
提示 2:获取完整的详细信息
问:“请提供有关 ISSUE-1889 的详细信息”
ChatGPT 识别到您需要有关特定问题的详细信息,并调用 fetch 工具,在对该工具采取任何行动前与用户确认。
工具调用请求:
{
  "id": "ISSUE-1889"
}
工具响应:
{
  "id": "ISSUE-1889",
  "title": "SQL injection vulnerability in search endpoint",
  "text": "Description: Security audit identified SQL injection vulnerability in /api/v1/search endpoint. User input from query parameter is not properly sanitized before being used in raw SQL query. Severity: HIGH - Immediate action required Affected Code: - File: services/search/query_builder.py - Line: 145-152 - Issue: String concatenation used instead of parameterized queries Investigation: - @security_team_alice: Confirmed exploitable with UNION-based injection - @sarah_dev: Checking all other endpoints for similar patterns - @john_backend: Found 3 more instances in legacy codebase Remediation: - Rewrite using SQLAlchemy ORM or parameterized queries - Add input validation and sanitization - Implement WAF rules as additional layer - Security regression tests Comments: - @tech_lead_mike: Stop all other work, this is P0 - @sarah_dev: PR-578 ready with fixes for all 4 vulnerable endpoints - @alex_devops: Deployed hotfix to production 2025-09-19 at 14:30 UTC - @security_team_alice: Verified fix, conducting full pentest next week Resolution: All vulnerable endpoints patched. Added pre-commit hooks to catch raw SQL queries. Security training scheduled for team.",
  "url": "https://internal-git.techcorp.com/issues/1889",
  "type": "issue",
  "status": "closed",
  "priority": "critical",
  "assignee": "sarah_dev",
  "created_date": "2025-09-18",
  "resolved_date": "2025-09-19",
  "labels": "security, vulnerability, bug, sql",
  "related_pr": "PR-578"
}
ChatGPT 会整合信息并清晰呈现。
幕后
提示:“获取有关 ISSUE-1889 的详细信息”
ChatGPT 调用
fetch(“ISSUE-1889”)Elasticsearch 会检索完整文档
返回一个包含所有字段在根级别的完整文档
ChatGPT会综合信息并提供正确的引用。
结论
在本文中,我们构建了一个自定义 MCP 服务器,使用专用的搜索和获取 MCP 工具将 ChatGPT 连接到 Elasticsearch,从而实现对私有数据的自然语言查询。
这种 MCP 模式适用于任何您想通过自然语言查询的 Elasticsearch 索引、文档、产品、日志或其他数据。
这些内容对您有多大帮助?