Agent Builder is available now GA. Get started with an Elastic Cloud Trial, and check out the documentation for Agent Builder here.
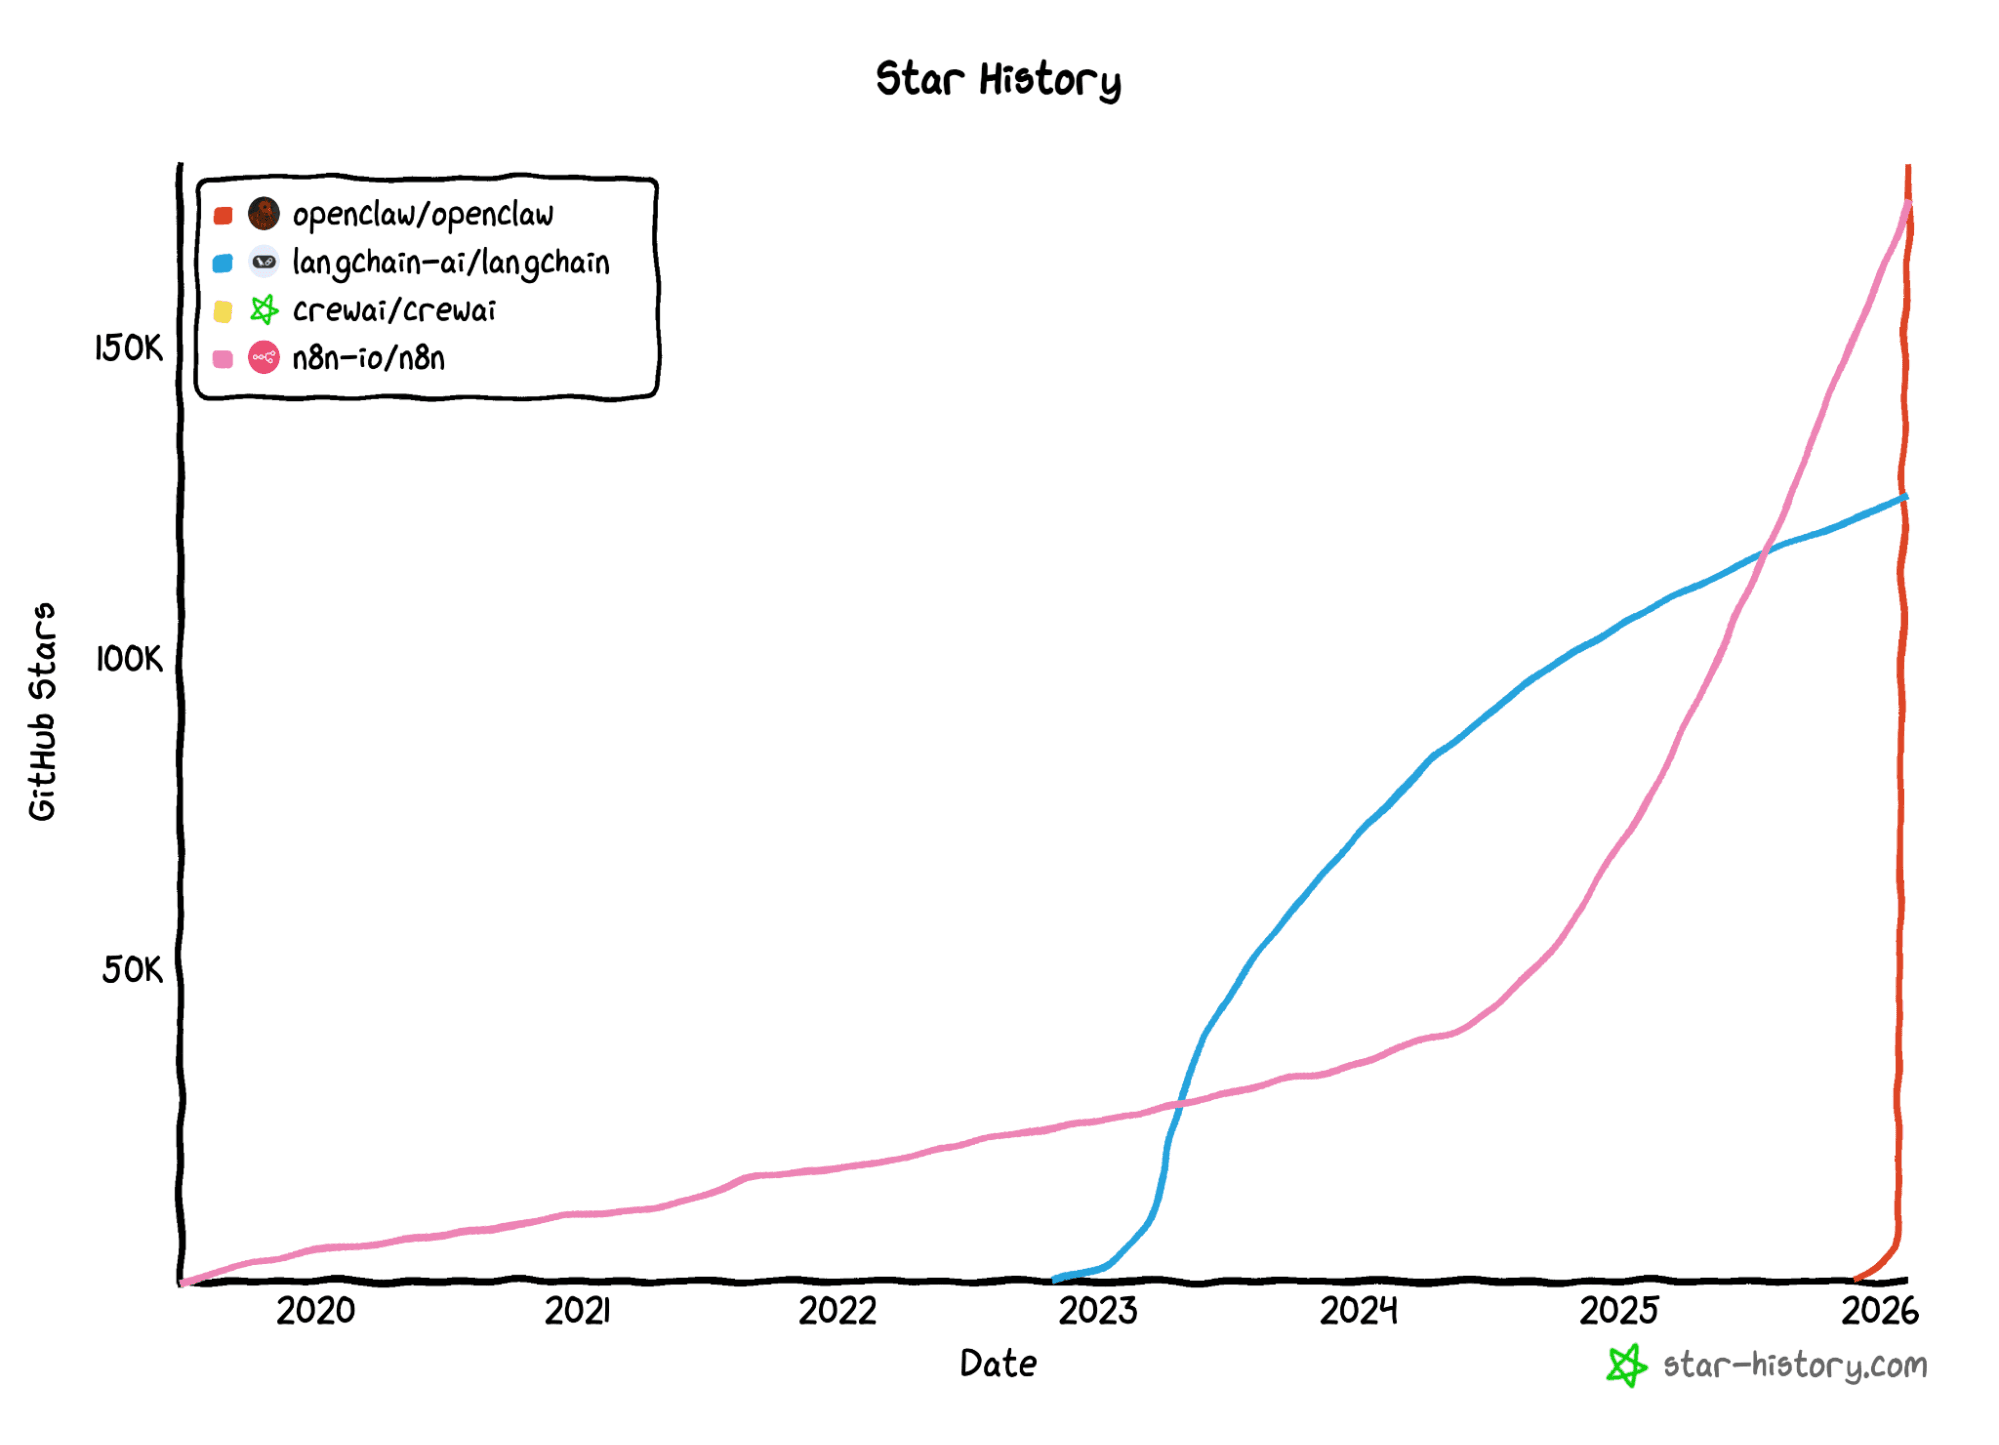
In recent weeks, OpenClaw has been appearing frequently in AI community discussions, particularly among developers interested in agents, automation, and local runtimes. The project gained traction quickly, which naturally raised a technical question:
What real problem does it solve for engineers?
OpenClaw is a self-hosted gateway for AI agents: a single runtime that coordinates execution, treats agents as isolated processes, and uses skills (structured instructions in markdown files) as the unit of integration. Conceptually, this isn’t entirely different from what we already do with command line interfaces (CLIs) and scripts, but it’s now formalized around agent-driven workflows.
This led to a practical exploration within the Elastic Stack:
If we treat OpenClaw as an orchestration runtime, how does it behave when Elasticsearch is the back end? And how straightforward is integration using OpenClaw skills?
Let's build an integration using composable skills.
Solution architecture
In this tutorial, we’ll teach OpenClaw how to access and query Elasticsearch data through a custom read-only skill, and we’ll then demonstrate how it composes multiple skills together; for example, combining Elasticsearch queries with real-time weather data to generate dynamic reports.
Before diving into the hands-on steps, let’s look at what we’re building. The solution is composed of three integrated layers that work together through OpenClaw orchestration.

Layer 1: Storage and search (Elasticsearch)
The data layer runs on Elasticsearch via start-local, a single command that spins up Elasticsearch and Kibana locally with Docker.
Two sample indices demonstrate different use cases:
fresh_produce: 10 products with semantic search (ecommerce scenario)app-logs-synthetic: 30 log entries across four services (observability scenario)
The same read-only skill works with both indices without any reconfiguration; the agent inspects the mapping and adapts its queries accordingly.
Layer 2: Orchestration (OpenClaw Gateway)
The gateway receives natural language requests and loads the Elasticsearch skill, and the large language model (LLM) decides which queries to construct. The skill is a pure SKILL.md with reference docs, meaning that its operations require no custom code.
To understand how the gateway organizes this, two core OpenClaw concepts are worth knowing:
- Agents: Independent AI instances, each with its own configuration, workspace, and set of skills. You can run multiple agents for different purposes.
- Workspace: A folder that defines an agent’s context:
AGENTS.md(the agent’s permanent briefing),.env(credentials), and askills/directory. Think of it as the agent’s working environment.
Layer 3: Skills (composable capabilities)
Skills are structured instructions in markdown files (SKILL.md) that teach the agent how to use specific tools or APIs. They can be global (available to all agents), workspace-specific, or bundled with OpenClaw. The agent selectively loads only the skills relevant to each request.
This tutorial uses two skills:
Elasticsearch-openclaw(custom, built for this tutorial): A read-only skill that teaches the agent how to search, filter, aggregate, and explore Elasticsearch indices using curl.Weather(community skill, used for composition demo): A skill that fetches current weather conditions from external APIs.
Later in the tutorial, we'll demonstrate how OpenClaw composes both skills in a single request, querying Elasticsearch products based on real-time weather data without any custom integration code.
Read-only by design
The elasticsearch-openclaw skill is read-only by design. It provides patterns for searching, filtering, and aggregating data, but it never writes, updates, or deletes. This minimizes the security footprint when giving AI agents access to your Elasticsearch cluster.
Even if the agent environment is compromised, your data remains safe from modification or deletion. This is enforced through:
- Skill design: No write operation patterns in
SKILL.mdor reference files. - API key permissions: The tutorial uses a read-only API key with only
readandview_index_metadataprivileges. - Agent instructions:
AGENTS.mdexplicitly states "You can SEARCH, FILTER, and AGGREGATE data, but you can NEVER write, update, or delete."
This security-first approach is why infrastructure setup (index creation, data loading) must be done manually; by design, the agent cannot do it for you.
Prerequisites
To follow this tutorial, you’ll need:
Software and tools:
- Docker Desktop installed and running (Docker Engine with Compose V2).
- Elasticsearch running locally via
start-local. (We’ll set this up in the next section.) - Jina API key (free): https://jina.ai/embeddings.
- OpenClaw installed: https://openclaw.ai.
Setting up the environment
Start by cloning the starter project, which contains the skill, workspace configuration, and Dev Tools scripts:
The repository contains:
Note: The devtools*.md files contain Kibana Dev Tools commands formatted as reference documentation.
Installing OpenClaw
OpenClaw is a self-hosted gateway. This means you maintain full control over execution and data, but you need to prepare your local environment or server.
I installed OpenClaw on a separate machine, which is why I included the disclaimer below.
** Security and responsibility disclaimer **
Since OpenClaw is an early-stage, rapidly evolving open-source project, the community has raised important discussions about potential security vulnerabilities, especially around token handling and third-party script execution.
Deployment recommendations:
- Isolated environments: If you’re not an advanced infrastructure security user, we recommend installing OpenClaw strictly in isolated, controlled environments (such as a dedicated virtual machine [VM], a rootless Docker container, or a test machine).
- Do not use in production: Avoid running the gateway on servers containing sensitive data or with unrestricted access to your corporate network until the project reaches a more stable, audited version.
- Least privilege: We reinforce the need to use Elasticsearch API keys with restricted permissions (read-only) to mitigate risks, in case the environment is compromised.
- Network segmentation: Both Elasticsearch and OpenClaw bind to
localhostby default. Keep it that way, unless you have a specific reason to expose them. - Credential rotation: Rotate API keys periodically. OpenClaw stores credentials locally, so treat the machine’s security as the perimeter.
- Audit logging: Enable Elasticsearch audit logging to track all API calls made by OpenClaw. This creates a full trail of what the agent accessed and when.
- Keep the installation up to date.
For a deeper analysis of the security architecture and deployment options, consult the official OpenClaw documentation.
Runtime installation
OpenClaw manages daemons and skill isolation via CLI. Since it’s a recent project that has undergone naming changes, we recommend strictly following the official documentation to ensure installation compatibility.
Preparing the Elasticsearch back end
Before connecting any agent runtime, we need a working Elasticsearch environment with data to query and a secure, read-only access layer. In the next two sections, we’ll spin up Elasticsearch locally using start-local, create an index with semantic_text and Jina v5 embeddings, load sample data, validate that semantic search works, and generate a read-only API key. Once this foundation is in place, the Elasticsearch side is complete and we can focus entirely on teaching the agent how to use it.
Part 1: Setting up Elasticsearch locally
Start a local Elasticsearch and Kibana instance with a single command:
Once complete: Elasticsearch at http://localhost:9200, Kibana at http://localhost:5601, and credentials in elastic-start-local/.env.
Part 2: Configuring the index in Kibana Dev Tools
Open http://localhost:5601 → Dev Tools and run devtools_fresh_produce.md in order.
- Step 1: Replace
YOUR_JINA_API_KEYwith your actual Jina API key (free). - Step 2: Save the encoded field immediately; it cannot be retrieved later.
The key commands in the Dev Tools file are:
Create the Jina inference endpoint:
Create the index with semantic_text:
The semantic_text field type handles embedding generation automatically at index time.
Index sample products using the bulk API (see devtools_fresh_produce.md for the full dataset of 10 products).
Validate semantic search:
The semantic query type handles inference on the query side automatically; no need to specify model IDs or embedding details.
Create a read-only API key:
Save the encoded value from the response. This is your API key for the OpenClaw configuration.
Connecting to OpenClaw
With the Elasticsearch back end ready, we can now wire it into OpenClaw. Several Elasticsearch integrations already exist in the ecosystem, from Elastic’s own Model Context Protocol (MCP) server to community-built MCP servers. However, most of these offer full CRUD access or are designed for different agent runtimes. Given that the technology is still in its early stages and security remains a primary concern, I chose to build a dedicated skill, simple, read-only, and purpose-built for OpenClaw. This approach ensures that the agent can search, filter, and aggregate data but never modify it, keeping the blast radius minimal even if the environment is compromised.
In the next sections, we’ll configure credentials, install the skill, create a dedicated agent, and explore how the workspace ties everything together.
Install the skill and create the agent
Step 1: Configure credentials
From the cloned repository, configure the credentials by copying the environment template and filling in your Elasticsearch URL and the read-only API key:
Edit the .env file with these two values:
Example .env file:
Step 2: Install the skill from ClawHub
ClawHub is OpenClaw's public skill registry. Think of it as npm for AI agent skills. At the time of this writing, ClawHub hosts over 3,200 skills, covering everything from Slack and GitHub integrations to Internet of Things (IoT) device automation. For this tutorial, we created elasticsearch-openclaw, a custom skill focused on read-only queries using semantic_text, aggregations, and observability on Elasticsearch 9.x. It’s published on ClawHub so you can install it directly. As a best practice, only install skills from trusted sources with known provenance; as with any package manager, review the content before granting access to your agent.
The elasticsearch-openclaw skill is published on ClawHub.
Recommended: Open the OpenClaw Web UI (http://127.0.0.1:18789/) and ask:
OpenClaw will:
- Fetch the skill from ClawHub.
- Install it in the appropriate directory.
- Confirm when ready to use.
Step 3: Create the agent
Do this by registering a dedicated agent with its own workspace, and then restart the gateway to load the new configuration:
At this point, you can open the OpenClaw web chat and start the conversation.
Understanding the workspace
Now that the agent is running, let’s look at what makes it tick.
AGENTS.md
The AGENTS.md file is the agent’s permanent briefing. It defines who the agent is, what it can do, and how it should behave. For our Elasticsearch agent, this file instructs the agent about the available indices, the read-only constraint, and the preferred query patterns.
Skills: When they make a difference
| Without skill | With `elasticsearch-openclaw` skill |
|---|---|
| Agent has no knowledge of Elasticsearch query syntax. | Agent knows semantic, full-text, filtered, and aggregation patterns. |
| Agent might attempt write operations. | Agent is instructed to never write, update, or delete. |
| Agent guesses field names and types. | Agent inspects mappings first and then constructs appropriate queries. |
| Generic curl commands with trial and error. | Structured query templates with best practices for Elasticsearch 9.x. |
Exploring with the agent
With the Elasticsearch back end configured and the OpenClaw agent connected, it’s time to see what the agent can actually do. In the next sections, we’ll test natural language queries, explore observability data, and compose multiple skills together.
Testing in OpenClaw
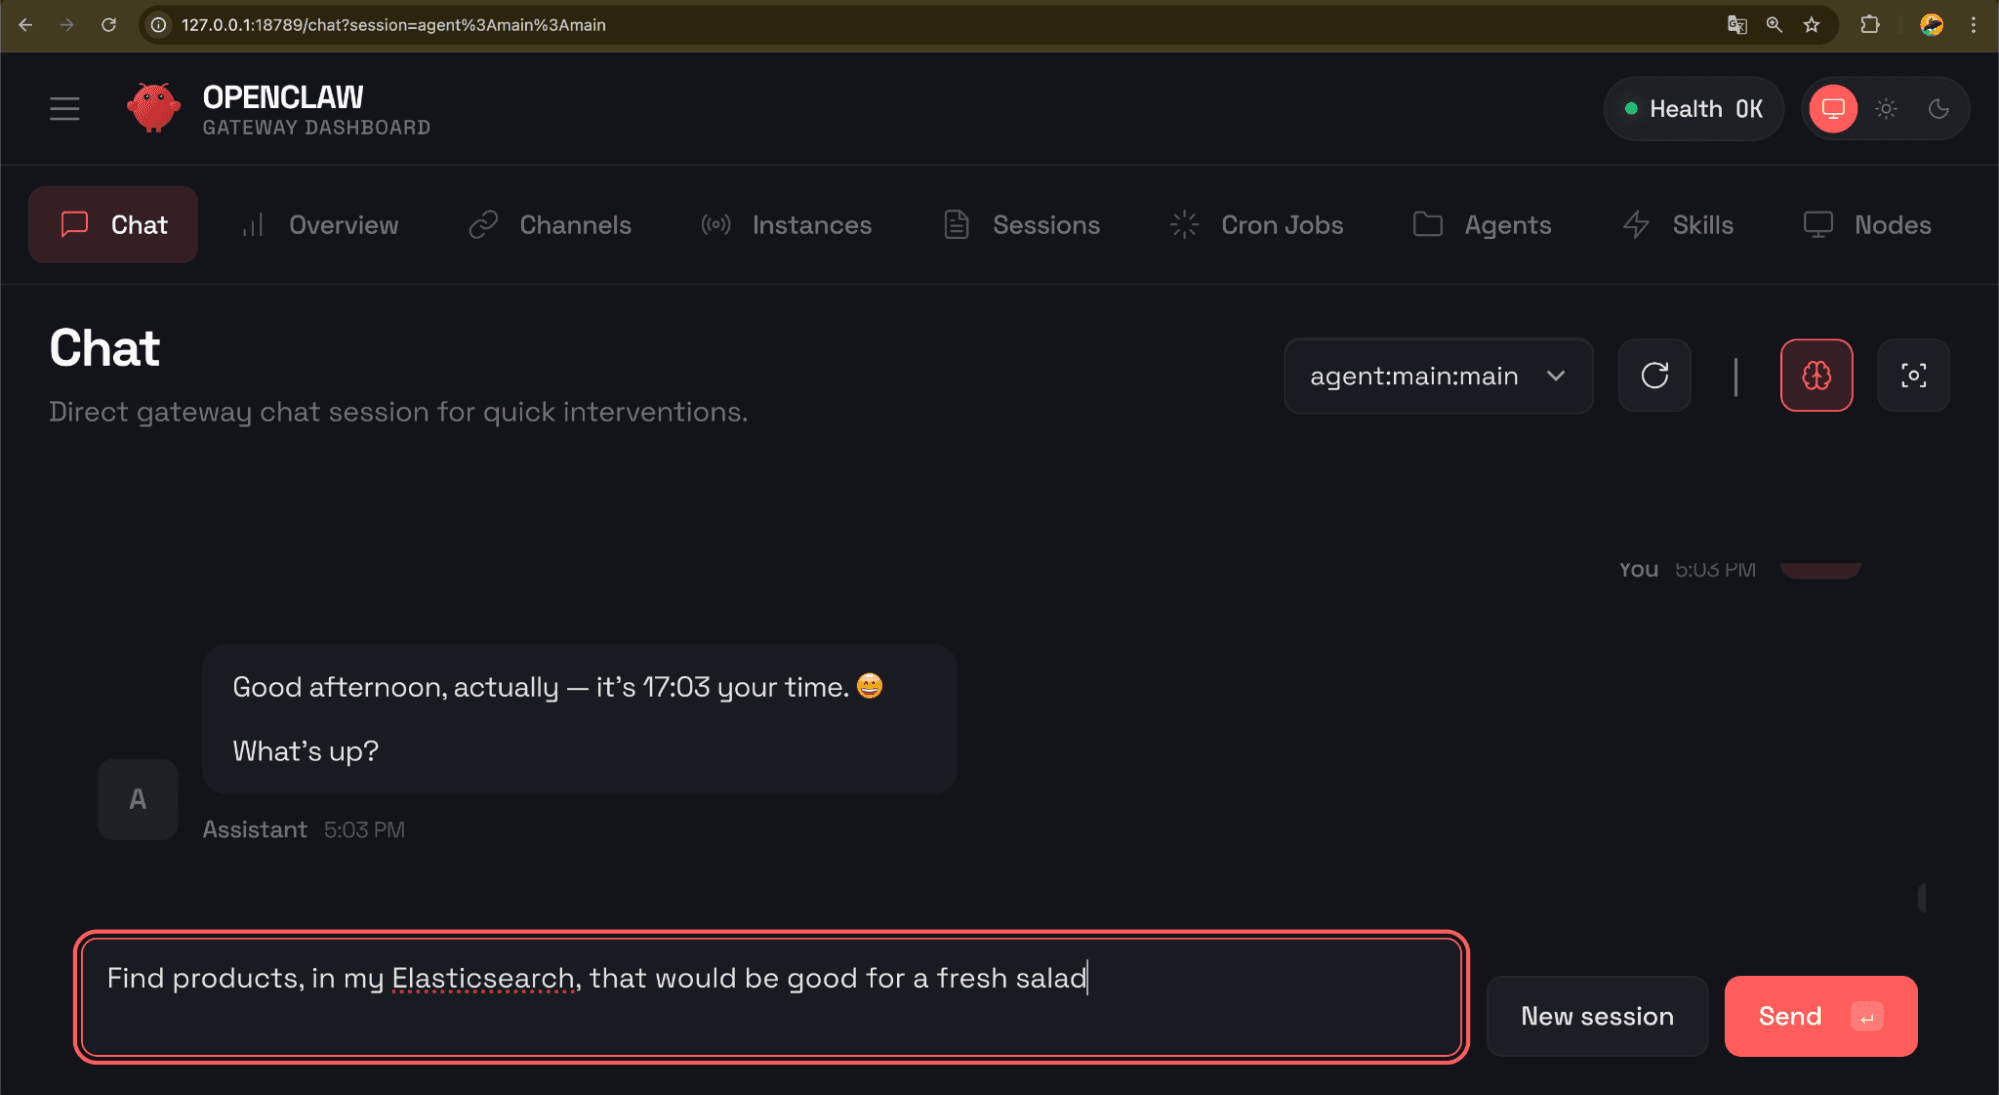
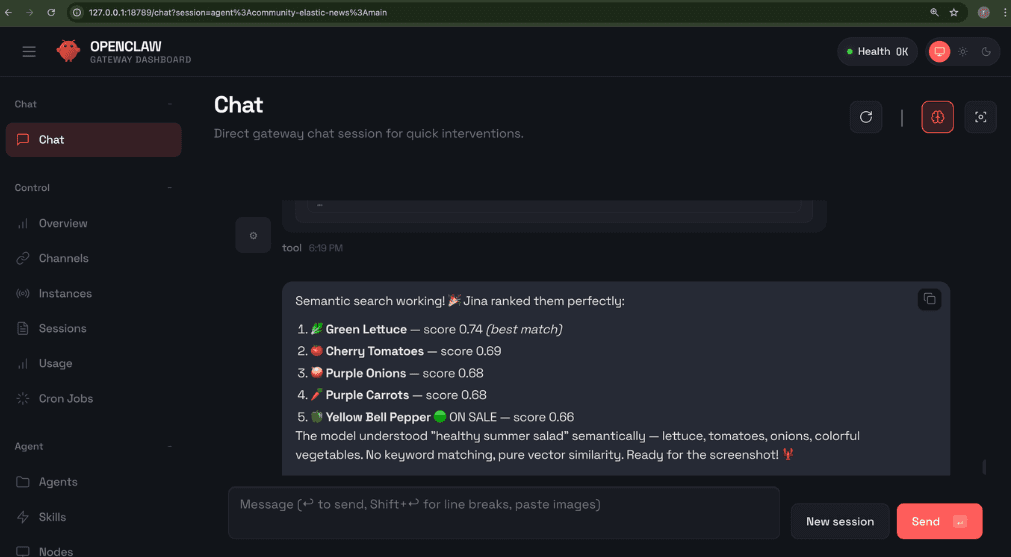
Open the OpenClaw web UI, and try some natural language queries. The agent will inspect the index mapping, choose the appropriate query type, and return results.
Type:
Result:
Others ideas to explore:
- Index exploration: > “What indices do I have in Elasticsearch? Show me the fields of
fresh_produce.” - Filtered search: > “Show me all products on sale under $15.”
- Aggregations: > “What’s the average price by category?”
Observability
To demonstrate that the skill works beyond a single use case, the repository includes a second index: app-logs-synthetic, with 30 synthetic log entries across four fictional services, created from devtools_app_logs_synthetic.md.
Setting up the log data
Since the skill is read-only, you need to populate the index first. The devtools_app_logs_synthetic.md file contains five commands (three for setup and two for verification):
Create ingest pipeline: Adds @timestamp to log entries automatically.Create index mapping: Defines theapp-logs-syntheticstructure (classic fields only, nosemantic_text).Bulk insert logs: Loads 30 synthetic log entries across four services.Count query: Verify 30 documents were indexed.Sample search: Quick test to confirm that data is queryable.
How to run:
- Open Kibana Dev Tools: http://localhost:5601 → Dev Tools.
- Copy each numbered block from the .md file.
- Paste into the Dev Tools console.
- Press Ctrl/Cmd+Enter to execute.
- Wait for a successful response before continuing to the next block.
This creates the app-logs-synthetic index with sample data ready for querying.
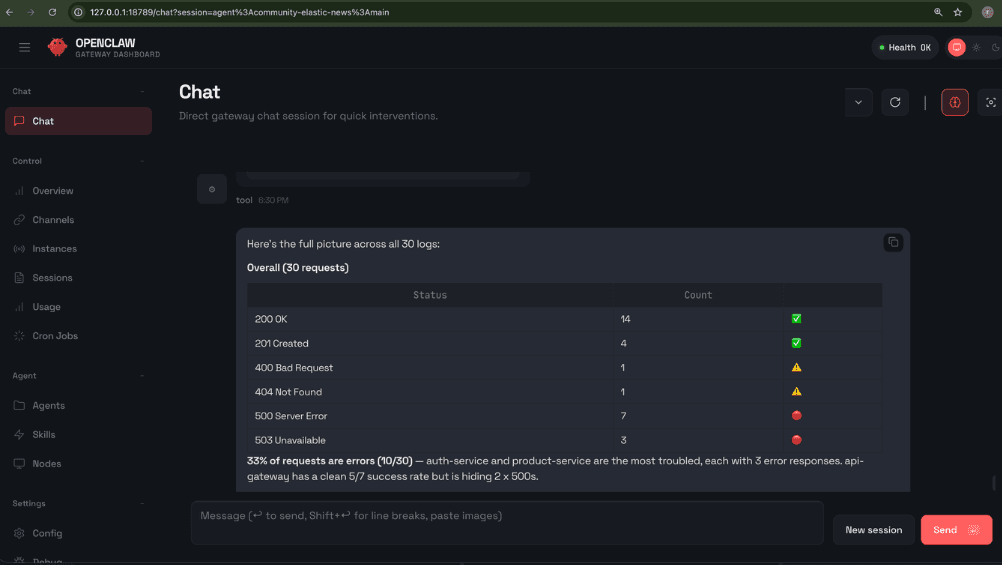
Try this query in the OpenClaw web UI:
Result:
Other ideas to explore:
- “How many 500 errors do I have in
app-logs-synthetic? Which services are failing?” - “Which endpoints have the slowest response times?”
- “What happened with the
payment-servicein the last 24 hours?”
This is the same skill, same agent, same setup, just pointed at different data. The agent inspects the new index mapping, adapts its queries, and returns relevant results without any reconfiguration.
Composing skills in action
This is where composable skills truly shine. Start by asking the agent:
OpenClaw will search for the weather skill, automatically attempt the installation, and guide you through the process. Just follow the on-screen instructions; no new API key is required for the weather skill. Afterward, try this:
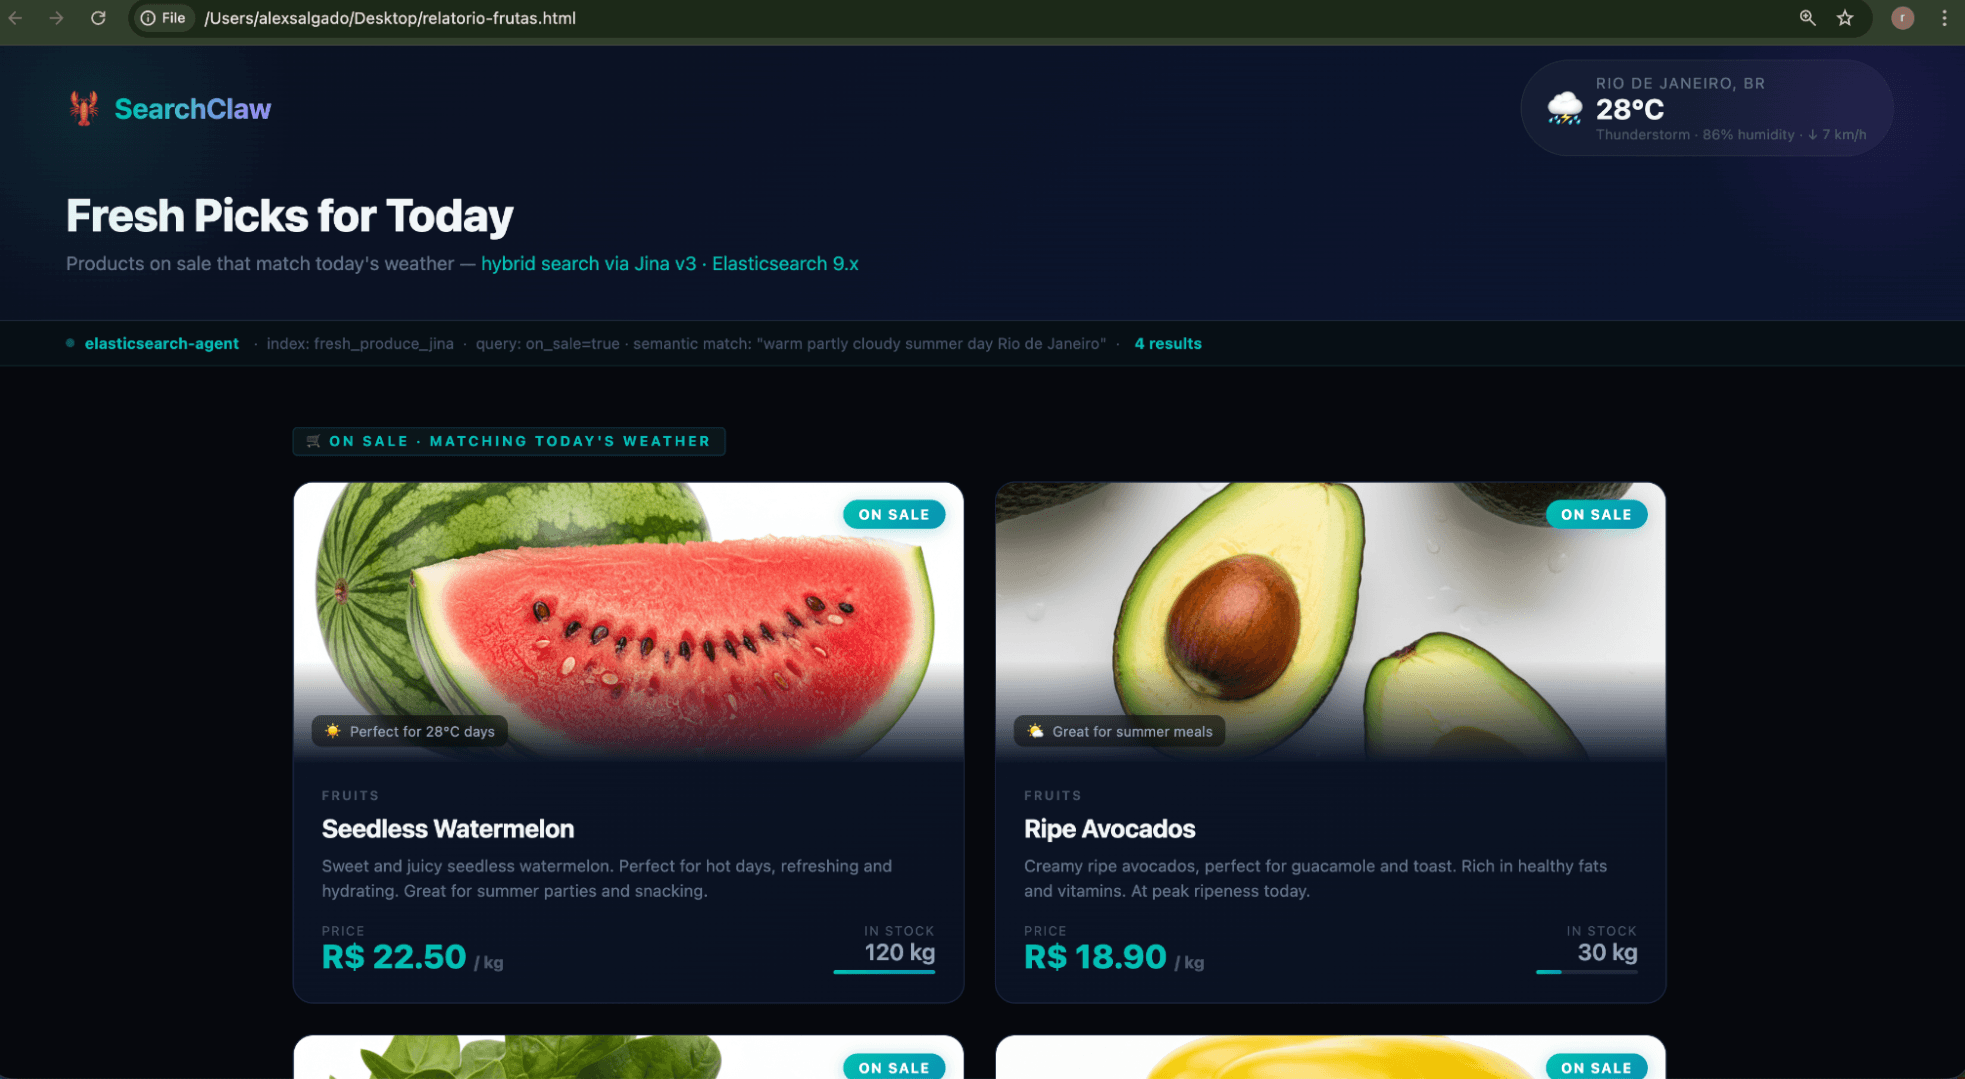
In a single request, the agent chains multiple skills: the weather skill to check current conditions, the Elasticsearch skill to run a hybrid search on products that match the context, and its built-in file and browser tools to generate an HTML report and open it. No custom integration code, no glue scripts, just skills composed by the LLM at runtime.
This is what makes OpenClaw different from a traditional automation framework. You don’t preprogram the workflow. You describe the outcome, and the agent figures out the composition.
Conclusion
SearchClaw started as a simple experiment and ended up demonstrating what composable, LLM-driven integration looks like in practice. The key takeaway is not the individual tools (all are familiar) but the approach. Instead of writing a specific application with hardcoded queries, we gave the agent capabilities and let it compose solutions dynamically. This is what makes OpenClaw native: composable, LLM-driven, and local-first.
As with any early-stage project, OpenClaw should be used thoughtfully, especially regarding security and environment isolation. The read-only skill approach demonstrated here is one way to limit risk while still unlocking the value of your Elasticsearch data.
The full code is available in the repository and can serve as a starting point for your own integrations: https://github.com/salgado/elasticsearch-openclaw-start-blog.
Related Content

July 1, 2026
One command. Natural language. Your Elasticsearch data, straight to the terminal.
Query your Elasticsearch data from the terminal in plain English. The official Elastic GitHub Copilot CLI plugin generates and runs ES|QL queries against your cluster. No Kibana, no manual syntax.
June 30, 2026
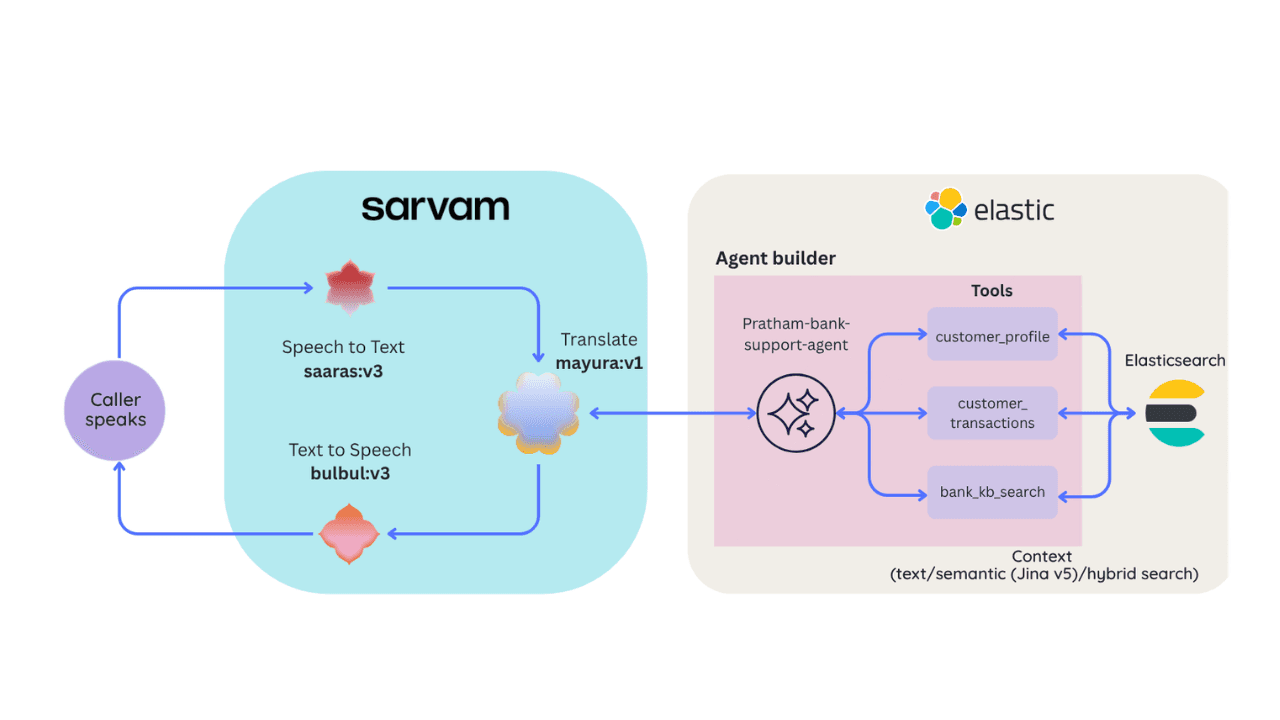
Building a multilingual voice agent with Elastic Agent Builder & Sarvam AI
A working demo combining Sarvam AI speech with Elastic Agent Builder: identity verification, per-customer ES|QL queries, and mid-call language switching across 22 Indian languages without multilingual indices.

June 26, 2026
Talk to your Elasticsearch data: building a real-time voice agent with Google ADK and MCP in 3 components
Wire Google ADK's real-time voice streaming to your Elasticsearch data via Agent Builder's built-in MCP server; no custom integration code required.

June 22, 2026
Your data analyst doesn't need SQL: wiring Elastic Agent Builder to AWS AgentCore for natural-language Elasticsearch queries
Wire plain-English questions to your Elasticsearch data using Elastic Agent Builder MCP, AWS Bedrock AgentCore and the Strands SDK. Python code included.
July 6, 2026
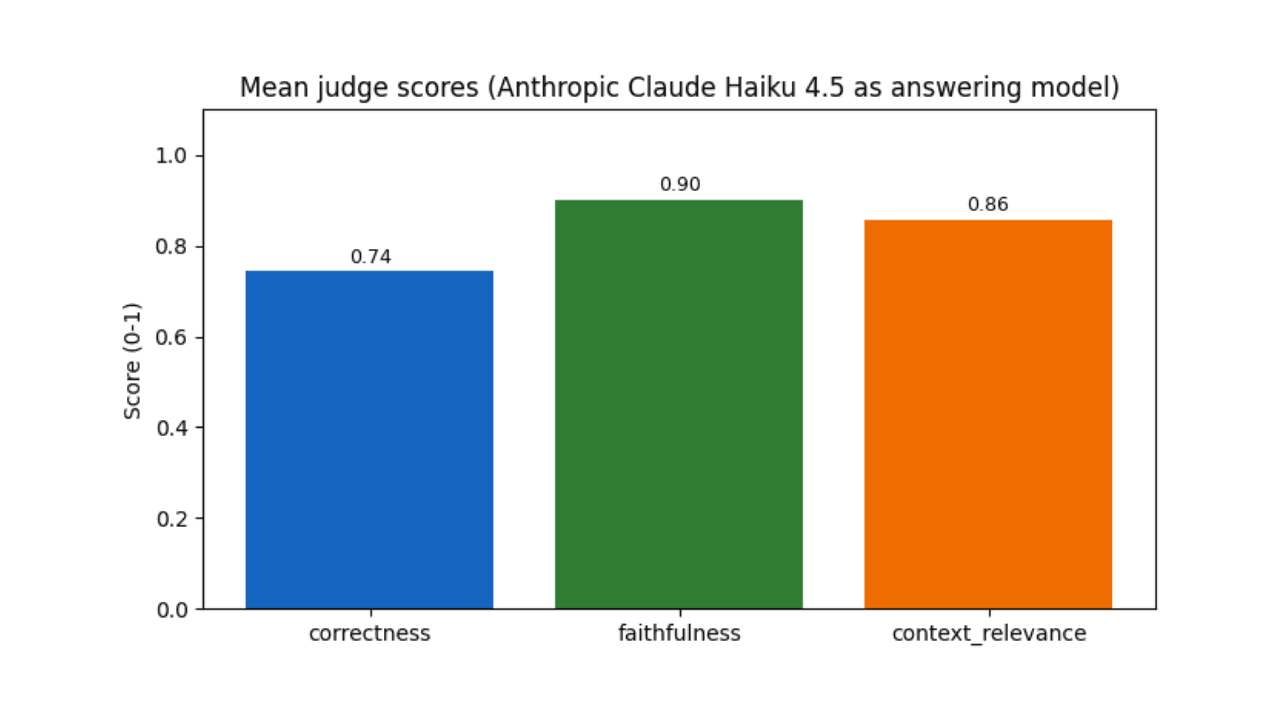
Who grades the grader? LLM-as-a-Judge inside Elasticsearch Workflows
Find out if your RAG agent is ready to ship. Score it on correctness, faithfulness and retrieval quality using only Elasticsearch Workflows and two Claude models.