Collecting and analyzing Zeek data with Elastic Security
In this blog, I will walk you through the process of configuring both Filebeat and Zeek (formerly known as Bro), which will enable you to perform analytics on Zeek data using Elastic Security. The default configuration for Filebeat and its modules work for many environments; however, you may find a need to customize settings specific to your environment. The steps detailed in this blog should make it easier to understand the necessary steps to customize your configuration with the objective of being able to see Zeek data within Elastic Security.
Beats are lightweight shippers that are great for collecting and shipping data from or near the edge of your network to an Elasticsearch cluster. Beats ship data that conforms with the Elastic Common Schema (ECS). Filebeat, a member of the Beat family, comes with internal modules that simplify the collection, parsing, and visualization of common log formats. The modules achieve this by combining automatic default paths based on your operating system. We will be using Filebeat to parse Zeek data.
I will also cover details specific to the GeoIP enrichment process for displaying the events on the Elastic Security map. Additionally, I will detail how to configure Zeek to output data in JSON format, which is required by Filebeat. This blog covers only the configuration. I assume that you already have an Elasticsearch cluster configured with both Filebeat and Zeek installed.
Environment details
My Elastic cluster was created using Elasticsearch Service, which is hosted in Elastic Cloud. You can easily spin up a cluster with a 14-day free trial, no credit card needed. You should give it a spin as it makes getting started with the Elastic Stack fast and easy.
I’m using Zeek 3.0.0. You can find Zeek for download at the Zeek website.
Filebeat overview
Filebeat ships with dozens of integrations out of the box which makes going from data to dashboard in minutes a reality. You can easily find what what you need on our full list of integrations. Not only do the modules understand how to parse the source data, but they will also set up an ingest pipeline to transform the data into ECS format.
Elastic is working to improve the data onboarding and data ingestion experience with Elastic Agent and Ingest Manager. However, that is currently an experimental release, so we’ll focus on using the production-ready Filebeat modules. Additionally, many of the modules will provide one or more Kibana dashboards out of the box.
Enable Filebeat Zeek module
The first thing we need to do is to enable the Zeek module in Filebeat. All of the modules provided by Filebeat are disabled by default.
Step 1: Enable the Zeek module in Filebeat
Enabling the Zeek module in Filebeat is as simple as running the following command:
sudo filebeat modules enable zeek
This command will enable Zeek via the zeek.yml configuration file in the modules.d directory of Filebeat. Filebeat should be accessible from your path. If it is not, the default location for Filebeat is /usr/bin/filebeat if you installed Filebeat using the Elastic GitHub repository.
Step 2: Add Zeek log path to zeek.yml
The Zeek log paths are configured in the Zeek Filebeat module, not in Filebeat itself. You need to edit the Filebeat Zeek module configuration file, zeek.yml. For my installation of Filebeat, it is located in /etc/filebeat/modules.d/zeek.yml. You should add entries for each of the Zeek logs of interest to you. The base directory where my installation of Zeek writes logs to /usr/local/zeek/logs/current
Here is the full list of Zeek log paths. You will need to edit these paths to be appropriate for your environment.
# Module: zeek
# Docs: /guide/en/beats/filebeat/7.6/filebeat-module-zeek.html

- module: zeek
    capture_loss:
        enabled: true
        var.paths: ["/usr/local/zeek/logs/current/capture_loss.log"]
    connection:
        enabled: true
        var.paths: ["/usr/local/zeek/logs/current/conn.log"]
    dce_rpc:
        enabled: true
        var.paths: ["/usr/local/zeek/logs/current/dce_rpc.log"]
    dhcp:
        enabled: true
        var.paths: ["/usr/local/zeek/logs/current/dhcp.log"]
    dnp3:
        enabled: true
        var.paths: ["/usr/local/zeek/logs/current/dnp3.log"]
    dns:
        enabled: true
        var.paths: ["/usr/local/zeek/logs/current/dns.log"]
    dpd:
        enabled: true
        var.paths: ["/usr/local/zeek/logs/current/dpd.log"]
    files:
        enabled: true
        var.paths: ["/usr/local/zeek/logs/current/files.log"]
    ftp:
        enabled: true
        var.paths: ["/usr/local/zeek/logs/current/ftp.log"]
    http:
        enabled: true
        var.paths: ["/usr/local/zeek/logs/current/http.log"]
    intel:
        enabled: true
        var.paths: ["/usr/local/zeek/logs/current/intel.log"]
    irc:
        enabled: true
        var.paths: ["/usr/local/zeek/logs/current/irc.log"]
    kerberos:
        enabled: true
        var.paths: ["/usr/local/zeek/logs/current/kerberos.log"]
    modbus:
        enabled: true
        var.paths: ["/usr/local/zeek/logs/current/modbus.log"]
    mysql:
        enabled: true
        var.paths: ["/usr/local/zeek/logs/current/mysql.log"]
    notice:
        enabled: true
        var.paths: ["/usr/local/zeek/logs/current/notice.log"]
    ntlm:
        enabled: true
        var.paths: ["/usr/local/zeek/logs/current/ntlm.log"]
    ocsp:
        enabled: true
        var.paths: ["/usr/local/zeek/logs/current/ocsp.log"]
    pe:
        enabled: true
        var.paths: ["/usr/local/zeek/logs/current/pe.log"]
    radius:
        enabled: true
        var.paths: ["/usr/local/zeek/logs/current/radius.log"]
    rdp:
        enabled: true
        var.paths: ["/usr/local/zeek/logs/current/rdp.log"]
    rfb:
        enabled: true
        var.paths: ["/usr/local/zeek/logs/current/rfb.log"]
    #  signatures:
    #    enabled: true
    #    var.paths: ["/usr/local/zeek/logs/current/signatures.log"]
    sip:
        enabled: true
        var.paths: ["/usr/local/zeek/logs/current/sip.log"]
    smb_cmd:
        enabled: true
        var.paths: ["/usr/local/zeek/logs/current/smb_cmd.log"]
    smb_files:
        enabled: true
        var.paths: ["/usr/local/zeek/logs/current/smb_files.log"]
    smb_mapping:
        enabled: true
        var.paths: ["/usr/local/zeek/logs/current/smb_mapping.log"]
    smtp:
        enabled: true
        var.paths: ["/usr/local/zeek/logs/current/smtp.log"]
    snmp:
        enabled: true
        var.paths: ["/usr/local/zeek/logs/current/snmp.log"]
    socks:
        enabled: true
        var.paths: ["/usr/local/zeek/logs/current/socks.log"]
    ssh:
        enabled: true
        var.paths: ["/usr/local/zeek/logs/current/ssh.log"]
    ssl:
        enabled: true
        var.paths: ["/usr/local/zeek/logs/current/ssl.log"]
    stats:
        enabled: true
        var.paths: ["/usr/local/zeek/logs/current/stats.log"]
    syslog:
        enabled: true
        var.paths: ["/usr/local/zeek/logs/current/syslog.log"]
    traceroute:
        enabled: true
        var.paths: ["/usr/local/zeek/logs/current/traceroute.log"]
    tunnel:
        enabled: true
        var.paths: ["/usr/local/zeek/logs/current/tunnel.log"]
    weird:
        enabled: true
        var.paths: ["/usr/local/zeek/logs/current/weird.log"]
    x509:
        enabled: true
        var.paths: ["/usr/local/zeek/logs/current/x509.log"]
Note: The signature log is commented because the Filebeat parser does not (as of publish date) include support for the signature log at the time of this blog.
Step 3: Restart Filebeat
Once you have finished editing and saving your zeek.yml configuration file, you should restart Filebeat. While your version of Linux may require a slight variation, this is typically done via:
sudo systemctl restart filebeat
At this point, you would normally be expecting to see Zeek data visible in Elastic Security and in the Filebeat indices. Don't be surprised when you don’t see your Zeek data in Discover or on any Dashboards. There are a few more steps you need to take.
Configure Zeek to output JSON
By default, Zeek does not output logs in JSON format. This is what is causing the Zeek data to be missing from the Filebeat indices. The Filebeat Zeek module assumes the Zeek logs are in JSON. You will likely see log parsing errors if you attempt to parse the default Zeek logs.
- You need to edit the
local.zeekconfiguration file to configure JSON logging output. The location of this configuration file will depend on your Zeek installation. My installation of Zeek is located in/usr/local/zeek. My configuration file is located at/usr/local/zeek/share/zeek/site/local.zeek. - Add the following line at the end of the configuration file:
@load policy/tuning/json-logs.zeek
- After you have finished editing the
local.zeekconfiguration file, you will need to restart Zeek using:sudo zeekctl deploy
This will restart Zeek using the updated configuration file settings. - Once you have that edit in place, you should restart Filebeat. At this point, you should see Zeek data visible in your Filebeat indices.
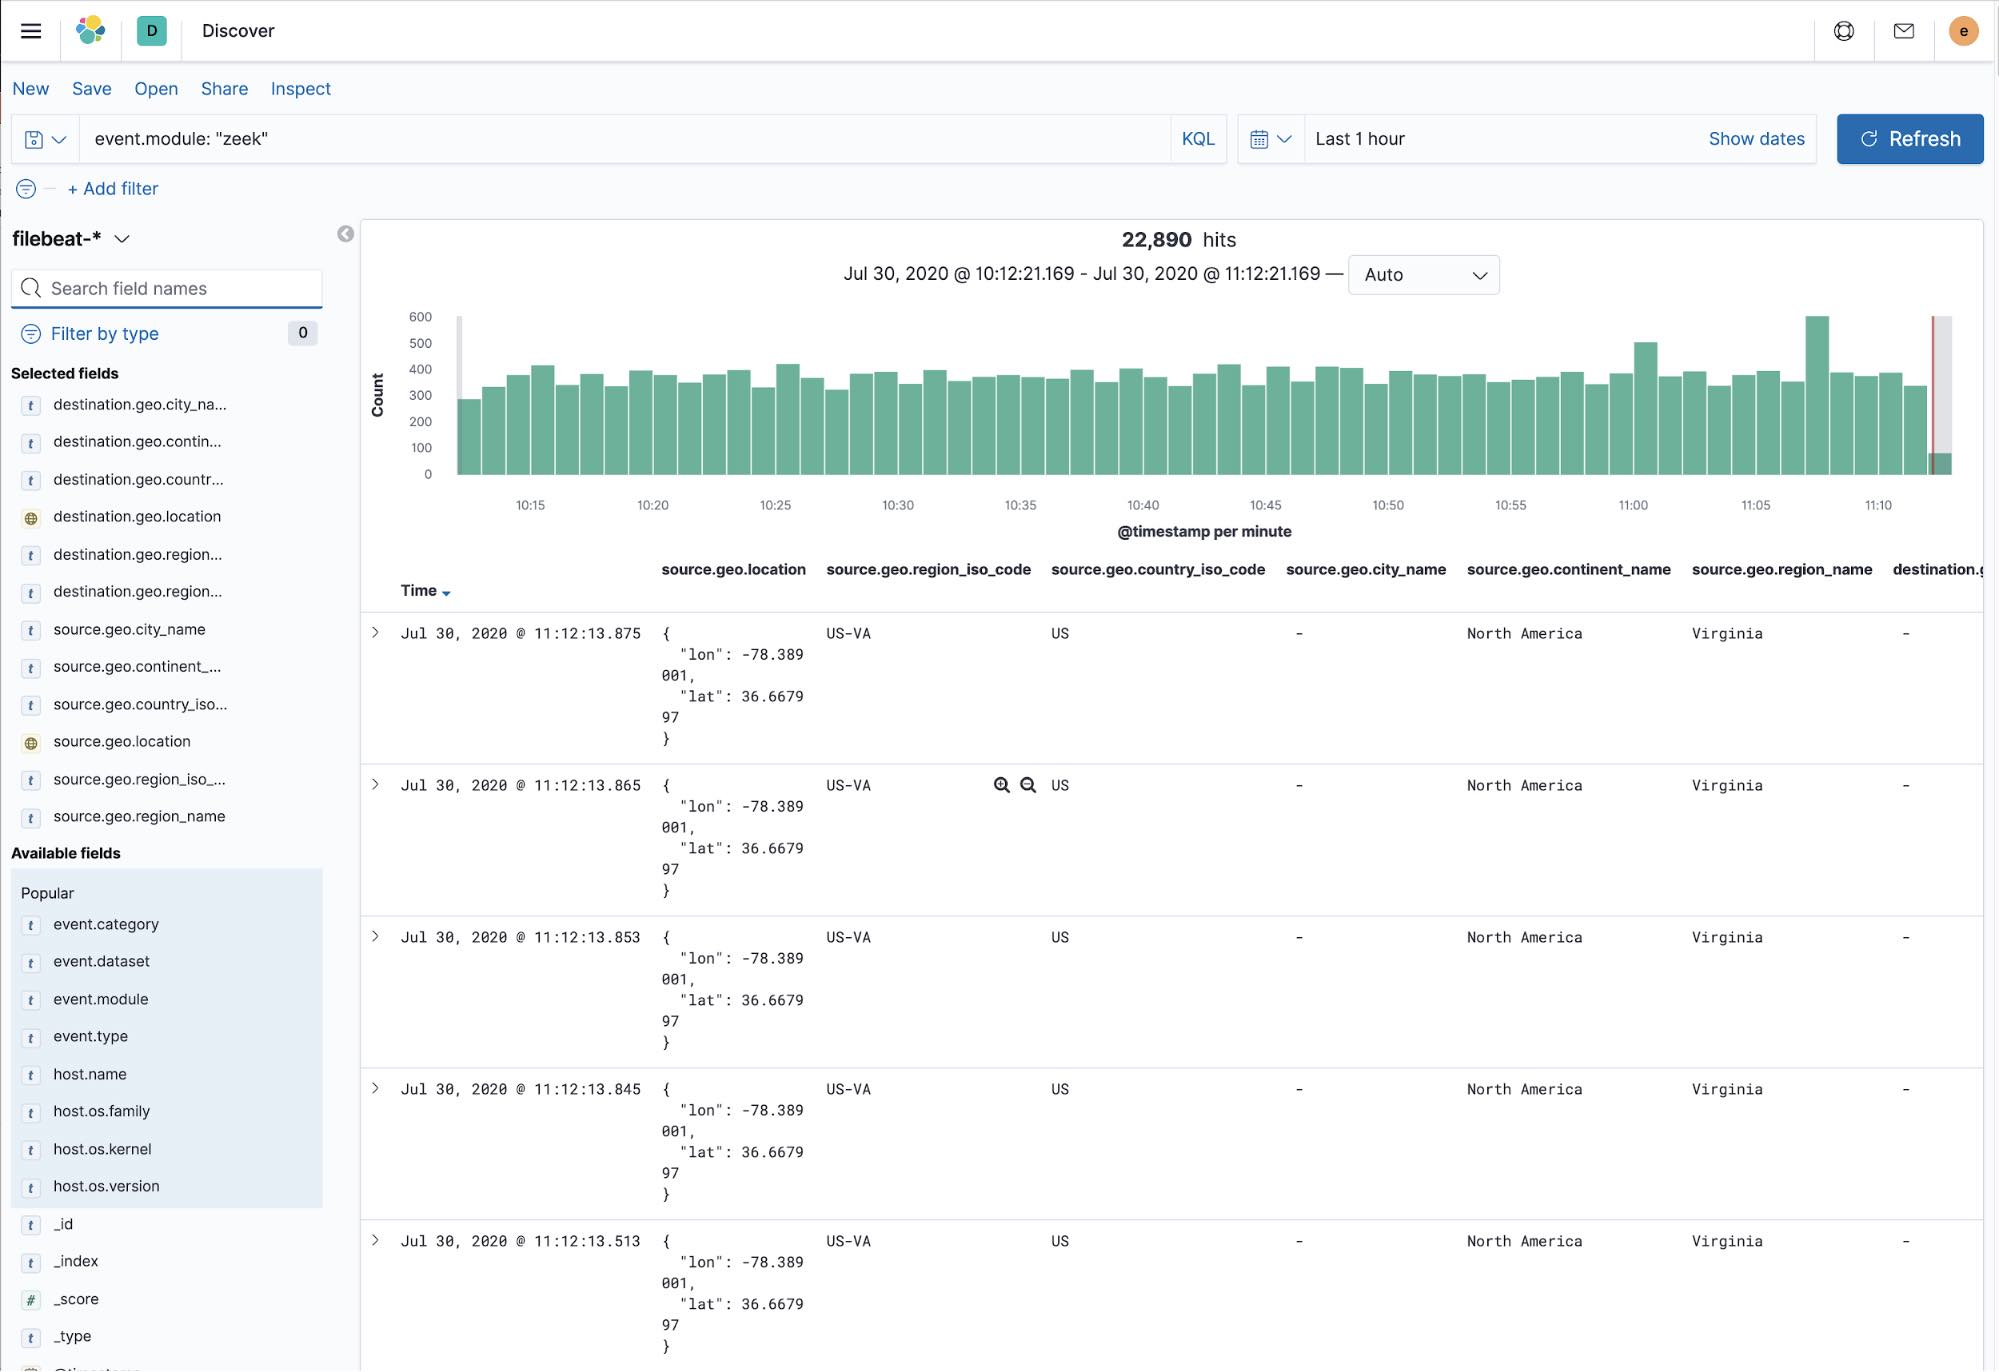
This is a view of Discover showing the values of the geo fields populated with data:
GeoIP enrichment
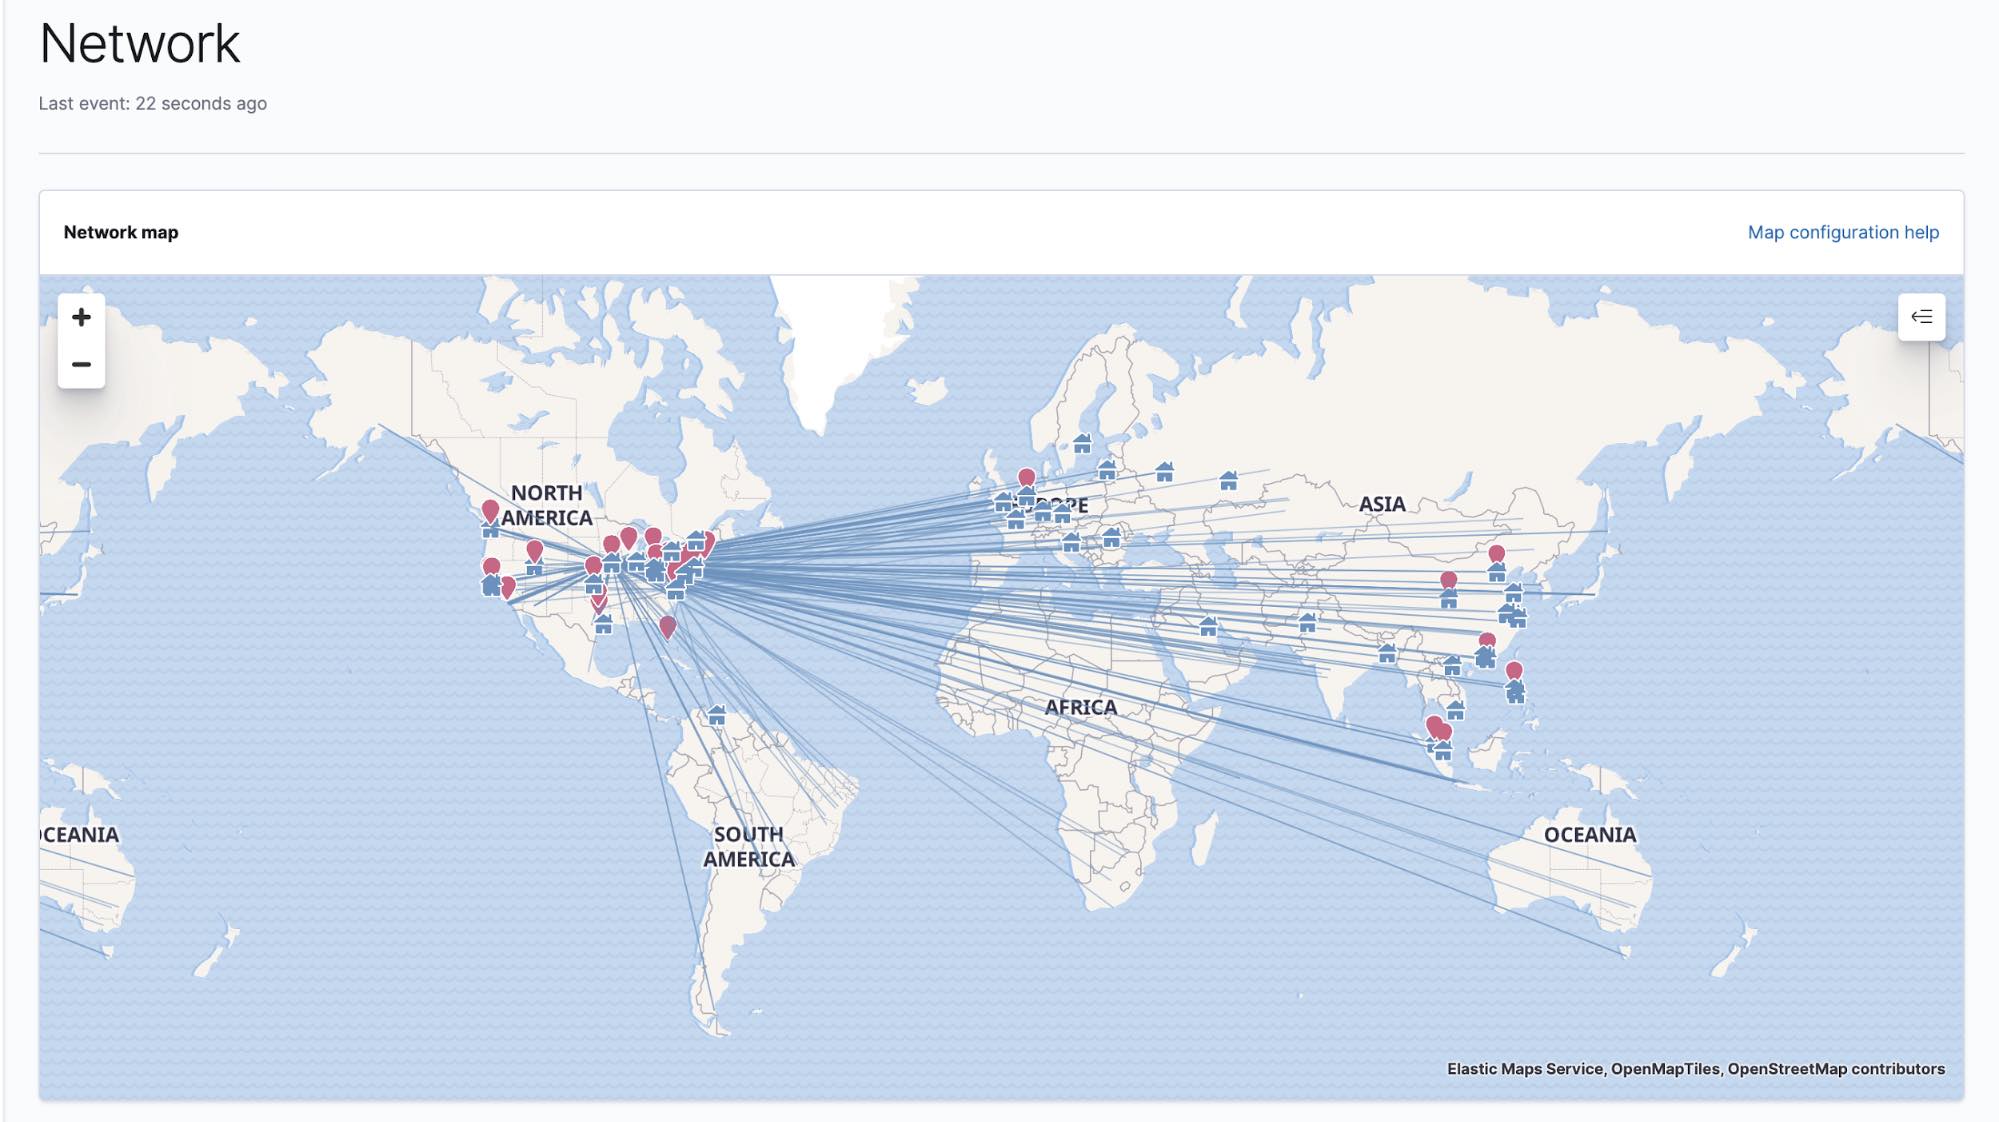
Once the Zeek data was in the Filebeat indices, I was surprised that I wasn’t seeing any of the “pew pew” lines on the Network tab in Elastic Security. I created the geoip-info ingest pipeline as documented in the SIEM Config Map UI documentation. I also verified that I was referencing that pipeline in the output section of the Filebeat configuration as documented.
Here is an example of defining the pipeline in the filebeat.yml configuration file:
output.elasticsearch:
  # Array of hosts to connect to.
  hosts: ["localhost:9200"]
  pipeline: geoip-info
The nodes on which I’m running Zeek are using non-routable IP addresses, so I needed to use the Filebeat add_field processor to map the geo-information based on the IP address. While that information is documented in the link above, there was an issue with the field names.
The GeoIP pipeline assumes the IP info will be in source.ip and destination.ip. This is true for most sources. However, with Zeek, that information is contained in source.address and destination.address. Why is this happening? It really comes down to the flow of data and when the ingest pipeline kicks in.
The Zeek module for Filebeat creates an ingest pipeline to convert data to ECS. This pipeline copies the values from source.address to source.ip and destination.address to destination.ip. However, the add_fields processor that is adding fields in Filebeat happens before the ingest pipeline processes the data. So the source.ip and destination.ip values are not yet populated when the add_field processor is active.
I modified my Filebeat configuration to use the add_field processor and using address instead of ip. This is what that looks like:
processors:
    - add_host_metadata:
    - add_cloud_metadata:
    - add_fields:
        when.network.source.address: 10.128.0.0/24
        fields:
            source.geo.location:
            lat: 41.619549
            lon: -93.598022
            source.geo.continent_name: North America
            source.geo.country_iso_code: US
            source.geo.region_iso_code: US-IA
            source.geo.region_name: Iowa
        target: ''
    - add_fields:
        when.network.destination.address: 10.128.0.0/24
        fields:
            destination.geo.location:
            lat: 41.619549
            lon: -93.598022
            destination.geo.continent_name: North America
            destination.geo.country_iso_code: US
You should note I’m using the address field in the when.network.source.address line instead of when.network.source.ip as indicated in the documentation. This is also true for the destination line. This addresses the data flow timing I mentioned previously. At this stage of the data flow, the information I need is in the source.address field.
Verify Zeek data in Elastic Security
Once you have completed all of the changes to your filebeat.yml configuration file, you will need to restart Filebeat using:
sudo systemctl restart filebeat
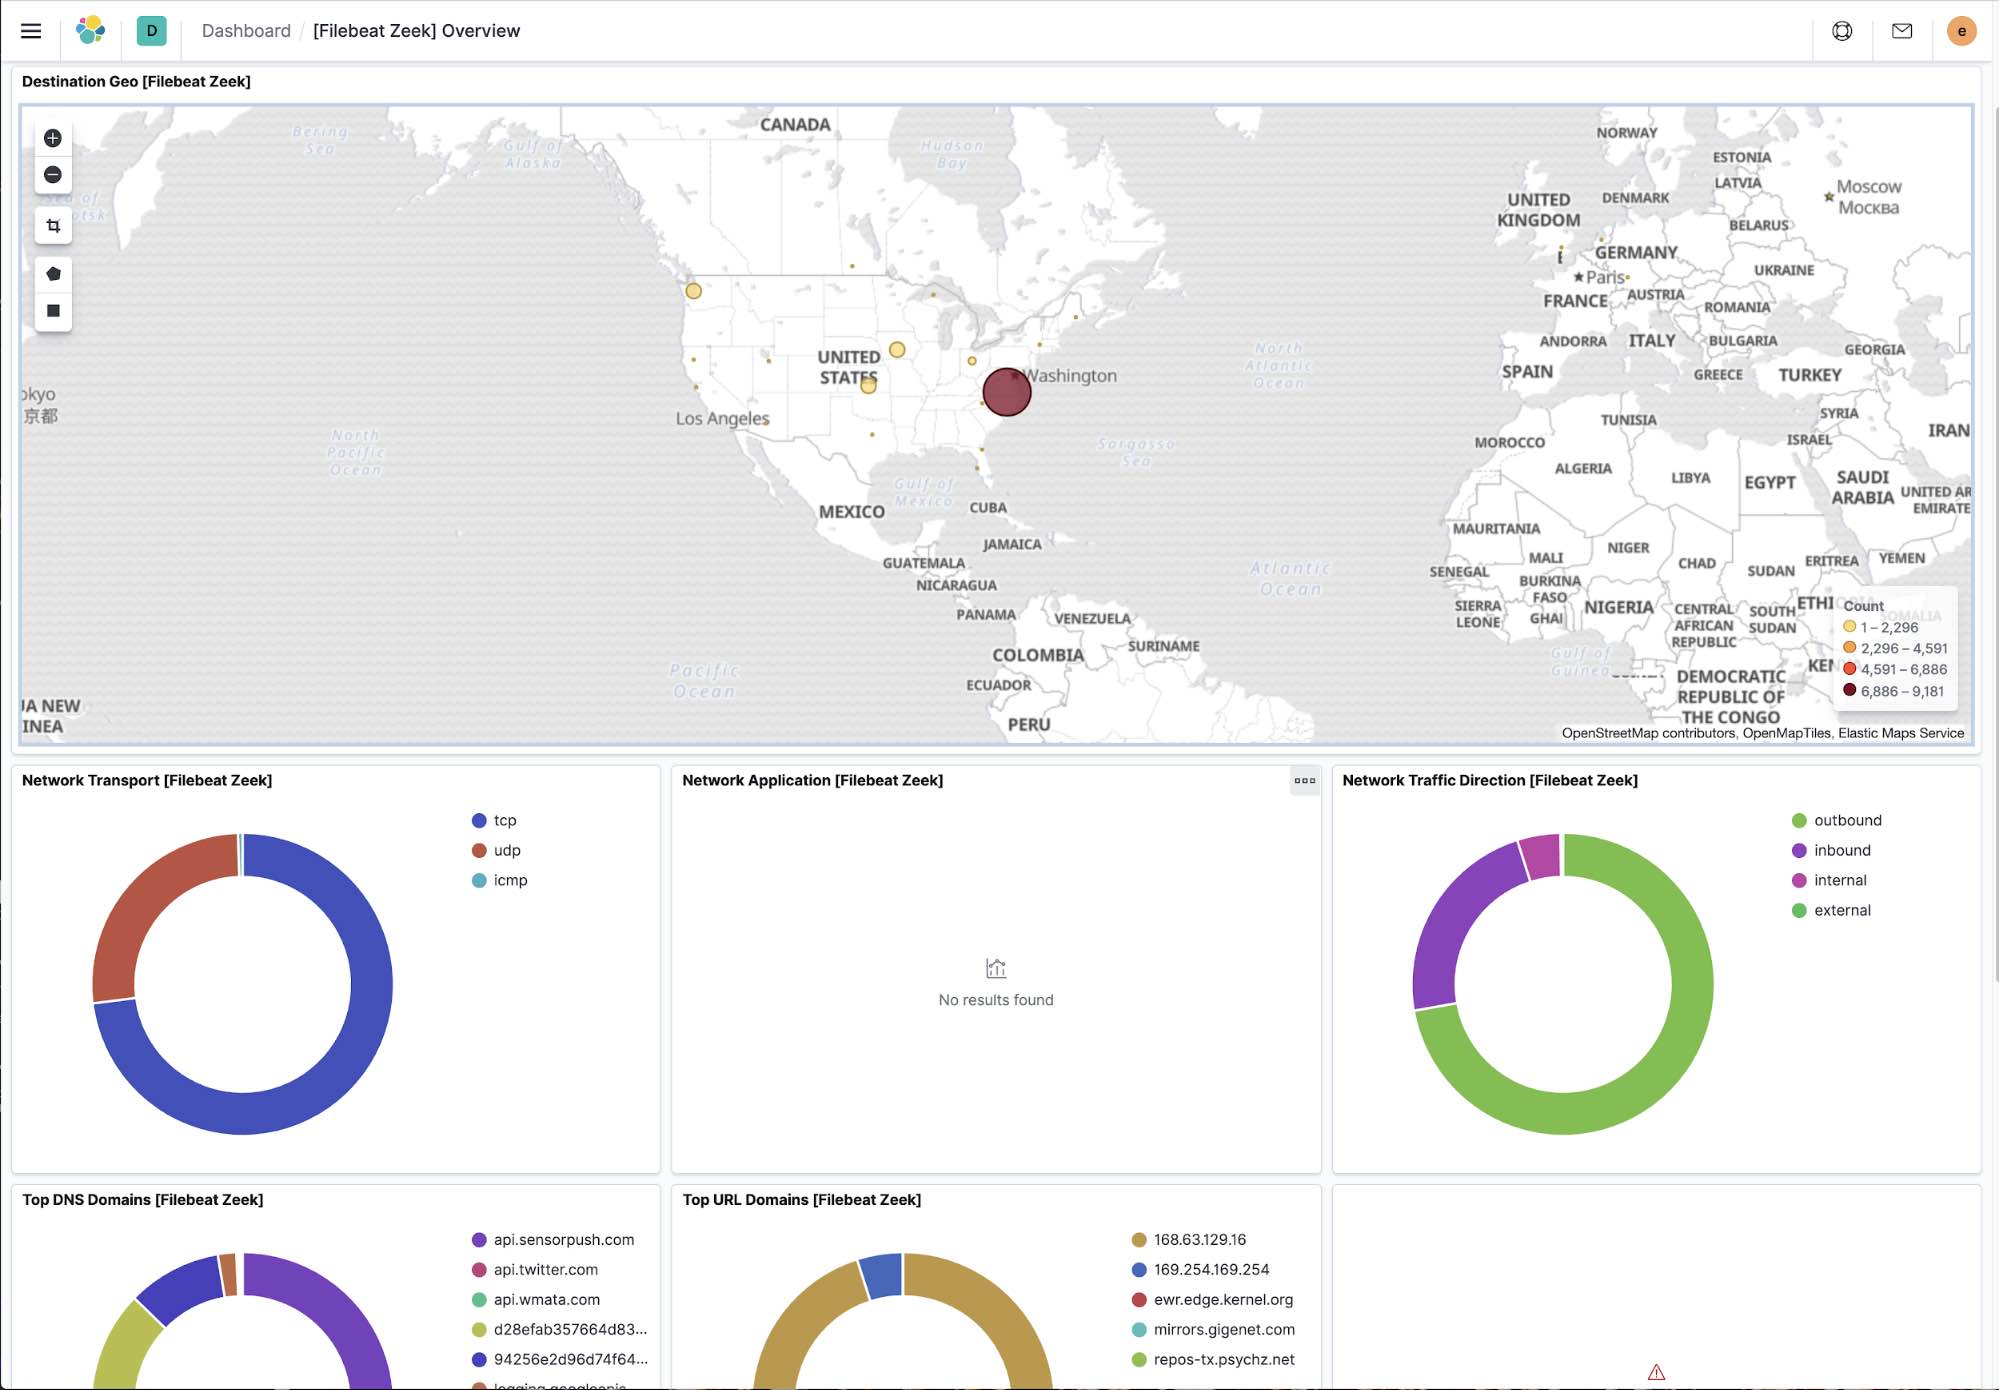
Now bring up Elastic Security and navigate to the Network tab. The map should properly display the “pew pew” lines we were hoping to see.
In addition to the network map, you should also see Zeek data on the Elastic Security overview tab. In this example, you can see that Filebeat has collected over 500,000 Zeek events in the last 24 hours.
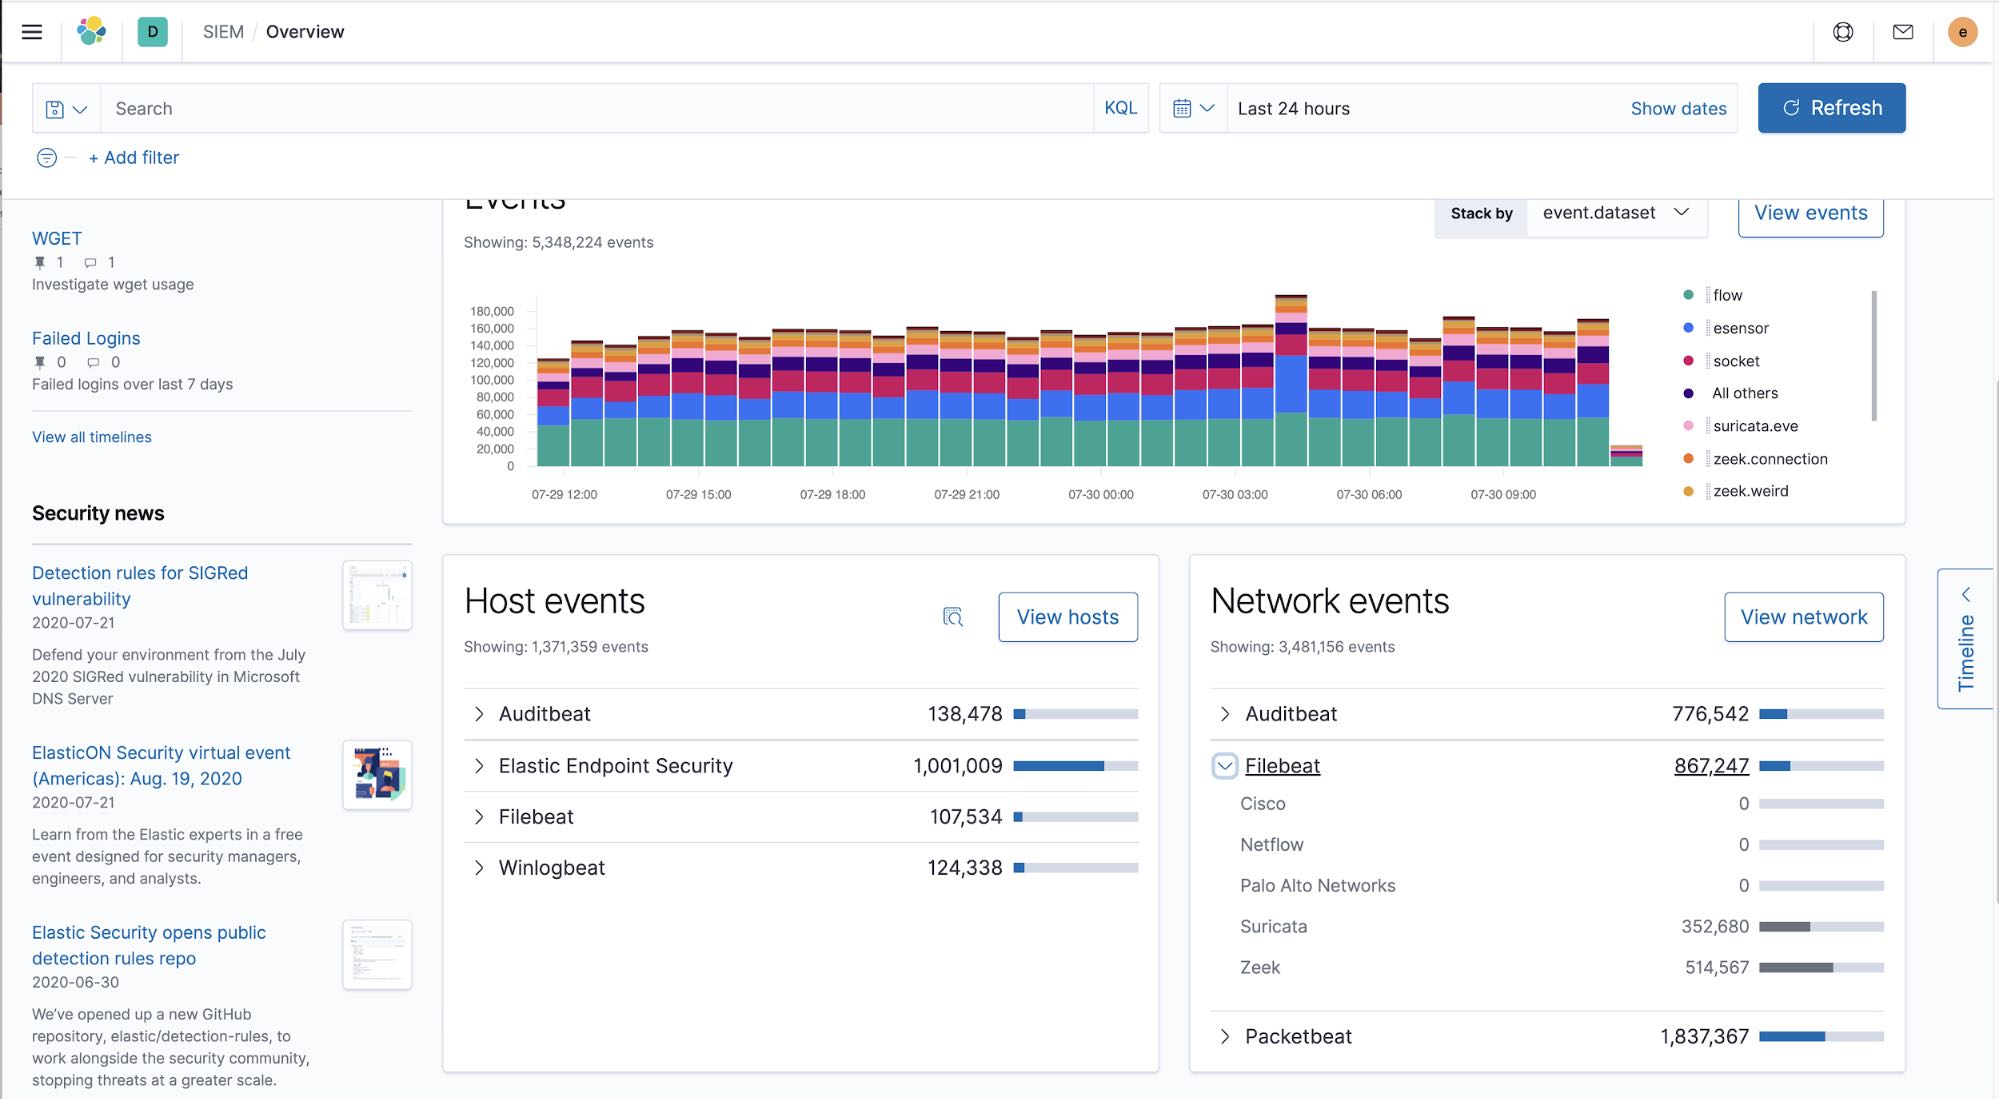
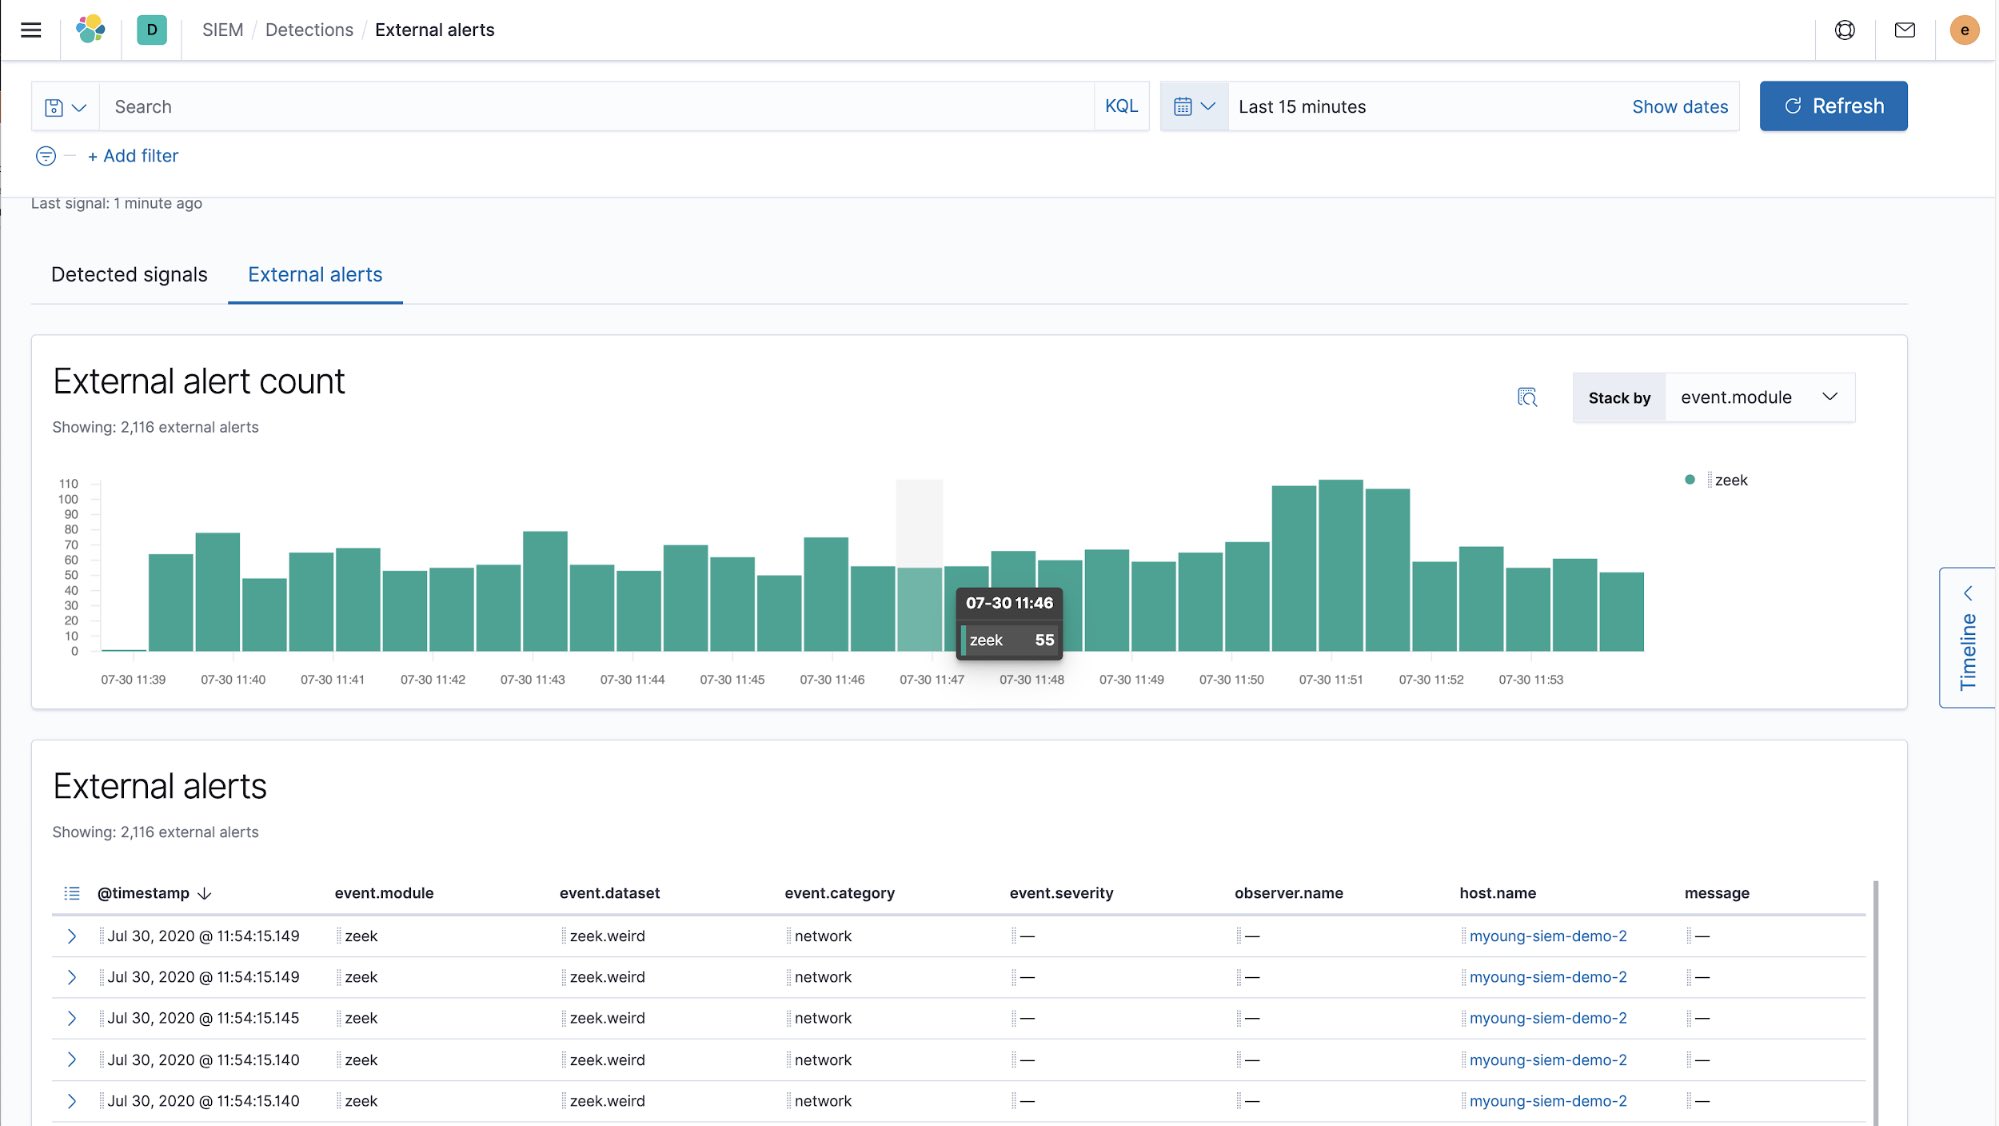
You are also able to see Zeek events appear as external alerts within Elastic Security.
The number of steps required to complete this configuration was relatively small. It should generally take only a few minutes to complete this configuration, reaffirming how easy it is to go from data to dashboard in minutes!
What’s next?
So what are the next steps? Think about other data feeds you may want to incorporate, such as Suricata and host data streams. I encourage you to check out our Getting started with adding a new security data source in Elastic SIEM blog that walks you through adding new security data sources for use in Elastic Security.
Ready for holistic data protection with Elastic Security? Try it free today in Elasticsearch Service on Elastic Cloud.