Agent Builder is available now GA. Get started with an Elastic Cloud Trial, and check out the documentation for Agent Builder here.
In this article, we’ll explore how to combine LangGraph and Elasticsearch to build a human-in-the-loop (HITL) system. This approach allows AI systems to involve users directly in the decision-making process, making interactions more reliable and context-aware. We’ll implement a practical example using a context-driven scenario to demonstrate how LangGraph workflows can integrate with Elasticsearch to retrieve data, handle user input, and produce refined results.
Requirements
- NodeJS version 18 or newer
- OpenAI API Key
- Elasticsearch 8.x+ deployment
Why use LangGraph for production HITL systems
In a previous article, we presented LangGraph and its benefits for building a retrieval-augmented generation (RAG) system using large language models (LLMs) and conditional edges to automatically make decisions and display results. Sometimes we don’t want the system to act autonomously end to end, but we want users to select options and make decisions within the execution loop. This concept is called human in the loop.
Human in the loop
HITL is an AI concept that allows a real person to interact with AI systems to provide more context, evaluate responses, edit responses, ask for more information, and perform other tasks. This is very useful in low-error-tolerance scenarios, such as compliance, decision-making, and content generation, helping improve the reliability of LLM outputs.
It's important to note that the primary purpose of HITL in agentic systems is validation, not blind trust in the agent's approach. HITL interventions should be reactive and triggered only when the system detects missing or ambiguous information. This ensures human involvement remains meaningful and adds value, rather than becoming a mandatory checkpoint that interrupts every workflow unnecessarily.
A common example is when your coding assistant asks you for permission to execute a certain command on the terminal or shows you the step-by-step thinking process for you to approve before starting coding.
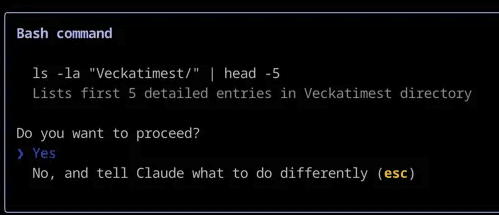
Claude Code using human in the loop to ask you for confirmation before executing a Bash command.
Elasticsearch and LangGraph: How they interact
LangChain allows us to use Elasticsearch as a vector store and to perform queries within LangGraph applications, which is useful to execute full-text or semantic searches, while LangGraph is used to define the specific workflow, tools, and interactions. It also adds HITL as an additional interaction layer with the user.
Practical implementation: Human in the loop
Let’s imagine a case where a lawyer has a question about a case he recently took on. Without the right tools, he would need to manually search through legal articles and precedents, read them in full, and then interpret how they apply to his situation. With LangGraph and Elasticsearch, however, we can build a system that searches a database of legal precedents and generates a case analysis that incorporates the specific details and context provided by the lawyer. You can find the full implementation of this use case in the following repository.
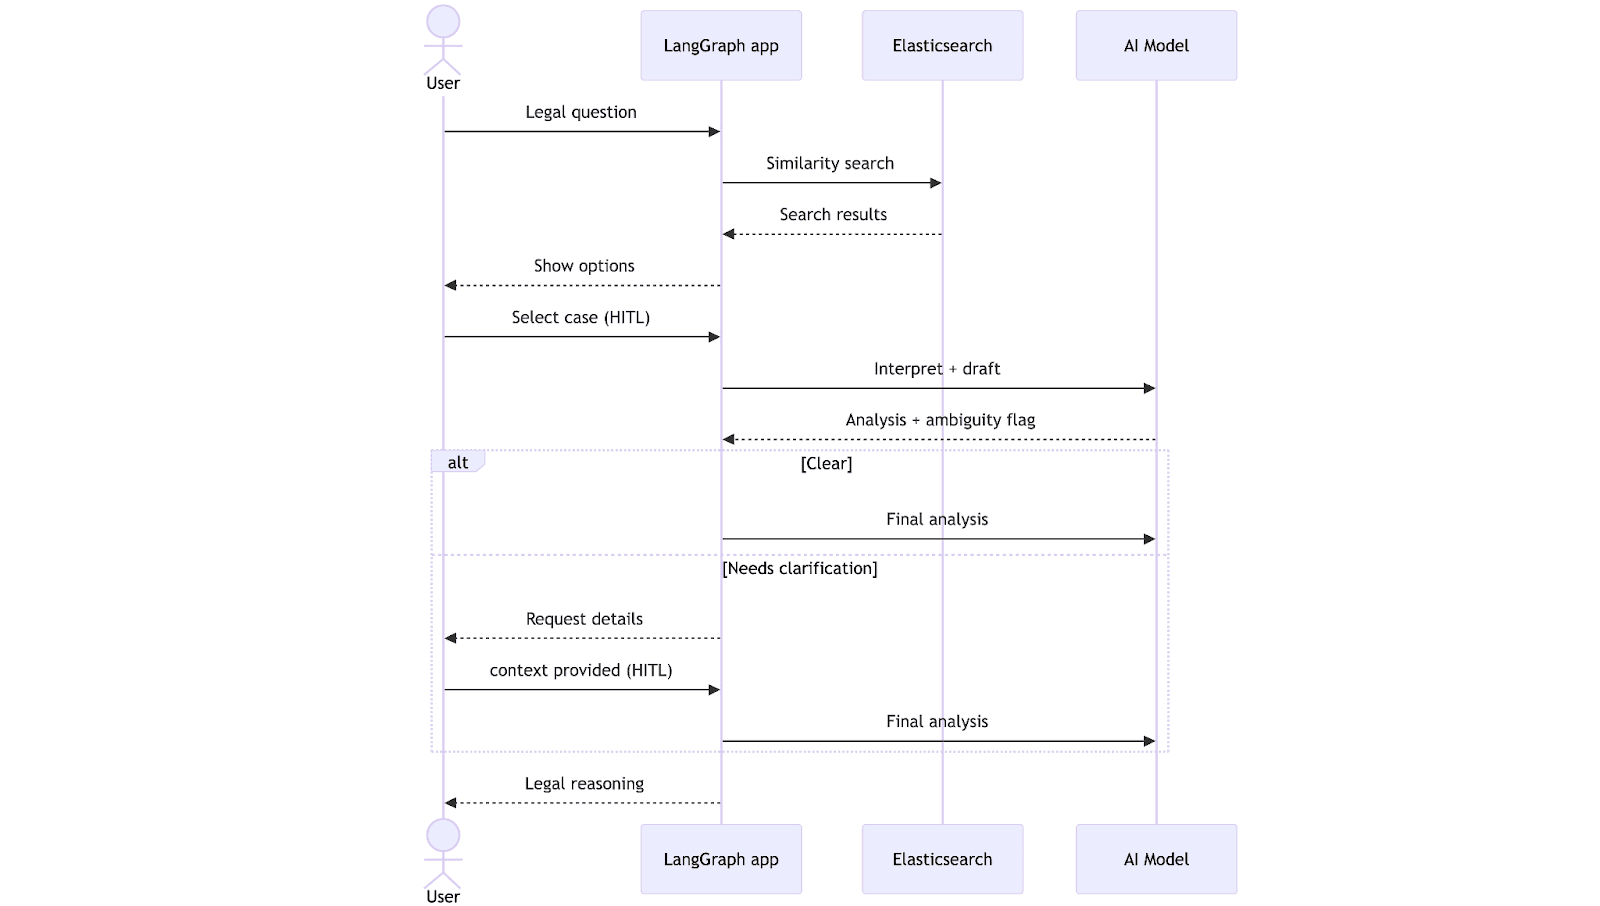
The workflow begins when the lawyer submits a legal question. The system performs a vector search in Elasticsearch, retrieves the most relevant precedents, and presents them for the lawyer to choose from, using natural language. After the selection, the LLM generates a draft analysis and checks whether the information is complete. At this point, the workflow can follow two paths: If everything is clear, it proceeds directly to generate a final analysis; if not, it pauses to request clarification from the lawyer. Once the missing context is provided, the system completes the analysis and returns it, taking into consideration the clarifications.
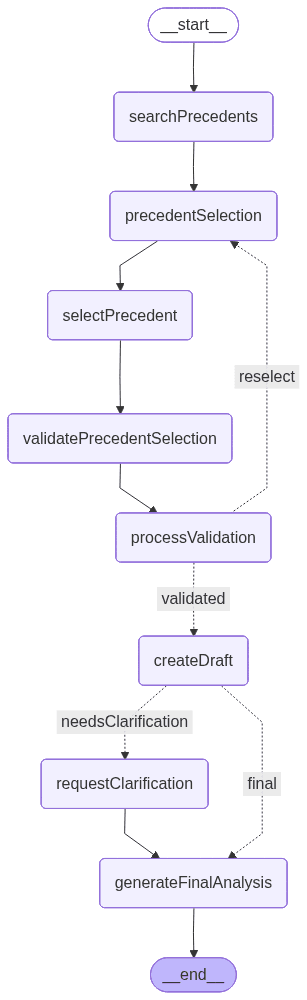
The following is a graph drawn by LangGraph showing how the app will look at the end of the development. Each node represents a tool or functionality:
Dataset
Here’s the dataset that will be used for this example. This dataset contains a collection of legal precedents, each describing a case involving service delays, the court’s reasoning, and the final outcome.
Ingestion and index setup
The index setup and data ingestion logic are defined in the dataIngestion.ts file, where we declare functions to handle the index creation. This setup is compatible with the LangChain vector store interface for Elasticsearch.
Note: The mapping setup is also included in the dataIngestion.ts file.
Install packages and set up environment variables
Let's initialize a Node.js project with default settings:
Now let's install all required dependencies:
- @elastic/elasticsearch: Elasticsearch client for Node.js. Used to connect, create indices, and run queries.
- @langchain/community: Provides integrations for community-supported tools, including the ElasticVectorSearch store.
- @langchain/core: Core building blocks of LangChain, such as chains, prompts, and utilities.
- @langchain/langgraph: Adds graph-based orchestration, allowing workflows with nodes, edges, and state management.
- @langchain/openai: Provides access to OpenAI models (LLMs and embeddings) through LangChain.
- dotenv: Loads environment variables from an .env file into process.env.
- tsx: Is a useful tool to execute typescript code.
Run the following command in the console to install all of them:
Create an .env file to set up the environment variables:
We’ll use TypeScript to write the code because it provides a layer of type safety and a better developer experience. Create a TypeScript file named main.ts, and insert the next section's code.
Package imports
In the main.ts file, we start by importing the required modules and initializing the environment variable configuration. This includes the core LangGraph components, the OpenAI model integrations, and the Elasticsearch client.
We also import the following from the dataIngestion.ts file:
ingestData: A function that creates the index and ingests the data.- Document and DocumentMetadata: Interfaces that define the dataset document structure.
Elasticsearch vector store client, embeddings client, and OpenAI client
This code will initialize the vector store, the embeddings client, and one OpenAI client:
Application workflow state schema will help in the communication between nodes:
In the state object, we’ll pass the following through the nodes: the user’s query, the concepts extracted from it, the legal precedents retrieved, and any ambiguity detected. The state also tracks the precedent selected by the user, the draft analysis generated along the way, and the final analysis once all clarifications are completed.
Nodes

searchPrecedents: This node performs a similarity search in the Elasticsearch vector store based on the user’s input. It retrieves up to five matching documents and prints them so they can be reviewed by the user:

precedentSelection: This node allows the user to select, using natural language, the use case retrieved by the proximity search that best matches the question. At this point, the application interrupts the workflow and waits for user input:
selectPrecedent: This node sends the user input, along with the retrieved documents, to be interpreted so that one of them can be selected. The LLM performs this task by returning a number that represents the document it infers from the user’s natural-language input:
validatePrecedentSelectionThis node introduces an explicit validation step (yes/no) to confirm that the precedent inferred by the system is indeed the one the lawyer intends to use. This step acts as a safeguard against misinterpretation of the user’s intent, ensuring that downstream legal analysis is based on the correct case:
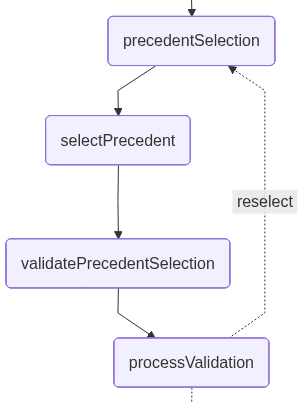
processValidation: This node processes the lawyer’s confirmation response (yes/no) from the previous HITL step and determines the next path in the workflow. It interprets the user input as an explicit approval or rejection of the selected precedent.
If the precedent isn’t confirmed, the node clears the current selection and redirects the graph back to the precedentSelection phase, allowing the user to choose again. If the precedent is confirmed, the workflow continues without modification:
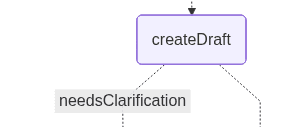
createDraft: This node generates the initial legal analysis based on the precedent selected by the user. It uses an LLM to evaluate how the chosen precedent applies to the lawyer’s question and determines whether the system has enough information to proceed.
If the precedent can be applied directly, the node produces a draft analysis and, taking the right path, jumps to the final node. If the LLM detects ambiguities, such as undefined contract terms, missing timeline details, or unclear conditions, it returns a flag indicating that clarification is required, along with a list of the specific pieces of information that must be provided. In that case, the ambiguity triggers the left path of the graph:
The two paths that the graph can take look like this:
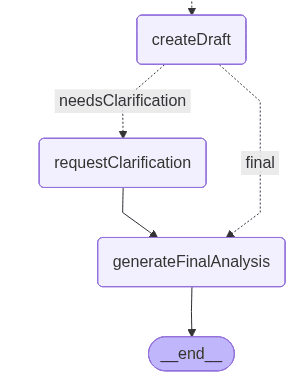
The left path includes an additional node that handles the clarification.
requestClarification: This node triggers the second HITL step when the system identifies that the draft analysis lacks essential context. The workflow is interrupted, and the user is asked to clarify the missing contract details detected by the previous node:
This intervention exemplifies the validation-driven nature of HITL: The system only pauses to request human input when it has identified specific gaps that could compromise the quality of the analysis. As an improvement, in production systems, this node could be enhanced with validation logic to verify that all required information points are addressed before proceeding, ensuring the analysis is built on complete and accurate context.
generateFinalAnalysis: This node produces the final legal analysis by combining the selected precedent with the additional context provided by the user, if needed. Using the clarification gathered in the previous HITL step, the LLM synthesizes the precedent’s reasoning, the contract details supplied by the user, and the conditions that determine whether a breach may have occurred.
The node outputs a complete analysis that integrates legal interpretation and practical recommendations:
Building graph:
In the graph, we can see the createDraft conditional edge, which defines the condition for choosing the “final” path. As shown, the decision now depends on whether the draft analysis detected ambiguity that requires additional clarification.
Put all together to be executed:
Execute the script
With all code allocated, let's execute the main.ts file, writing the following command on terminal:
Once the script is executed, the question “Does a pattern of repeated delays constitute breach even if each individual delay is minor?” will be sent to Elasticsearch to perform a proximity search, and the results retrieved from the index will be displayed. The app detects that multiple relevant precedents match the query, so it pauses execution and asks the user to help disambiguate which legal precedent is most applicable:
The interesting thing about this application is that we can use natural language to choose one option, letting the LLM interpret the user’s input to determine the correct choice. Let’s see what happens if we enter the text “Case H”:
After case selection, the application requests a small validation to confirm that the model selected the correct use case. If you answer “no”, the application returns to the case selection step:
Once confirmed, the application workflow continues drafting the analysis:
The model takes the user’s case selection and integrates it into the workflow, proceeding with the final analysis once enough context has been provided. In this step, the system also makes use of the previously detected ambiguity: The draft analysis highlighted missing contractual details that could meaningfully affect the legal interpretation. These “missing information” items guide the model in determining what clarifications are essential to resolve uncertainty before producing a reliable final opinion.
The user must include in the next input the requested clarifications. Let's try with "Contract requires ‘prompt delivery’ without timelines. 8 delays of 2-4 days over 6 months. $50K in losses from 3 missed client deadlines. Vendor notified but pattern continued.":
This output shows the final stage of the workflow, where the model integrates the selected precedent (Case H) and the lawyer’s clarifications to generate a complete legal analysis. The system explains why the pattern of delays likely constitutes a breach, outlines the factors that support this interpretation, and provides practical recommendations. Overall, the output demonstrates how the HITL clarifications resolve ambiguity and allow the model to produce a well-founded, context-specific legal opinion.
Other real-world scenarios
This kind of application, using Elasticsearch, LangGraph, and HITL, can be useful in other kinds of apps, including:
- Reviewing tools calls before their execution; for example, in financial trading, a human approves buy/sell orders before they’re placed.
- Provide additional parameters when needed; for example, in customer support triage, where a human agent selects the correct issue category when the AI finds multiple possible interpretations of the customer’s problem.
And there are plenty of use cases to discover, where HITL will be a game changer.
Conclusion
With LangGraph and Elasticsearch, we can build agents that make their own decisions and act as linear workflows or follow conditional paths based on context. With human in the loop, the agents can involve the actual user in the decision-making process to fill contextual gaps and request confirmations on systems where fault tolerance is critical.
The key advantage of this approach is that you can filter a large dataset using Elasticsearch capabilities and then use an LLM to select a single document based on the user intent; that is, HITL. The LLM complements Elasticsearch by handling the dynamics of how users express their intent..
This approach keeps the system fast and token efficient, as we’re only sending the LLM what’s needed to make the final decision and not the whole dataset. And at the same time, this keeps it very precise at detecting user intent and iterating until the desired option is picked.
Related Content

July 28, 2026
Your agents have been keeping receipts: turning Elastic Agent Builder's built-in OTel traces into token cost dashboards in Kibana
Your Agent Builder agents already log every LLM call as an OTel trace, and that agent tracing data can power token cost dashboards and budget alerts before one runaway conversation quietly wrecks your month.

July 28, 2026
One prompt, a complete workflow: Elastic's AI agent writes your automation for you
Elastic Workflows takes a plain-text prompt and generates YAML you can inspect, version and run against your Elasticsearch data. Now GA, with human-in-the-loop workflows in Slack, parallel execution, and 10 new connectors.
July 20, 2026
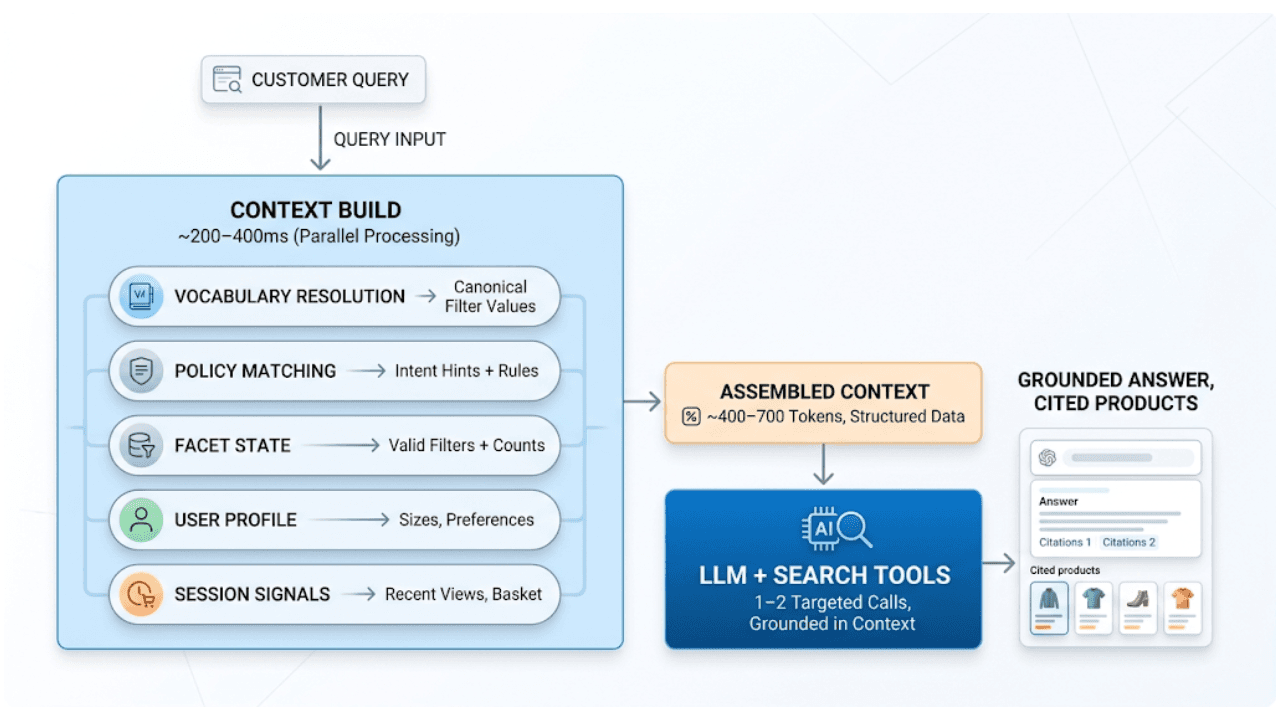
AI shopping agents: Why context comes before the query
AI shopping agents that guess at your vocabulary make expensive mistakes. Pre-computed catalog context stops the guessing before the first tool call.
June 30, 2026
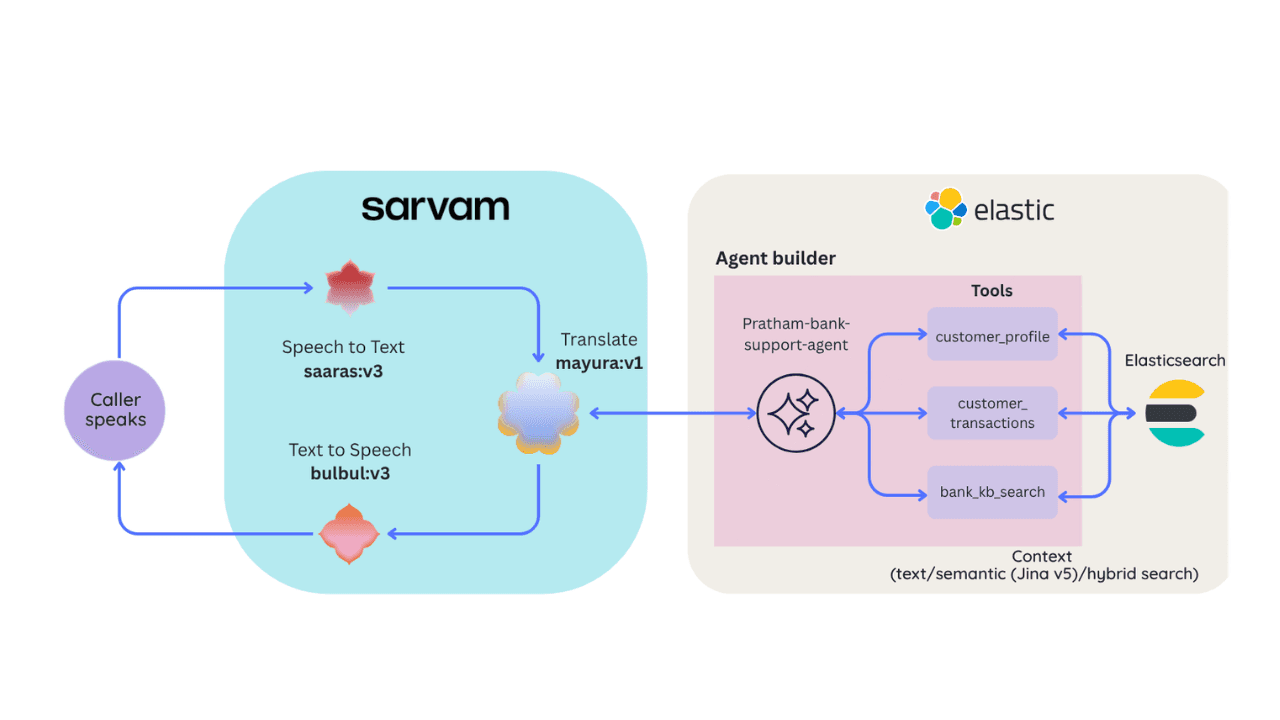
Building a multilingual voice agent with Elastic Agent Builder & Sarvam AI
A working demo combining Sarvam AI speech with Elastic Agent Builder: identity verification, per-customer ES|QL queries, and mid-call language switching across 22 Indian languages without multilingual indices.

July 24, 2026
How Elasticsearch detects multiple change points in time series with 0.99 recall
ES|QL's CHANGE_POINT command finds structural shifts, variance changes and spikes in any metric in ~1ms, without tuning anything per series.