How to Secure your Elasticsearch Clusters using Kerberos
The ferocious three-headed guard dog to secure your data
Elasticsearch 6.4 adds Kerberos authentication support for Platinum subscriptions, which is the first step towards a fully-Kerberized Elastic Stack. Kerberos is a mature technology that allows for secure authentication in distributed systems. Kerberos provides single sign-on access to different services without repeatedly needing to provide a username and password. This blog covers how to configure Elasticsearch to support Kerberos authentication for HTTP traffic.
Deployment Overview
Let’s consider a simple scenario in which a user “Alice” has a single node Elasticsearch cluster. Alice already has a Kerberos realm, demo.local, and she would like to secure the Elasticsearch cluster using Kerberos authentication. The Kerberos authentication server has the authority to authenticate a user, host or service within the realm. The commands used in this article refer to the MIT Kerberos implementation. Please refer to MIT Kerberos documentation for more details.
In this simple scenario, there are three host machines:
- Host-1 (
kdc.demo.local): This is the Kerberos Key Distribution Center (KDC), usually with the responsibilities of the Authentication Server and Ticket Granting Server. - Host-2 (
es.demo.local): This is where the Elasticsearch single node cluster resides. - Host-3 (
client.demo.local): This is where the Elasticsearch client resides.
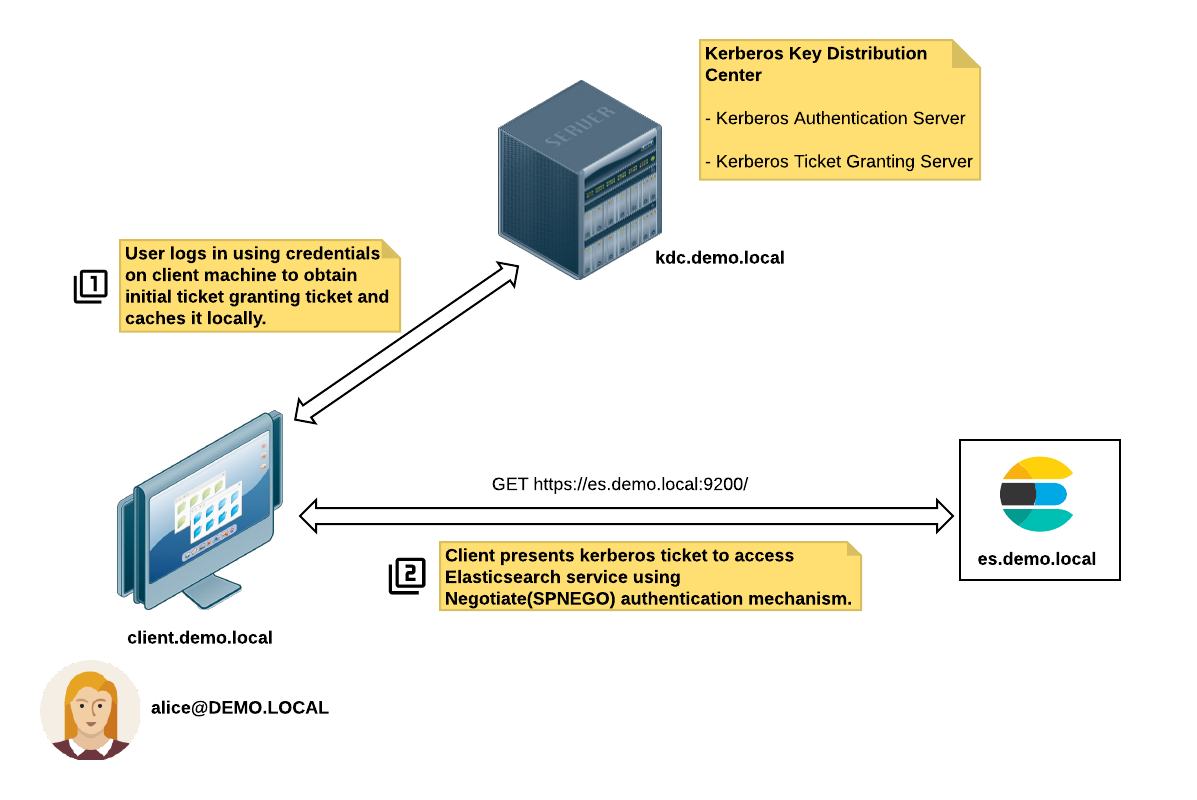
These are the steps for a successful Kerberos authentication:
- Alice (
alice@DEMO.LOCAL) logs on to the client machine (client.demo.local) using her credentials. - The client machine requests a Ticket Granting Ticket (TGT) from the KDC server (
kdc.demo.local). - The client accesses the Elasticsearch service
https://es.demo.local:9200, which in turn returns a response with an HTTP status code ofUnauthorized(401)and includes theWWW-Authenticate: Negotiateheader. - The client requests a session ticket from the Ticket Granting Server (TGS) for the Elasticsearch service principal
HTTP/es.demo.local@DEMO.LOCAL. The Elasticsearch service principal name is derived from the URL used to access the service. - The client presents this ticket to the Elasticsearch service for authentication.
- The Elasticsearch service validates the Kerberos ticket and grants access (if the ticket is valid).
Let's configure Kerberos realm
To enable the Elasticsearch Kerberos realm, you need to have Kerberos infrastructure in place:
- Clocks on all the participating machines in the domain are synchronized
- A working DNS domain for all the participating machines
- A KDC server
- Client nodes installed with Kerberos libraries and configuration files like
kinit,klist
Assuming that you have Kerberos infrastructure in place, the following information is needed:
- Kerberos configuration file
krb5.conf--- This file contains the necessary details of your Kerberos environment such as the default realm, KDC servers, and domain realm mappings. On a Linux system, this file is typically located in the/etcdirectory. The JVM system propertyjava.security.krb5.confshould be set to the full path of this configuration file. The JVM will load this configuration and use it to find required information when required. - Elasticsearch HTTP service
keytab--- A keytab is a file that stores pairs of principals and encryption keys. This is the keytab used by Elasticsearch HTTP service to validate incoming tickets from clients. Usually the service principal name(s) would be in the formatHTTP/es.demo.local@DEMO.LOCALwhere the service class isHTTP,es.demo.localis the fully qualified domain name for the Elasticsearch host andDEMO.LOCALis the Kerberos realm. This file needs to be placed in the Elasticsearch config directory. Make sure to protect this file by having read only file permissions for the user running Elasticsearch as this file contains credentials. The Kerberos system administrator can provide you with the keytab file for your service.
Armed with these two files we can now proceed to configure Kerberos realm in Elasticsearch.
1. Configure JVM Options
First, we need to edit the JVM options file (jvm.options) to configure the JVM system property for the Kerberos configuration file:
# Kerberos configuration
-Djava.security.krb5.conf=/etc/krb5.conf
2. Configure Elasticsearch for Kerberos
Next, we need to add a Kerberos realm in the elasticsearch.yml file:
# Kerberos realm
xpack.security.authc.realms.kerb1:
type: kerberos
    order: 1
    keytab.path: es.keytab
This configures Kerberos realm (kerb1) of type kerberos , realm order 1, and the keytab.path pointing to the Elasticsearch service keytab file (es.keytab) in the configuration directory. For more details, please refer to the configuring kerberos realm documentation.
3. Restart Elasticsearch
Once the configuration is in place, the Elasticsearch node needs to be restarted.
4. Map Kerberos users to roles
Kerberos is an authentication protocol that does not provide authorization details. For authorization, we can use the role mapping API to map users to roles. The following creates a role mapping named kerbrolemapping, where the monitoring_user role is assigned to the user alice@DEMO.LOCAL:
$ curl -u elastic -H "Content-Type: application/json" -XPOST http://es.demo.local:9200/_xpack/security/role_mapping/kerbrolemapping -d

{
    "roles" : [ "monitoring_user" ],
    "enabled": true,
    "rules" : {
    "field" : { "username" : "alice@DEMO.LOCAL" }
    }
}
For more details on role mapping, see our documentation on mapping users and groups to roles.
Voila, it works!
To verify authentication works on the client machine, we need to issue the kinit command to obtain a ticket granting ticket:
$ kinit alice@DEMO.LOCAL
Password for alice@DEMO.LOCAL:
$ klist
Ticket cache: KEYRING:persistent:1000:krb_ccache_NvNtNgS
Default principal: alice@DEMO.LOCAL

Valid starting      Expires             Service principal
31/08/18 02:20:07   01/09/18 02:20:04   krbtgt/DEMO.LOCAL@DEMO.LOCAL
Then invoke curl with the negotiate parameter so that Kerberos authentication over HTTP can be performed:
$ curl --negotiate -u : -XGET http://es.demo.local:9200/
and Voila!
{
    "name" : "Lw7K29R",
    "cluster_name" : "elasticsearch",
    "cluster_uuid" : "qd3iafXORLy0VCfVD_Hp9w",
    "version" : {
    "number" : "6.4.0",
    "build_flavor" : "default",
    "build_type" : "tar",
    "build_hash" : "595516e",
    "build_date" : "2018-08-17T23:18:47.308994Z",
    "build_snapshot" : true,
    "lucene_version" : "7.4.0",
    "minimum_wire_compatibility_version" : "5.6.0",
    "minimum_index_compatibility_version" : "5.0.0"
    },
    "tagline" : "You Know, for Search"
}
Conclusion
As we saw it is easy to configure a Kerberos realm once you have access to the service principal keytab and kerberos configuration file; there are only a few lines of Kerberos realm configuration needed for Elasticsearch. Kerberos support in Elasticsearch is just the beginning and we are going to continue to roll out support for other Elastic Stack components in future updates, stay tuned!