AI agents that perform actions: Automating IT requests with Agent Builder and Workflows
Using Elastic Agent Builder and Workflows to create an AI agent that automatically performs IT actions, such as laptop refreshes.
In the world of IT operations, context switching is the enemy of productivity. For internal teams, simple requests, like a laptop refresh or employee onboarding, often require navigating multiple portals, filling out rigid forms, and manually updating information technology service management (ITSM) tools like ServiceNow.
At a recent DevFest, we demonstrated how to bridge the gap between natural language requests and structured IT workflows. By combining Elastic Agent Builder with Elastic Workflows, we can create AI assistants that not only answer questions but also perform complex actions.
In this post, we’ll dive into the architecture from that talk, specifically looking at how we built an automated "Laptop Refresh" workflow. We’ll demonstrate how to configure an agent that collects user requirements and triggers a server-side automation to interact directly with ServiceNow APIs.
Watch the full breakdown: This post is based on our presentation at Google DevFest. You can watch the full session here to see the demo in action.
The architecture: From chat to fulfillment
Note: The technical implementation described in this document is a streamlined version of the full production environment. While the architecture diagram provided serves as an accurate structural reference for the actual deployment, the accompanying text and code snippets have been simplified for illustrative purposes and may differ from the final, complex configurations used in the live implementation.
The goal is to move from a manual, form-heavy process to a conversational interface. Instead of a user navigating a catalog, they simply tell the AI assistant that they’re due for a laptop upgrade.
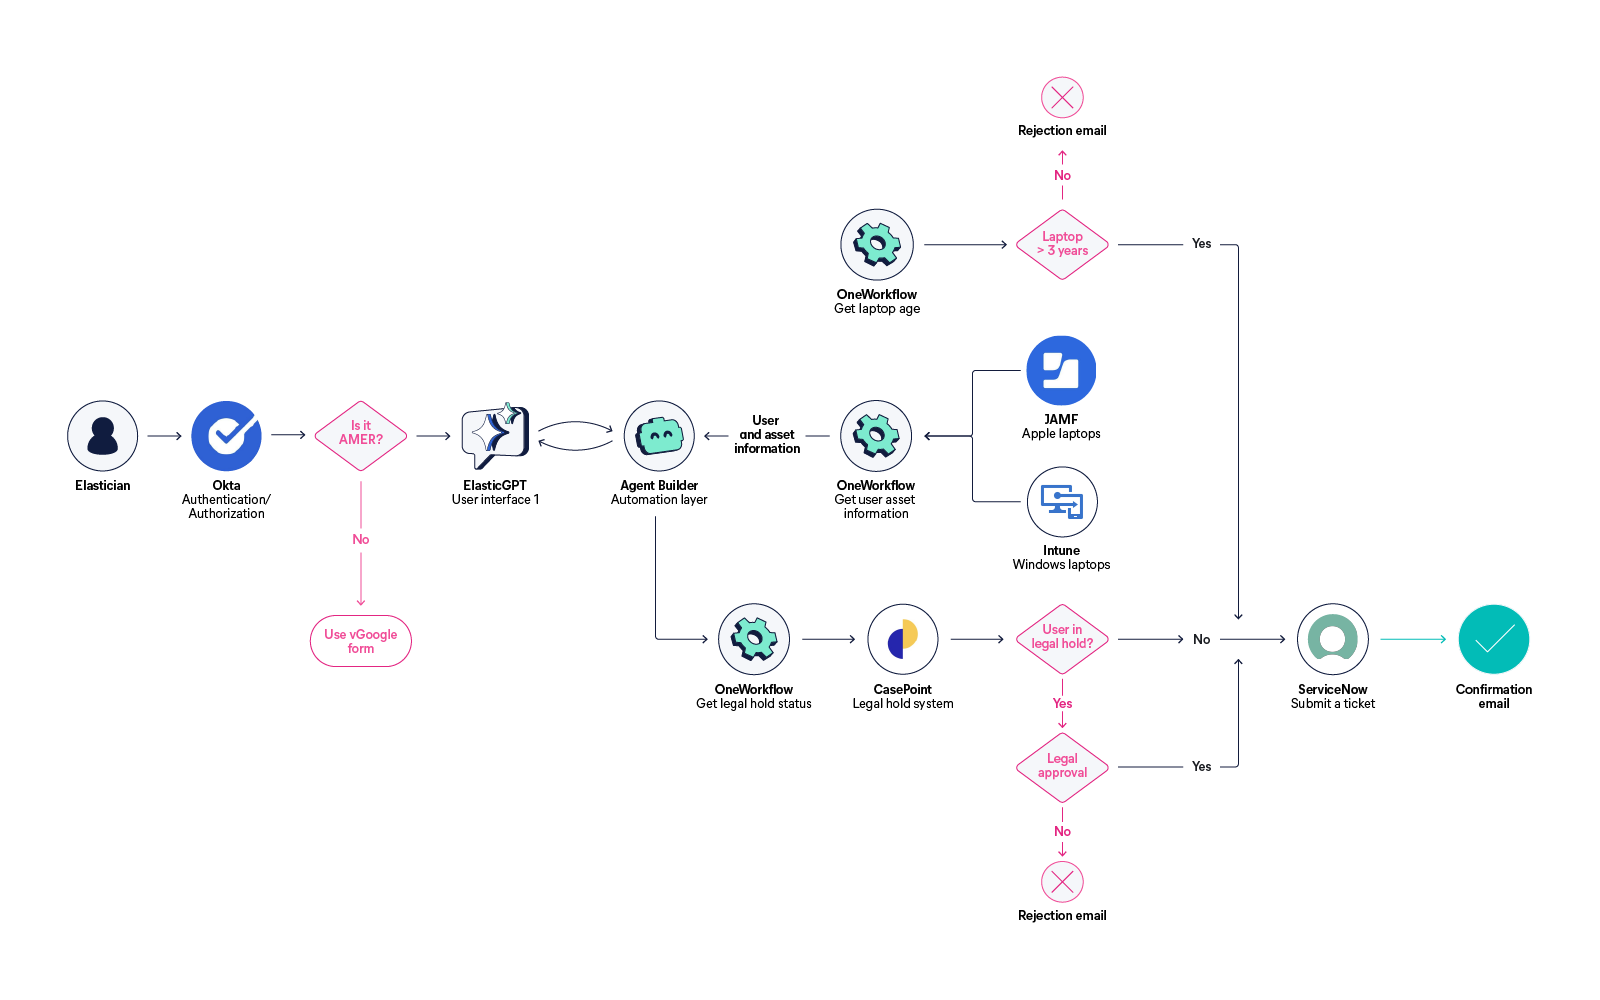
As illustrated above, the flow consists of three distinct layers:
1. Interaction layer (ElasticGPT/Agent Builder): The user interacts naturally with an interface powered by ElasticGPT. Behind the scenes, Agent Builder processes this conversation, handling intent detection and slot filling, to structure the data and orchestrate interactions with other internal systems.
Intent detection
Mechanism: System prompt instruction.
Implementation: The agent is explicitly told its single purpose in the
MISSIONstatement. It doesn’t need to "detect" other intents because it’s scoped strictly to IT provisioning.Code reference:
MISSION: You are a specialized agent designed to collect complete employee onboarding information...
Constraint: If a user asks about non-IT topics (for example, "What is the weather?"), the
MISSIONimplies that the agent should pivot back to data collection or decline, depending on the large language model’s (LLM's) default safety alignment.
Slot filling (data collection)
Mechanism: Phased conversation flow.
Implementation: Instead of asking for all slots at once, the DATA
COLLECTION STRATEGYbreaks the slots into five logical phases. This prevents the context switching fatigue mentioned above.Code reference:
PHASE 1: Personal information, PHASE 2: Employment Details, and so on.
Validation: The prompt enforces immediate validation (for example,
Validate inputs immediately), acting as a gatekeeper before moving to the next slot.
2. Automation layer ( Workflows): Once the agent has the data, it triggers a workflow. This workflow handles the logic: checking device eligibility, enforcing policy (for example, "Is the laptop > 3 years old?"), and making API calls.
3. System of record (ServiceNow): The workflow reads and writes directly to the ITSM tool to maintain audit trails and initiate fulfillment.
Step 1: Configuring the agent
The first step is defining the "brain" of the operation using Agent Builder. We need an agent that acts strictly within the bounds of IT provisioning. We don't want a general chatbot; we want a data collection machine that feels like a helpful colleague.
We achieve this via a robust system prompt. The prompt dictates the agent's operating protocol, enforcing a step-by-step data collection strategy.
Here’s the refined structure of the prompt we used. Notice how it enforces validation and logically groups questions to avoid overwhelming the user:
MISSION: You are a specialized agent designed to collect complete employee onboarding information for IT equipment provisioning.

OPERATING PROTOCOL:
0. On every new chat, send a welcome message, and directly jump to data collection.

1. DATA COLLECTION STRATEGY:
   - Use a step-by-step approach across 5 clear phases
   - Validate inputs immediately

2. CONVERSATION FLOW:
   PHASE 1: Personal Information (Name, Email, Phone)
   PHASE 2: Employment Details (Job Title, Department, Manager)
   PHASE 3: Location & Shipping (Address, Country)
   PHASE 4: Technical Setup (Laptop Type, Accessories)
   PHASE 5: Confirmation

...

6. SUCCESS COMPLETION:
   After all data is collected and validated, invoke the tool "laptoprefreshworkflow" with the JSON payload.
For a sample system prompt or instructions, please refer here.
By explicitly instructing the agent to send the data in a specific JSON format at the end of the conversation, we ensure that the input matches exactly what our automation layer expects.
Step 2: The automation layer (Workflows)
The agent provides the intent and the data, but Workflows provides the muscle.
We define a workflow using a YAML configuration. This workflow acts as the bridge between the AI agent and the ServiceNow REST APIs. It handles authentication, data retrieval, and the ordering process.
Below is the workflow definition. We’ve refined the code to use secure variable handling for credentials rather than hardcoding them.
Workflow inputs
First, we define the inputs the workflow expects to receive from the agent:
YAML
version: "1"
name: Submit Laptop Refresh Request
enabled: true
triggers:
  - type: manual
inputs:
  - name: userid
    type: string
  - name: preferred-address
    type: string
  - name: laptop-choice
    default: Macbook latest
    type: string
  - name: laptop-keep-or-return
    default: return
    type: string
Interacting with ServiceNow
The workflow executes a series of HTTP steps. Crucially, we first need to identify the user's current asset to link the refresh request correctly.
1. Fetching computer data
We query the cmdb_ci_computer table in ServiceNow to find the asset currently assigned to the user.
YAML
steps:
  - name: snow_get_computer_data
    type: http
    with:
      url: https://elasticdev.service-now.com/api/now/table/ci_computer?assigned_to={{ inputs.userid }}
      method: GET
      headers:
        Accept: application/json
        Content-Type: application/json
        # Best Practice: Use secrets for authorization headers
        Authorization: Basic {{ secrets.servicenow_creds }}
      timeout: 30s
2. Adding to cart
Once we have the asset details and the user's preferences, we don't just create a generic ticket. We use the ServiceNow Service Catalog API to programmatically add the specific item to a cart.
YAML
  - name: snow_post_add_item_to_cart
    type: http
    with:
      url: https://elasticdev.service-now.com/example
      method: POST
      headers:
        Accept: application/json
        Content-Type: application/json
        Authorization: Basic {{ secrets.servicenow_creds }}
      body: |
        {
            "sysparm_quantity": 1,
            "variables": {
              "caller_id_common": "{{ inputs.userid }}",
              "current_device": "{{ steps.snow_get_asset.output.data.result.sys_id }}",
              "laptop_keep_or_return": "{{ inputs.laptop-keep-or-return }}",
              "choose_your_laptop": "{{ inputs.laptop-choice }}",
              "shipping_address": "{{ inputs.preferred-address }}"
            }
        }
3. Indexing the transaction
Finally, we want to keep a record of this transaction within Elasticsearch for analytics and future reference. We use the elasticsearch.index step to store the request details immediately after submission.
YAML

  - name: index-submission-record
    type: elasticsearch.index
    with:
      index: laptop-refresh-submission-data
      id: "{{ steps.snow_post_submit_order.output.data.result.request_id }}"
      document:
        request-id: "{{ steps.snow_post_submit_order.output.data.result.request_id }}"
        user-id: "{{ inputs.userid }}"
        configuration-item: "{{ steps.snow_get_computer_data.output.data.result[0].sys_id }}"
        laptop-choice: "{{ inputs.laptop-choice }}"
        timestamp: "{{ steps.snow_post_submit_order.output.data.result.sys_created_on }}"
For detailed workflow yaml, please refer here.
The result
By stitching these components together, we create a seamless experience:
The user chats naturally with the agent to provide details.
The agent structures this unstructured conversation into a JSON object.
Workflow receives the JSON, validates the user's current hardware via ServiceNow, creates the order, and indexes the result.
This approach reduces a process that traditionally took users 5–10 minutes of form navigation into a quick conversation, while ensuring that IT operations retains full visibility and control.
Video demo:

Ready to build?
This pattern, using an agent for the interface and using Workflows for the execution, can be applied to almost any ITSM task, from password resets to software provisioning.
If you’re interested in trying this out, be sure to watch the DevFest talk for the full context, and check out the Elastic AI Agent Builder documentation to get started building your own agents today.
Related Content