TLS for the Elastic Stack: Elasticsearch, Kibana, Beats, and Logstash
Editor's Note (August 3, 2021): This post uses deprecated features. Please reference the map custom regions with reverse geocoding documentation for current instructions.
Transport Layer Security (TLS) can be deployed across the entire Elastic Stack, allowing for encrypted communications so you can rest easy at night knowing that the data transmitted over your networks is secured. It may not seem all that necessary, but then again consider the impossible situation of making sure that no developer starts logging sensitive data into the logs that you are shipping to a central location. Sensitive data is what most would believe to be passwords, customer's personal information, etc. However, this definition of sensitive data is far too narrow for the era of cyber security that we live in. Imagine a compromised router that allows an attacker to peer into the raw unencrypted data on the network, where seeing the logging data could provide the software and operating system versions of all the software being used on a network. This provides every detail necessary for the attacker to look up known software vulnerabilities that could allow the attacker to gain direct access to these servers. The security of an entire organization hinges on the weakest link, and in today's world of cybersecurity attacks - don't let your logging / search system be that weakest link.
6.x will require Elasticsearch TLS node to node communication when using X-Pack security for a multi node cluster. Read here for more details.
This blog will guide you through the process of setting up and configuring TLS to keep all data private from Filebeat -> Logstash -> Elasticsearch -> Kibana -> your web browser. You'll need a system that has some memory available in order to run each of these, as you will be setting up two Elasticsearch nodes (1gb memory per node by default, starting the second node is optional if you need to conserve some memory), one Logstash server (1gb memory by default), one Kibana server (~200mb memory), and one Filebeat (~10mb). You will likely need 6gb total system memory, but 8gb would be ideal since I have no way of telling what other software or memory hungry browser (with 50 tabs open) you are running.
Understanding TLS / Certs
First we should start with some of the fundamentals, by discussing what a certificate is and how it will be used. A certificate holds the public information, including the public key, that helps encrypt data between two parties; where only the party with the matched private key could decrypt data from an initial handshake. Without wading too far into the details, the public and private key represent a hard-to-compute but easy-to-verify computational puzzle, where the private key holds very large numbers that allow for easily solving this computational puzzle. The hard-to-compute means the math necessary to try to solve this computational puzzle, in modern public key cryptography, would take thousands of years with current compute resources. The private key holds the source numbers necessary to easily verify the puzzle, and the certificate is generated from the private key to contain the necessary inputs to this math puzzle. Additionally, the certificate will contain a form of identities, known as the Common Name (CN). Throughout the examples to follow, I will use a server's DNS name for the identity. All public parts of the puzzle and the identity of a certificate are first created through generating a Certificate Signing Request (CSR). The CSR allows to request for identity to be inserted and signed by an authority, at which point the certificate is created.
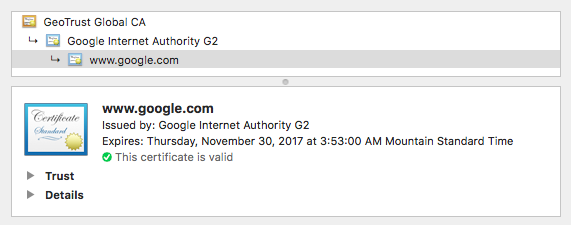
The certification / verification of the certificate is important, since the handshake that will take place between the client and server requires the client trusting the signing authority of the server's certificate. The client must either trust the server's certificate directly or it should be signed by an authority that the client trusts. For example, your OS / browser has a preset list of certificates that are "publicly" trusted. When you visit google.com, this certificate is signed by a chain of authorities that can create a path back to the trusted cert for your client OS / browser. Think of it like a notary for signing legal documents, the notary must be certified somehow in order to be recognized.
A certificate authority, also known as a root authority, in the simplest form is self signed - meaning the certificate generated was signed by using its own private key. Publicly trusted authorities have very strict standards and auditing practices to ensure that a certificate is not created without validating proper identity ownership. If you wanted to generate a certificate for http://elastic.example, you would need to prove ownership of this domain name / identity first.
Inside a certificate, the Subject contains a Distinguished Name (DN) which at minimum will have the Common Name (CN). The CN can be set to anything, and the Subject Alternative Name (SAN) should be used to specify the proper identity such as DNS name and/or IP addresses. The SAN can also contain multiple DNS and/or IP addresses. This identity will be used for client verification such that the server's certificate properly matches the identity that is present in the certificate. The client will verify this by resolving the DNS name while trying to establish a new connection.
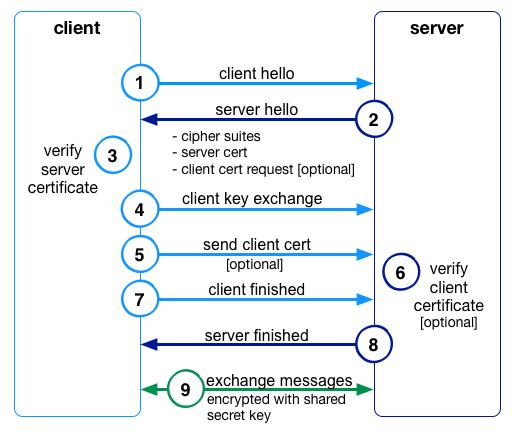
You might at this point wonder how all the communications could be encrypted when only the server would have the information to decrypt. This is where the TLS handshake comes in, which is best explained with the picture below. To start this handshake, the client must make a request to connect to the server (1). The server then responds with a certificate (2), which the client is then responsible for validating / trusting the server's identity as mentioned earlier (3). Optionally, the server can also ask for a client certificate if you wanted the additional security where the server must also trust the client (4). Using the public key of the server the client creates a new symmetric key, the shared secret key, which only the client has knowledge of at this point. It encrypts this shared key using the public key of the server, which allows the server to receive this new shared key and decrypt (5). At this point the shared key is now only known to the client and server (7)(8), and can be used for encrypting and keeping the traffic private between the two parties (9).
Now, let's put this knowledge into practice by setting up the Elastic Stack with TLS encrypted communication between each product. This setup will not cover all the features and settings, just the minimum to apply TLS encryption.
Setup & Download
To make things easier, we should setup a directory to be used throughout this blog. I'll be storing this in my user's home directory. The -p option creates the tmp folder if it does not already exist in your home directory.
$ mkdir -p ~/tmp/cert_blog
Beats, Logstash, and Kibana have TLS support in the open source product. Elasticsearch requires our commercial plugin, X-Pack, for TLS and other security features. X-Pack security provides authentication and authorization control to prevent access to indices, documents, and even fields within documents. X-Pack also provides alerting, monitoring, reporting, graph exploration, machine learning, and support! See here for more details.
Download the latest preview release for the products below. Select the zip or tar file format, and place these in the ~/tmp/cert_blog folder we created:
(You can setup TLS with the 5.x Elastic Stack as well. The only major change in the instructions that follow is that you will not generate passwords for the built in elasticsearch user, since these shipped with default passwords set)
Extract each product into this same folder. From here forward when I refer to the {product} folder, this will be the extracted product folder location. For example, the elasticsearch folder for me is ~/tmp/cert_blog/elasticsearch-6.0.0-beta2
Elastic certgen tool
One amazing feature that X-Pack adds is a certgen tool. Openssl can be used to generate and sign certificates; but it can be hard for even experienced users to use, and can lead to countless hours of frustration trying to insert common items like a Subject Alternative Name (SAN). certgen makes it easy to generate the necessary certificates and even a signing authority. It can even be used to create CSRs if you intend to have your certs signed by a public or corporate / internal signing authority.
To access the certgen tool, we must first install Elasticsearch X-Pack.
(installing will prompt to allow java security manager modifications, answer yes to these)
$ cd ~/tmp/cert_blog/elasticsearch-6.0.0-beta2
$ bin/elasticsearch-plugin install x-pack
Create a Certificate Authority / Signing Authority
Encrypting a private key with a password is a good practice, especially if it will be used to sign other certificates. Let's create this password that will be used for encrypting the certificate authority's private key. You could use whatever you would like here or use something like the command below to generate a strong password. Be sure to safely save whatever password you choose, as it is impossible to recover and you will need it in order to sign certificates.
$ openssl rand -base64 32
 <long complex password>
Go into the elasticsearch folder
$ cd ~/tmp/cert_blog/elasticsearch-6.0.0-beta2
In this next step, we will just create the root authority that we will use for signing other certificates. Use whatever name you would like (but retain the CN= part). In the example below the generated public certificate will have a lifespan of 10 years, and will generate a large private key with 4096 bits. When prompted, you will need to enter the password that you selected or generated. Hit enter to skip the subsequent instance name questions, since we don't want to create any more server certificates.
$ bin/x-pack/certgen --dn 'CN=MyExample Global CA' --pass --days 3650 --keysize 4096 --out ~/tmp/cert_blog/MyExample_Global_CA.zip
...
Enter password for CA private key:
Enter instance name:
Would you like to specify another instance? Press 'y' to continue entering instance information:
At some point, you will want to check out the certgen docs for all possible settings and usage, but I'll provide all the commands necessary to get through this exercise.
You should now have a zip file that contains your root certificate authority's private key and public certificate. Unzip this file, but keep in mind we will only be distributing the ca/ca.crt file. The ca/ca.key file should be stored away for safe keeping (along with the password from earlier that is needed to decrypt it).
$ cd ~/tmp/cert_blog
$ unzip MyExample_Global_CA.zip
Archive:  MyExample_Global_CA.zip
   creating: ca/
  inflating: ca/ca.crt
  inflating: ca/ca.key
We can inspect the details of this new certificate with openssl. You'll notice the Issuer = Subject, which indicates the certificate is self signed. The extensions section can contain information like the SAN or fingerprints that help identify the current or signing certificate. The basic constraint is important, CA:TRUE shows that it can be used to sign other certificates.
$ openssl x509 -noout -text -in ca/ca.crt
...
        Issuer: CN=MyExample Global CA
        Validity
            Not Before: Sep 24 19:42:40 2017 GMT
            Not After : Sep 22 19:42:40 2027 GMT
        Subject: CN=MyExample Global CA
...
        X509v3 extensions:
            X509v3 Subject Key Identifier:
                8F:6C:8B:20:B3:7A:D9:18:31:9B:99:CC:8C:93:25:98:75:F4:4B:60
            X509v3 Authority Key Identifier:
                keyid:8F:6C:8B:20:B3:7A:D9:18:31:9B:99:CC:8C:93:25:98:75:F4:4B:60
                DirName:/CN=MyExample Global CA
                serial:0C:0B:14:99:98:D6:7B:64:0D:00:03:64:B8:1F:7D:F7:9F:BF:6F:30
            X509v3 Basic Constraints: critical
                CA:TRUE
...
Generate the server certificates
Create a new file ~/tmp/cert_blog/certgen_example.yml
This example will generate the public cert and private key for two elasticsearch nodes, kibana, and logstash; and usage of these certificates will require the DNS name to be properly set up. For testing purposes, we can edit /etc/hosts so these DNS names will be valid.
instances:
  - name: 'node1'
    dns: [ 'node1.local' ]
  - name: "node2"
    dns: [ 'node2.local' ]
  - name: 'my-kibana'
    dns: [ 'kibana.local' ]
  - name: 'logstash'
    dns: [ 'logstash.local' ]
In the next command we will use the yaml file created above and generate certificates for each instance that will be valid for 3 years (use whatever period you are comfortable with, just keep in mind that when a certificate expires - it will need to be replaced). We must specify the cert and key for the signing / root authority that we created earlier, and the --pass option will prompt for the password necessary to decrypt the signing authority's private key.
$ cd ~/tmp/cert_blog/elasticsearch-6.0.0-beta2
$ bin/x-pack/certgen --days 1095 --cert ~/tmp/cert_blog/ca/ca.crt --key ~/tmp/cert_blog/ca/ca.key --pass --in ~/tmp/cert_blog/certgen_example.yml --out ~/tmp/cert_blog/certs.zip
Unzip the created file
$ cd ~/tmp/cert_blog
$ unzip certs.zip -d ./certs
Archive:  certs.zip
   creating: ./certs/node1/
  inflating: ./certs/node1/node1.crt
  inflating: ./certs/node1/node1.key
   creating: ./certs/node2/
  inflating: ./certs/node2/node2.crt
  inflating: ./certs/node2/node2.key
   creating: ./certs/my-kibana/
  inflating: ./certs/my-kibana/my-kibana.crt
  inflating: ./certs/my-kibana/my-kibana.key
   creating: ./certs/logstash/
  inflating: ./certs/logstash/logstash.crt
  inflating: ./certs/logstash/logstash.key
Inspecting the certificate for node1, you will notice the issuer / signing authority is CN=MyExample Global CA. The Subject = the name we provided in the yaml, and the SAN has the proper DNS name. We are all set.
$ openssl x509 -text -noout -in certs/node1/node1.crt
...
        Issuer: CN=MyExample Global CA
        Validity
            Not Before: Sep 24 21:42:02 2017 GMT
            Not After : Sep 23 21:42:02 2020 GMT
        Subject: CN=node1
...
        X509v3 extensions:
            X509v3 Subject Key Identifier:
                A0:26:83:23:A8:C6:FB:02:F3:7F:C9:BC:1A:C9:16:C9:04:62:3E:DE
            X509v3 Authority Key Identifier:
                keyid:8F:6C:8B:20:B3:7A:D9:18:31:9B:99:CC:8C:93:25:98:75:F4:4B:60
                DirName:/CN=MyExample Global CA
                serial:0C:0B:14:99:98:D6:7B:64:0D:00:03:64:B8:1F:7D:F7:9F:BF:6F:30
            X509v3 Subject Alternative Name:
                DNS:node1.local
            X509v3 Basic Constraints:
                CA:FALSE
...
To test with these certificates, we need the DNS names to resolve. We can modify /etc/hosts for testing, but in production you should have proper DNS set up. The line for 127.0.0.1 / localhost in /etc/hosts should look something like this:
127.0.0.1 localhost node1.local node2.local kibana.local logstash.local
(Remember to remove these additions when you are done testing)
Elasticsearch TLS setup
Create a cert directory in the elasticsearch config folder
$ cd ~/tmp/cert_blog/elasticsearch-6.0.0-beta2
$ mkdir config/certs
We will be starting two nodes, so we need to create a second config folder
$ cp -r config config2
Copy in the ca.crt, and the node's private key and public cert.
$ cp ~/tmp/cert_blog/ca/ca.crt ~/tmp/cert_blog/certs/node1/* config/certs
$ cp ~/tmp/cert_blog/ca/ca.crt ~/tmp/cert_blog/certs/node2/* config2/certs
Configuring the elasticsearch nodes:
edit config/elasticsearch.yml
node.name: node1
network.host: node1.local
xpack.ssl.key: certs/node1.key
xpack.ssl.certificate: certs/node1.crt
xpack.ssl.certificate_authorities: certs/ca.crt
xpack.security.transport.ssl.enabled: true
xpack.security.http.ssl.enabled: true
discovery.zen.ping.unicast.hosts: [ 'node1.local', 'node2.local']
node.max_local_storage_nodes: 2
edit config2/elasticsearch.yml
node.name: node2
network.host: node2.local
xpack.ssl.key: certs/node2.key
xpack.ssl.certificate: certs/node2.crt
xpack.ssl.certificate_authorities: certs/ca.crt
xpack.security.transport.ssl.enabled: true
xpack.security.http.ssl.enabled: true
discovery.zen.ping.unicast.hosts: [ 'node1.local', 'node2.local']
node.max_local_storage_nodes: 2
You will notice in the config above that network.host is set to the DNS name. network.host is a shortcut for setting both network.bind_host and network.publish_host. The bind_host controls which interfaces elasticsearch will be available on, and the publish_host is how we tell other nodes they should communicate with this node. This is important, since we want other nodes to connect using the proper DNS name set in the certificate, or they will reject the connection due to an identity mismatch. Additionally, discovery uses DNS names, since this list is used by the node at the initial startup phase for contacting one of these hosts for discovering / joining the cluster. When this new node can join, the discovery node returns the list of all the nodes currently in the cluster (which is where the publish_host comes into play).
Startup the first node
$ ES_PATH_CONF=config ./bin/elasticsearch
Open a new terminal window, go to the elasticsearch folder, and start the second node
$ ES_PATH_CONF=config2 ./bin/elasticsearch
We need to configure passwords for the various system accounts. Make sure both nodes start properly before continuing. You should see something similar to this log line:
[2017-09-24T21:13:43,482][INFO ][o.e.n.Node ] [node2] started
With a new terminal window, go to the elasticsearch folder
$ cd ~/tmp/cert_blog/elasticsearch-6.0.0-beta2
$ bin/x-pack/setup-passwords auto -u "https://node1.local:9200"
Initiating the setup of reserved user [elastic, kibana, logstash_system]  passwords.
The passwords will be randomly generated and printed to the console.
Please confirm that you would like to continue [y/N]y
Changed password for user elastic
PASSWORD elastic = #q^4uL*tIO@Sk~%iPwg*
Changed password for user kibana
PASSWORD kibana = %uhWtQCN-9GNa52vot_h
Changed password for user logstash_system
PASSWORD logstash_system = #3vs5PZDBrWTIVnCgOCh
Save these passwords!
Now let's see that both nodes are listed in the cluster correctly (hint: add ?v to the end of the URL to get the column names, see _cat API docs)
$ curl --cacert ~/tmp/cert_blog/ca/ca.crt -u elastic 'https://node1.local:9200/_cat/nodes'
127.0.0.1 42 100 14 1.91   mdi * node1
127.0.0.1 39 100 14 1.91   mdi - node2
Let's send that request to the second node that should be running on port 9201.
curl --cacert ~/tmp/cert_blog/ca/ca.crt -u elastic 'https://node1.local:9201/_cat/nodes'
curl: (51) SSL: certificate verification failed (result: 5)
Ah, we only changed the port and not the DNS name. The curl client did not allow this since the server's identity did not match the certificate it was presenting. Let's correct that and try again using the correct DNS name for the second node.
$ curl --cacert ~/tmp/cert_blog/ca/ca.crt -u elastic 'https://node2.local:9201/_cat/nodes'
127.0.0.1 20 100 24 2.04   mdi - node2
127.0.0.1 43 100 24 2.04   mdi * node1
We now have a working two node elasticsearch cluster. Keep in mind that two nodes is great for some quick testing, but for anything beyond a quick test it is imperative to properly set the minimum_master_node setting to 2 when using two nodes.
Kibana TLS setup
From the kibana folder, install x-pack
$ bin/kibana-plugin install x-pack
This step will take a couple of minutes. Go grab a drink, you earned it.
Next, create a cert folder in the config directory and copy in the certs.
$ mkdir config/certs
$ cp ~/tmp/cert_blog/ca/ca.crt ~/tmp/cert_blog/certs/my-kibana/* config/certs
Edit config/kibana.yml. Make sure to insert the correct kibana user's password that was generated earlier.
server.name: "my-kibana"
server.host: "kibana.local"
server.ssl.enabled: true
server.ssl.certificate: config/certs/my-kibana.crt
server.ssl.key: config/certs/my-kibana.key
elasticsearch.url: "https://node1.local:9200"
elasticsearch.username: "kibana"
elasticsearch.password: "%uhWtQCN-9GNa52vot_h"
elasticsearch.ssl.certificateAuthorities: [ "config/certs/ca.crt" ]
Start up kibana
$ bin/kibana
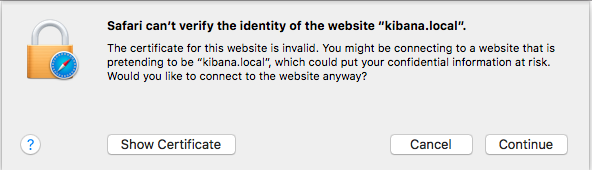
Once kibana has fully started, visit https://kibana.local:5601 in your web browser. You should get an error that the certificate is not trusted. This is expected since neither the direct certificate nor the signing authority is trusted by the browser. You can add / trust the newly created certificate authority to your OS / browser, but these steps can vary depending upon the OS / browser that you use. I'll leave that for you and google to figure out.
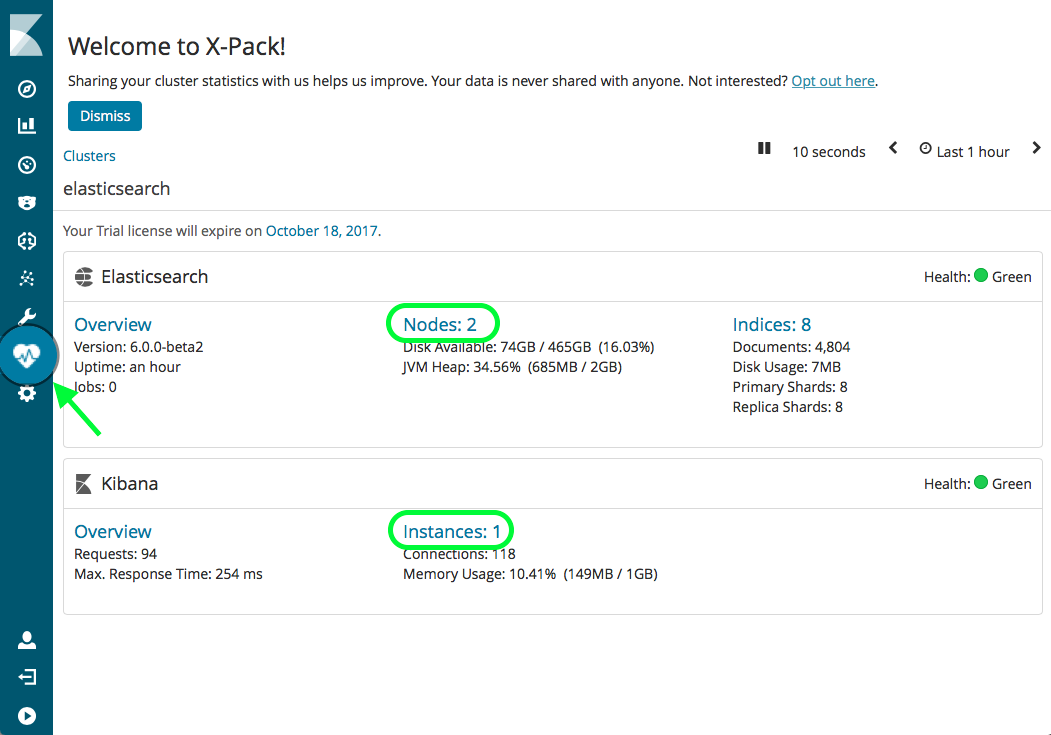
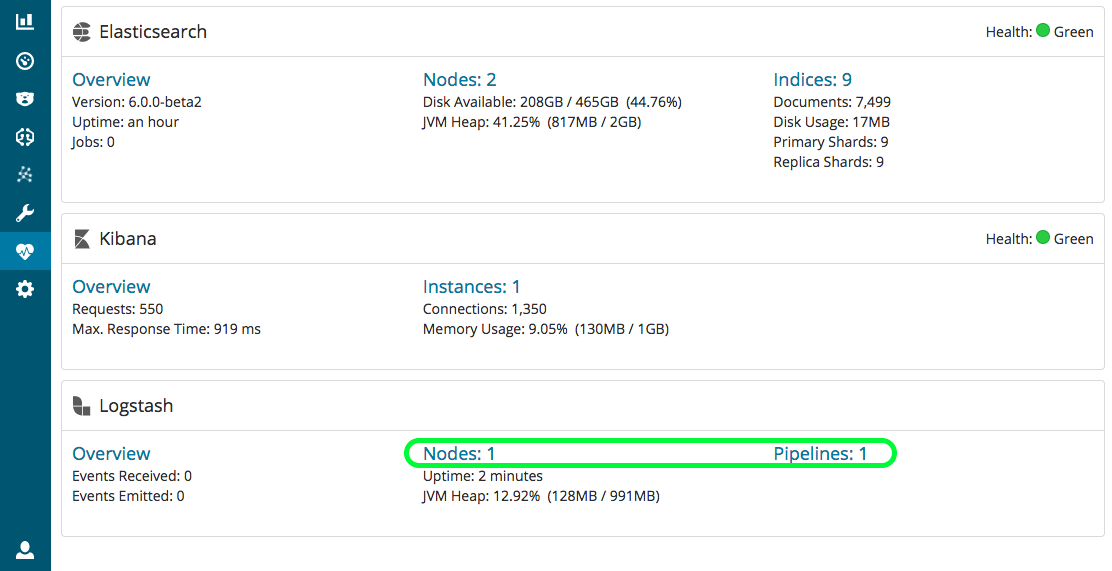
Dismiss / continue past the certificate error for now, and login with the elastic user and the auto-generated password. Once logged in, click on the monitoring tab - and you should see an overview that elasticsearch has 2 nodes and kibana has 1 instance.
We now have elasticsearch and kibana communications encrypted, and the certs are fully verified using DNS.
Before moving on though, let's use the UI to setup an account that logstash can use to write to elasticsearch with.
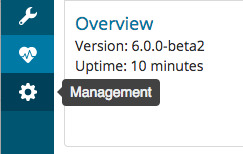
Click on the management tab
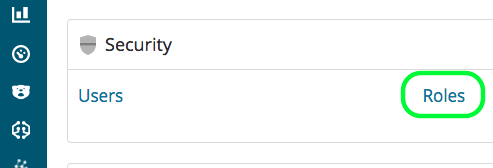
We will need to setup a role that will grant the necessary permissions that are needed for our logstash configuration.
Click on Roles
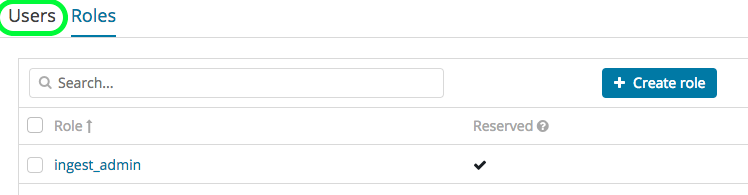
Then click the "Create role" button

Create the role as pictured below and click save.

Now we will assign this role to a new user.
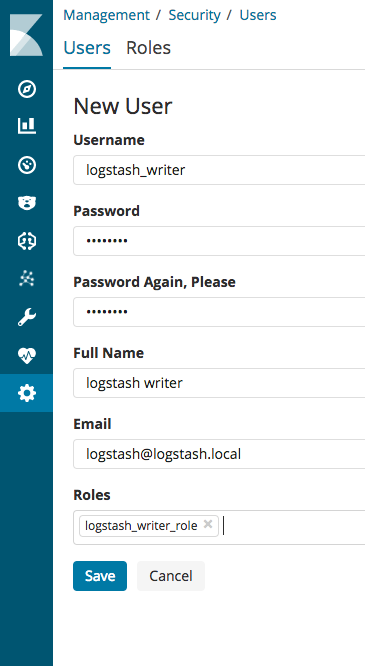
Click on Users tab
Click the "Create user" button
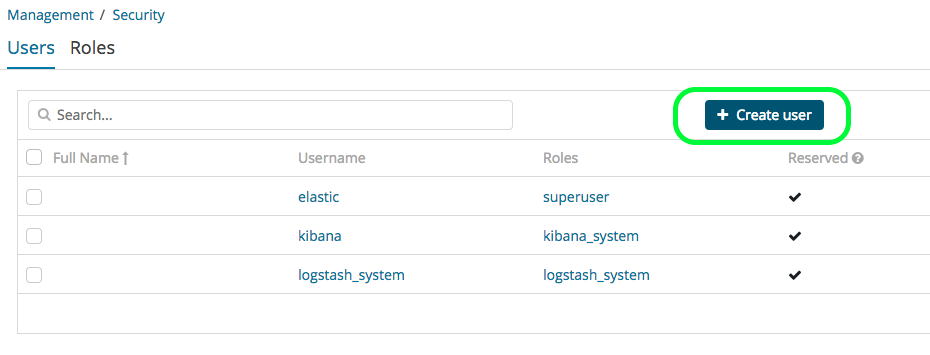
Fill in all the details pictured below. The email can be whatever you would like, it is not used beyond just having a contact record in elasticsearch. Assign the newly created logstash_writer_role and click save.
Logstash TLS setup
X-Pack is not necessary to setup TLS for logstash, but we will install / use it since it will allow us to view logstash information in the Kibana monitoring UI - which is awesome.
From the logstash folder run
$ bin/logstash-plugin install x-pack
We need to create a certs directory in the config folder, and copy in the certificates.
$ mkdir config/certs
$ cp ~/tmp/cert_blog/ca/ca.crt ~/tmp/cert_blog/certs/logstash/* config/certs
The logstash-input-beats plugin requires the private key to be in the pkcs8 format. The following openssl command below will make a new file in the pkcs8 format.
$ openssl pkcs8 -in config/certs/logstash.key -topk8 -nocrypt -out config/certs/logstash.pkcs8.key
Edit config/logstash.yml. Make sure to insert the correct auto-generated password for the logstash_system user.
node.name: logstash.local
xpack.monitoring.elasticsearch.username: logstash_system
xpack.monitoring.elasticsearch.password: '#3vs5PZDBrWTIVnCgOCh'
xpack.monitoring.elasticsearch.url: https://node1.local:9200
xpack.monitoring.elasticsearch.ssl.ca: config/certs/ca.crt
Create config/example.conf. For the elasticsearch output config, the user and password will use the logstash_writer account that you just created in the kibana UI.
input {
  beats {
    port => 5044
    ssl => true
    ssl_key => 'config/certs/logstash.pkcs8.key'
    ssl_certificate => 'config/certs/logstash.crt'
  }
}
output {
  elasticsearch {
    hosts => ["https://node1.local:9200","https://node2.local:9201"]
    cacert => 'config/certs/ca.crt'
    user => 'logstash_writer'
    password => 'changeme'
    index => 'logstash-%{+YYYY.MM.dd}'
  }
}
Start logstash with the example configuration.
$ bin/logstash -f config/example.conf
After it is up and running, visiting the Kibana Monitoring page will now have a logstash section with 1 node and 1 pipeline!
Filebeat TLS setup
From the Filebeat folder, create a certs directory, and copy in the the CA cert. We only need the signing authority, as Filebeat will only be a client talking to Logstash server. You could configure Filebeat to also provide a client certificate if you wanted a form of mutual auth, but that is a topic for another day.
$ mkdir certs
$ cp ~/tmp/cert_blog/ca/ca.crt certs
We need a test log to configure Filebeat to read. If you already have a log file somewhere, you can skip this step and just put in the correct path to that log file. If not, download the sample log and unpack into the Filebeat directory.
Create example-filebeat.yml:
filebeat.prospectors:
- type: log
  paths:
    - logstash-tutorial-dataset
output.logstash:
  hosts: ["logstash.local:5044"]
  ssl.certificate_authorities:
    - certs/ca.crt
Then run Filebeat with this config
$ ./filebeat -e -c example-filebeat.yml
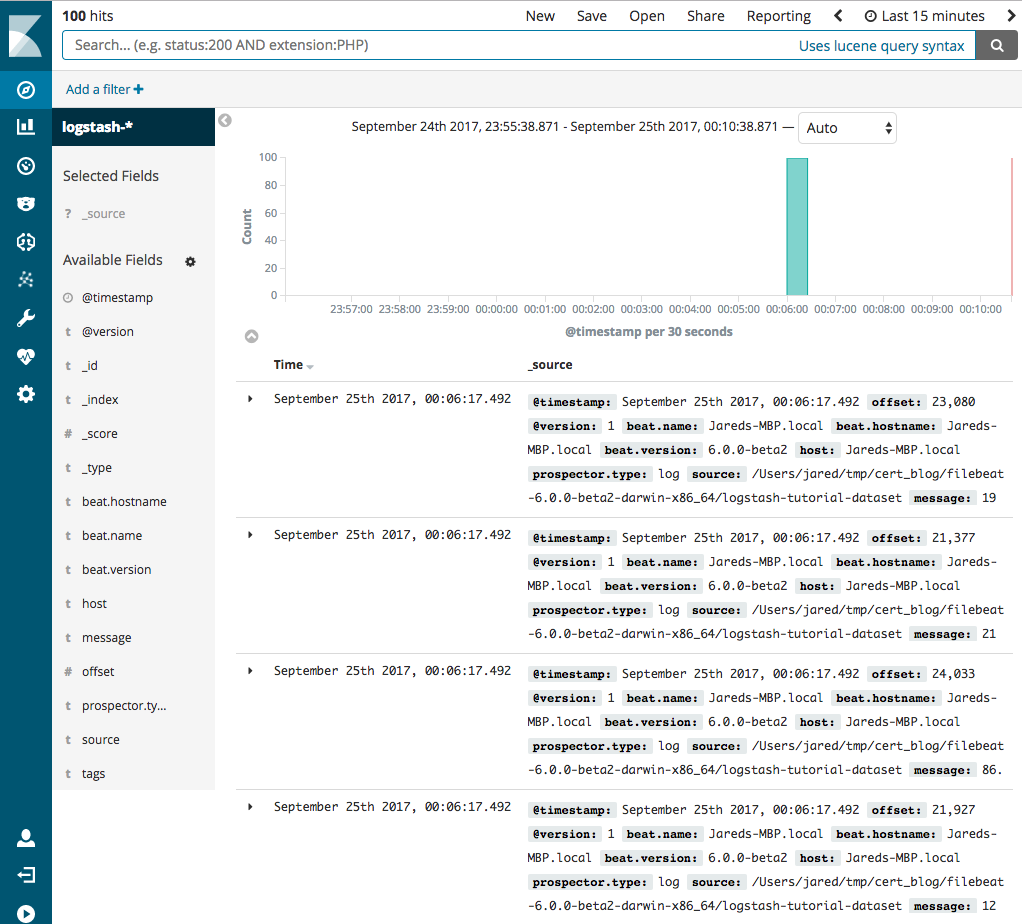
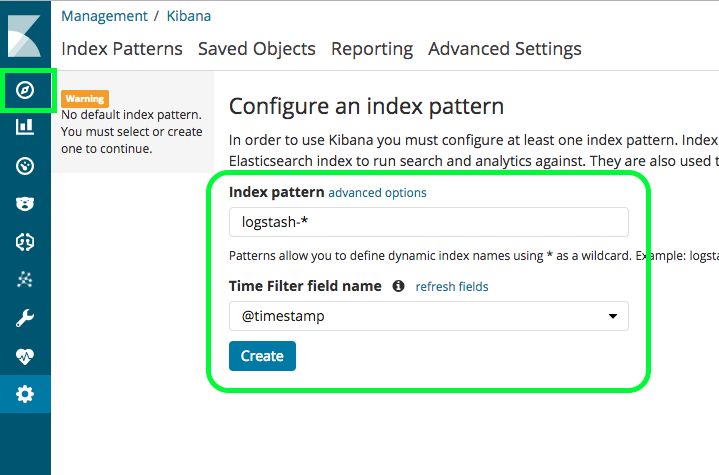
Now, you can visit the Kibana discover page, and click the "Create" button for a new index pattern. The index pattern is used for selecting logstash-* named indices for searching on.
We should now have log data in the kibana UI! This data was transmitted fully encrypted from Filebeat -> Logstash -> Elasticsearch. Kibana pulled it from Elasticsearch encrypted and transmitted it to your browser encrypted. Huzzah!