How to leverage big healthcare data to improve consumers’ lives
Automating the deployment and configuration of the ELK Stack with Ansible


 Share on Twitter
Share on Twitter

 Share on LinkedIn
Share on LinkedIn

 Share on Facebook
Share on Facebook

 Share by Email
Share by Email

 Print this page
Print
Challenges of healthcare data
Healthcare data makes up a third of the world’s data and is projected to grow, in the next few years, at a faster pace than traditional data-rich industries like financial services and manufacturing. The staggering data volumes in healthcare, in addition to its heterogeneity and fragmentation, represent substantial challenges to extracting insights for improving healthcare outcomes of individuals and communities.
At Carelon, a healthcare services company dedicated to making it easier to deliver whole-person health, we have undertaken various initiatives to address these challenges — most notably full-text search of healthcare claims. In this post, we share with you our automated deployment and configuration solution for ELK stack. We use ELK stack internally at our organizational unit at Carelon to power real-time search capabilities on top of healthcare claims data lake, reaching peak performances of single digit seconds on a multi-query execution against an index with billions of records.
Existing healthcare data paradigm
Nowadays consumer-facing applications have search functionality in more than one place. There is an expectation that this functionality can serve on-demand, accurate, and real-time results. This is achieved via real-time (or near real-time) synchronization of the application data with a search index, backed by a NoSQL analytics database like Elasticsearch.
Other types of applications are internal-facing enterprise apps, which serve diverse communities of business leaders, subject matter experts, and data-centric teams. Here, the need is to access on-demand and real-time insights and seamlessly explore multiple “what if” business scenarios.
Much of the operational data from enterprises today is transactional in nature. This data is always stored in a relational database in a centralized data lake.
Traditionally, enterprise analytics applications rely heavily on SQL for preparing the data, and quite often that SQL logic is the end-result of a long and iterative process. An alternative to the SQL-only approach is to implement the best of both worlds: a data lake with a highly customized “Search Index” layered on top. This search index embeds answers to the most-encountered use cases by the business and analytics teams.
Within our approach, the complex and ever-evolving business questions described by the SQL would be run automated at scale and stored in the search index. The results of this SQL are then consumed many times over by everyone with ease via pre-built user interfaces.
Furthermore, real time data synchronization between the data lake and the search index is not that critical compared to the ability to execute automated, fast, and high throughput data pipelines. These pipelines push data with ever-evolving mappings to reflect new business rules (to be described in a follow-up blog post) or even completely refresh the search index.
This is a great example where a search and analytics solution goes hand in hand with the relational database management system (RDBMS) business transactions data store and data lake at the enterprise.
Real-time, scalable, and secure data at Carelon
At Carelon, we achieve real-time search capability on an index with billions of records with complex mappings on an Elasticsearch cluster spanning dozens of data nodes (with over 1K CPUs). In addition, working in an environment governed by stringent security and compliance policies motivated our need to develop an in-house Ansible deployment for Elasticsearch on “bare-metal” compute nodes.
In the rest of the blog post, we share our custom Ansible deployment and configuration for all ELK stack services on a reference 3 node cluster, which can be easily modified and scaled to meet your specific data indexing and search needs (on as many compute nodes as your budget allows).
ELK node deployment Ansible recipe
The end goal of this blog post is to demonstrate an end-to-end Ansible deployment and configuration of ELK-B cluster including APM Server and Enterprise Search, which we will refer to as ELK stack for brevity.
The detailed steps are described at the elk-ansible.github.io project page. Here we will provide a high-level overview of these steps. In short, these steps are:
- Prepare the minimalistic infrastructure, which consists of four compute nodes, DNS records, and various certificates in PKCS12 for the servers CA files for the clients.
- Obtain the Ansible roles and modify the input configuration for the playbooks, i.e., Ansbile inventory variables and host files in the inventory directory
- For each service, run the command: ansible-playbook -I <inventory_directory> playbook-<service-name>.yml
We need an existing compute infrastructure on which to deploy the ELK stack. For completeness, we provide a set of instructions for deploying the underlying compute infrastructure on AWS. Step 1 for deploying the compute nodes is provided for educational purposes only and does not correspond to any real-world production-grade scenario.
Architecture supported by the Ansible deployment
Currently, we support the latest version of ELK stack version 7. We will be adding support for version 8 soon. All the services communicate over SSL, and the various secret settings are stored in the respective components’ secrets keystore manager except for Enterprise Search, since there is no native secrets manager that is part of that service.
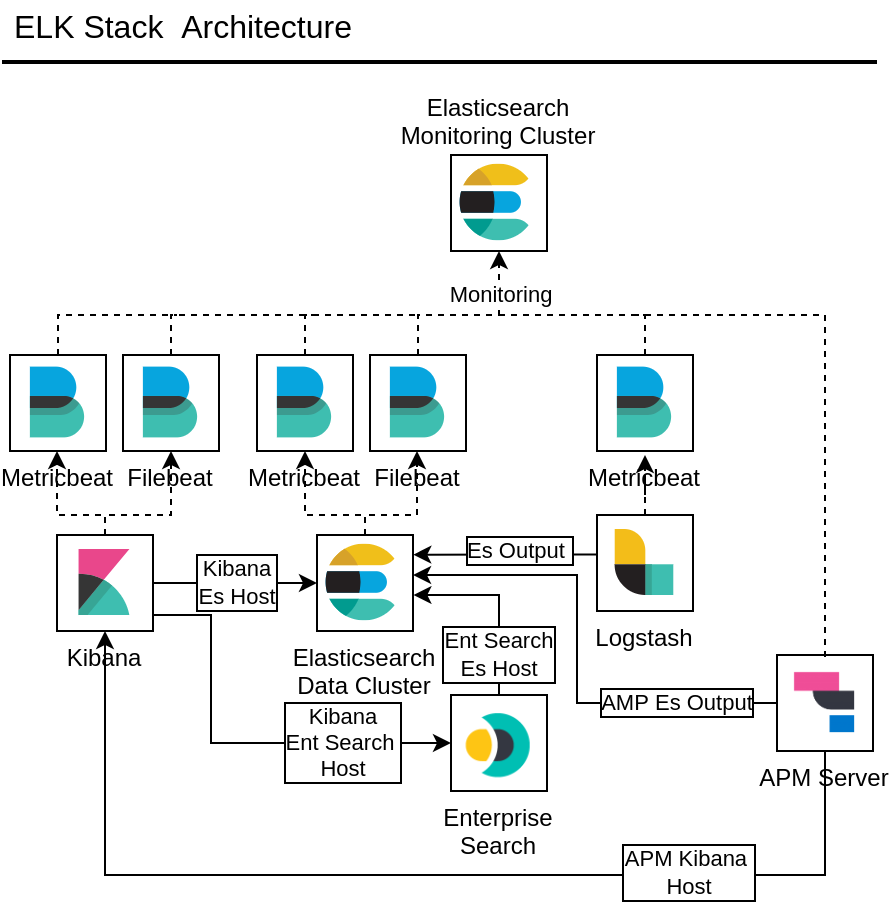
On Figure 1, we outlined the ELK stack configuration supported by the Ansible playbooks and roles. All the settings are controlled via the Ansible Hosts and Variables files. In the setup, we’re accounting for a dedicated monitoring cluster for collecting the observability data via Beats. In the physical setup, we use the same Elasticsearch cluster for both Data and Monitoring roles.
Infrastructure preparation
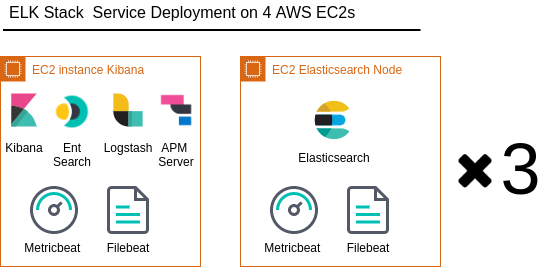
The underlying infrastructure consists of four compute instances (Figures 2 and Figure 3) and is intended to provide the minimal infrastructure sufficient for node deployment of all the ELK stack components, thus demonstrating the capabilities of the Ansible modules and playbooks.
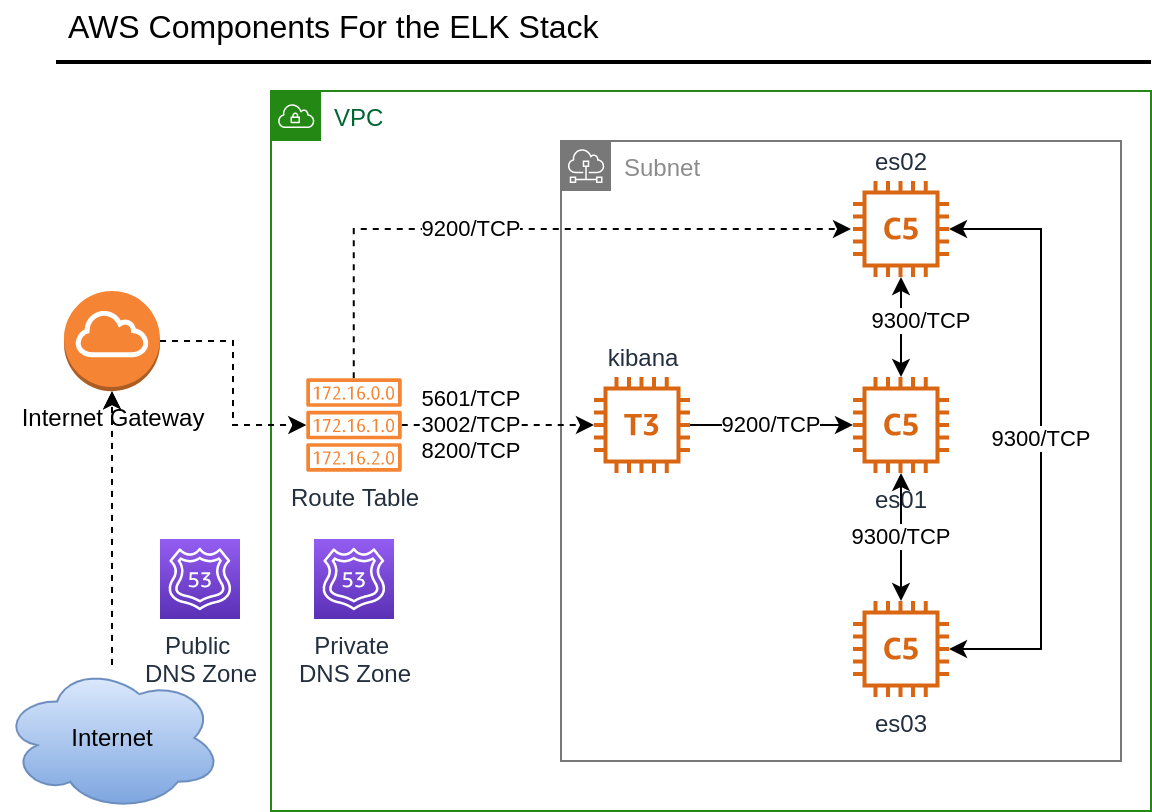
Architecture diagram with all the AWS services is shown on Figure 3.
The infrastructure preparatory steps can be summarized as:
1. Infrastructure deployment.
- The entire setup will be deployed on four compute instances on AWS. We provided scripts for deployment via Terraform or alternatively AWS CDK.
2. DNS configuration.
- We assume that you own a domain (i.e., mydomain.co) that is registered at some major DNS domain providers. We will use that domain for the CNAME records for our Elasticsearch nodes, Kibana, Enterprise Search, and APM Server.
3. Generate SSL Certificate and convert to PKCS12 key file.
- For this minimal setup, we generate a single SSL Certificate containing all the CNAME records that are part of the deployment. We will use acme.sh command line utility from Let’s Encrypt and openssl command line for generating the PKCS12 key file from the certificates and chains files.
The DNS and SSL certificate provisioning steps are provided as part of the entire end-to-end initial infrastructure provisioning and were chosen for convenience and ease of use.
After we prepare the infrastructure, we will prepare our Ansible hosts and variable files.
Ansible roles and playbook Configuration
For ease of demonstration, we are using the free and open source Ansible and ssh key authentication with the nodes.
Inventory and Variable Files are the inventory/ directory of the repository. We use a dedicated hosts group for each service. Target host names in the group are matching the hostname from our ssh configuration file.
[es-nodes]
tf-elk-es01 node_name=node-1
tf-elk-es02 node_name=node-2
tf-elk-es03 node_name=node-3
[kibana-node]
tf-elk-kibana node_name=kibana
[logstash-node]
tf-elk-kibana node_name=logstash01
[ent-search-node]
tf-elk-kibana node_name=enterprise-search
[apm-server]
tf-elk-kibana node_name=apm-server
The recommended method for obtaining the roles is via cloning the respective role repository and creating symbolic links to your roles/ directory, relative to the playbook files. The name of the links matches the roles variable in from the playbook.
Here we show a sample from the Playbook from the Elasticsearch cluster:
- hosts: es-nodes
 roles:
 - role: ansible-elasticsearch
 vars:
 seed_hosts: "[{%for host in groups['es
nodes']%}\"{{hostvars[host].ansible_eth0.ipv4.address}}:9300\"{% if not loop.last  %},{% endif %}{% endfor %}]"
 master_nodes: "[{%for host in groups['es
nodes']%}\"{{hostvars[host].ansible_eth0.ipv4.address}}\"{% if not loop.last %},{%  endif %}{% endfor %}]"
 es_heap_size: "{{hostvars[inventory_hostname].heap_size}}"
 es_version: "{{hostvars[inventory_hostname].es_version}}"
 es_package_dir: "{{hostvars[inventory_hostname].es_package_dir}}"  es_data_dirs:
 - "/opt/data"
 es_api_host: "{{ ansible_default_ipv4.address}}"
 es_config:
 node.name: "{{hostvars[inventory_hostname].node_name}}"
 cluster.name: "{{hostvars[inventory_hostname].cluster_name}}"  cluster.initial_master_nodes: "{{master_nodes}}"
 discovery.seed_hosts: "{{ seed_hosts }}"
 network.host: "_eth0_"
 node.roles: [master,data,ingest]
 xpack.monitoring.collection.enabled: true
 xpack.security.http.ssl.client_authentication: none
 xpack.security.transport.ssl.client_authentication: none
 es_api_basic_auth_username: elastic
 es_api_basic_auth_password: "{{hostvars[inventory_hostname].elastic_pass}}"  es_enable_http_ssl: true
 es_enable_transport_ssl: true
 es_ssl_keystore: "files/certs/{{hostvars[inventory_hostname].cert_file}}"  es_ssl_truststore: "files/certs/{{hostvars[inventory_hostname].cert_file}}"  es_ssl_keystore_password: "{{hostvars[inventory_hostname].cert_pass}}"  es_ssl_truststore_password: "{{hostvars[inventory_hostname].cert_pass}}"  es_validate_certs: no
Variables in the playbook are controlled via the variable file. We define node group specific variables as shown in the sample variables file below. Note that the placeholder word “changeme” for all the passwords and secrets is used for demonstration purposes only.
[all:vars]
heap_size="1g"
cluster_name=demo-cluster
elastic_pass=changeme
remote_monitoring_user_pass=changeme
es_version=7.17.5
es_package_dir="/opt/logs"
cert_filename=es_all.mydomain.co.pfx
cert_pass=changeme
es_local_mon_ssl_cacert_filename=ca.cer
kibana_system_pass=changeme
apm_system_pass=changeme
logstash_system_pass=changeme
beats_system_pass=changeme
beats_user_pass=changeme
elasticsearch_mon_hosts=["es01.mydomain.co:9200","es02.mydomain.co:9200","es03. mydomain.co:9200"]
[kibana-node:vars]
es_host="es01.sciviz.co"
es_ssl_cert_filename="kibana.mydomain.co.cer"
es_ssl_key_filename="kibana.mydomain.co.key"
kibana_srv_public_url= "https://kibana.mydomain.co:5601"
beats_mon_user_pass=changeme
logstash_keystore_pass=changeme
Run the Ansible playbook
The last step is to run the ansible-playbook for each service:
ansible-playbook -I <inventory_directory> playbook-<service-name>.yml
All the detailed step by step guides can be found on the elk-ansible.github.io project page.
Share
- Share on Twitter
Share on Twitter
- Share on LinkedIn
Share on LinkedIn
- Share on Facebook
Share on Facebook
- Share by Email
Share by Email
- Print this page
Print