ProblemChild: Detecting living-off-the-land attacks using the Elastic Stack
When it comes to malware attacks, one of the more common techniques is “living off the land” (LOtL). Utilizing standard tools or features that already exist in the target environment allows these attacks to blend into the environment and avoid detection. While these techniques can appear normal in isolation, they start looking suspicious when observed in the parent-child context. This is where the ProblemChild framework can help.
In this blog, we will talk about how you can use Elastic machine learning to create your own ProblemChild framework to detect LOtL activity in Windows process event data (we will be referring to Windows process events as just “events” throughout this blog). We will talk in detail about the following:
- Extracting features from event metadata
- Training a supervised model to classify events as malicious vs. benign
- Using the trained model to enrich event data at ingest time
- Picking out the most unusual events for analysts to triage
If you would like to follow along with this blog, we recommend starting a free 14-day Elastic trial. All the supporting materials for this blog are also available in the examples repository.
Background
Living-off-the-land binaries (LOLBins) are Microsoft-signed binaries that come pre-installed on the operating system. These binaries can sometimes have unexpected features outside of their core functionality, which attackers can leverage. For example, the task scheduler in Windows, which allows an admin to create, delete, run, and schedule tasks on a local computer. However, attackers may leverage the binary to bypass User Account Control (UAC) and escalate privileges. The use of these binaries complicates the discovery of the attack, since adversary behavior is mixed with traditional benign operating system activity.
Things get a little interesting when viewed from a parent-child lens, since unusual child processes spawned by a parent process can indicate malicious activity. For example, word.exe spawning powershell.exe could indicate a Spearphishing Attachment. Current solutions to detect LOtL attacks using parent-child relationships include writing rules and heuristics. While these solutions work well, they can sometimes be either too rigid or too lax and do not generalize well. There is also a significant amount of manual effort that goes into writing them.
With ProblemChild, the goal remains the same: we hope to provide better generalization with the added advantage of ranking and prioritizing events for further investigation using machine learning.
The ProblemChild framework
ProblemChild uses data frame analytics available in the Elastic Stack to build a supervised model to classify events as malicious or benign using features extracted from event metadata. It then uses anomaly detection to pick out “high priority” events for further analysis from those detected as malicious by the supervised model.
Data
For the supervised model, we gathered Windows process event metadata from a variety of sources like the Splunk Attack data, Splunk botsv1, Red Canary Atomic Red Team, and several internal databases. An example of a raw sample used in training is as follows:
{
  "timestamp_utc": "2019-06-14 15:31:17Z",
  "pid": 372,
  "integrity_level": "system",
  "elevation_type": "default",
  "signature_status": "trusted",
  "serial_event_id": 1007,
  "elevated": true,
  "signature_signer": "Microsoft Windows Publisher",
  "event_subtype_full": "already_running",
  "command_line": "C:\\Windows\\System32\\svchost.exe -k LocalSystemNetworkRestricted -p",
  "parent_process_name": "services.exe",
  "ppid": 620,
  "sha256": "7fd065bac18c5278777ae44908101cdfed72d26fa741367f0ad4d02020787ab6",
  "user_name": "SYSTEM",
  "process_path": "C:\\Windows\\System32\\svchost.exe",
  "user_sid": "S-1-5-18",
  "timestamp": 132049998770000000,
  "process_name": "svchost.exe",
  "original_file_name": "svchost.exe",
  "parent_process_path": "C:\\Windows\\System32\\services.exe",
  "unique_pid": 1007,
  "md5": "8a0a29438052faed8a2532da50455756",
  "sha1": "a1385ce20ad79f55df235effd9780c31442aa234",
  "unique_ppid": 1006,
  "event_type_full": "process_event",
  "opcode": 3,
  "user_domain": "NT AUTHORITY"
}
Feature engineering
Since we wanted to focus on identifying LOtL activity using parent-child context, we started by extracting features that capture information about the process itself, its parent, and surrounding contextual information (e.g., elevation level, system user, etc.) from the raw event metadata (shown above) as follows:
- Process name
- Parent process name
- Commandline arguments
- Process path
- Parent process path
- Event subtype
- Whether event is elevated
- Elevation type
- Integrity level
- Normalized process path
- Whether process is signed
- Whether signer is trusted
- Whether user is running as system
- Filename mismatch
- Whether process name ends with exe
All of the feature engineering was done using processors already available in the Elastic Stack or using custom scripts written in Painless, which were then used in script processors. A high-level breakdown of the featurization process is as follows:
Since the model supports Windows process events for the Elastic Endpoint Security integration, Elastic Endgame, and Winlogbeat, we first use a script processor to standardize the field names across the different agents. We did this so the model always has the same set of input fields, regardless of the agent type.
We then used script processors to build features that were derived from the common set of fields.
Example: The following script processor sets the feature feature_ends_with_exe to true if the process name associated with the event ends with ".exe" and false otherwise.
{
    "script": {
        "lang": "painless",
        "source": """
    if(ctx.feature_process_name.contains(".exe")) {
      ctx.feature_ends_with_exe = true
        }
    else {
      ctx.feature_ends_with_exe = false
        }
  """
    }
}
We noticed that minor variations like change in case, usernames, certain special characters (mainly ", /, \), and appearance of random numbers/hexadecimal values in fields like commandline arguments and process paths were affecting the performance of our models, and needed to be normalized and/or obfuscated. We also found that replacing certain Windows directories with appropriate tokens, for example replacing windows/system32 and windows/syswow64 with the token win_system_dir, further improved model performance. These normalizations and obfuscations were done using the lowercase and gsub processors available in the Elastic Stack.
Example: The following processor replaces text matched by the pattern defined in the pattern field with the string 'process_id' in the feature_command_line field.
{
    "gsub": {
        "field": "feature_command_line",
        "pattern": "[0-9a-f]{4,}-[0-9a-f]{4,}-[0-9a-f]{4,}-[0-9a-f-]{4,}",
        "replacement": "process_id"
    }
}
Finally, we used a series of script processors to extract n-gram features from process and parent process names and paths and commandline arguments. After experimenting with different n-gram lengths, we concluded that bigrams were the most optimum fit and provided the best trade-off between dimensionality of the feature set and model performance.
Example: The following processor generates bigrams for the field feature_process_name.
{
    "script": {
        "id": "ngram-extractor",
        "params": {
            "ngram_count": 2,
            "field": "feature_process_name",
            "max_length": 100
        }
    }
}
All the processors mentioned so far were a part of an ingest pipeline used to featurize raw events from the source index and re-index them. Please refer to the examples repository for detailed instructions on featurization and the relevant configurations, scripts, etc. An example of features created by the ingest pipeline is as follows:
{
          "feature_command_line_2-gram_feature10" : "",
          "feature_process_parent_executable_2-gram_feature53" : ".e",
          "feature_process_parent_executable_2-gram_feature54" : "ex",
          "feature_process_parent_executable_2-gram_feature55" : "xe",
          "feature_process_parent_executable_2-gram_feature56" : "",
          "feature_process_executable_2-gram_feature49" : "ka",
          "feature_process_executable_2-gram_feature48" : """\k""",
          "feature_process_executable_2-gram_feature47" : """r\""",
          "feature_command_line" : "kaps.exe -u",
          "feature_process_executable_2-gram_feature46" : "er",
          "feature_process_executable_2-gram_feature45" : "le",
          "feature_process_executable_2-gram_feature44" : "ll",
          "feature_process_executable_2-gram_feature43" : "il",
          "feature_process_executable_2-gram_feature42" : "ki",
          "feature_process_executable_2-gram_feature41" : """\k""",
          "feature_process_executable_2-gram_feature40" : """s\""",
          "feature_running_as_system" : false,
          "feature_process_signer_trusted" : true,
          "feature_process_parent_executable_2-gram_feature46" : "er",
          "feature_process_parent_executable_2-gram_feature47" : """r\""",
          "feature_process_parent_executable_2-gram_feature48" : """\k""",
          "feature_process_parent_executable_2-gram_feature49" : "ka",
          "feature_process_parent_executable_2-gram_feature42" : "ki",
          "feature_process_parent_executable_2-gram_feature43" : "il",
          "feature_process_parent_executable_2-gram_feature44" : "ll",
          "feature_process_parent_executable" : """c:\win_system_dir\drivers\rivetnetworks\killer\kaps.exe""",
          "feature_process_parent_executable_2-gram_feature45" : "le",
          "feature_process_parent_executable_2-gram_feature50" : "ap",
          "feature_process_parent_executable_2-gram_feature51" : "ps",
          "feature_process_parent_executable_2-gram_feature52" : "s.",
          "feature_process_executable_2-gram_feature56" : "",
          "feature_process_executable_2-gram_feature55" : "xe",
          "feature_process_executable_2-gram_feature54" : "ex",
          "feature_process_executable_2-gram_feature53" : ".e",
          "feature_process_executable_2-gram_feature52" : "s.",
          "feature_process_executable_2-gram_feature51" : "ps",
          "feature_process_executable_2-gram_feature50" : "ap",
          "feature_process_name" : "kaps.exe",
          "feature_process_executable_2-gram_feature29" : "iv",
          "feature_process_executable_2-gram_feature28" : "ri",
          "feature_process_executable_2-gram_feature27" : """\r""",
          "feature_process_executable_2-gram_feature26" : """s\""",
          "feature_process_executable_2-gram_feature25" : "rs",
          "feature_process_executable_2-gram_feature24" : "er",
          "feature_process_executable_2-gram_feature23" : "ve",
          "feature_process_executable_2-gram_feature22" : "iv",
          "feature_process_executable_2-gram_feature21" : "ri",
          "feature_process_executable_2-gram_feature20" : "dr",
          "feature_process_name_2-gram_feature4" : ".e",
          "feature_process_parent_name_2-gram_feature4" : ".e",
          "feature_process_name_2-gram_feature5" : "ex",
          "feature_process_parent_name_2-gram_feature3" : "s.",
          "feature_process_name_2-gram_feature6" : "xe",
          "feature_process_parent_name_2-gram_feature2" : "ps",
          "feature_process_name_2-gram_feature7" : "",
          "feature_process_parent_name_2-gram_feature1" : "ap",
          "feature_process_parent_name_2-gram_feature7" : "",
          "feature_process_parent_name_2-gram_feature6" : "xe",
          "feature_process_parent_name_2-gram_feature5" : "ex",
          "feature_ends_with_exe" : true,
          "feature_process_executable_2-gram_feature39" : "ks",
          "feature_process_executable_2-gram_feature38" : "rk",
          "feature_process_executable_2-gram_feature37" : "or",
          "feature_process_executable_2-gram_feature36" : "wo",
          "feature_process_executable_2-gram_feature35" : "tw",
          "feature_process_executable_2-gram_feature34" : "et",
          "feature_process_executable_2-gram_feature33" : "ne",
          "feature_process_executable_2-gram_feature32" : "tn",
          "feature_process_name_2-gram_feature0" : "ka",
          "feature_process_parent_name_2-gram_feature0" : "ka",
          "feature_process_executable_2-gram_feature31" : "et",
          "feature_process_name_2-gram_feature1" : "ap",
          "feature_process_executable_2-gram_feature30" : "ve",
          "feature_process_name_2-gram_feature2" : "ps",
          "feature_process_name_2-gram_feature3" : "s.",
          "feature_process_parent_executable_2-gram_feature17" : "32",
          "feature_process_parent_executable_2-gram_feature18" : """2\""",
          "feature_process_parent_executable_2-gram_feature19" : """\d""",
          "feature_process_parent_executable_2-gram_feature3" : "wi",
          "feature_process_parent_executable_2-gram_feature13" : "st",
          "feature_process_parent_executable_2-gram_feature2" : """\w""",
          "feature_process_parent_executable_2-gram_feature14" : "te",
          "feature_process_parent_executable_2-gram_feature5" : "nd",
          "feature_process_parent_executable_2-gram_feature15" : "em",
          "feature_process_parent_executable_2-gram_feature4" : "in",
          "feature_process_parent_executable_2-gram_feature16" : "m3",
          "feature_process_parent_executable_2-gram_feature7" : "ow",
          "feature_process_parent_executable_2-gram_feature6" : "do",
          "feature_process_parent_executable_2-gram_feature10" : """\s""",
          "feature_process_parent_executable_2-gram_feature9" : """s\""",
          "feature_process_parent_executable_2-gram_feature11" : "sy",
          "feature_process_parent_executable_2-gram_feature8" : "ws",
          "feature_process_parent_executable_2-gram_feature12" : "ys",
          "feature_process_parent_executable_2-gram_feature1" : """:\""",
          "feature_process_parent_executable_2-gram_feature0" : "c:",
          "feature_process_signed" : true,
          "feature_elevation_type" : "limited",
          "feature_integrity_level" : "medium",
          "feature_elevated" : false,
          "feature_process_executable_2-gram_feature19" : """\d""",
          "feature_process_executable_2-gram_feature18" : """2\""",
          "feature_process_executable_2-gram_feature17" : "32",
          "feature_process_executable_2-gram_feature16" : "m3",
          "feature_process_executable_2-gram_feature15" : "em",
          "feature_process_executable_2-gram_feature14" : "te",
          "feature_process_executable_2-gram_feature13" : "st",
          "feature_process_executable_2-gram_feature12" : "ys",
          "feature_process_executable_2-gram_feature11" : "sy",
          "feature_process_executable_2-gram_feature10" : """\s""",
          "feature_process_executable" : """c:\win_system_dir\drivers\rivetnetworks\killer\kaps.exe""",
          "feature_filename_mismatch" : false,
          "feature_process_executable_2-gram_feature8" : "ws",
          "feature_command_line_2-gram_feature4" : ".e",
          "feature_process_executable_2-gram_feature7" : "ow",
          "feature_command_line_2-gram_feature3" : "s.",
          "feature_process_executable_2-gram_feature6" : "do",
          "feature_command_line_2-gram_feature6" : "xe",
          "feature_process_executable_2-gram_feature5" : "nd",
          "feature_command_line_2-gram_feature5" : "ex",
          "feature_process_parent_executable_2-gram_feature39" : "ks",
          "feature_command_line_2-gram_feature0" : "ka",
          "feature_command_line_2-gram_feature2" : "ps",
          "feature_process_executable_2-gram_feature9" : """s\""",
          "feature_command_line_2-gram_feature1" : "ap",
          "feature_process_parent_executable_2-gram_feature35" : "tw",
          "feature_normalized_ppath" : "win_system_dir",
          "feature_process_parent_executable_2-gram_feature36" : "wo",
          "feature_process_parent_executable_2-gram_feature37" : "or",
          "feature_process_parent_executable_2-gram_feature38" : "rk",
          "feature_process_parent_executable_2-gram_feature31" : "et",
          "feature_process_parent_executable_2-gram_feature32" : "tn",
          "feature_process_parent_executable_2-gram_feature33" : "ne",
          "feature_process_parent_executable_2-gram_feature34" : "et",
          "feature_process_parent_executable_2-gram_feature40" : """s\""",
          "feature_process_parent_executable_2-gram_feature41" : """\k""",
          "feature_event_action" : "creation_event",
          "feature_process_executable_2-gram_feature0" : "c:",
          "feature_process_executable_2-gram_feature4" : "in",
          "feature_process_executable_2-gram_feature3" : "wi",
          "feature_process_executable_2-gram_feature2" : """\w""",
          "feature_process_parent_name" : "kaps.exe",
          "feature_process_executable_2-gram_feature1" : """:\""",
          "feature_process_parent_executable_2-gram_feature28" : "ri",
          "feature_process_parent_executable_2-gram_feature29" : "iv",
          "feature_process_parent_executable_2-gram_feature24" : "er",
          "feature_process_parent_executable_2-gram_feature25" : "rs",
          "feature_process_parent_executable_2-gram_feature26" : """s\""",
          "label" : 0,
          "feature_process_parent_executable_2-gram_feature27" : """\r""",
          "feature_process_parent_executable_2-gram_feature20" : "dr",
          "feature_process_parent_executable_2-gram_feature21" : "ri",
          "feature_process_parent_executable_2-gram_feature22" : "iv",
          "feature_process_parent_executable_2-gram_feature23" : "ve",
          "feature_process_parent_executable_2-gram_feature30" : "ve",
          "feature_command_line_2-gram_feature8" : " -",
          "feature_command_line_2-gram_feature7" : "e ",
          "feature_command_line_2-gram_feature9" : "-u"
        }
The nice thing about data frame analytics is that it automatically encodes boolean and categorical features (even features like n-grams), thus eliminating the need for you to manually convert these features into numerical values for the model. It also examines the features and automatically selects the most important features for classification.
Training the supervised model
The next step was to train a classification model based on the features extracted above. We used the data frame analytics UI to create the classification job. A snippet of what the process looks like in the UI is shown below:
An overview of the process shown in the video is as follows:
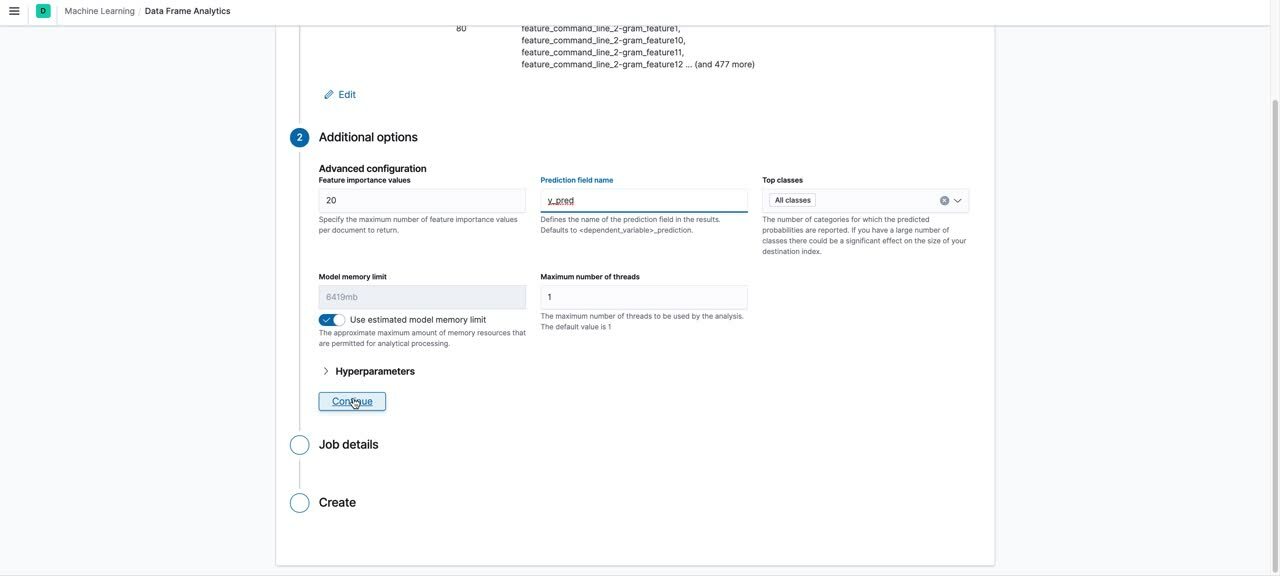
Choose the source index pattern for your jobChoose the job type as “Classification”Choose the dependent variable as the field containing the ground truth labelSet the training percentage: we recommend that you take an iterative approach to training. Start with a smaller training percentage, evaluate the performance and decide if you need to train on more data. A training percentage of ~55 worked for us. We didn’t see any gains in performance beyond this percentage for our datasetKeep only the fields required for training and exclude the rest by unchecking the boxes next to the fields. We only retained the following fields: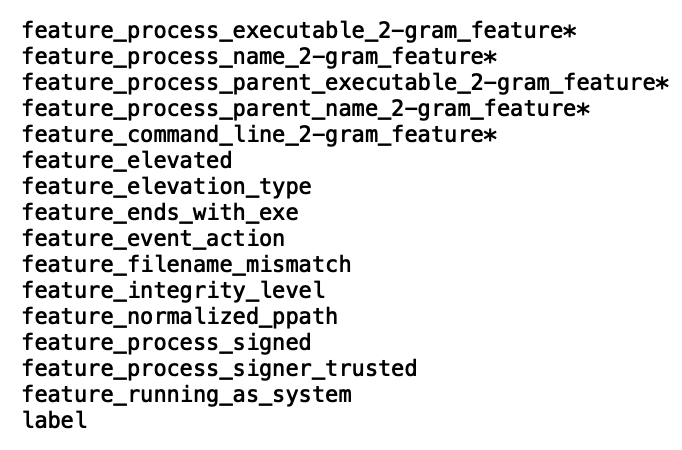
Evaluating the trained model
Once the model has trained, you can navigate to the data frame analytics results UI to analyze the performance of the model on the test set. The UI displays the confusion matrix, a key metric in evaluating the overall model performance. Additionally, you can also view a data table of the results, which shows how the model performed on individual data points in the dataset. You can toggle between the training and testing results by using the Training/Testing filters to the top right in the UI.


Data table of individual results
We focused mainly on the confusion matrix for model evaluation. The confusion matrix displays the percentage of data points that were classified as true positives (malicious events that the model identified as malicious and that were actually malicious) and true negatives (benign events that the model identified as benign and that were actually benign). The matrix also displays the percentage of events that the model misclassified as malicious (false positives) and vice versa (false negatives).
As seen in the figure above, our model had a 98% true positive rate on the testing data, which is pretty good, considering malicious process events are generally tricky to identify. The false positive rate was low, which is also a good sign. This means that the model will not generate a large number of alerts if deployed to production in our environment.
One thing to note here is that the performance of your model could look very different from ours based on the training data. You might need to tune your model, increase the training percentage, add more training data or features, etc.
Enriching incoming events on ingest
Once you have a model you like, you can use it to enrich incoming events with a prediction of whether or not the event is likely to be malicious, along with a probability score of how confident the model is in its prediction.
This can be done by configuring an ingest pipeline for the new events with an inference processor. However, for the trained model to make predictions, the incoming events need to be featurized using the same set of processors as discussed in the Feature Engineering section of this blog. Hence the ingest pipeline for these new events consists of all the processors mentioned previously, with the inference processor added after all the feature generating processors. A snippet of an enriched document looks as follows:
The complete ingest pipeline configuration and additional configuration details can be found in the examples repository. You might also note that the document shown above does not have any of the features created by the featurization processors. This is because the ingest pipeline here contains a script processor that removes all the features created for inference, as well as any other superfluous features, once inference is done. Of course, you can choose to keep the features in by excluding this script processor from the ingest pipeline.
An additional feature that you can configure to complement the supervised model is a blocklist. The blocklist can be used to catch known offenders in your environment that the trained model might miss based on certain keywords present in the commandline arguments. This is configured as a script invoked by a script processor after the inference processor in the ingest pipeline. A starter list of keywords is provided in the examples repository. You can also add to the list, but make sure to update the blocklist script processor in your ingest pipeline if you do.
As mentioned at the beginning of this blog, the ProblemChild framework is currently built only for Windows process events. There are other operating systems (macOS, Linux) as well as different types of events (network, registry) for each OS. It would be ideal to make the ingest pipeline execute conditionally only when the incoming document contains the desired fields. For this, we used a pipeline processor and checked for specific fields in the document before deciding whether or not to direct it to the ingest pipeline. A sample of such a processor is as follows:
PUT _ingest/pipeline/problemchild_pipeline
{
  "description": "A pipeline of pipelines for ProblemChild detection",
  "processors": [
    {
      "pipeline": {
        "if": "ctx.containsKey('event') && ctx['event'].containsKey('kind')  && ctx['event'].containsKey('category') && ctx['event']['kind'] == 'event' && ctx['event']['category'].contains('process') && ctx.containsKey('host') && ctx['host'].containsKey('os') && (ctx['host']['os'].containsKey('family') || ctx['host']['os'].containsKey('type') || ctx['host']['os'].containsKey('platform')) && (ctx['host']['os']['type'] == 'windows' || ctx['host']['os']['type'] == 'Windows' || ctx['host']['os']['family'] == 'windows' || ctx['host']['os']['family'] == 'Windows' || ctx['host']['os']['platform'] == 'windows' || ctx['host']['os']['platform'] == 'Windows')
        "name": "problemchild_inference"
      }
    }
  ]
}
For a production use case, you might want to consider some error handling for the above pipeline as well.
Anomaly detection for second-order analytics
With ProblemChild, our goal was to not only classify malicious events, but go a step further and identify the creme de la creme of the malicious events. In environments working with a large amount of data, even a small false positive rate can result in a large number of alerts. Picking out the rarest events for analysts can help them prioritize events and catalyze the triage process.
The Elastic Stack has an anomaly detection module, which we leveraged to build an additional layer of analytics on top of our supervised model results. We made use of the rare detector to create anomaly detection jobs to identify rare processes spawned by a particular parent process/user/host, as well as the high_count detector to identify groups of suspicious processes spawned by a particular parent process/user/host. The configurations and datafeeds required to set up these jobs can be found in the examples repository as well.
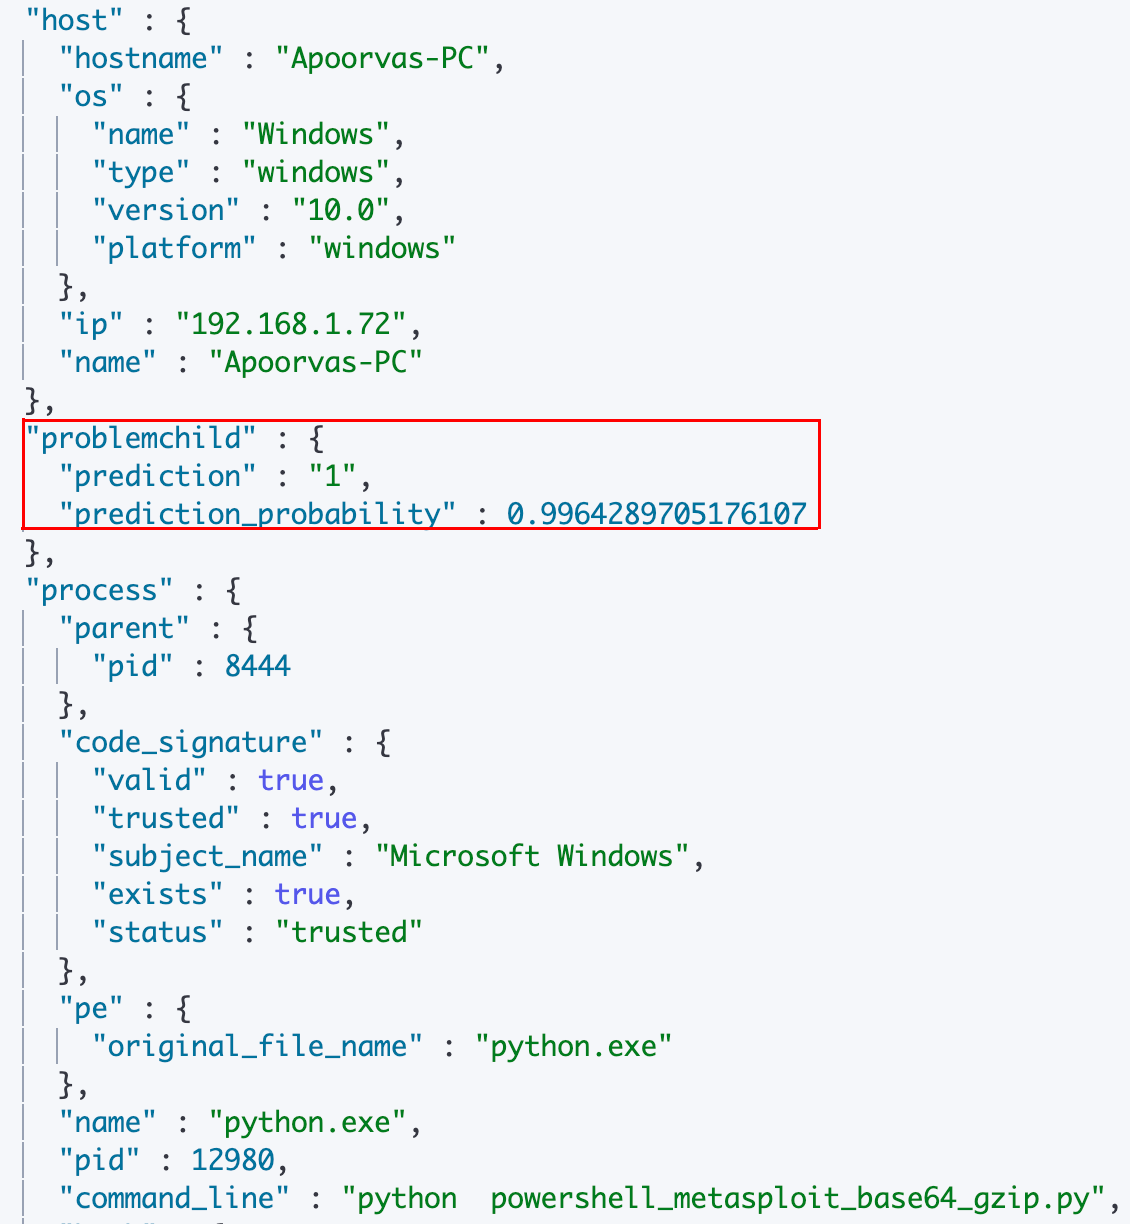
The Anomaly Explorer is a good place to view anomalies detected by your anomaly detection jobs. You can see an overall visualization of anomalies across a given time period, as well as an individual breakdown of the anomalies with the associated anomaly score and relevant context in the form of influencers.

You can also go a step further and convert these unsupervised machine learning jobs into rules to generate actual detections. We will talk more about this in a future blog post.
Conclusion
In this blog post, we trained a classification model to identify malicious Windows process events and used anomaly detection to further uncover rare events. We will also be releasing our models and configurations for ProblemChild in the detection-rules repository. Watch that space for future updates to ProblemChild. Also, stay tuned for a future blog post to find out how to use these in the Elastic SIEM app.
In the meantime, experience the latest version of Elasticsearch Service on Elastic Cloud and follow along with this blog to build the ProblemChild framework from scratch on your Windows process event data. Also be sure to take advantage of our Quick Start training to set yourself up for success. Happy experimenting!