当字段中出现映射冲突时,无论这些字段是符合 Elastic Common Schema (ECS) 标准,还是源自特定数据源,都需要使用 Dev Tools 对数据进行重索引。这些冲突可能会对数据摄取后的下游功能产生负面影响,进而导致结果不准确,或导致完整数据集无法用于可视化、仪表板、Security 应用和聚合等功能。本文详细介绍了重索引流程的具体步骤。
本博客的内容是使用 Elastic 版本 9.2.8 和 8.19.14,以及 Filestream Integration 版本 2.3.0 和 1.2.0 开发和验证的。
重要提示:具体步骤可能需要根据您的环境进行适当调整。此外,请注意,自 Filestream Integration 2.3.3 版本起,动态模板已从 @package 组件模板中移除。
在开始重索引流程之前,请先评估当前环境中的存储分配情况。下文步骤会创建现有后备索引的一个副本,该副本将暂时存放在热层中。
Elasticsearch 数据层
- 热层:时序数据进入 Elasticsearch 的入口,存放最新且查询最频繁的数据。热层节点需要快速读写能力,因此需要更多资源和更快的存储(SSD)。该层为强制层,新的数据流索引会自动分配到此层。
- 温层:当时序数据的查询频率低于热层中近期索引的数据时,便可将其移到温层。温层通常保存最近几周的数据。仍允许更新,但更新频率通常较低。温层节点通常不需要像热层节点那样高的性能。为提高弹性,温层中的索引应配置一个或多个副本。
- 冷层:查询频率较低的数据可以从温层移到冷层。冷层仍可搜索,但优先降低存储成本,而非追求搜索速度。或者,冷层也可以存储带副本的常规索引,而不是可搜索快照。这样可以使用成本更低的硬件来存放较旧数据,但相比温层,并不会降低磁盘空间需求。
- 冻结层:查询频率很低或不再查询的数据,会从冷层移到冻结层,并在剩余生命周期中保留于此。该层使用快照存储库和部分挂载的索引来存储和加载数据,在降低本地存储占用和成本的同时,仍支持搜索。冻结层上的搜索速度通常慢于冷层,因为 Elasticsearch 可能需要从快照存储库中读取冻结的数据。建议使用专用的冻结层节点。
前提条件:确定哪些字段存在冲突
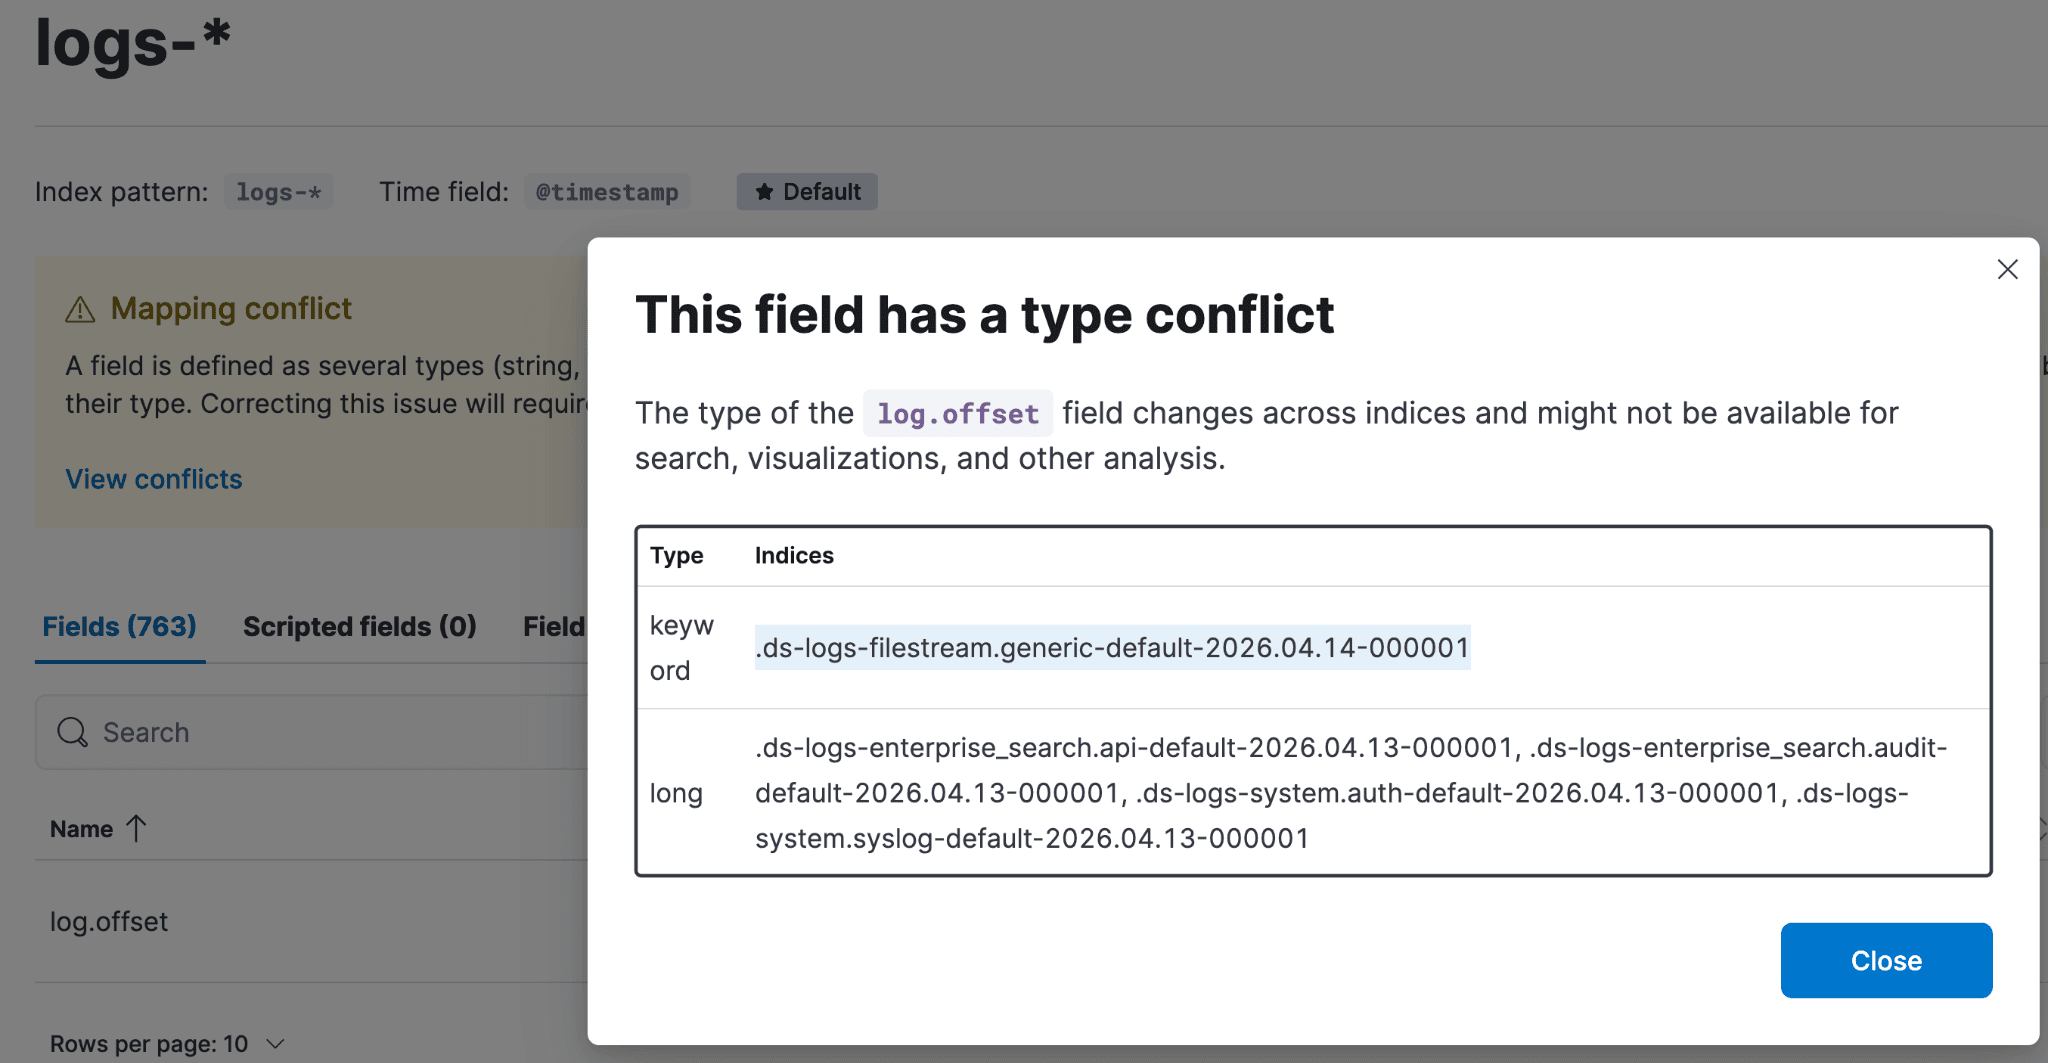
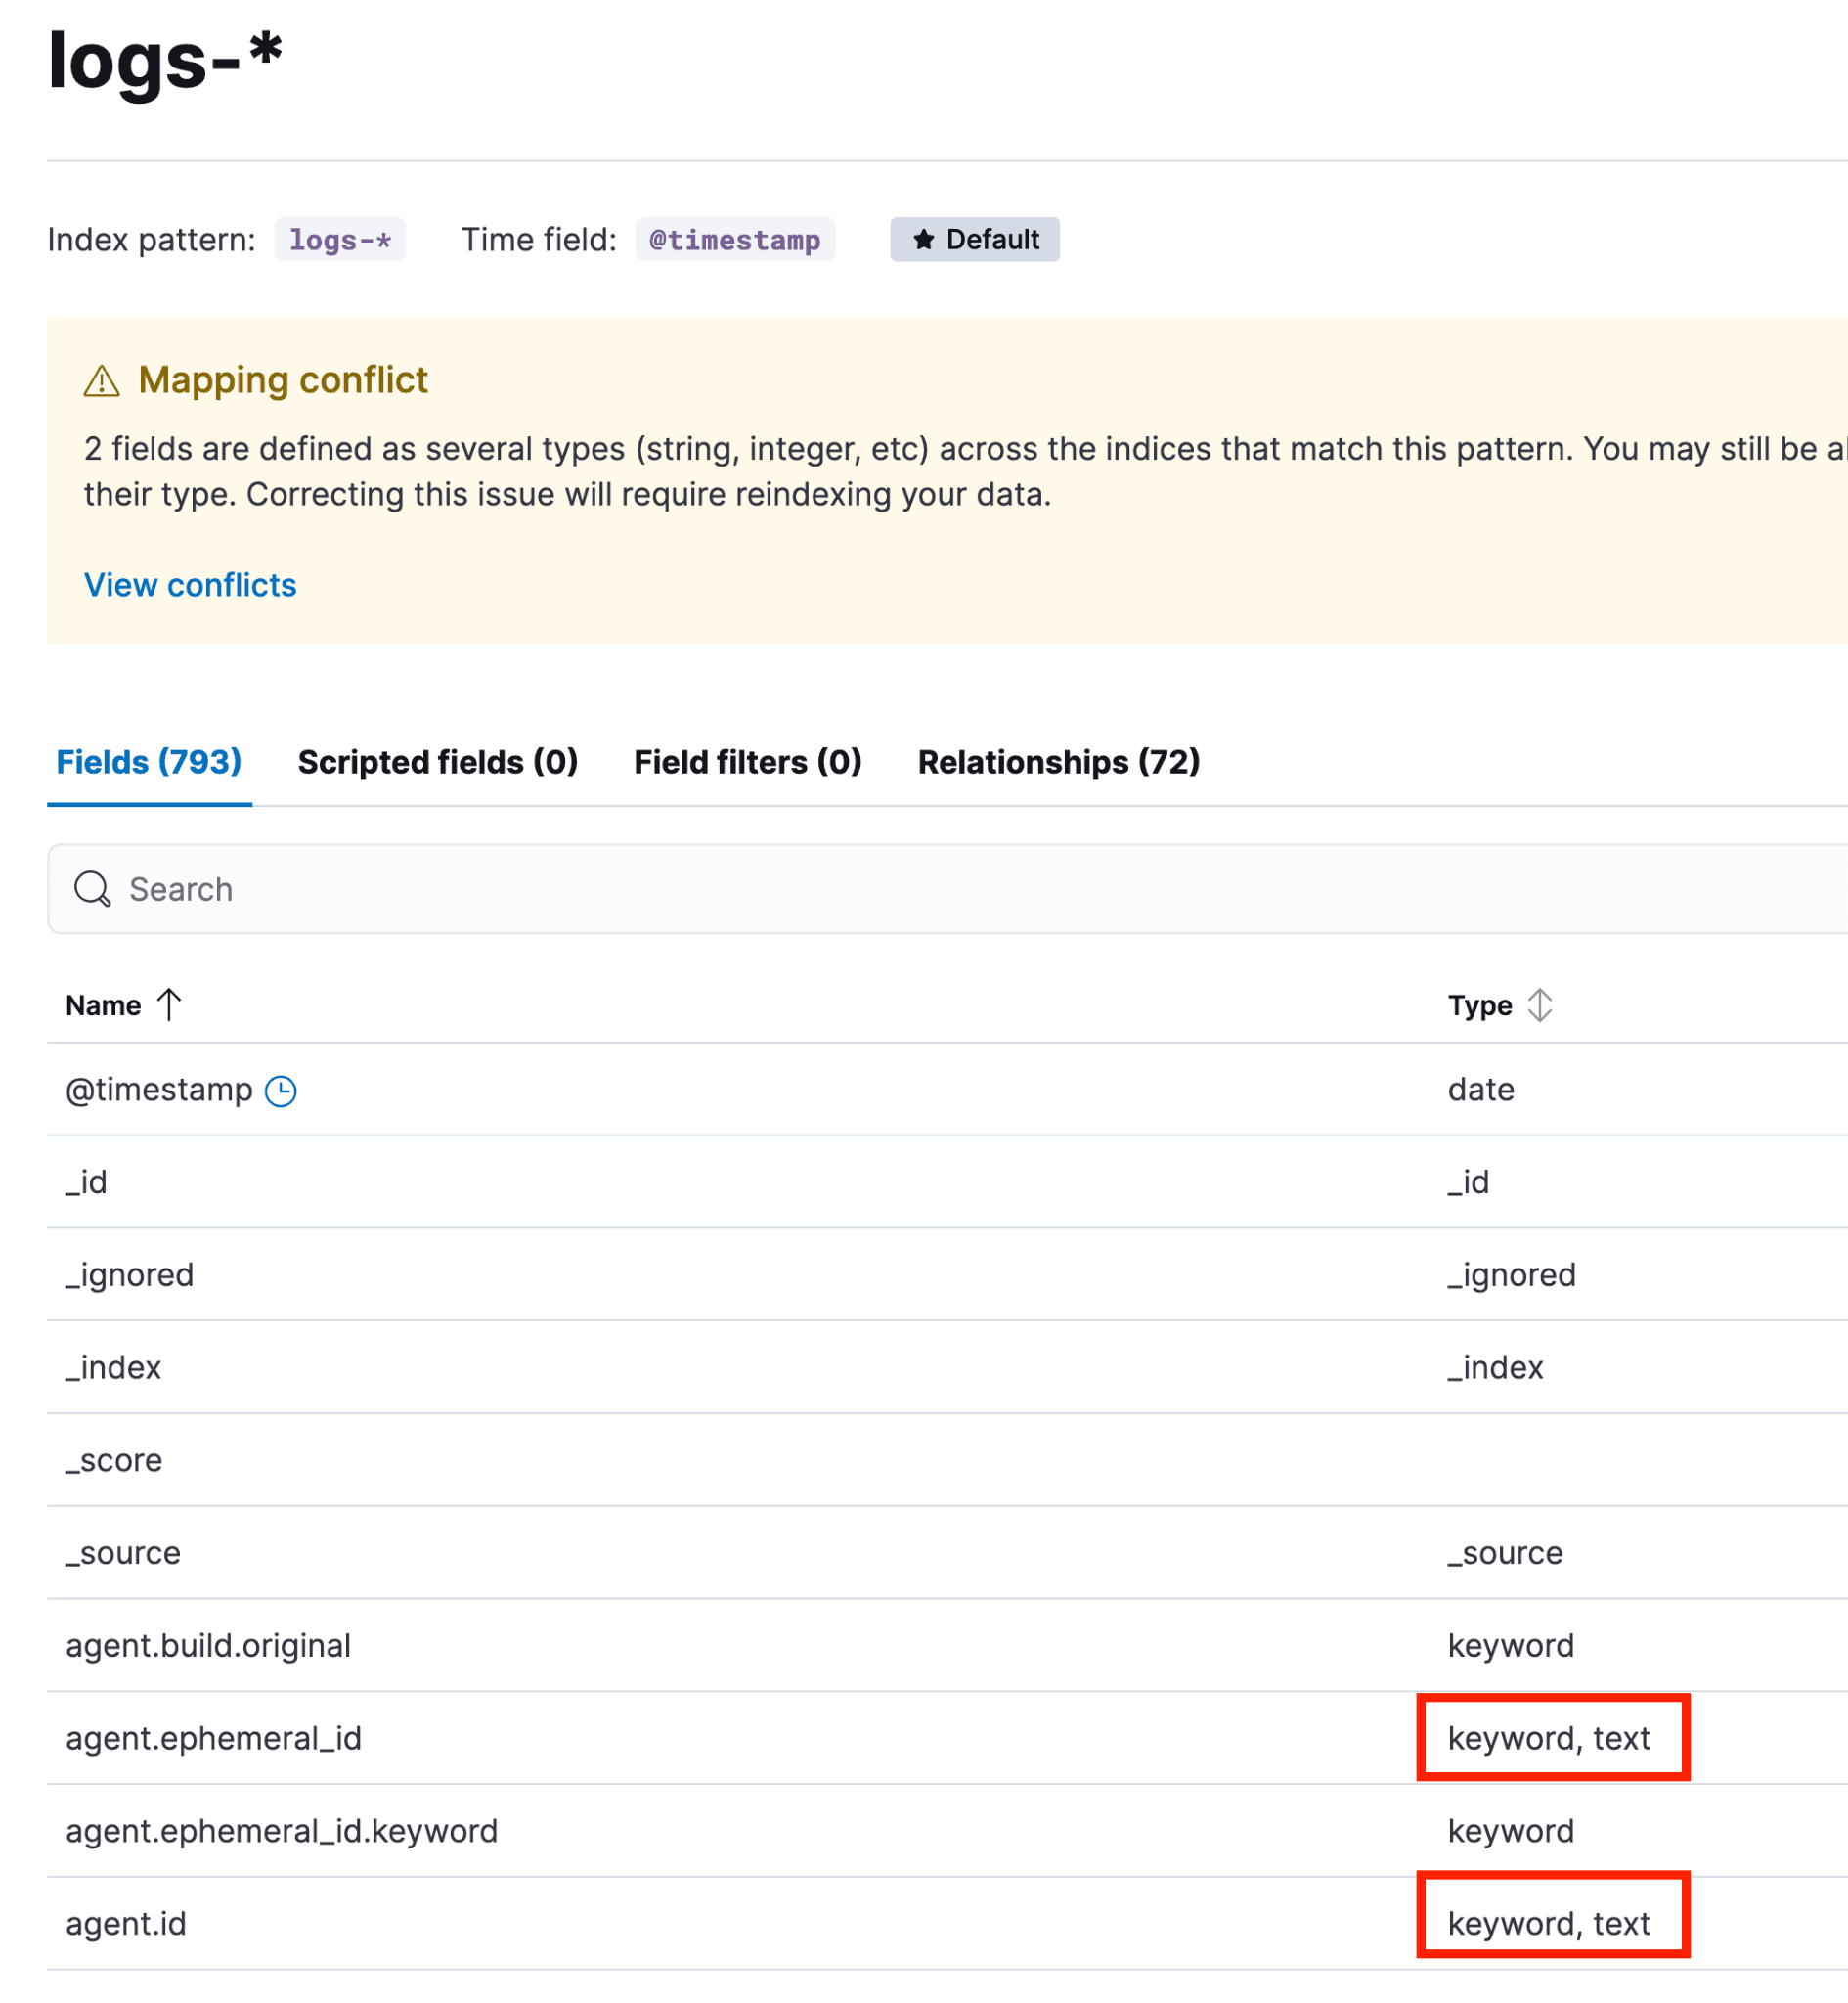
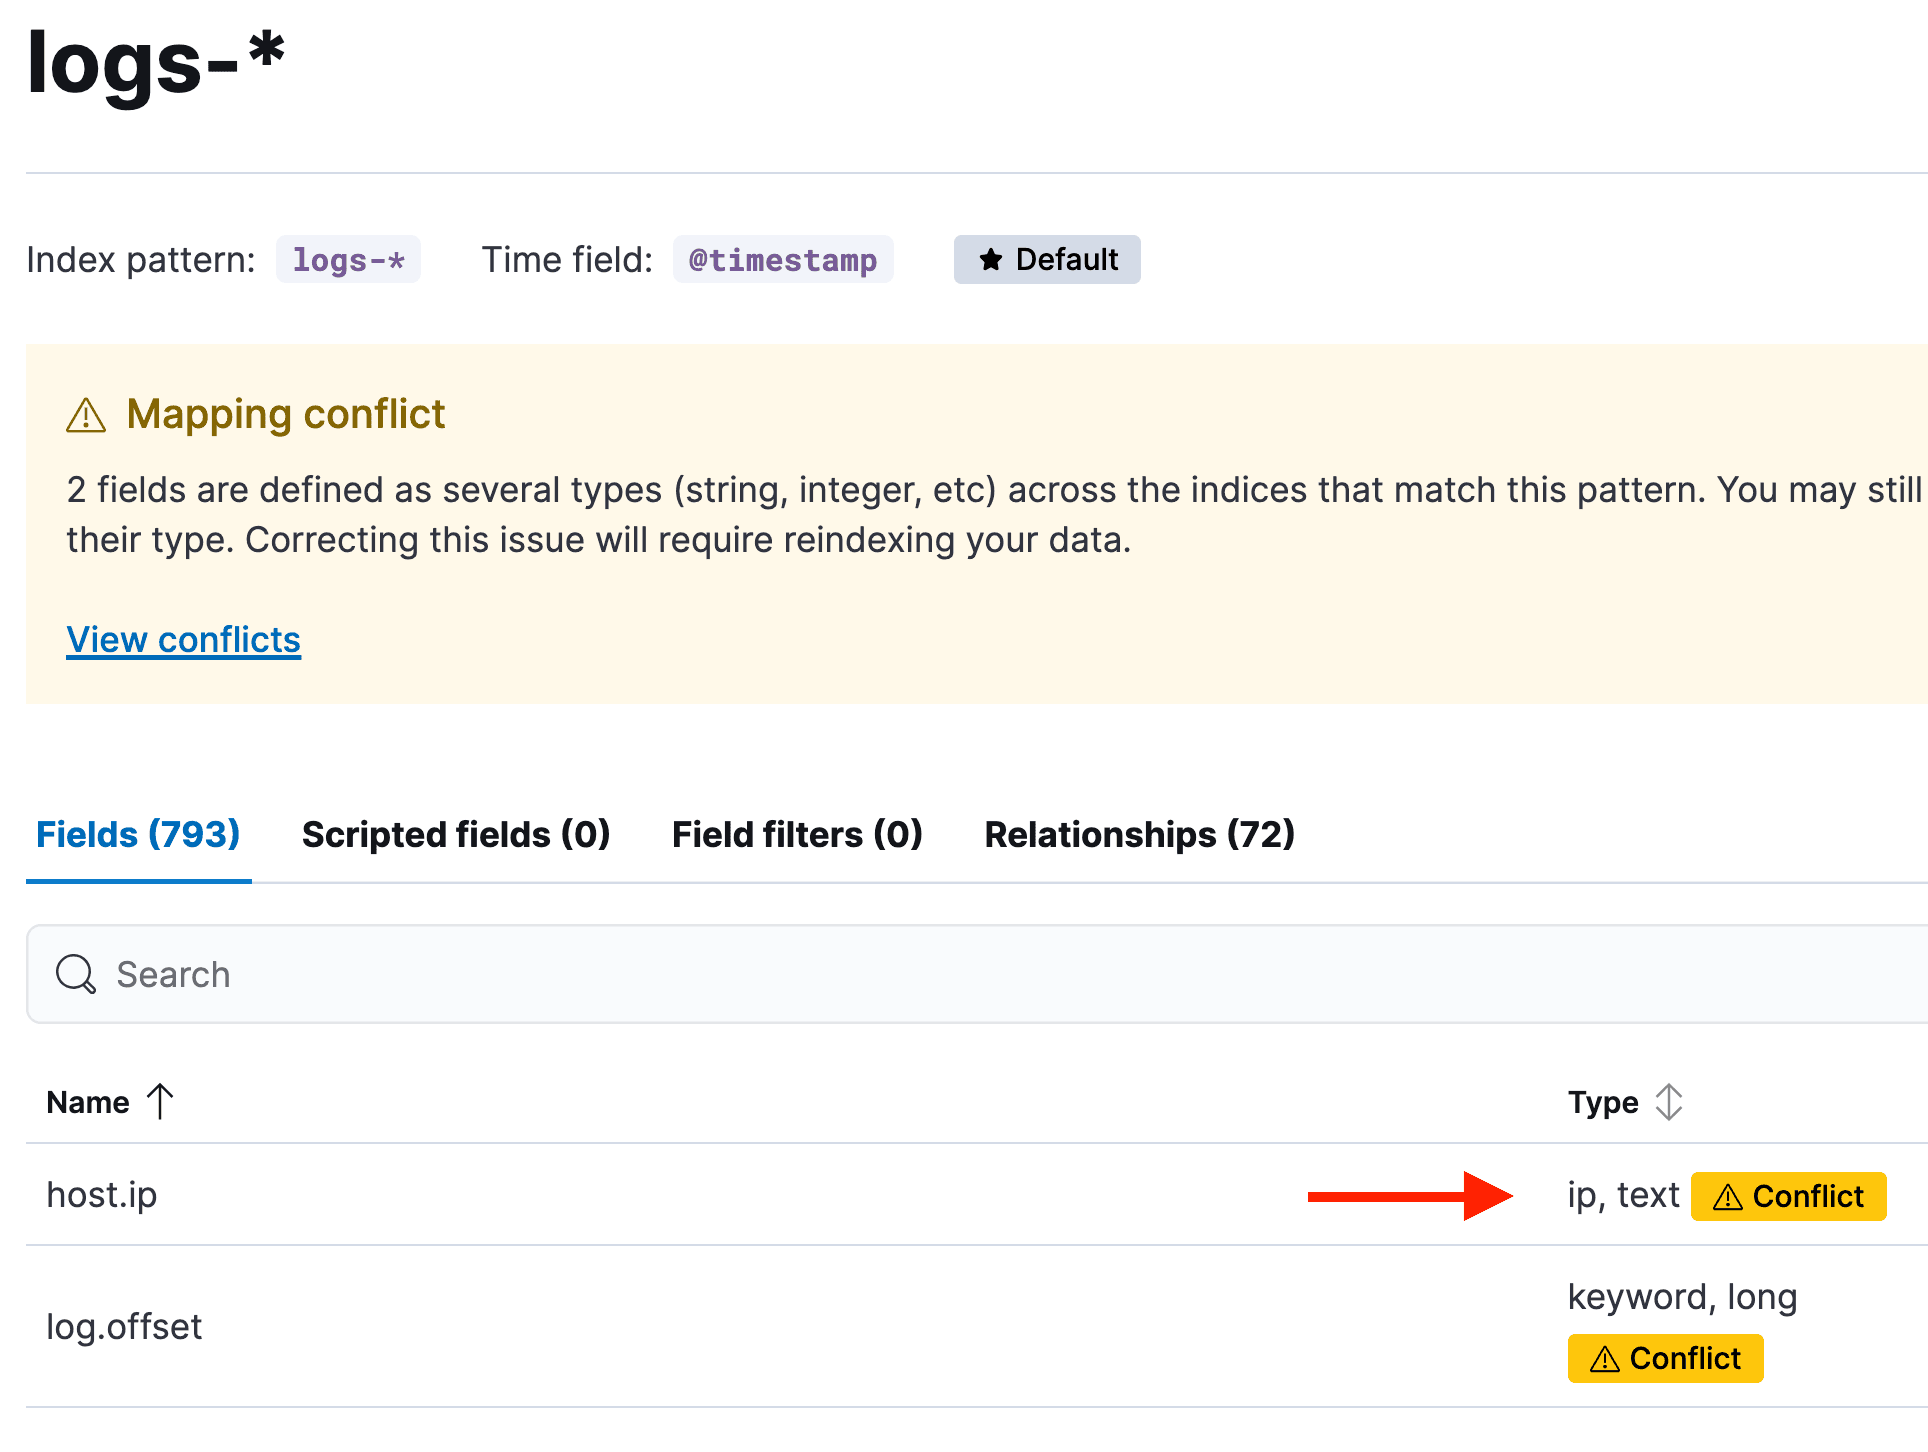
要确定哪些字段存在映射冲突,请依次前往 Stack Management → 数据视图 → logs-*(logs-* 数据视图是 logs- 前缀下覆盖范围最广的数据视图)。如果有冲突,会显示一个黄色提示框。可以点击“查看冲突”,也可以在搜索框旁边的“字段类型”下拉菜单中选择“冲突”。
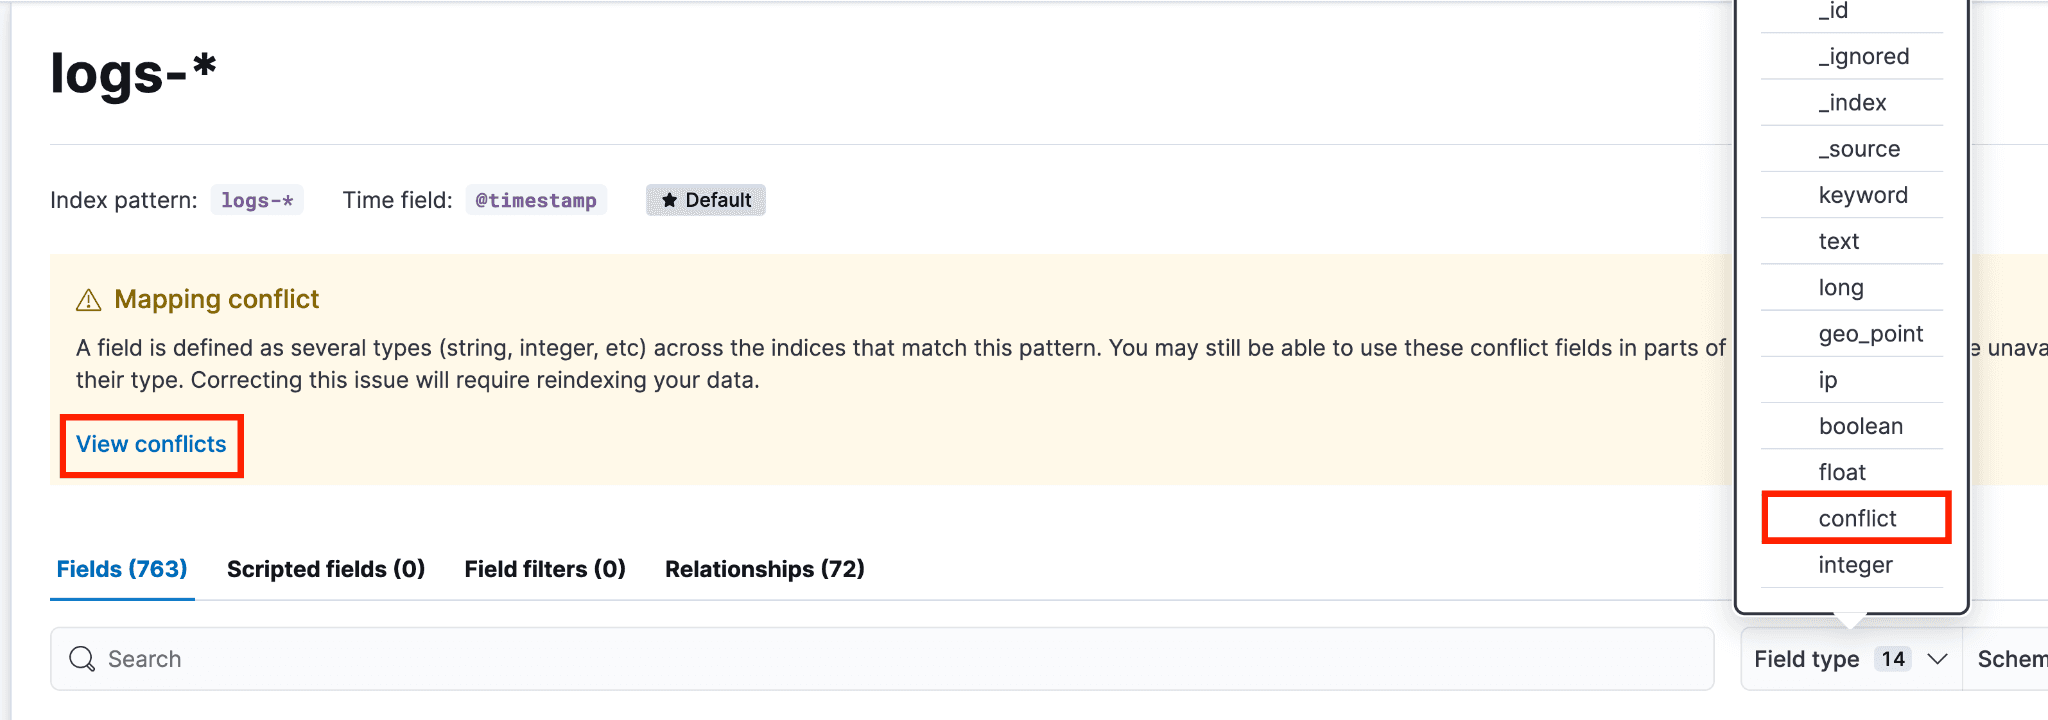
点击黄色的“冲突”按钮,可看到哪些索引关联了哪种映射类型。
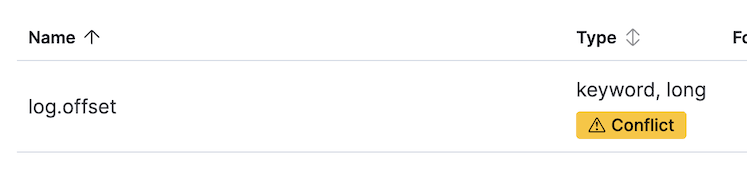
这种情况(字段同时映射为 keyword 和 long)通常是因为在相关数据流的组件模板中定义该字段的具体映射类型之前,数据就已经被摄取。此时,Elasticsearch 会尝试根据其动态模板来设定映射。

要判断该字段应采用哪种映射,以及它是否属于 ECS 字段,需要查阅 ECS 字段参考文档进行验证。如果不是 ECS 字段,则必须检查其实际值,以确定正确的映射类型。
如果像本例中的 log.offset 字段在 ECS 中未被记录,下一步是调查该字段的值,确定哪种冲突映射类型有最多的支持索引,并检查其他索引的组件模板。
通常,与最多索引关联的映射类型是正确的,但仍建议您查看字段的实际值来确认。要确认某映射类型(如 long)的有效性,还需验证字段值确实符合该类型。验证可通过 Discover 搜索相关字段来完成。也可以查看包含相同字段的其他数据流来进一步确认。
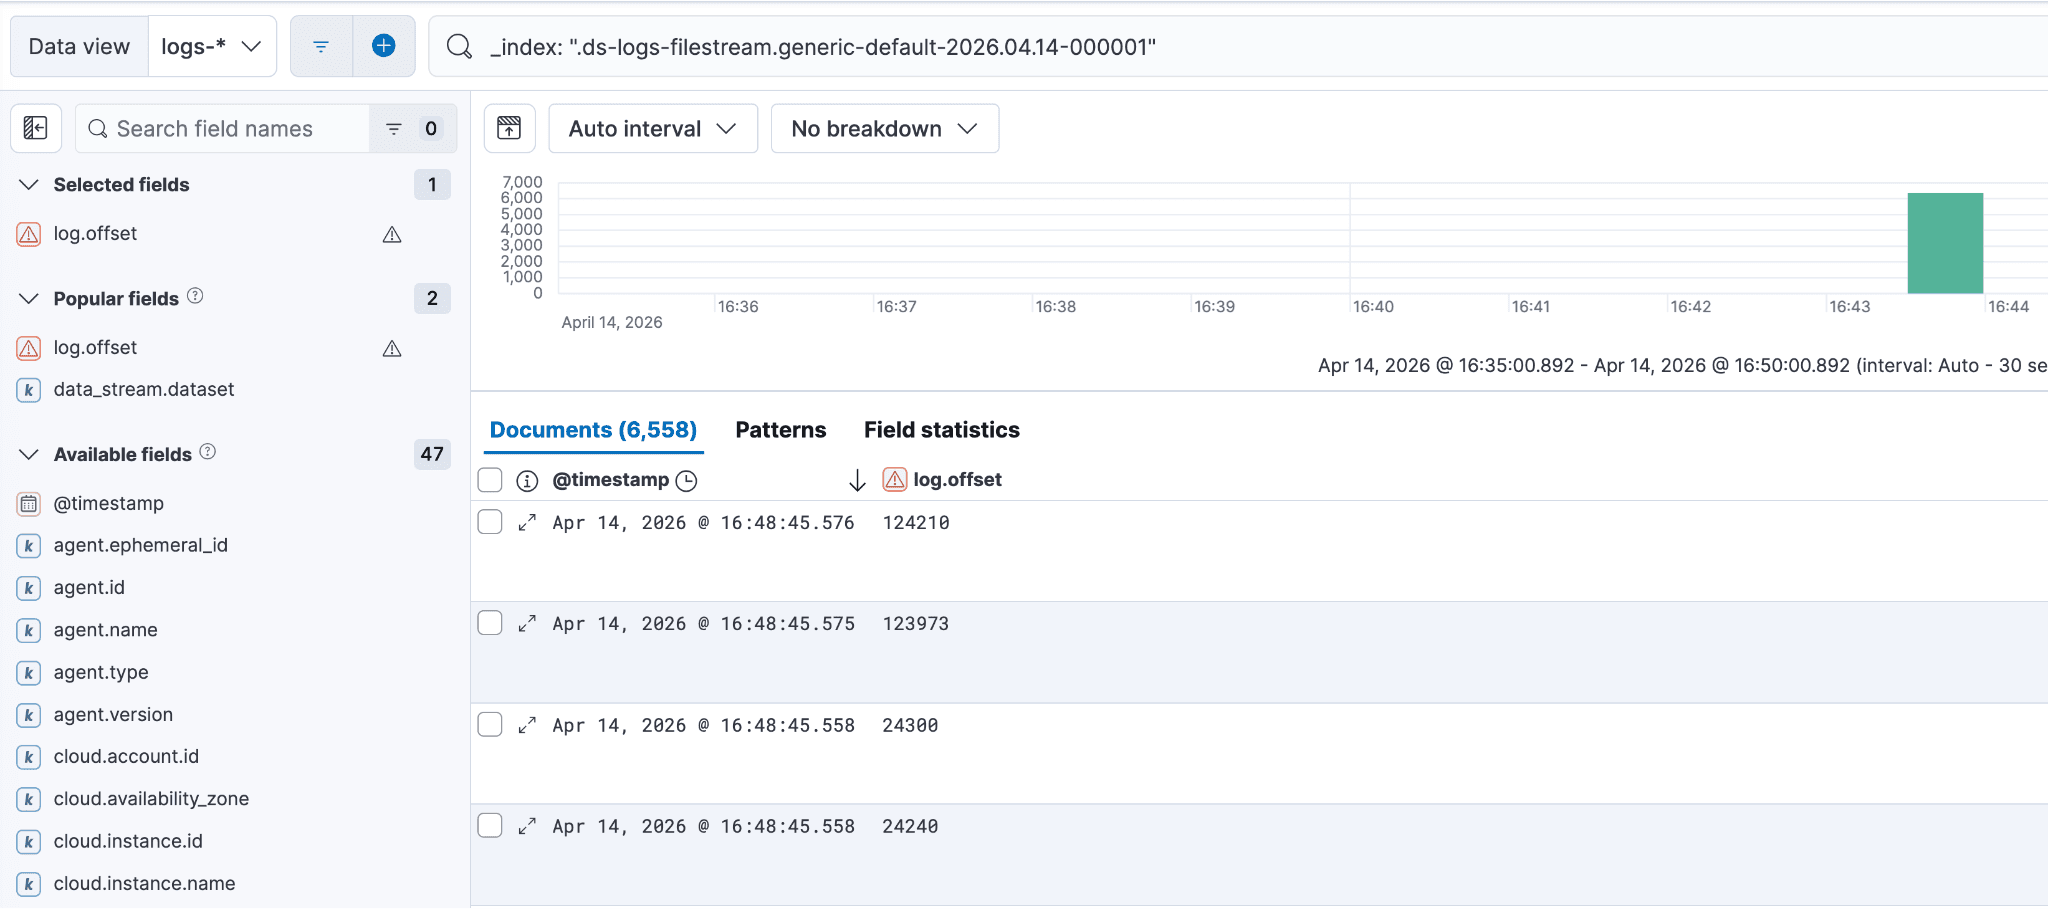
要查看映射问题字段的实际值,请回到前面提到的黄色“冲突”按钮,点击“冲突”按钮,选中某个后备索引,并将其粘贴到 Discover 会话中。您的 Kibana Query Language (KQL) 语句应类似于下面的截图,并包含 _index: 字段分隔符。
准备新的后备索引自定义组件模板
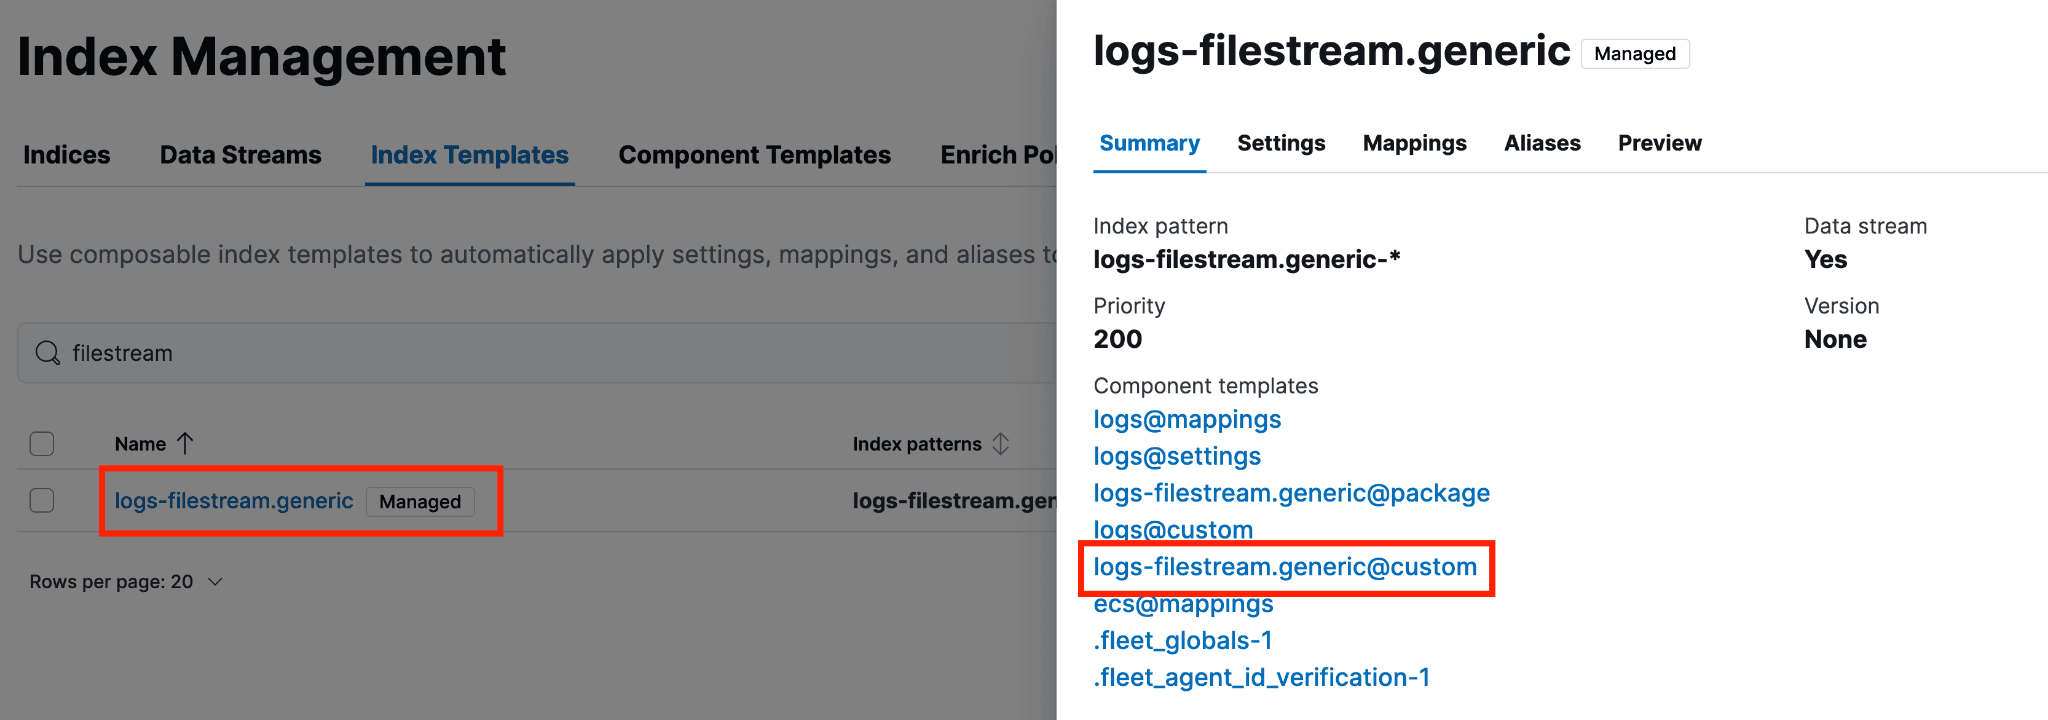
要解决数据流中的映射冲突,首先检查相关的 @package 组件模板。可以在 Stack Management → 索引管理 -> 组件模板中找到它。搜索目标数据流,并选择对应的 @package 链接。该模板开箱即包含字段映射;虽然映射不匹配的情况并不常见,但有时更合适的字段类型可能会被遗漏。
检查模板,确认它包含了所需的字段嵌套和映射。例如,如果模板错误地将 log.offset 列为 keyword,这就是问题的根源。
重要提示:由于不建议修改 @package/托管模板,您必须使用或创建 @custom 组件模板,为未来所有数据修正映射类型(例如,将 log.offset 修正为正确类型)。
- 不建议修改
@package/托管模板,因为当集成更新到新版本时,对@package模板所做的任何更改都会被覆盖。这就是为什么我们建议使用@custom模板。 - 如果数据流遇到映射冲突,需要向数据流的
@custom组件模板中添加所有缺失的字段(包括 ECS 和非 ECS)的嵌套或映射。如果该模板不存在,请创建它,并确保为字段指定正确的映射类型。 - 如果数据视图中存在多个冲突,请一次性为数据流添加所有必要的缺失映射,这样只需重索引一次,而不是多次。在
@custom组件模板中为正确的数据类型配置条目,可以确保未来摄取的所有数据都遵循相同的映射规则。
要创建 @custom 组件模板(或确认它是否已存在并被使用),请进入“索引模板”,输入数据流名称,然后点击该数据流所使用的 @custom 模板。如果模板还未创建,会出现黄色提示框,可以通过界面创建。

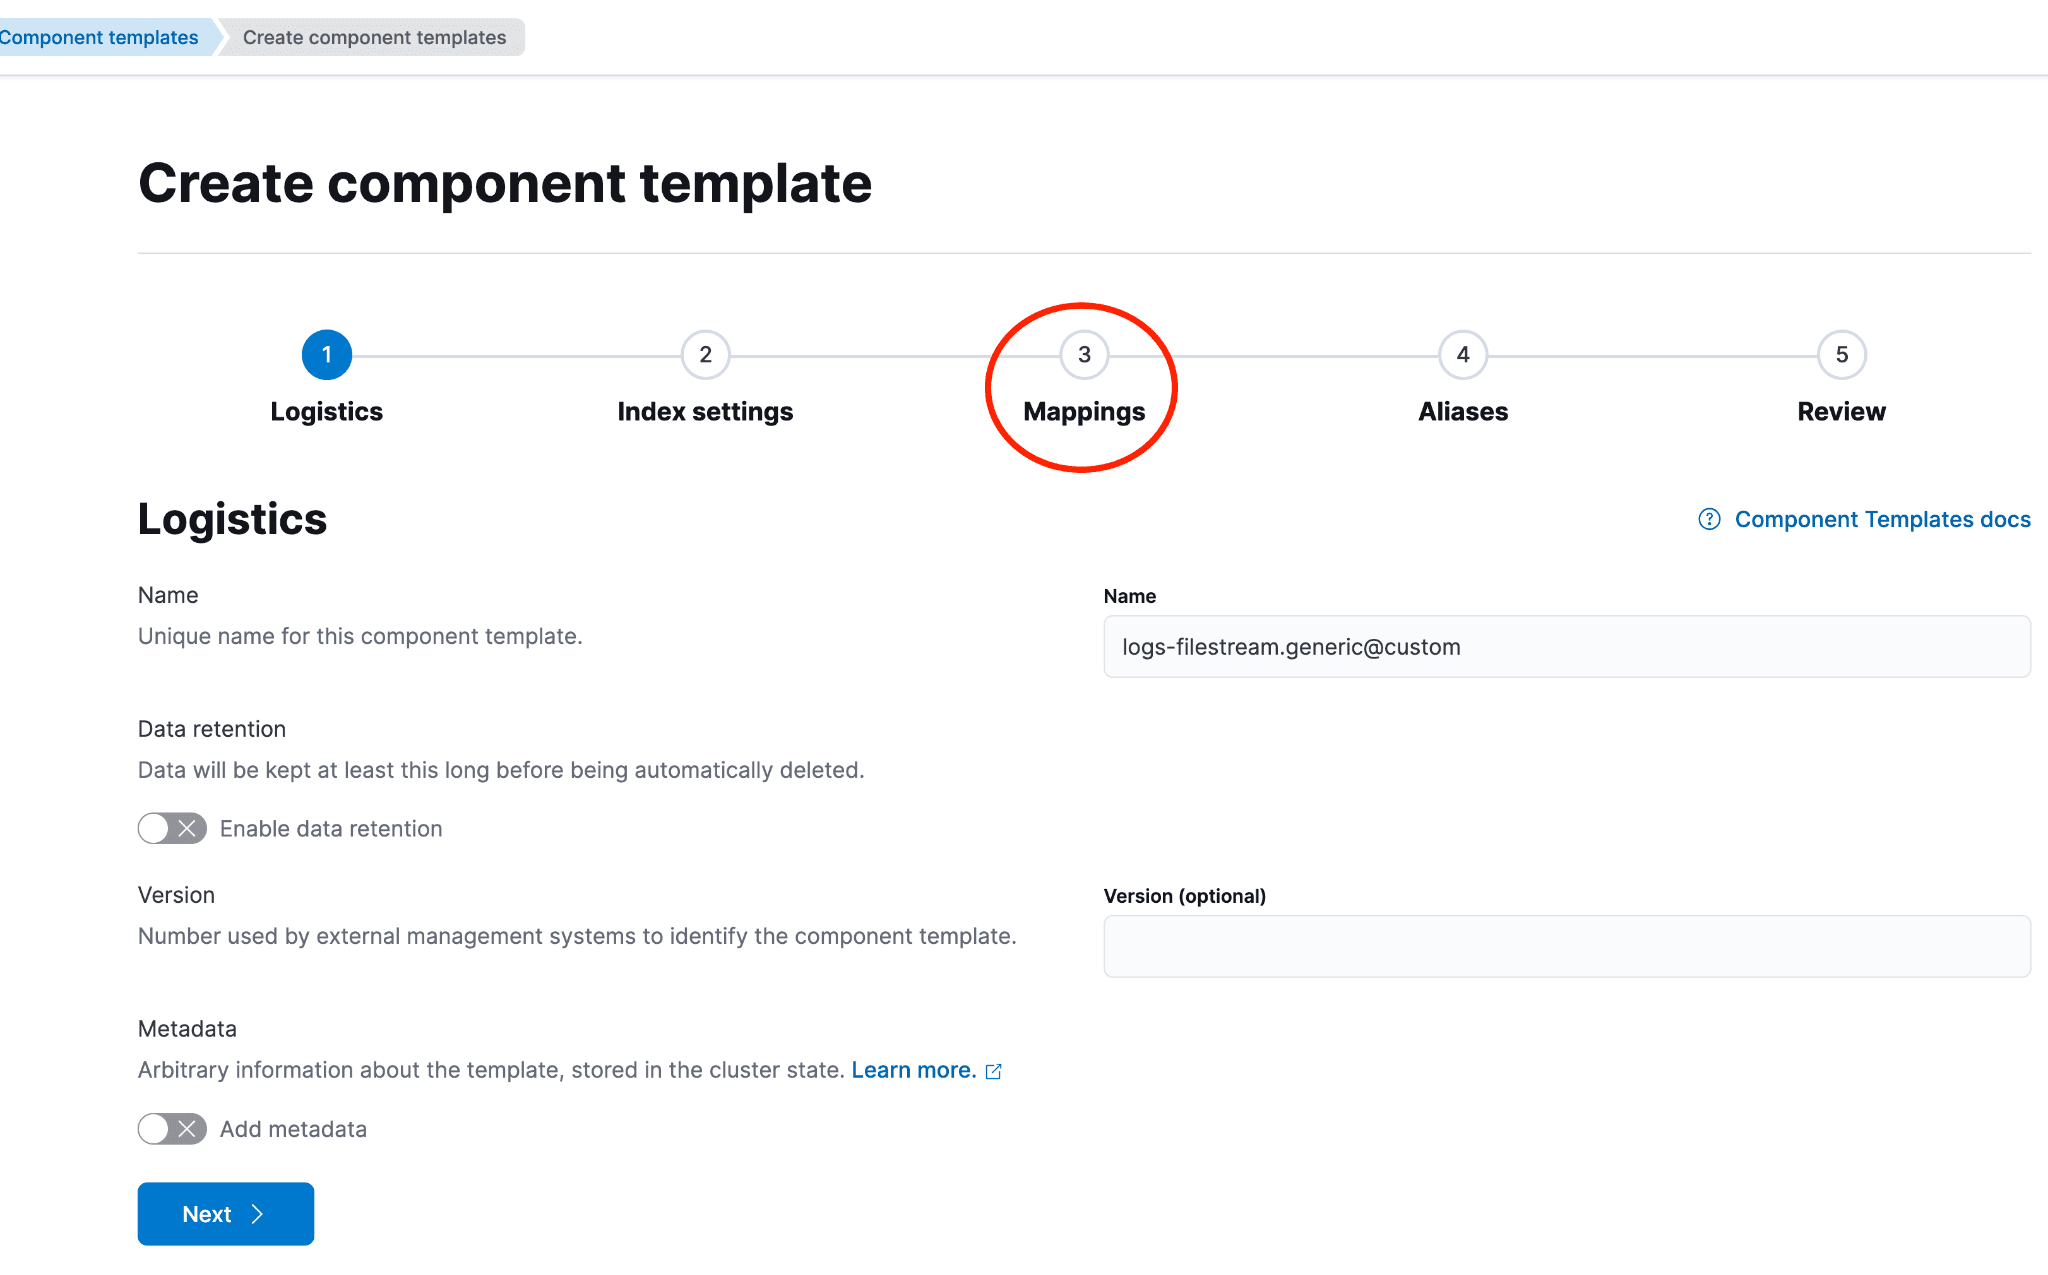
下图展示了点击“创建组件模板”后的页面。保持第一页的默认设置,然后点击“映射”或“下一步”,直到进入“映射”页面。
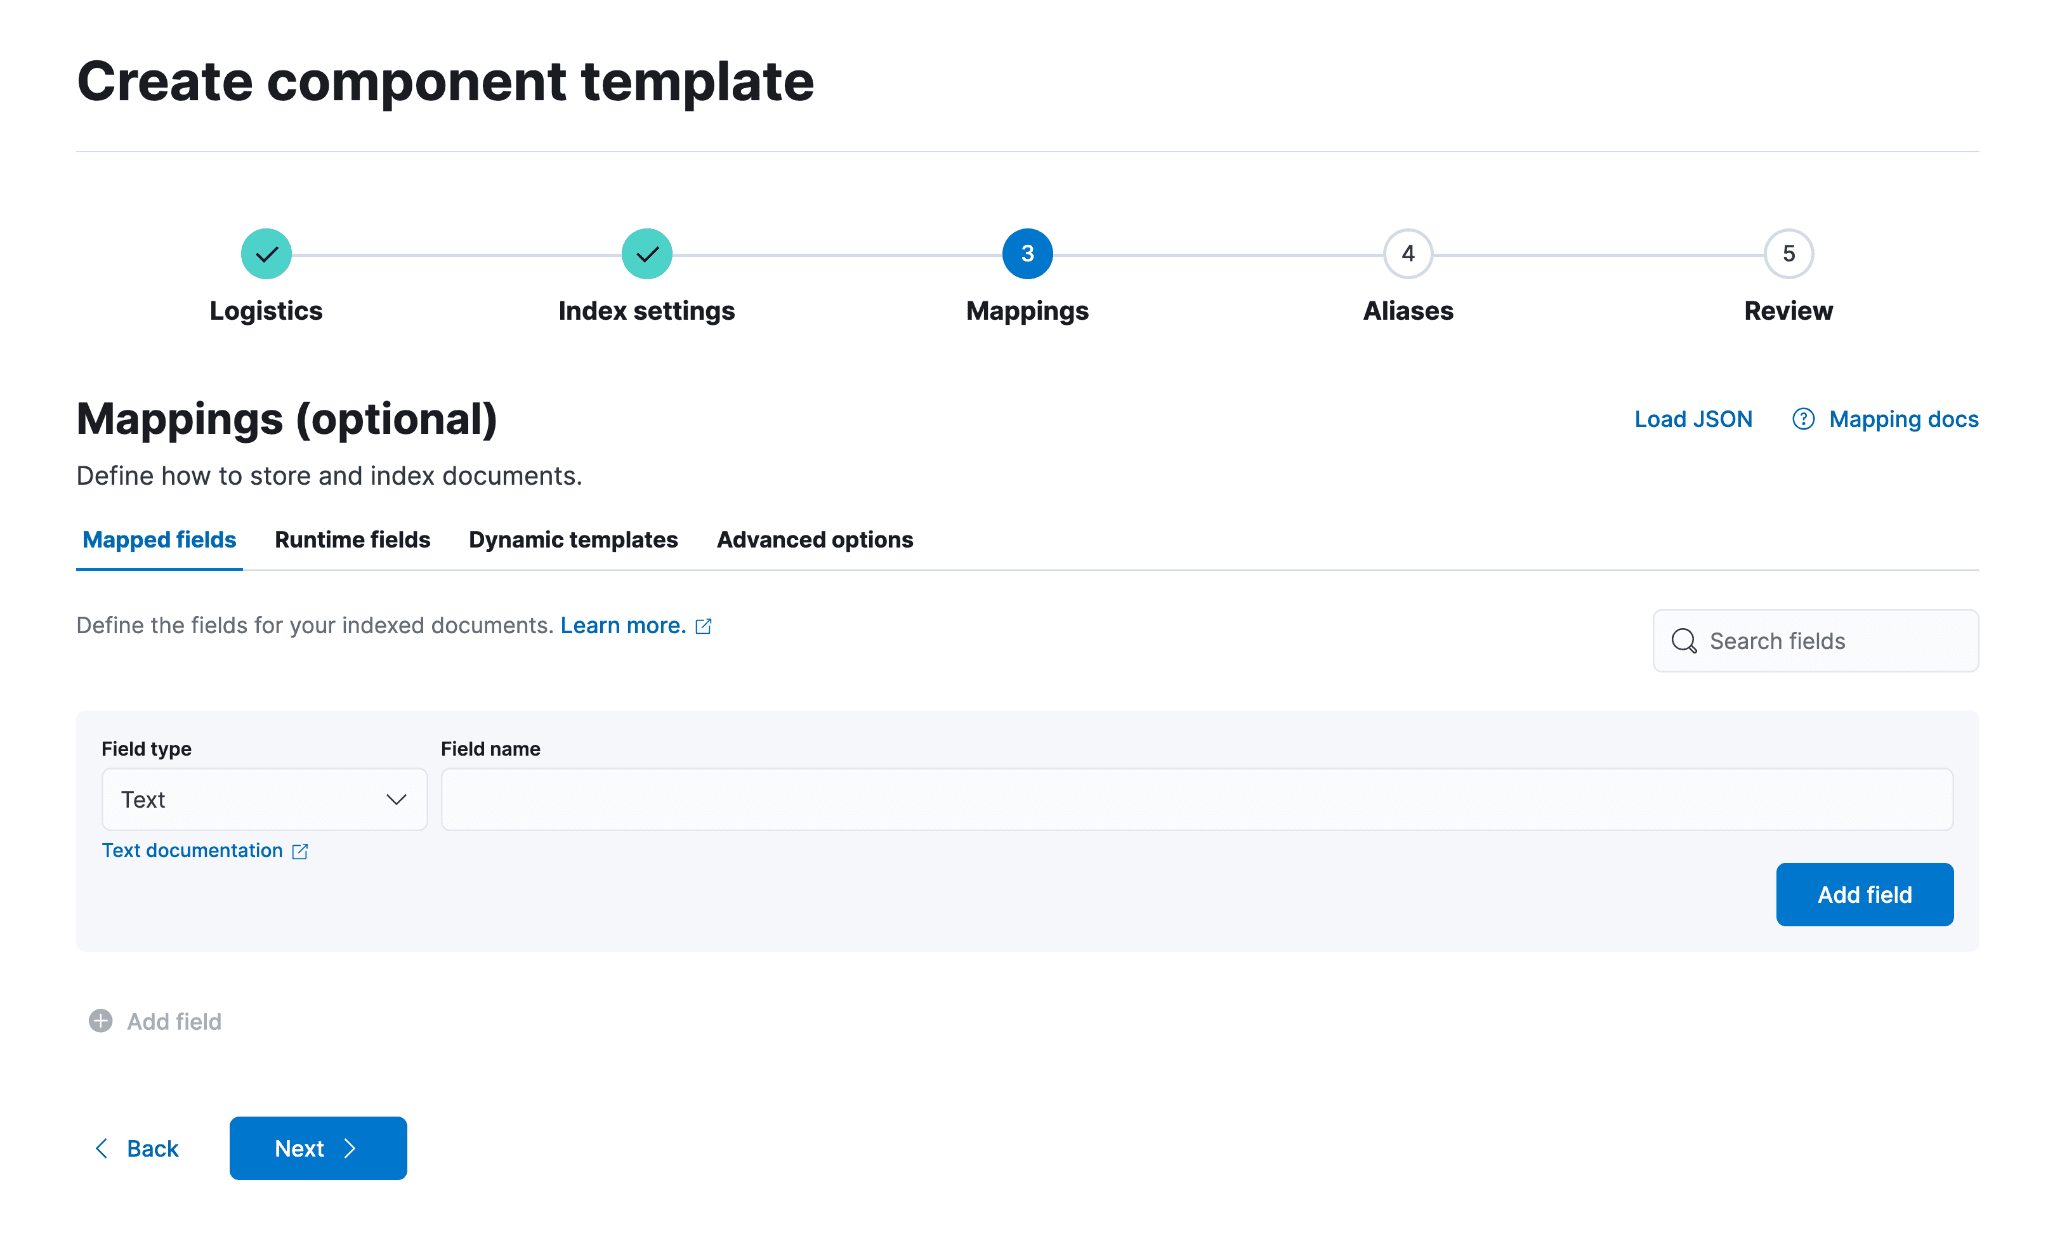
若要为新传入的字段明确设置映射,或更新存在映射冲突的字段,则需要为冲突字段添加条目。这样,当数据流因索引生命周期管理 (ILM) 策略触发滚动时,新映射即可生效。
以下将为 filestream 数据流的 @custom 组件模板中的 log.offset 字段设置映射。根据需要重复上述步骤,添加自定义字段或更新 @package 中的必要字段,并为该数据集配置对应的映射。在本例中,将 offset 设置为 Long 时,字段类型将为 Numeric,数值类型将为 Long。点击“添加字段”,然后点击该区域外部以继续。
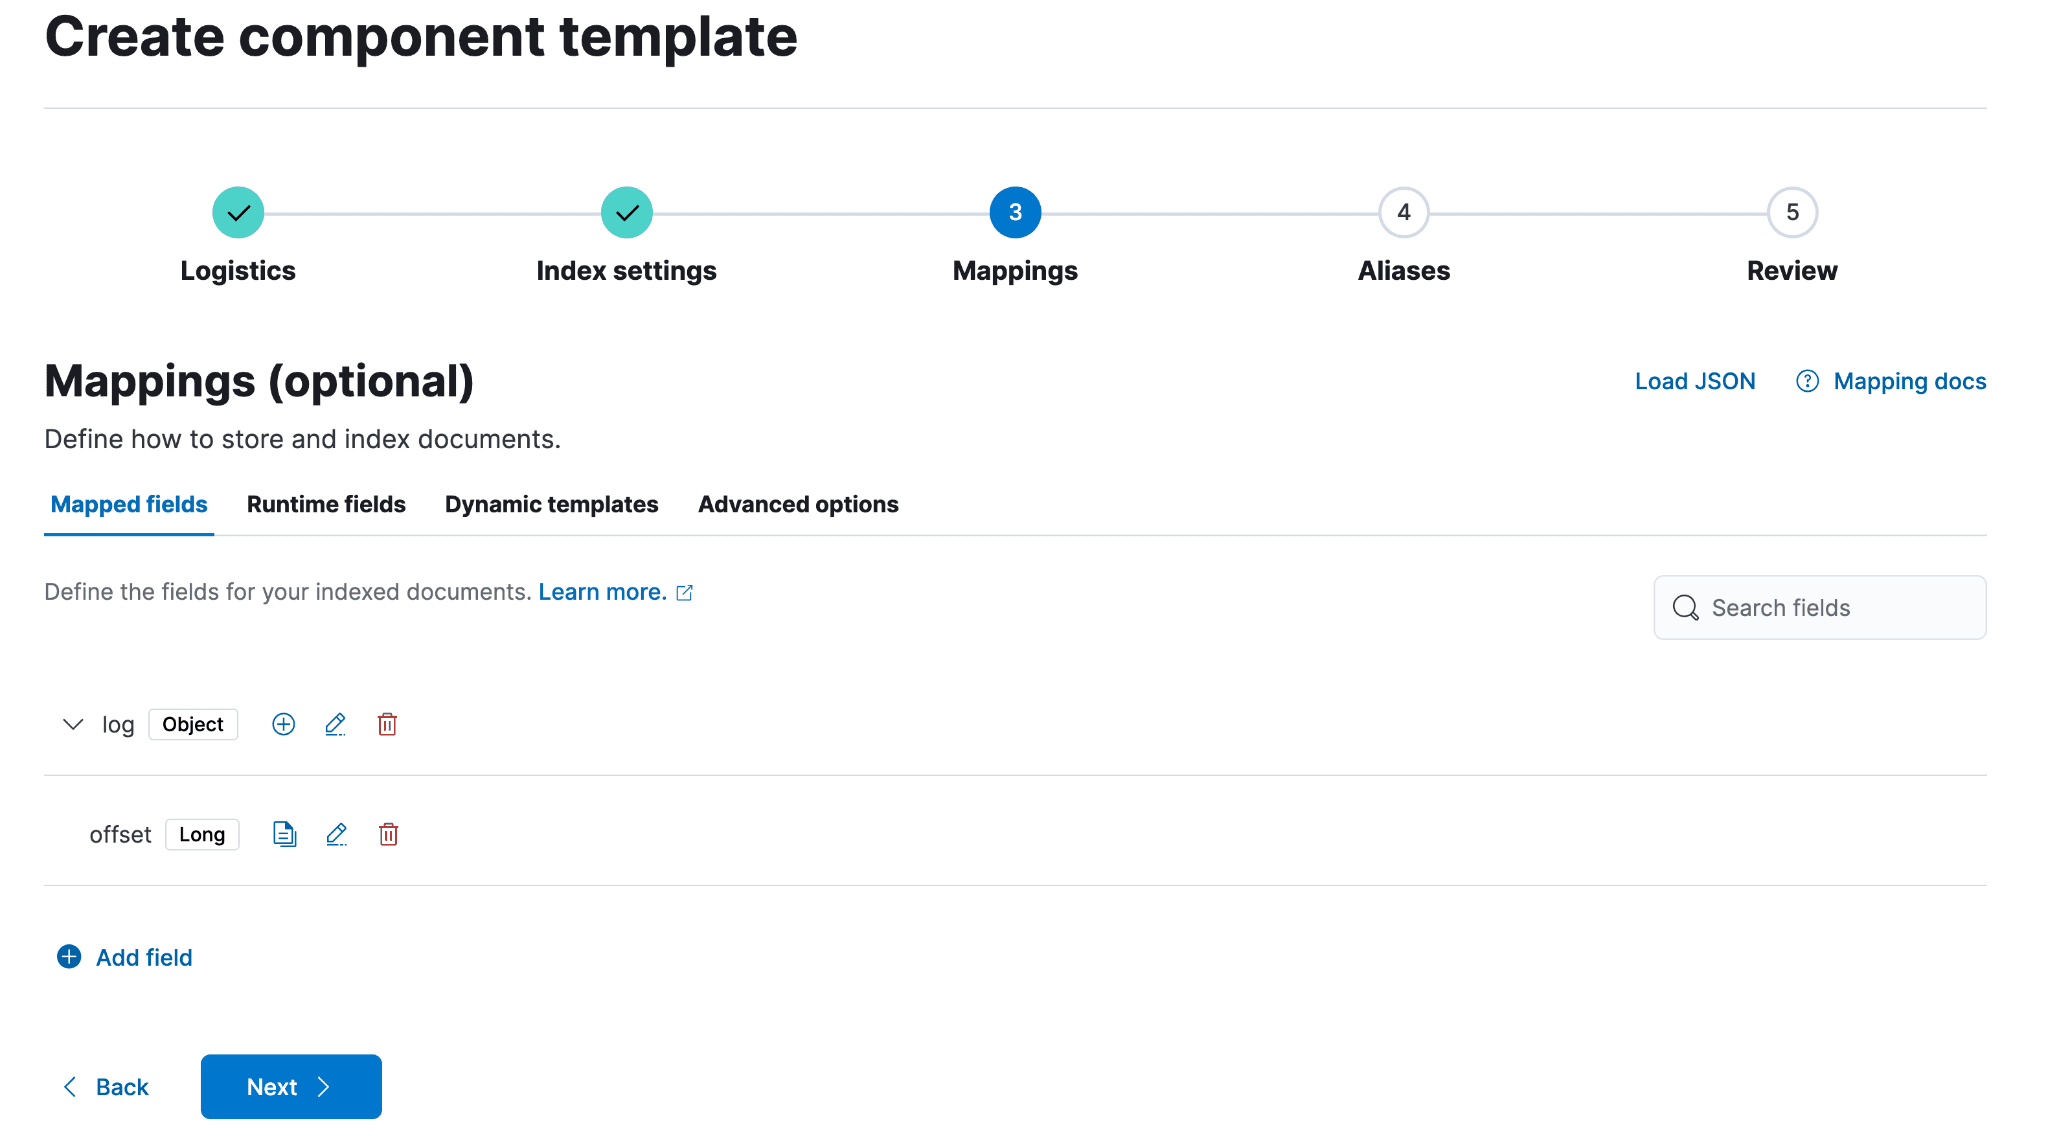
添加完所有需要的字段后,继续点击直至进入审核步骤;准备就绪后,选择“创建组件模板”。从此步骤开始摄取的所有新数据,其 log.offset 都将设置为 long 类型。
创建新的后备索引结构
新的后备索引需要包含数据流组件模板中的现有映射,以及 ecs@mappings 组件模板中的映射。ecs@mappings 组件模板在数据流组件之后应用,作为兜底模板,捕获可能未被前面组件模板覆盖的额外映射。
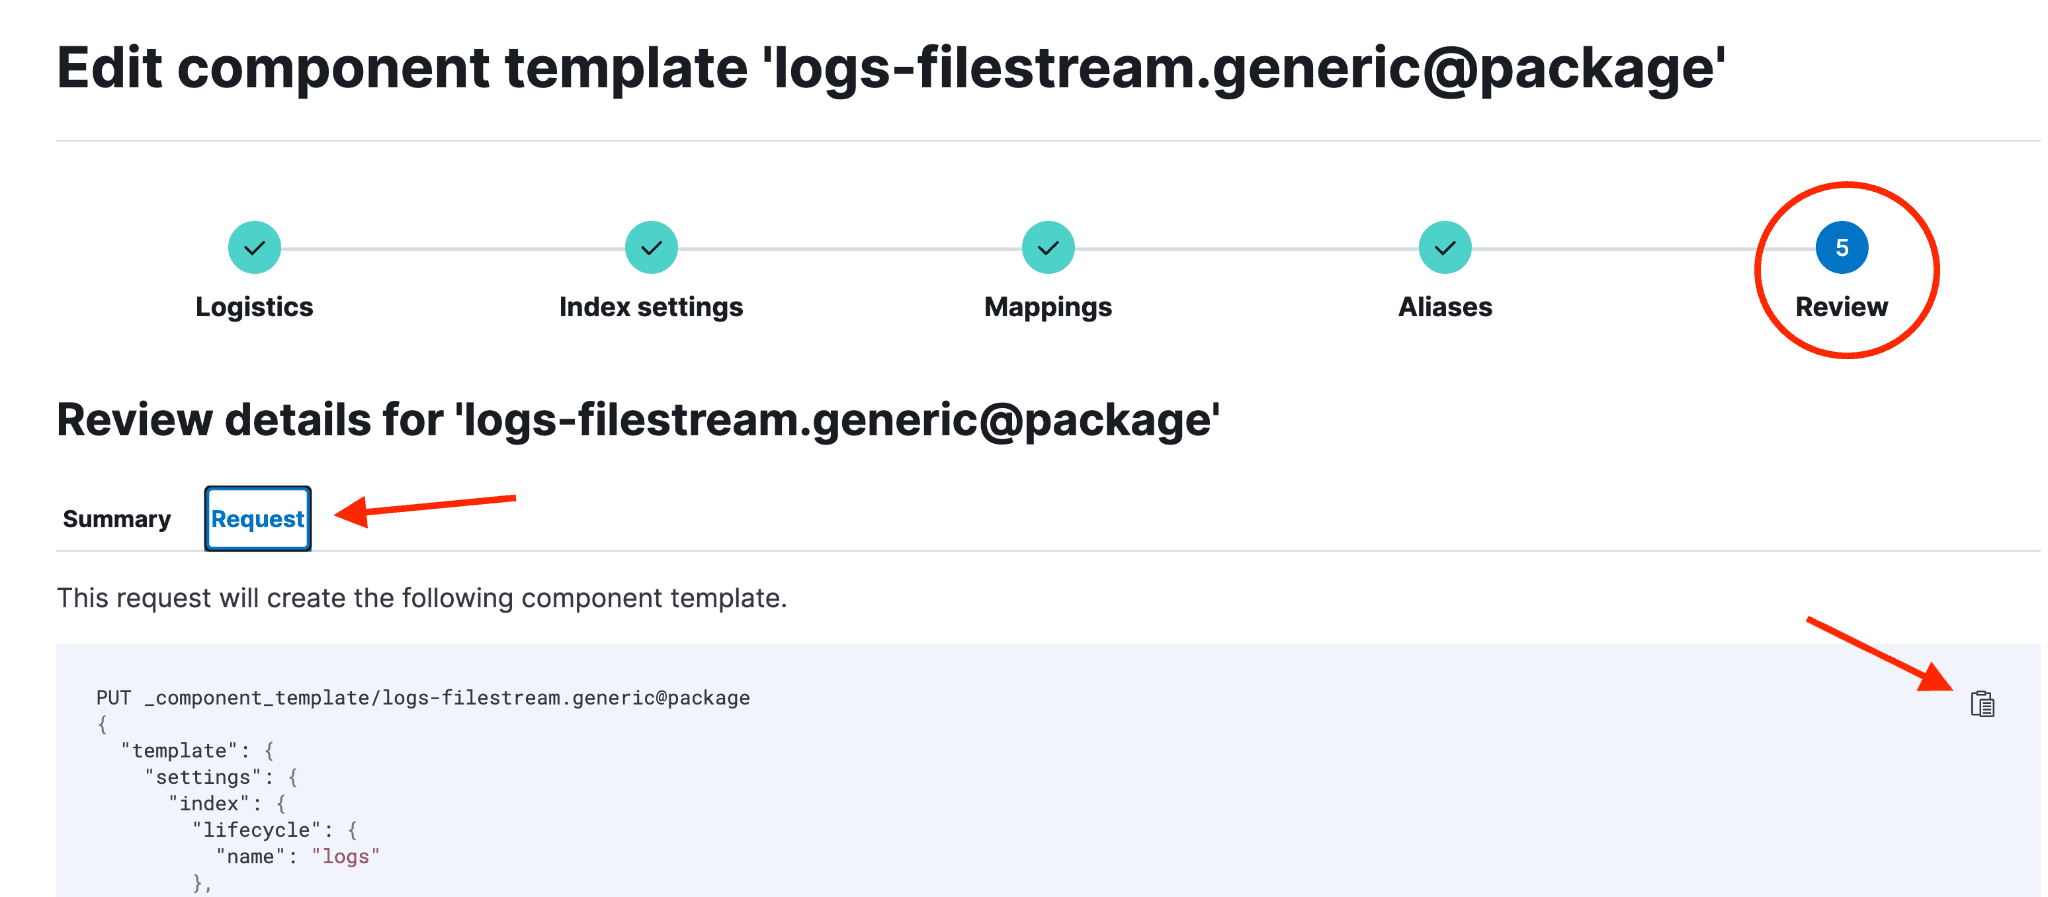
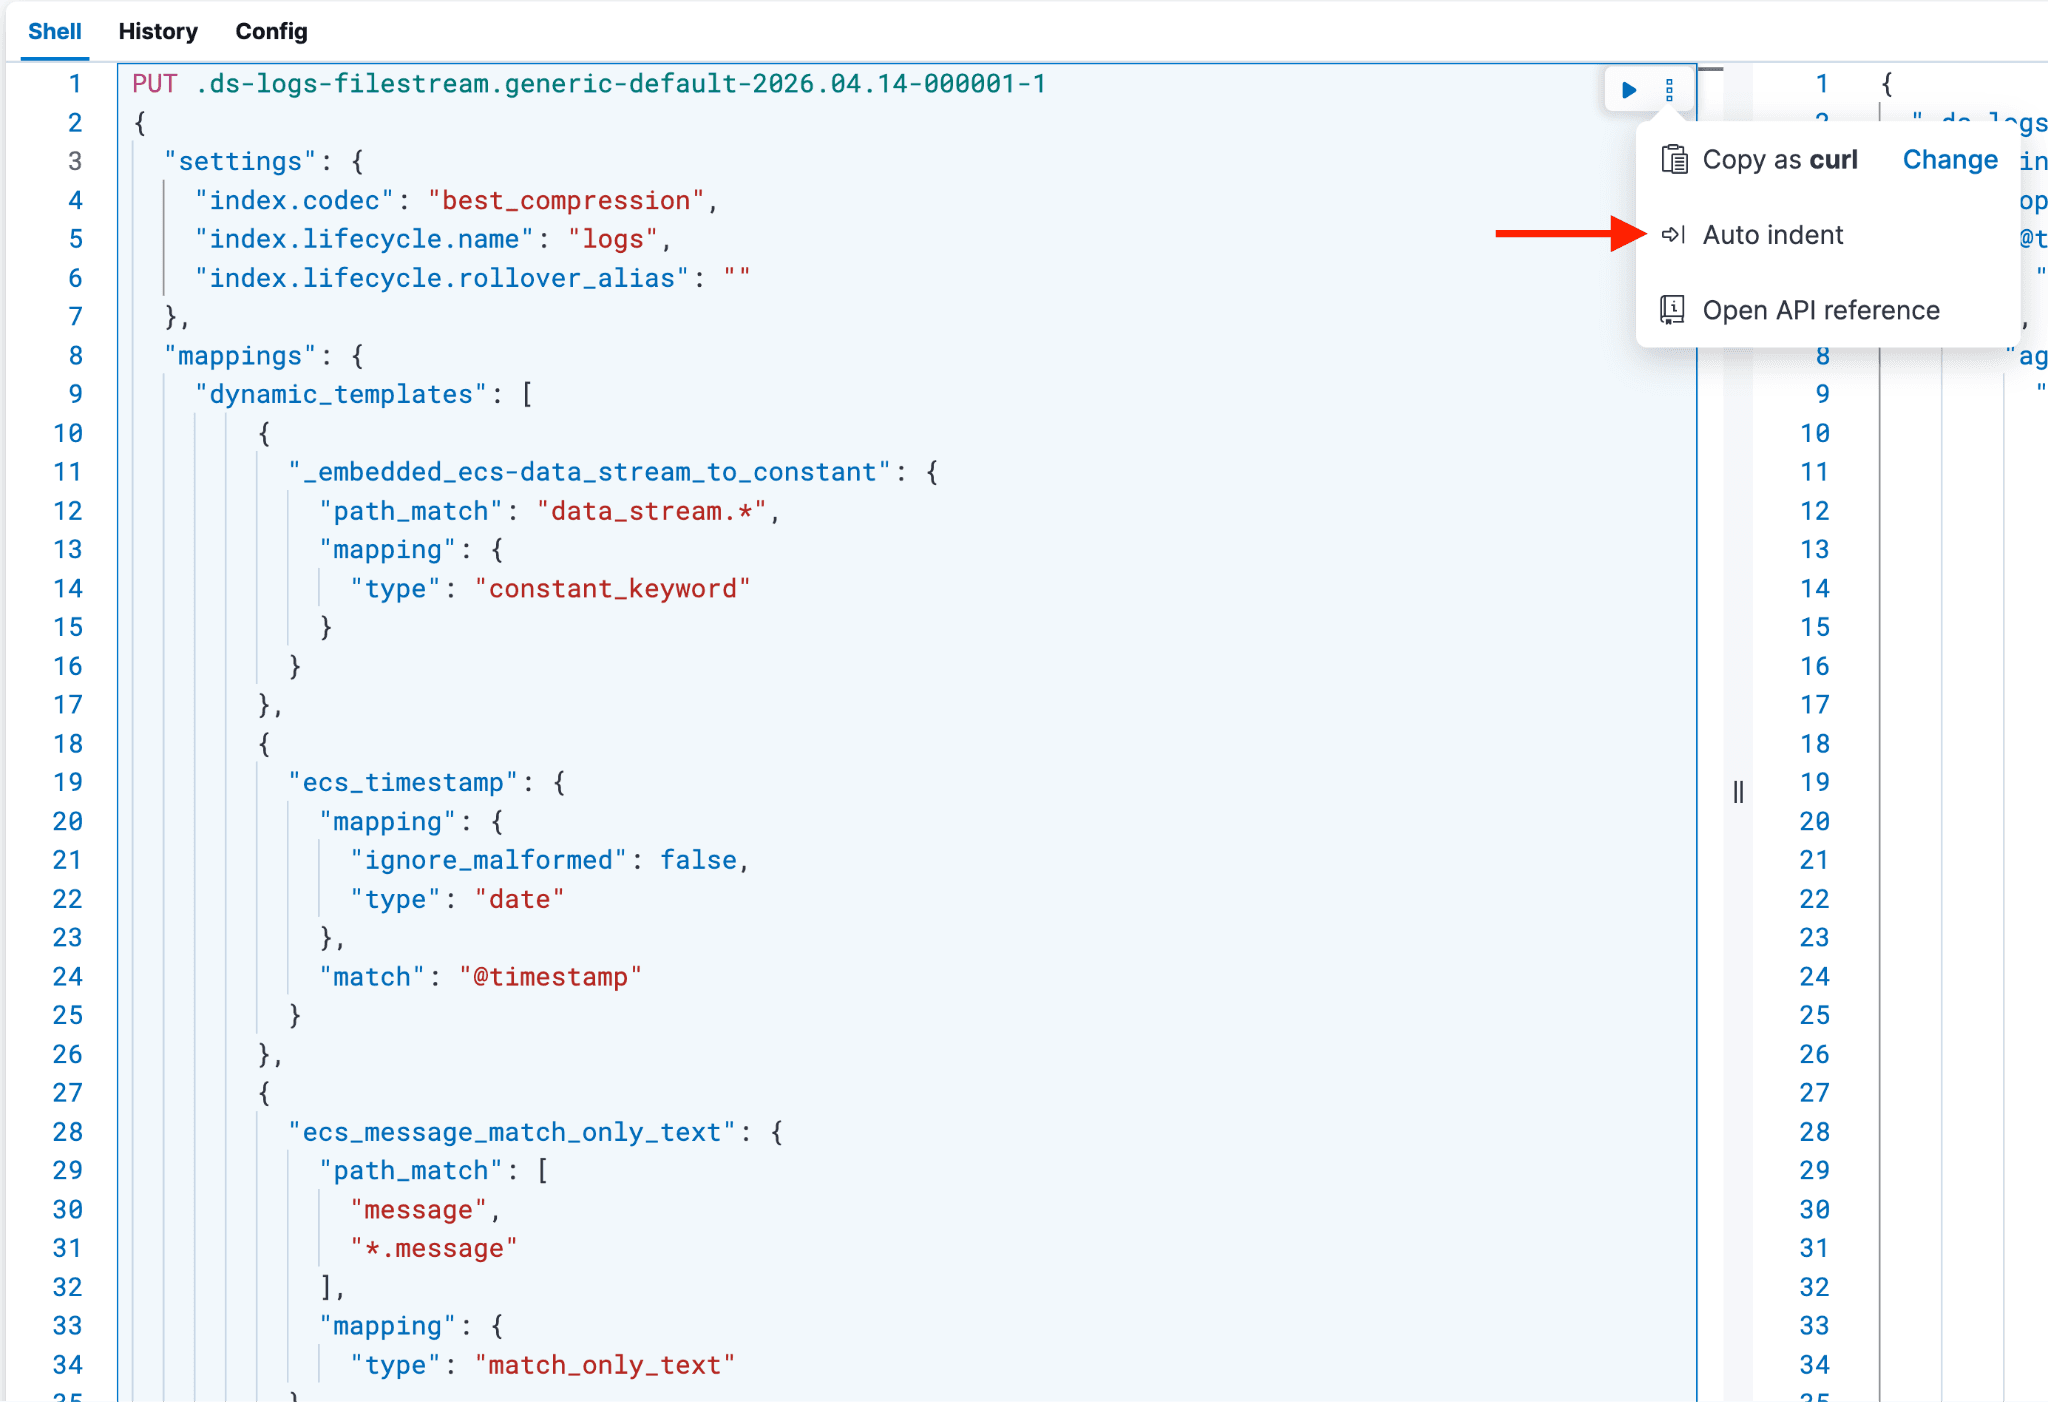
在浏览器中打开数据流的 @package 映射页面。(依次前往 Stack Management → 索引管理 → 组件模板 → logs-filestream.generic@package → 管理 → 编辑。)进入后,点击“审核”部分,然后点击“请求”,最后点击右侧的“复制”按钮。复制组件模板的 JSON 内容,可以确保在更新 log.offset 字段映射时,其余的字段映射和设置得以保留。该 JSON 将构成新重索引后的后备索引的结构基础。
重要提示:如果不复制模板的 JSON 就直接进行重索引,虽然 log.offset 冲突会解决,但因为当前映射的完整性没有被保留,集成中会出现新的冲突,导致需要额外的工作才能解决原始问题。
打开第二个浏览器标签页,进入 Dev Tools,粘贴刚刚复制的内容。接下来,按以下方式清理粘贴的内容:
对请求进行以下修改:
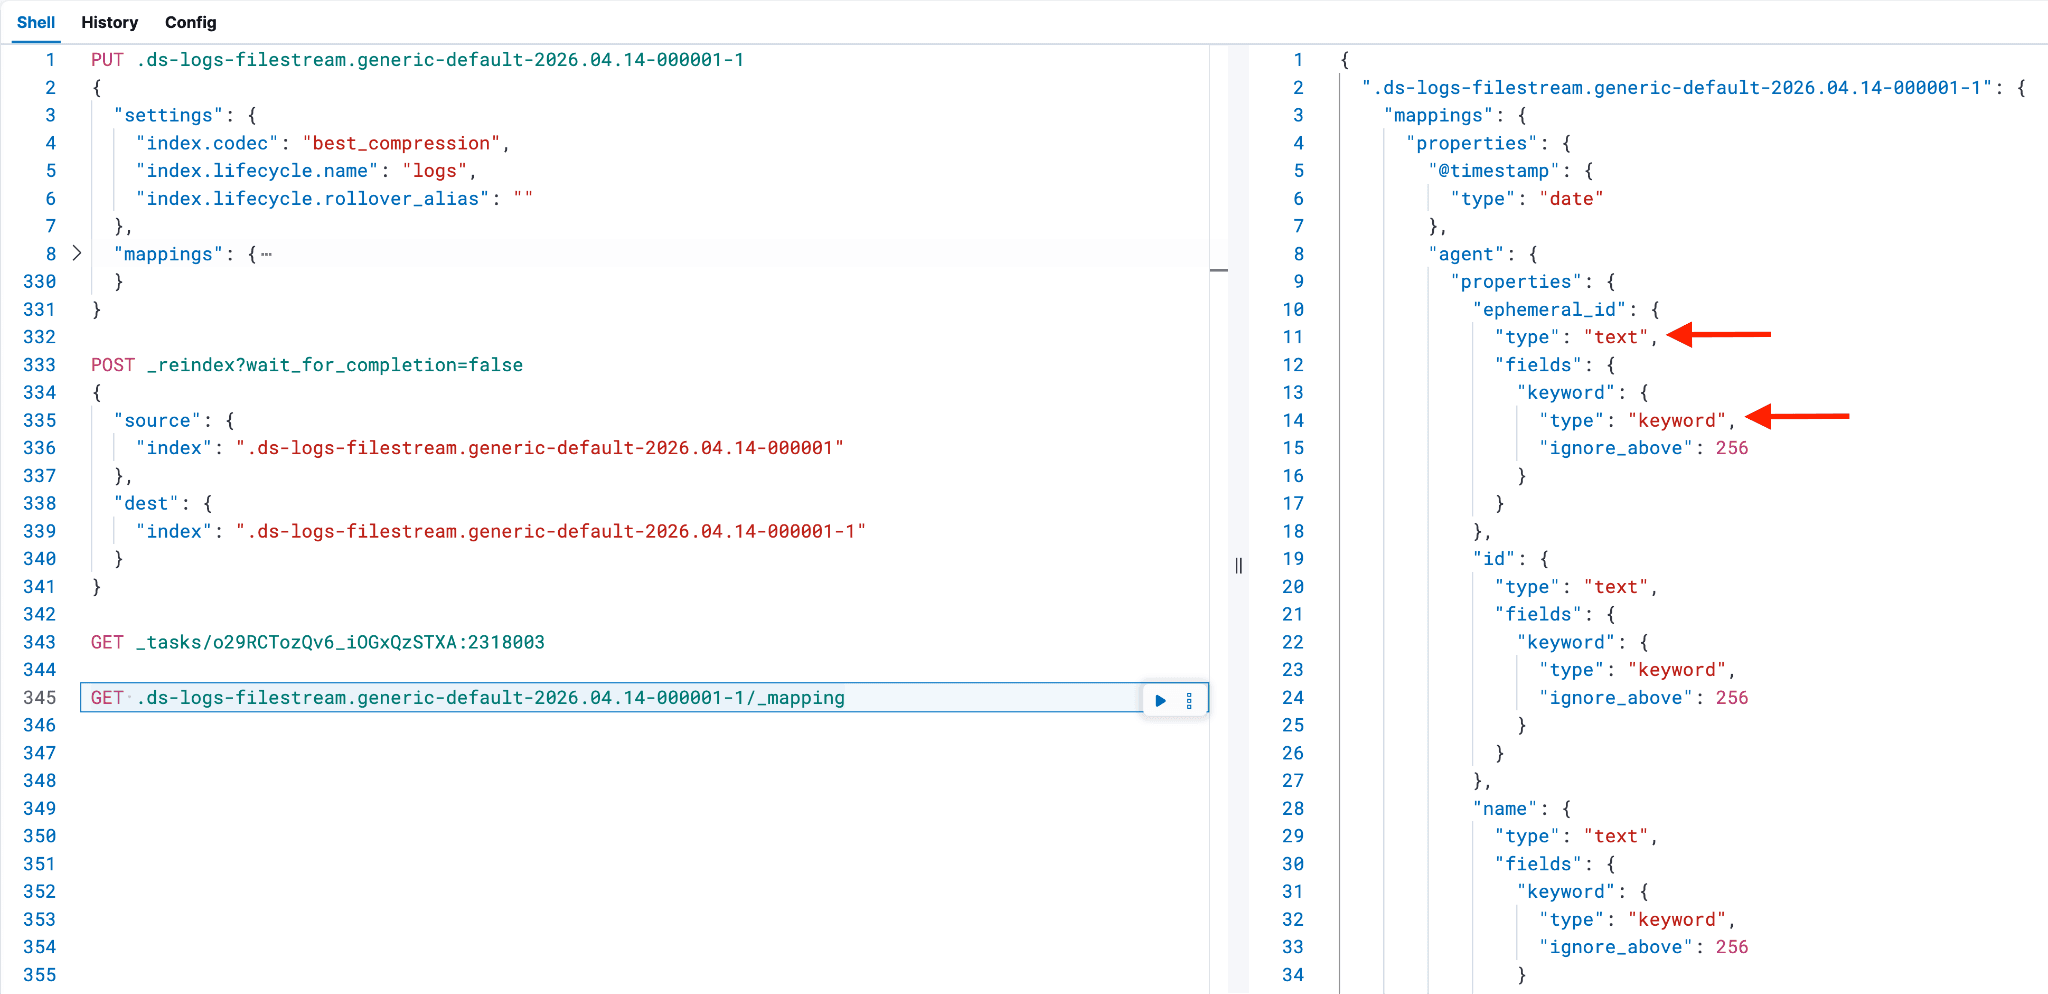
1. 索引名称:将 _component_template/logs-filestream.generic@package 替换为您要重索引的后备索引名称,并在末尾加上 -1。例如,使用 PUT <backing index to reindex>-1。
- 附加的
-1表示重新索引,并且不会与默认的 ILM 滚动更新设置冲突,这些设置基于索引的创建日期。
2. 设置:删除 "template" 这一行(第 3 行),以及整个 JSON 负载的最后一个右花括号;第 3 行应以 "settings": { 开头。
- 将 settings 部分的内容替换为
"index.codec": "best_compression"。此操作会在索引创建时应用 Elastic 的最佳压缩算法。 - 添加
"index.lifecycle.name": "logs",以及一行"index.lifecycle.rollover_alias": ""。"index.lifecycle.name": "logs"会将日志 ILM 策略应用到新的后备索引。如果您未使用日志,请修改 ILM 策略名称。"index.lifecycle.rollover_alias": ""为空,因为此后备索引不会发生滚动;但必须保留此设置,以避免索引从“热”阶段进入下一个 ILM 阶段时出现 ILM 滚动错误。
3. 结构:请求现在应包含 Settings 部分和 Mappings 部分。在 "mappings": { 中,应包含 "dynamic_templates" 和一个 "properties" 部分,后者含有预定义的字段及其映射。
4. 动态模板修改:当前的 dynamic_templates 部分中,有些字段条目在后续添加 ecs@mappings 动态模板时可能被覆盖,造成冗余和不必要的代码行。
- 删除
"dynamic_templates"中除了标题为"_embedded_ecs-data_stream_to_constant": {的第二部分以外的所有部分。 - 重复上述过程;不过这次收集的是
ecs@mappings组件模板的动态映射,而不是@package组件模板的动态映射。- 更简单的方式是:从
ecs@mappings组件模板的界面中复制全部映射内容,粘贴到 Dev Tools 的dynamic_templates部分,然后酌情删除重复和不必要的行。将这些动态模板设置内容放在"_embedded_ecs-data_stream_to_constant": {条目的后面。在 Dev Tools 中,dynamic_templates部分应与下面的示例内容非常相似。
- 更简单的方式是:从
- 如果未包含
dynamic_templates或将其全部移除,其他字段(见下方截图)就会出现双重映射,即同时映射为text和keyword,而不是保留dynamic_templates部分时应有的正确映射。剩下应当只有"mappings"下的"properties"部分。这也会导致数据视图中出现字段被重复映射的问题(如果之前没被这样映射过),从而引发更多映射冲突。
5. 元数据删除:删除最后一个名为 "_meta" 的部分,以及名为 "version" 的部分(如果存在)。
6. 格式化:对剩余部分进行自动缩进,并调整或删除任何会导致执行失败的多余花括号。
7. 映射更改:定位到 "properties" 部分,找到 "log",然后找到其下嵌套的 "offset"。将类型从 keyword 改为 long,并删除标记为 "ignore_above": 1024, 的行条目(包括逗号)。如果在前面创建的 @custom 组件模板中添加了多个条目,请在此处一并列出。
此时,您的 Dev Tools 控制台视图应与下面的示例类似。
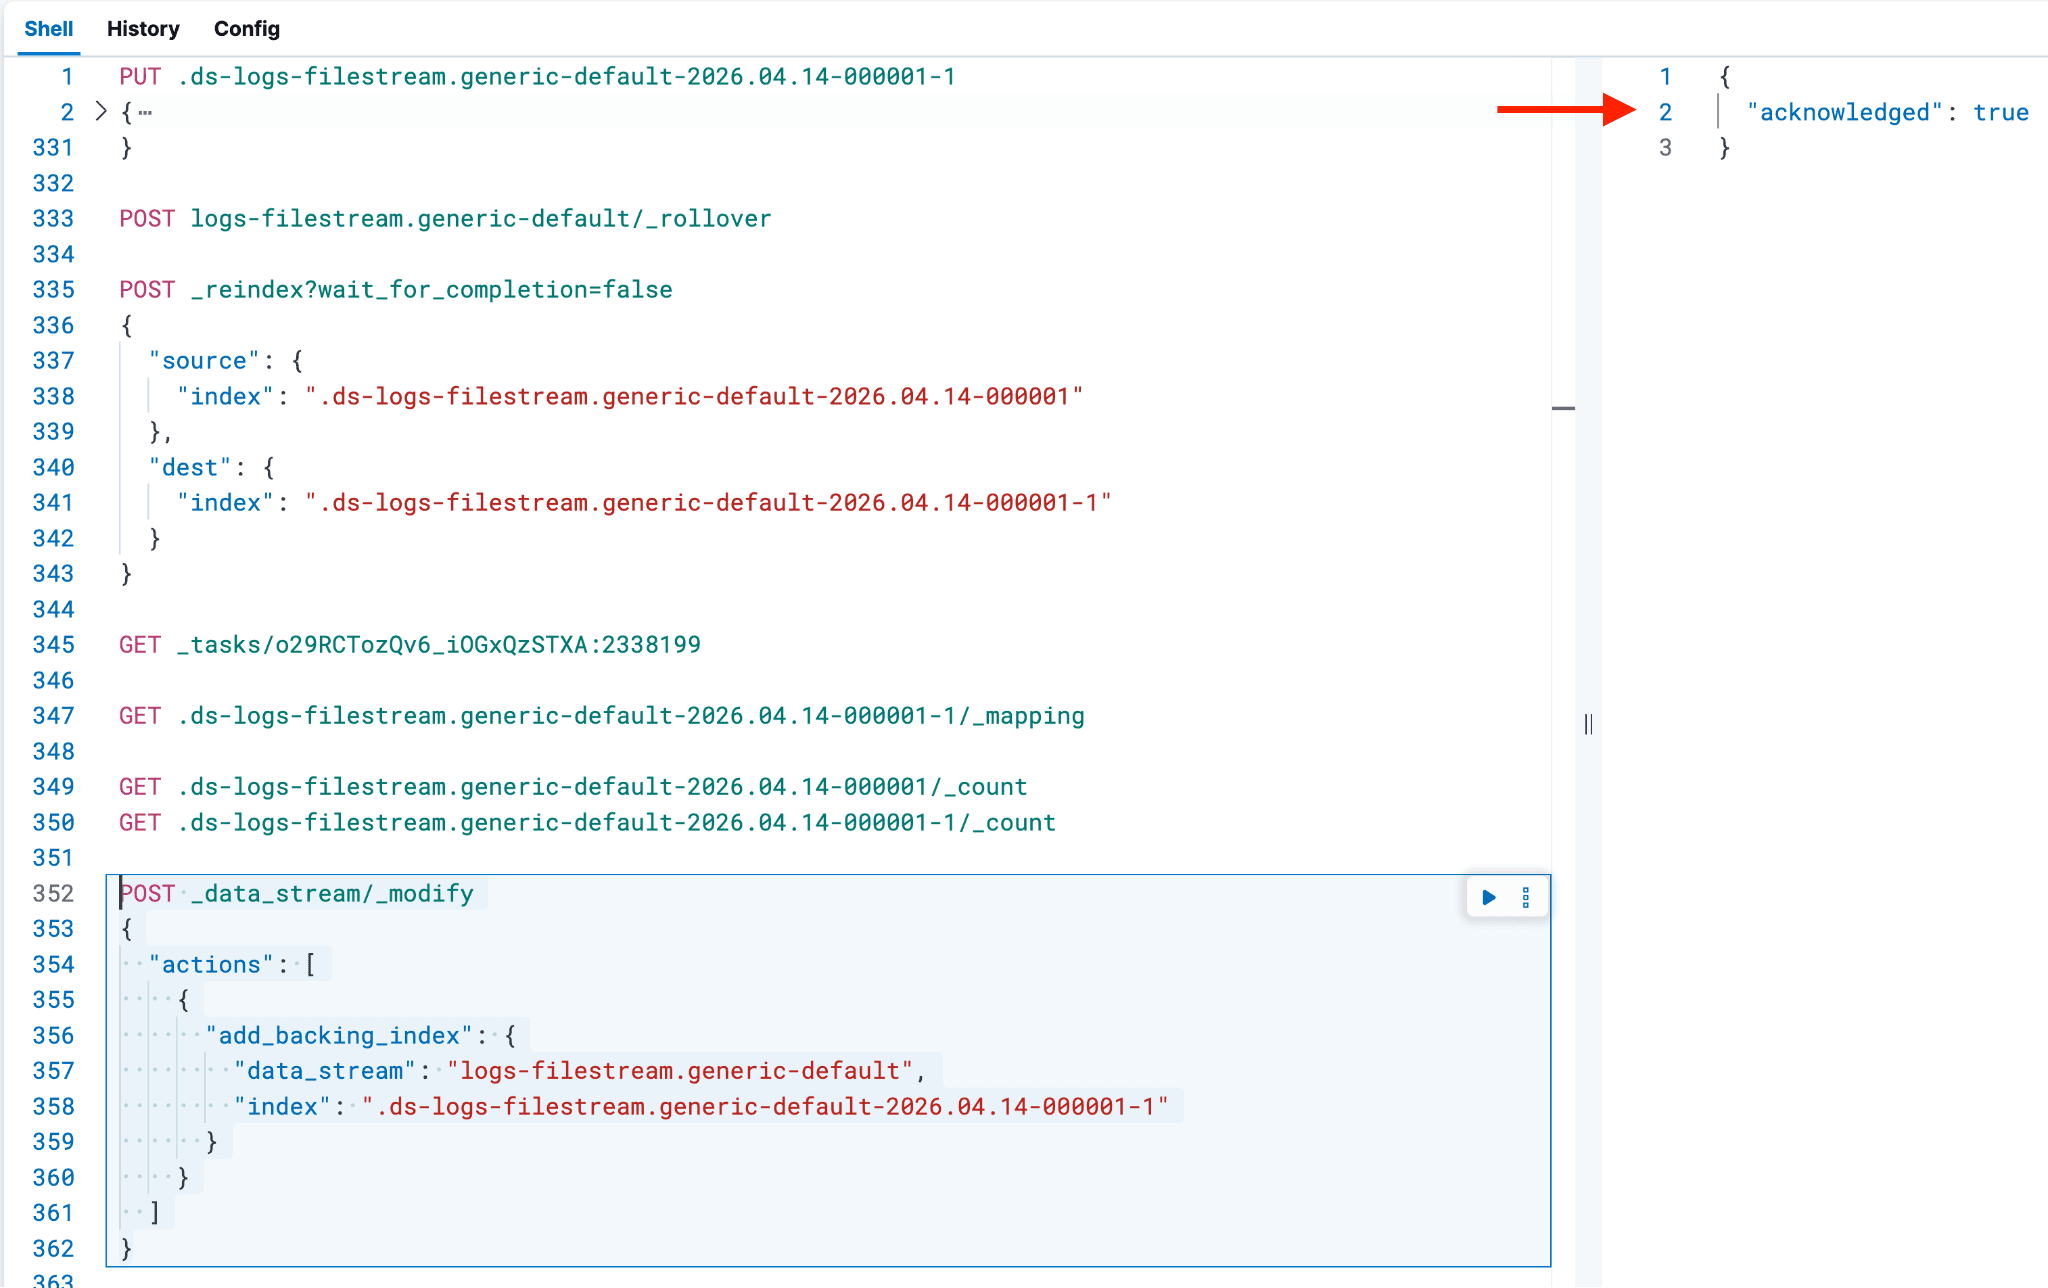
当您的控制台内容与示例相似(包括任何额外的自定义字段和符合您环境的值)后,执行命令创建新后备索引的骨架;如果出现错误,先暂停并处理。
开始重索引
新的后备索引成功创建后,下一步是执行重索引并解决映射冲突。
重要提示:如果存在映射冲突的后备索引是最新索引,并且是当前写入索引(例如,后备索引的结尾编号为 -000001),则需要对数据流执行滚动。必须执行数据流滚动,因为当前写入索引正在接收文档,是一个实时的后备索引,不能被修改。
通过前面创建的 @custom 组件模板,正确的字段映射现已应用到较新的写入索引,此后所有新文档都会体现这一更改。
通过执行以下命令来完成:
例如:

重索引是指将数据从现有后备索引复制到同一命名规范下的新索引中,通常用于应用必要的变更。这些变更可能包括更新组件模板,或添加新的摄取流水线来处理数据。
接下来,数据会从不正确映射的后备索引复制到新的后备索引中。原始后备索引已经完成滚动,这意味着无法再向其中添加新文档。新后备索引会沿用相同的命名规范,在应用正确的 ILM 策略的同时保持数据可见性和完整性,但会加上 -1 后缀来表示已经过重索引。
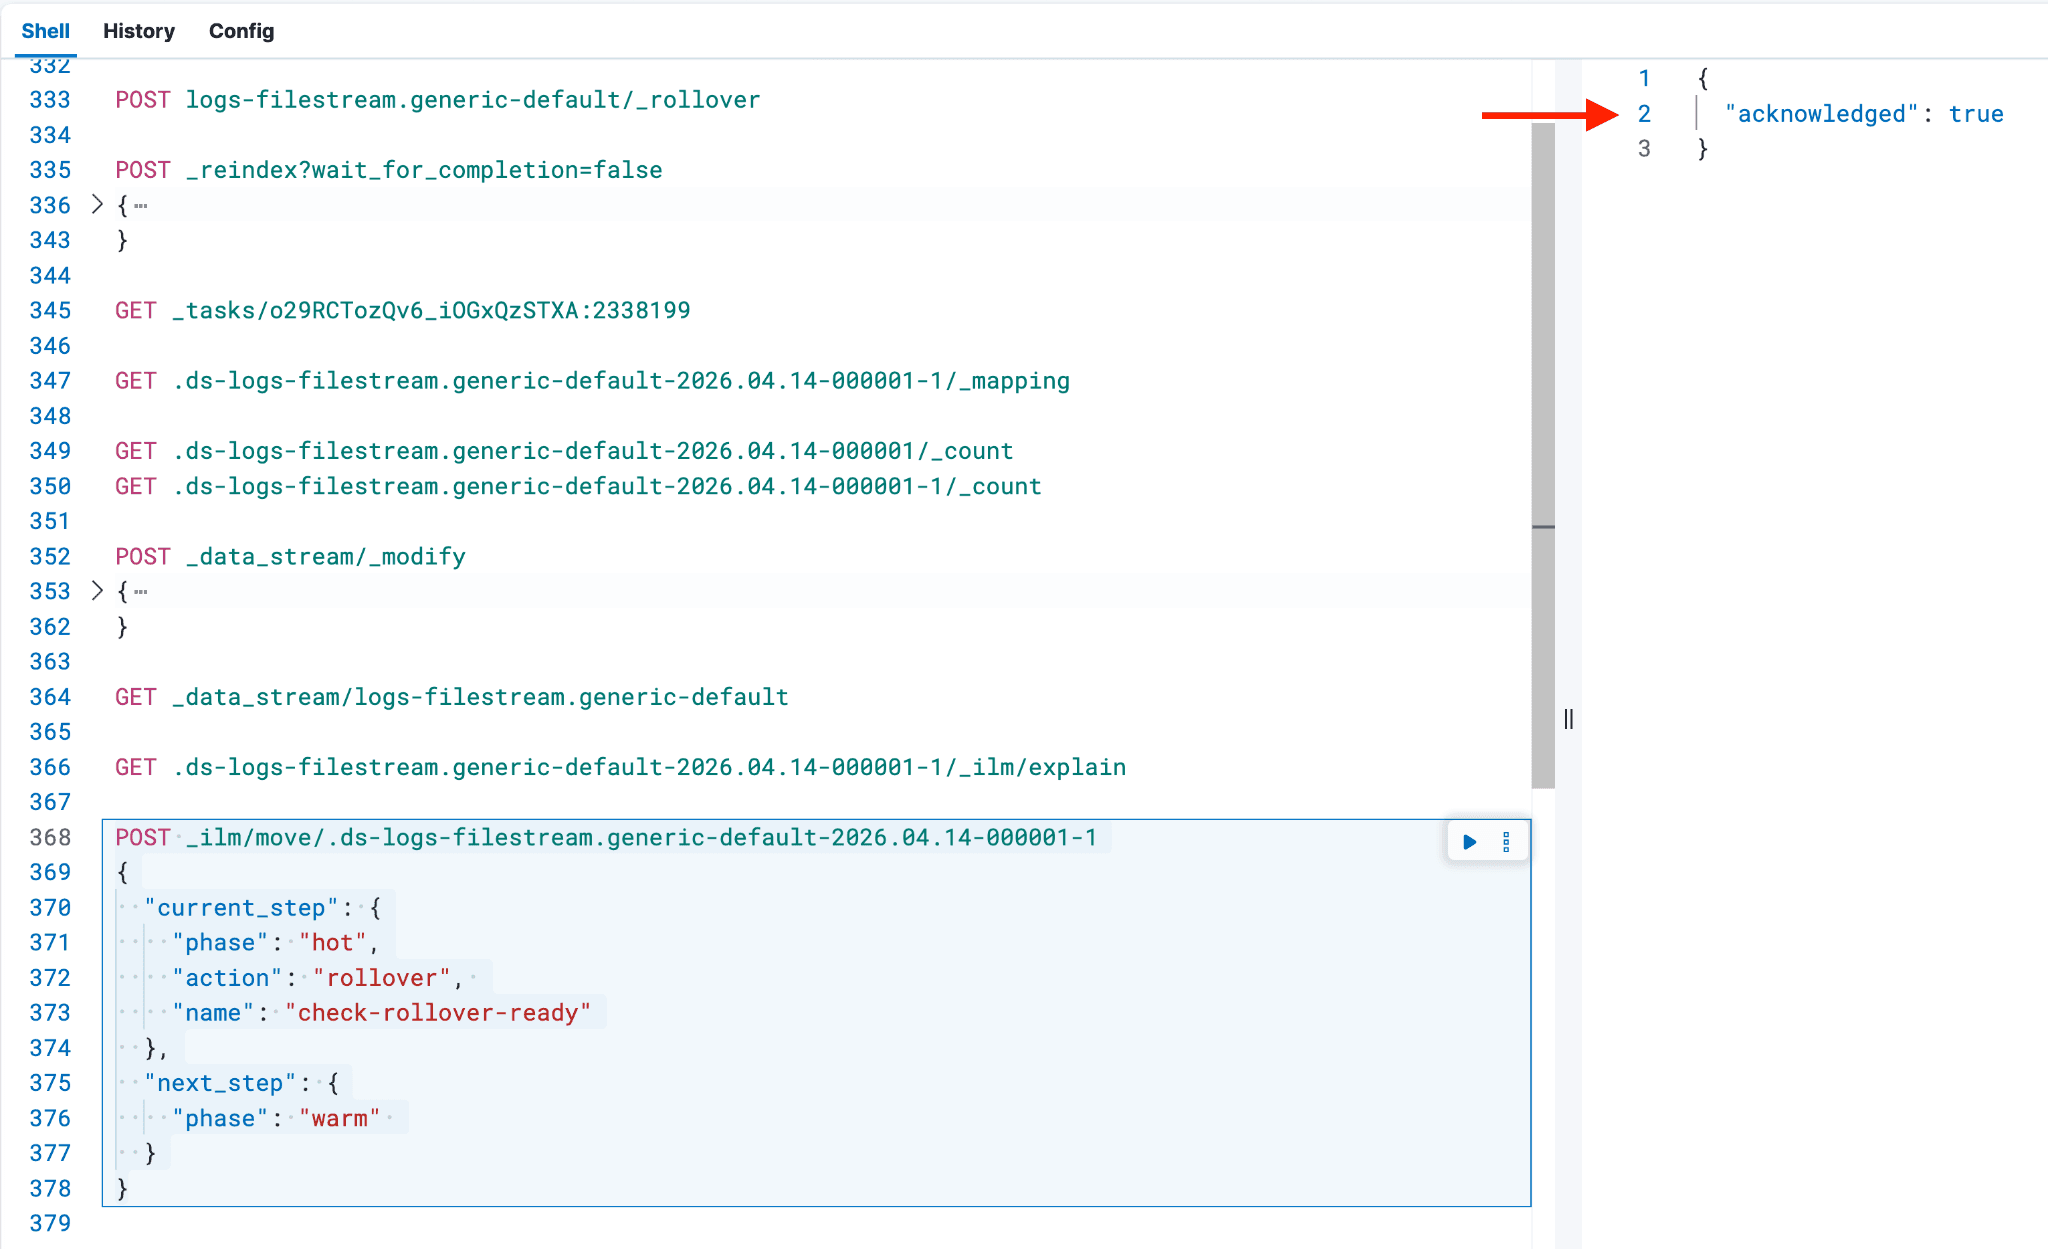
根据需要调整索引名称,并将以下代码粘贴到控制台中。通过包含 wait_for_completion=false,您可以跟踪文档复制的进度,从而帮助估算剩余的重新索引时间。没有此设置,您无法使用下面的 GET _tasks 命令跟踪状态,只能使用 GET <backing index name>-1/_count 检查较新的后备索引中的文档计数。
重要提示:如果在重索引过程中出现问题,不要重新执行重索引命令,否则会重启进程,并在以 -1 结尾的索引中生成重复记录。如果必须重启,先删除 -1 后缀的索引,然后重新执行前面的 PUT 命令,以重建新后备索引的骨架。
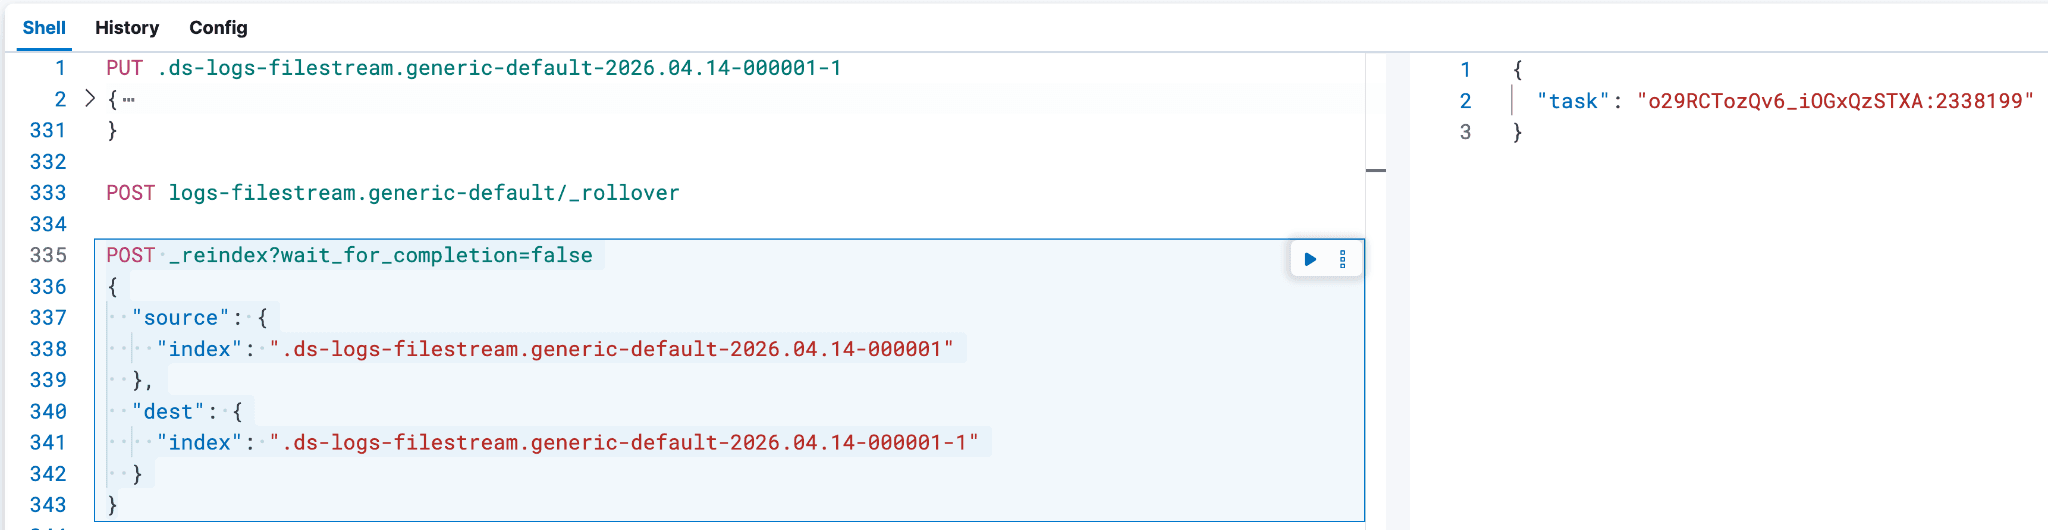
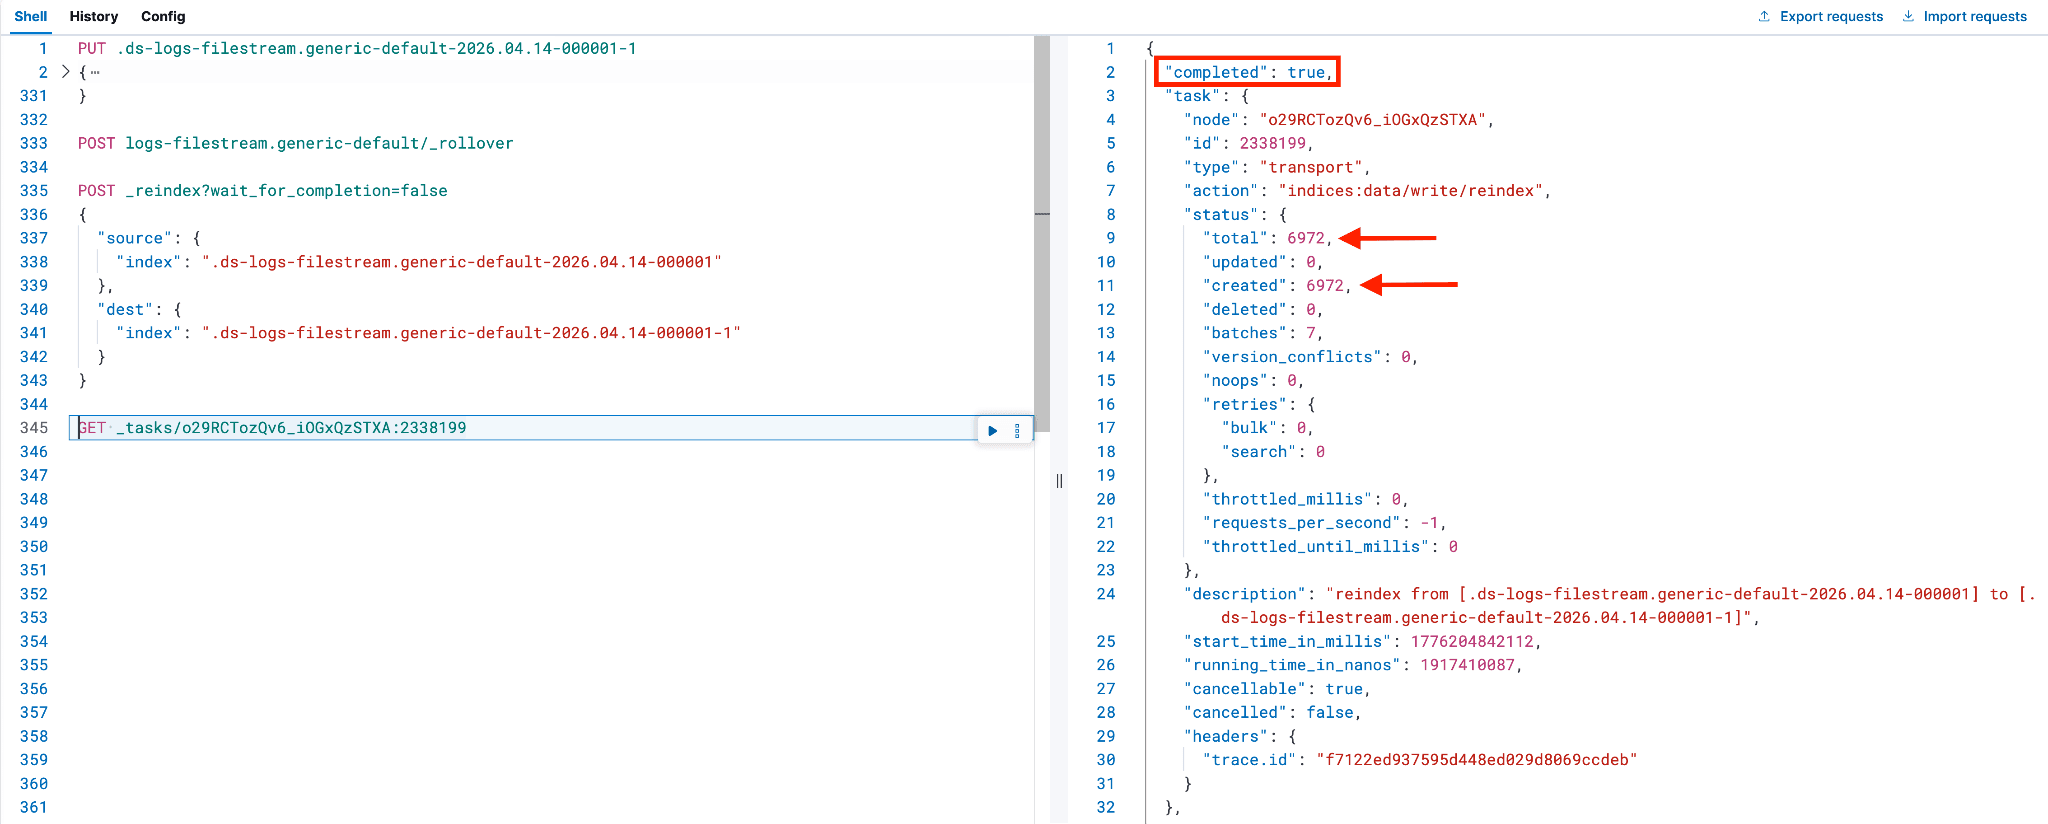
执行后,响应中会包含一个任务 ID。可以使用该任务 ID 通过 GET _tasks/<task ID> 命令监控重索引的进度。
重新索引的持续时间取决于原始索引中的数据量。可以通过在执行 GET 命令时查找 "completed": true 来跟踪完成情况,这应该会产生类似的输出。
GET _tasks/<task ID>
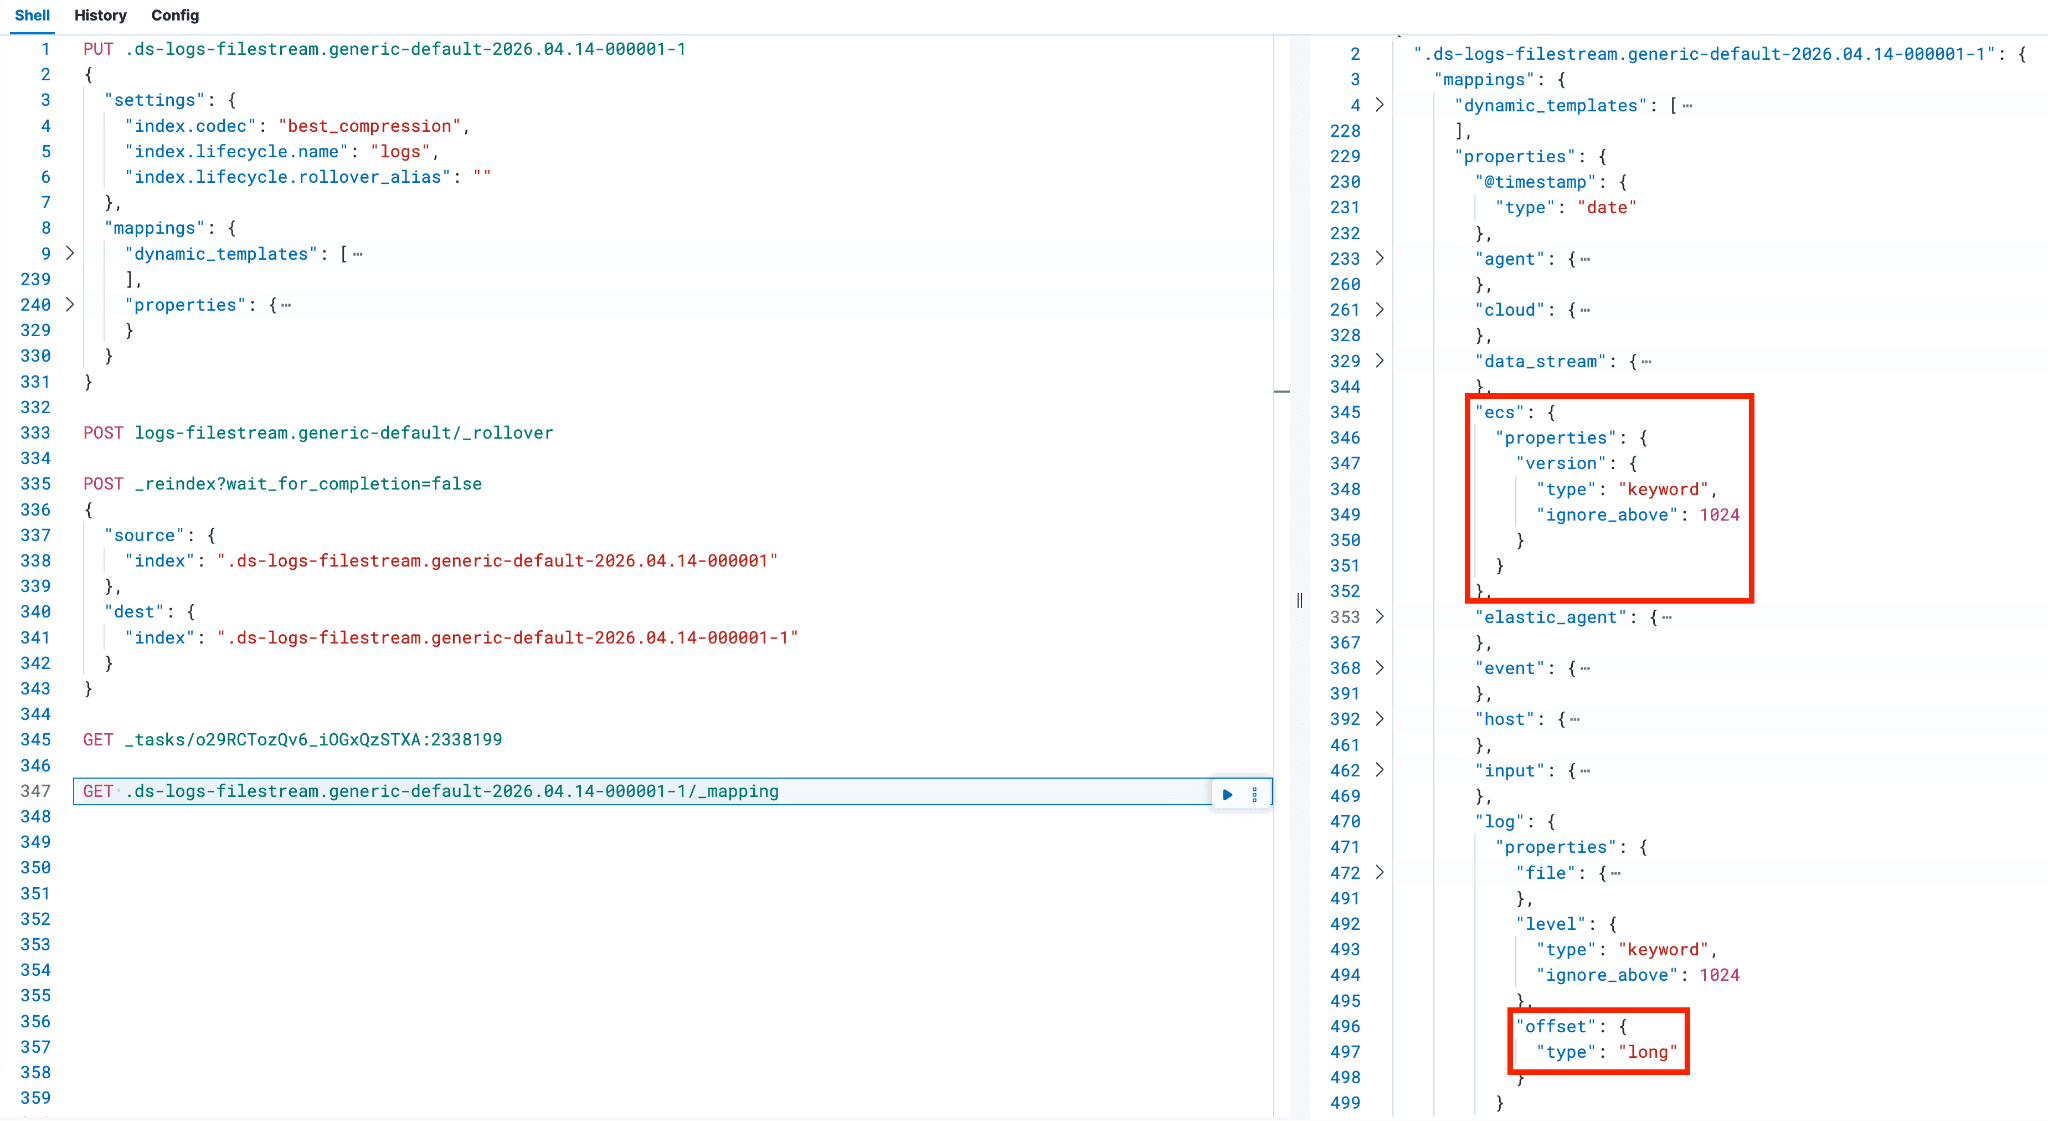
在重索引流程完成并核对文档数量后,下一步是验证新后备索引以及相关字段的映射是否正确。
例如:
可以确认 log.offset 的映射如下。要确认其他字段只有一个映射条目(而不是同时存在 text 和 keyword),可以将它们与前面 PUT 命令中不属于 dynamic_templates 部分的字段进行对比。
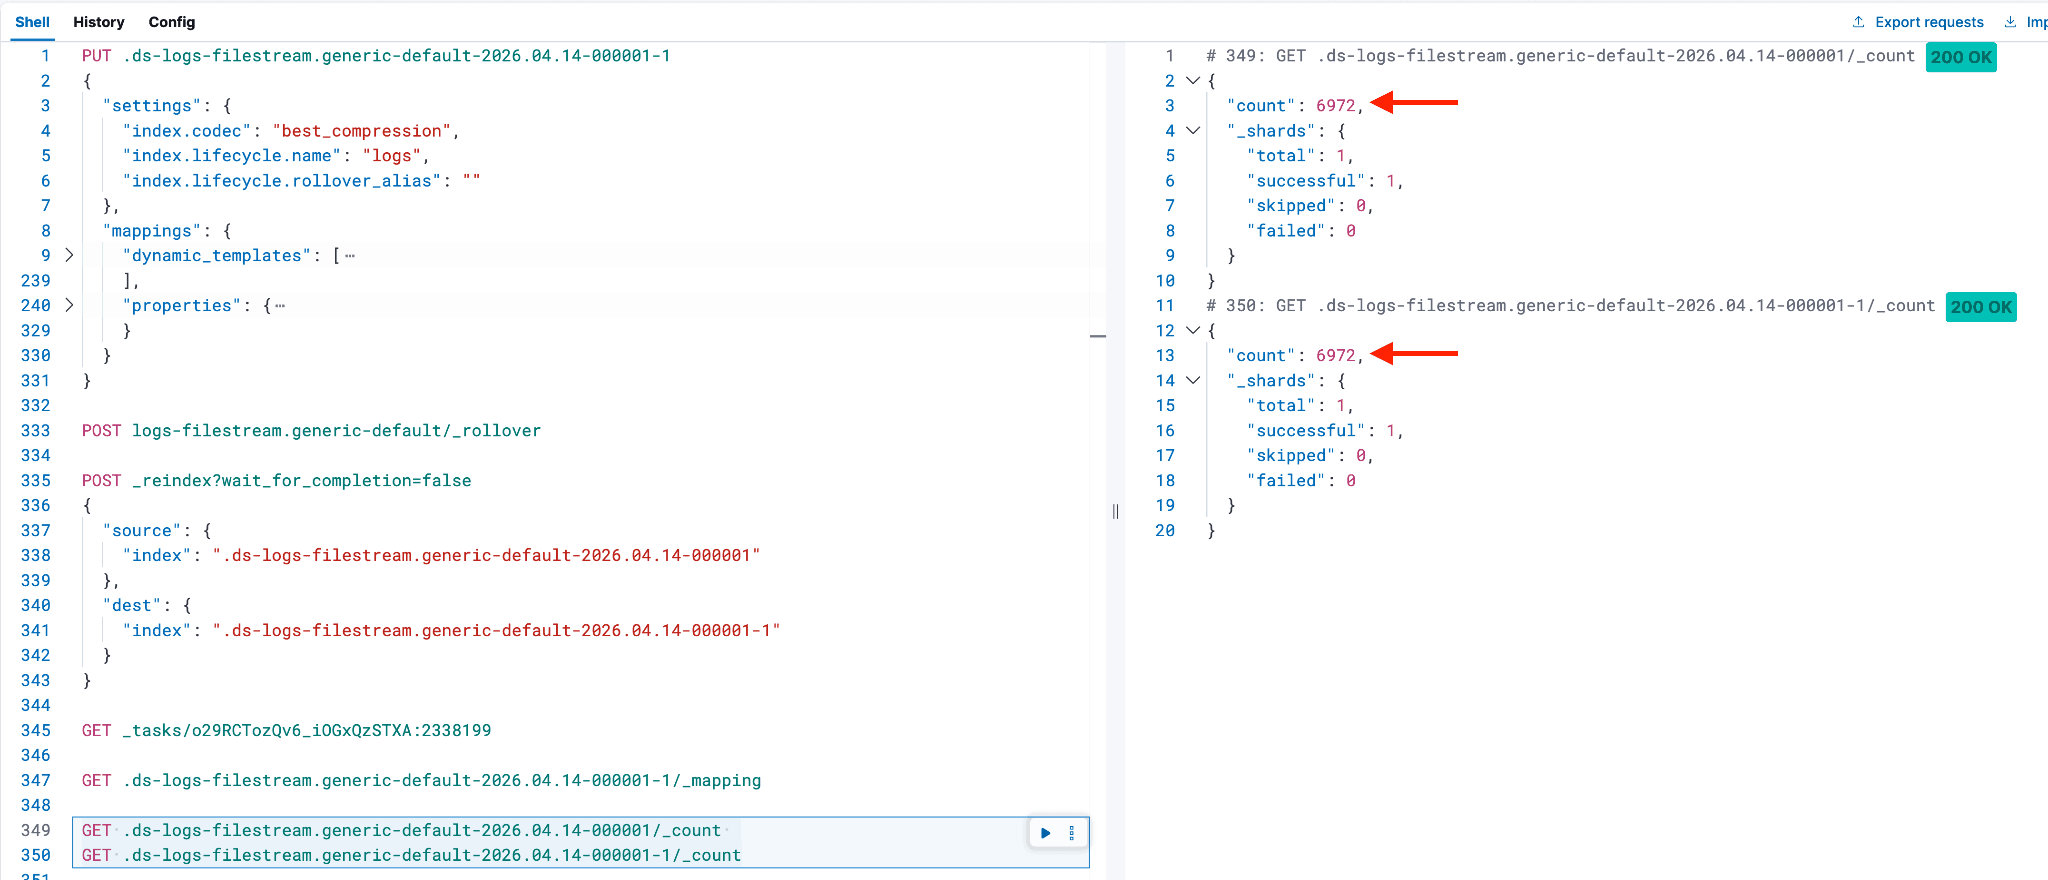
如果正在重索引的后备索引包含大量文档,可以检查这些文档复制到新后备索引的状态;您可以使用以下两个 Dev Tools 命令比较文档数量。
GET .ds-logs-filestream.generic-default-2026.04.14-000001/_count
GET .ds-logs-filestream.generic-default-2026.04.14-000001-1/_count
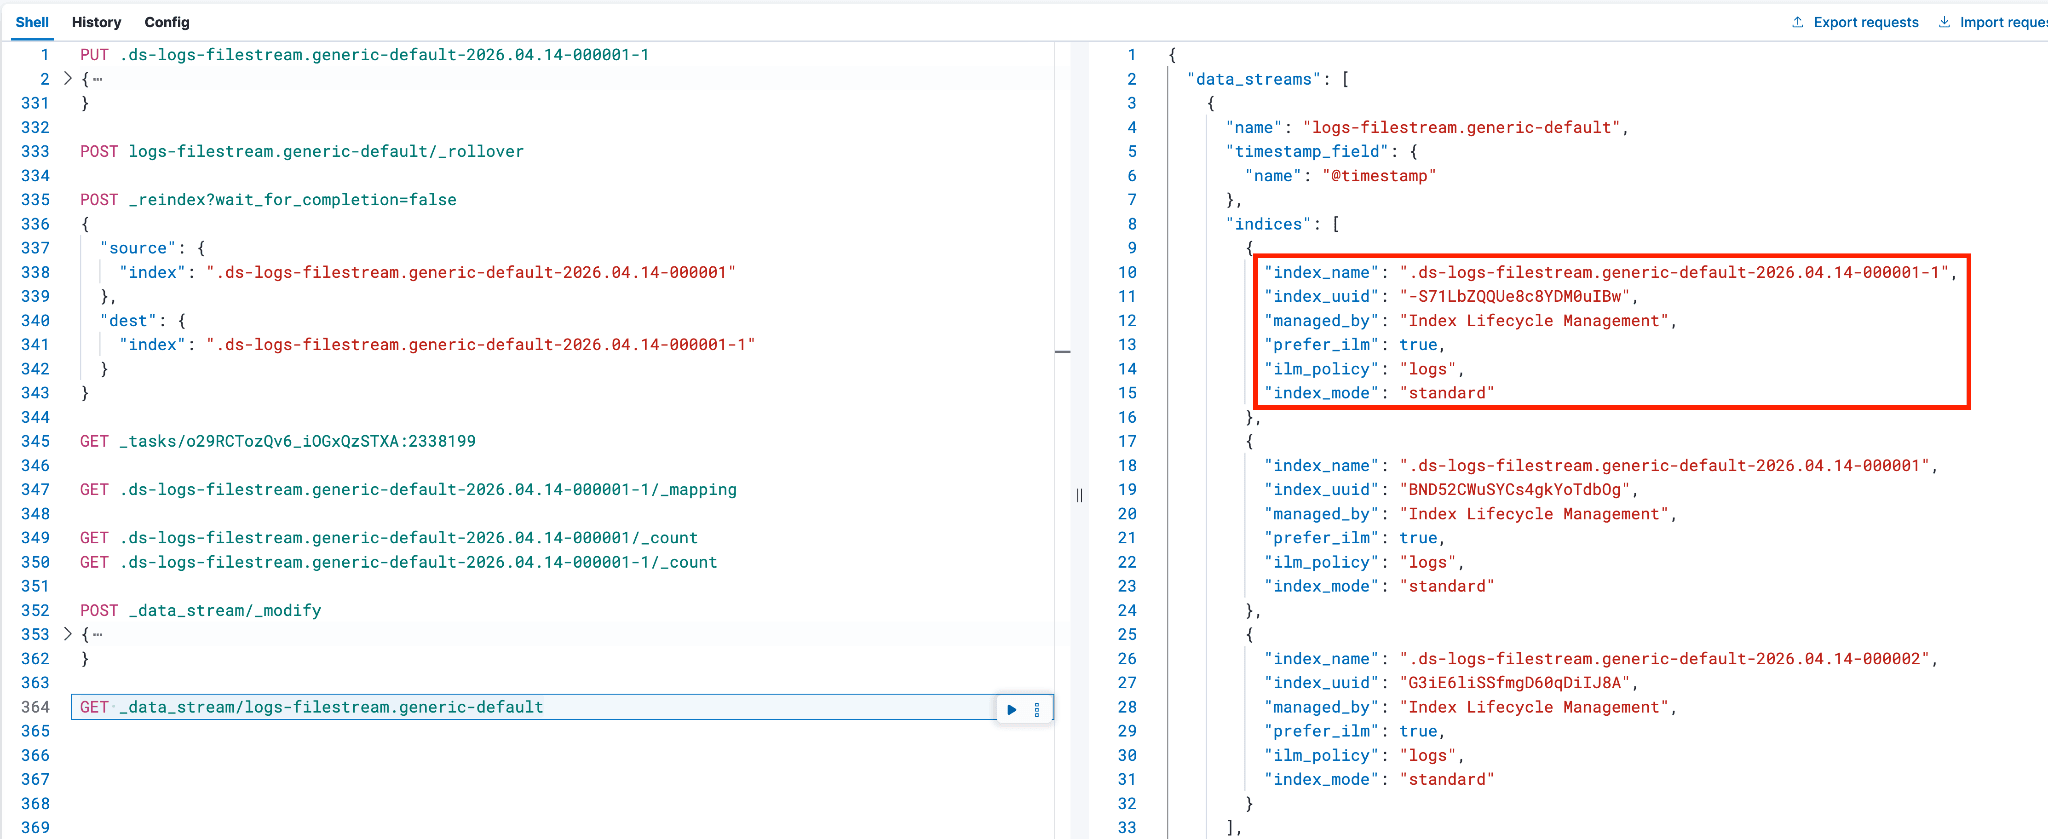
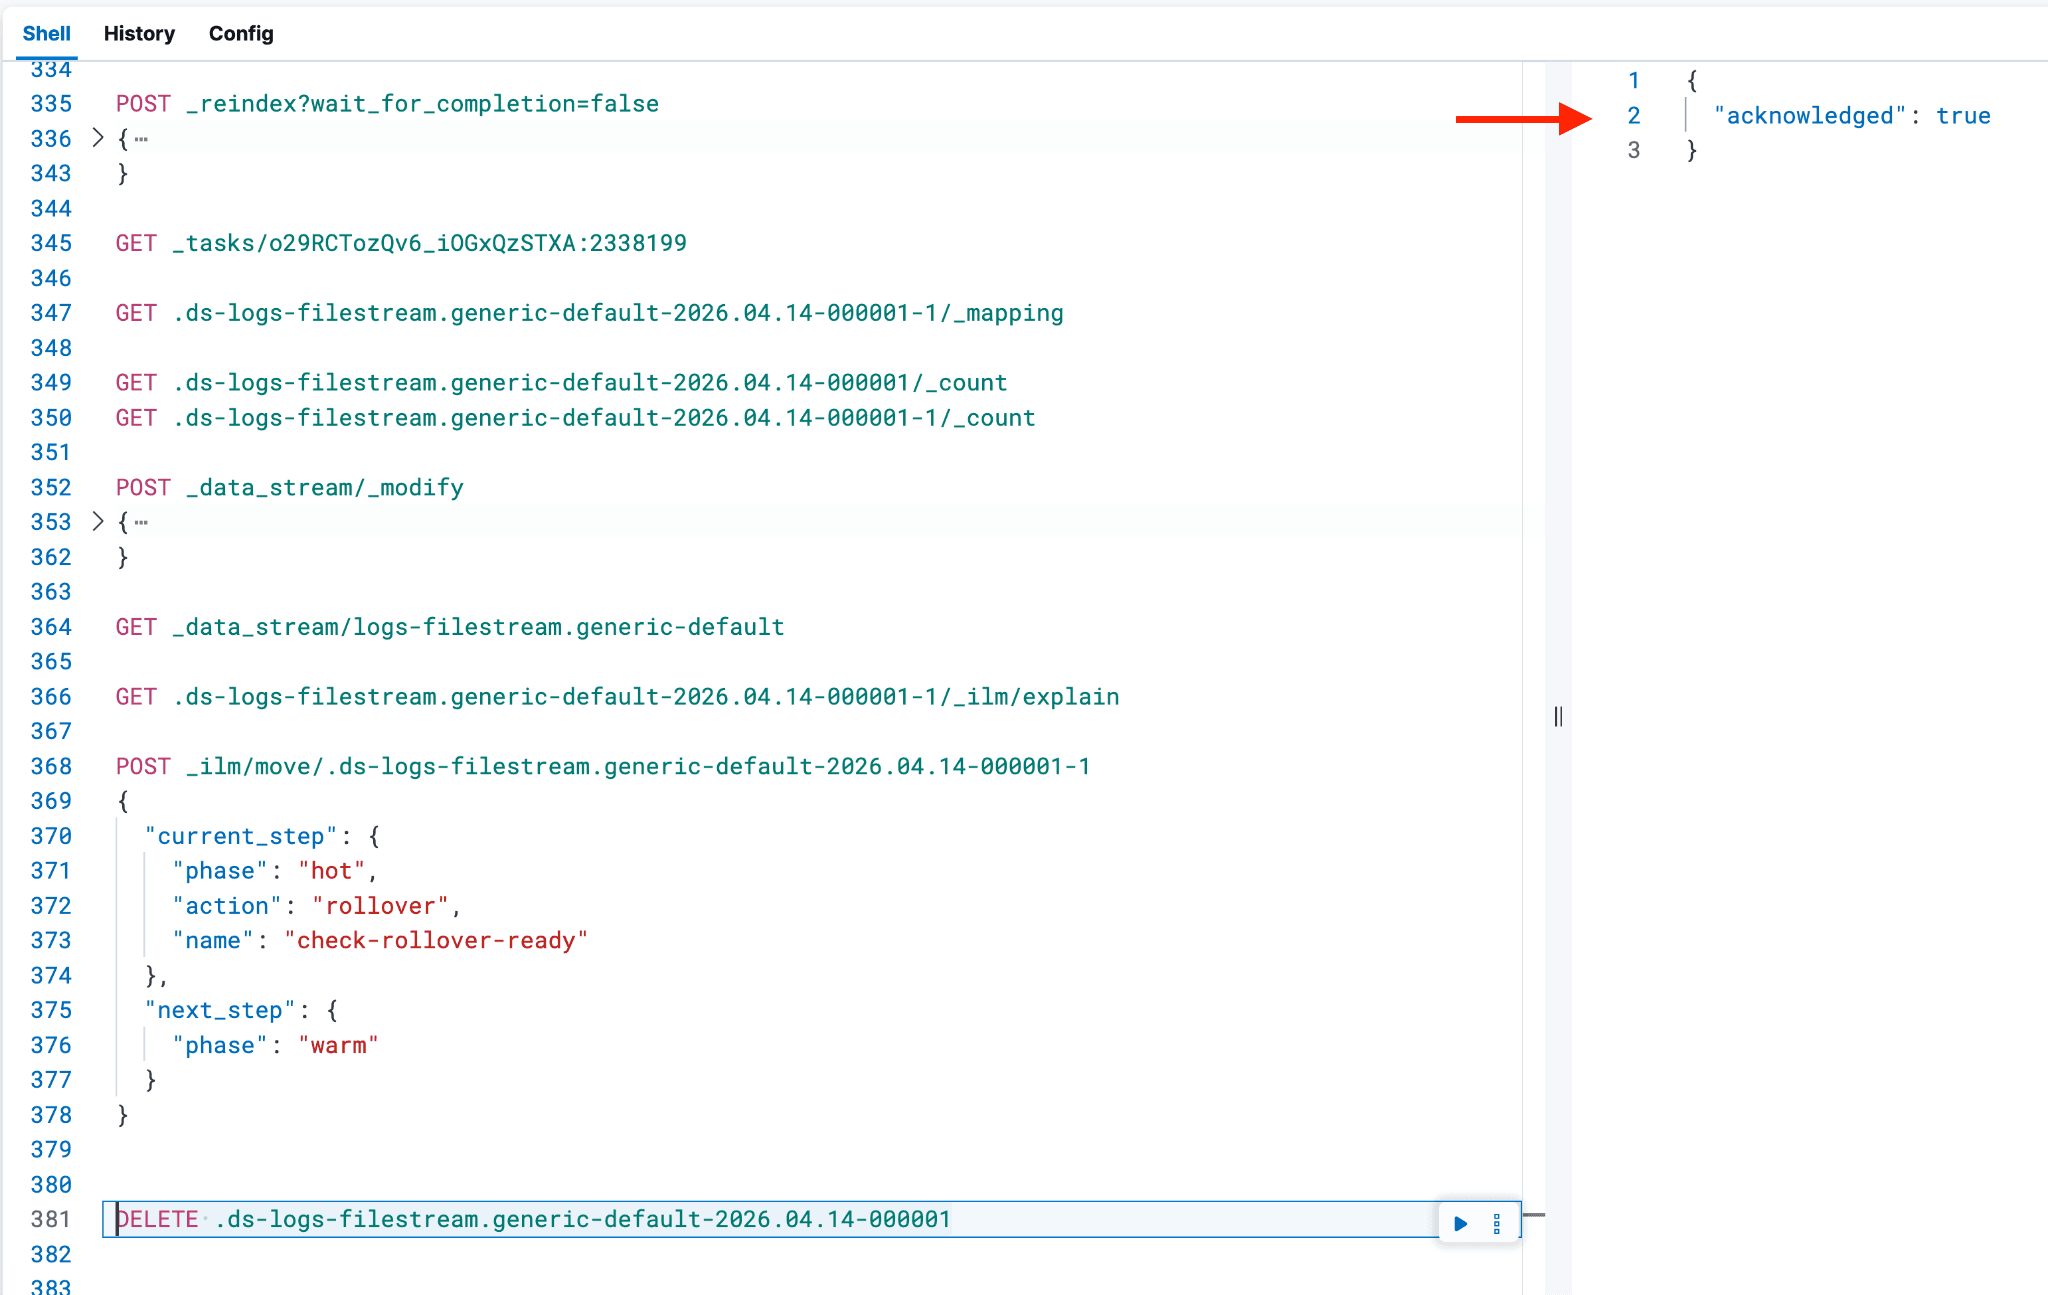
确认文档计数一致且映射正确后,请更新数据流,将新的后备索引纳入其中,以避免在索引管理中出现孤立的后备索引;否则,ILM 策略将不会在该后备索引上触发。
- 如果成功,返回值应为 true。
使用以下命令确认新后备索引是否已添加,并确保 ilm_policy 正确:
使用下列命令检查后备索引的 ILM 状态:
- 看到索引处于热状态是正常的,因为它是最近创建的(请参阅第 8 行或第 10 行)。
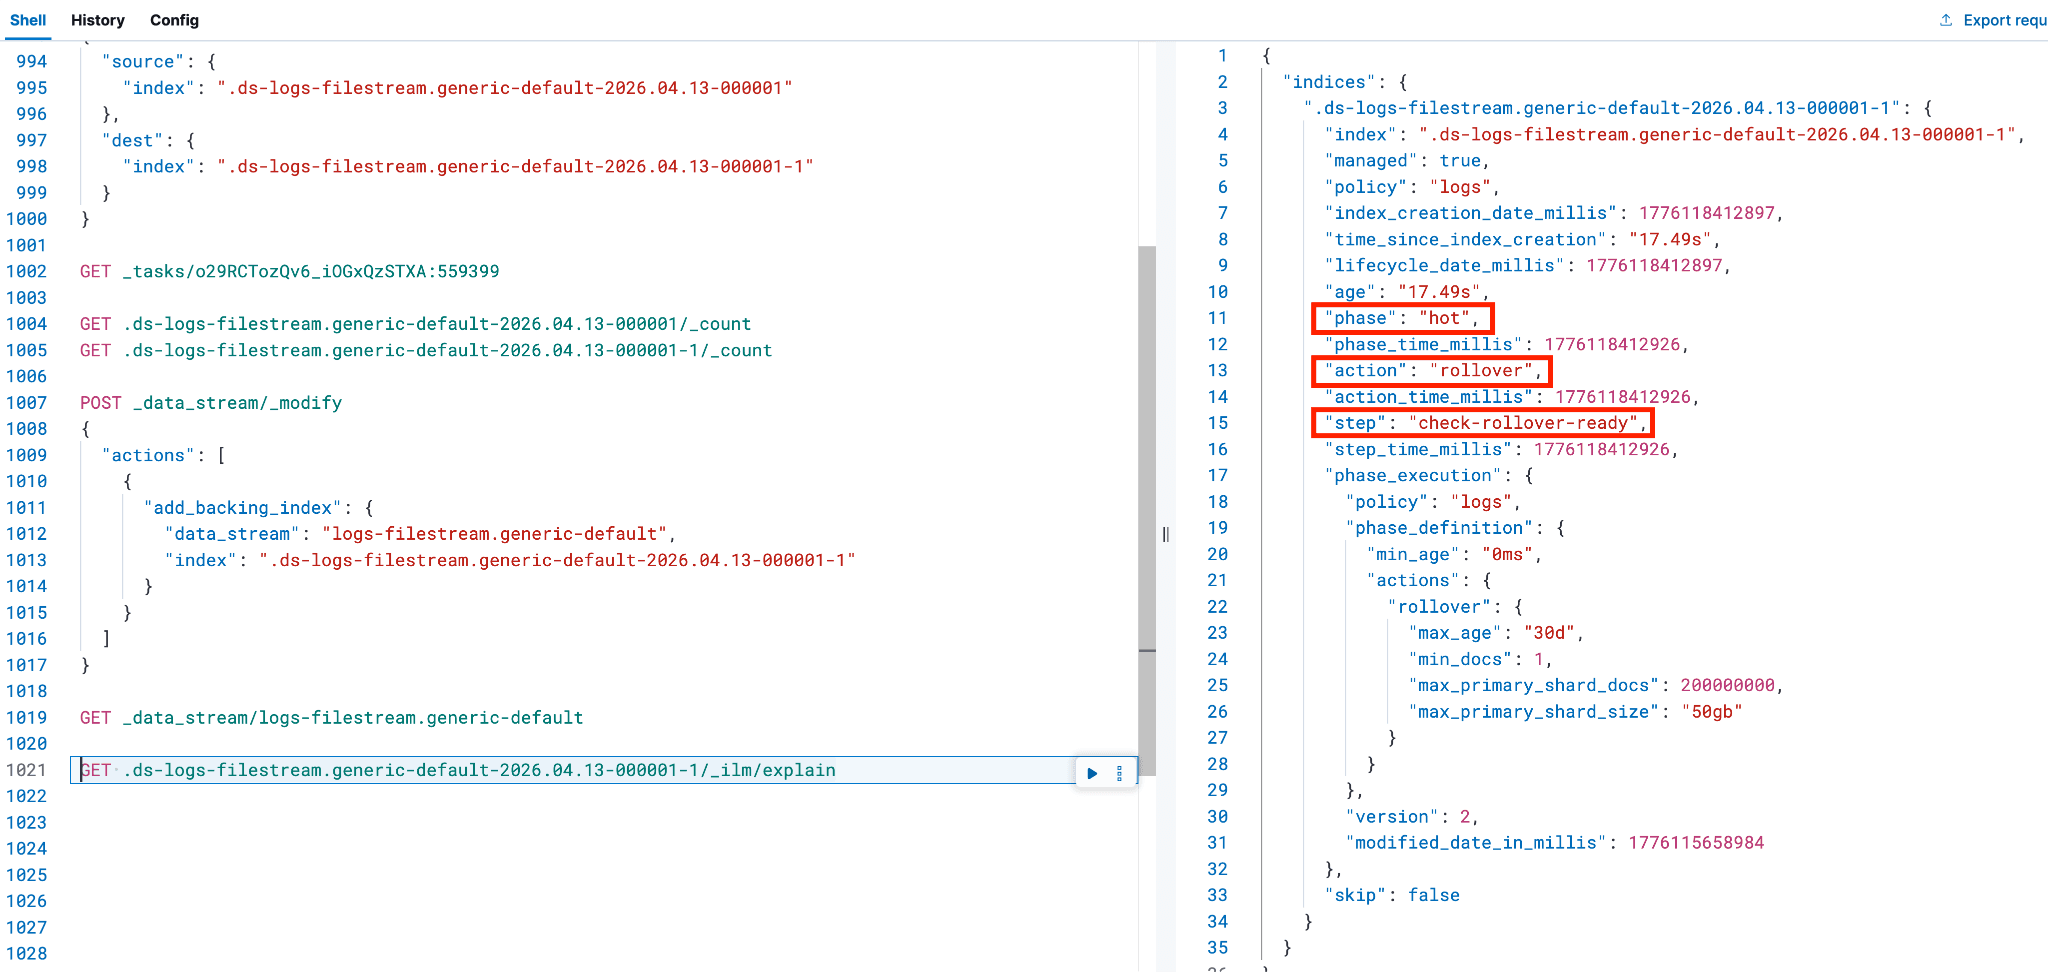
执行以下命令,将后备索引从热层转换到该数据流 ILM 策略中 hot 阶段之后的下一个合适数据层。在上方截图中,可以分别从第 11、13、15 行找到 current_step 中 phase、action 和 name 的具体值。
next_step 的值表示索引将要转入的下一个 ILM 阶段或数据层。
例如:
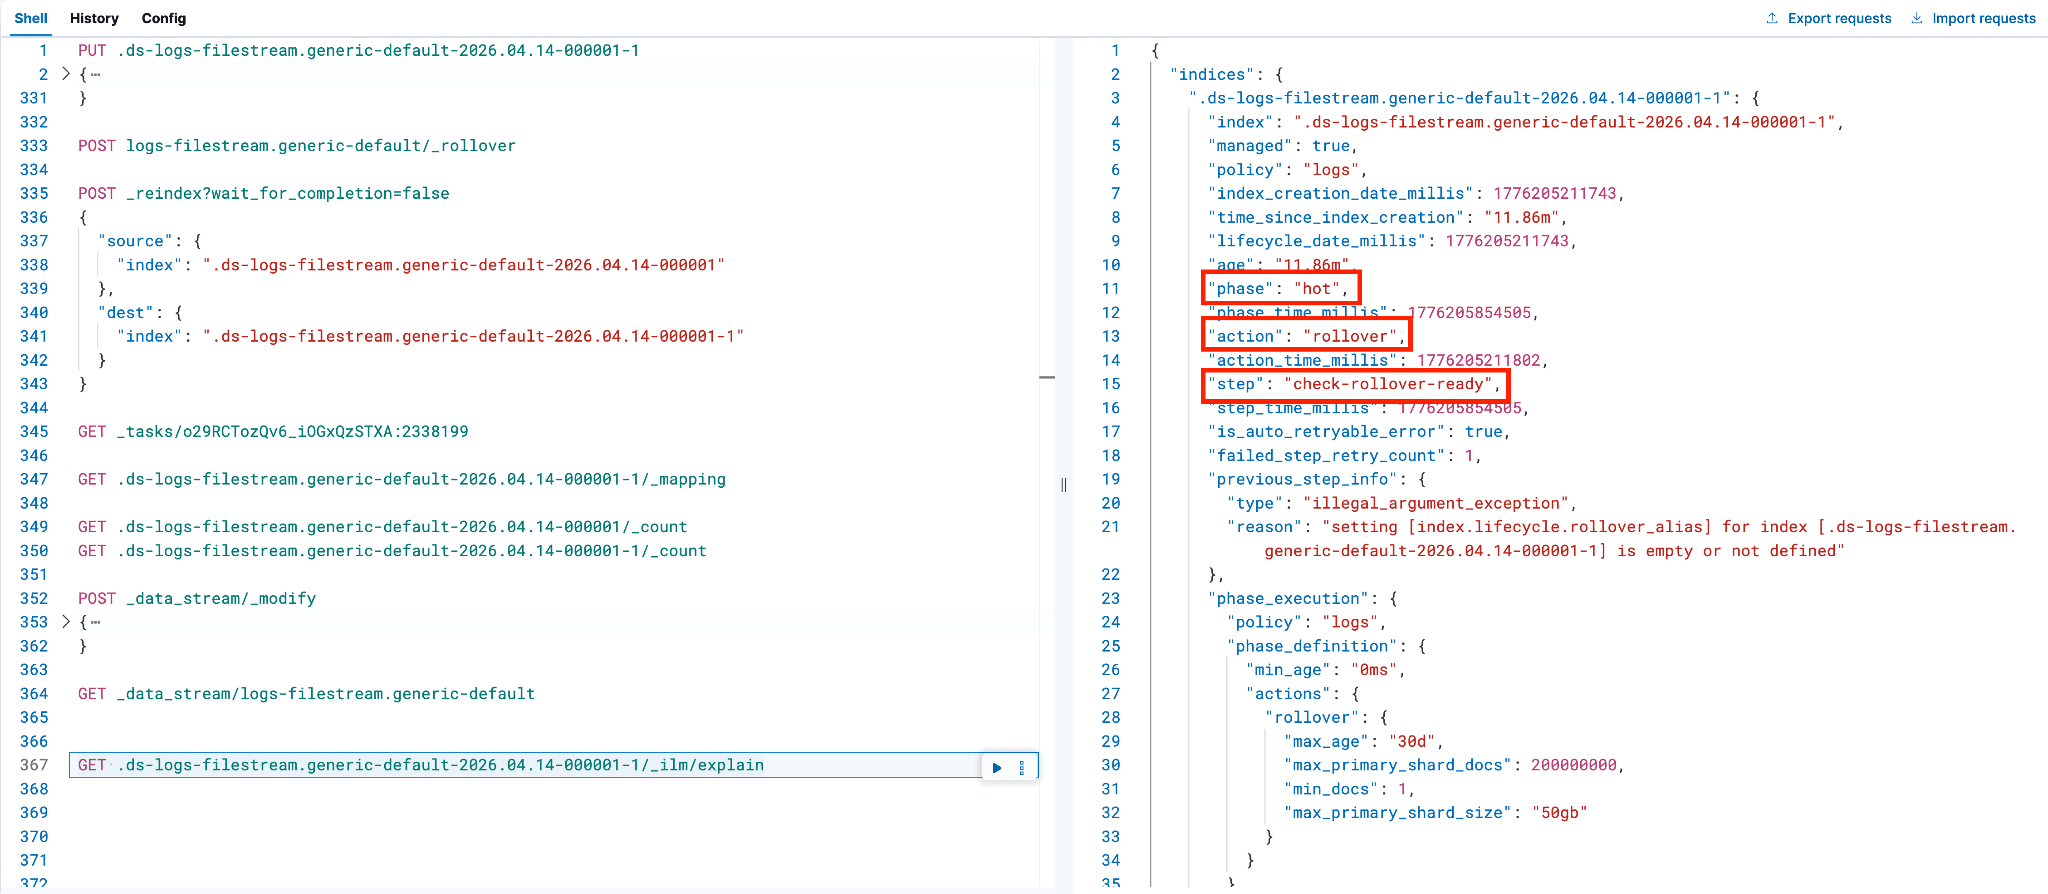
- 虽然不是必需步骤,但作为安全措施,您可以再次执行
_ilm/explain命令,确认后备索引已进入下一阶段,且不再处于"热"阶段。

一旦满足以下条件,您就可以安全地删除具有映射冲突的原始后备索引:
- 新的后备索引已成功创建。
- 文档已迁移到新索引,且计数一致。
- 映射已修正(包括数据流专用映射和 ECS 映射)。
- 数据流包含了新的支持索引。
- ILM 策略已生效,索引已离开 hot 阶段。
重要提示:或者,在删除原始索引之前,可以查看“数据视图”页面。选择 logs-*,确认重索引后的后备索引(以 -1 结尾)现在显示在 long 部分。原始后备索引应仍存在于 keyword 下。如果重索引后的后备索引不在 long 部分,请返回检查前面的步骤,并做出必要修正。
例如:
冲突解决后,回到“数据视图”页面,选择 logs-*。如果冲突仅与 log.offset 相关,则不应再看到任何列出的冲突。如果还存在其他冲突,原始后备索引应不再出现在冲突列表中;相反,新的后备索引现在应列在 long 部分。
您还可以在 Discover 中验证 log.offset 字段现在显示了合适的图标。

继续重复上述步骤,处理每个存在映射冲突的后备索引,直到所有冲突都成功解决。
参考资料:
总结
遵循本文步骤,您将能够解决映射冲突,并确保所有新数据都被正确映射。这可以通过将必要的组件模板关联到数据源来实现。该工作流不仅解决了当前问题,还建立了一套安全且可重复的流程,用于随着数据和需求演进来管理架构变更。
相关内容
2026年5月18日
在 Elasticsearch 中使用确定性防护措施实现智能 AI 搜索,以确保查询安全执行
当 LLM 直接生成查询时,智能体 AI 搜索系统常常会失败。了解确定性防护措施和控制平面架构如何通过 Elasticsearch 实现安全、可靠且受治理的查询执行。

2026年5月11日
个性化电子商务搜索:整合购买历史记录和用户群组
了解如何在 Elasticsearch 中打造个性化电商搜索体验,同时不破坏治理机制。本文介绍了如何提升购物者曾购买过的产品,以及如何根据用户资料启用针对特定用户群组的策略。
2026年5月4日
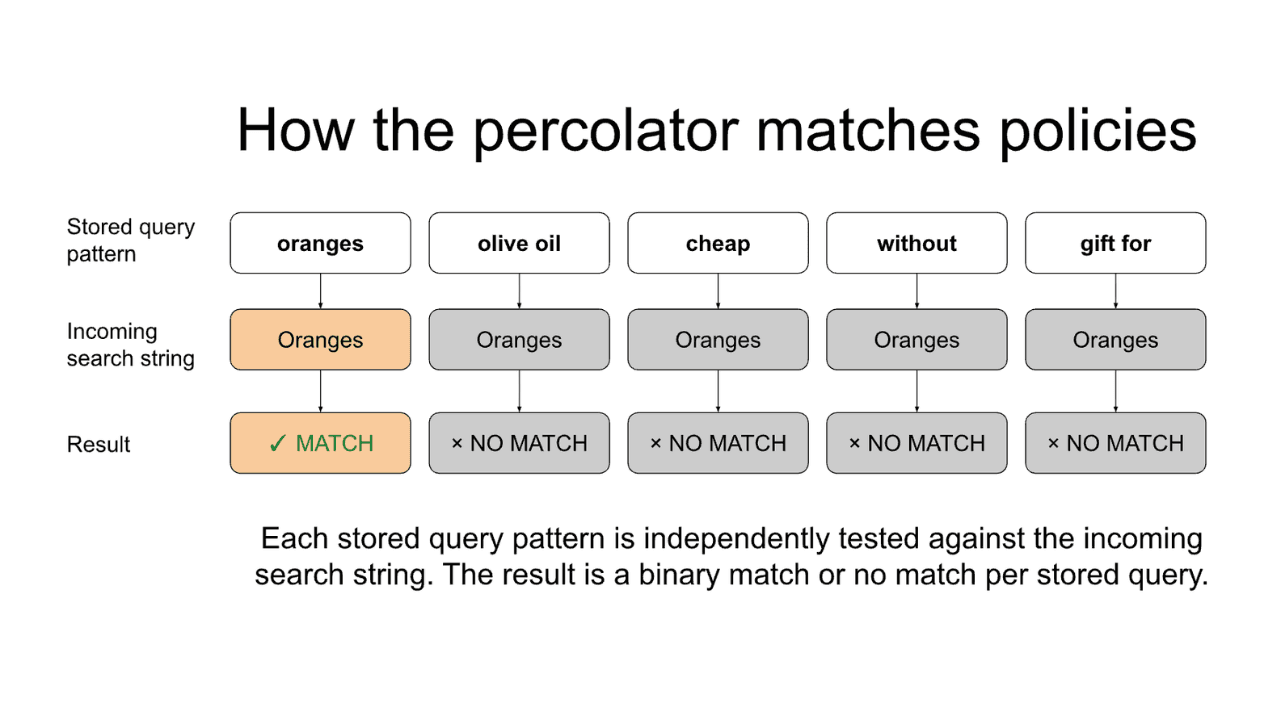
用于电子商务搜索治理的 Elasticsearch percolator:将模糊查询转化为受控检索策略
了解如何使用 Elasticsearch percolator 实现搜索治理。在本博客中,我们将概述在生产环境中创建受治理的策略引擎以及制定受控检索策略所需的模式。