Simplify your Elasticsearch operations with real-time issue detection and actionable recommendations to optimize performance and reduce costs. AutoOps is available for cloud and self-managed deployments. Learn more about AutoOps.
Anomaly detection jobs created by hand don't version, don't review and don't promote cleanly across environments. This post shows how to manage the full AD lifecycle (job, datafeed and operational state) as Terraform code. Six resources, one terraform apply, and your job is running. One variable change promotes it from dev to production. terraform destroy tears it all down in the correct order.
The complete, ready-to-clone code is available at github.com/elastic/terraform-ad-example.
Prerequisites
- An Elastic Cloud account with an organization-level API key. See Elastic Cloud regions, deployment templates, and instances for available regions and templates.
- Terraform installed (>= 1.0.0). The Elastic Stack provider version 0.14.0 or later is required for anomaly detection (AD) job and datafeed resource support. See Install Terraform.
- A terminal opened in a directory containing the clone of the git repo github.com/elastic/terraform-ad-example.
- A valid index suitable for AD jobs (that is, with a timestamp field) should exist in the Elasticsearch cluster once it’s deployed. In this example, the index is
filebeat-nginx-elasticco-full.
Terraform project structure for anomaly detection
A modular layout means that each resource has its own module, so job configs, datafeeds and state controllers can be shared and reused across teams independently.
Outputs are key: They allow modules to be chained so that the datafeed automatically receives the job_id from the job module, and Terraform derives the correct creation and destruction order from this dependency graph.
Why separate state from config in Terraform ML jobs?
Note how the state modules are separate from the configuration modules. This reflects a real operational pattern in machine learning (ML): You’ll frequently need to stop a datafeed (for example, to reindex data) or close a job (for example, to reset a model after a pipeline incident) without changing the job's configuration at all. Keeping them separate means operational actions don't create noisy diffs in your config resources.
Configuring the Elastic Cloud deployment in Terraform
Providers and deployment
We use two providers: elastic/ec to provision the Elastic Cloud deployment; and elastic/elasticstack to manage the ML resources within it. The elasticstack provider's connection details are derived directly from the ec_deployment resource, so credentials are never hard-coded:
The deployment itself provisions Elasticsearch (with a dedicated ML node) and Kibana:
The ml block within elasticsearch is essential; it provisions a dedicated ML node. Without it, ML jobs cannot be opened. Here we allocate 1 GB of memory in a single availability zone, which is sufficient for this example. Depending on the characteristics of your AD job and your data, you may need to size your ML node differently.
Because the elasticstack provider references ec_deployment.demo directly, Terraform understands the dependency: It will provision the deployment first and then use the resulting credentials and endpoints automatically.
Wiring the modules together
The output references (module.job.job_id, module.datafeed.datafeed_id) create an implicit dependency graph: Terraform will always create the job before the datafeed, and the datafeed before its state resource. On destroy, the order is automatically reversed.
In the diagram below, solid arrows represent the implicit dependency graph created when one module’s outputs feed into another’s inputs. In contrast, the dotted arrow between job_state and datafeed_state denotes the explicit depends_on defined in the root main.tf.

The explicit depends_on on module.datafeed_state deserves explanation: There's no data flow between the datafeed state and job state modules, but the Elasticsearch API requires the job to be open before a datafeed can start. Without this dependency, Terraform would attempt both in parallel, which would fail.
We start with the job "closed" and the datafeed "stopped". We'll open and start them in later steps to demonstrate lifecycle management.
Module: Anomaly detection job
The job module defines the AD job configuration. Here's the resource itself (modules/job/main.tf):
There are a few things worth noting regarding module reuse:
- The Elasticsearch job API stores arbitrary metadata in a JSON object called custom_settings. In this module, that object is whatever you pass in as the Terraform variable
custom_settings: The resource setscustom_settings = jsonencode(var.custom_settings), so the cluster receives the JSON encoding of that map. The default value that is defined invariables.tfis therefore exactly the default metadata (created_by = "terraform" and department = "ITOps) unless a caller overridescustom_settingswhen invoking the module (for example, to record ownership when importing a legacy job that was created outside Terraform). - The same pattern applies to the other tunables:
analysis_limits,model_snapshot_retention_days, anddaily_model_snapshot_retention_after_daysare variables with defaults so the module works out of the box, while teams can override them at the call site (for instance, raisingmodel_memory_limitfor a higher-cardinality job).
| Variable | Default | Purpose |
|---|---|---|
| custom_settings | created_by = "terraform" | Arbitrary job metadata; override to record ownership |
| analysis_limits.model_memory_limit | (see variables.tf) | Tune up for higher-cardinality jobs |
| model_snapshot_retention_days | (see variables.tf) | Retention period for model snapshots |
The full variable definitions and outputs are in the GitHub repo.
Module: Datafeed
The datafeed module connects an index pattern to an AD job and is the primary parameterization point for service teams. (modules/datafeed/main.tf):
The indices variable is the key parameterization point; each service team passes its own index pattern when calling the module.
Modules: Job state and datafeed state
Job state and datafeed state are managed by separate modules, so operational actions (stopping a datafeed, closing a job) don't require a config plan to execute.
How to run and apply the anomaly detection Terraform config
Set your API key and initialize
The repo also includes an elastic-env.sh helper for managing secrets. See the README for details.
Plan and create the resources
The plan shows all six resources that will be created:
- The Elastic Cloud deployment.
- The AD job.
- The datafeed.
- The two state resources.
- A scoped API key for bulk ingestion.
Review the output carefully; this is one of Terraform's greatest strengths. Here's the key section:
Once satisfied, apply:
Notice the creation order:
- The deployment provisions first (~2 minutes).
- Then the API key.
- Then the AD job.
- Then the datafeed and job state in parallel.
- And finally the datafeed state.
Terraform derived this order automatically from the dependency graph:
At this point, you can confirm the job exists in Kibana's ML UI; the nginx job will be visible in the closed state.
Load sample data
The initial terraform apply also creates a scoped Elasticsearch API key for bulk ingestion. We can use it to load some test data. The repo includes a file (sample_data.ndjson) with a few sample documents matching the job's expected fields (@timestamp, nginx.access.body_sent.bytes, and the influencer fields: nginx.access.geoip.city_name and nginx.access.user_agent.build). It can be loaded into the deployment using the Elasticsearch _bulk API:
In practice, you'd want many more documents (hundreds to thousands across weeks/months) for the anomaly detection model to learn meaningful baselines; this sample is enough to verify that the pipeline works end to end.
Open the job
Change the state parameter in the job_state module call (defined in the top level main.tf file):
Terraform updates only the job state resource; the job configuration and datafeed are untouched:
Start the datafeed
Similarly, update the datafeed state:
The datafeed is now running. Since we haven't specified start or end times, it will process all available data in its indices and will continue polling for new data in real time.
Cleaning up
When you're done, a single command tears everything down in the correct reverse order:
- Datafeed state first.
- Then job state.
- Then datafeed.
- Then job.
- Then API key.
- And then the deployment:
How do you promote anomaly detection jobs from dev to production with Terraform?
With this modular structure, promoting a job from dev to production becomes a variable change rather than a manual migration. The platform team validates the job against a dev cluster and then updates a single variable:
The same Terraform configuration, the same modules, the same reviewed workflow, just different parameters.
In practice, you'd use separate Terraform workspaces or .tfvars files per environment, feeding into a continuous integration and continuous deployment (CI/CD) pipeline.
How do I import existing anomaly detection jobs into Terraform?
If you already have AD jobs running that were created through the UI or API, the provider supports importing them into Terraform state:
This lets you gradually shift legacy jobs under Terraform management without recreating them.
What's next
Future releases of the Elasticsearch Terraform provider will add support for ML calendars and filters resources. In the meantime, this modular pattern can be extended to manage other Elasticsearch resources alongside your AD jobs.
To experience the full benefits, upgrade to 9.3 (or later) or start your Elastic Security free trial. If you're also managing detection rules, see Managing Elastic Security Detection Rules with Terraform.
Resources
- Full example code on GitHub
- Anomaly Detection in Terraform documentation
- Elastic Stack Terraform Provider documentation
- Elastic Cloud Terraform Provider documentation
- Elastic Cloud regions, deployment templates, and instances
Frequently Asked Questions
How do I manage Elastic anomaly detection jobs with Terraform?
Use the Elastic Stack Terraform provider (v0.14.0 or later), which includes native resources for anomaly detection jobs (elasticstack_elasticsearch_ml_anomaly_detection_job), datafeeds and their operational state. A single terraform apply provisions the job, datafeed and all state resources in the correct dependency order.
Why should I separate anomaly detection job state from job configuration in Terraform?
Job state (open/closed) and datafeed state (started/stopped) change frequently during normal operations (reindexing, model resets, pipeline incidents) without any change to the underlying configuration. Keeping them in separate Terraform modules means operational actions don't produce diffs in your config resources and don't require a full config plan to execute.
Can I import existing Elastic anomaly detection jobs into Terraform without recreating them?
Yes. The Elastic Stack Terraform provider supports terraform import for existing AD jobs. Run terraform import module.job.elasticstack_elasticsearch_ml_anomaly_detection_job.nginx <deployment_id>/nginx to bring a job created through the Kibana UI or Elasticsearch API under Terraform management without deleting and recreating it.
How do I promote an anomaly detection job from a dev to a production cluster with Terraform?
With a modular Terraform layout, environment promotion is a variable change. Update ec_region and indices in your .tfvars file or workspace variable, then run terraform apply against the production cluster. The same reviewed configuration runs in both environments: no manual migration, no UI steps.
What size ML node do I need for Terraform-managed anomaly detection on Elastic Cloud?
The example allocates 1 GB of memory in a single availability zone, which is sufficient for low-cardinality AD jobs. Higher-cardinality jobs or larger datasets require a larger size value in the ml block of the Elasticsearch resource and the model_memory_limit variable in the job module is the primary tuning point.
Why does the Elasticsearch Terraform provider require an explicit depends_on between datafeed state and job state?
The Elasticsearch API requires a job to be open before its datafeed can start. Because there is no data flow between the two state modules, Terraform would otherwise attempt to start both in parallel and fail. The explicit depends_on = [module.job_state] in the root main.tf enforces the required sequencing.
What is the difference between the Elastic Cloud Terraform provider and the Elastic Stack Terraform provider?
The elastic/ec provider provisions Elastic Cloud infrastructure (deployments, node topology, regions). The elastic/elasticstack provider manages resources within a running Elasticsearch cluster (ML jobs, datafeeds, security API keys, index settings). A typical setup uses both: ec to create the deployment, elasticstack to configure it, with credentials passed automatically between them.
相关内容

2026年7月1日
One command. Natural language. Your Elasticsearch data, straight to the terminal.
Query your Elasticsearch data from the terminal in plain English. The official Elastic GitHub Copilot CLI plugin generates and runs ES|QL queries against your cluster. No Kibana, no manual syntax.
2026年6月30日
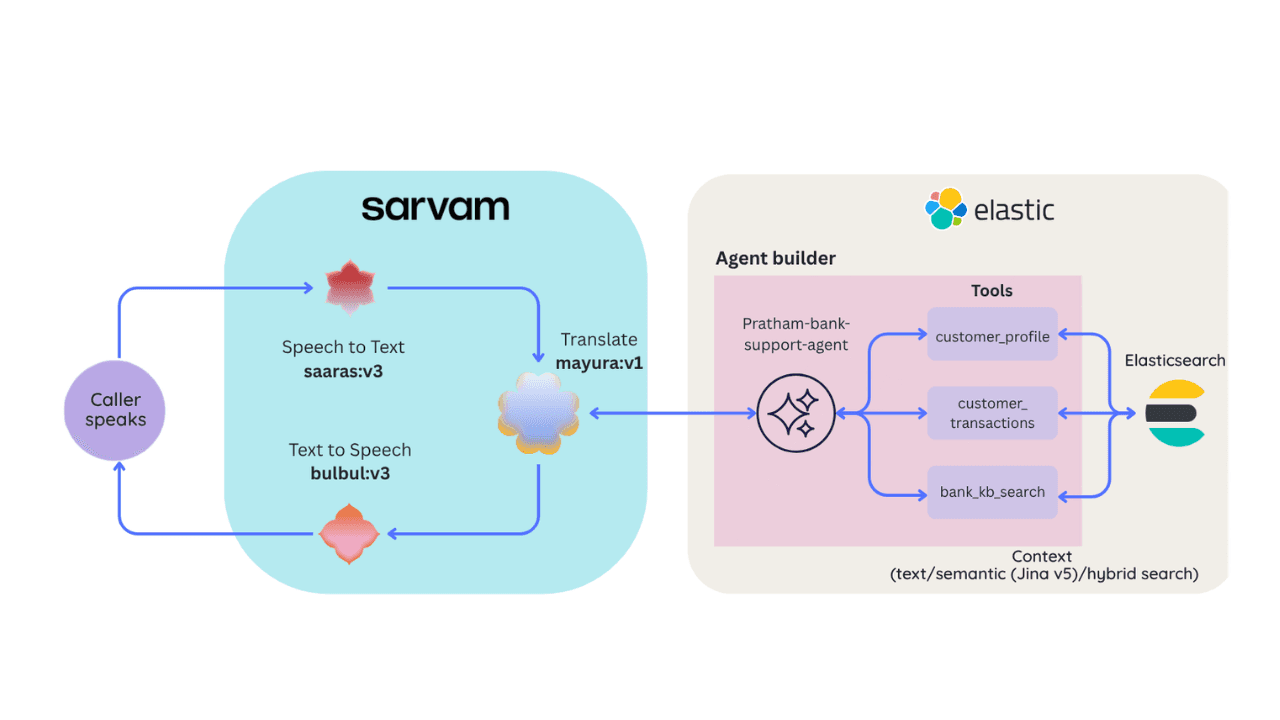
Building a multilingual voice agent with Elastic Agent Builder & Sarvam AI
A working demo combining Sarvam AI speech with Elastic Agent Builder: identity verification, per-customer ES|QL queries, and mid-call language switching across 22 Indian languages without multilingual indices.

2026年6月26日
Talk to your Elasticsearch data: building a real-time voice agent with Google ADK and MCP in 3 components
Wire Google ADK's real-time voice streaming to your Elasticsearch data via Agent Builder's built-in MCP server; no custom integration code required.

2026年6月22日
Your data analyst doesn't need SQL: wiring Elastic Agent Builder to AWS AgentCore for natural-language Elasticsearch queries
Wire plain-English questions to your Elasticsearch data using Elastic Agent Builder MCP, AWS Bedrock AgentCore and the Strands SDK. Python code included.
2026年6月17日
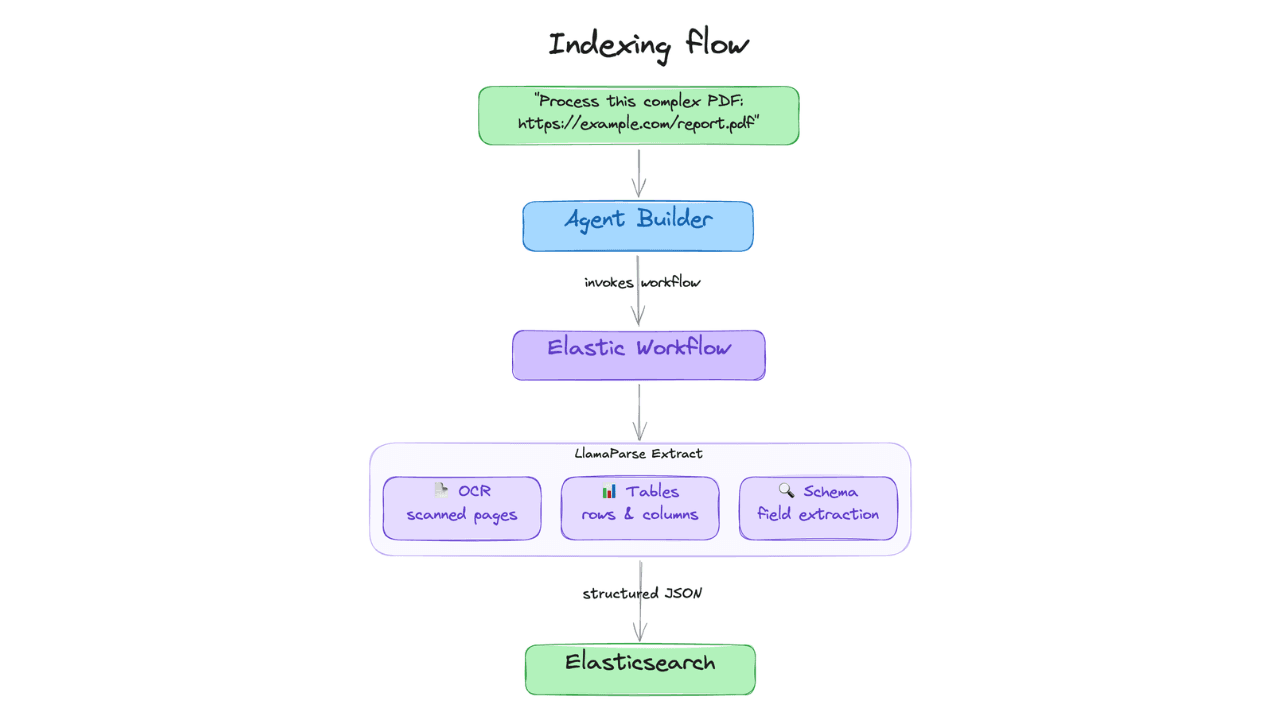
Extract chart data standard OCR misses: Elastic Agent Builder and LlamaParse in one pipeline
Build an end-to-end pipeline that extracts structured data (including values from charts) out of complex PDFs and into Elasticsearch, ready for agent queries with ES|QL.