Elasticsearch has native integrations with the industry-leading Gen AI tools and providers. Check out our webinars on going Beyond RAG Basics, or building prod-ready apps with the Elastic vector database.
To build the best search solutions for your use case, start a free cloud trial or try Elastic on your local machine now.
The recently announced Elasticsearch Relevance Engine
TM (ESRETM) contains a package of important capabilities that supercharge search and make it possible to query Elasticsearch with the same natural language you use to ask generative AI questions.
This got me wondering how we can use this for logs. It is fairly easy to get started with the Elastic Learned Sparse Encoder model, an important ESRE capability that enables semantic search — we will go through how to use it for logging in this blog. This capability is significantly different from Elasticsearch’s current capabilities because it understands a word's meaning and searches broadly across words that have similar meaning or are synonymous to the words I searched for.
The Elastic Learned Sparse Encoder is also an efficient search ranking solution that yields better results than traditional BM25 and vector-based KNN search in the out-of-domain space (i.e., when a model is not strictly trained on the user’s data). Late interaction models improve search accuracy by encoding raw text in such a way that more contextual information is available at query time.
How does the Elastic Learned Sparse Encoder work?
When the Elastic Learned Sparse Encoder is applied on a raw text (such as a log message), it generates a data structure. The structure’s keys represent terms found in the raw text, as well as their synonyms. In a process called term expansion , the model adds and removes terms and synonyms to the data based on their relevance to the raw text, from a static vocabulary of 30K fixed terms. This is similar to vector embedding in a way that an auxiliary data structure (or multiple structures) is created and stored in a field, which then can be used for just-in-time semantic matching within a query.
Each term also has an associated score, which captures its contextual importance within the raw text. We call this data structure a (scored) bag of words or BOW.
Example BOW
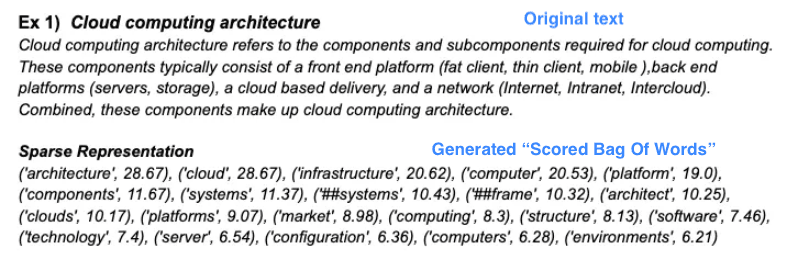
Notice how the input text’s words are captured, stemmed, their synonyms are added, and finally scored. Also note that the “scored bag of words” structure is just a map of [word => score]. You will see how this is generated for our syslogs later on.
At query time, behind the scenes the input query string goes through the same inference process as the raw log text we did at ingestion time, in order to generate a BOW. Then this BOW is matched against the BOWs of the raw log text in the index, similarly to a k-nearest neighbor search with embedded vectors. The final rank score of the search results is the result of a formula that takes into account the scores from matching words from the BOWs of the query and the raw log text.
As an example of how this is useful, if I am searching for “Are there any TLS warnings?” in my syslogs, the following log line “2023/05/24 17:10:33: Error getting config status, workload certificates may not be configured: HTTP 404” is matched despite an exact match not existing within that specific log line. ESRE understands that TLS relates to certificates.
A word of caution here: this search is a “fuzzy” search and might not give you the results you need. There may even be better models you can use for this, such as a model trained on your own data. It is important to remember this is just another tool to help point us in the right direction when we have ambiguous problems to solve. Being able to talk about problems generically as part of search rather than having to be very specific about the errors we are seeing can help us with root cause analysis.
You can get this up and running and start using it to search your logs with a few clicks.
This has the power to change the way you do problem detection and remediation, as ESRE will likely return logs that you may never have thought to analyze previously but have relevance for the problem you are trying to solve. This is a win for reducing your MTTx metrics. You can then use the returned documents from Elastic and the same search terms to ask a question of a generative AI engine like ChatGPT, which we will explore towards the end and has also been explored for other use cases in this blog.
At the end of this blog you end up with a high-level process that looks like this:

Setting up ESRE for log analysis and probing TLS issues
Over the next few steps, I’ll walk through:
- Getting an account on Elastic Cloud ( must be version 8.8 ) and installing the Elastic Agent
- Setting up ESRE in this environment and wiring up the logs to ESRE
- Using Kibana to search the logs using ESRE
- Quickly creating an application with ChatGPT that can work with Elasticsearch and ESRE
Step 0: Create an account on Elastic Cloud
A couple of notes before continuing:
1. Make sure you click on “Advanced Options” (shown below) and add a machine learning node with at least 4GB of RAM for this blog when you create an Elastic Cloud instance.


2. Be sure to follow the “Add System” integration steps when you follow the instructions below.
With those notes in mind, Follow the instructions to get started on Elastic Cloud.
Step 1: Install the Elastic Learned Sparse Encoder model
These steps will get the Elastic Learned Sparse Encoder deployed for use with syslogs. The documentation pages are located here.
Elastic Learned Sparse Encoder is a retrieval model trained by Elastic that enables you to perform semantic search to retrieve more relevant search results. This search type provides you search results based on contextual meaning and user intent, rather than exact keyword matches.
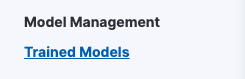
Go to Analytics -> Machine Learning:

Click on Model Management -> Trained Models:
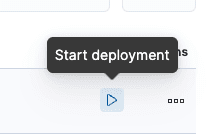
Choose the Elastic Learned Sparse EncodeR v1 and click the download button at the far right.

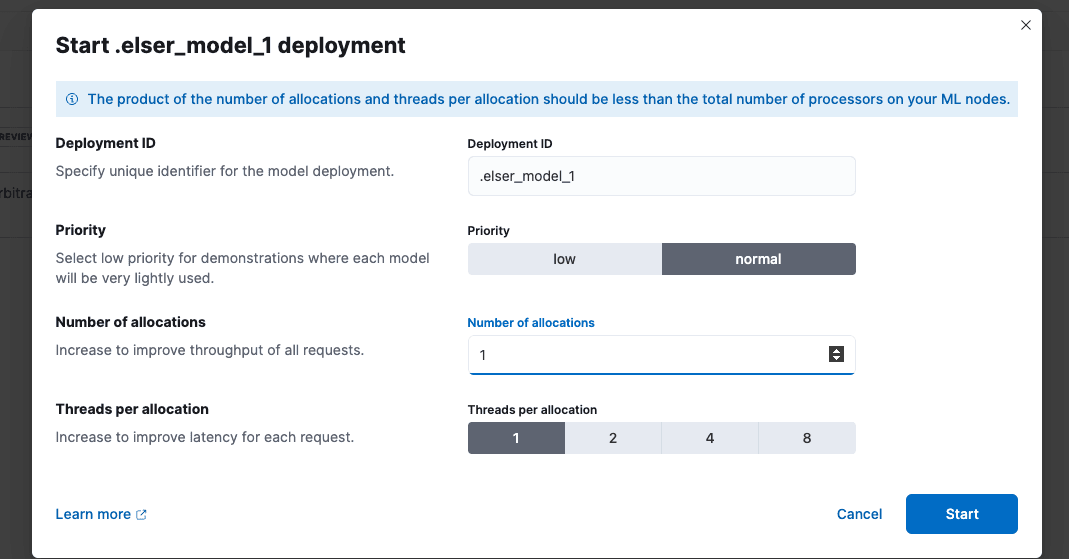
Once it is downloaded, we need to start it up.

For the purposes of this blog, the default settings are fine.
Step 2: Modify the index template
Next up we need to add a couple of fields to our incoming documents for the Elastic Learned Sparse Encoder to use for tokens and for search. We can do this by updating the index template for the log type we want to use the model for.
In this section, we are adding token field and a text_field — both of these are required for use with the Elastic Learned Sparse Encoder model. When running inference, the model will look for the log message in the text_field field. The inference step will then convert the log message text into a list of token-weight pairs, which is stored in the tokens field — that’s why we need these mappings.
Index templates allow us to define the format and mappings for documents that live in an index, in this case the syslog index.
Head over to “Stack Management.”

Next, go to Index Management -> Index Templates. We are going to modify the “syslog” index as shown below:

Click on the index name, select Manage in the bottom right, and then select Edit.

Skip to step 4: “Mappings.”

And add the following mappings: ml.tokens and text_field.

Click Next and save.
Step 3: Add a custom ingest pipeline
Next we are going to add a custom ingest pipeline so that the Elastic Learned Sparse Encoder can add the tokens to the documents that are sent to Elastic. This is required for semantic search — check out a deep dive on this. The cool thing is we can view the tokens in the document, which gives you an intuition for how this works.
The pipeline step will first copy the log message into the text_field field, as this is where the model looks for the data it needs. With the inference step, it will then convert the log message text into a list of token-weight pairs, which is stored in the ml.tokens field.
Be aware that if you have very busy log ingest on this index, the inference will add a little bit of processing time — this might not be a good idea if you have a very heavy load but will be fine for our small use case here.
First, head over to Ingest Pipelines:

Create a new ingest pipeline called “logs-system.syslog@custom” This is a special name that is called from the main syslog ingest pipeline and is present in all the “Managed” pipelines so you can add custom ingest steps.
Now let's add two processors to this ingest pipeline:
- The first processor will set the text_field with the log message field, which has the log data we want to search for by using the Set processor and Copy from from operation as shown below.

- The second processor to add in is the "inference" processor that will generate the tokens we need for semantic search. Set that up in the following way.

Field map:
Inference configuration:
Once done, click Create pipeline.
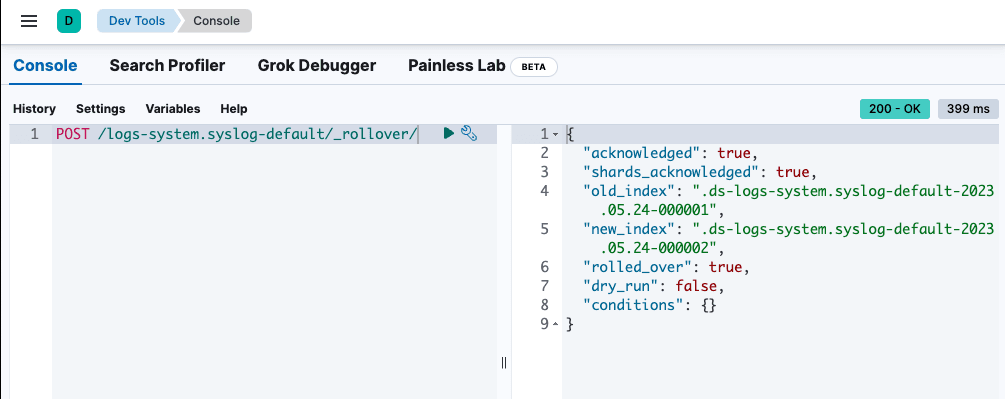
Step 4: Rollover the index
To force the index to rollover and use the new index template we created, head over to Dev Tools and execute the following POST:
Step 5: Welcome to semantic search with logs
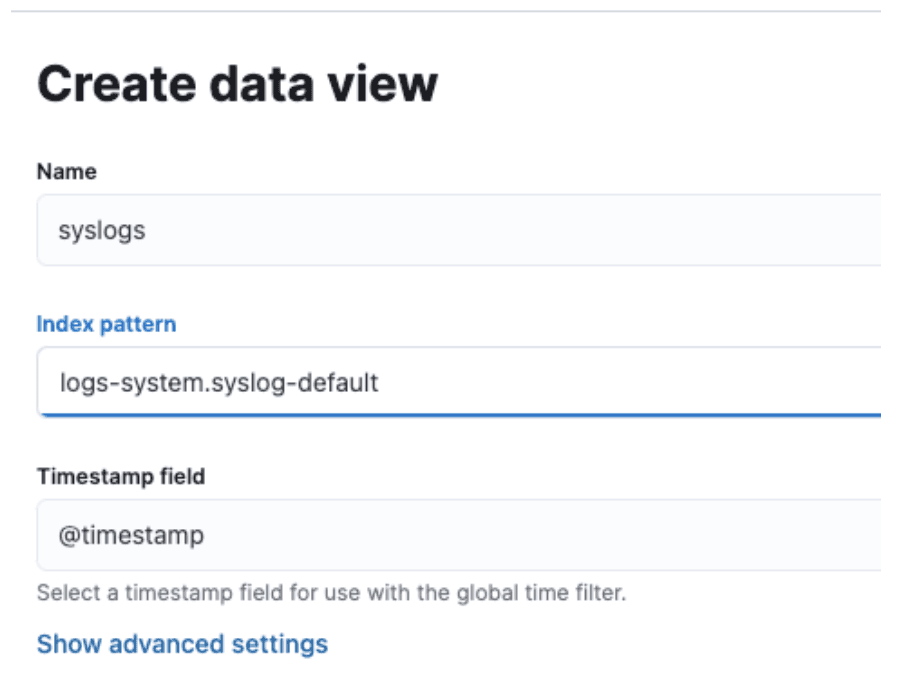
Now, go to Discover and create a new data view that just shows the syslogs:
You might have to wait a bit for some data to populate here. Once there is data, you should see the ML Tokens field populated like so:
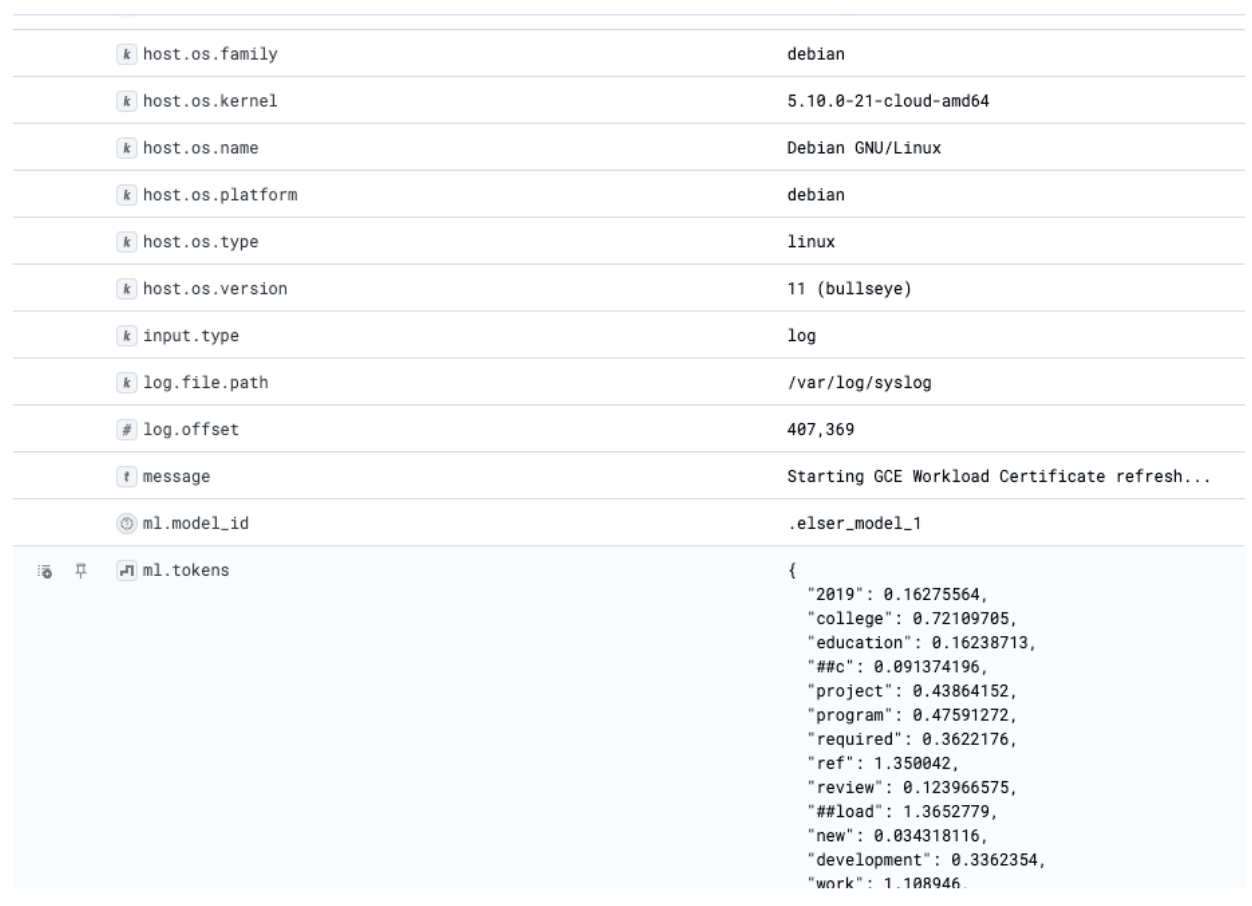
This is the magic of the Elastic Sparse Learned Encoder The tokens you can see here power how it is able to understand the semantic meaning from the log lines and enable you to find logs that have similar meaning to your search parameter.
Now we can run a semantic search. Change the language box below from KQL to Lucene.

Enter the following into the search box. Here the text expansion query uses the natural language processing model to convert the query text into a list of token-weight pairs, which are then used in a query against the rank features field we defined above.
Congratulations! You just did a semantic search with Elastic.
Now there is one more thing to do here: we need to sort the results so that we see the top ranked search results. Add the _score field as shown below.

And the “message” field.

Now we can sort this by High to Low, which gives us an indication of what was a strong match (similar to how search results are ranked on Google):

Now let’s see if we can wire this up to ChatGPT!
Step 6: Wiring this up to ChatGPT
Now let's have ChatGPT write us some code. We ask ChatGPT:
“Can you write some code to query Elasticsearch and then send the documents that are returned to ChatGPT?”
It writes the following code:
Now this is very easy to adapt so that we can use our new Elasticsearch “Semantic query” as follows.
Change the following lines, from:
To this below. Note that this will make sure we only get the top three ranked results and therefore the most relevant results:
And change this line:
To this:
This allows us to include Elasticsearch results in our ChatGPT query, making it far less likely to hallucinate and more likely to give us a relevant diagnosis. Take a look at the end result here.
ChatGPT responds:
The error message you're seeing seems to suggest that there might be an issue related to Transport Layer Security (TLS) certificates. The HTTP 404 error indicates that the requested resource cannot be found.
This error could be due to various reasons:
- Incorrect or incomplete configuration: The error suggests that workload certificates may not be configured. If your service requires TLS certificates to communicate securely, but these have not been properly set up, this could cause the issue. You should review your configuration to make sure TLS is correctly set up
- Wrong path: The system might not be able to find the certificates because they're not located at the specified path in your configuration. You need to ensure that the path to the certificate files is correct.
- Permission issues: There could be issues with file or directory permissions that are preventing your system from accessing the certificate files. You should ensure that the relevant user or service has the necessary permissions to access these files.
- Server or service is not available: The HTTP 404 error could indicate that the server or service you're trying to reach is not currently available or doesn't exist. You need to check if the server is running and that the endpoint is correct. Now if you didn’t want to do this yourself, I have created an application that does all of this over here, in this GitHub repository. When you run it, you get this nice graphical user interface:

So with everything wired up, the architecture of our solution ends up like this:
Now you’ve seen how to set up the Elastic Learned Sparse Encoder model, I challenge our readers to figure out what other things they can use the model for and what logging use cases they can come up with. You could also extend this example to cache and store ChatGPT responses in Elastic, just like this blog, enabling you to start a knowledge base. Over time you could augment this with your own knowledge.
Superior relevance out of the box for SREs
In this blog, we guided you through the process of setting up the Elastic Learned Sparse Encoder for log analysis and tossed the gauntlet down to our readers to discover novel uses for the model. One straightforward example might involve probing for any TLS-related issues as shown in this blog.
With the unveiling of the Elasticsearch Relevance Engine, we're bringing the unique Elastic retrieval model into your hands. This ready-to-use model easily integrates with our full range of data ingestion methods, including ingest pipelines as shown in this blog. Out of the box, anybody can use it on their searchable corpus, and it's compact enough to fit within the confines of laptop memory.
Elastic's Learned Sparse Encoder provides semantic search across domains for search use cases including logs, as shown in this blog, delivering highly pertinent search results without the necessity for bespoke adaptation or training.
Testing in the field has consistently shown that hybrid ranking techniques yield the most relevant search result sets. However, a critical ingredient — RRF — has been absent. We're now integrating RRF to fulfill your application search needs, enabling you to fuse vector and textual search capacities.
Learn more about the possibilities with Elasticsearch and generative AI.
In this blog post, we may have used third party generative AI tools, which are owned and operated by their respective owners. Elastic does not have any control over the third party tools and we have no responsibility or liability for their content, operation or use, nor for any loss or damage that may arise from your use of such tools. Please exercise caution when using AI tools with personal, sensitive or confidential information. Any data you submit may be used for AI training or other purposes. There is no guarantee that information you provide will be kept secure or confidential. You should familiarize yourself with the privacy practices and terms of use of any generative AI tools prior to use.
Elastic, Elasticsearch and associated marks are trademarks, logos or registered trademarks of Elasticsearch N.V. in the United States and other countries. All other company and product names are trademarks, logos or registered trademarks of their respective owners.
Frequently Asked Questions
How does the Elastic Learned Sparse Encoder work?
When the Elastic Learned Sparse Encoder is applied to a raw text, it generates a data structure. The structure’s keys represent terms and their synonyms found in the raw text. In a process called term expansion, the model adds and removes terms and synonyms based on relevance, creating a scored bag of words (BOW). At query time, the BOW of the query is matched against the BOWs of the raw text. The final rank score of the search results is the result of a formula that takes into account the scores from matching words from the BOWs of the query and the raw log text.
Related Content
July 7, 2026
Short queries, formal documents: how HyDE improved semantic search precision by 50% in Elasticsearch
HyDE boosts semantic search precision and recall by 50% on short queries. Here's how to implement it in Elasticsearch with the Inference API and semantic_text.
June 24, 2026
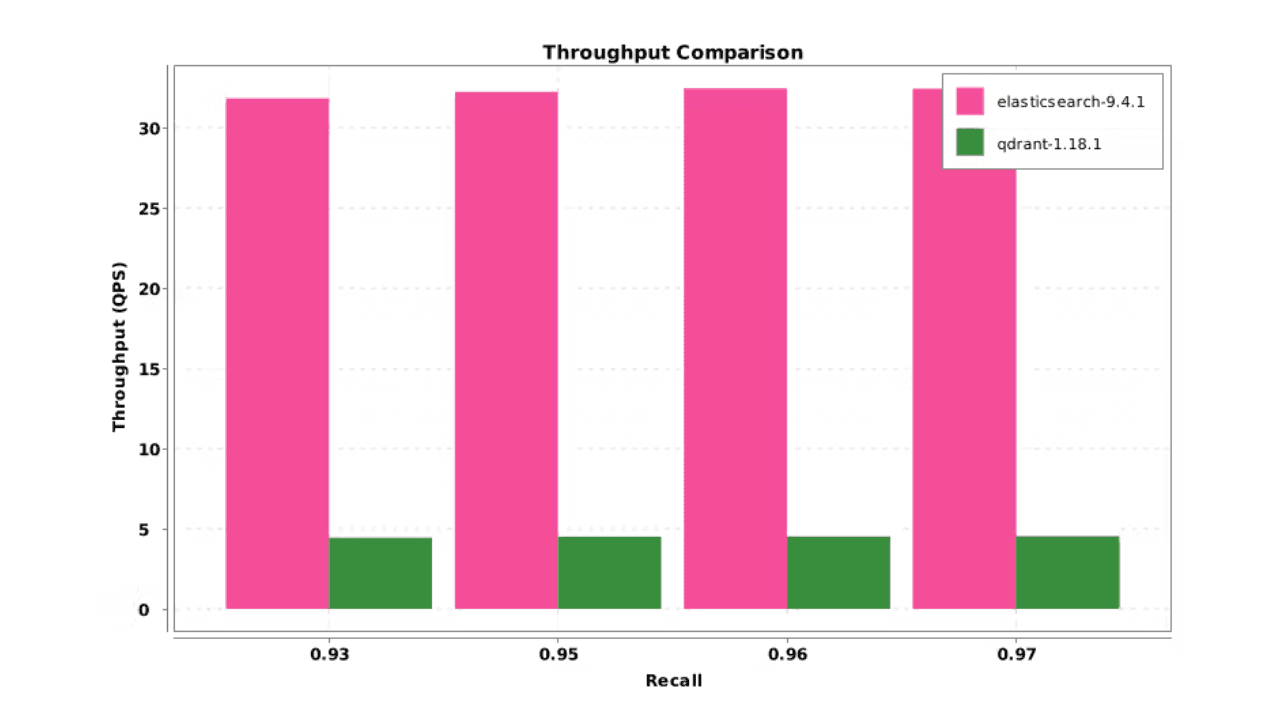
Elasticsearch DiskBBQ delivers 7x faster vector search than Qdrant on network-attached storage
Elasticsearch DiskBBQ achieves up to 7x higher vector search throughput than Qdrant at comparable recall on network-attached storage. Explore the benchmark methodology and full results.
July 6, 2026
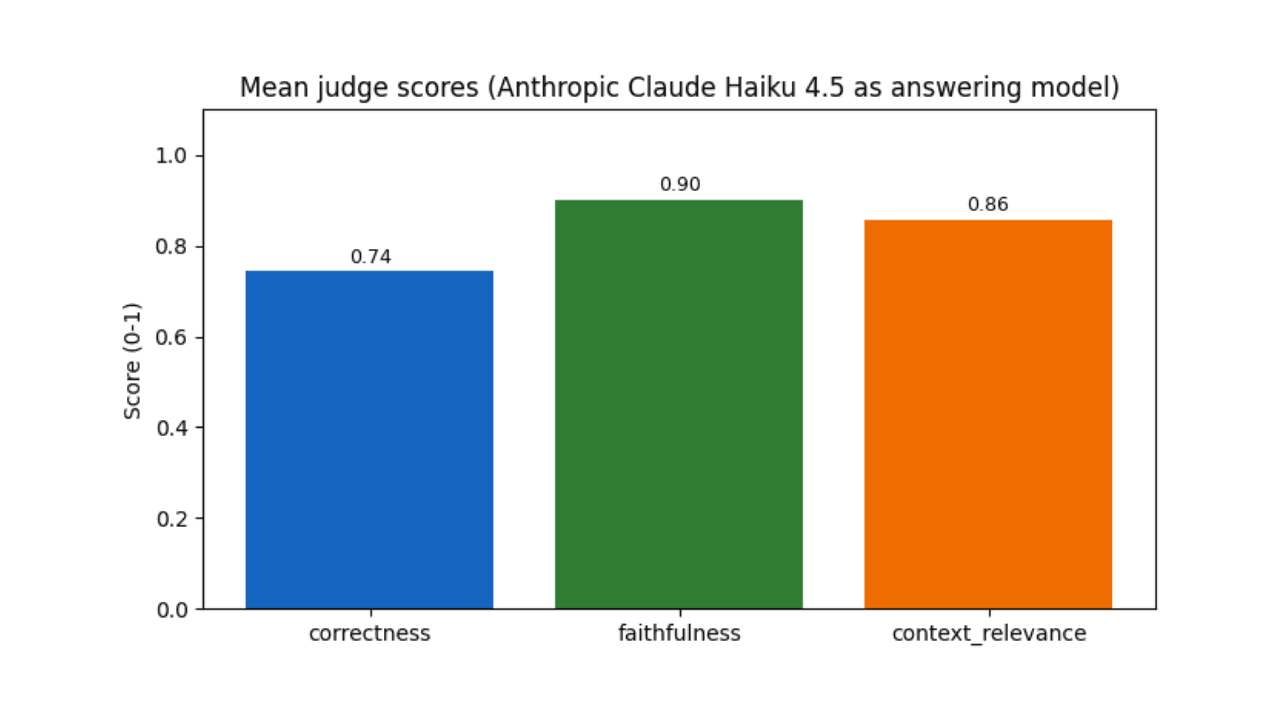
Who grades the grader? LLM-as-a-Judge inside Elasticsearch Workflows
Find out if your RAG agent is ready to ship. Score it on correctness, faithfulness and retrieval quality using only Elasticsearch Workflows and two Claude models.

June 15, 2026
Your search index is already an agent memory system: Persistent agent memory for Claude Code with Elasticsearch
Give your AI agent persistent cross-session memory using Elasticsearch: Hybrid recall, a knowledge graph, and cross-device handoffs. Three commands to install.

June 15, 2026
Your FAQ bot doesn't need a PhD: LLM query routing with Elastic Workflows
Route LLM queries by complexity using Elasticsearch search metadata: Mistral Small for FAQ questions, Claude Sonnet for multi-source synthesis.