Try out vector search for yourself using this self-paced hands-on learning for Search AI. You can start a free cloud trial or try Elastic on your local machine now.
Background and introduction to Azure OpenAI On Your Data
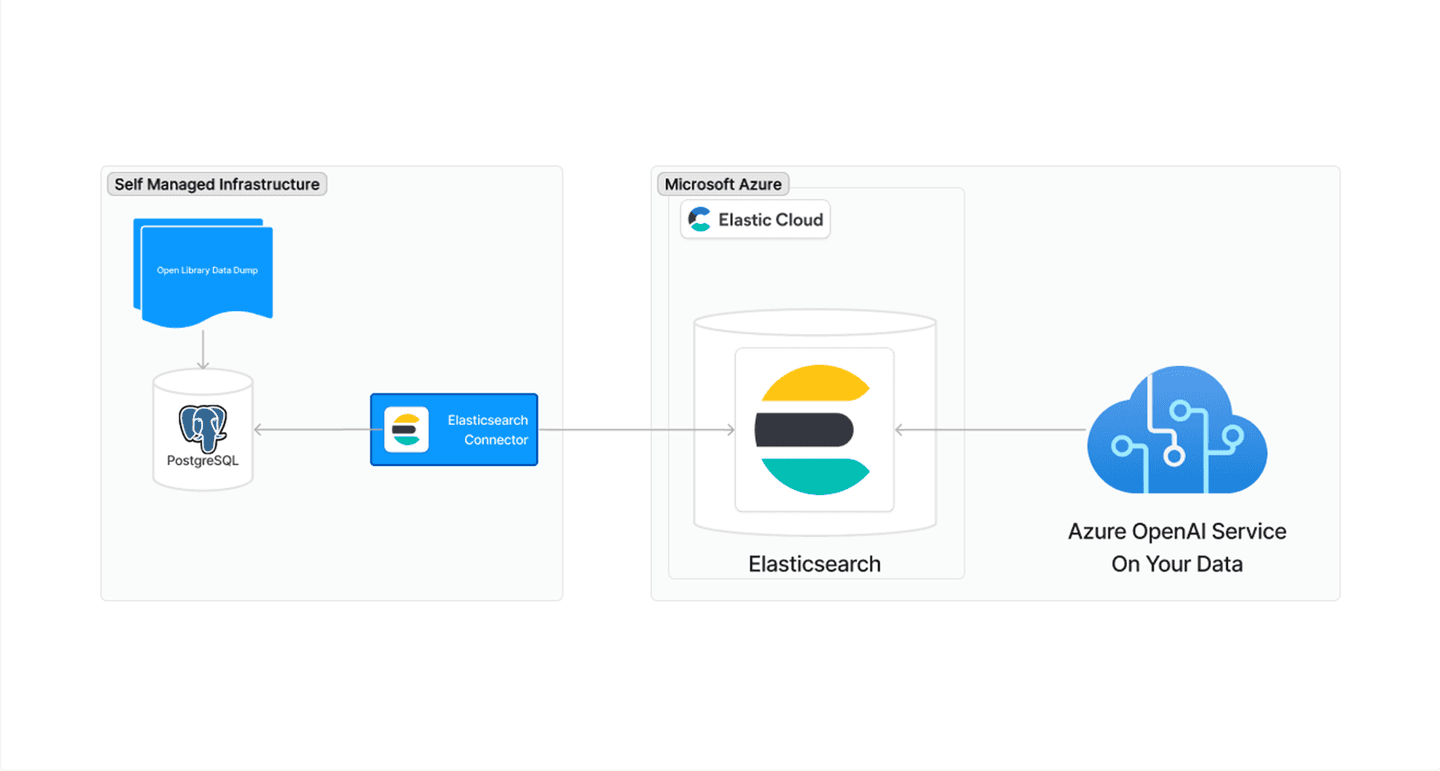
Recently Microsoft integrated Elasticsearch directly into Azure via Azure OpenAI Service "On Your Data". "On Your Data" empowers organizations to construct state-of-the-art conversational experiences by leveraging powerful AI models such as GPT-4 and the RAG model. This gives you the ability to ground LLMs with your private data ensuring that conversations are informed and accurate.
In this article I wanted to demonstrate how easy it is to spin up an Elasticsearch cluster, ingest data using an Elasticsearch Connector, and then chat with that data using the new Azure OpenAI Service "On Your Data" integration. One of the things we'll use in this article is the recently added Connectors API and CLI, which enables us to interact with Elasticsearch fully programatically with no need to switch back and forth between your dev environment and Kibana.
Pre-requisites
For this example I’m going to use the OpenLibrary dataset from https://openlibrary.org. In order to use this dataset you’ll need to do some pre-work to get the data ready to ingest into Elasticsearch. Specifically, you’ll need to:
- Download a recent dump of the data from https://openlibrary.org/developers/dumps
- Import the data dump into PostgreSQL. I used the open source tools and steps listed in https://github.com/LibrariesHacked/openlibrary-search
While step 2 isn’t strictly necessary because you could write a custom ingestion script, I like staging the data in PostgreSQL for a few reasons. First, Elasticsearch has support out of the box for ingesting data from PostgreSQL via a connector. The connector is already optimized for throughput and has some nice resilience built-in and I hate re-inventing the wheel. Second, I can write a custom SQL query for use with the connector. This means I have a lot of flexibility to extract only the data I want from the dataset and can represent the highly normalized data for a “book” as a single document without having to write custom code to do it from the raw referential data dumps. So instead of spending a few days writing and tweaking a custom script to create a single document representing the edition, author, and work that makes up a book, I can spend just a few minutes importing the data into PostgreSQL and setting up the connector to ingest the data into Elasticsearch.
Spinning up the Elasticsearch Cluster
Now that I have all my data ready to ingest I’m going to create an Elasticsearch deployment. I’m using the Elastic Cloud because I don’t want to worry about or have to manage any infrastructure.
Note, I’m going to be doing most of this via the command line and curl. I’ll be using a few shell variables that you’ll want to export these on the command line as you get them, specifically:
- ES_URL: the url to your Elasticsearch deployment
- API_KEY: the key that we’ll create a few steps down
- CONNECTOR_ID: the ID of the connector that gets created a few steps down
The first step is to create a deployment at https://cloud.elastic.co/deployments/create or via the API). Because I know I’m going to be generating embeddings on millions of documents and performing text expansion on my queries I’m going to bump the minimum size of the Machine Learning instances to 4GB.
Expand the "Advanced settings" section
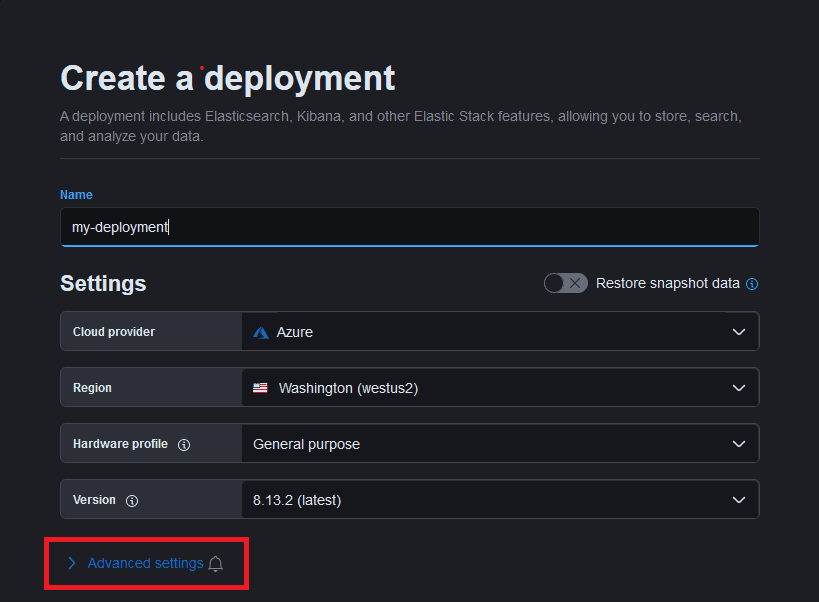
Scroll down to the Machine Learning Instance and update the "Minimum size per zone" to 4GB

Now you can click the "Create deployment" button. In a few moments your deployment will be complete.
Next, let’s create an API key. Remember to save this somewhere secure as we’re going to use it a lot as we go. Note, in order to keep this example simple I'm using overly permissive access. In practice (and in production) you will likely want to set more granular permission using roles and/or restrictions.
Next, you’ll want to create the index and set up the dense_vector mappings for the title and description fields. This step assumes that you know the document schema which creates a sort of “chicken and the egg” problem since you don’t know the schema until after you’ve ingested the data. For simplicity's sake, I set up a temporary index using the same steps listed below, created a connector, and ingested a single document (setting a limit to 1 on the SQL query). That enabled me to know what the document schema would look like so I could generate the mappings I wanted at the start. This is a known sharp edge that our team is working to resolve in future versions.
Now that we’ve got our index created and mappings set up, let’s download the E5 model and set the input field names to the dense vector mappings we just created.
Next we want to deploy the model. If you get a 408, you’ll want to wait a minute after the previous command to allow the download to complete first.
And finally, we’ll want to create an inference pipeline that will create embeddings on the title and description fields as we ingest data from the connector.
Ingesting the Data
Now that we have our cluster created, configured, and ready to use, let’s start ingesting the data. To do that we’re going to use the Elasticsearch PostgreSQL connector. I’m going to do this from source, because why not, but if you want something more out of the box you can you can install from Docker.
First, let’s clone the GitHub repo and install all the dependencies.
Next, I’m going to use the magical connector CLI to authenticate with my Elasticsearch instance and let it handle the basic connector configuration. The first step is to login to Elasticsearch via the CLI and enter your Elasticsearch instance URL and API key when prompted.
Next, create the connector and enter your PostgreSQL connection information when prompted.
Because our data source has A LOT of data that is normalized we’re going to want to create a custom SQL statement which we can configure the connector to use with its advanced sync rules capability. We'll use the following SQL statement which helps us create a single document from the highly relational data. Note, since this SQL will be sent via a curl command, we need to escape ' using '\''.
Draft the advanced sync rule. Once the connector is running, the draft sync rule will be activated upon passing validation.
Note: This API call is currently available in Elasticsearch Serverless and will be included in the Elasticsearch 8.14 release.
We also want to wire up the connector to the inference pipeline we created earlier so that embeddings will be automatically generated as documents are ingested.
Next, we'll use the API to kick off a sync to ingest the data into Elasticsearch.
Finally, it’s time to run the connector
You can check how many documents were ingested using:
Connecting Azure OpenAI On Your Data to Elasticsearch
Now that we've got Elasticsearch deployed and all our data ingested, let's use Azure OpenAI Service’s "On Your Data" to chat with the index. For this I’m going to use the Azure OpenAI console.
The first thing we need to do is open Azure AI Studio's web interface and:
- Open the "Chat" playground
- Select the "Add your data" tab
- Click the "Add your data source" button

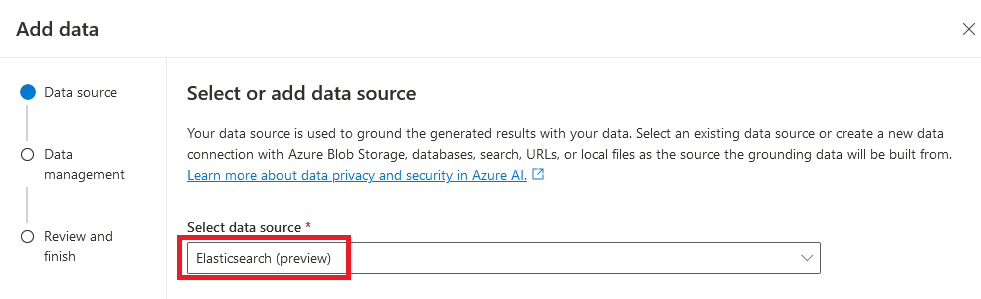
Next, select Elasticsearch as your data source and:
- Enter your Elasticsearch endpoint URL ($ES_URL from above)
- Enter your API key ($API_KEY from above)
- Click the "Verify connection" button
- Select your books-index
- Check the "Use custom field mapping" button
- Clicking the "Next" button

Next, we'll set the search type and embedding model by:
- Selecting "Vector" from the Search type dropdown
- Selecting "Elasticsearch - .multilingual-e5-small_linux-x86_64" as the embedding model
- Clicking the "Next" button

Next, we'll configure the data fields by:
- Selecting all the fields (such as "author_name" and "description") that contain relevant content from the "Content data" dropdown
- Leave defaults for the "title" and "Vector Fields"

On the next screen, review your data source settings and click the "Save and close" button and you're ready to chat away.

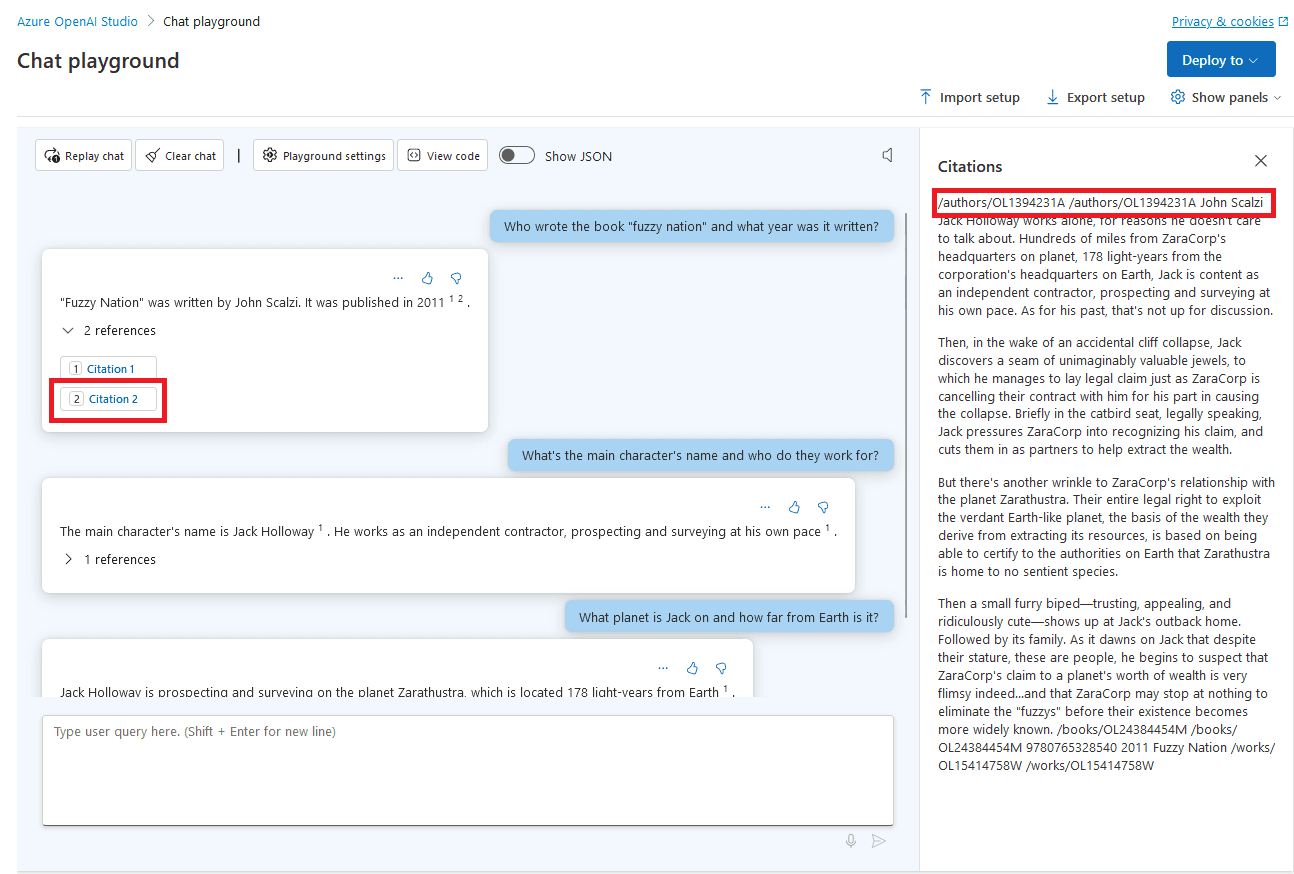
Now you're ready to chat with your data. This is where semantic search really shines. I'm able to ask an initial question and then, using the semantic meaning and context of the chat history, able to ask follow-up questions of my data in natural language.

The great thing is that I can see the citations inline with the context provided in the flyout.
Where to go from here?
Chatting with your index is just one of the many powerful things you can do. Outside of the Azure OpenAI On Your Data integration, once you’ve got your data in Elasticsearch there are many other things to try such as using one of the many other 3rd party embedding models we support by deploying a text embedding model.
- Play around with ELSER, a sparse vector retrieval model trained by Elastic.
- Setup semantic search with Cohere, HuggingFace, or OpenAI embedding models.
- In general, any trained model that has a supported architecture is deployable in Elasticsearch by using eland.
Elasticsearch also gives you the ability to:
- Use search templates, a stored search you can run with different variables, to run searches without exposing Elasticsearch’s query syntax to your users. Search templates let you change your searches without modifying your app’s code.
- Use hybrid search, an approach to combine the power of lexical (BM25) search with approximate nearest neighbor (kNN) search.
- Use mid-stage re-ranking using Learn To Rank or query rescore as well as using Cohere's rerank API.
Not all search uses cases are semantic search use cases. If lexical search (BM25) is a better fit for your search use cases, there are several aspects of Elasticsearch to help you get the most relevant search results.
- Synonyms can help you find documents with similar words, correct common misspellings, or make domain specific language more user friendly. You can use the synonyms API to define and manage synonyms in an internal system index or group related synonyms into a "synonyms set".
- Query Rules allow customization of search results for queries that match specified criteria metadata. This allows for more control over results, for example ensuring that promoted documents that match defined criteria are returned at the top of the result list.
Related Content

July 13, 2026
The disk that never woke up: what actually decided our Qdrant vector search benchmark rematch
On the same hardware, Elasticsearch and Qdrant land in the same range at 56 QPS. The io_uring disk scorer and memory claims turned out to be the two things that mattered least.

July 14, 2026
4 NVIDIA AI tasks, 1 Elasticsearch API: Embeddings, chat, completion, and rerank
Set up NVIDIA hosted models in Elasticsearch with one API key and a model ID. No custom integration code needed.
July 10, 2026
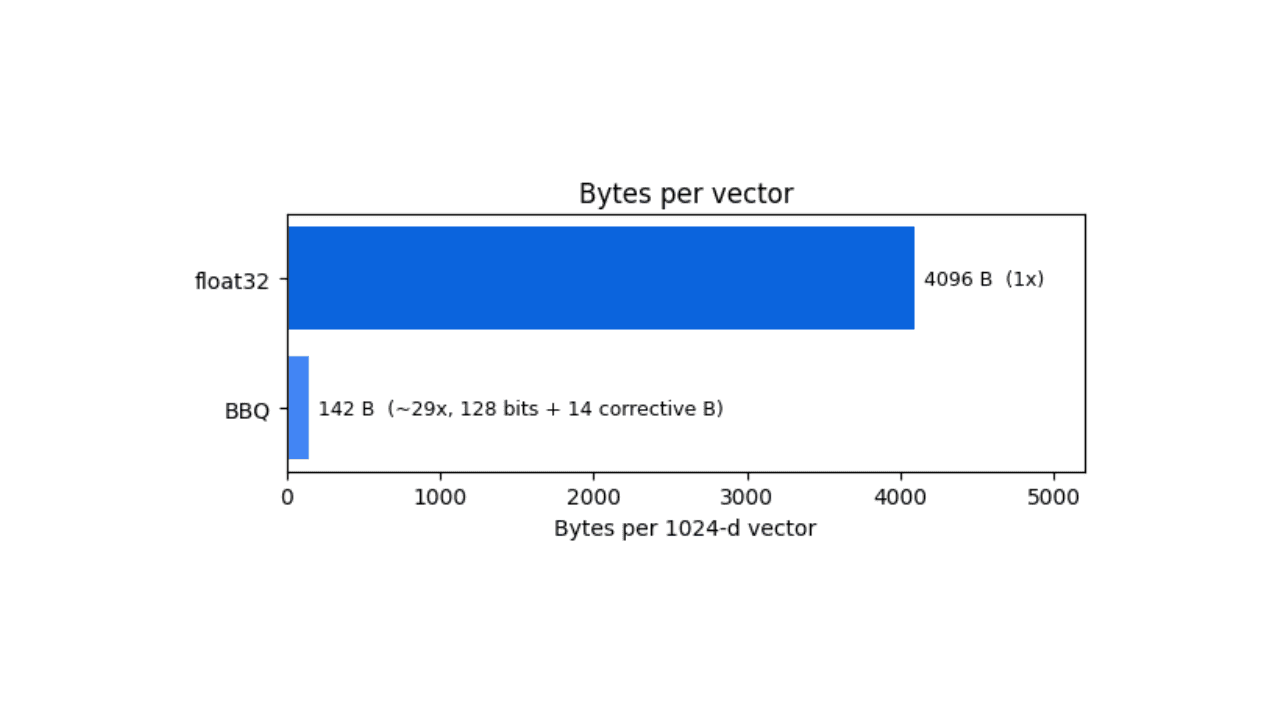
How BBQ shrinks Jina v5 embeddings by 29x without losing recall in Elasticsearch
A hands-on test comparing BBQ and float32 vector indices in Elasticsearch, measuring memory, disk and recall@10 across five languages.
July 7, 2026
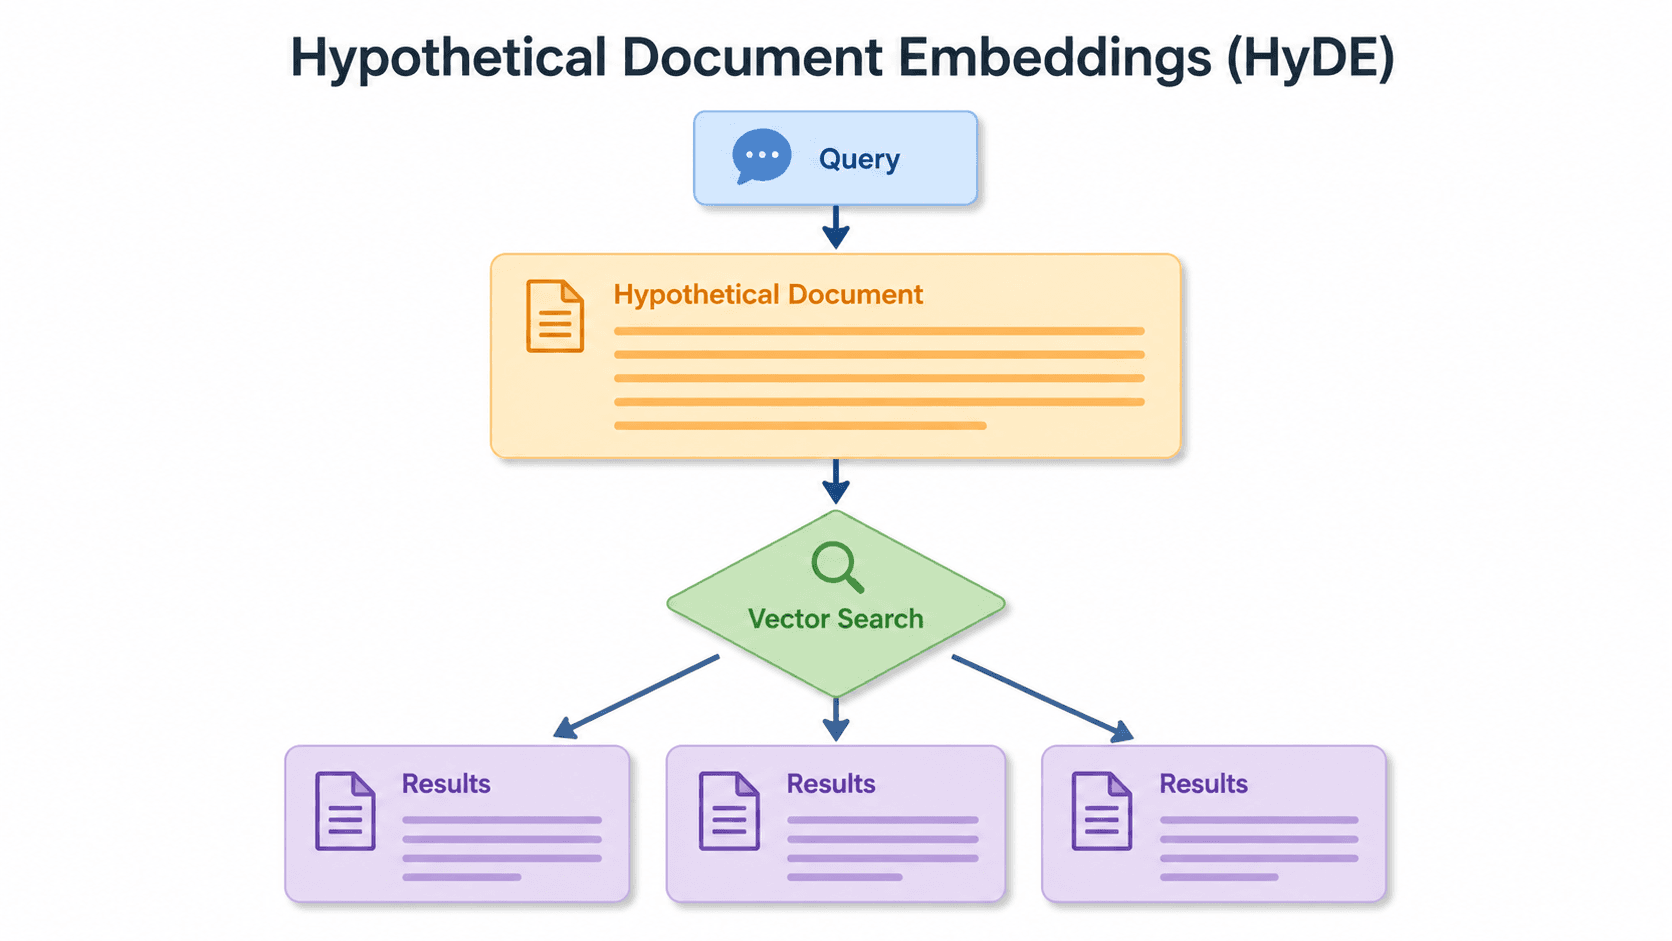
Short queries, formal documents: how HyDE improved semantic search precision by 50% in Elasticsearch
HyDE boosts semantic search precision and recall by 50% on short queries. Here's how to implement it in Elasticsearch with the Inference API and semantic_text.

July 2, 2026
A simdvec deep-dive: How Elasticsearch uses neural-net and video-codec CPU instructions for vector search
Four ways Elasticsearch's vector search engine reuses neural-network, video-codec and cryptography CPU instructions for up to 6x speedups; with the math, the failed attempts and the benchmarks.