Check out the different ways to ingest data into Elasticsearch and dive into practical examples to try something new.
Elasticsearch is packed with new features to help you build the best search solutions for your use case. Start a free cloud trial or try Elastic on your local machine now.
In the Search team At Elastic, we have been exploring different ETL tools and how we can leverage them to ship data into Elasticsearch and enable AI-powered search on the ingested data. Today, I’d like to share our story with the Meltano ecosystem and Meltano Elasticsearch loader.
Meltano is a declarative code-first data integration engine that allows you to sync data between different storages. There are many extractors and loaders available at the hub.meltano.com. If you store your data in Snowflake and you want to build a search experience out-of-the-box for your customers, you might want to think about using Elasticsearch, where you can build a semantic search for your customers based on the data you have. Today, we will focus on syncing data from Snowflake to Elasticsearch.
Requirements
Snowflake credentials
You will have received all the below credentials after signup, or you can get them from the Snowflake panel.
- Account username
- Account password
- Account Identifier (see here for instructions on how to get it)
Snowflake dataset
If you create a new Snowflake account you will have sample data to experiment with.

However, I will be using one of the public air quality datasets that contains Nitrogen Dioxide (NO2) measurements.
Elastic credentials
- Visit https://cloud.elastic.co and sign up.
- Click on Create deployment. In the pop-up, you can change or keep the default settings.
- Once you’re ready for deployment, click on Continue (or click on Open Kibana). It will redirect you to the Kibana dashboard.
- Go to Stack Management -> Security -> API keys and generate a new API key.
Steps to ingest data from Snowflake to Elasticsearch using Meltano
1. Install Meltano
In my example, I will be using the Meltano Python package but you can also install it as a Docker container.
Add the snowflake extractor
Verify the extractor
Add Elasticsearch loader
2. Configure the extractor and the loader
There are multiple ways to configure Meltano extractors and loaders:
- Edit
meltano.yml - Using CLI commands like
- Using CLI interactive mode
I will be using the interactive mode.
To configure the Snowflake extractor run the following command and provide at least the Account Identifier, Username, Password, and Database.
You should see the following screen where you can choose an option to configure.

After you configured the extract you can test the connection. Simply run the following command:
Configure the Elasticsearch loader and provide Host, Port, Schema, and the API key,
If you want to change the index name you can run this command and change it:
ie. the default index string defined as ecs-{{ stream_name }}-{{ current_timestamp_daily}} that results in ecs-animals-2022-12-25 where the stream name was animals.
When everything is configured we can start syncing data.
Once the sync starts you can go to Kibana and see that a new index is created and there are some indexed documents.

You can view the documents by clicking on the index name. You should see your documents.

3. Use your index settings (or mapping)
If we start syncing data, the loader will automatically create a new index with dynamic mapping, which means Elasticsearch will take care of the fields and their types in the index. We can change this behavior if we want to by creating an index in advance and applying the settings we need. Let’s try.
Navigate to the Kibana -> DevTools and run the following commands:
3.1 Create a new pipeline
This will drop all the documents with datavalue < 10.
3.2 Create a new index
3.3 Apply index settings
3.4 Change the index name in Meltano
4. Start a sync job
When the job is done you can see that the index has fewer documents than the one we created before

Conclusion
We have successfully synced the data from Snowflake to Elastic Cloud. We let Meltano create a new index for us and take care of the index mapping and we synced data to the existing index with a predefined pipeline.
I would like to highlight some key points I wrote down during my journey:
Elasticsearch loader (page on Meltano Hub)
- It is not ready to process a big chunk of data. You need to adjust the default Elasticsearch configuration to make it more resilient. I’ve submitted a Pull Request to expose “request_timeout” and “retry_on_timeout” options that will help.
- It uses the 8.x branch of Elasticsearch Python client so you can make sure it supports the latest Elasticsearch features.
- It sends data synchronously (doesn’t use Python AsyncIO) so might be quite slow when you need to transfer a huge data volume.
Meltano CLI
- It is just awesome. You don’t need a UI so everything can be configured in the terminal which gives engineers a lot of options for automation.
- You can simply run on-demand sync with one command. No other running services are required.
Replication/Incremental sync
- If your pipeline requires data replication or incremental syncs, you can visit this page to read more.
Also, I would like to mention that Meltano Hub is amazing. It is easy to navigate and find what you need. Also, you can easily compare different loaders or extractors by just looking at how many customers use them.
Find more information in the following blog posts if you’re interested in building AI-based apps:
- Full text and semantic search capabilities on your data set.
- Connect your data with LLMs to build Question - Answer.
- Build a Chatbot that uses a pattern known as Retrieval-Augmented Generation (RAG).
How to ingest data from Snowflake to Elasticsearch using Meltano
1
Install Meltano.
2
Configure the extractor and the loader.
3
Use your index settings (or mapping).
4
Create a new pipeline.
5
Create a new index.
6
Apply index settings.
7
Change the index name in Meltano.
8
Start a sync job.
Related Content

June 19, 2026
Why your Elasticsearch cluster is hitting disk watermarks: 14 real-world causes explained
Learn how Elasticsearch disk watermarks work, why they trigger, and how to diagnose 14 of the most common scenarios Support encounters, from index bloat to ILM stalls.
June 12, 2026
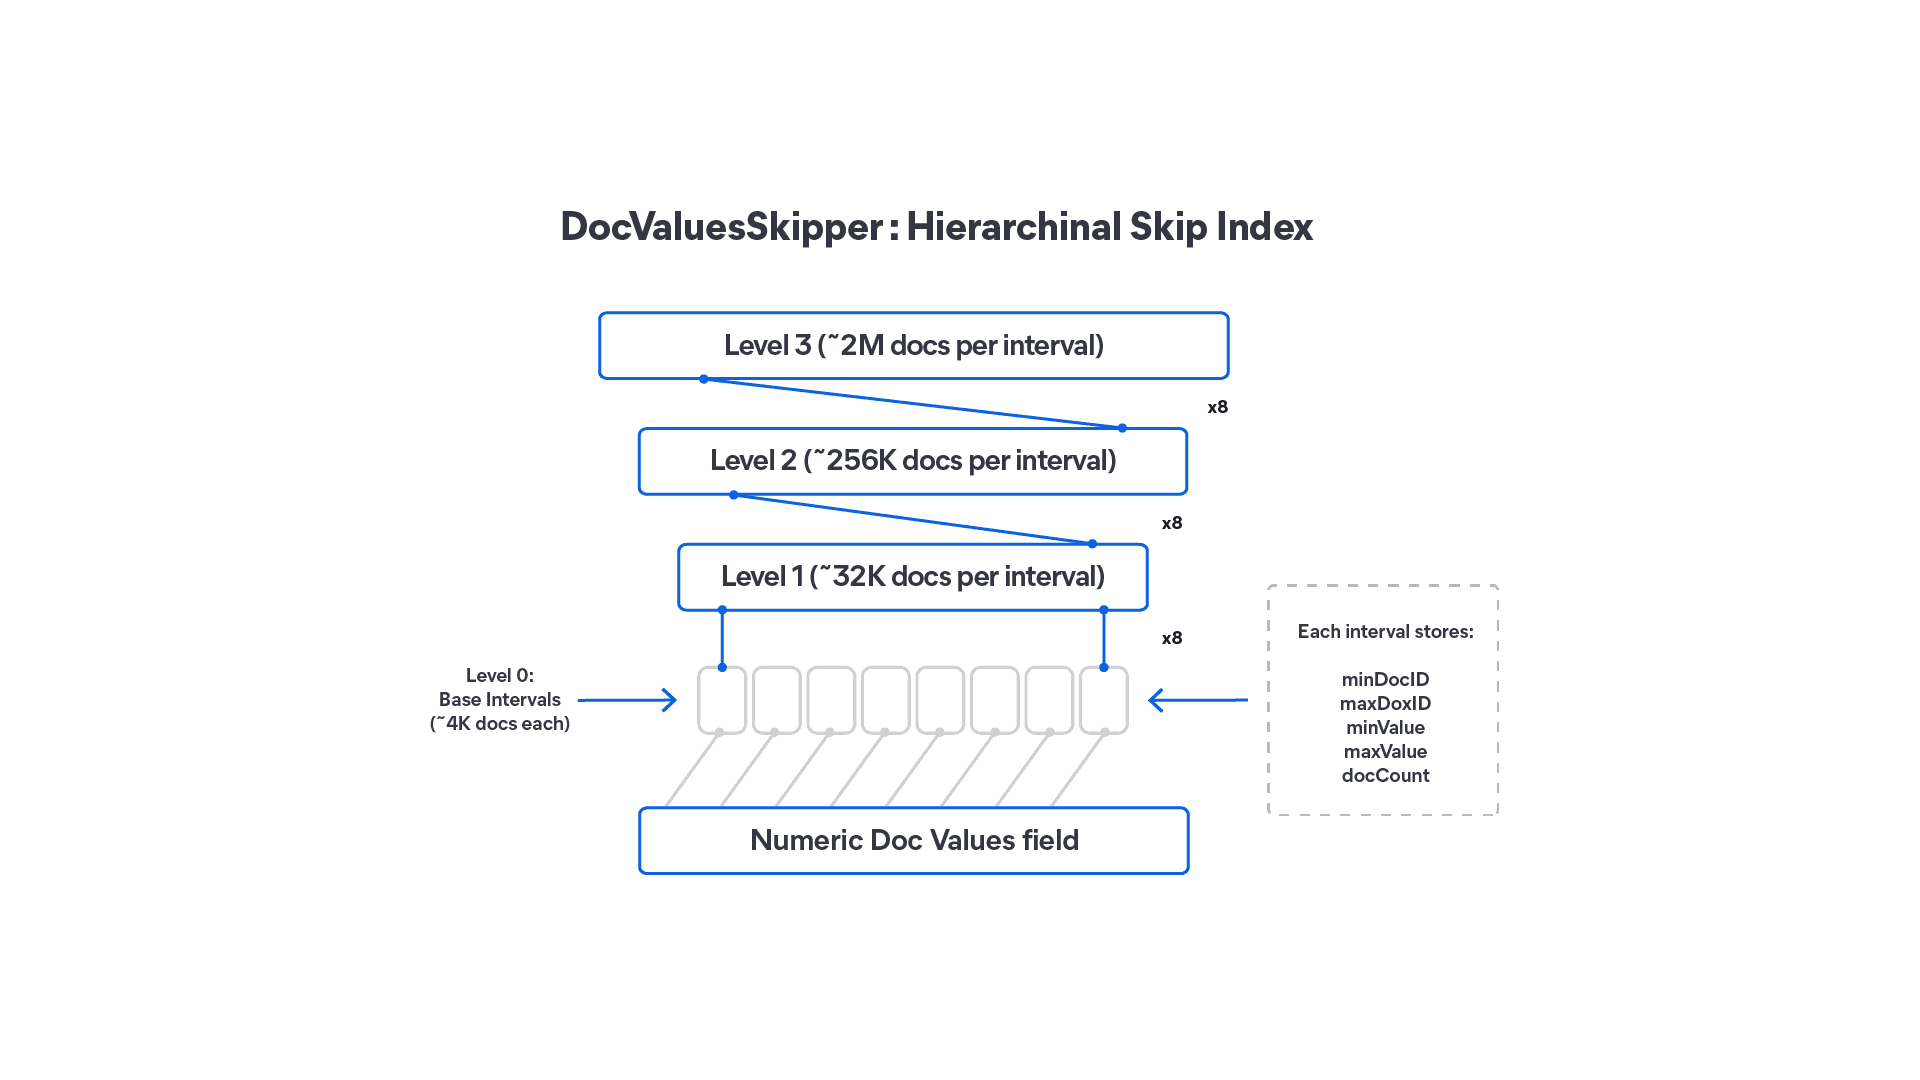
How DocValuesSkippers in Lucene 10 make range queries faster without doubling your storage
DocValuesSkippers add block-level skipping to Lucene DocValues fields, speeding up range queries on sorted or insert-ordered indexes with less than 0.1% storage overhead.
June 2, 2026
Elasticsearch reindex now relocates across nodes automatically: zero user intervention, no lost progress
Elasticsearch reindex now survives node shutdowns, uses Point in Time for more efficient source iteration, and ships with dedicated management APIs. Reindex-from-remote is GA in Serverless.

May 20, 2026
Elasticsearch downsampling methods: last-value vs. aggregate sampling
Elasticsearch downsampling now gives you a choice: last-value sampling for maximum storage savings or aggregate sampling for precise rate calculations and counter resets, both fully queryable in ES|QL.

April 2, 2026
When TSDS meets ILM: Designing time series data streams that don't reject late data
How TSDS time bounds interact with ILM phases; and how to design policies that tolerate late-arriving metrics.