Check out the different ways to ingest data into Elasticsearch and dive into practical examples to try something new.
Elasticsearch is packed with new features to help you build the best search solutions for your use case. Start a free cloud trial or try Elastic on your local machine now.
To demonstrate how to use the Elastic web crawler, we will take a concrete example of a website on which we want to add search. We will explore the approach to discovering the website and leveraging the features provided by the Elastic Web Crawler to best prepare the ingested data for search.
In this article we'll be using Elastic Cloud version 8.13.
What is the Elastic Web Crawler
The Elastic web crawler is an out-of-the-box tool that enables users to crawl a website and ingest its content into Elasticsearch.
The Elastic web crawler begins each crawl by visiting the entry point URLs. From there the crawler fetches the content from this webpage and extracts it. The HTML document is transformed into a search document and indexed.
Then it follows any links to which that page points to, respecting the set of rules defined by the user. The new URLs are visited using the same methodology until the crawler has indexed all of the accessible web pages. If there is no link to a web page, the crawler can’t find it.
Website discovery & web crawler creation
A first crawl
We’ll take the site Books to scrape, a website that offers a selection of book information, as an example of a simple website to crawl. It has been designed specifically for testing web crawlers.
If you’re using Elastic Cloud the setup is straightforward as the Elastic Web Crawler is available out-of-the-box. If you manage your own Elastic deployment, make sure to check this page for requirements.
Let’s begin from the Kibana homepage. From there, navigate to the Search solution then create a new Web Crawler.

Provide a name for the index, in our case search-books and enter the main website URL in the next screen: https://books.toscrape.com/. Then validate the domain and wait for the execution of few checks to make sure the domain can be crawled.
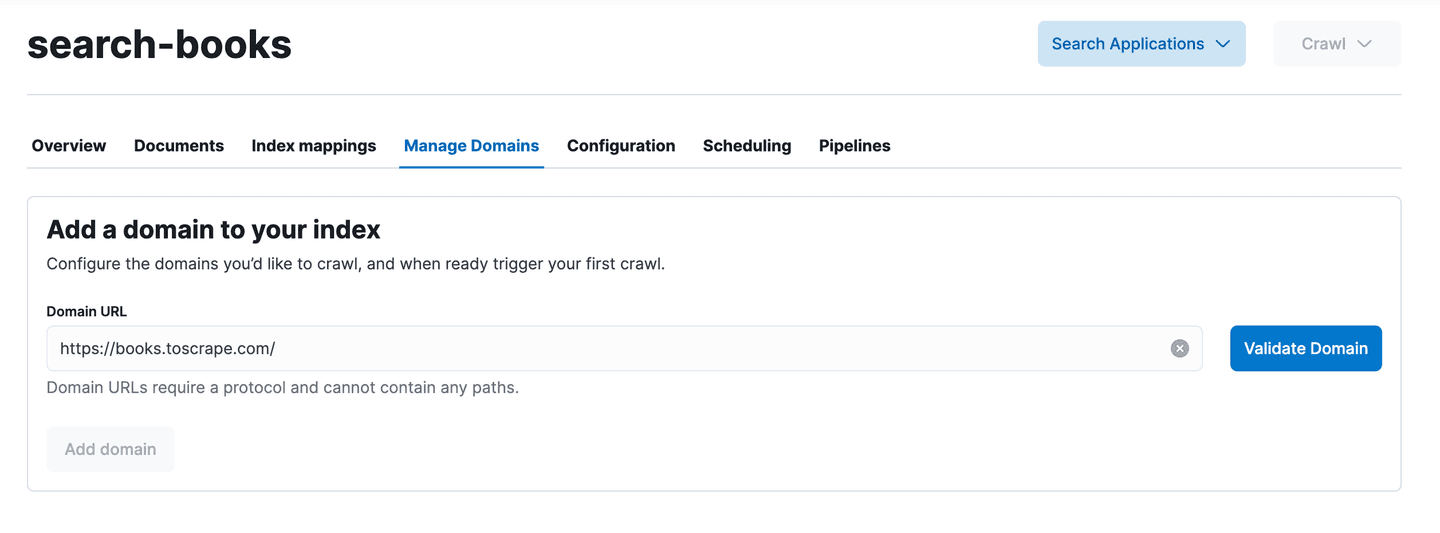
At this point, let’s already crawl the website with the default configuration by clicking on Crawl => Crawl all domains. Doing so, we will see what links are being crawled and how the documents are being indexed for each web page.
Looking at the Documents list, we see that some category pages are also crawled, we are not interested in those as we want to only crawl the book detail pages.

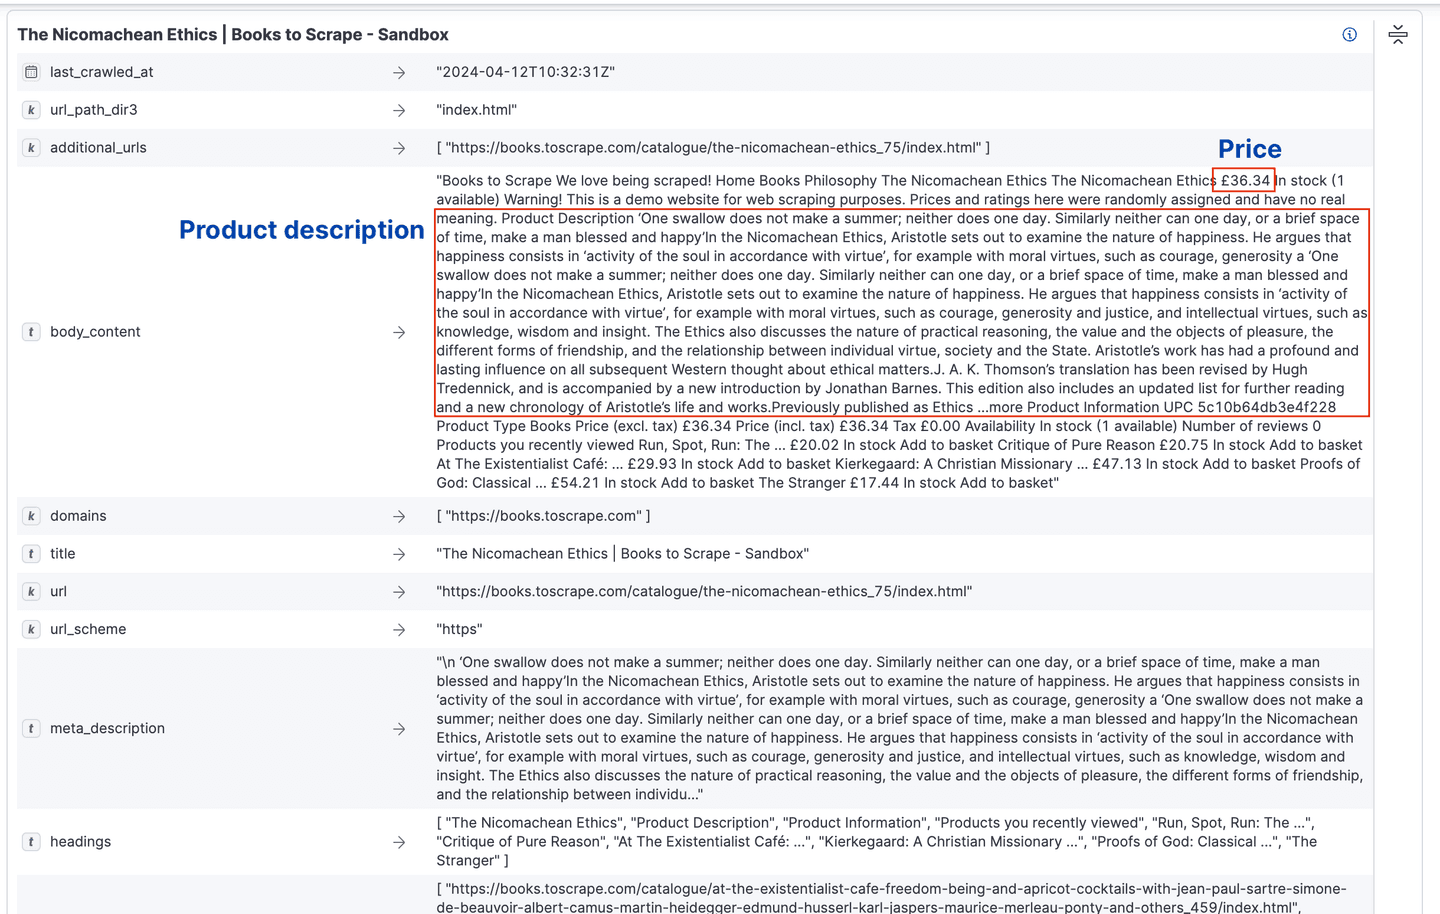
Another thing we notice when expanding a book document, is that the book price or summary are mixed up together in the field body_content. Therefore making that important information not easily usable in a search query.
Define crawl rules
From our first crawl, we noticed that the category pages were crawled and we are not interested in them, so let’s exclude them from the crawling.
Under Crawl rules, add a new rule to disallow crawling pages that Begins with the path pattern /catalogue/category/.
We can run a new crawl now with the new rule in place.
Note: As part of the exploration process, each time we will change the web crawler configuration, I will recommend deleting the content. In the last chapter Prepare for production deployment, we will see how to re-run the web crawler without manually deleting the data.
Enrich the data extracted by the web crawler
By default, the Elastic Web Crawler extracts all the information from the webpage using a default schema. By example, the HTML tag <title> is extracted in a field title and the tag <body> is extracted in a field body_content. It is a good base to work with, but most of the times, we will want to customize how the data is extracted and enrich it to be used in a search application.
Extract data from custom field
Looking at how the documents were being indexed, we noticed we would like to extract the book summary and price in their own separate fields.
It's typical to customize how the crawler extracts content from webpages when exploring a new website, and to achieve this, extraction rules are a great tool.
Using the browser inspector, we can see what HTML tag contains the price text, here it is a HTML tag <p> with class=price_color.

Extraction rules use CSS Selector or XPath to identify specific elements in the webpage. We can test them using the browser console.
To try XPath, we can use the function $x. For example, to return the book summary node, we can run $x("//article[@class='product_page']/p")[0] in the browser console.

To try CSS Selector, we can use document.querySelectorAll. For example, to select the price using CSS Selector, we can run: document.querySelectorAll("div.product_main p.price_color")[0] in the browser console.

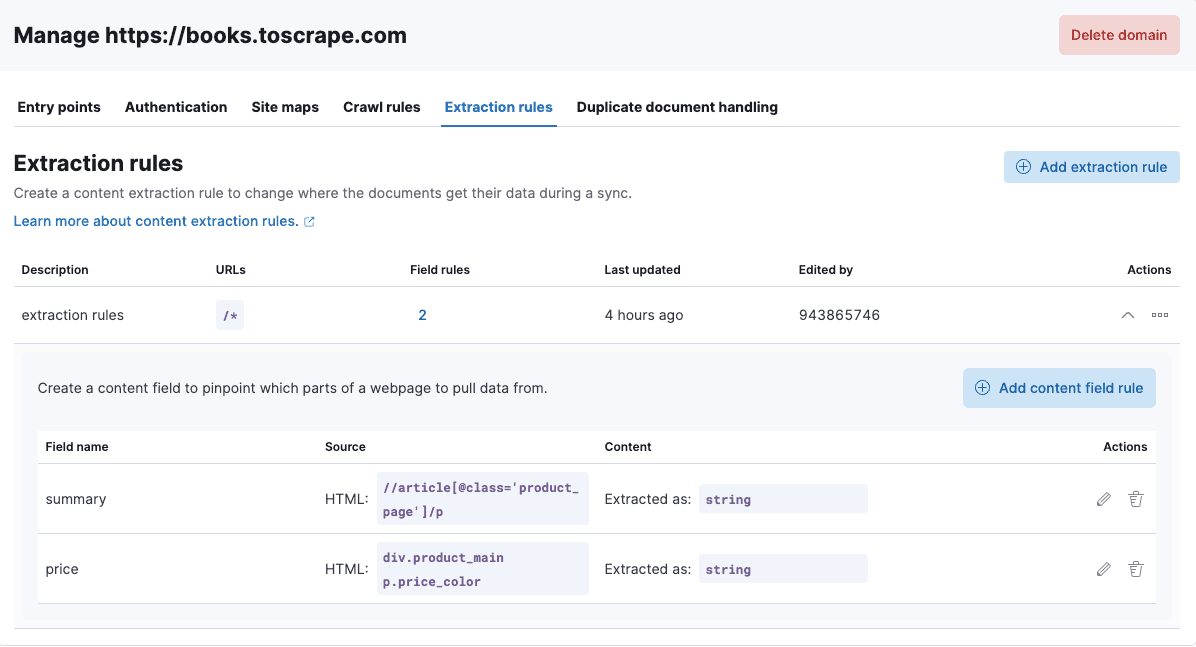
Using what we tested in the browser console, let’s create an extraction rule to add two new fields: summary and price.
Extraction rule:
- Name: book page rules
- Apply to All URLs
- First field:
- Field name: summary
- Source: Extract content from HTML element
- CSS Selector: //article[@class='product_page']/p
- Content: Use content from Extracted Value
- Store extracted content as a String
- Second field
- Field name: price
- Source: Extract content from HTML element
- CSS Selector: div.product_main p.price_color
- Content: Use content from Extracted Value
- Store extracted content as a String
Ingest pipeline to transform data
More often than not the data extracted from a web page is not perfectly formatted to be used in a search engine. In our case, we have extracted the book price in a separate price field, but if we look closely, it has been indexed as a string: "£18.03", which is not ideal to perform search using comparison (i.e get all books cheaper than £20), or aggregations (i.e what is the average price of a sci fi book).
To make some small transformations at ingest time, we can use the ingest pipelines in Elasticsearch. There are many processors available to do different tasks, in our case, we’re going to use a Script processor to execute a custom function for each document being indexed, that will strip the first character out of the price to keep only the numeral part.
To manage ingest pipelines, go to the Pipelines tab and click on Copy and Customize then Click on Edit pipeline button to begin editing the ingest pipelines.

There add a Script processor with the following code:
Save everything and go back to the web crawler index configuration page.
The script we added will create a new field called price_float at ingest time. We need to edit the index mapping to provide the correct field type, in our case we would like to index it as a float.
Open the console and execute the following code to update the index mapping:
Now we can delete all the documents in the index and run the crawl again. A new field price_float with float type is present in all documents.
Enable semantic search with ML Inference pipeline
Another type of pipeline we can use to enrich data is the Inference pipeline that allows us to run ML models against the data that is being indexed.
In our case, we want to leverage Elastic's proprietary ML model called ELSER that enables semantic search on any English text.
Back to the Pipelines tab, we scroll down to the Machine Learning Inference Pipelines part. Here we can deploy and start the ELSER model if not done already.

Then, let’s add a new Inference pipeline by clicking on the Add Inference Pipeline button. On the first screen select the ELSER model then go to the next screen where we pick the input and output fields of the inference pipeline. In our case, we want to enable semantic search on the book summary. We select that field and add it to the list.

After finishing the configuration, we can remove all the documents and run the web crawler one more time.
Test search query
After configuring the web crawler using the extraction rules and ingest pipelines, our documents are easy to search on.
Let’s see a query example that performs a semantic search on the book summary and has a filter based on the book price.
Preparing the web crawler for production deployment
In this chapter, we’ll discuss specific features of the web crawler that are important when it comes to putting the web crawler into production.
Scheduling
As a website gets updated frequently, it might be important to keep the data in Elasticsearch up-to-date with the website. For that, we can schedule frequent crawls of the website using the scheduling capabilities of the Elastic Web Crawler.
The Elastic Web Crawler detects automatically if a web page has been updated since the last crawl, and will update the corresponding documents in Elasticsearch. If a web page has been deleted since the last crawl, the document will then be deleted from Elasticsearch.
Protected website
Another useful feature is the ability to crawl websites that are not publicly available or are behind an authentication.
This documentation explains in detail how to crawl a website that is in a private network.
If the website requires authentication to access specific web pages, we can add the credentials or a specific header in the Authentication under the Domain configuration screen.
Conclusion
In this blog-post, we saw how to discover a new website to crawl from end-to-end, how to leverage the Elastic Web crawler features to prepare the data to be used in a search application and finally how to get ready to deploy this in production.
If you're interested in learning more about Elastic ingestion capabilities, check the other out-of-the-box connectors. If you want to use the ingested data in a GenAI Application, check out our tutorials.
Frequently Asked Questions
What is the Elastic Web Crawler?
The Elastic web crawler is an out-of-the-box tool that enables users to crawl a website and ingest its content into Elasticsearch.
How does the Elastic Web Crawler work?
The Elastic web crawler begins each crawl by visiting the entry point URLs. From there, the crawler fetches the content from this webpage and extracts it. The HTML document is transformed into a search document and indexed. Then it follows any links to which that page points to, respecting the rules defined by the user. The new URLs are visited using the same methodology until the crawler has indexed the accessible web pages.
Related Content

June 19, 2026
Why your Elasticsearch cluster is hitting disk watermarks: 14 real-world causes explained
Learn how Elasticsearch disk watermarks work, why they trigger, and how to diagnose 14 of the most common scenarios Support encounters, from index bloat to ILM stalls.
June 12, 2026
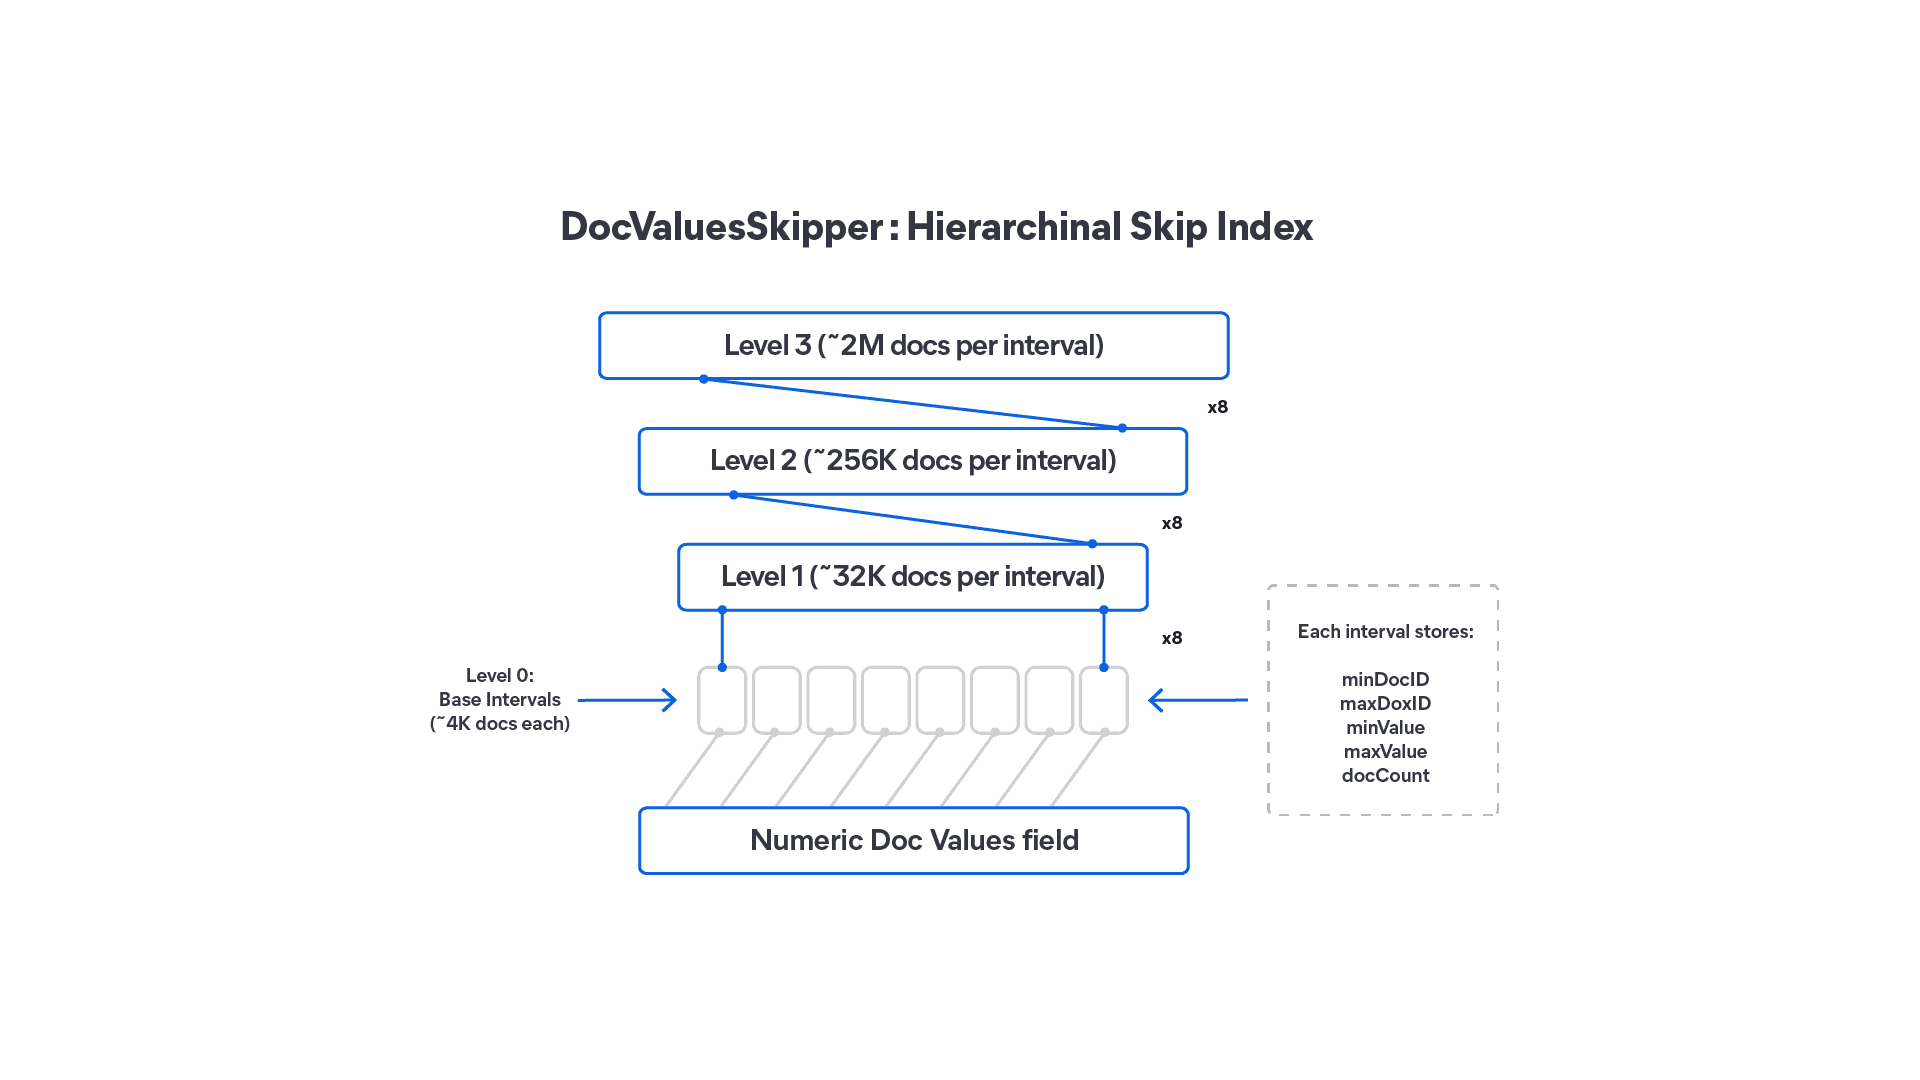
How DocValuesSkippers in Lucene 10 make range queries faster without doubling your storage
DocValuesSkippers add block-level skipping to Lucene DocValues fields, speeding up range queries on sorted or insert-ordered indexes with less than 0.1% storage overhead.

June 2, 2026
Elasticsearch reindex now relocates across nodes automatically: zero user intervention, no lost progress
Elasticsearch reindex now survives node shutdowns, uses Point in Time for more efficient source iteration, and ships with dedicated management APIs. Reindex-from-remote is GA in Serverless.

May 20, 2026
Elasticsearch downsampling methods: last-value vs. aggregate sampling
Elasticsearch downsampling now gives you a choice: last-value sampling for maximum storage savings or aggregate sampling for precise rate calculations and counter resets, both fully queryable in ES|QL.

April 2, 2026
When TSDS meets ILM: Designing time series data streams that don't reject late data
How TSDS time bounds interact with ILM phases; and how to design policies that tolerate late-arriving metrics.