Elasticsearch has native integrations with the industry-leading Gen AI tools and providers. Check out our webinars on going Beyond RAG Basics, or building prod-ready apps with the Elastic vector database.
To build the best search solutions for your use case, start a free cloud trial or try Elastic on your local machine now.
ChatGPT Plus subscribers now have the opportunity to create their own customized versions of ChatGPT, known as GPTs, replacing plugins as discussed in a previous blog post. Building upon a foundation from the first installment of this series—where we delved into setting up Elasticsearch data and creating vector embeddings in Elastic Cloud—this blog will guide you through the process of developing a custom GPT designed to interact seamlessly with your Elasticsearch data.
Custom GPTs
GPTs mark a significant advancement from the plugin system, offering an easier way for users to create custom versions of ChatGPT. Facilitated by an intuitive user interface, this enhancement simplifies the customization process, often eliminating the need for coding skills for a broad range of applications. Beyond basic personalization, those aiming to integrate ChatGPT with external data can do so through custom actions. Users have the option to share these tailored GPTs on the GPT store, keep them private for personal use, or only share them within your company’s workspace with the ChatGPT Team plan.

How ChatGPT communicates with Elasticsearch
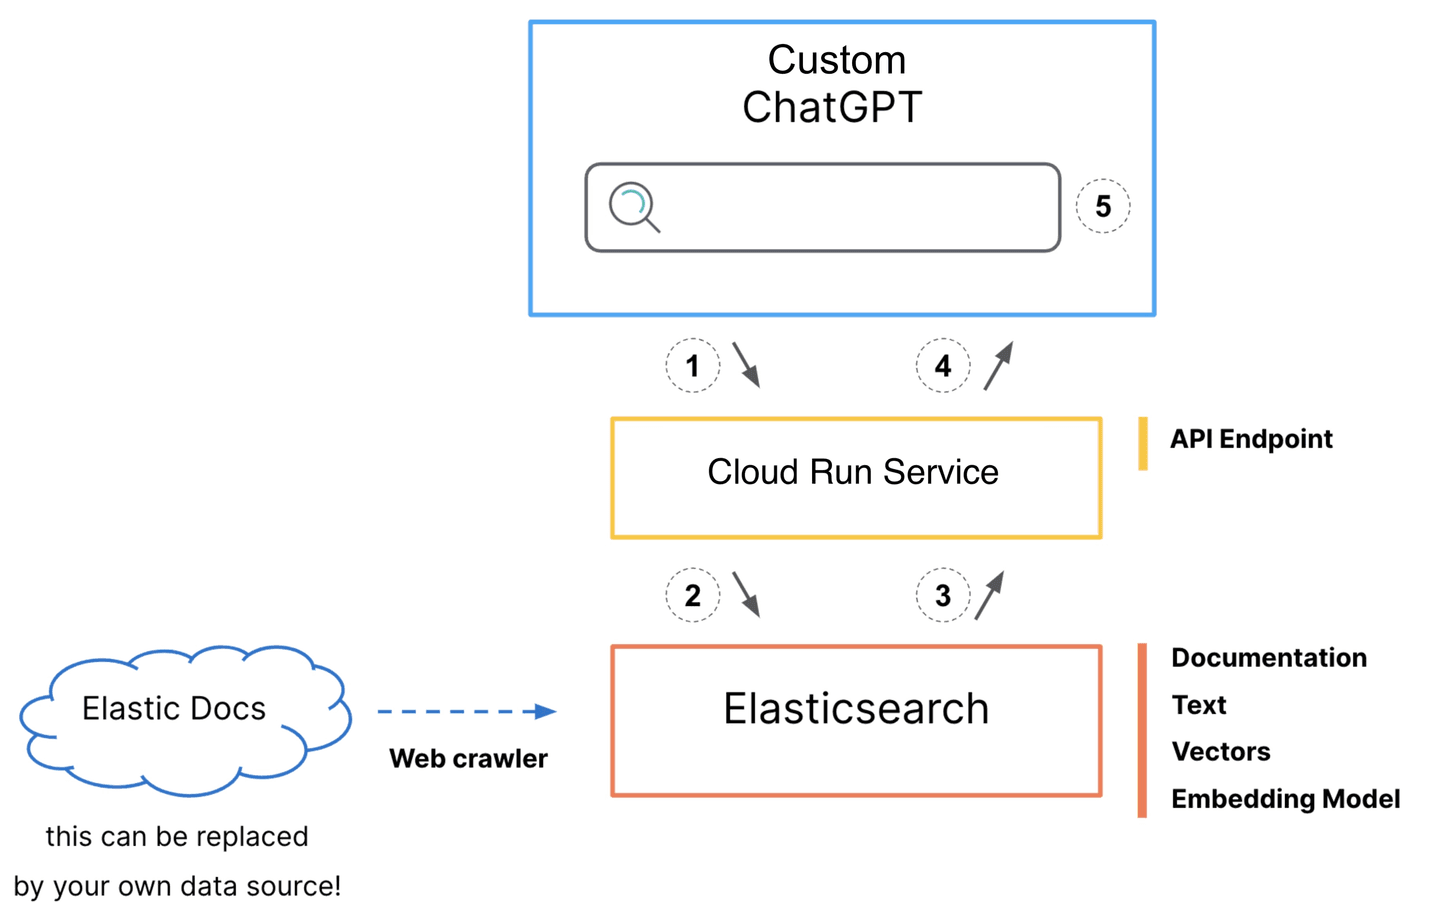
- ChatGPT initiates a call to the
/searchendpoint in the Cloud Run service. - The service takes this input to create an Elasticsearch search request.
- The query response with the documentation body and URL are returned to the service.
- The service returns the document body and URL in text form to the custom ChatGPT.
- This response is then relayed back to the GPT in text form, ready for interpretation.
Again, this blog post assumes that you have set up your Elastic Cloud account, vectorized your content, and have an Elasticsearch cluster filled with data ready to be used. If you haven’t set all that up, see our previous post for detailed steps to follow.
Code
To bring our custom GPT to life, we create a service that acts as the intermediary between ChatGPT and our Elasticsearch data. The core of this service is a Python application which sets up a Quart app and defines the /search endpoint. In addition, we use a Dockerfile to facilitate the deployment of the app on Cloud Run.
The Python app connects to our Elastic Cloud cluster, executes a hybrid search combining BM25 and kNN queries, and returns the relevant documentation body and URL. This allows our custom GPT to access and utilize Elasticsearch data in real time.
For the complete code refer to the GitHub repository. This includes the Python app and the Dockerfile necessary for Cloud Run deployment.
Deploy a service
For detailed steps on deploying the service using Google Cloud Platform (GCP), refer to the deployment section in our previous blog post on ChatGPT Plugins. There, you’ll find a step-by-step guide for setting up and deploying your service on GCP.
Create a custom GPT
After logging into your ChatGPT Plus account, navigate to “My GPTs” via your profile to find the “Create a GPT” link. Alternatively, the “Explore GPTs” section above your conversations also leads to the GPT store, where you can find a link to create a GPT.

Configure the custom GPT
The GPT editor provides two ways to configure your GPT: the "Create" tab for a guided setup through conversational prompts and the "Configure" tab for direct configuration input. For configuring the Elastic Docs Assistant, we'll primarily use manual configuration to precisely define our GPT's settings.
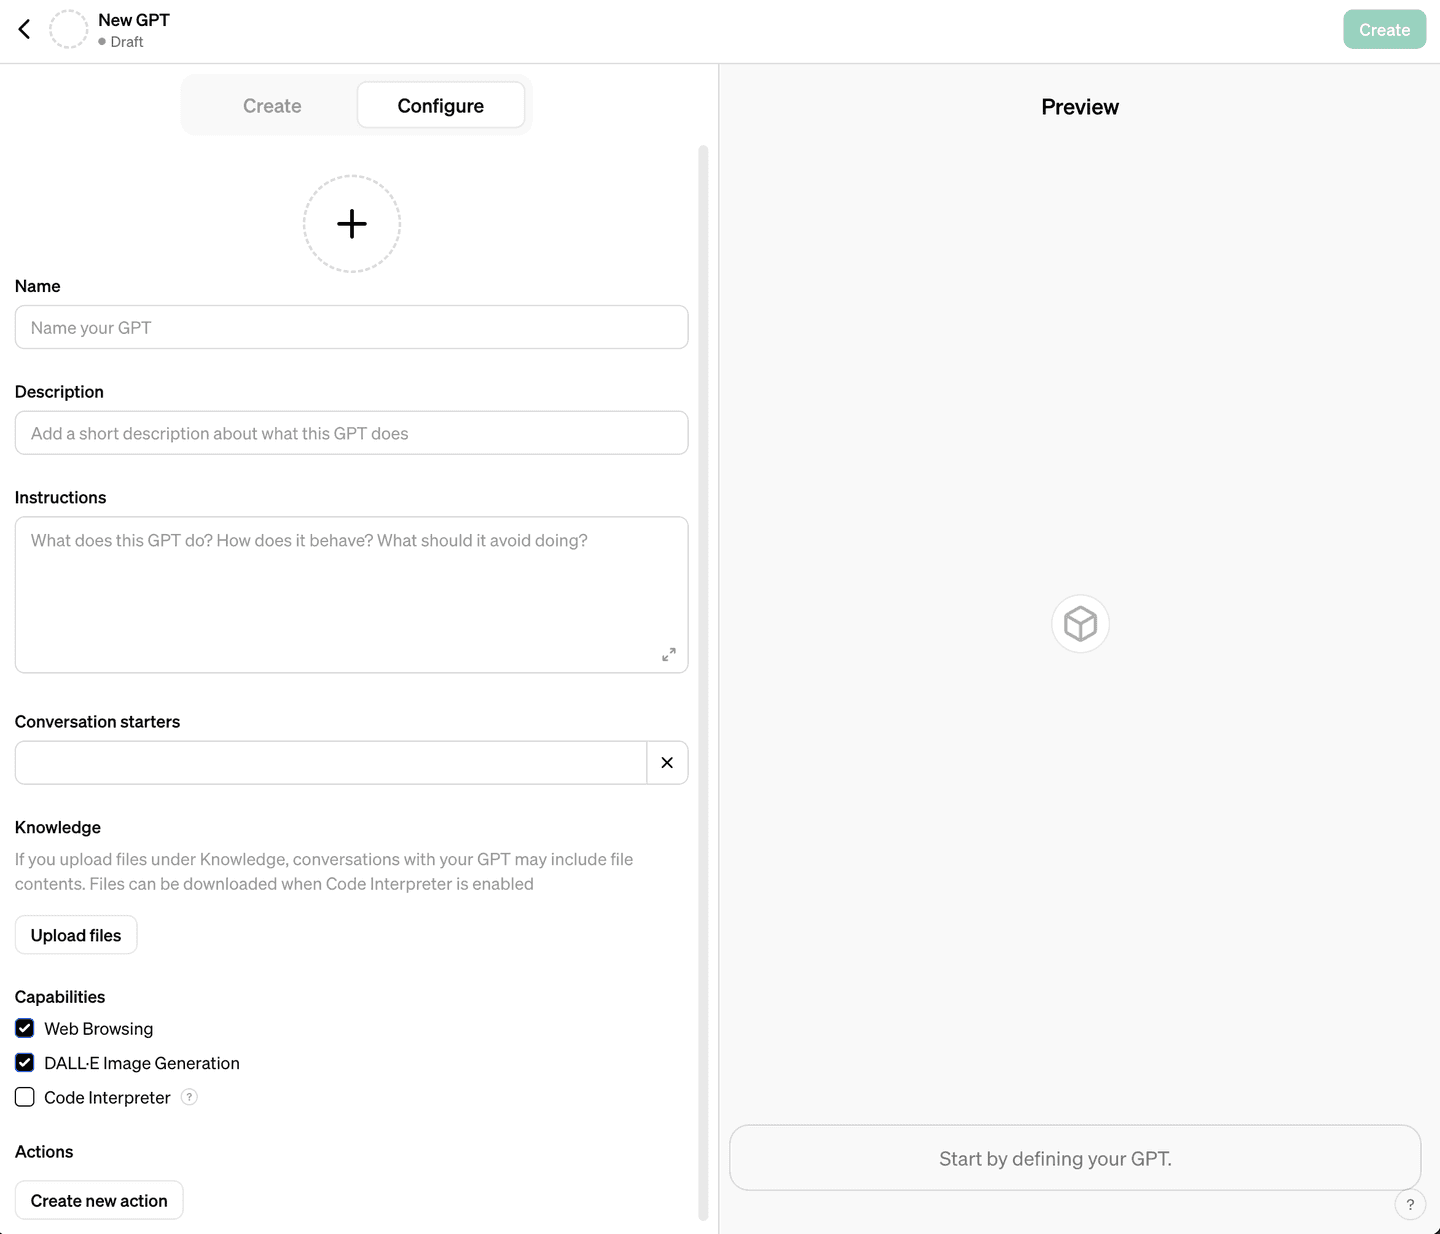
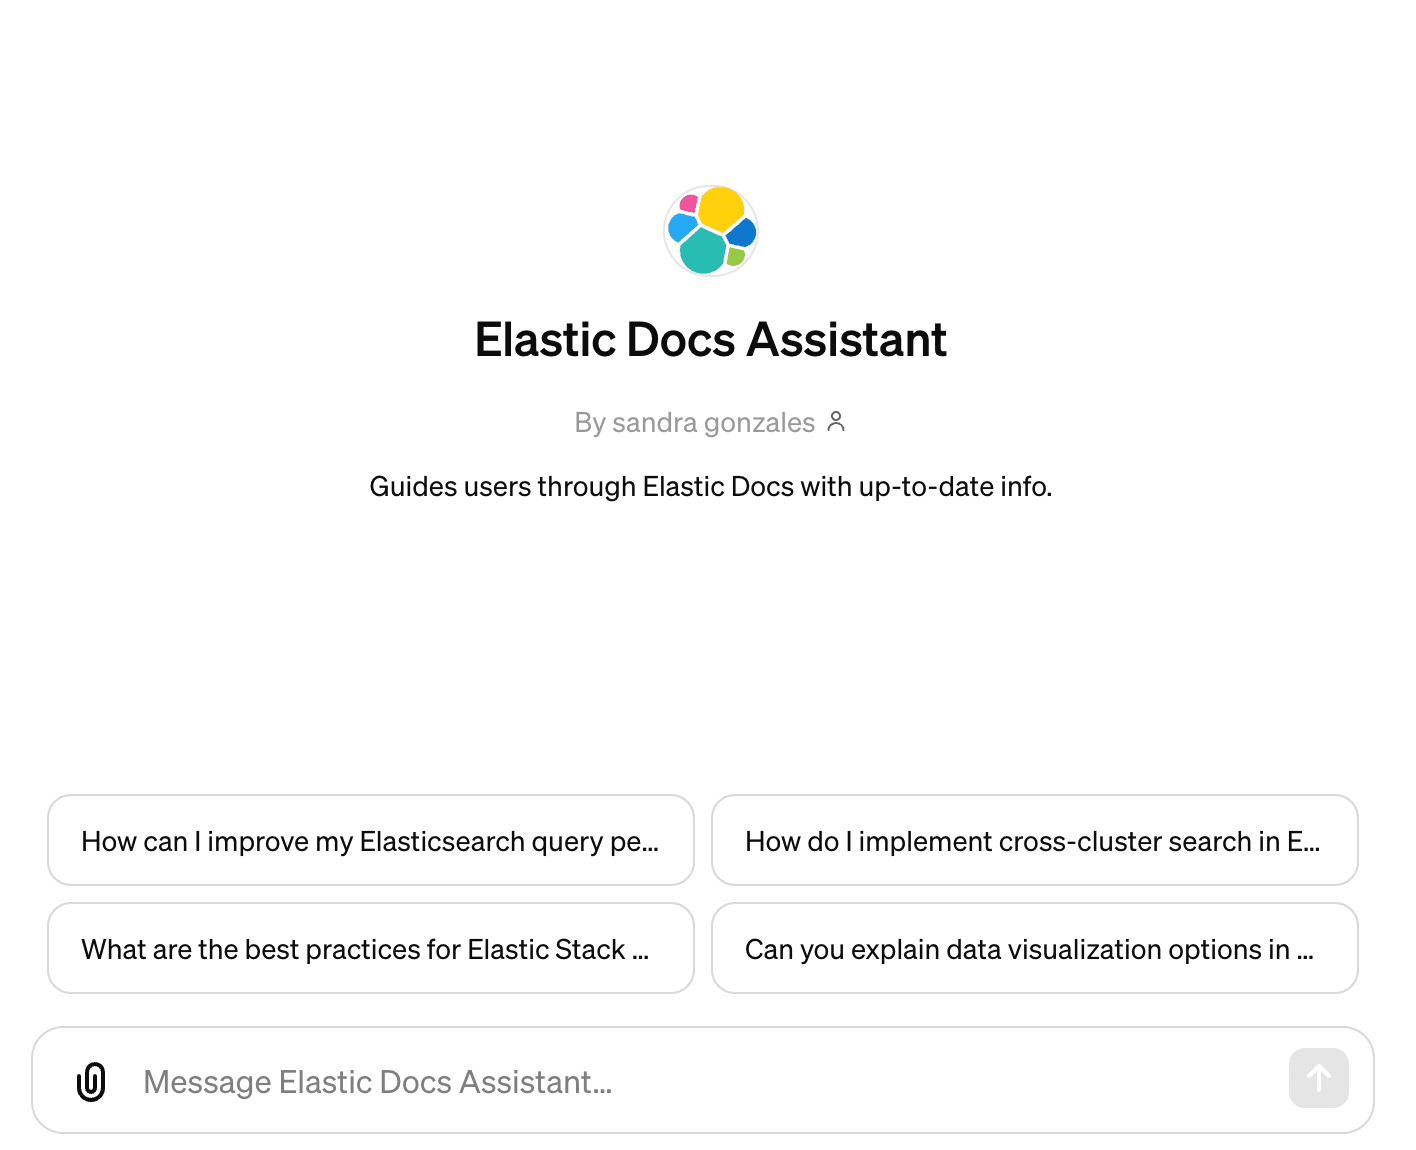
Assign a name to your GPT, such as “Elastic Docs Assistant,” and add a brief description highlighting its function.
Under instructions, define the primary role of your GPT and provide it with instructions on how to present information:
Let’s switch to the “Create” tab and ask ChatGPT to generate conversation starters and a logo. Perhaps I’ll upload my own logo instead.

We won’t be uploading any knowledge files as all the data we use is in Elasticsearch. Instead, we'll define an action.
Define an action
This is where we connect our data to Elasticsearch. Clicking “Create a new action” will take us to the action editor.
First, I define my API key that I’m using in my endpoint service with a custom header name I set in my environment.

Then I copy in my OpenAPI specification:
Upon entering this information our schema will be automatically validated and display a search action, with any errors in red. If everything looks good, this is where the preview pane becomes particularly useful. Not only can you test the action to confirm its functionality, but the assistant also provides debugging information about the request. This is helpful for refining your GPT’s responses based on the service's response.

Further customization can be achieved by configuring the GPT instructions to dynamically modify its action requests, such as rewriting the user input before it's sent to the service or adding request query parameters based on some condition in the user input. This eliminates the need for traditional coding logic, assuming your endpoint is designed to support these modifications.
Publish the custom GPT
Click “Publish” in the top right corner above the preview pane to be taken to your newly created GPT.
What's next for custom GPTs
This exploration of Custom GPTs, leveraging Elasticsearch for dynamic, data-driven conversations, has only begun to reveal the potential of what's possible. By harnessing the power of ChatGPT's interface and connecting it to external data, we introduce a new dimension of customization and contextually rich interactions with state-of-the-art AI models.
You can try all of the capabilities discussed in this blog today! Get started by signing up for a free Elastic Cloud trial.
In this blog post, we may have used third party generative AI tools, which are owned and operated by their respective owners. Elastic does not have any control over the third party tools and we have no responsibility or liability for their content, operation or use, nor for any loss or damage that may arise from your use of such tools. Please exercise caution when using AI tools with personal, sensitive or confidential information. Any data you submit may be used for AI training or other purposes. There is no guarantee that information you provide will be kept secure or confidential. You should familiarize yourself with the privacy practices and terms of use of any generative AI tools prior to use.
Elastic, Elasticsearch and associated marks are trademarks, logos or registered trademarks of Elasticsearch N.V. in the United States and other countries. All other company and product names are trademarks, logos or registered trademarks of their respective owners.
Frequently Asked Questions
What are GPTs?
GPTs are customized versions of ChatGPT. Facilitated by an intuitive user interface, GPTs simplify the customization process, often eliminating the need for coding skills for a broad range of applications.
Related Content
July 7, 2026
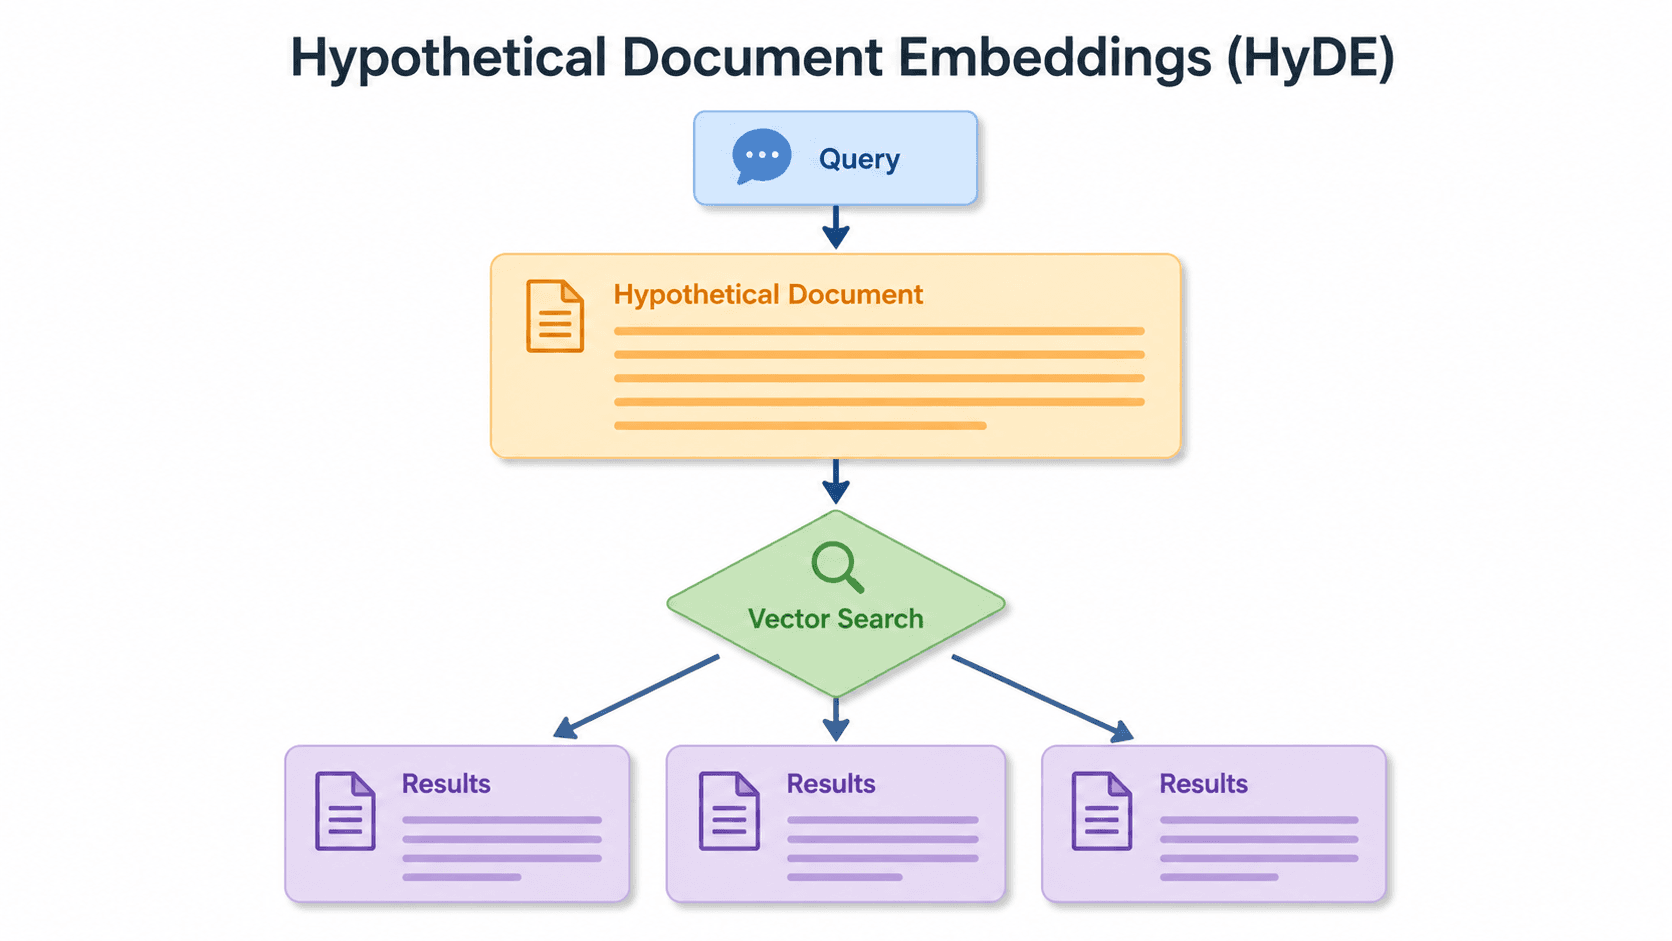
Short queries, formal documents: how HyDE improved semantic search precision by 50% in Elasticsearch
HyDE boosts semantic search precision and recall by 50% on short queries. Here's how to implement it in Elasticsearch with the Inference API and semantic_text.
June 24, 2026
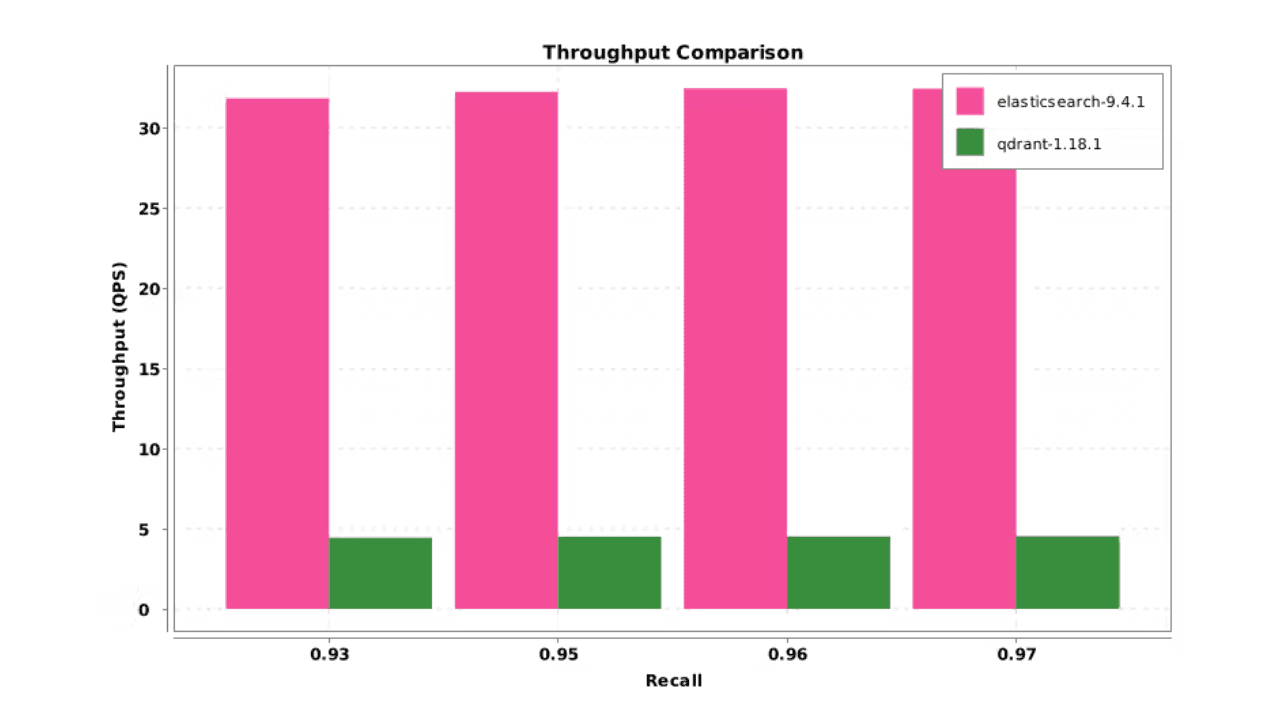
Elasticsearch DiskBBQ delivers 7x faster vector search than Qdrant on network-attached storage
Elasticsearch DiskBBQ achieves up to 7x higher vector search throughput than Qdrant at comparable recall on network-attached storage. Explore the benchmark methodology and full results.
July 6, 2026
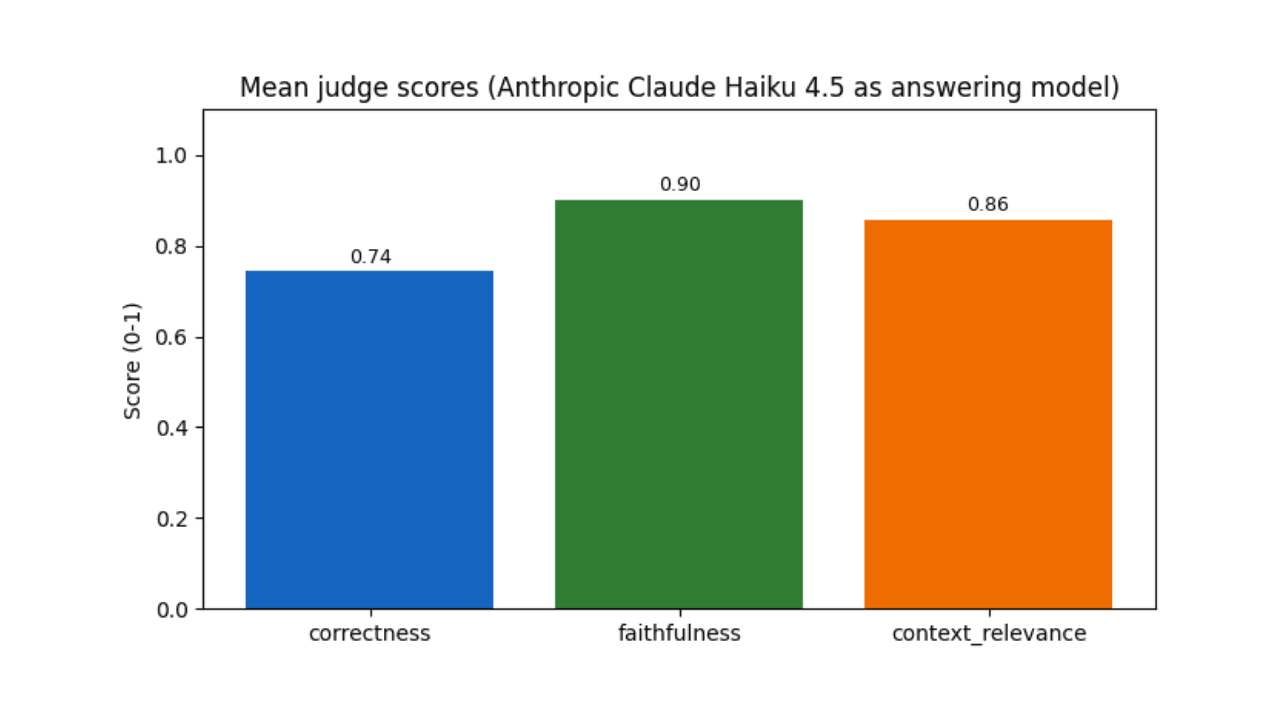
Who grades the grader? LLM-as-a-Judge inside Elasticsearch Workflows
Find out if your RAG agent is ready to ship. Score it on correctness, faithfulness and retrieval quality using only Elasticsearch Workflows and two Claude models.

June 15, 2026
Your search index is already an agent memory system: Persistent agent memory for Claude Code with Elasticsearch
Give your AI agent persistent cross-session memory using Elasticsearch: Hybrid recall, a knowledge graph, and cross-device handoffs. Three commands to install.

June 15, 2026
Your FAQ bot doesn't need a PhD: LLM query routing with Elastic Workflows
Route LLM queries by complexity using Elasticsearch search metadata: Mistral Small for FAQ questions, Claude Sonnet for multi-source synthesis.