Check out the different ways to ingest data into Elasticsearch and dive into practical examples to try something new.
Elasticsearch is packed with new features to help you build the best search solutions for your use case. Start a free cloud trial or try Elastic on your local machine now.
To take advantage of the powerful search capabilities offered by Elasticsearch, many businesses keep a copy of searchable data in Elasticsearch. Elasticsearch is a scalable data store and vector database, proven for traditional text search and vector search in semantic search use cases. The Elasticsearch Relevance Engine
TM (ESRE) enables you to add semantic search on proprietary data that can be integrated with generative AI technologies to build modern search experiences.
Snowflake is a fully managed SaaS (software as a service) that provides a single platform for data warehousing, data lakes, data engineering, data science, data application development, and secure sharing and consumption of real-time/shared data.
In this blog, we will see how to bring your snowflake data to Elasticsearch using below methods:
- Using Logstash (periodic sync)
- Using Snowflake Elasticsearch Python Script (one time sync)
Prerequisites
Snowflake credentials
You will have received all below credentials after signup, or you can get them from the Snowflake panel.
- Account username
- Account password
- Account Identifier
Elastic credentials
- Visit https://cloud.elastic.co and sign up.
- Click on Create deployment. In the pop-up, you can change the settings or keep the default settings.
- Download or copy the deployment credentials (both username and password).
- Also copy the Cloud ID.
- Once you’re ready for deployment, click on Continue (or click on Open Kibana). It will redirect you to the Kibana dashboard.
Methods to ingest data from Snowflake to Elasticsearch
Method 1: Using Logstash
Logstash is an open source ETL tool where you can provide multiple sources as an input, transform (modify) it, and push to your favorite stash. One of the famous use cases of Logstash is reading logs from the file and pushing to Elasticsearch. We can also modify the data on the fly using a filter plugin, and it will push updated data to the output.
We’re going to use the JDBC input plugin to pull the data from Snowflake and push to Elasticsearch using the Elasticsearch output plugin.
- Install Logstash by referring to the documentation.
- Go to the Maven Central Repository and download: https://repo1.maven.org/maven2/net/snowflake/snowflake-jdbc.
- Click on the directory for the version that you need and download the snowflake-jdbc-#.#.#.jar file. In my case, I have downloaded
snowflake-jdbc-3.9.2.jar. (Refer to official documentation to learn more about the Snowflake JDBC Driver.) - Create a pipeline by creating file
sf-es.conf. Add the below snippet and replace all credentials.
jdbc_connection_string :
Schedule: Here you can schedule to run this flow periodically using cron syntax. On every run, your data will be moved incrementally. You can check more on scheduling.
Please change according to your requirements.
JDBC Paging (Optional): This will cause a sql statement to be broken up into multiple queries. Each query will use limits and offsets to collectively retrieve the full result-set. You can use this to move all data in a single run.
Enable JDBC paging by adding below configurations:
- Run Logstash
Method 2: Using Snowflake-Elasticsearch Python script
If Logstash is not currently in place or has not been implemented, I have written a small Python utility, which is available here on GitHub, to pull data from Snowflake and push it to Elasticsearch. This will pull all your data at one time. So if you have a small amount of data to be migrated in a non-periodic manner, you can use this utility.
Note: This is not a part of the official Elastic connectors. Elastic connectors provide support for various data sources. You can use this connector if you have a requirement to sync data from any supported data sources.
- Installation
- Installing dependencies
- Change configs
- Open
config/connector.yml. - Replace credentials with the following:
- Run connector
Verify data
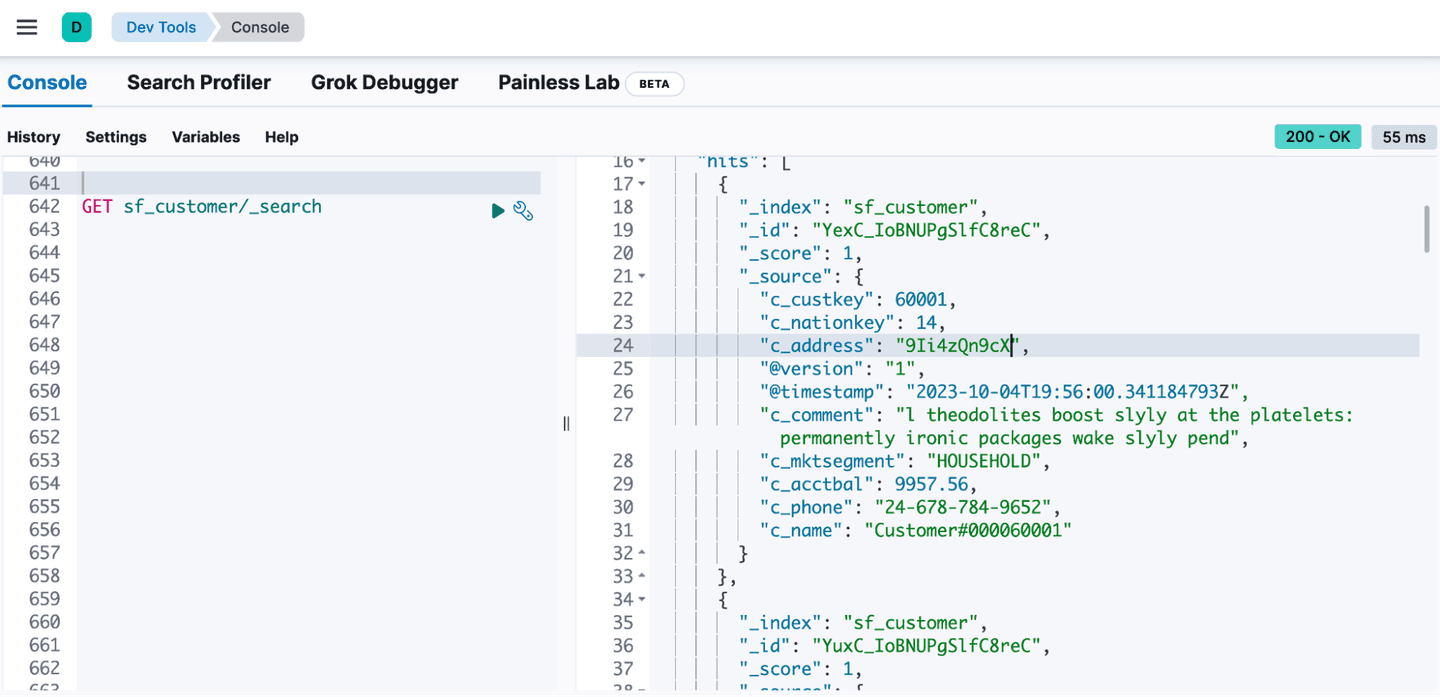
- Log in to Kibana and go to ☰ > Management > Dev Tools.
- Copy and paste the following API GET request into the Console pane, and then click the ▶ (play) button. This queries all records in the new index.
Conclusion
We have successfully migrated the data from Snowflake to Elastic Cloud. You can achieve the same on any Elasticsearch instance, whether it is in the cloud or on prem.
Start leveraging full text and semantic search capabilities on your data set. You can also connect your data with LLMs to build Question - Answer capabilities.
Frequently Asked Questions
What is Snowflake?
Snowflake is a fully managed SaaS that provides a single platform for data warehousing, data lakes, data engineering, data science, data application development, and secure sharing and consumption of real-time/shared data.
Related Content

June 19, 2026
Why your Elasticsearch cluster is hitting disk watermarks: 14 real-world causes explained
Learn how Elasticsearch disk watermarks work, why they trigger, and how to diagnose 14 of the most common scenarios Support encounters, from index bloat to ILM stalls.
June 12, 2026
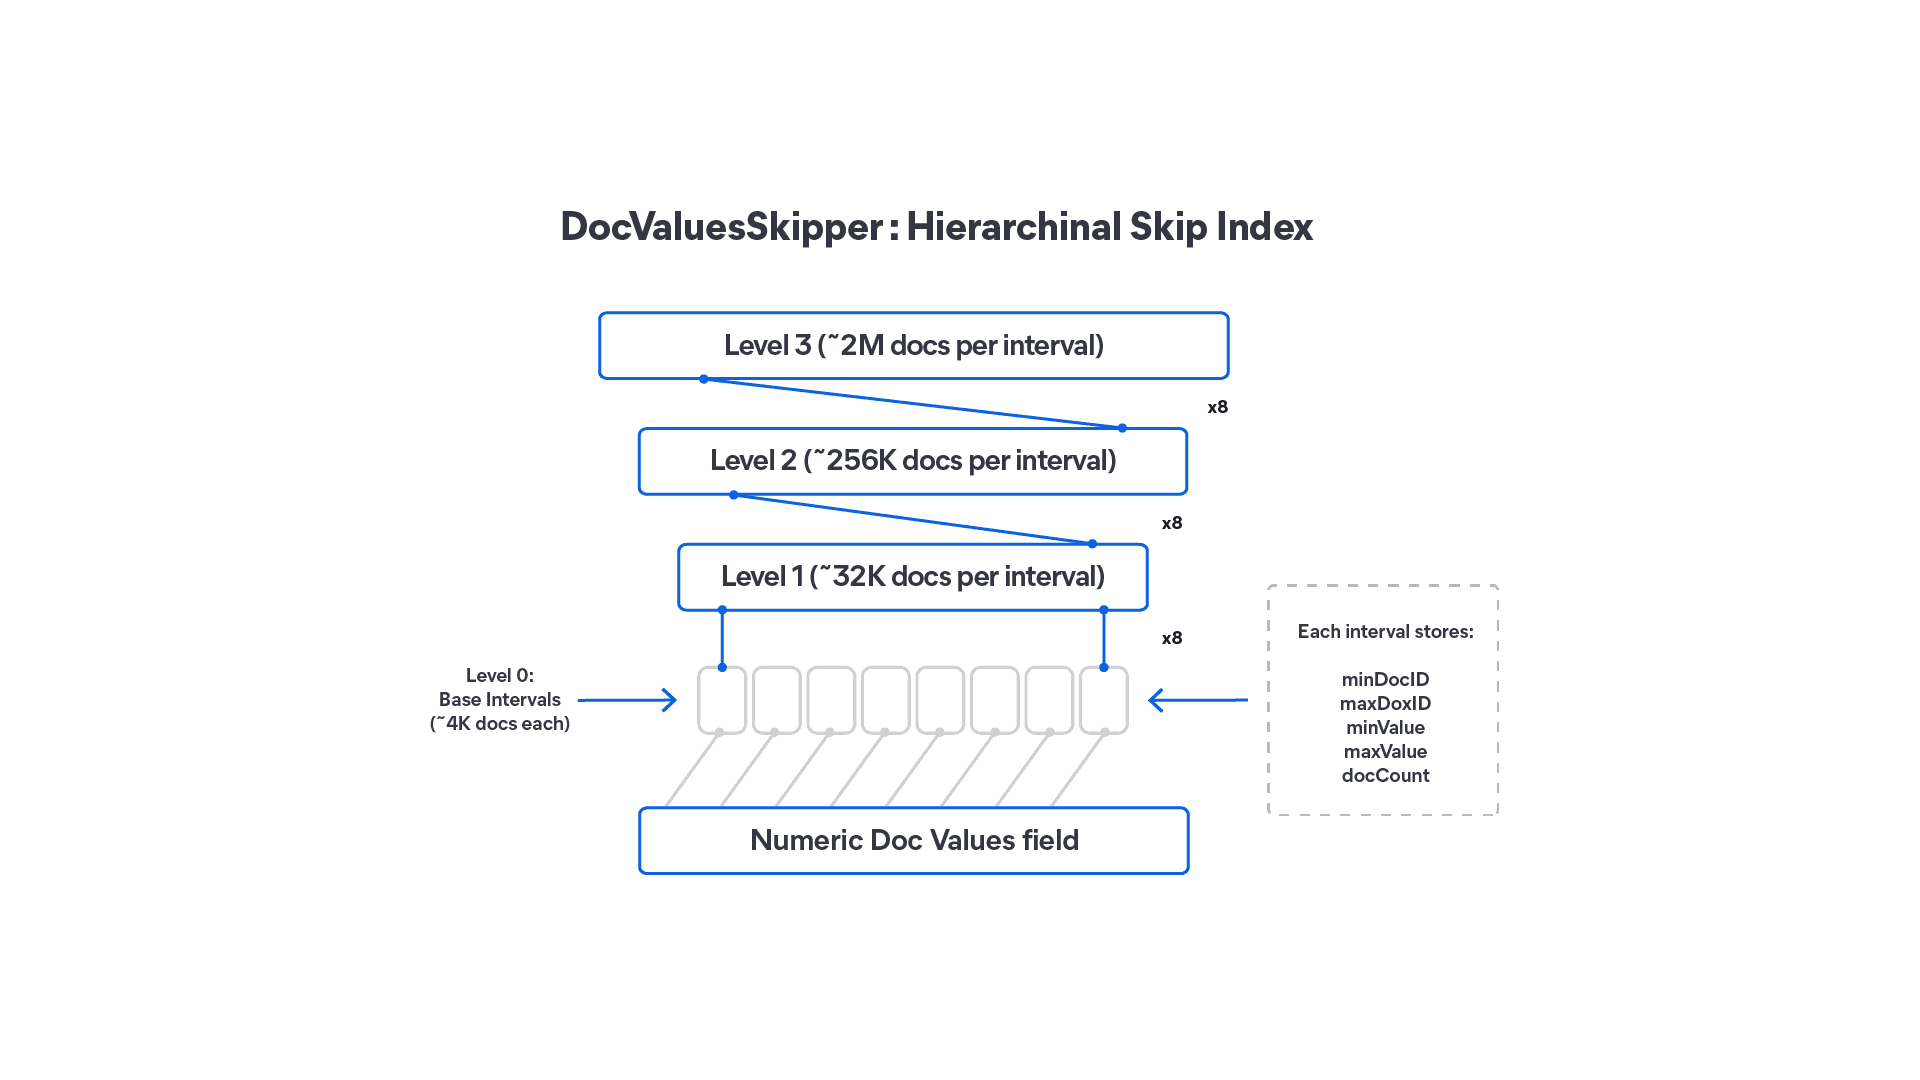
How DocValuesSkippers in Lucene 10 make range queries faster without doubling your storage
DocValuesSkippers add block-level skipping to Lucene DocValues fields, speeding up range queries on sorted or insert-ordered indexes with less than 0.1% storage overhead.
June 2, 2026
Elasticsearch reindex now relocates across nodes automatically: zero user intervention, no lost progress
Elasticsearch reindex now survives node shutdowns, uses Point in Time for more efficient source iteration, and ships with dedicated management APIs. Reindex-from-remote is GA in Serverless.

May 20, 2026
Elasticsearch downsampling methods: last-value vs. aggregate sampling
Elasticsearch downsampling now gives you a choice: last-value sampling for maximum storage savings or aggregate sampling for precise rate calculations and counter resets, both fully queryable in ES|QL.

April 2, 2026
When TSDS meets ILM: Designing time series data streams that don't reject late data
How TSDS time bounds interact with ILM phases; and how to design policies that tolerate late-arriving metrics.