Role-based access control and external authentication is GA in ECE 2.3
We’re thrilled to announce that with the release of Elastic Cloud Enterprise (ECE) 2.3, role-based access control and authentication with external sources are now generally available. These features allow you to have multiple users whose access to the ECE platform is controlled by role. You can add users natively in ECE and connect your own directory servers or identity providers to give access to your existing users.
We initially added beta support for these features in ECE 2.2. As well as ironing out bugs with 2.3, we’ve added support for Active Directory in addition to the existing LDAP and SAML options.
How does it work?
Enabling RBAC for ECE adds a security deployment, which is a system deployment that manages all of the authentication configuration and permissions. When a user attempts to log in, ECE verifies the authentication using the security deployment, falling back to the system users if necessary. If the user successfully authenticates, ECE applies their assigned roles and translates them into fine-grained permissions that control what data each user can see and what actions they can take.
Note that a user’s ECE roles are separate from whatever credentials the user holds for the deployments hosted in ECE. A user could have no access to ECE but administrative access to the hosted deployments, and vice versa.
What roles are available?
ECE offers a rich set of operations, both at the platform and deployment level. In order to save administrators the effort of defining and maintaining their own role definitions, ECE provides a set of predefined roles that cover the most common use cases. These roles will be kept updated as more features are delivered, so you don’t need to worry about keeping your own definitions up to date.
The roles are described below. Users can hold more than one role and combine them as needed — for example, a “Platform admin” can do anything, so there is no need to give them another role. However, a “Platform viewer” can see everything but cannot change anything, so you might choose to combine it with the “Deployments manager” role.
Platform admin
This role allows a user to see all data and perform any operation in ECE in the same way as the system-level admin user (or root in ECE 1.x) that is created during the install process. This role would typically only be held by administrators that are responsible for the entire ECE platform. The “Platform” section in the UI is a good example, as it gives information about e.g. allocators and their deployments, and the ability to vacate an allocator or put it into maintenance mode.
Platform viewer
This role gives view-only permission for the entire platform and hosted deployments. The associated permissions are the same as those held by the readonly system-level user. This is useful for automation, for example, monitoring ECE’s status.
Deployments manager
This role allows a user to create and manage deployments on the platform. A user with this role can perform all actions on a deployment — scale up, scale down, configure snapshots, restart nodes, reset passwords, and more. This role does not allow a user to access any platform-level operations and resources such as deployment templates, instance configurations, allocators, system deployments, etc.
This is a suitable role for anyone who has responsibility for managing deployments, but has no requirement to see platform-level information, such as development team leads.
Deployments viewer
A user holding this role can view deployments, but cannot modify them in any way. This role is suitable for support staff or development team members.
Managing native users
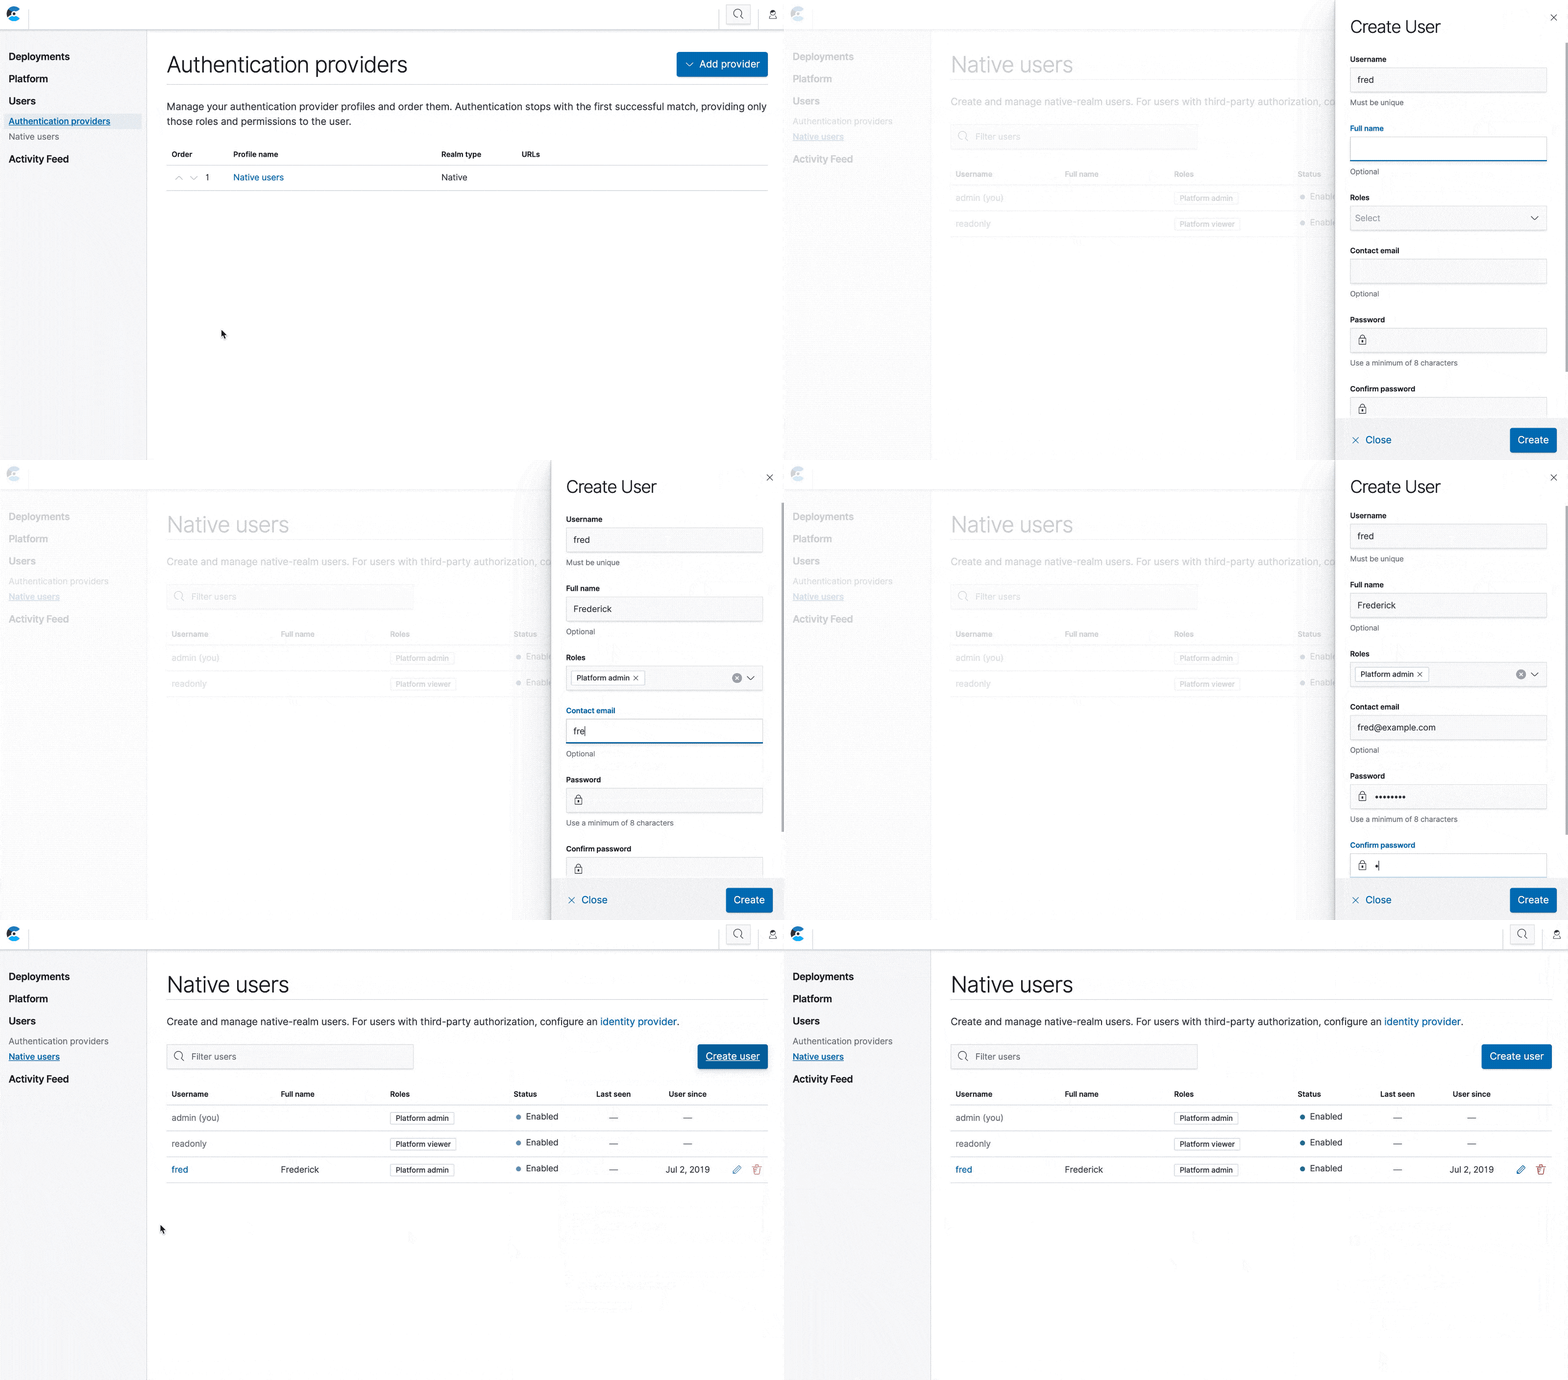
The simplest way to get started with RBAC in ECE is to create native users. These are held in the security deployment, in the Elasticsearch native realm. They only support a limited number of attributes: username, full name, email, password, roles, and whether they are currently enabled.
Click on "Users" in the navigation menu to view your authentication providers, one of which is the "Native users" profile. Opening the profile takes you to a list of all native users. The list includes the two system users that are created by the ECE installer. These users can’t be edited or deleted, and you can’t reset their passwords here — see the documentation for further instructions on how to reset passwords.

From the "Native users" page you can create, edit, and delete native users. These users can log in to ECE just like the system users, and their access is controlled by the roles you assign to them.
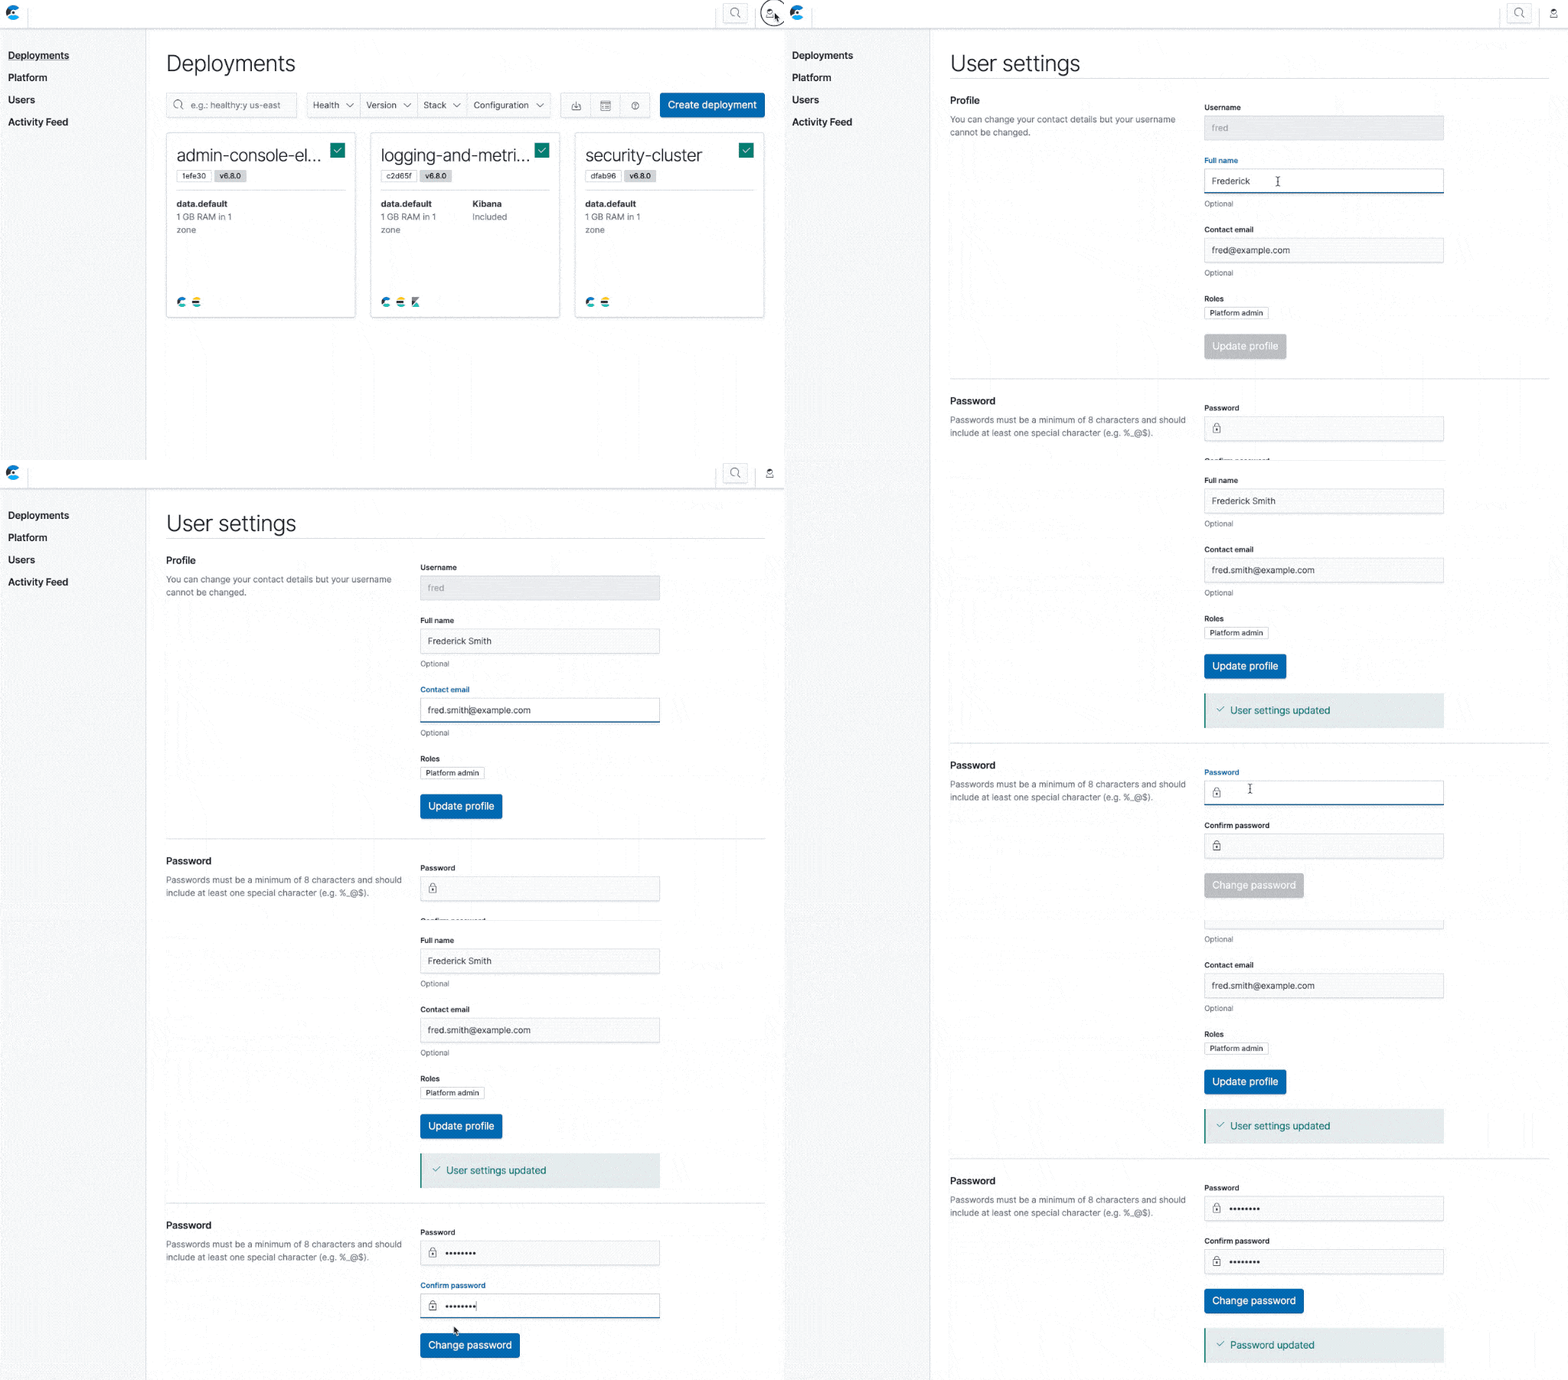
User settings page
ECE 2.3 also adds a user settings page. Click on the user icon at the top-right of the page, and click "Settings". If you’re logged in as a native user, you can edit your name and email, or change your password. If you’re logged in with a user from an external authentication provider, you’ll see a read-only page with some basic information, the name and type of the authentication profile, and the roles you hold.

External authentication providers
If you already have an LDAP, Active Directory, or SAML server, you can configure ECE to use them for authentication and authorization. You can even configure multiple servers, and authentication will be attempted in the order you set in the same way as Elasticsearch. Using your existing authentication sources means that you only have to manage users in one place. The role mapping configuration for an external provider lets you map users’ attributes to roles in ECE, so any changes to users’ attributes, such as group membership, gets picked up by ECE automatically.
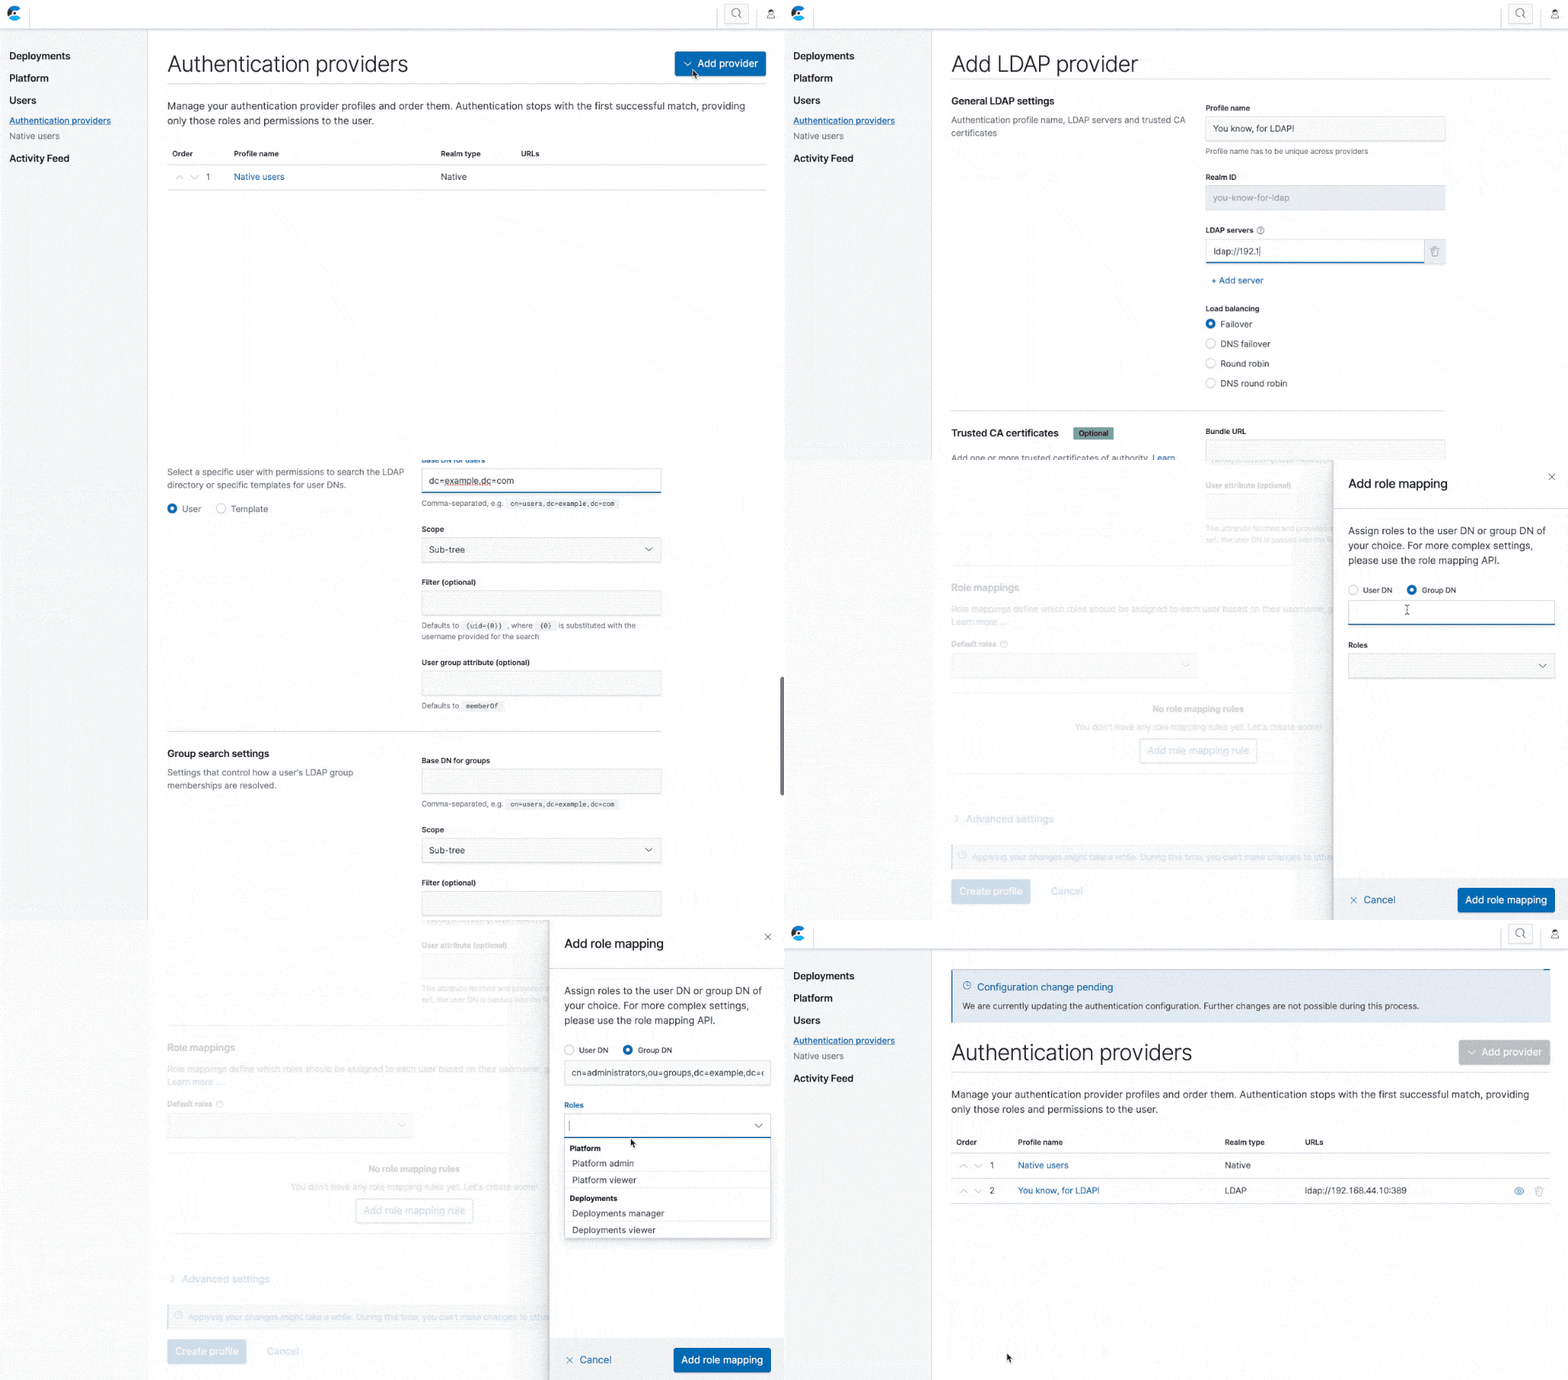
From the auth providers overview page, click "Add provider" and pick a type. On the next page you’ll configure the provider. Let’s walk through the configuration options for a basic LDAP setup.

LDAP auth provider
General settings:
- Every profile has a name. Besides using it to label the profile, the name is also used to generate a realm ID. Note that once a profile is created, the realm ID never changes.
- At least one LDAP server must be set, including the
ldap:orldaps:protocol at the start. If you choose a DNS-based load-balancing strategy, you can only specify a single server. - Choose a load-balancing strategy, keeping in mind the above restriction.
Trusted certificates:
- If your LDAP server is secured in such a way that clients need to hold particular SSL/TLS certificates, you’ll need to prepare a bundle file and make it available to ECE via a URL. See the documentation for more details.
- If your bundle is password protected, supply the password here.
Bind credentials:
- If credentials are required to bind to the LDAP server, you can set them here.
- Alternatively, if credentials are not required then click the “Bind anonymously” toggle.
Search mode settings:
- You can specify each of the details for a user search. See the documentation for information on these fields. At a minimum, you’ll probably want to set the “Base DN for users”, for example “cn=users,dc=example,dc=com”.
- Alternatively, if you need to use a template to perform LDAP queries instead, click the “Template” radio button, and supply one or more templates.
Group search settings:
- Much like the search mode settings, you can configure how ECE should search for a user’s groups. You’ll probably want to set the “Base DN for groups”, for example “ou=groups,dc=example,dc=com”.
Role mappings:
- A user needs to hold one or more roles in order to do anything with ECE. You can specify default roles, which will be assigned to all users that successfully authenticate. For example, you could grant all users the “Deployments viewer” role, so that they could see all the deployments that are hosted in ECE, without being able to edit anything.
- The other method of assigning roles is through role mapping. These are simply rules that say if the user DN or group DN matches some value, then the specified role or roles are assigned. You can have as many mappings as you require — for example, a mapping that give IT Ops users “Deployment viewer”, a mapping that gives all developers “Deployment manager”, and a mapping that gives all administrators “Platform viewer”.
When you’re done, click Create profile, and ECE reconfigures the security deployment. You should now log in with a variety of LDAP users in order to check that they can authenticate and that their roles are correct. You can explicitly check the roles from the user settings page, as well as by navigating through the UI and ensuring that what they are able to see and do is what you expect.
Active Directory and SAML auth providers
From a high level, the process is similar to LDAP from ECE’s perspective. You create a SAML or Active Directory auth provider, name it, specify how ECE should communicate with the server, and define the mappings that should be applied.
See the documentation for a full description of configuring a SAML auth provider or an Active Directory auth provider.
REST API support
All of the above operations can also be carried out using the REST API. For example, to fetch a list of all users, even those that are currently disabled:
GET /api/v1/users?include_disabled=true
Let’s say you need to give access to a new sysadmin, Sarah. You could create a new native user for her as follows:
POST /api/v1/users
{
  "user_name": "sarah",
  "security": {
    "roles": ["ece_platform_admin"],
    "password": "deadb33f"
  }
}
If you then wanted to change Sarah’s access, you could send a PATCH request with just the field you want to change, in this case the roles:
PATCH /api/v1/users/sarah
{
  "security": {
    "roles": ["ece_platform_viewer"]
  }
}
Finally, you could remove Sarah’s account with a DELETE request:
DELETE /api/v1/users/sarah
See the REST API documentation for details and examples of the auth provider endpoints.
Get started today
For a complete list of the changes in ECE 2.3, be sure to check out the release notes, and if you want to try it out yourself, get started today with a free 30-day trial.