A step-by-step guide to creating custom ES Rally tracks
Follow along with this comprehensive tutorial to learn how to craft personalized Rally tracks


 Share on Twitter
Share on Twitter

 Share on LinkedIn
Share on LinkedIn

 Share on Facebook
Share on Facebook

 Share by Email
Share by Email

 Print this page
Print
What is ES Rally, and what is it for?
ES Rally is a tool for testing performance on Elasticsearch® that allows you to run and record comparative tests.
Decision-making can be difficult, especially when you don't have the information you need and only have guesses or experience from past changes that have been positive or negative.
If we add to this that the data world must be flexible, as it evolves rapidly and therefore our Elasticsearch must adapt to it, this tool will help us to be able to measure all the changes and evolutions that we make over time and evaluate their impact. And most importantly, we can then obtain the information needed to make the right decisions.
Using ES Rally
ES Rally comes with several "tracks" out of the box. A track describes one or more performance testing scenarios.
In many cases, these tests can be used to evaluate different versions of Elasticsearch or the underlying hardware, as well as an already deployed cluster. However, in this particular case, it is important to keep in mind that if the cluster is already operational and serving traffic, the metrics may not be accurate due to parallel usage that will affect the result. However, the given values can still be used for evaluation and comparison later.
At this point, you may be wondering if you can use your own data set that you already have in your Elasticsearch cluster. The answer is yes. Not all optimization or improvement happens solely in Elasticsearch. It can also be done in the data model, whether it evolves or you see improvements based on how you use your data. You can use ES Rally to measure the impact of these changes. We will show how to create your own "track" next.
Creating your own track with your data
First, let's take a look at the prerequisites. ES Rally can be installed in several ways, but in my humble opinion, we will save time and keep things simple if we use the container distribution.
On the other hand, we should consider the disk space. ES Rally will download the index you tell it to download, so if you're thinking of downloading a 1TB index, you need to keep that in mind. At this point, the size does matter — as the saying goes, "not too much and not too little" — so it's important to define a representative size. If it's too small, the ingestion speed metrics may not be representative, but if it's too large, the creation times of the track will be high.
One way to prepare your data for this is to use the Elasticsearch Reindex API with the max_docs parameter to create an index that is sized to the tests that will be run later.
Example
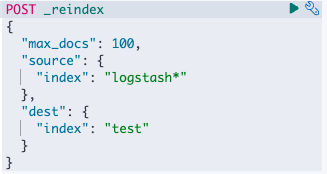
The reindex process can take more than 30 seconds, so it is recommended to launch it with the wait_for_completion=false option. This will return a task ID that you can use to track the progress and completion of the process.
Note: Currently, ES Rally is single-threaded when creating custom tracks. This is to avoid impacting the performance of the cluster or the machine where the task is running. As a result, this process can take some time to complete. Using a virtual terminal like screen or tmux will allow you to run the process in the background.
Getting started
Once the target index has been identified and we have ensured that we have enough space, let's launch the creation of a custom track (please review and adapt accordingly, to avoid hardcoding the password, we will use read -s to enter it at the time):
export loca_path='/path/where/save/esrally'
export user='user'
export track_name='test'
export ssl='true'
export verify_ssl='true'
export indice='test'
export es_host='es:port'
read -s password
docker run --rm --name esrally \
-v ${loca_path}:/rally/.rally/ \
elastic/rally create-track \
--track=${track_name} \
--target-hosts=${es_host} \
--client-options="timeout:60,use_ssl:${ssl},verify_certs:${verify_ssl},basic_auth_user:'${user}',basic_auth_password:'${password}'" \
--indices="${indice}" \
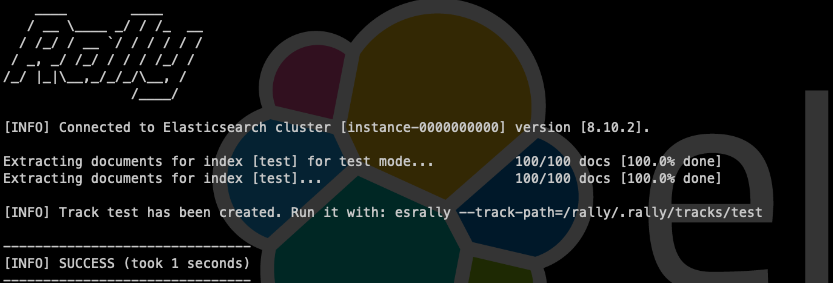
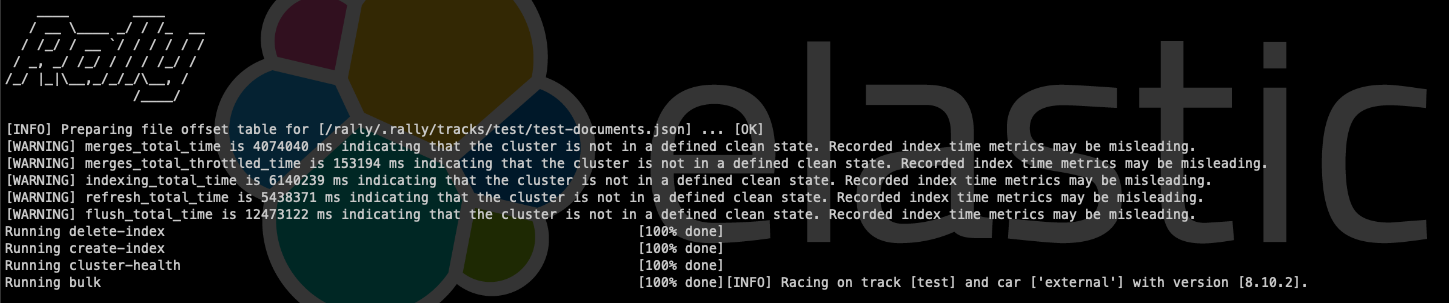
--output-path=/rally/.rally/tracksWe will get an output similar to:
We can see the custom track that we have created in the following way:
docker run --rm --name esrally \
  -v ${loca_path}:/rally/.rally/ \
  elastic/rally info --track-path=/rally/.rally/tracks/${track_name}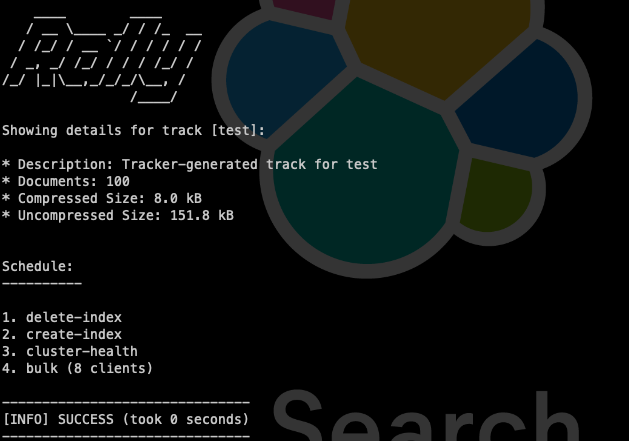
What have we obtained?
Let's take a look at what we have after launching ES Rally. This will be essential to know what to adapt and how to run our future tests with a goal.
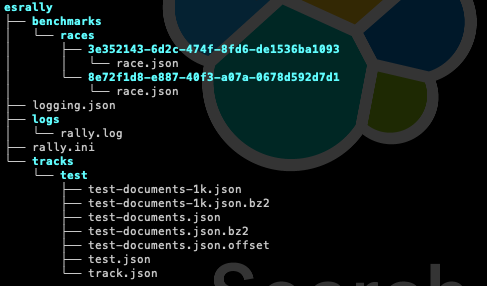
The image below shows the default configuration of ES Rally, the logs of the executions we perform, and the custom track we have created.
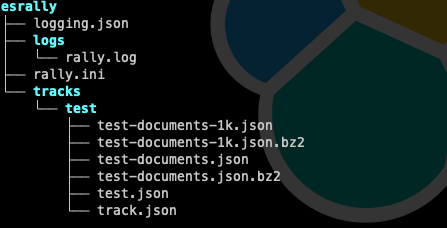
- logging.json: This is where we define how events are logged in our log files.
- logs/rally.log: This is where the logs from our executions of ES Rally are dumped. This file is not rotated by default, so we can configure an external tool like logrotate to do it.
- rally.ini: This is the file where the configuration for ES Rally is defined.
-
tracks/track_name/: This will contain the files related to our custom track, in this particular case:
- name-documents-1k.json: first 1,000 documents
- name-documents-1k.json.bz2: first 1,000 compressed documents
- name-documents.json: all documents
- name-documents.json.bz2: all compressed documents
- name.json: the definition of the original index (mapping and settings)
- track.json: the configuration of the custom track (indices, corpus, schedule, challenges)
Normally, the most relevant documents we will use to adapt the behavior and tests we will run with ES Rally are rally.ini and within each custom track name.json and track.json.
Now that we have our custom track, how do we use it?
Without going into depth, let's adapt what we already have to run the first test that we will use as a baseline to measure future changes in our cluster (assuming that the variables are kept for their correct execution):
docker run --rm --name esrally \
  -v ${loca_path}:/rally/.rally/ \
  elastic/rally race \
  --track-path=~/.rally/tracks/${track_name} \
  --target-hosts=${es_host} \
  --pipeline=benchmark-only \
--client-options="timeout:60,use_ssl:true,basic_auth_user:'${user}',basic_auth_password:'${password}'"This will give us information about the execution, but don't worry, it is being saved for later use.
We used the benchmark-only pipeline type to launch it on an already operational cluster, which is why we can see warnings that tell us that different steps that are taken may have misleading metrics, in addition to seeing the default steps that are defined in the "schedule" section of the track.json file.
Finally, the metrics section will show us the values for each metric.
Note: Metrics can be saved to Elasticsearch by configuring reporting.

[...]
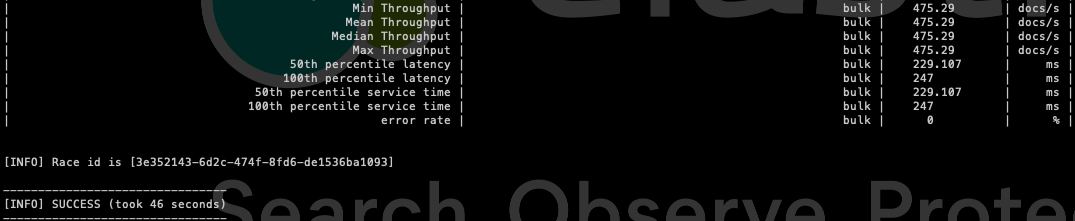
To understand each one in depth, we will have to take a look at the official documentation, where each one is explained in detail. However, many of them are self-explanatory, and we will find the most relevant ones for the case below.
The moment of change
At this point, we have our custom track and we have executed it at least once with the default configuration of ES Rally and with the original mapping and settings for that index.
Let's define a use case, data model optimization. I propose this one in particular because I have seen a substantial improvement in performance and significant savings in resources in many deployments, obtaining a positive impact even on the underlying cost of resources such as storage savings.
I know that this use case can be a challenge, especially when we don't have control over the data model because it comes from another area or is governed by an external application. But this will allow us to put numbers on the table that translate into performance and costs and therefore a more efficient, profitable, and optimal use of Elasticsearch.
My colleague Mattias Brunnert wrote a blog post on analyzing and optimizing storage in Elasticsearch, where you can see an example of the impact of mapping (or data model) in this regard. I want to emphasize that an optimal data model will not only save disk space, but it will also improve the speed of ingestion and the speed of queries.
For this reason, taking advantage of where we are now, explore the following api _field_usage_stats, which will show you how you are using your data. From there you can see, for example, from a mapping of an index of n fields which fields you are using and which ones you are no. Based on this, you can define a new, more optimal mapping aligned to your needs and real usage.
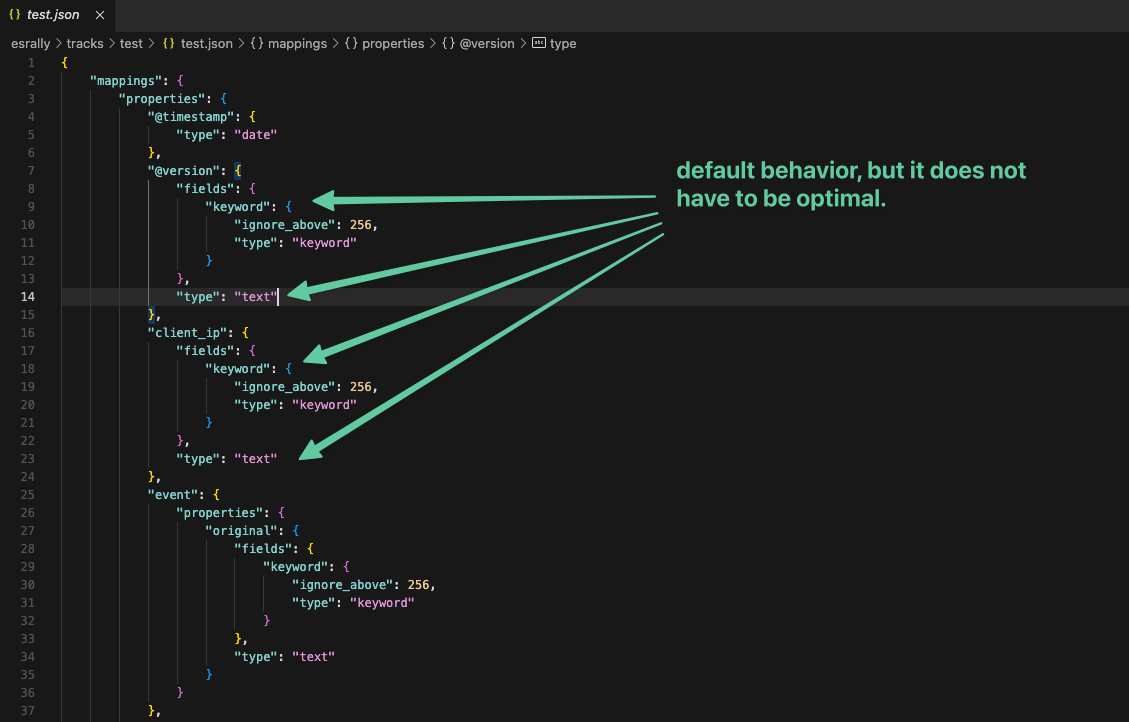
Well, we already have the use case, we have analyzed our data, and we have discovered that we can improve the mapping of the index used in the custom track, so we proceed to edit the name.json file to adapt it to the result of our analysis.
We could find something like this, where we see a default behavior where Text and Keyword fields are generated when a text data type is inferred, but which is clearly incorrect in this example.
So we adapted the mapping and saved the changes to proceed to rerun the same test.
And we will get an output like the previous one:

The moment of evaluation
Now that we have two executions of our custom track, where the difference is the optimization of the mapping, we will compare the results.
First, as we mentioned earlier, the results are stored in the persistence that we have given them:
In those JSON files, we can see the results obtained for each test individually, but ES Rally also allows us to compare the executions performed. To do this, we will first list the executions performed:
docker run --rm --name esrally -v ${loca_path}:/rally/.rally/ elastic/rally esrally list races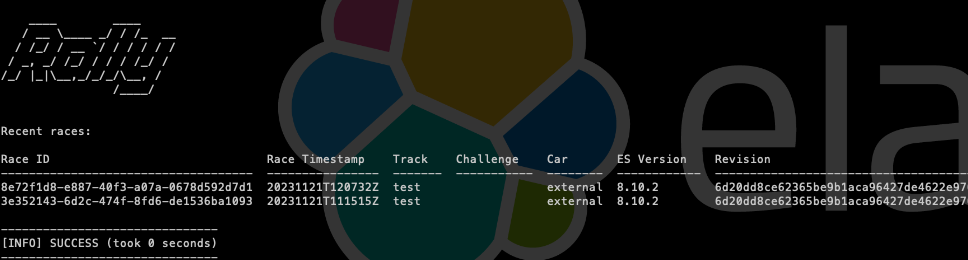
And by obtaining the Race ID, we will execute the following to compare:
docker run --rm --name esrally -v ${loca_path}:/rally/.rally/ \
elastic/rally esrally compare \
--baseline=ID_WITHOUT_CHANGES \
--contender=ID_WITH_CHANGES
This will give us the comparison of both executions:
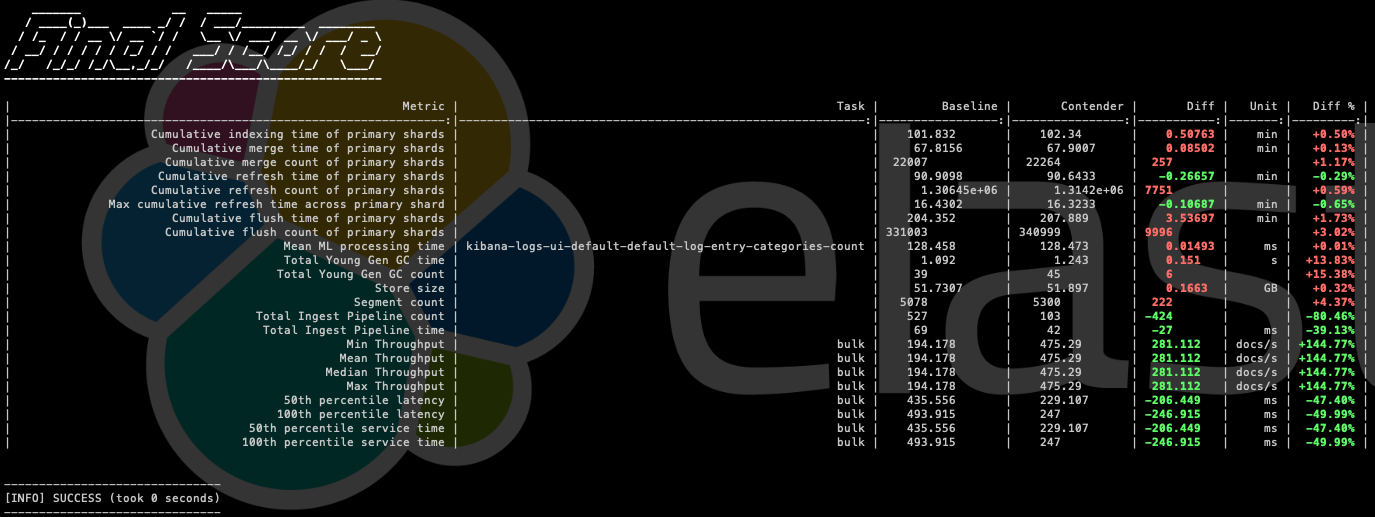
Note: These data are an example and do not represent a real value; they have been executed in a laboratory and the data sample consists of 100 documents.
Optimize Elasticsearch with ES Rally
We have seen how to use ES Rally with our own data sets, how to modify them to adapt them to scenarios that represent a current or future situation, and how to compare and evaluate them. This will help us to measure possible future or scheduled changes and determine if a positive or negative impact is obtained. It is also useful for measuring the performance of the cluster, if we execute load tests on a regular basis and determine how far or close we are from reaching operational or SLA limits with respect to the performance of Elasticsearch.
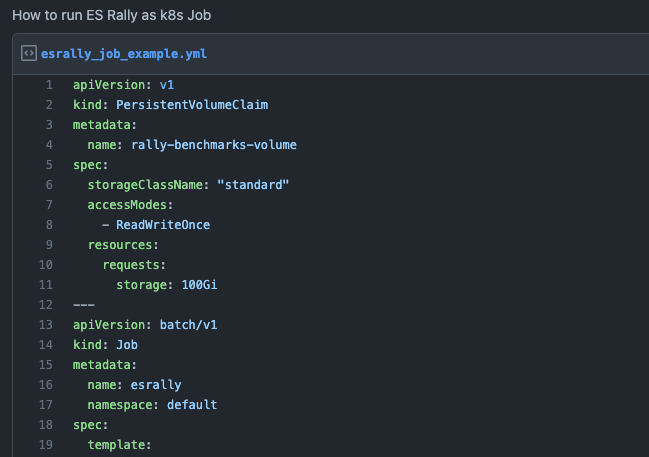
ES Rally can be configured in many ways, and it can even be executed in a distributed manner to test large Elasticsearch environments — for example, when a single node where ES Rally is executed is not enough or represents a bottleneck in the execution.
Although we have seen how to run it from Docker, I leave you as a bonus an example of how to run it from K8s as a Job:
Want to learn more about ES Rally and its use cases?
I encourage you to check out the official documentation or contact our Consulting team to help you use it in your organization in the most optimal way possible to add the greatest value.
Remember, data is the key to decision-making.
The release and timing of any features or functionality described in this post remain at Elastic's sole discretion. Any features or functionality not currently available may not be delivered on time or at all.
Share
- Share on Twitter
Share on Twitter
- Share on LinkedIn
Share on LinkedIn
- Share on Facebook
Share on Facebook
- Share by Email
Share by Email
- Print this page
Print