Elasticsearch has a library of ingestion tools to bring data from several sources. However, sometimes your data sources might not be compatible with Elastic’s existing ingestion tools. In this case, you may need to create a customized connector to connect your data with Elasticsearch.
There are several reasons to use Elastic connectors for your apps. For example, you may want to:
- Bring data from custom or legacy applications to Elasticsearch
- Introduce a semantic search for your organizational data
- Extract textual content from files like PDFs, MS Office documents and more
- Use Kibana UI to manage your data sources (including configuration, filtering rules, setting up periodic sync schedule rules)
- You want to deploy Elastic connectors on your own infrastructure (some of Elastic-supported connectors are available as
native connectorsin the Elastic Cloud)
An open-code framework to create customized connectors
If creating your own connector is the solution to your requirements, the connectors framework will help you create one. We created the framework to enable the creation of custom connectors and help users connect unique data sources to Elasticsearch. Code for connectors is available on GitHub, and we have documentation that can help you get started.
The framework is designed to be simple and performant. It is meant to be developer-friendly, hence it is open-code and highly customizable. The connectors you create can be self-managed on your own infrastructure. The goal is to enable developers to integrate their own data sources very easily with Elasticsearch.
What you need to know before you use connectors framework
The framework is written in async-python
There are several courses to learn async-python. In case you want a recommendation, we thought this LinkedIn learning course was really good, but it requires a subscription. A free alternative we liked was this one.
Why did we choose async python?
Ingestion is IO bound (not CPU bound) so async programming is the optimal approach when building a connector from a resource-utilization perspective. In I/O bound applications, the majority of the time is spent waiting for external resources, such as reading from files, making network requests, or querying databases. During these waiting periods, traditional synchronous code would block the entire program, leading to inefficient resource utilization.
Any other pre-requisites?
This is not a pre-requisite. It’s definitely worth going through the Connectors Developer's Guide before you get started! Hope you find this useful.
Using connectors framework to build a customized connector
Getting started is easy. In terminology related to the framework, we refer to a custom connector as a source. We implement a new source by creating a new class, and the responsibility of this class is to send documents to Elasticsearch from the custom data source.
As an optional way to get started, users can also check out this example of a directory source. This is a good but basic example that can help you figure out how you can write a custom connector.
Outline of steps
Once you know which custom data source you want to create a connector for, here’s an outline of steps to write a new source:
- add a module or a directory in connectors/sources
- declare your dependencies in requirements.txt. Make sure you pin these dependencies
- implement a class that implements methods described in connectors.source.BaseDataSource
- (optional, when contributing to repo) add a unit test in
connectors/sources/testswith +90% coverage - declare your connector connectors/config.py in the sources section
- That’s it. We’re done! Now you should be able to run the connector
What you need to know before writing your customized connector
To enable Elasticsearch users to ingest data and build a search experience on top of that data, we provide a lightweight Connector Protocol. This protocol allows users to easily ingest data, use Enterprise Search features to manipulate that data, and create a search experience while providing them with a seamless user experience in Kibana. To be compatible with Enterprise Search and take full advantage of the connector features available in Kibana, a connector must adhere to the protocol.
What you need to know about connectors protocol
This documentation page provides a good overview of the protocol. Here’s what you need to know:
- All communication between connectors and other parts of the system happen asynchronously through an Elasticsearch index
- Connectors communicate their status to Elasticsearch and Kibana so that users can provide it with configuration and diagnose any issues
- This allows for simple, developer-friendly deployment of connectors.
connectorsservice is stateless, and doesn’t care where your Elastic deployment runs, as long as it can connect to it over the network it works well. The service is also fault-tolerant, and it can resume operation on a different host after a restart or a failure. Once it reestablishes a connection with Elasticsearch, it will continue its normal operation. - Under the hood, the protocol uses Elasticsearch indices to track connector state
.elastic-connectorsand.elastic-connectors-sync-jobs(described in the docs linked above)
Where custom connectors are hosted
The connector itself is not tied to Elasticsearch and it can be hosted in your own environment
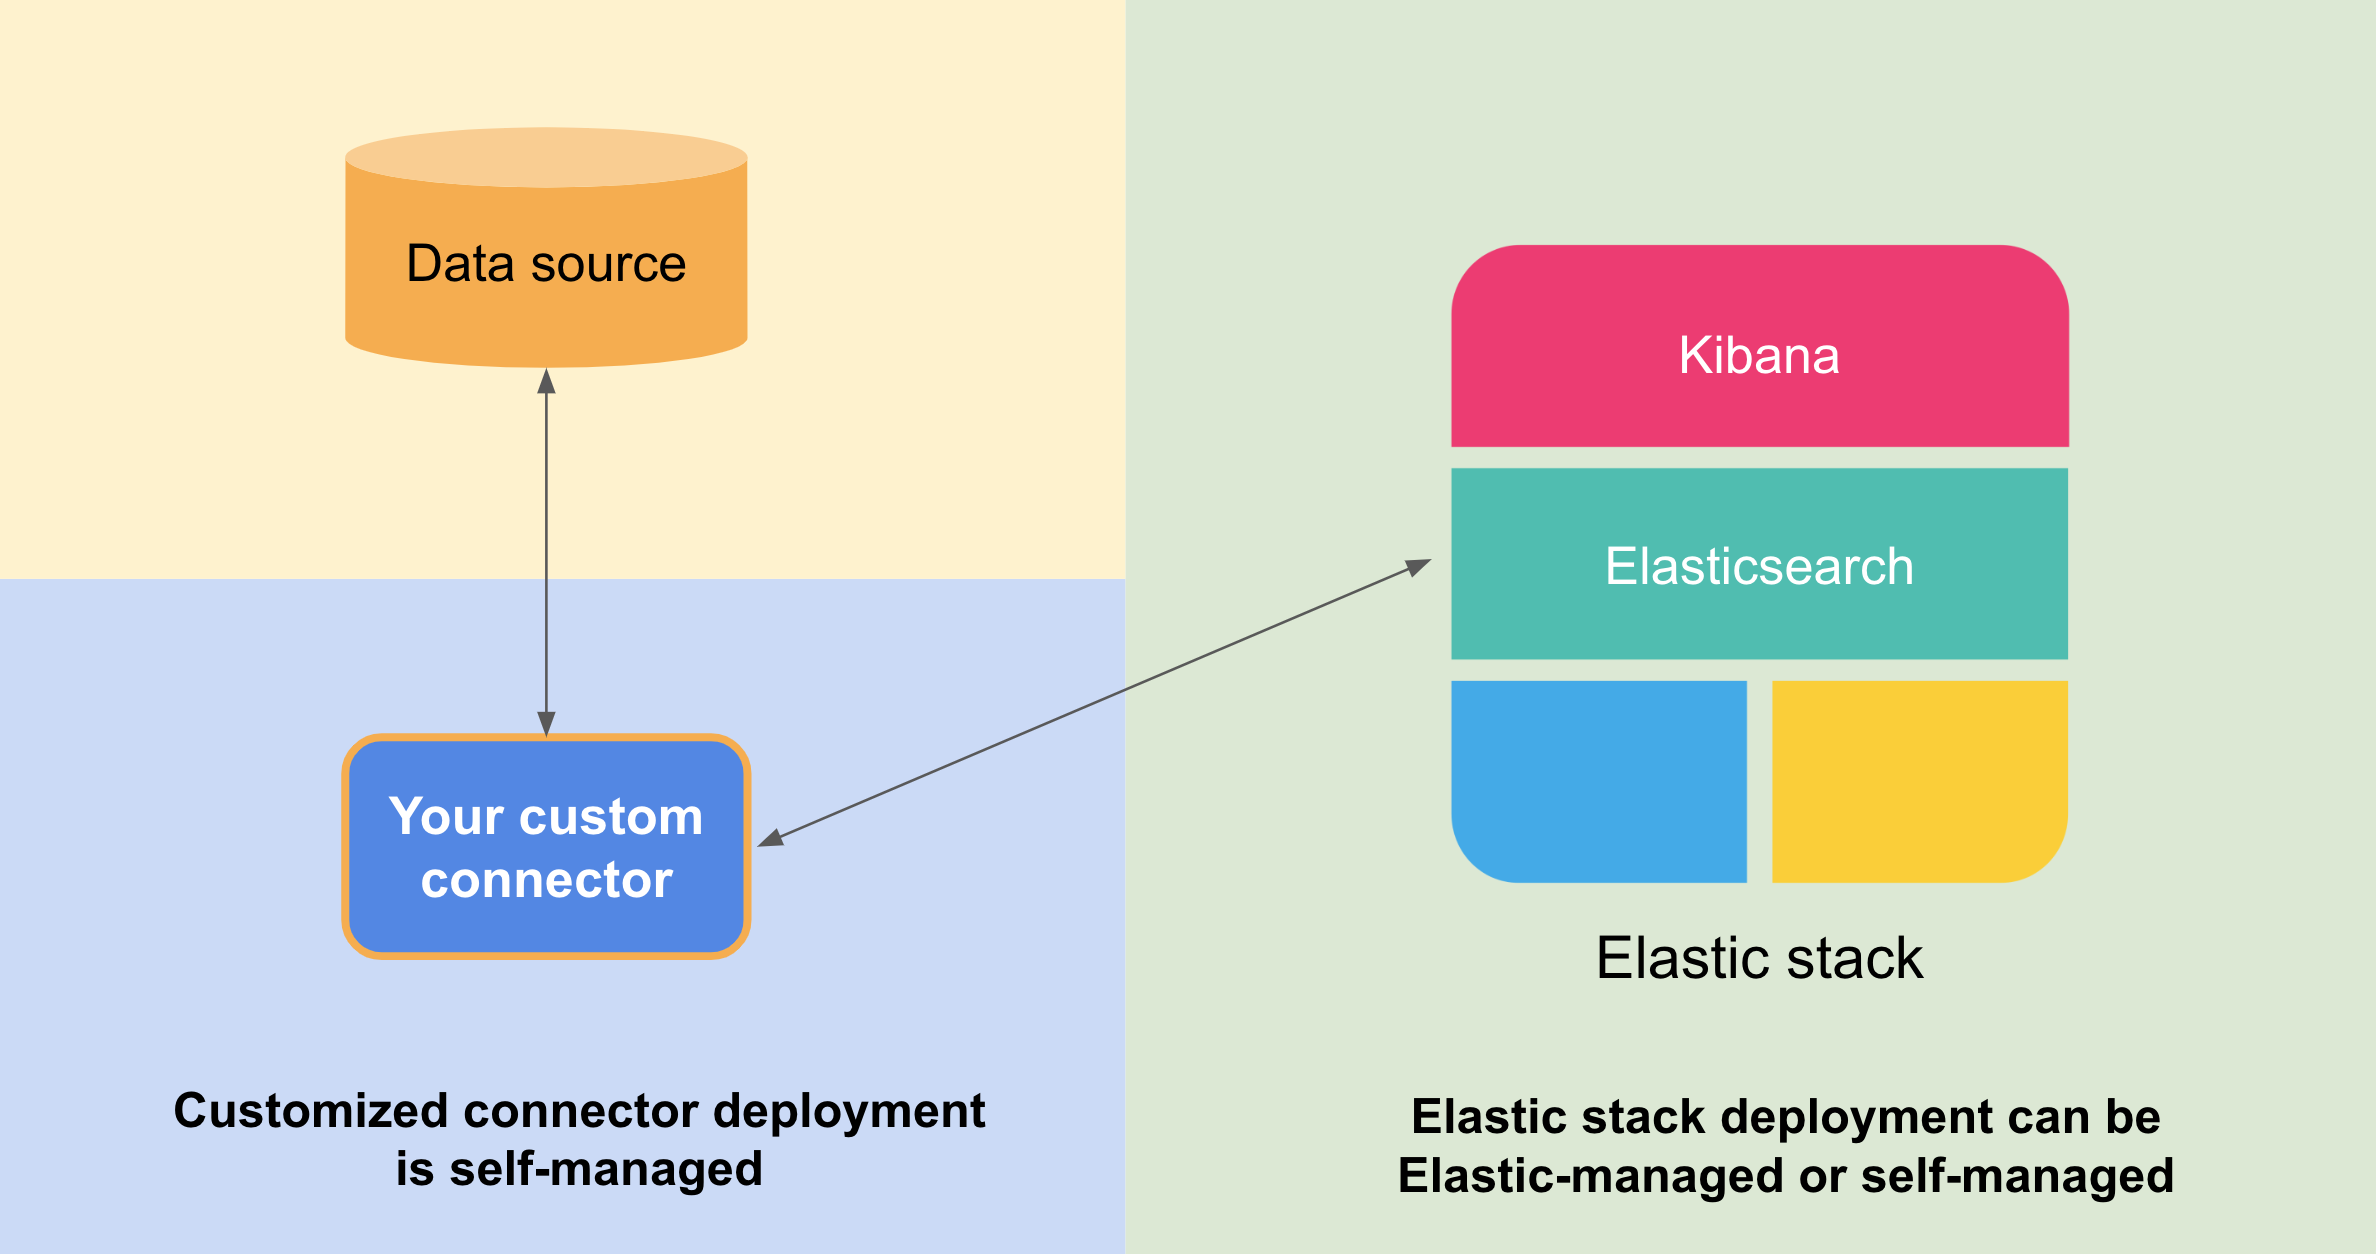
If you have an Elasticsearch deployment, regardless of whether it is self-managed or lives in Elastic Cloud:
- You, as a developer/company can write a customized connector for your data source
- Manage the connector on your own infrastructure and configure the connector service for your needs
- As long as the connector can discover Elasticsearch over the network it is able to index the data
- You, as the admin can control the connector through Kibana
Example: Google Drive connector using connectors framework
We wrote a simple connector for Google Drive using the connectors framework. We implemented a new source by creating a new class whose responsibility is to send documents to Elasticsearch from the targeted source.
Note: This tutorial is compatible with Elastic stack version 8.10. For later versions, always check the connectors release notes for updates and refer to the Github repository.
We start with a GoogleDriveDataSource class with expected method signatures of BaseDataSource to configure the data source, check its availability (pinging), and retrieve documents. In order to make this connector functional we need to implement those methods.
class GoogleDriveDataSource(BaseDataSource):
    """Google Drive"""

    name = "Google Drive"
    service_type = "google_drive"

    @classmethod
    def get_default_configuration(cls):
        """Returns a dict with a default configuration"""
        raise NotImplementedError

    async def ping(self):
        """When called, pings the backend

        If the backend has an issue, raises an exception
        """
        raise NotImplementedError

   async def get_docs(self, filtering=None):
        """Returns an iterator on all documents present in the backend

        Each document is a tuple with:
        - a mapping with the data to index
        - a coroutine to download extra data (attachments)

        The mapping should have least an `id` field
        and optionally a `timestamp` field in ISO 8601 UTC

        The coroutine is called if the document needs to be synced
        and has attachments. It needs to return a mapping to index.

        It has two arguments: doit and timestamp
        If doit is False, it should return None immediately.
        If timestamp is provided, it should be used in the mapping.

        Example:

           async def get_file(doit=True, timestamp=None):
               if not doit:
                   return
               return {'TEXT': 'DATA', 'timestamp': timestamp,
                       'id': 'doc-id'}
        """
        raise NotImplementedError
This GoogleDriveDataSource class is a starting point for writing Google Drive source. By following these steps, you will implement the logic needed to sync data with Google Drive:
- We need to add this file in connectors/sources
- Set your new connector
nameandservice_typee.g.Google Driveas name andgoogle_driveas service type - To get your connector sync data from the source, you need to implement:
get_default_configuration- This function should return a collection of RichConfigurableFields. These fields allow you to configure the connector from the Kibana UI. This includes passing authentication details, credentials, and other source-specific settings. Kibana smartly renders these configurations. For example, if you flag a field with"sensitive": TrueKibana will mask it for security.ping- A simple call to the data source that verifies its status, think of it as a health check.get_docs- This method needs to implement the logic to actually fetch the data from the source. This function should return an async iterator that returns a tuple containing: (document,lazy_download), where:document- is a JSON representation of an item in the remote source. (like name, location, table, author, size, etc)lazy_download- is a coroutine to download the object/attachments for content extraction handled by the framework (like text extraction from a PDF document)
There are other abstract methods in BaseDataSource class. Note that these methods don’t need to be implemented, if you only want to support content syncing (e.g. fetching all data from google drive). They refer to other connector functionalities such as:
- Document level security (
get_access_control,access_control_query) - Advanced filtering rules (
advanced_rules_validators) - Incremental syncs (
get_docs_incrementally) - Other functionalities may be added in the future
How we approached writing the official Elasticsearch Google Drive connector
Start by implementing the methods expected by the BaseDataSource class
We needed to implement the methods get_default_configuration, ping and get_docs to have the connector synchronize the data. So let’s dive deeper into the implementation.
The first consideration is: How to “talk” to Google Drive to get data?
Google provides an official python client, but it is synchronous, so it’s likely to be slow for syncing content. We think a better option is the aiogoogle library, which offers full client functionality written in async python. This might not be intuitive at first, but it is really important to use async operations for performance. So, here in this example, we opted not to use the official google library as it doesn't support async mode.
If you use synchronous or blocking code within an asynchronous framework, it can have a significant impact on performance. The core of any async framework is the event loop. The event loop allows for the concurrent execution of asynchronous tasks by continuously polling for completed tasks and scheduling new ones. If a blocking operation is introduced, it would halt the loop's execution, preventing it from managing other tasks. This essentially negates the concurrency benefits provided by the asynchronous architecture.
The next concern is the connector authentication
We authenticate the Google Drive connector as a service account. More information about authentication can be found in these connector docs pages.
- Service account can authenticate using keys
- We pass the authentication key to the service account through the Kibana UI in Elasticsearch
Let’s look at the get_default_configuration implementation that allows an end user to pass a credential key that will be stored in the index for authentication during syncs:
class GoogleDriveDataSource(BaseDataSource):
    """Google Drive"""

    name = "Google Drive"
    service_type = "google_drive"

    {...}

    @classmethod
    def get_default_configuration(cls):
        """Get the default configuration for Google Drive.

        Returns:
            dict: Default configuration.
        """
        return {
            "service_account_credentials": {
                "display": "textarea",
                "label": "Google Drive service account JSON",
                "sensitive": True,
                "order": 1,
                "tooltip": "This connectors authenticates as a service account to synchronize content from Google Drive.",
                "type": "str",
                "value": "",
            },
        }
Next, let’s implement a simple ping method
We will make a simple call to google drive api, e.g. /about endpoint.
For this step, let's consider a simplified representation of the GoogleDriveClient. Our primary goal here is to guide you through connector creation, so we're not focusing on implementation details of the Google Drive client. However, a minimal client code is essential for the connector's operation, so we will rely on pseudo-code for the GoogleDriveClient class representation.
class GoogleDriveClient(GoogleAPIClient):
    """A google drive client to handle api calls made to Google Drive API."""

    {... google drive client implementation}

    async def ping(self):
        return await self.api_call(resource="about", method="get", fields="kind")


class GoogleDriveDataSource(BaseDataSource):
    """Google Drive"""

    name = "Google Drive"
    service_type = "google_drive"

    {...}

    @cached_property
    def google_drive_client(self):
        """Initialize and return the GoogleDriveClient

        Returns:
            GoogleDriveClient: An instance of the GoogleDriveClient.
        """
        self._validate_service_account_json()

        json_credentials = json.loads(self.configuration["service_account_credentials"])

        return GoogleDriveClient(json_credentials=json_credentials)


    async def ping(self):
        """Verify the connection with Google Drive"""
        try:
            await self.google_drive_client.ping()
            self._logger.info("Successfully connected to the Google Drive.")
        except Exception:
            self._logger.exception("Error while connecting to the Google Drive.")
            raise
Async iterator to return files from google drive for content extraction
The next step is to write get_docs async iterator that will return the files from google drive and coroutines for downloading them for content extraction. From personal experience, it is often simpler to start implementing get_docs as a simple stand-alone python script to get this working and fetch some data. Once the get_docs code is working, we can move it to the data source class.
Let’s look at api docs, we can:
- Use files/list endpoint to iterate over docs in drive with pagination
- Use files/get and files/export for downloading the files (or exporting google docs to a specific file format)
class GoogleDriveDataSource(BaseDataSource):
    """Google Drive"""

    name = "Google Drive"
    service_type = "google_drive"

    {...}

    async def get_content(self, file, timestamp=None, doit=None):
        """Extracts the content from a file file.

        Args:
            file (dict): Formatted file document.
            timestamp (timestamp, optional): Timestamp of file last_modified. Defaults to None.
            doit (boolean, optional): Boolean value for whether to get content or not. Defaults to None.

        Returns:
            dict: Content document with id, timestamp & text
        """

        # Code details have been omitted here for brevity. For a complete implementation,
        # please refer to the connector code on GitHub.


    async def get_docs(self, filtering=None):
        """Executes the logic to fetch Google Drive objects in an async manner.

        Args:
            filtering (optional): Advenced filtering rules. Defaults to None.

        Yields:
            dict, partial: dict containing meta-data of the Google Drive objects,
                                partial download content function
        """


        async for files_page in self.google_drive_client.list_files():
            async for file in self.prepare_files(files_page=files_page):
                yield file, partial(self.get_content, file)
So what is happening in this bit of code?
list_filespaginates over files in drive.prepare_filesformats the file metadata to expected schemaget_contentis a coroutine that downloads the file andBase64encodes its content (compatible format for content extraction)
Some code details have been omitted for brevity. For a complete implementation, see the actual connector implementation on GitHub.
Let’s run the connector!
To integrate your custom connector into the framework, you'll need to register its implementation. Do this by adding an entry for your custom connector in the sources section in connectors/config.py. For the Google Drive example, the addition would appear as:
"sources": {
  ...,
  "google_drive": "connectors.sources.google_drive:GoogleDriveDataSource",
  ...
}
Now in the Kibana interface:
- Go to Search -> Indices -> Create a new index -> Use a Connector
- Select Customized connector (when using a custom connector)
- Configure your connector. Generate the Elasticsearch API key and connector ID, and put these details in
config.ymlas instructed, and start your connector.
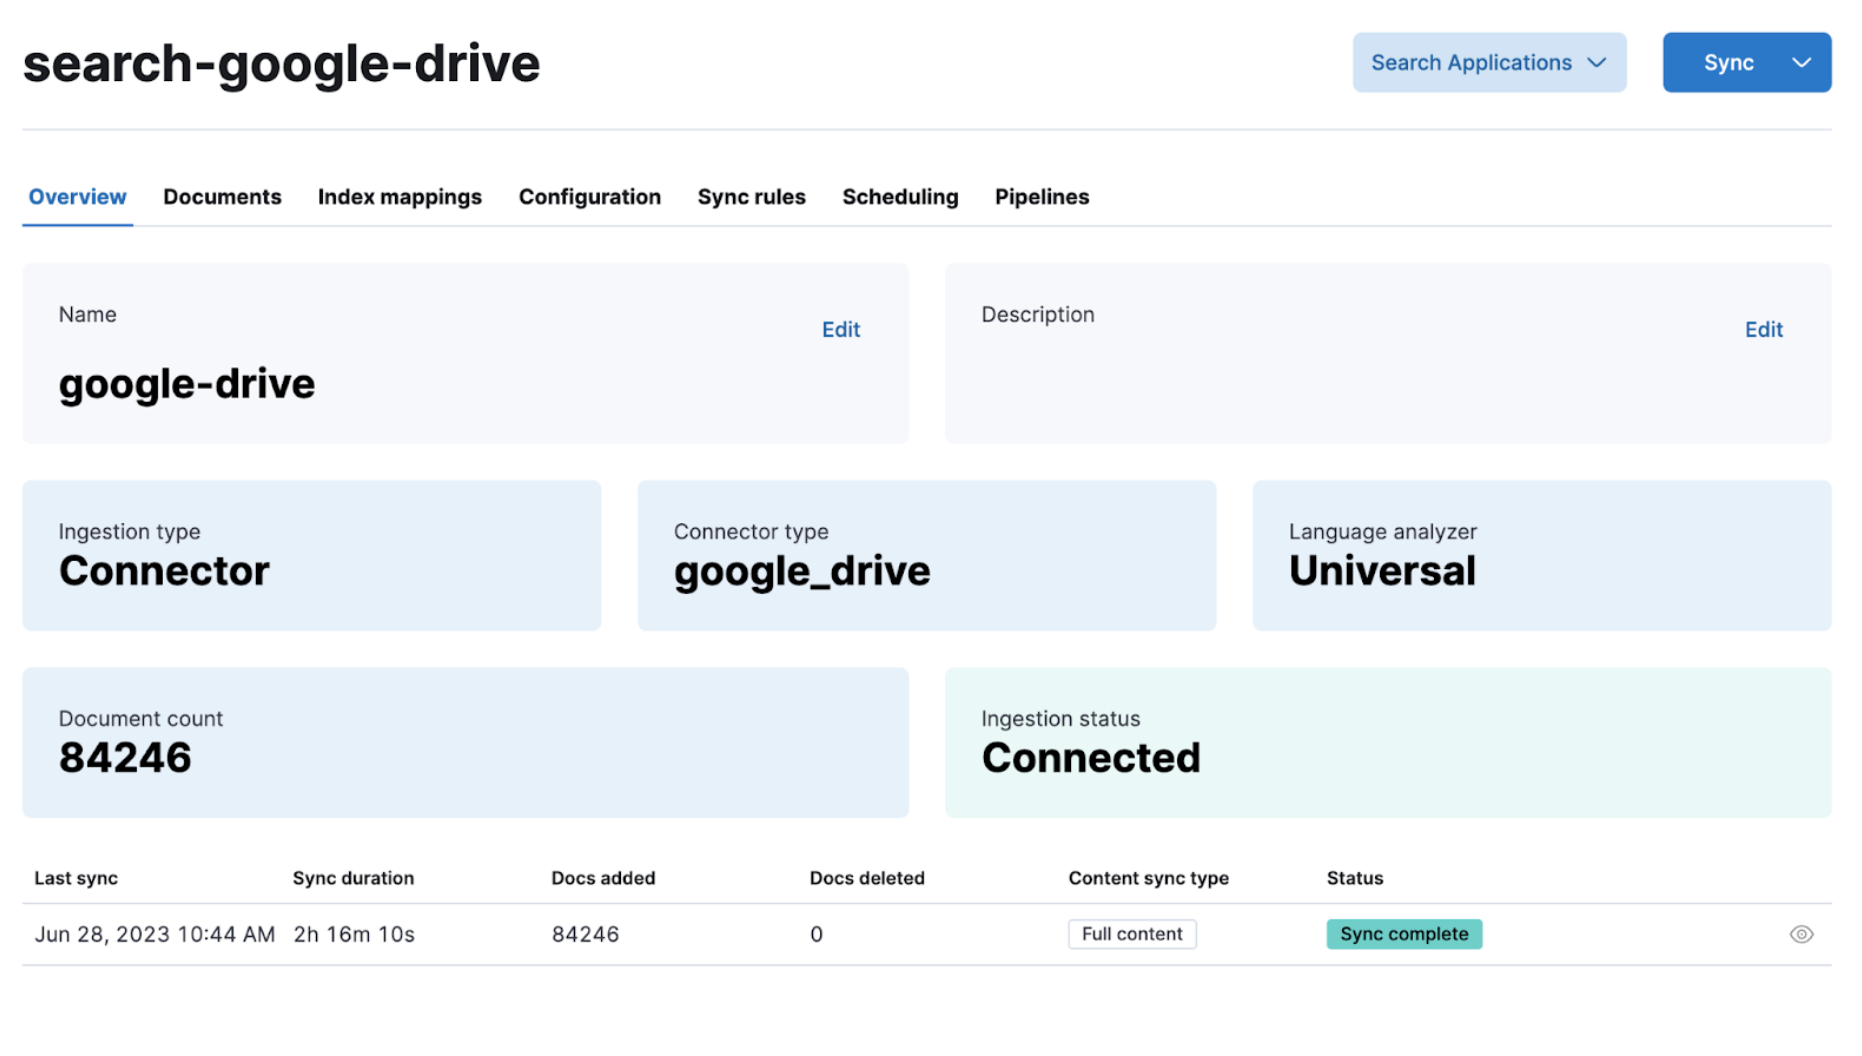
At this point, your connector should be detected by Kibana! Schedule a recurring data sync or just click “Sync” to start a full sync.
A connector can be configured to use Elasticsearch’s ingestion pipelines to perform transformations on data before storing it in an index. A common use case is document enrichment with machine learning. For example, you can:
- analyze text fields using a Text embedding model that will generate a dense vector representation of your data
- run text classification for sentiment analysis
- extract key information from text with Named Entitiy Recogintion (NER)
Once your sync finishes, your data will be available in a search-optimized Elasticsearch index. At this point, you can dive into building search experiences or delve into analytics.
Do you want to create and contribute a new connector?
If you create a custom connector for a source that may help the Elasticsearch community, consider contributing it. Here are the promotion path guidelines to get a customized connector to become an Elastic-supported connector.
Acceptance criteria for contributing connectors
Also, before you start spending some time developing a connector, you should create an issue and reach out to get some initial feedback on the connector and what libraries it will use. Once your connector idea has some initial feedback, ensure your project meets a few acceptance criteria:
- add a module or a directory in
connectors/sources - implement a class that implements all methods described in
connectors.source.BaseDataSource - add a unit test in
connectors/sources/testswith +90% coverage - declare your connector in
connectors/config.pyin the sources section - declare your dependencies in
requirements.txt. Make sure you pin these dependencies - for each dependency you are adding, including indirect dependencies, list all the licences and provide the list in your patch.
- make sure you use an async lib for your source. If not possible, make sure you don't block the loop
- when possible, provide a docker image that runs the backend service, so we can test the connector. If you can't provide a docker image, provide the credentials needed to run against an online service.
- the test backend needs to return more than 10k documents due to 10k being the default size limit for Elasticsearch pagination. Having more than 10k documents returned from the test backend will help test the connector
Supporting tools to test your connector
We also have some supporting tools that profile the connector code and run performance tests. You can find those resources here:
- Perf8 - Performance library and dashboard, to profile the quality of python code to assess resource utilization and detect blocking calls
- E-2-E functional tests that make use of perf8 library to profile each connector
Wrap up
We hope this blog and the example were useful for you.
Here’s the complete list of available native connectors and connector clients for Elasticsearch. If you don’t find your data source listed, perhaps create a custom connector?
Here are some useful resources relevant to this article:
- connectors GitHub repository and documentation page
- Async Python learning course
- New custom connector community guidelines
- Licensing details for Elastic’s connector-framework (search for
Connector Frameworkat this link)
If you don’t have an Elastic account, you can always spin up a trial account to get started!