Elasticsearch has native integrations with the industry-leading Gen AI tools and providers. Check out our webinars on going Beyond RAG Basics, or building prod-ready apps with the Elastic vector database.
To build the best search solutions for your use case, start a free cloud trial or try Elastic on your local machine now.
Introduction
Everything is a search problem. I heard someone say this during my first week at Elastic and the phrase has since taken up permanent residence in my brain. This blog is not intended as an analysis of pertinent statements made by my fantastic colleagues, but I do first want to take a moment to dissect this statement.
Since its inception, Elasticsearch has remained at the forefront of technology - breaking the mould in the software arena and powering the tech backbones of household name companies, the world over. We tend to categorise Elastic’s offering into several ‘OTB’ solutions - security, observability etc., but stripping these back, the problems we are solving are fundamentally search-oriented. It’s about being able to ask questions of your data and return meaningful and relevant results, regardless of the banner, and it’s this that makes Elastic such a powerful technology.
As a bit of an ode to search and a showcasing of some of Elastic’s capabilities, this blog will take you through the end-to-end development of a search application, using machine learning models for Named Entity Extraction (NER) and semantic searching; combining Elastic and non-Elastic components, and layering these with a simple UI to showcase the power of search.
The guide has been designed for use with Elastic Cloud, however, the same approach can be applied to locally hosted instances, with alterations to authentication methods and other cloud-specific concepts. The full git repository is available at: Kibana Search Project
Topics covered
- Logstash
- Ingest Pipelines
- ELSER
- Custom ML Models
- Streamlit
Step 1: Download BBC News dataset from Kaggle
The dataset we’re going to be using is the BBC News dataset, available as a CSV from: BBC News Dataset. This is a self-updating dataset, collecting RSS Feeds from BBC News. The dataset includes the title, description, date, url and various other attributes of published articles. We’re going to use Logstash to ingest the data, however, other methods i.e a Python Client or a standard upload are equally valid (Adding data to Elasticsearch | Elasticsearch Service Documentation | Elastic).
The raw data schema is a little problematic, so, if using Logstash, minor tweaks need to be made to the structure of the file. Unzip the downloaded file and run the script, modifying the input/output to reflect the location and name of the saved file on your local machine. This script will reorder the columns so the ‘Publish Date’ of the article comes first, to ease interpretation of the date field.
Step 2: Use Docker to upload and start the custom NER ML Model
Next, we’re going to import the custom ML model for the NER task, for which, detailed documentation can be found here: How to deploy named entity recognition | Machine Learning in the Elastic Stack [8.11]. This tutorial uploads the custom model using docker, however, for alternative methods of installation, see: Introduction to custom machine learning models and maps | Elastic Blog.
Whilst there are many models we could utilise for NER, we’re going to use ‘distilbert-base-uncased’ from distilbert-base-uncased · Hugging Face. Optimised for lowercase text, this model proves beneficial in extracting entities with precision from unstructured data, in our case - with the assistance of Named Entity Recognition, we can extract people, places, organisations, etc. from our news articles, for use downstream.
To create a one-off API key for this task, we can call the _security endpoint, specifying our key requirements API Key Generation. Ensure you copy the encoded value generated by the request, as this value cannot be retrieved later. The API key we are creating will be used solely for this upload, therefore we can assign limited permissions and an expiry date:
To import the model to your cluster, ensure Docker Desktop is up and running and run the following command in a terminal; setting the values of "CLOUD_ID" and "API_KEY" to reflect those associated with your Cloud Cluster.
If you are met with errors, ensure your Cloud ID and authentication credentials are correct, and that Docker is functioning as expected.
Step 3: Download ELSER
In this step, we’re going to download ELSER, Elastic’s ‘out-of-domain model’ to the stack. Navigate to Machine Learning -> Model Management -> Trained Models and select download on elser_model_2. For more information on installing ELSER in non-cloud environments, visit: ELSER – Elastic Learned Sparse EncodeR | Machine Learning in the Elastic Stack [8.12].

Step 4: Add mappings and pipelines in Elastic
Mappings in Elastic define the schema of our data. We need to add formal mappings for our BBC News index to ensure the data is typed as expected, and Elastic understands the structure, when we ship it to the cluster. As part of this mapping, we are excluding the tokens produced by the ELSER model to prevent mapping explosions, and defining a number of tags generated by the NER model. Navigate to Dev Tools and create the mapping:
Pipelines define a series of data processing steps before indexing. Our ingest pipeline comprises field removal, model inferences for both ELSER and our custom NER model and a script to add the output values from our NER model run to a tags field.
Step 5: Use Logstash to ingest data
We now need to configure Logstash to ship the data to Elastic. Download Logstash (if not already downloaded), and follow the steps to install, documented here: Getting Started with Logstash.
Our configuration file comprises three elements: an input block, a filter block and an output block. Let’s take a second to run through the contents of each.
Input: Our input configures Logstash to read data from our CSV file located at the specified path. It starts reading from the beginning of the file, disables the sincedb feature, and assumes the file is in plain text.
Filter: This section applies filters to the incoming data. It uses the CSV filter to parse the CSV data, specifying the comma as the separator and defining the column names. To account for the presence of duplicate entries in the bbc news dataset, we apply a fingerprint filter to calculate a unique fingerprint based on the concatenation of the "title" and "link" fields, storing it in [@metadata][fingerprint]. The mutate filter renames the "link" field to "url" and removes the "guid" field.
Output: The final section configures the output destinations for the processed data. It sends the data to our Elasticsearch Cloud instance specified by the Cloud ID and credentials. The data is stored in the "bbc-news-elser" index - mapped in Section 2 - and our Ingest Pipeline named "news-pipeline" is applied. The document_id is set to the unique fingerprint generated by our fingerprint filter. Additionally, a copy of the data is printed to the console for debugging purposes using the rubydebug codec.
Remember to set the CLOUD_ID and API_KEY as environment variables - or store in a key store, Logstash Keystore Guide - and ensure that the path to the CSV file is accurate. Note - you will need to create a new API key for Logstash with relevent permissions. You can either run Logstash directly from the command line using the '-f' flag to specify the configuration location, or use the pipelines file to point to the config. If opting for the pipeline approach, add the following lines to your pipelines.yml file:
Step 6: Verify data ingest
If all has gone smoothly, we should now be able to explore our BBC News data in the cluster.
Create a data view in Discover, or Stack Management, using the pubDate field as the ‘Timestamp field’.

Verify you can see the data:

To better understand what's going on under the hood with the NER model, we can query the data in Dev Tools, tailoring the response to return fields of interest:
This should return a response similar to the block below:
Breaking this snippet down, we can see our original "title" value, and the results produced by the NER model. The "predicted_value:" field shows the text with identified entities annotated. In this case, "Chantelle Cameron" and "Jessica McCaskill" have been identified as persons (PER). The "entities" object contains an objects, each representing a named entity recognised in the raw "title" field and comprises:
- "entity" - the string of the named entity as recognised in the text.
- "class_naAme" - the classification assigned to the entity i.e PER, LOC, ORG.
- "class_probability" - a decimal value representing the model's confidence in its classification of the entity. The values for both entities in the response above are close to 1, indicating high confidence.
- "start_pos" and "end_pos" - the start and end positions (zero-indexed) of the entity within the predicted_value text, which can be useful for applications requiring highlighting or further processing of specific entities in the text.
Step 7: Deploy search UI
In this final step, we introduce a Streamlit application that leverages our BBC News dataset for semantic and standard text searches.
First, follow the steps to install Streamlit, as described here: Streamlit Git Repo, or use the requirements.text file located in the git repository. Once installed, create a file called elasticapp.py and add the Python code block. As above, where we require an authentication to the cloud cluster , the “CLOUD_ID”, “API_KEY" variables need to be set before running (alternatively, user and password can be used to authenticate access to the cluster). This can be achieved by creating a dotenv file, or by exporting the variabls. For the latter approach, run the following commands:
The user interface we’re implementing facilitates the input of both semantic and standard queries, the selection of an Elasticsearch index and subsequently initiates a search on our articles dataset. The Elasticsearch connection is established using our cloud credentials loaded from environment variables. The backend logic includes functions for fetching data based on user queries and updating the Streamlit app's display with the search results.
And that’s it. You should now be able to access your working application in your browser:

Related Content
July 7, 2026
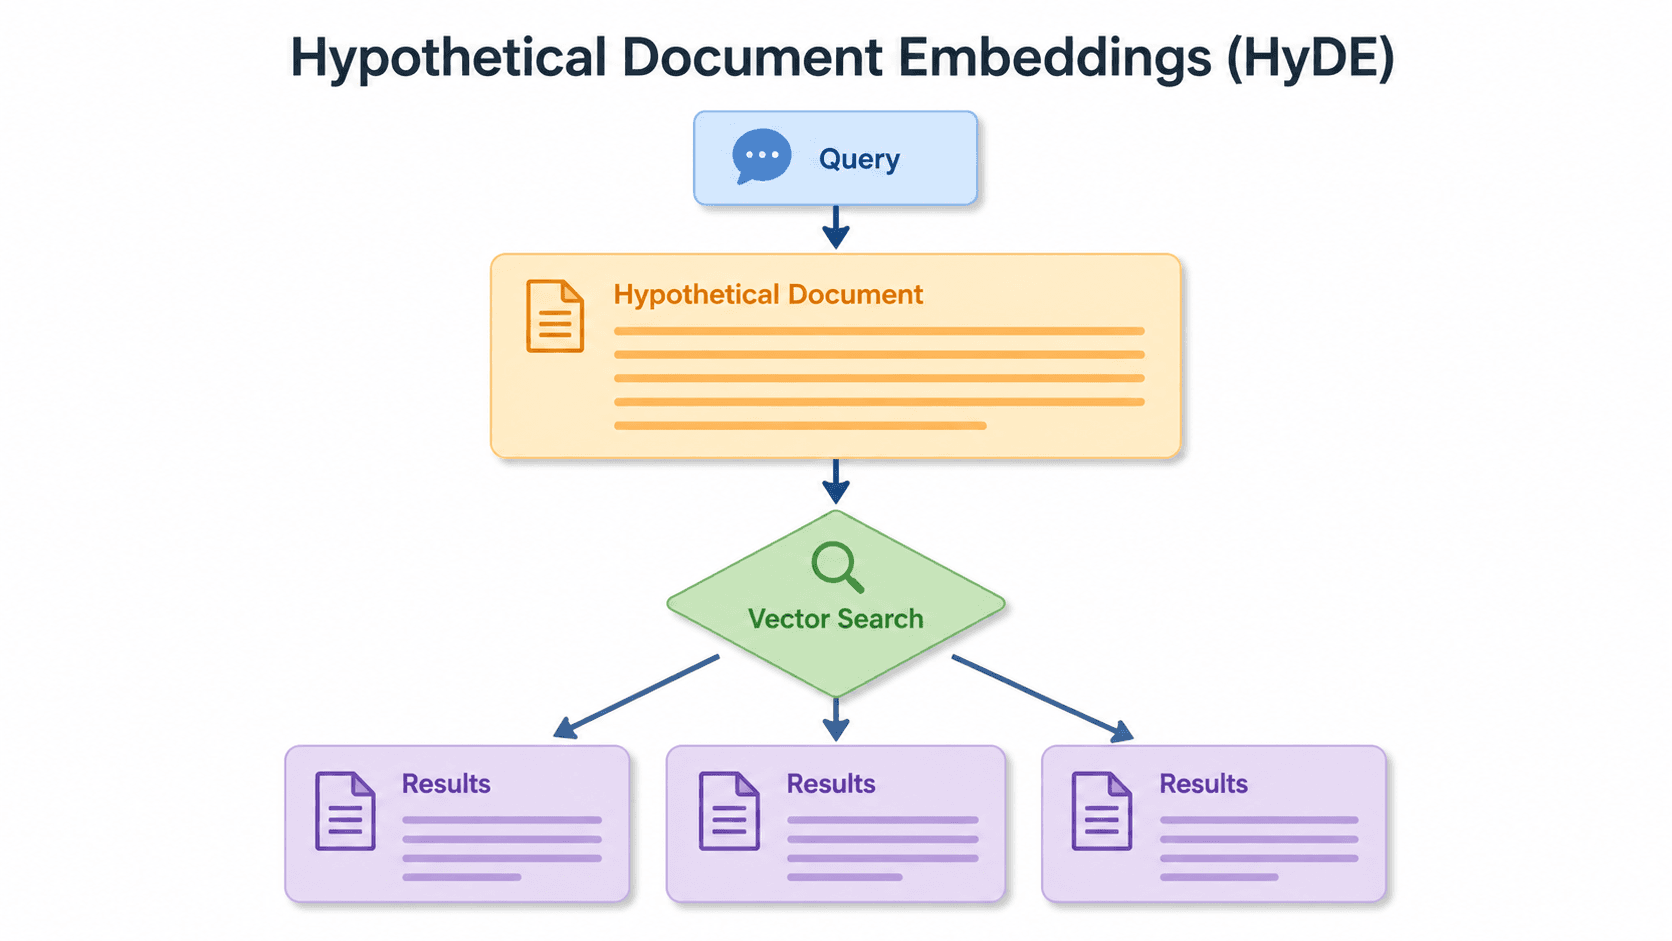
Short queries, formal documents: how HyDE improved semantic search precision by 50% in Elasticsearch
HyDE boosts semantic search precision and recall by 50% on short queries. Here's how to implement it in Elasticsearch with the Inference API and semantic_text.
June 24, 2026
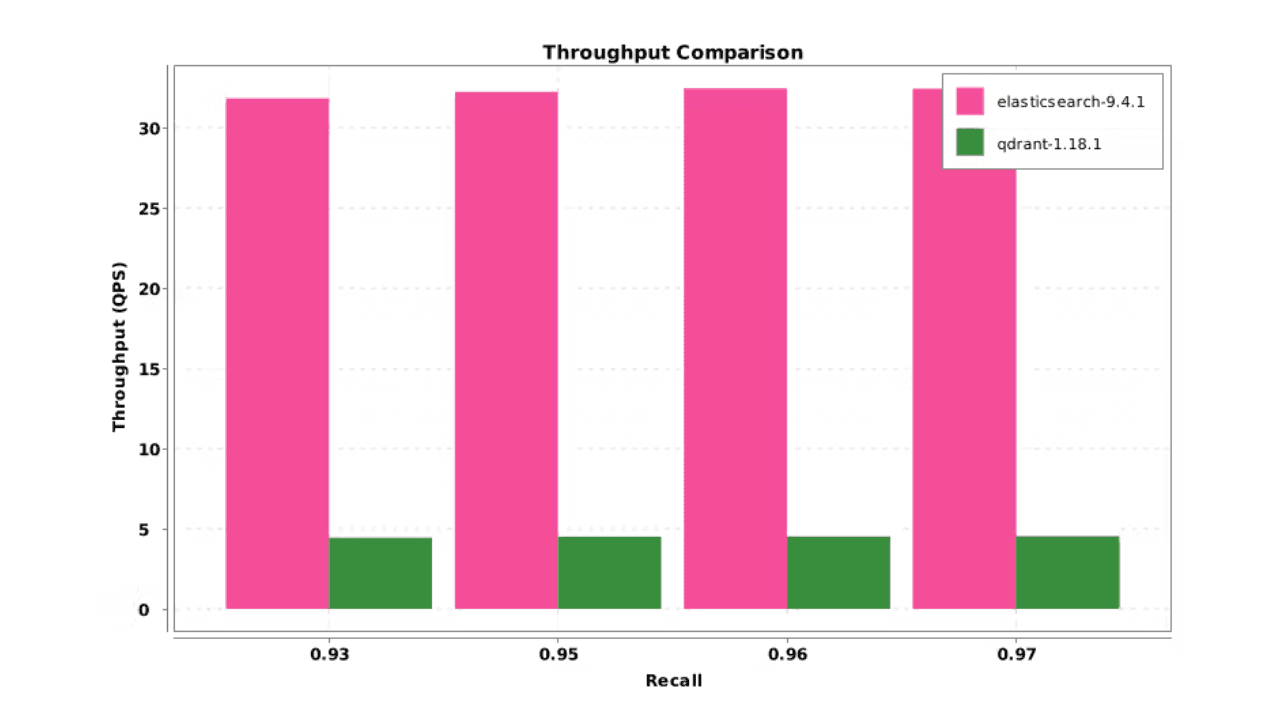
Elasticsearch DiskBBQ delivers 7x faster vector search than Qdrant on network-attached storage
Elasticsearch DiskBBQ achieves up to 7x higher vector search throughput than Qdrant at comparable recall on network-attached storage. Explore the benchmark methodology and full results.
July 6, 2026
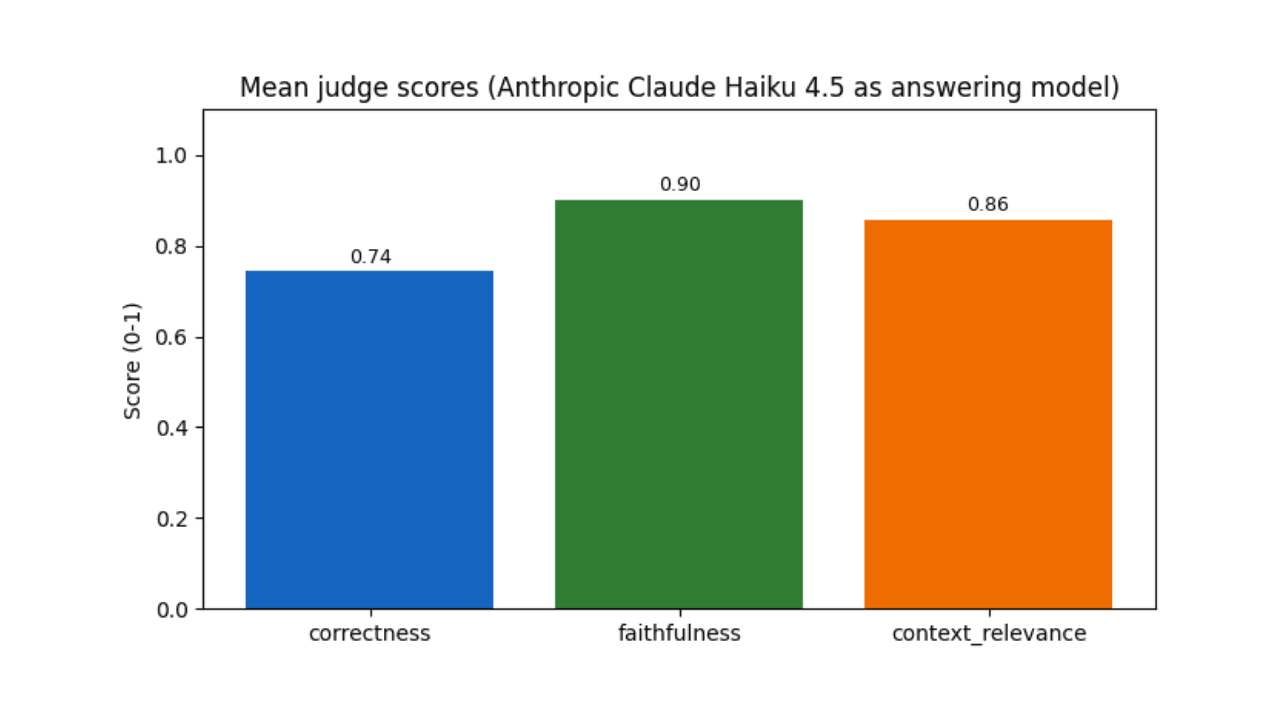
Who grades the grader? LLM-as-a-Judge inside Elasticsearch Workflows
Find out if your RAG agent is ready to ship. Score it on correctness, faithfulness and retrieval quality using only Elasticsearch Workflows and two Claude models.

June 15, 2026
Your search index is already an agent memory system: Persistent agent memory for Claude Code with Elasticsearch
Give your AI agent persistent cross-session memory using Elasticsearch: Hybrid recall, a knowledge graph, and cross-device handoffs. Three commands to install.

June 15, 2026
Your FAQ bot doesn't need a PhD: LLM query routing with Elastic Workflows
Route LLM queries by complexity using Elasticsearch search metadata: Mistral Small for FAQ questions, Claude Sonnet for multi-source synthesis.