Elasticsearch and Kibana Deployments on Azure
We've written before about how easy it is to spin up an Elasticsearch cluster on Azure, using our offering on the Azure Marketplace. The Marketplace is a fantastic way to try Elasticsearch on Azure since all the hard work of provisioning resources and wiring them together is taken care of, leaving you just the simple task of providing the inputs to the step-by-step wizard. A few minutes later and Voila! you have a cluster!
Once trying the Marketplace offering however, you're most likely going to want to integrate deployments into your build automation pipeline of choice, and this is where the ARM template in our github repository comes in; using the Azure CLI or PowerShell SDKs, it's easy to target a specific release of the template for reliable deployments. What's more, the template accepts many additional parameters to configure features such as snapshot and restore to an Azure storage account, Transport Layer Security, load balancing and SSL offload with Application Gateway, as well as being able to configure the number and size of disks to attach to each data node. The latter is particularly useful when you have a relatively small data set, so your storage demands are not large, but require virtual machines with sufficient RAM and CPU for your running workload. For this post, let's explore a few different scenarios.
Deploying from the command line
You have a number of tooling options when it comes to deploying from the command line:
These options are available to you whether you’re running on Windows, Linux or OSX. Cross-platform FTW!
Using a Service Principal
To perform automated deployments using Azure PowerShell, we want a non-interactive login, so setting up and using a Service Principal that has access to deploy to our target subscription is one way to achieve this. Once a Service Principal is configured, it can be used to log in and select the subscription into which we wish to deploy
$clientID = "<client id>"
$clientSecret = "<client secret>"
$secureClientSecret = $clientSecret | ConvertTo-SecureString -AsPlainText -Force
$credential = new-object -typename System.Management.Automation.PSCredential `
                         -argumentlist $clientID, $secureClientSecret
Add-AzureRmAccount -Credential $credential -Tenant "<tenant id>" -ServicePrincipal
Select-AzureRmSubscription -SubscriptionId "<subscription id>"
if all is well, then we should see something like the following in standard output
Environment           : AzureCloud
Account               : <account id>
TenantId              : <tenant id>
SubscriptionId        : <subscription id>
SubscriptionName      : <subscription name>
CurrentStorageAccount : <storage account, if configured>
Account      : <account id>
Environment  : AzureCloud
Subscription : <subscription id>
Tenant       : <tenant id>
Now we're ready to automate!
Simple deployment
The following diagram provides an overview of the Azure resources that the Elastic ARM template can deploy:
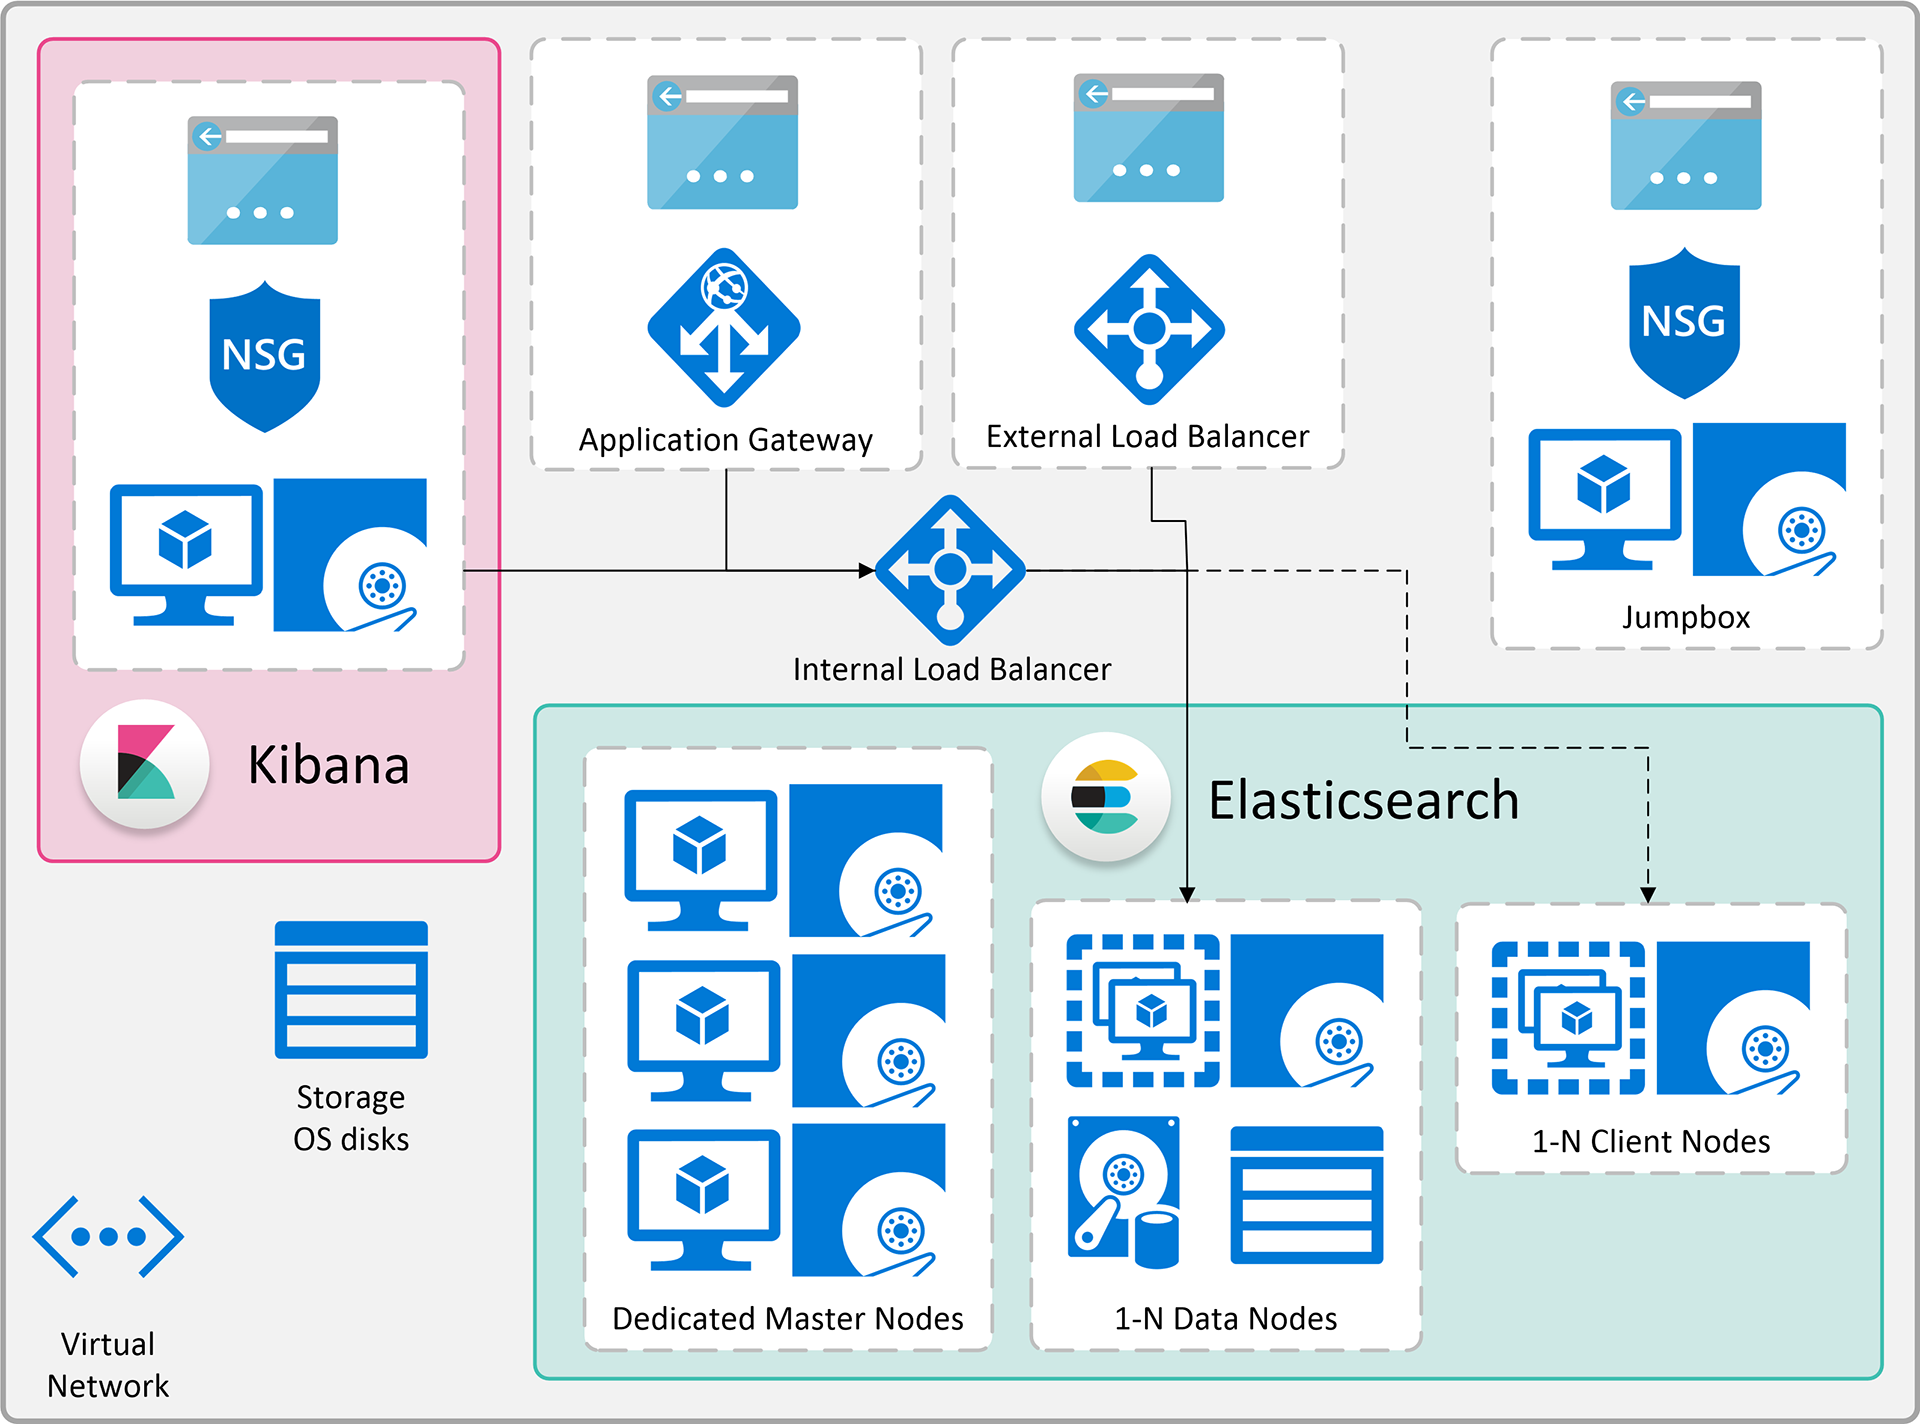
The template accepts a lot of parameters to configure deployed resources, with many of them optional. This allows a number of different topologies to be deployed, letting you decide whether to
- deploy a new virtual network to attach the cluster to or use an existing virtual network
- use dedicated master nodes or allow data nodes to be master eligible
- use client nodes
- deploy an instance of Kibana
- deploy a jumpbox to be able to ssh into nodes in the cluster (when not deploying Kibana)
- allow external access to the cluster through either an external load balancer or Application Gateway
Note that the release versions of the ARM template do not necessarily align with the version of Elasticsearch and Kibana deployed by default; the template is able to deploy many different versions of Elasticsearch and Kibana, which can be controlled through the esVersion parameter, deploying the latest version of Elasticsearch and Kibana if unspecified. For template version 5.1.2, this is Elasticsearch and Kibana 5.3.1. We're looking to align the template version with the Elastic stack version in a future release.
The simplest deployment possible is one where we supply arguments only for
- the base URL to retrieve the main ARM template as well as all of the linked templates and artifacts used in the deployment
- the cluster name
- authentication credentials for the Virtual Machines and default users configured for X-Pack Security
We can target any git commit, branch or tag within the repository by using its identifier in the template URI and base URL. The following example uses the 5.1.2 tag release as the version of the template to use, creating a resource group "simple-deployment" in the Australia Southeast region to deploy the cluster into
$templateVersion = "5.1.2"
$templateUrl = "https://raw.githubusercontent.com/elastic/azure-marketplace/$templateVersion/src"
$mainTemplate = "$templateUrl/mainTemplate.json"
$location = "Australia Southeast"
$resourceGroup = "simple-deployment"
$name = "elasticsearch"
$templateParameters = @{
"artifactsBaseUrl"= $templateUrl
"esClusterName" = $name
"adminUsername" = "russ"
"authenticationType" = "password"
"adminPassword" = "Password1234"
"securityAdminPassword" = "AdminPassword123"
"securityReadPassword" = "ReadPassword123"
"securityKibanaPassword" = "KibanaPassword123"
}
New-AzureRmResourceGroup -Name $resourceGroup -Location $location
$deployment = New-AzureRmResourceGroupDeployment -Name $name -ResourceGroupName $resourceGroup `
-TemplateUri $mainTemplate -TemplateParameterObject $templateParameters
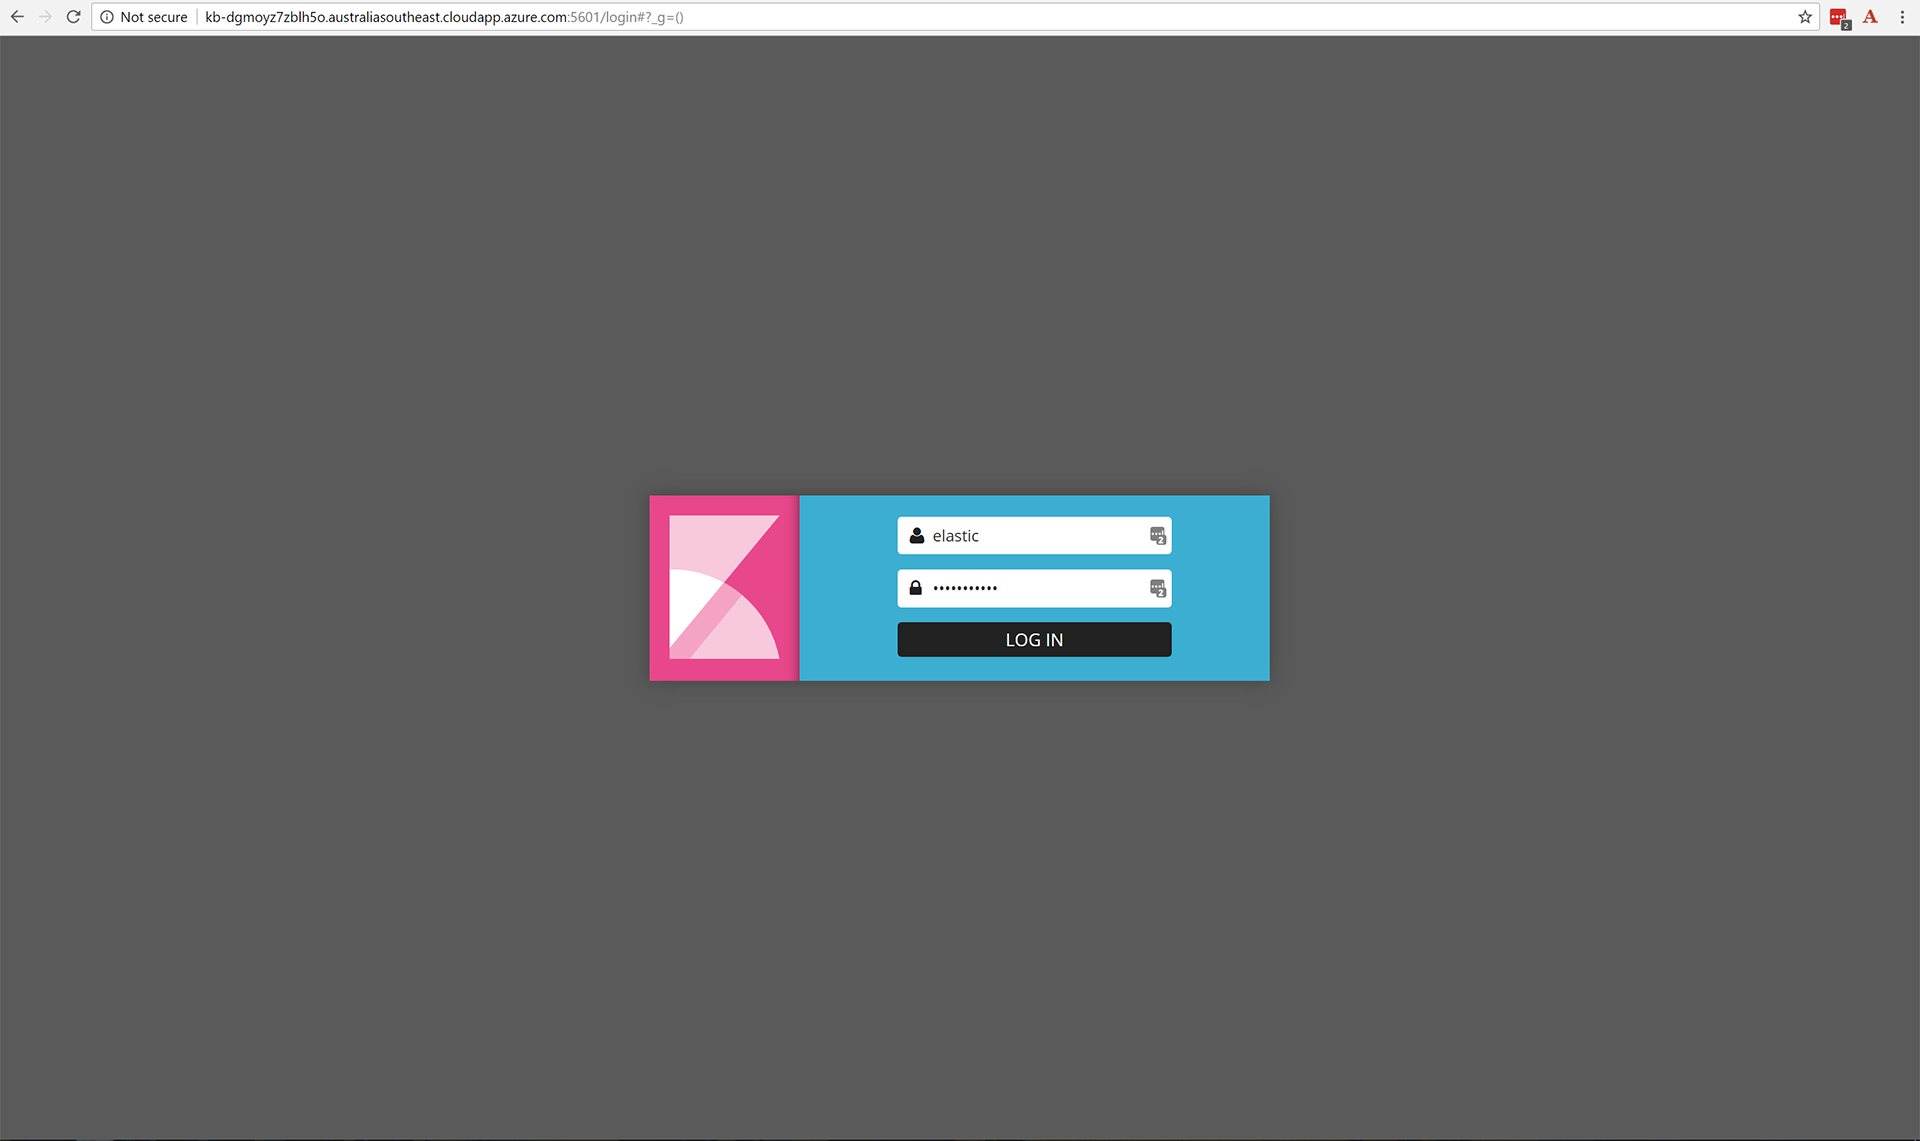
Start-Process $deployment.Outputs.kibana.Value
Upon successful deployment, the default browser will open at the URI of the deployed Kibana instance, and we can log in to Kibana with the elastic superuser account and the securityAdminPassword password specified in the template parameters
Transport Layer Security
The 5.1.2 tag release deploys Elasticsearch and Kibana 5.3.1 with a trial license of X-Pack enabled by default, so our cluster is secured through X-Pack Security. Communication with Kibana however is not encrypted by default; for this, we can supply a certificate and private key as template parameters to be used for SSL/TLS.
Encrypting communication with Kibana
We've written previously about using the Let's Encrypt™ service to generate certificates. We'll use it here to generate a certificate and private key to use with Kibana. Luckily for us, there's a PowerShell module that will allow us to generate a certificate with Let's Encrypt™ using ACMESharp, a .NET client for the ACME protocol. Once installed and loaded using
Install-Module -Name ACMESharp
Import-Module ACMESharp -Prefix ACME
a certificate and private key can be generated by first verifying ownership of the domain for which we want to generate a certificate, using the DNS challenge validation
Initialize-ACMEVault
New-ACMERegistration -Contacts mailto:<your email address> -AcceptTos
New-ACMEIdentifier -Dns <your domain name> -Alias arm
Complete-ACMEChallenge arm -ChallengeType dns-01 -Handler manual
and adding a TXT record with the name and value returned from the complete challenge cmdlet. With the TXT record in place, validation of ownership can commence
Submit-ACMEChallenge arm -ChallengeType dns-01
With the challenge submitted, the status of the challenge can be checked with
(Update-ACMEIdentifier arm -ChallengeType dns-01).Challenges | Where-Object {$_.Type -eq "dns-01"}
And with a Status of valid returned, we can now generate and export the certificate and private key
New-ACMECertificate arm -Generate -Alias cert1
Submit-ACMECertificate cert1
Get-ACMECertificate cert1 -ExportCertificatePEM "C:\kibana.crt" -ExportKeyPEM "C:\kibana.key"
Providing them to the template as Base-64 encoded strings
$templateVersion = "5.1.2"
$templateUrl = "https://raw.githubusercontent.com/elastic/azure-marketplace/$templateVersion/src"
$mainTemplate = "$templateUrl/mainTemplate.json"
$location = "Australia Southeast"
$resourceGroup = "tls-cluster"
$name = "elasticsearch"
$kibanaCert = [Convert]::ToBase64String([System.IO.File]::ReadAllBytes("C:\kibana.crt"))
$kibanaKey = [Convert]::ToBase64String([System.IO.File]::ReadAllBytes("C:\kibana.key"))
$templateParameters = @{
    "artifactsBaseUrl"= $templateUrl
    "esClusterName" = $name
    "kibanaCertBlob" = $kibanaCert
    "kibanaKeyBlob" = $kibanaKey
    "adminUsername" = "russ"
    "authenticationType" = "password"
    "adminPassword" = "Password1234"
    "securityAdminPassword" = "AdminPassword123"
    "securityReadPassword" = "ReadPassword123"
    "securityKibanaPassword" = "KibanaPassword123"
}
New-AzureRmResourceGroup -Name $resourceGroup -Location $location
$deployment = New-AzureRmResourceGroupDeployment -Name $name -ResourceGroupName $resourceGroup `
    -TemplateUri $mainTemplate -TemplateParameterObject $templateParameters
Start-Process $deployment.Outputs.kibana.Value
After template deployment and with a CNAME record set up against the domain for which we generated the certificate, using the domain returned in the kibana output parameter, communication to Kibana is now encrypted when accessed from our domain. A CNAME record is required here as the domain under which the public IP address is configured is owned by Microsoft Azure and hence we cannot verify ownership and generate a certificate for it. In this example, a CNAME record is set up against the sub domain arm-deployment.elastic.co with a value pointing to cloudapp.azure.com sub domain.
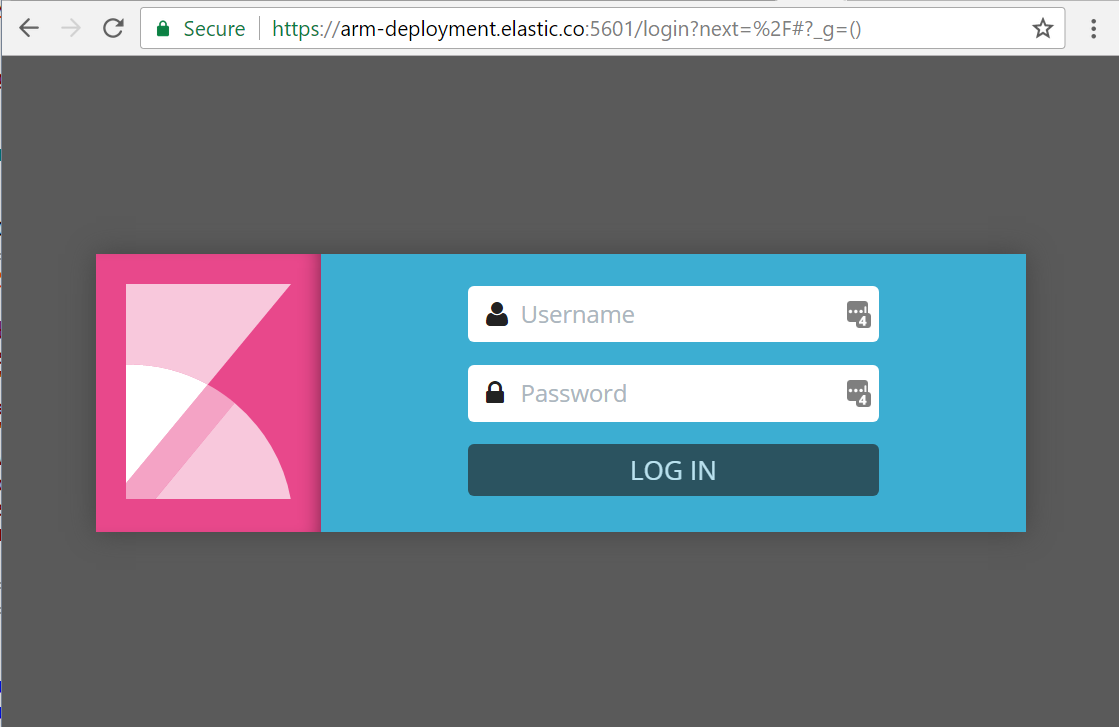
Too easy! Certificates issued by Let's Encrypt™ are valid for 90 days so you'd want to set up automated renewal of the certificate and key on the Kibana VM; Both the certificate and private key can be found in /etc/kibana/ssl or /opt/kibana/config/ssl for 5.x and 2.x deployments, respectively.
Encrypting communication with Elasticsearch
With the default template parameters, the Elasticsearch cluster is not directly accessible outside of the virtual network to which it is attached; only Kibana is configured with a public IP address and a network security group to allow TCP traffic on port 22 for ssh and 5601 for the web UI. External access can be configured using the loadBalancerType parameter, with a value of "gateway" deploying Application Gateway for external access, providing a means to encrypt communications and perform SSL offload, the latter feature being something that can't be done with Azure's layer 4 load balancers.
A PKCS#12 archive certificate (.pfx) can be supplied to encrypt communication to Application Gateway. The ACMESharp PowerShell module can export a generated certificate in this format too, including a password
Get-ACMECertificate cert1 -ExportPkcs12 "C:\application-gateway.pfx" -CertificatePassword "CertPassword123"
Both the PFX certificate and password can be supplied as parameter arguments to the template.
Application Gateway has two SKU tiers, Standard and Web Application Firewall (WAF), either of which can be configured in addition to the gateway SKU size and count, effectively controlling the performance throughput. The default Application Gateway tier is Standard and can be deployed to allow external encrypted communication with the cluster using the following
$templateVersion = "5.1.2"
$templateUrl = "https://raw.githubusercontent.com/elastic/azure-marketplace/$templateVersion/src"
$mainTemplate = "$templateUrl/mainTemplate.json"
$location = "Australia Southeast"
$resourceGroup = "app-gateway-cluster"
$name = "elasticsearch"
$gatewayCert = [Convert]::ToBase64String([System.IO.File]::ReadAllBytes("C:\application-gateway.pfx"))
$templateParameters = @{
    "artifactsBaseUrl"= $templateUrl
    "esClusterName" = $name
    "loadBalancerType" = "gateway"
    "appGatewayCertBlob" = $gatewayCert
    "appGatewayCertPassword" = "CertPassword123"
    "adminUsername" = "russ"
    "authenticationType" = "password"
    "adminPassword" = "Password1234"
    "securityAdminPassword" = "AdminPassword123"
    "securityReadPassword" = "ReadPassword123"
    "securityKibanaPassword" = "KibanaPassword123"
}
New-AzureRmResourceGroup -Name $resourceGroup -Location $location
New-AzureRmResourceGroupDeployment -Name $name -ResourceGroupName $resourceGroup -TemplateUri $mainTemplate -TemplateParameterObject $templateParameters
As before, setting up a CNAME record with a value of the Application Gateway domain name against the domain for which we generated the certificate will ensure communication to the gateway is encrypted. The fully qualified domain name for the Application Gateway public IP address can be retrieved with
$gatewayPublicIp = Get-AzureRmPublicIpAddress -Name "es-app-gateway-ip" `
    -ResourceGroupName "app-gateway-cluster"
$domainName = $gatewayPublicIp.DnsSettings.Fqdn
Application Gateway connects to the node VMs through an internal load balancer, making it easy to add additional nodes to the load balancer backend pool to scale up the cluster.
One important point to note with Application Gateway currently is that the health check probe it uses to ascertain that the resources to which it is connected are healthy uses HTTP protocol and does not allow authentication credentials to be passed for the check. Consequently, to allow Application Gateway to work with a cluster secured with X-Pack Security, anonymous access is enabled and assigned a role with access only to the base URI. Hopefully, health check probes will support passing authentication credentials in the future, allowing all cluster resources to require authentication to access.
Configuring data disks
The default template deployment deploys the maximum number of disks that the chosen data node VM SKU size can have attached. Attaching more data disks is a way of achieving higher IOPS, particularly with Premium Storage, at the expense of, well, being more expensive! It could very well be the case that you would like to use more powerful VMs for the data nodes to handle the traffic load that you're going to throw at the cluster, but actually don't require a great deal of storage space. In this case, the number of data disks to attach to each data node can be controlled, in addition to their capacity and type of storage. For example, we may want to use beefy compute-optimized F-Series VMs, such as the Standard_F16s, but not need the 32 Premium storage 1024GB data disks that would be attached to each data node using the default template parameters; perhaps two Standard storage 128GB data disks will suffice. This can be achieved using those parameters that control the deployed data disks
$templateVersion = "5.1.2"
$templateUrl = "https://raw.githubusercontent.com/elastic/azure-marketplace/$templateVersion/src"
$mainTemplate = "$templateUrl/mainTemplate.json"
$location = "Australia Southeast"
$resourceGroup = "f-series-cluster"
$name = "elasticsearch"
$templateParameters = @{
    "artifactsBaseUrl"= $templateUrl
    "esClusterName" = $name
    "adminUsername" = "russ"
    "authenticationType" = "password"
    "adminPassword" = "Password1234"
    "securityAdminPassword" = "AdminPassword123"
    "securityReadPassword" = "ReadPassword123"
    "securityKibanaPassword" = "KibanaPassword123"
    "vmSizeDataNodes" = "Standard_F16s"
    "vmDataDiskCount" = 2
    "vmDataDiskSize" = "Small"
    "storageAccountType" = "Standard"
}
New-AzureRmResourceGroup -Name $resourceGroup -Location $location
$deployment = New-AzureRmResourceGroupDeployment -Name $name -ResourceGroupName $resourceGroup `
    -TemplateUri $mainTemplate -TemplateParameterObject $templateParameters
Start-Process $deployment.Outputs.kibana.Value
The vmDataDiskCount parameter can accept several values ranging from 0 to 40 to control the number of attached disks. When more than one disk is specified, a RAID 0 array device is configured to stripe data across all attached disks, to maximize IOPS throughput.
Using temporary storage
When no disks are attached, the temporary drive is configured as the location to store data, using path.data in the elasticsearch.yml configuration file. Azure mounts the temporary drive at /mnt with directory /dev/sdb1 for Linux VMs. The temporary drive is ephemeral in nature and data on it can be lost under a number of different scenarios, including when you resize the VM, shutdown or restart the VM, when the VM is moved to a different host server, amongst others. Because of this, great care should be taken if you are considering using it, to avoid data loss, such as having a sufficient number of data nodes within the cluster with replica shards. Nevertheless, using the temporary drive can provide a cost effective way of having good performing storage, since the temporary drive is provided at no extra cost and is present on the physical machine that hosts the VM.
Integrating other Azure resources
All of the scenarios demonstrated so far have been concerned with changing the deployment options for the ARM template and deploying resources configured by the template based on those options. Where the true power of the template really comes into its own however is in the ease with which it can be combined with other Azure resources. Let's explore how we can integrate other resources with the template now.
Configuring snapshot and restore
When you're running Elasticsearch in production, taking regular snapshots of your data is a good habit to get into, so that you have a backup of your data in the event of catastrophic failure. Configuring an Azure storage account and using the Azure repository plugin is a cinch with the ARM template
$location = "Australia Southeast"
$storageResourceGroup = "storage-account"
$storageAccountName = "esclusterbackups"
New-AzureRmResourceGroup -Name $storageResourceGroup -Location $location
New-AzureRmStorageAccount -ResourceGroupName $storageResourceGroup `
    -AccountName $storageAccountName -Type "Standard_LRS" -Location $location
$storageAccountKeys = Get-AzureRmStorageAccountKey -ResourceGroupName $storageResourceGroup `
    -Name $storageAccountName
$templateVersion = "5.1.2"
$templateUrl = "https://raw.githubusercontent.com/elastic/azure-marketplace/$templateVersion/src"
$mainTemplate = "$templateUrl/mainTemplate.json"
$resourceGroup = "repository-cluster"
$name = "elasticsearch"
$templateParameters = @{
    "artifactsBaseUrl"= $templateUrl
    "esClusterName" = $name
    "adminUsername" = "russ"
    "authenticationType" = "password"
    "adminPassword" = "Password1234"
    "securityAdminPassword" = "AdminPassword123"
    "securityReadPassword" = "ReadPassword123"
    "securityKibanaPassword" = "KibanaPassword123"
    "vmDataNodeCount" = 1
    "vmDataDiskCount" = 0
    "azureCloudPlugin" = "Yes"
    "azureCloudStorageAccountName" = $storageAccountName
    "azureCloudStorageAccountKey" = $storageAccountKeys[0].Value
}
New-AzureRmResourceGroup -Name $resourceGroup -Location $location
New-AzureRmResourceGroupDeployment -Name $name -ResourceGroupName $resourceGroup `
    -TemplateUri $mainTemplate -TemplateParameterObject $templateParameters
With the Azure repository plugin configured, we can create a repository for the cluster within the configured Azure Storage account using Kibana Console, and verify that it's functional
PUT _snapshot/my_backup
{
    "type": "azure",
    "settings": {
        "container": "backups"
    }
}
POST _snapshot/my_backup/_verify
If the verification process succeeded, you should see a response similar to
{
  "nodes": {
    "oNiES_IATWO5pRbe-FeGjg": {
      "name": "master-1"
    },
    "fq5p8P3MQxakSNgdTWJ-Gg": {
      "name": "master-2"
    },
    "UAZaTlzISqe1GEgsuPzepQ": {
      "name": "master-0"
    },
    "scP5AZeyTX6hJYHAbGZ20A": {
      "name": "data-0"
    }
  }
}
With all in order, we can take a snapshot of our data and wait for the snapshot to complete
PUT /_snapshot/my_backup/snapshot_1?wait_for_completion=true
Within the Azure Storage account, the snapshot directories and files have been created
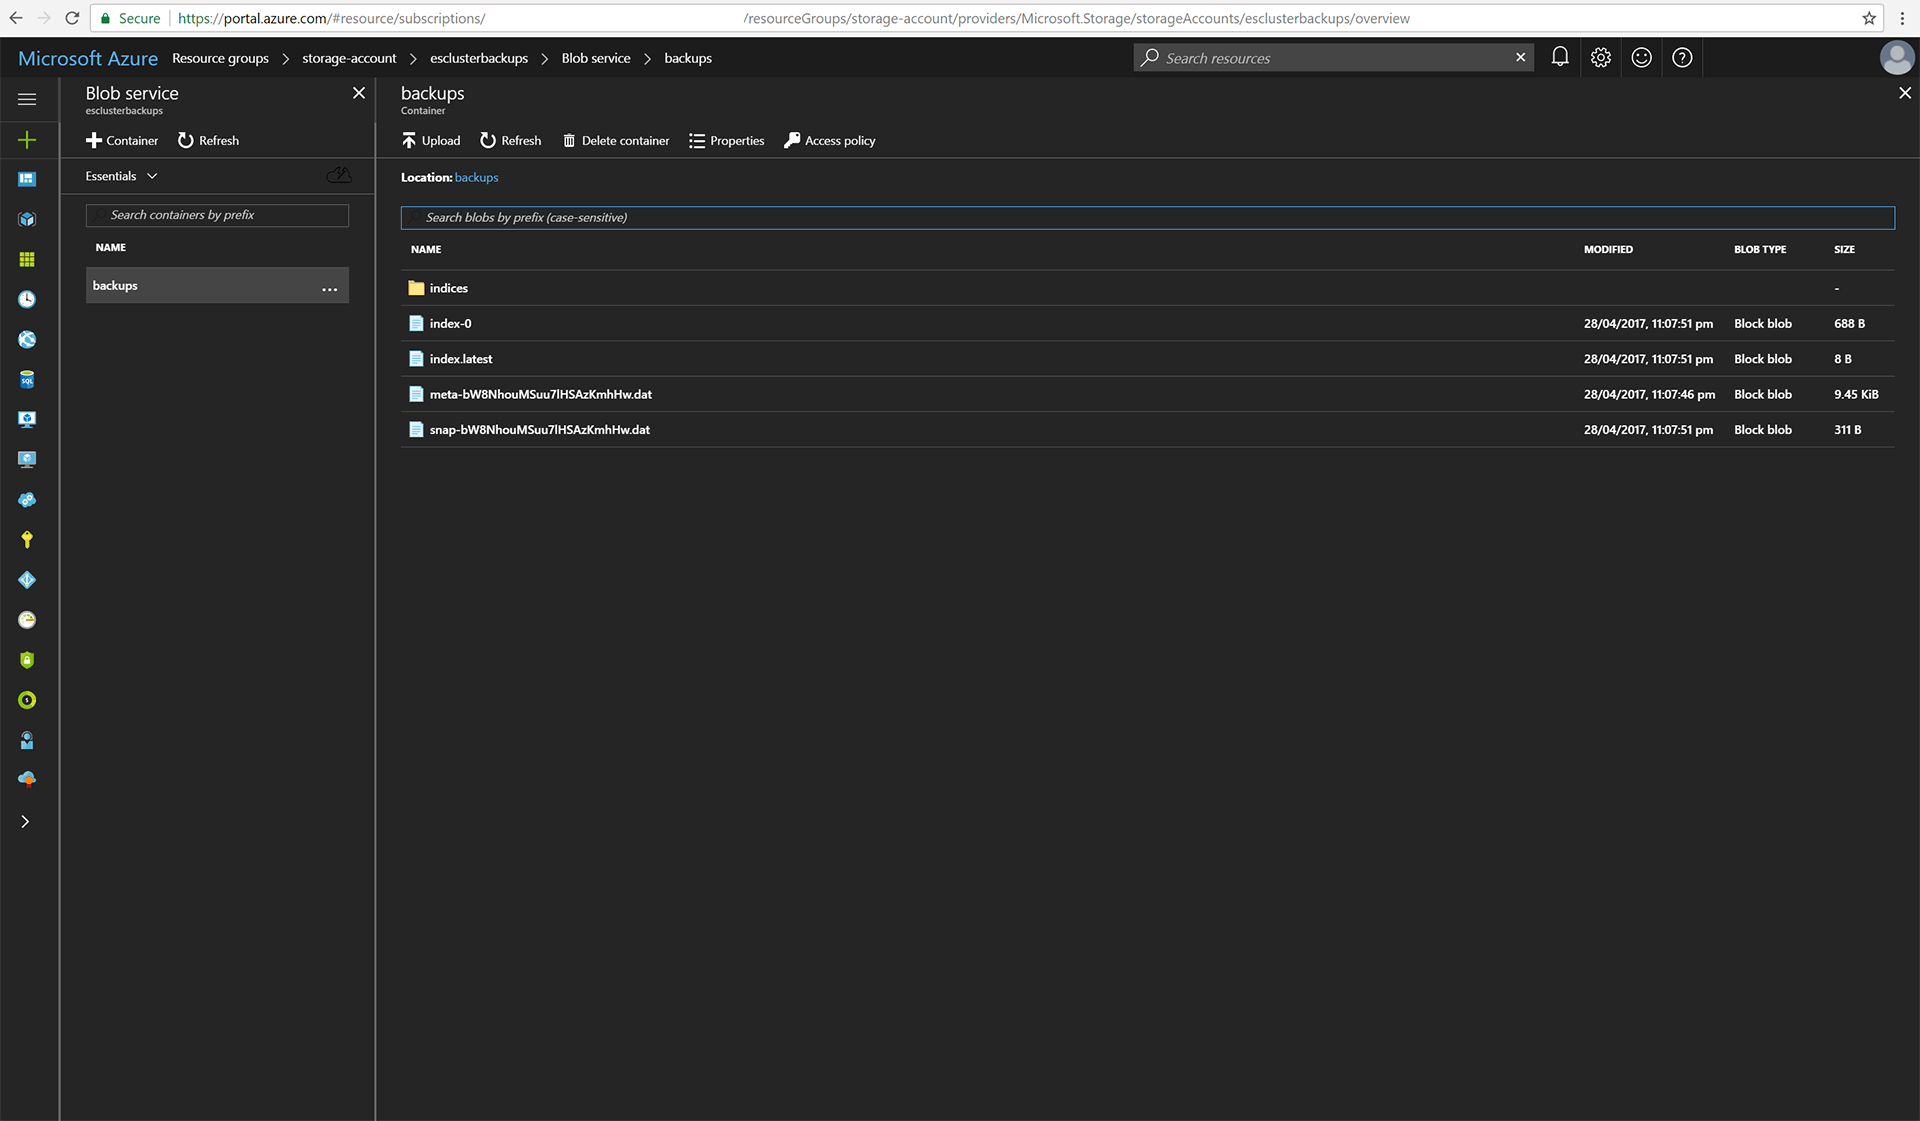
If need be, we can create the Storage account with Zone redundant (ZRS), Geo redundant (GRS) or Read-Access Geo redundant (RA-GRS) storage for durability and high availability.
Deploying two clusters into an existing virtual network
Deploying two clusters into an existing virtual network might be something you'd like to do when that virtual network already has devices attached that will communicate with the deployed clusters, such as Azure App Services. Configuring an existing virtual network for usage with the cluster requires a subnet be specified to which to attach the deployed resources and a known available private IP address to use as the static address for each internal load balancer. Of course, the subnet also needs to have a sufficient number of available IP addresses for all of the resources that will be attached to the virtual network.
In this example, we create a virtual network with one subnet and deploy two clusters into the same subnet. Firstly, creating the virtual network
$location = "Australia Southeast"
$vnetResourceGroup = "vnet"
$vnetName = "es-net"
$addressPrefix = "10.0.0.0/24"
New-AzureRmResourceGroup -Name $vnetResourceGroup -Location $location
New-AzureRmVirtualNetwork -ResourceGroupName $vnetResourceGroup -Name $vnetName `
    -AddressPrefix $addressPrefix -Location $location
$vnet = Get-AzureRmVirtualNetwork -Name $vnetName -ResourceGroupName $vnetResourceGroup
$subnetName = "es-subnet"
Add-AzureRmVirtualNetworkSubnetConfig -Name $subnetName -AddressPrefix "10.0.0.0/25" -VirtualNetwork $vnet
Set-AzureRmVirtualNetwork -VirtualNetwork $vnet
With the VNet set up, a few functions make it easier to work with address prefixes in CIDR notation; we need to know a couple of pieces of information about a subnet into which to deploy the cluster:
- An available IP address to pass to the template to use as the static private IP address of the internal load balancer
- That the subnet has a sufficient number of available IP addresses for all of the deployed resources to be attached
These concerns are handled with the following
function ConvertTo-UInt32 ([IPAddress]$IpAddress) {
    $bytes = $IpAddress.GetAddressBytes()
    if ([BitConverter]::IsLittleEndian) {
        [Array]::Reverse($bytes)
    }
    return [BitConverter]::ToUInt32($bytes, 0)
}
function ConvertTo-IpAddress([UInt32]$UInt32) {
    $bytes = [BitConverter]::GetBytes($UInt32)
    if ([BitConverter]::IsLittleEndian) {
        [Array]::Reverse($bytes)
    }
    return [IPAddress]::new($bytes)
}
function Get-AvailablePrivateIpAddresses($VNet, $SubnetName, $Count) {
    $subnet = Get-AzureRmVirtualNetworkSubnetConfig -VirtualNetwork $VNet -Name $SubnetName
    $addressPrefixParts = $subnet.AddressPrefix.Split("/")
    $ipAddress = [IPAddress]::Parse($addressPrefixParts[0])
    $cidr = [Convert]::ToByte($addressPrefixParts[1])
    $maskUInt = [Convert]::ToUInt32("1" * $cidr + "0" * (32 - $cidr), 2)
    [UInt32] $networkUInt = $maskUInt -band (ConvertTo-UInt32 $ipAddress.Address)
    [UInt32] $broadcastUInt = 4294967295 -bxor $maskUInt -bor $networkUInt
    $subnetCount = $broadcastUInt - ($networkUInt + 1)
    if ($Count -and $subnetCount -lt $Count) {
        Write-Error -Message "Requested $Count available addresses but subnet contains maximum $subnetCount addresses"
        return
    }
    $availableAddresses = New-Object "System.Collections.Generic.HashSet[IpAddress]"
    for($i = $networkUInt; $i -le $broadcastUInt; $i++) {
      [IpAddress] $testAddress = ConvertTo-IpAddress ($i)
      if ($availableAddresses.Contains($testAddress)) {
        continue;
      }
      $result = Test-AzureRmPrivateIPAddressAvailability -VirtualNetwork $vnet `
          -IPAddress $($testAddress.IPAddressToString)
      if ($result.Available) {
        $availableAddresses.Add($testAddress) > $null
      }
      foreach($a in $result.AvailableIPAddresses) {
        $availableAddress = [IpAddress]::Parse($a)
        if ($availableAddress.Address -ge $networkAddress.Address -and `
            $availableAddress.Address -le $broadcastAddress.Address) {
            $availableAddresses.Add($availableAddress) > $null
        }
      }
      if ($Count -and $availableAddresses.Count -ge $Count) {
        break;
      }
    }
    if ($availableAddresses.Count -lt $Count) {
        Write-Error "Insufficent available addresses in subnet. Requested $Count, available $($availableAddresses.Count)"
        return
    }
    return $availableAddresses
}
With the VNet in place, deploying two clusters into the same VNet is straightforward
$templateVersion = "5.1.2"
$templateUrl = "https://raw.githubusercontent.com/elastic/azure-marketplace/$templateVersion/src"
$mainTemplate = "$templateUrl/mainTemplate.json"
$resourceGroup = "first-cluster"
$name = $resourceGroup
$availableAddresses = Get-AvailablePrivateIpAddresses -VNet $vnet -SubnetName $subnetName -Count 8
$templateParameters = @{
    "artifactsBaseUrl"= $templateUrl
    "esClusterName" = "first-cluster"
    "adminUsername" = "russ"
    "authenticationType" = "password"
    "adminPassword" = "Password1234"
    "securityAdminPassword" = "AdminPassword123"
    "securityReadPassword" = "ReadPassword123"
    "securityKibanaPassword" = "KibanaPassword123"
    "vmHostNamePrefix" = "f-"
    "vNetNewOrExisting" = "existing"
    "vNetName" = $vnetName
    "vNetExistingResourceGroup" = $vnetResourceGroup
    "vNetLoadBalancerIp" = "$(($availableAddresses | Select -First 1).IPAddressToString)"
    "vNetClusterSubnetName" = $subnetName
}
Write-Host "[$(Get-Date -format 'u')] Deploying first cluster"
New-AzureRmResourceGroup -Name $resourceGroup -Location $location
New-AzureRmResourceGroupDeployment -Name $name -ResourceGroupName $resourceGroup `
    -TemplateUri $mainTemplate -TemplateParameterObject $templateParameters
Write-Host "[$(Get-Date -format 'u')] Deployed first cluster"
$resourceGroup = "second-cluster"
$name = $resourceGroup
$availableAddresses = Get-AvailablePrivateIpAddresses -VNet $vnet -SubnetName $subnetName -Count 8
$templateParameters = @{
    "artifactsBaseUrl"= $templateUrl
    "esClusterName" = "second-cluster"
    "adminUsername" = "russ"
    "authenticationType" = "password"
    "adminPassword" = "Password1234"
    "securityAdminPassword" = "AdminPassword123"
    "securityReadPassword" = "ReadPassword123"
    "securityKibanaPassword" = "KibanaPassword123"
    "vmHostNamePrefix" = "s-"
    "vNetNewOrExisting" = "existing"
    "vNetName" = $vnetName
    "vNetExistingResourceGroup" = $vnetResourceGroup
    "vNetLoadBalancerIp" = "$(($availableAddresses | Select -First 1).IPAddressToString)"
    "vNetClusterSubnetName" = $subnetName
}
Write-Host "[$(Get-Date -format 'u')] Deploying second cluster"
New-AzureRmResourceGroup -Name $resourceGroup -Location $location
New-AzureRmResourceGroupDeployment -Name $name -ResourceGroupName $resourceGroup `
    -TemplateUri $mainTemplate -TemplateParameterObject $templateParameters
Write-Host "[$(Get-Date -format 'u')] Deployed second cluster"
The most important point here is that each cluster must be given a unique value for vmHostNamePrefix; since nodes discover each other and form a cluster using unicast hosts in elasticsearch.yml configuration, and host names are used within this configuration, the host names must be different for the two deployed clusters.
Connecting Azure App services to Elasticsearch
We expect a very common scenario in using Elasticsearch in Azure will be in connecting existing Azure App Services to a VNet in which a cluster is deployed, to allow those services to communicate with the cluster. This communication can be within the internal network only, meaning the cluster is not exposed externally, keeping all data transfer within Azure.
There are a few resources involved to put this altogether, so we'll go though them piece by piece. For this example, we're going to deploy a Nancy web application that provides a search interface over Nuget packages. Thankfully, we don't need to write this from scratch as we can use our Nusearch tutorial repository in conjunction with the Azure quickstart template to deploy a web application from github.
Since the Nusearch application works best when there is data to search, an Azure storage account will be deployed to use for snapshot and restore, to allow us to restore data into the cluster
$location = "Australia Southeast"
$storageAccountResourceGroup = "nusearch-storage"
$storageAccountName = "nusearchdata"
Write-Host "[$(Get-Date -format 'u')] Deploying new storage account"
New-AzureRmResourceGroup -Name $storageAccountResourceGroup -Location $location
New-AzureRmStorageAccount -ResourceGroupName $storageAccountResourceGroup -AccountName $storageAccountName `
    -Type "Standard_LRS" -Location $location
Write-Host "[$(Get-Date -format 'u')] Deployed new storage account"
Elasticsearch deployment
With the storage account deployed, a cluster with the the Azure repository plugin is configured as per the previous snapshot/restore example
$storageAccountKeys = Get-AzureRmStorageAccountKey -ResourceGroupName $storageAccountResourceGroup `
    -Name $storageAccountName
$templateVersion = "5.1.2"
$clusterResourceGroup = "nusearch-cluster"
$clusterName = "nusearch-cluster"
$templateUrl = "https://raw.githubusercontent.com/elastic/azure-marketplace/$templateVersion/src"
$mainTemplate = "$templateUrl/mainTemplate.json"
$templateParameters = @{
    "artifactsBaseUrl"= $templateUrl
    "esClusterName" = $clusterName
    "adminUsername" = "russ"
    "vNetLoadBalancerIp" = "10.0.0.4"
    "vNetName" = "es-net"
    "authenticationType" = "password"
    "adminPassword" = "Password1234"
    "securityAdminPassword" = "AdminPassword123"
    "securityReadPassword" = "ReadPassword123"
    "securityKibanaPassword" = "KibanaPassword123"
    "azureCloudPlugin" = "Yes"
    "azureCloudStorageAccountName" = $storageAccountName
    "azureCloudStorageAccountKey" = $storageAccountKeys[0].Value
}
Write-Host "[$(Get-Date -format 'u')] Deploying cluster"
New-AzureRmResourceGroup -Name $clusterResourceGroup -Location $location
New-AzureRmResourceGroupDeployment -Name $clusterName -ResourceGroupName $clusterResourceGroup `
    -TemplateUri $mainTemplate -TemplateParameterObject $templateParameters
Write-Host "[$(Get-Date -format 'u')] Deployed cluster"
Azure App service deployment and configuration
With the storage account and cluster deployed, all that remains is to deploy the Azure App Service and connect it to the VNet deployed as part of the cluster ARM template. VNet integration can be achieved by creating a virtual network gateway and configuring the VNet for point to site connectivity
function WriteLog($Message, $ForegroundColor) {
    if ($ForegroundColor -eq $null) {
        $ForegroundColor = "White"
    }
    Write-Host "[$(Get-Date -format 'u')] $message" -ForegroundColor $ForegroundColor
}
function New-Website($resourceGroupName, $webAppName, $location, $webAppParameters) {
    $deployFromGithubTemplate = "https://raw.githubusercontent.com/Azure/azure-quickstart-templates/master/201-web-app-github-deploy/azuredeploy.json"
    New-AzureRmResourceGroup -Name $resourceGroupName -Location $location
    New-AzureRmResourceGroupDeployment -Name $webAppName -ResourceGroupName $resourceGroupName `
        -TemplateUri $deployFromGithubTemplate -TemplateParameterObject $webAppParameters
    WriteLog "Finished Deploying Nusearch website" -ForegroundColor "green"
}
function Add-VNetGateway($resourceGroupName, $vnetName, $vnetIpName, $location, $vnetIpConfigName, $vnetGatewayName, $certificateData, $vnetPointToSiteAddressSpace) {
    $vnet = Get-AzureRmVirtualNetwork -Name $vnetName -ResourceGroupName $resourceGroupName
    $subnet = Get-AzureRmVirtualNetworkSubnetConfig -Name "GatewaySubnet" -VirtualNetwork $vnet
    WriteLog "Creating a public IP address for this Virtual Network"
    $pip = New-AzureRmPublicIpAddress -Name $vnetIpName -ResourceGroupName $resourceGroupName `
        -Location $location -AllocationMethod Dynamic
    $ipconf = New-AzureRmVirtualNetworkGatewayIpConfig -Name $vnetIpConfigName -Subnet $subnet `
        -PublicIpAddress $pip
    WriteLog "Finished creating a public IP address for this Virtual Network" -ForegroundColor "green"
    WriteLog "Adding a root certificate to this Virtual Network"
    $root = New-AzureRmVpnClientRootCertificate -Name "AppServiceCertificate.cer" `
        -PublicCertData $certificateData
    WriteLog "Finished Adding a root certificate to this Virtual Network" -ForegroundColor "green"
    WriteLog "Creating Virtual Network Gateway. This may take up to an hour."
    $gateway = New-AzureRmVirtualNetworkGateway -Name $vnetGatewayName -ResourceGroupName $resourceGroupName `
        -Location $location -IpConfigurations $ipconf -GatewayType Vpn -VpnType RouteBased -EnableBgp $false `
        -GatewaySku Basic -VpnClientAddressPool $vnetPointToSiteAddressSpace -VpnClientRootCertificates $root
    WriteLog "Finished creating Virtual Network Gateway" -ForegroundColor "green"
}
function Add-AppServiceToExistingVnet($subscriptionId, $webAppResourceGroup, $webAppName, $vnetName, $vnetResourceGroup) {
    WriteLog "Getting App information"
    $webApp = Get-AzureRmResource -ResourceName $webAppName -ResourceType "Microsoft.Web/sites" `
        -ApiVersion 2015-08-01 -ResourceGroupName $webAppResourceGroup
    $location = $webApp.Location
    $webAppConfig = Get-AzureRmResource -ResourceName "$($webAppName)/web" `
        -ResourceType "Microsoft.Web/sites/config" -ApiVersion 2015-08-01 `
        -ResourceGroupName $webAppResourceGroup
    $vnet = Get-AzureRmVirtualNetwork -Name $vnetName -ResourceGroupName $vnetResourceGroup
    $vnetName = $vnet.Name
    $vnetGatewayName="$($vnetName)-gateway"
    $vnetIpName="$($vnetName)-gateway-ip"
    $vnetIpConfigName="$($vnetName)-gateway-ip-conf"
    $vnetGatewayAddressSpace="10.0.0.128/28"
    $vnetPointToSiteAddressSpace="172.16.0.0/16"
    WriteLog "Creating Virtual Network Connection for website $webAppName to Virtual Network $($vnet.Name)"
    $virtualNetworkParameters = @{
        "vnetResourceId" = "/subscriptions/$($subscriptionId)/resourceGroups/$($vnet.ResourceGroupName)/providers/Microsoft.Network/virtualNetworks/$($vnetName)"
    }
    $virtualNetworkConnection = New-AzureRmResource -Location $location -Properties $virtualNetworkParameters `
        -ResourceName "$($webAppName)/$($vnet.Name)" -ResourceType "Microsoft.Web/sites/virtualNetworkConnections" `
        -ApiVersion 2015-08-01 -ResourceGroupName $webAppResourceGroup -Force
    WriteLog "Virtual Network Connection created" -ForegroundColor "green"
    $gatewaySubnet = Get-AzureRmVirtualNetworkSubnetConfig -Name "GatewaySubnet" -VirtualNetwork $vnet `
        -ErrorAction Ignore
    if ($gatewaySubnet -ne $null) {
        WriteLog "GatewaySubnet already exists for Virtual Network $($vnet.Name). Using this." -ForegroundColor "green"
    }
    else {
        WriteLog "Creating GatewaySubnet in Virtual Network $($vnet.Name)"
        Add-AzureRmVirtualNetworkSubnetConfig -Name "GatewaySubnet" -AddressPrefix $vnetGatewayAddressSpace `
            -VirtualNetwork $vnet
        Set-AzureRmVirtualNetwork -VirtualNetwork $vnet
        WriteLog "GatewaySubnet created in Virtual Network $($vnet.Name)" -ForegroundColor "green"
    }
    Add-VNetGateway $vnet.ResourceGroupName $vnetName $vnetIpName $location $vnetIpConfigName `
        $vnetGatewayName $virtualNetworkConnection.Properties.CertBlob $vnetPointToSiteAddressSpace
    $gateway = Get-AzureRmVirtualNetworkGateway -ResourceGroupName $vnet.ResourceGroupName `
        -Name $vnetGatewayName
    WriteLog "Retrieving VPN Package and supplying to Web App"
    $packageUri = Get-AzureRmVpnClientPackage -ResourceGroupName $vnet.ResourceGroupName `
        -VirtualNetworkGatewayName $gateway.Name -ProcessorArchitecture Amd64
    $virtualNetworkGatewayParameters = @{
        "vnetName" = $vnet.Name;
        "vpnPackageUri" = $packageUri
    }
    WriteLog "Adding website $webAppName to Virtual Network $($vnet.Name)"
    New-AzureRmResource -Location $location -Properties $virtualNetworkGatewayParameters -ResourceName "$($webAppName)/$($vnet.Name)/primary" -ResourceType "Microsoft.Web/sites/virtualNetworkConnections/gateways" -ApiVersion 2015-08-01 -ResourceGroupName $webAppResourceGroup -Force
    WriteLog "Finished adding website $webAppName to Virtual Network $($vnet.Name)" -ForegroundColor "green"
}
$webAppResourceGroup = "nusearch-web"
$webAppName = "nusearch-app"
$webAppParameters = @{
    "siteName" = $webAppName
    "hostingPlanName" = "nusearch"
    "sku" = "S1"
    "workerSize" = "1"
    "repoURL" = "https://github.com/elastic/elasticsearch-net-example.git"
    "branch" = "5.x-deploy"
}
New-Website $webAppResourceGroup $webAppName $location $webAppParameters
$sub = Get-AzureRmSubscription
Add-AppServiceToExistingVnet $sub.SubscriptionId $webAppResourceGroup $webAppName `
$templateParameters.vNetName $clusterResourceGroup
Setting up VNet integration and configuring point to site connectivity can take up to an hour to deploy and configure so don't worry if the process takes up to this amount of time.
Updating App settings
Once it's finished deploying, we can change the Application settings for the deployed web application to use the Elasticsearch cluster
function Add-AppSettings($resourceGroupName, $webAppName, $appSettings) {
    WriteLog "Updating App Settings for website"
    $webApp = Get-AzureRMWebAppSlot -ResourceGroupName $resourceGroupName -Name $webAppName -Slot production
    $existingAppSettings = $webApp.SiteConfig.AppSettings
    $hash = @{}
    foreach ($kvp in $existingAppSettings) {
        $hash[$kvp.Name] = $kvp.Value
    }
    foreach ($kvp in $appSettings.GetEnumerator()) {
        $hash[$kvp.Name] = $kvp.Value
    }
    Set-AzureRMWebAppSlot -ResourceGroupName $resourceGroupName -Name $webAppName -AppSettings $hash -Slot production
    WriteLog "App Settings for website updated" -ForegroundColor "green"
}
$appSettings = @{
    "ElasticClient:Host" = "$($templateParameters.vNetLoadBalancerIp)"
    "ElasticClient:Username" = "es_read"
    "ElasticClient:Password" = "$($templateParameters.securityReadPassword)"
}
Add-AppSettings $webAppResourceGroup $webAppName $appSettings
With all this in place, the web application should now be able to communicate with the cluster. But, you may see the following errors in the error log of the web application
System.Net.Sockets.SocketException: An attempt was made to access a socket in a way forbidden by its access permissions
And your web application front page may be showing a Yellow Screen of Death or the following
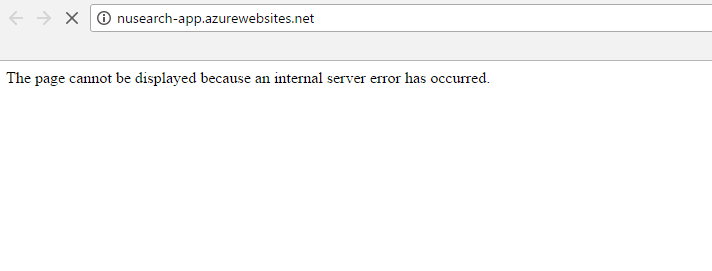
It seems that an Azure App service cannot communicate with the cluster until the network details are synchronized across. Unfortunately, this functionality is not exposed through the Azure CLI or PowerShell SDKs currently, only within the Azure portal. Hopefully this is addressed soon, but in the meantime the Sync Network button can be found by navigating to
Resource group name -> App Service Plan -> Networking -> VNet Integration -> click network name -> click Sync Network
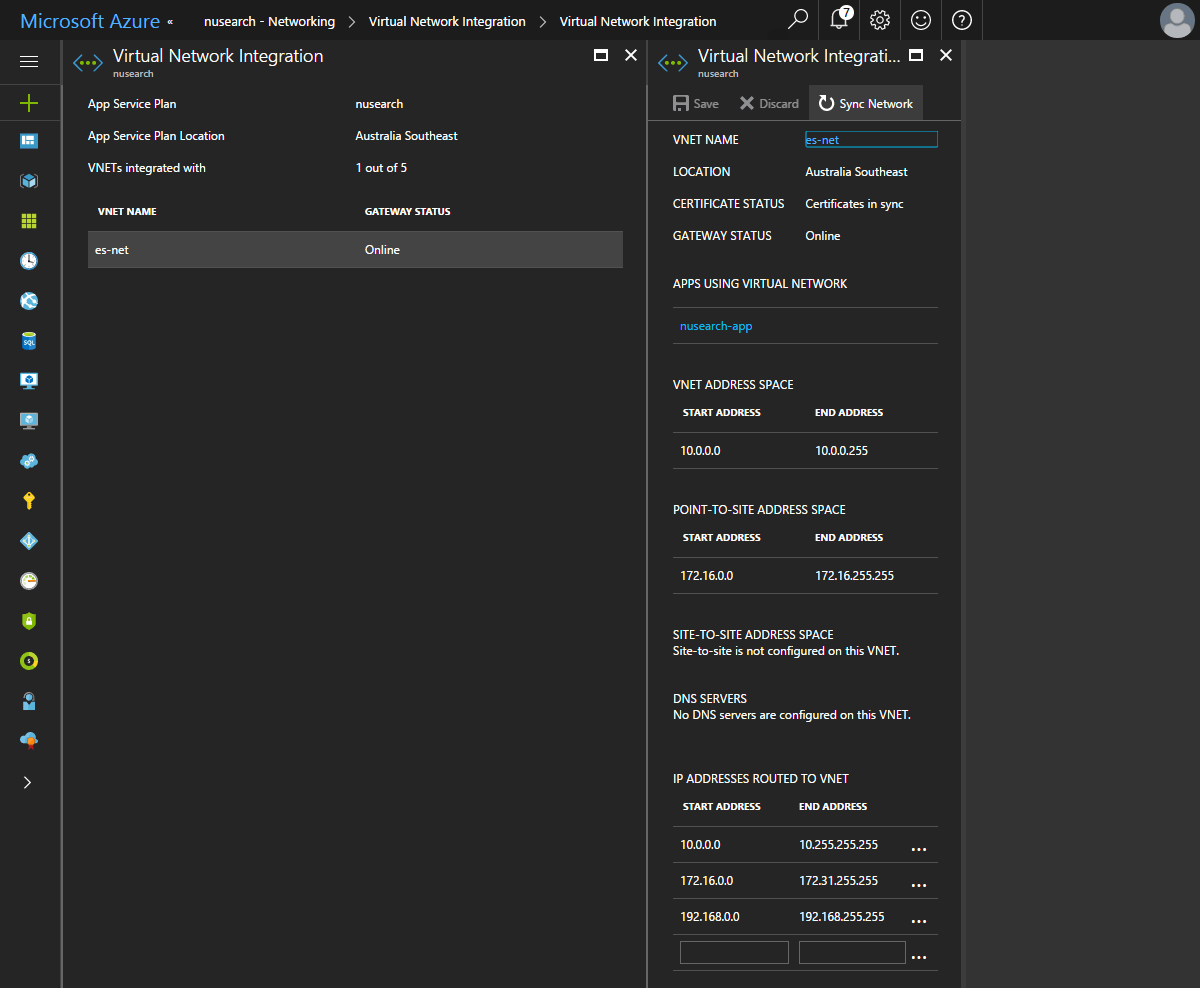

After performing the network sync, the App Service can now talk to the cluster!
Indexing nuget data
The easiest way to get data into Elasticsearch to complete this demo is to run the application locally against a local Elasticsearch cluster and snapshot the indexes to the local filesystem; First, set path.repo in elasticsearch.yml
path.repo: "C:\\nusearch-backups"
configure a repository that points to this path
PUT _snapshot/nusearch
{
    "type": "fs",
    "settings": {
      "location": "C:\\nusearch-backups"
    }
}
and snapshot the data in the local cluster
PUT /_snapshot/nusearch/snapshot_1?wait_for_completion=true
Now, Using AzCopy, upload the snapshot files from the local cluster to the Azure storage account deployed earlier
.\AzCopy.exe /Source:C:\nusearch-backups /Dest:https://<storage-account-name>.blob.core.windows.net/backups /DestKey:<destination key> /S
DestKey is a storage account access key for the storage account. When finished, we simply create an azure repository on the deployed cluster and restore snapshot_1. As before, We can use Kibana Console for this
PUT _snapshot/nusearch
{
    "type": "azure",
    "settings": {
        "container": "backups"
    }
}
GET _snapshot/nusearch/_all
POST /_snapshot/nusearch/snapshot_1/_restore?wait_for_completion=true
And we now have an Azure App Service talking to our Elasticsearch cluster on Azure, allowing us to search across Nuget packages with autocompletion.

Summary
We've walked through a few different scenarios, demonstrating the capability of our ARM template. Check out our Azure Template examples repository to play with any of the examples presented here. With a few lines of PowerShell or the Azure CLI, it's easy to integrate Elasticsearch and Kibana with your existing Azure resources, opening up new opportunities to splice, dice and analyze your data with the power of the Elastic stack.