An Arduino-Based Home Weather Station on the Elastic Stack
I’m far from a meteorologist. I’m a hacker with a garage/office that I spend way too much time in. I have a bias toward things that feel like data. A friend told me that I was maybe being a bit of a garage troll; I am tucked away from the sun and warmth. I decided that I needed to figure out if she was right.
This was a perfect opportunity to dive into the Internet of Playful Things: Arduino for my weather measurements, Elasticsearch for storage, and Kibana for viewing and analysis. With off-the-shelf parts, open source libraries and a Saturday afternoon available, I got to work.
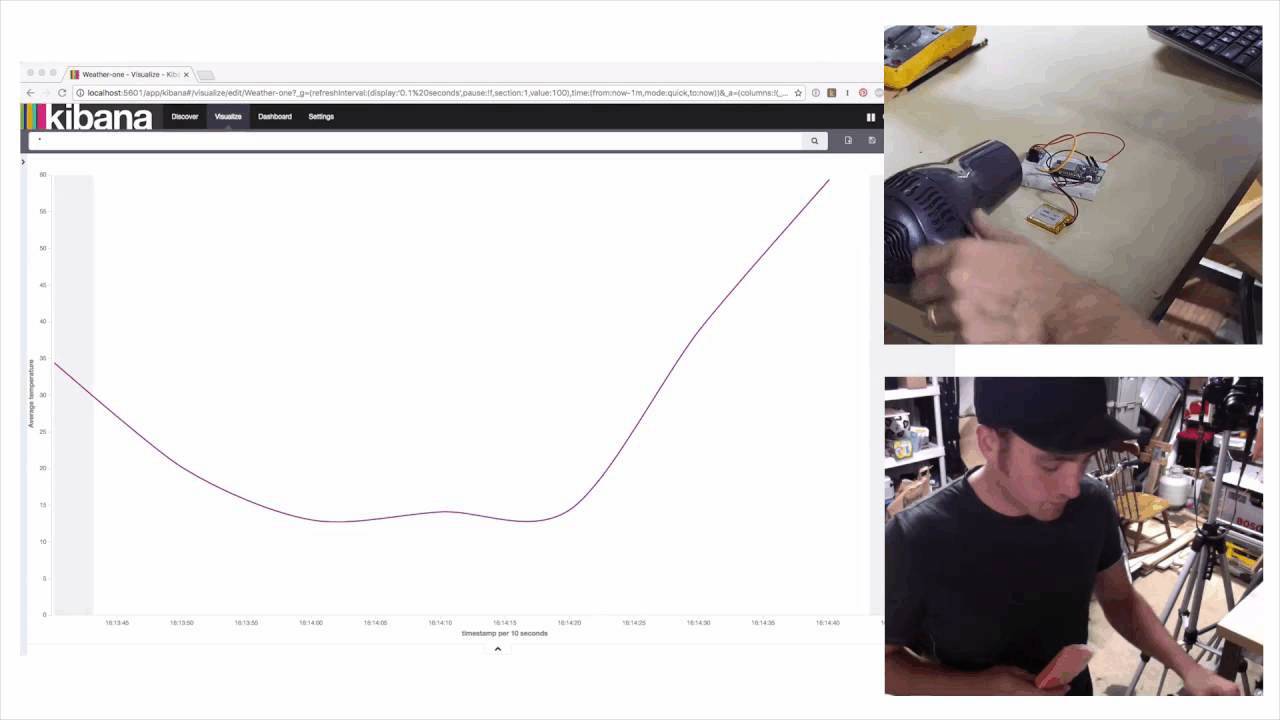
In true DIY blog post fashion, here’s the finished product. I’m far too impatient to test with weeks and weeks worth of data. In order to speed up my testing, I raided the freezer and bathroom for some supplies...
I choose the ESP8266 more and more often lately. It’s a microcontroller with WiFi capabilities that can be used by itself or with most other platforms. Folks have built compatibility layers for Node.js, Python, and Arduino with it. It has become a very popular device because of its price and capabilities. For only a couple bucks, you can add WiFi to any hobby hardware project. For about sixteen dollars, you can get a battery-powered Arduino and node/lua-compatible development board. For this project I chose a board from Adafruit.
Elasticsearch and Kibana provide a very tidy combination for storing and visualizing the sensor data coming out of my hardware. Prebuilt modules from Adafruit make creating your own wireless weather station simple.
Things you’ll need
Electronics
- Adafruit Feather HUZZAH or another ESP8266 dev board
- Adafruit BMP180 Temperature/Pressure/Altitude Sensor
Tools
- Soldering Iron
- Hookup Wire
Nice to have
- 3.7v Lithium Battery - like these
- Breadboard - half size is just right
- Jumper Wires - like these
Computer
- Arduino Software (with some extra libraries and examples, detailed below)
- Elasticsearch + Kibana
For Elasticsearch and Kibana, you can setup an instance on Elastic Cloud or you’ll need to share a network with your devices and use a local instance of both.
Hardware Build
I recommend using a breadboard for most prototypes and temporary projects. The first step is to solder the header pins onto the board. Adafruit ships most of its modules without the pins soldered on. If you haven’t soldered before, there are lots of really good guides to getting started. SparkFun has a nice guide. If you’re getting really into it you should dig into the NASA Workmanship Standards.
A note on soldering and tools:
Most guides on how to solder are written by people who do it a lot. Like most other hobbies and professions, using good tools will make the job easier. It’s also expensive. All you really need to get started is an iron, solder, and something to cut and strip wires with. Get better tools as you need them. My local library will loan the tools, yours might too. You might also have a local hackerspace which may be able to assist with tools, equipment, and techniques.
My first toolset, which got me through about 10 years of experimenting.
This sensor board uses SPI to communicate with the microcontroller. The ESP8266 has SPI support, so we hook up Data (SDA) and Clock (SCL) lines to the SDA and SCL lines of each board for communication.
We also hook up the 3v and Ground (GND) lines to power sensor board. That’s it! 4 wires is all we need.
Arduino Software
If you haven’t already, download and install the Arduino IDE and ESP8266 Board Package. Follow this guide if you need help.
You’ll also need to install the libraries below.
- NTP - NTP is the network time protocol, it’s how we get the clock day/time from the internet to generate timestamps.
- Adafruit Unified Sensor Library (More information)
- Adafruit BMP085U Sensor Library (this also covers the BMP180 sensor we are using)
Use this guide if you need help installing Arduino Libraries.
Having WiFi makes it very easy to publish directly to Elasticsearch via the HTTP interface. The only real challenge was getting the Arduino code to generate an Elasticsearch compatible timestamp. I think that we’ve got a clever and straight-forward solution, by combining the arduino `mils()` function with an NTP generated unix timestamp.
Change the SSID and password in the sketch below and you should be ready to start.
Configuring Elasticsearch
Before we start sending data we’re going to prime Elasticsearch to index the documents we’re sending. Make sure to check the Elasticsearch URL (my `response = requests.put` line) to match your Elasticsearch endpoint.
I’m using Python and the requests library, but you can use whatever tool you’re familiar with.
import requests
import json
data = {
    "mappings": {
        "reading": {
            "properties": {
                "temperature": {"type": "float"},
                "pressure": {"type": "float"},
                "timestamp": {"type": "date"},
            },
        }
    }
}
response = requests.put('http://localhost:9200/weather', data=json.dumps(data))
try:
    assert response.status_code is 200
except AssertionError:
    raise AssertionError("Your mapping was not created", response)
# You could use this snippet to delete your old data if you have an error.
#response = requests.delete('http://localhost:9200/weather')
#try:
#    assert response.status_code is 200
#except AssertionError:
#    raise AssertionError("Your mapping was not deleted", response)
Sending Data
Modify the sketch as mentioned above, and upload it to your device. It should start sending data to your Elasticsearch instance. You can verify in the Serial Monitor under `Tools -> Serial Monitor`. Make sure that the baud rate is set to 115200.
Configuring Kibana
Open your Kibana instance, click “Settings” and add a new pattern. If you type “weather” into the index pattern, it should autofill the timestamp.
Mine looks like this:
Once you create a new index, you can click `Visualize` to start making graphs.
Here’s one I created. Start with the settings I have in the screenshot and then experiment to find what you like.
Arduino Code Listing
      /*
 *  Simple HTTP get webclient test
 */
#include <ESP8266WiFi.h>
#include <Wire.h>
#include <Adafruit_Sensor.h>
#include <Adafruit_BMP085_U.h>
#include <TimeLib.h>
#include <WiFiUdp.h>
Adafruit_BMP085_Unified bmp = Adafruit_BMP085_Unified(10085);
static const char ntpServerName[] = "us.pool.ntp.org";
// Setup your wifi SSID and password here.
const char* ssid     = "CanIGetAWiFi";
const char* password = "n0youCan7";
const int timeZone = 0;  // UTC
// Variables needed for NTP
// Elasticsearch needs us to generate timestamps for the data in order to make date histograms in Kibana.
WiFiUDP Udp;
unsigned int localPort = 8888;  // local port to listen for UDP packets
time_t getNtpTime();
void printDigits(int digits);
void sendNTPpacket(IPAddress &address);
// This is the IP address, or DNS name of my Elasticsearch instance.
const char* host = "192.168.1.215";
const int port = 9200;
int motion;
// Variables
float temperature;
String timestamp;
time_t start_time;
uint32_t t_ms;
uint32_t start_mills;
String run_mills;
int milis_chars;
void setup() {
  Serial.begin(115200);
  delay(100);
  // We start by connecting to a WiFi network
  Serial.println();
  Serial.print("Connecting to ");
  Serial.println(ssid);
  WiFi.begin(ssid, password);
  while (WiFi.status() != WL_CONNECTED) {
    delay(500);
    Serial.print(".");
  }
  Serial.println("");
  Serial.println("WiFi connected");
  Serial.println("IP address: ");
  Serial.println(WiFi.localIP());
  Serial.println("Setting up NTP");
  Udp.begin(localPort);
  Serial.print("Local port: ");
  Serial.println(Udp.localPort());
  Serial.println("waiting for sync");
  setSyncProvider(getNtpTime);
  setSyncInterval(300);
  start_time = now();
  Serial.println("Pressure Sensor Test"); Serial.println("");
  /* Initialise the sensor */
  if(!bmp.begin())
  {
    /* There was a problem detecting the BMP085 ... check your connections */
    Serial.print("Ooops, no BMP180 detected ... Check your wiring!");
    while(1);
  }
}
void loop() {
  // Measure pressure & temperature from BMP sensor
  // Modified from https://learn.adafruit.com/bmp085/using-the-bmp085-api-v2
  sensors_event_t event;
  bmp.getEvent(&event);
  float pressure = event.pressure;
  float temperature;
  bmp.getTemperature(&temperature);
  // Use WiFiClient class to create TCP connections, connect to the Elasticsearch instance.
  WiFiClient client;
  if (!client.connect(host, port)) {
    Serial.println("connection failed");
    return;
  }
  run_mills = String(millis());
  milis_chars = run_mills.length();
  // To generate a millisecond unix timestamp, we first get the second timestamp, and add to it, the last three characters of the arduino/relative millisecond timestamp
  timestamp = String(now()) + run_mills.charAt(milis_chars-3) + run_mills.charAt(milis_chars-2) + run_mills.charAt(milis_chars-1);
  // With such a simple document, we're just going to use a string to generate the JSON to send to Elasticsearch
  String data = "{pressure: "+String(pressure)+", temperature: "+String(temperature)+", timestamp: "+ timestamp +"}";
  // We can inspect the data being sent over the Serial line, in the Arduino IDE.
  Serial.println(data);
  // We now create a URI for the request
  // This is the index of the Elasticsearch document we're creating
  String url = "/weather/reading";
  //
  client.print(String("POST ") + url + " HTTP/1.1\r\n" +
               // If you're using Shield, you'll need to generate an authentication header
               "Content-Length: " + data.length() + "\r\n" +
               "\r\n" + data);
  // We need this delay in here to give the WiFi Time
  delay(50);
  // Read all the lines of the reply from server and print them to Serial
  while(client.available()){
    String line = client.readStringUntil('\r');
    Serial.print(line);
  }
  Serial.println();
}
/* Copied from https://github.com/PaulStoffregen/Time/blob/master/examples/TimeNTP_ESP8266WiFi/TimeNTP_ESP8266WiFi.ino#L99 */
/*-------- NTP code ----------*/
const int NTP_PACKET_SIZE = 48; // NTP time is in the first 48 bytes of message
byte packetBuffer[NTP_PACKET_SIZE]; //buffer to hold incoming & outgoing packets
time_t getNtpTime()
{
  IPAddress ntpServerIP; // NTP server's ip address
  while (Udp.parsePacket() > 0) ; // discard any previously received packets
  Serial.println("Transmit NTP Request");
  // get a random server from the pool
  WiFi.hostByName(ntpServerName, ntpServerIP);
  Serial.print(ntpServerName);
  Serial.print(": ");
  Serial.println(ntpServerIP);
  sendNTPpacket(ntpServerIP);
  uint32_t beginWait = millis();
  while (millis() - beginWait < 1500) {
    int size = Udp.parsePacket();
    if (size >= NTP_PACKET_SIZE) {
      Serial.println("Receive NTP Response");
      Udp.read(packetBuffer, NTP_PACKET_SIZE);  // read packet into the buffer
      unsigned long secsSince1900;
      // convert four bytes starting at location 40 to a long integer
      secsSince1900 =  (unsigned long)packetBuffer[40] << 24;
      secsSince1900 |= (unsigned long)packetBuffer[41] << 16;
      secsSince1900 |= (unsigned long)packetBuffer[42] << 8;
      secsSince1900 |= (unsigned long)packetBuffer[43];
      return secsSince1900 - 2208988800UL + timeZone * SECS_PER_HOUR;
    }
  }
  Serial.println("No NTP Response :-(");
  return 0; // return 0 if unable to get the time
}
// send an NTP request to the time server at the given address
void sendNTPpacket(IPAddress &address)
{
  // set all bytes in the buffer to 0
  memset(packetBuffer, 0, NTP_PACKET_SIZE);
  // Initialize values needed to form NTP request
  // (see URL above for details on the packets)
  packetBuffer[0] = 0b11100011;   // LI, Version, Mode
  packetBuffer[1] = 0;     // Stratum, or type of clock
  packetBuffer[2] = 6;     // Polling Interval
  packetBuffer[3] = 0xEC;  // Peer Clock Precision
  // 8 bytes of zero for Root Delay & Root Dispersion
  packetBuffer[12] = 49;
  packetBuffer[13] = 0x4E;
  packetBuffer[14] = 49;
  packetBuffer[15] = 52;
  // all NTP fields have been given values, now
  // you can send a packet requesting a timestamp:
  Udp.beginPacket(address, 123); //NTP requests are to port 123
  Udp.write(packetBuffer, NTP_PACKET_SIZE);
  Udp.endPacket();
}
It turned out that the temperature alone wasn’t enough to dissuade my friend that I’ve been spending too much time inside the house. That being said, setting up this experiment couldn’t have been easier and I’m really looking forward to using WiFi-enabled microcontrollers to send readings to Elasticsearch for further experiments.
I also got this sweet live gif of myself with a hair dryer and a popsicle on this temperature sensor, so there’s that.
Issac Kelly is an Engineer and Designer in Oakland, CA.