9 : 15 AM: 非イベント- 見出しが発表されます: 「 Chrysalis Backdoor: Lotus Blossom の詳細」CISO が Slack メッセージを送信します:「影響を受けていますか?」
従来の SOC では、何十ものアラートを精査し、クエリを作成し、VirusTotal を手動で確認し、インデックス パターンを巡回して何かを見逃さないようにタイムラインを作成するなど、手作業による慌ただしい作業に午前中のすべてを費やすことになります。
しかし、エージェント SOC では、作業はすでに完了しています。1 時間ごとに実行される Attack Discovery は、30 件を超える重要なアラートのうち 5 、単一の攻撃ナラティブ「DLL サイドローディングの永続性を持つマルウェア」にすでに関連付けていました。この検出によりワークフローが自動的にトリガーされ、その結果がエージェントに渡されました。エージェントはツールを使用して、VirusTotal でマルウェア ハッシュを検証し、ES|QL を使用してログを検索し、オンコール スケジュールをチェックしてケースを作成し、オンコール アナリストが追加された状態で Slack インシデント チャネルを立ち上げ、CISO 対応の概要も生成しました。これらはすべて、あなたがコーヒーを飲み始める前に実行されました。
CISO に次のように返信します。「すでに確認およびトリアージ済みです。」事件は解決した。リンクはこちらです。
この投稿では、パイプラインの構築方法( Attack Discovery 、 Workflows 、 Agent Builderの統合)について説明します。
脅威:Lotus BlossomによるChrysalisバックドア
脅威アクターのプロフィール
| 属性 | 本論 |
|---|---|
| 名前 | ロータス ブロッサム (別名: ビルバグ、ラズベリー タイフーン、スプリング ドラゴン) |
| 起源 | 中国(国営) |
| アクティブ開始日 | 2009 |
| 背景 | スパイ活動 |
| 対象セクター | 政府、通信、航空、重要インフラ、メディア |
| 対象地域 | 東南アジア、中央アメリカ |
キャンペーン概要
Lotus Blossom は、Notepad++ 更新インフラストラクチャのサプライ チェーン侵害を実行しました。
- 攻撃期間: 6 月 2025 ~ 12 月 2025 (約 6 か月)
- ベクター: Notepad++ の更新メカニズムの乗っ取り (WinGUp)
- 方法:標的ユーザーを悪意のあるアップデートサーバーに選択的にリダイレクトする
- ペイロード:これまで文書化されていなかった「Chrysalis」バックドア
- 発見者: Rapid7 MDR チーム、公開日: 2026 年 2 月 2 日
Chrysalisのバックドア機能
Chrysalis バックドアは、高度で機能豊富なインプラントです。
- カスタム暗号化(LCG、FNV-1aハッシュ、MurmurHash)
- 反射型DLL読み込み
- 回避のためのAPIハッシュ
- 正規の Bitdefender バイナリによる DLL サイドローディング (
BluetoothService.exe) - 完全なリモートアクセス機能
- 永続的な Windows サービスのインストール
攻撃チェーン
[1] INITIAL ACCESS
    └── User executes malicious NSIS installer from Desktop
              ↓
[2] EXECUTION
    └── Installer drops files to hidden AppData folder
        ├── BluetoothService.exe (legitimate binary)
        └── log.dll (malicious Chrysalis loader)
              ↓
[3] PERSISTENCE
    └── BluetoothService.exe registered as Windows service
        └── Runs under SYSTEM context
              ↓
[4] DEFENSE EVASION
    └── DLL sideloading via legitimate signed binary
              ↓
[5] COMMAND & CONTROL
    └── DNS beacon to api[.]skycloudcenter[.]com ✅ CONFIRMED
MITRE ATT&CKマッピング
| 戦術 | テクニック | ID |
|---|---|---|
| 初期アクセス(Initial Access) | サプライチェーンの侵害 | T1195.002 |
| 実行 | ユーザーによる実行 | T1204.002 |
| 永続化 | Windows サービス | T1543.003 |
| 防御回避 | DLLサイドローディング | T1574.002 |
| コマンド&コントロール | DNS | T1071.004 |
課題:スピード vs. 正確さ
国家による APT キャンペーンに関する脅威インテリジェンスが明らかになると、SOC チームは厳しいトレードオフに直面します。
スピード:経営幹部は今すぐに答えを求めています。「私たちは危険にさらされているのか?」
正確性:アナリストは、判断を下す前に、調査、相関関係の調査、確認を行う時間が必要です。
従来のワークフローでは、アナリストは次の作業を行う必要があります。
- 分析の範囲と関連する検索基準を決定する
- 複数のデータソースにわたってIOCを手動で検索する
- 数日または数週間にわたるアラートを相関させる
- 脅威インテリジェンスに基づいて調査結果を検証する
- 攻撃タイムラインを構築する
- 自信を持ってエスカレーションする
このプロセスには数時間から数日かかり、その間にアクティブな攻撃者がデータを盗み出したり、横方向に移動したりする可能性があります。
ソリューション: 攻撃検出 + ワークフロー + エージェントビルダー
Elastic Security の AI を活用した自動化スタックは、このワークフローを手動による探索から自動確認へと変革します。しかし、具体的な設定に入る前に、構成要素がどのように組み合わさるかを理解しておくことが重要です。
エージェントとワークフロー: 2 つのエントリ ポイント、1 つの構成可能なアーキテクチャ
Agent Builder には、連携して動作する 2 つのプリミティブが用意されています。
- エージェントはインテリジェンス層です。彼らはタスクについて推論し、どのツールを呼び出すかを決定し、発見した内容に基づいて適応します。エージェントは、検索ツール、MCP ツール、そして重要なワークフローをツールとして呼び出すことができます。
- ワークフローは構造層です。これらは決定論的なパイプラインです。つまり、ステップは順番に、確実に、繰り返し実行されます。ワークフロー内の任意のステップをオプションでエージェント ステップにすることができ、パイプラインの途中で推論できるようになります。
これら 2 つは完全に構成可能です。ワークフローはエージェントを呼び出すことができます。エージェントはワークフローを呼び出すことができます。ワークフロー内のエージェント ステップは別のワークフローを呼び出すことができます。すべての接続はオプションであり、問題の要求に応じて組み合わせることができます。
これがアーキテクチャを強力にするものです。エージェントが推論して決定し、ワークフローが実行して調整します。Chrysalis 攻撃シナリオでは、両方を使用しました。
私たちの流れ
流れ:
- 多数のアラート→ Attack Discovery は、さまざまなアラートを 1 つの攻撃ナラティブに関連付けます
- 攻撃検出→ ワークフローをトリガーするアラートを生成
- ワークフロー→ 攻撃検出結果を分析するためにエージェントビルダーを起動します
- エージェントビルダー→ コールエンリッチメントワークフロー(VirusTotal、Threat Intel、ES|QLクエリ)
- エージェント ビルダーがワークフローを呼び出す→ エージェント ビルダーは、ワークフローをツールとして呼び出してインシデント対応アクションを続行します (ケース アクション、ホストの分離、チームへの通知)
ステップ1: 攻撃検出により脅威が明らかになる
Attack Discovery は LLM を使用してセキュリティ警告を分析し、攻撃パターンを識別します。従来のアラートのグループ化とは異なり、アラート間の意味的な関係を理解します。
アラートキュー:干し草の山の中の針
これが SOC アナリストの現実です。アラート ページを開くと、複数のホスト、ユーザー、ルールにわたる多数のアラートが表示されます。アラートの重大度やタイプはさまざまで、その多くはノイズです。
数十のアラート。複数のルールが実行されます。重大度レベルは低から重大までの範囲です。いくつかはクリサリス攻撃です。いくつかは無関係な Windows Defender イベントです。一部は、まったく異なるワークフローからの SIEM 変更検出です。この騒音の壁の中で協調攻撃を見つけるのは困難です。
アタック・ディスカバリーが発見したもの
Attack Discovery は、これらすべてのアラートを分析し、単一の協調攻撃に属する5 つのアラートを特定しました。これらのアラートをノイズから抽出し、1 つのストーリーに関連付けました。
Attack Discovery は、 5 個の個別のアラートを表示する代わりに、それらを 1 つの検出に関連付けました。
DLLサイドローディングの永続性を備えたマルウェア
srv-win-defend-01上の悪意のある実行ファイルが、DLL サイドローディングを使用してBluetoothService.exe経由で永続化されました
- ホスト: srv-win-defend-01
- ユーザー: james_spiteri
- 重大度:重大
- 攻撃チェーン:初期アクセス → 実行 → 持続 → 防御回避 → C2
攻撃検出では次のことも行われます。
- MITRE ATT&CK戦術にマッピングされたアラート
- DLLサイドローディング手法を特定
- 疑わしい持続メカニズムをフラグ付け
- C2ネットワークインジケーターを強調表示
ステップ2: スケジュールされた検出によりワークフローがトリガーされます
Attack Discovery ではアナリストがボタンをクリックする必要はありません。私たちはこれを1 時間ごとのスケジュールで実行するように設定し、協調攻撃の最新のアラートを継続的に分析しました。
1 時間ごとの実行が開始されると、通常の検出の中に埋もれていた Chrysalis 関連のアラートを含む過去 1 時間のすべてのアラートが取り込まれ、DLL サイドローディング攻撃が発見として表面化しました。
ワークフローを攻撃検出からのアクション ステップとしてリンクすると、攻撃検出が協調攻撃を検出するたびに、ワークフローが自動的に起動されます。
しかし、このアプローチが従来の SOAR プレイブックと異なるのは、ワークフローですべてのステップがスクリプト化されていないことです。攻撃の検出全体を Agent Builder に引き渡し、 「解決してください」と指示します。
ワークフロー定義
これが私たちが実際に使用した 2 つのステップで構成されるワークフローです。
name: Auto Triage AD
description: >-
  Demonstrates the application of AI agents and workflows
  to enable agentic alert triaging.
enabled: true
tags:
  - Example
  - Agentic Workflow

triggers:
  - type: alert                          # Fires when Attack Discovery generates an alert

steps:
  # Step 1: Hand the attack discovery to the agent with clear instructions
  - name: initial_analysis
    type: kibana.request
    with:
      method: "POST"
      path: "/api/agent_builder/converse"
      headers:
        kbn-xsrf: "true"
      body:
        agent_id: <your-agent-id>        # Your custom Hunting Agent
        input: |
          Confirm the attack by searching for behaviour in the logs
          (all logs which are relevant), always leverage security labs tools,
          always leverage virustotal if file hashes are available.
          If this is a true positive, create a case with all the relevant content too.

          {{event|json}}

          Create a slack channel for this incident, check who's on call,
          add them to it, and send a formatted message with what's happening
          and next steps. If this is a true positive, create a case with all
          the relevant content too - add a button to the slack message linking
          to the case, and another button leading to the result of the attack.
          Lastly, include a button that will take me to this agent conversation,
          just replace the conversation ID with the actual one from this conversation
          (https://<your-kibana-url>/app/agent_builder/conversations/<conversation-id>)

          Change the attack discovery status to acknowledged, or,
          if false positives, close it.
    timeout: 10m
    on-failure:
      retry:
        max-attempts: 3

  # Step 2: Follow up to catch anything that didn't complete
  - name: followup_analysis
    type: kibana.request
    with:
      method: "POST"
      path: "/api/agent_builder/converse"
      headers:
        kbn-xsrf: "true"
      body:
        conversation_id: "{{ steps.initial_analysis.output.conversation_id }}"
        agent_id: <your-agent-id>
        input: |
          Complete any previous steps which might not have ran successfully.
          Just in case, the conversation ID is
          {{ steps.initial_analysis.output.conversation_id }}
    timeout: 10m
    on-failure:
      retry:
        max-attempts: 3
このワークフローがなぜこんなに短いのか
自動化全体は2 つのステップで行われます。
initial_analysis: 攻撃検出結果を、実行したいことを記述した自然言語の指示とともに Agent Builder に送信します。followup_analysis: 同じ会話を再開し、エージェントにすべてのタスクが完了したことを確認するように要求するフェイルセーフ。エージェントは複数のツールを順番に呼び出し、個々のツール呼び出しがタイムアウトしたり一時的なエラーが発生したりする可能性があるため、この手順により、何も見逃されないようにします。
これは根本的な変化です。ワークフローはトリガーとセーフティネットであり、エージェントは脳です。
脅威ハンティングエージェントの拡張方法
結果の説明を続ける前に、これがなぜ可能になったのかについて少し考えてみましょう。Agent Builder の最も強力な機能の 1 つは、追加のツールを使用して既存のエージェントを拡張できることです。ゼロから構築するのではなく、デフォルトのThreat Hunting Agentを採用し、カスタム ワークフロー ベースのツールを追加して、このシナリオに必要な特定の機能を実現しました。
追加したもの
Agent Builder には、 platform.core.generate_esqlやplatform.core.product_documentationなどの組み込みプラットフォーム ツールが付属しています。しかし、本当の力は自分自身のものを加えることによって生まれます。Threat Hunting Agent を、いくつかのカテゴリにわたるツールで拡張しました。
| 道具 | タイプ | 何をするのか |
|---|---|---|
vt.hash.lookup | ワークフロー(カスタム) | VirusTotalでファイルハッシュを分析する |
check.on.call.schedule | ワークフロー(カスタム) | オンコールスケジュールを照会して現在の応答者を見つける |
create.case | ワークフロー(カスタム) | Elastic Securityでケースを作成する |
create.channel | ワークフロー(カスタム) | インシデント調整用のSlackチャンネルを作成する |
get.time | ワークフロー(カスタム) | 命名とタイムスタンプの現在の時刻を取得します |
5 つのカスタム ツール。たったこれだけで、デフォルトの Hunting Agent が自動的にマルウェアを検証し、ログを検索し、オンコール対応者の検索、ケースの作成、インシデント チャネルの起動を行うようになり、潜在的な脅威の検出時間が短縮されました。
エージェントの推論チェーン
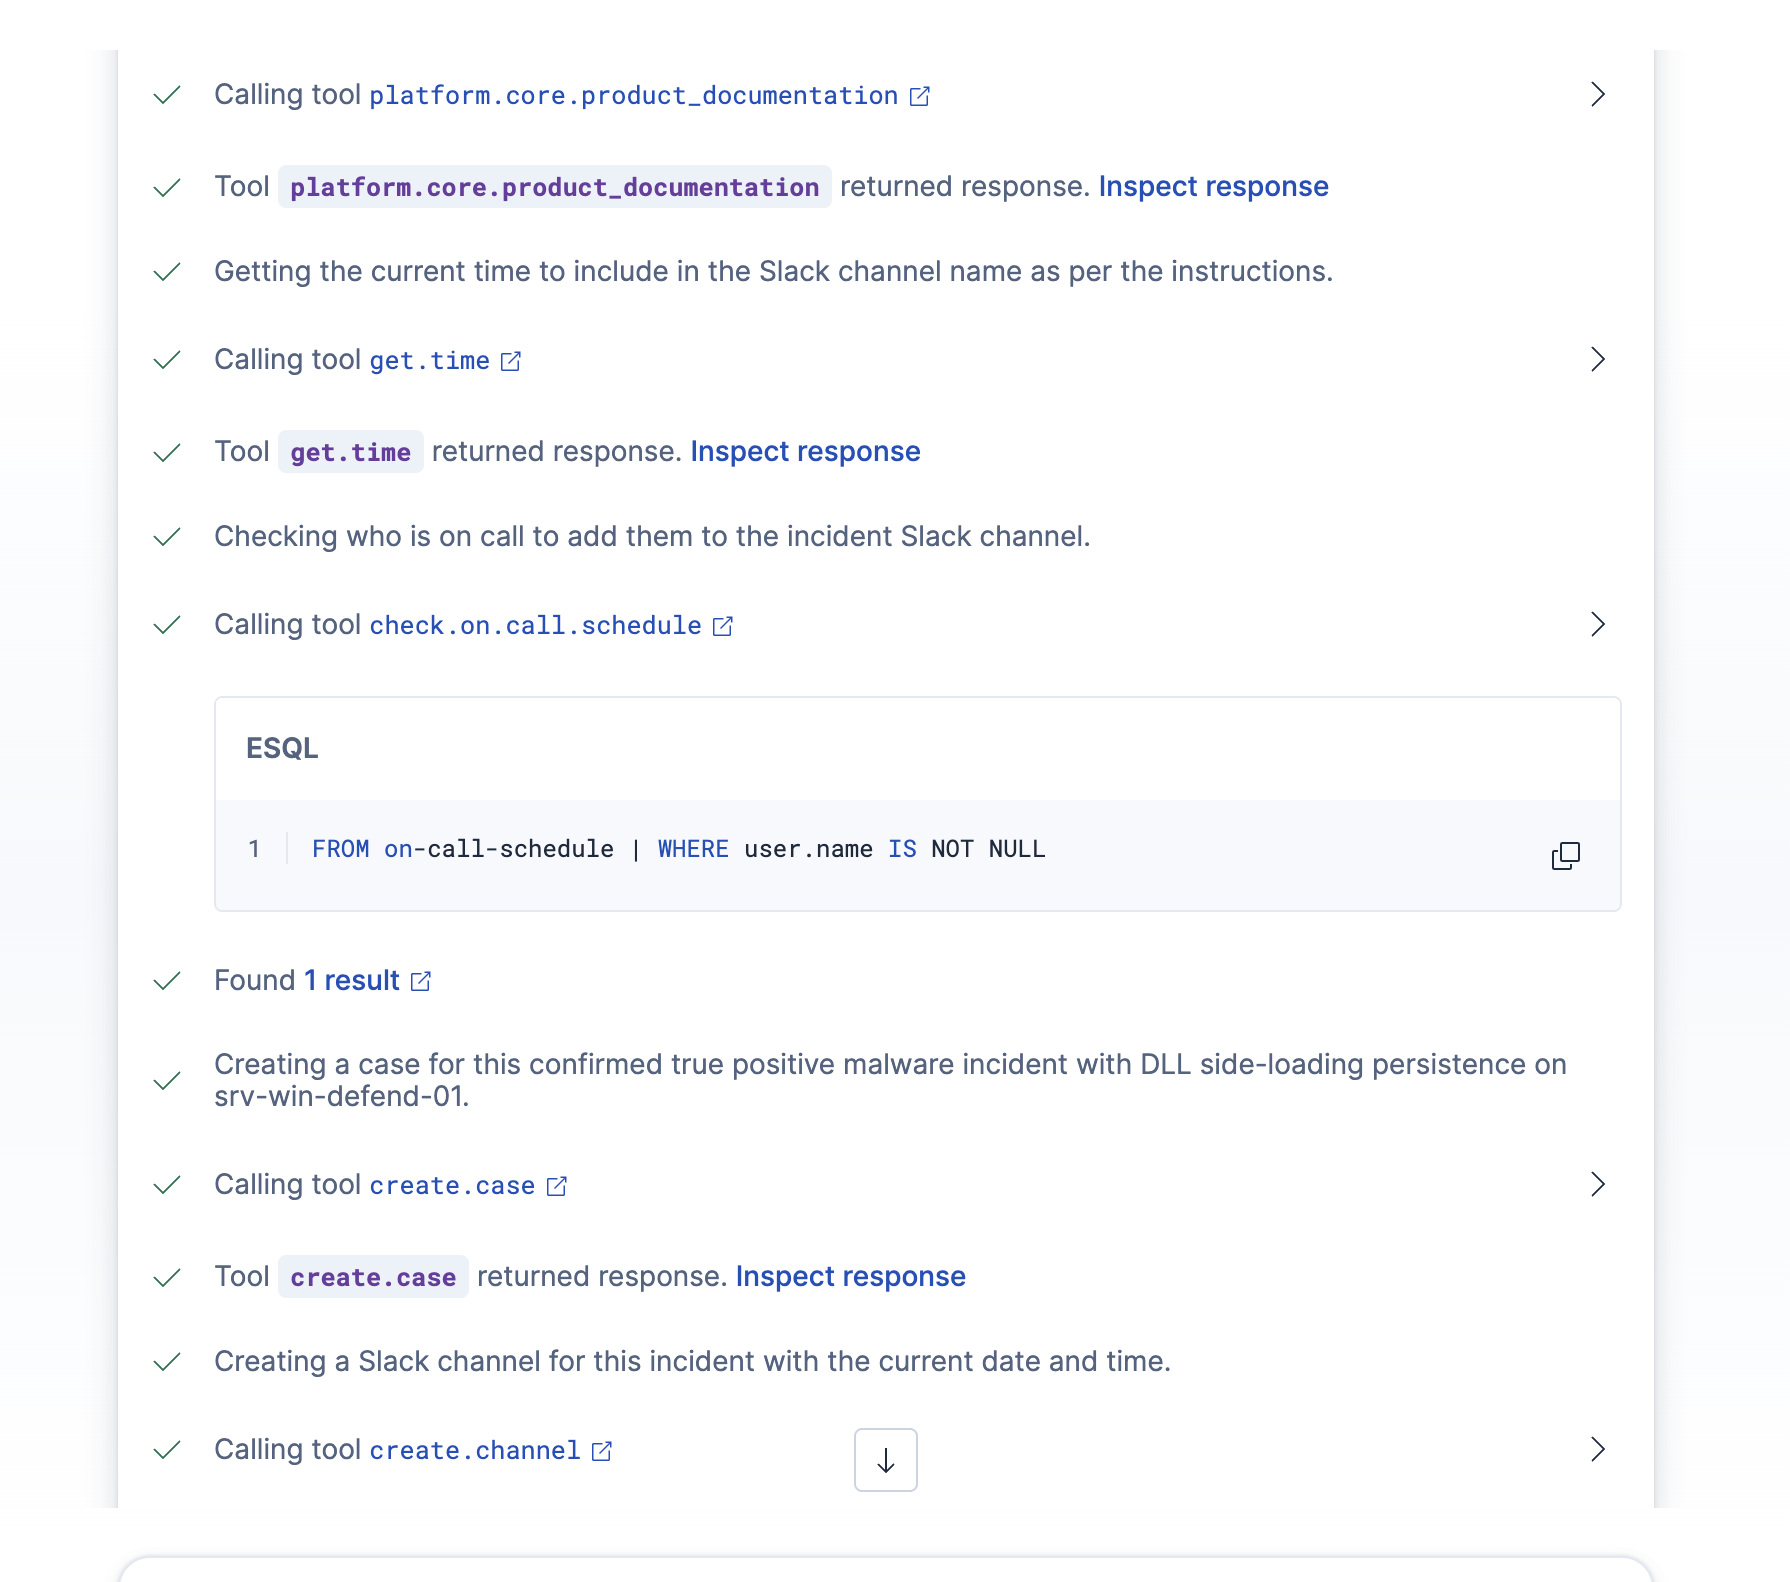
注目すべき点は、Attack Discovery コンテキストが与えられると、エージェントがどのツールをどの順序で呼び出すかを自動的に決定したことです。これらの手順は人間が作成したものではありません。
ステップ 1: VirusTotal 検索: vt.hash.lookup
- エージェントの最初の動作: マルウェア ハッシュを検証します。
ステップ 2: ES|QL クエリの生成: platform.core.generate_esql
- マルウェアが確認されたため、エージェントは関連するすべてのアクティビティを検索しました。
ステップ 3: 製品ドキュメント: platform.core.product_documentation
- エージェントは Elastic Security ドキュメントを参照して、レスポンス コンソールの修復コマンドを生成しました。
透明性のために、どのツールが順番に呼び出されたかを示す推論手順
追加の推論チェーンを示します。製品ドキュメントを参照し、オンコール スケジュール情報を確認してから、すべての関連情報を含むケースを作成し、Slack 経由でアナリストにオンコールで通知します。
ステップ4: 現在の時刻を確認する: get.time
ステップ 5: オンコール スケジュールを確認する: check.on.call.schedule
- エージェントは、現在のレスポンダーを見つけるために、
on-call-scheduleインデックスに対して ES|QL クエリを実行しました。
ステップ 6: ケースの作成: create.case
ステップ 7: Slack チャネルを作成する: create.channel
これが重要である理由
エージェントは台本に従っていませんでした。状況を検討し、次のように決定しました。
- まず、マルウェアが本物であることを確認します(VirusTotal)
- 次に、影響を理解する(ES|QLログ検索)
- 次に、修復方法(製品ドキュメント)を確認します。
- 次に、適切な対応者を見つける(オンコールスケジュール)
- 次に、追跡アーティファクト(ケース)を作成します。
- 最後に、チームを調整する(Slackチャンネル)
これは、ワークフロー (固定されたシーケンスに従う) とエージェント (次に何をすべきかを推論する) の違いです。ワークフローによってエージェントが起動され、エージェントが残りの処理を実行しました。
ステップ3: 自動化されたインシデント対応
信頼性の高い確認により、ワークフローは自動的に次の処理を実行します。
1. インシデントケースを作成する
関連するすべての証拠が添付された構造化されたケースが作成されます。
- 攻撃検出の調査結果
- VirusTotal分析結果
- 脅威インテリジェンスの一致
- エージェントビルダー分析
- 推奨される対応措置
2. SOCに通知する
重大なインシデントについてアナリストに通知する Slack メッセージが適切なチャネルに送信されます。
3. 対応アクションを有効にする
ワークフローでは、オプションで自動応答アクションをトリガーできます。
- ホスト分離: Elastic Defend 経由で
srv-win-defend-01分離します - ユーザーの停止: Active Directory で
james_spiteri無効にする - ネットワーク ブロック: C2 ドメインをファイアウォールのブロックリストにプッシュする
- IOC掃討作戦:クリサリスの指標を探る艦隊全体のスキャンを開始
確認までの時間:前と後
| メトリック | 手動プロセス | 自動化されたパイプライン |
|---|---|---|
| アラート相関 | 30~60分 | インスタント(攻撃発見) |
| IOC抽出 | 15~30分 | インスタント(ワークフロー) |
| VirusTotal検索 | 10~15分 | 5秒(API) |
| 脅威インテリジェンスの相関関係 | 30~60分 | 10秒(ES |
| 攻撃の帰属 | 1~4時間 | 30秒(エージェントビルダー) |
| インシデントの作成 | 15~30分 | インスタント(ワークフロー) |
| SOC通知 | 5~10分 | インスタント(コネクタ) |
| 合計時間 | 2~6時間 | < 4 分 |
もう一つの道:エージェントに尋ねる
上記はすべて自動化されたパイプラインについて説明しています。Attack Discovery が脅威を見つけ、ワークフローが開始され、エージェントがそれをトリアージし、適切なアナリストに通知が届きます。
しかし、これを使用する同様に強力な方法がもう 1 つあります。それは、Agent Builder に直接アクセスして、わかりやすい英語で質問することです。
シナリオ: 最初に脅威について読む
脅威インテリジェンス フィードをスクロールしているときに、Chrysalis バックドアに関する Rapid7 のブログ投稿を見つけたと想像してください。あなたが知りたいのは、私たちが危険にさらされているかどうかです。
それでおしまい。同じエージェントが同じツールを使って残りの作業を実行します。
- Rapid7 ブログから IOC と TTP を取得するために
web.searchツールを使用して脅威レポートを読み取ります - ファイル、ネットワーク、プロセス イベント ログ全体で Chrysalis インジケーターを探すための ES|QL クエリを生成します。
- VirusTotalで環境内で一致するファイルハッシュが見つかったかどうかを確認します
- 調査結果、信頼度、推奨アクションを含む CISO 対応の概要を作成します。
エージェントは、自動化されたパイプラインと同じツールを呼び出します。違いはエントリ ポイントです。スケジュールされた攻撃検出によってワークフローがトリガーされるのではなく、質問によってエージェントがトリガーされました。
これがアナリストにとってゲームを変える理由
これは見落としがちですが、非常に重要な部分です。アナリストは、クエリ言語、インデックス パターン、ツール名を 1 つも知る必要はありませんでした。
彼らは ES|QL を書きませんでした。さまざまなデータがどこに保存されているかを覚えておく必要はありませんでした。VirusTotal API 構文を覚えたり、どの脅威インテリジェンス インデックスを照会するかを考えたりする必要はありませんでした。
彼らは自然言語で質問しました。エージェントは、どのインデックスを検索するか、どのクエリを記述するか、どのツールを呼び出すか、結果をどのように合成するかなど、残りの部分を理解しました。
先月チームに加わったジュニアアナリストにとって、これは変革をもたらす出来事です。10 年間この仕事に携わってきた上級アナリストにとっては、人生の何時間もが戻ってくることになります。ステータスの最新情報を知りたい CISO にとっては、質問するだけで済みます。
効果的な脅威ハンティングの障壁が、「ES|QL と 47 インデックス パターンを知っている」から「探しているものを説明できる」に下がりました。
重要なポイント
- スケジュールに従って Attack Discovery を実行すると、攻撃を見逃すことはありません。アラートを継続的に分析するため、キューを監視している人がいないときでも、組織化された脅威が明らかになります。
- ワークフローは、検出をトリガーし、エージェントを呼び出し、アクションを実行するなど、応答を調整します。
- Agent Builder を使用すると、ニーズに合わせてエージェントを構築または拡張できます。ゼロから開始するか、既存のエージェントにカスタム ツールを追加するかに関係なく、環境に合わせて機能を構成できます。
- エージェントが推論し、ワークフローが実行されます。エージェントは自律的に VirusTotal を呼び出し、ログを検索し、オンコール スケジュールを確認し、Slack チャネルを作成することを決定しました。そのシーケンスを人間がスクリプト化したわけではありません。
- 2 つのエントリ ポイント、同じ機能- 自動化されたパイプラインとチャット インターフェイスは同じエージェントと同じツールを使用します。スケジュールされた検出によってトリガーされるか、アナリストが質問するかに関係なく、結果は同じです。
- 自然言語は新しいクエリ言語です。アナリストは ES|QL、インデックス パターン、または API 構文を知る必要はありません。顧客が探しているものを説明すると、エージェントが残りの作業を処理します。
Chrysalis バックドア キャンペーンは、これがなぜ重要であるかを示しています。国家レベルの攻撃者がサプライ チェーンを侵害し、 4 秒以内に持続性を確立できる場合、その速度に匹敵する防御が必要です。それは、睡眠中に実行される自動パイプラインであれ、脅威を最初に発見したときにエージェントと直接会話することであれ、です。