WARNING: Version 5.5 of the Elastic Stack has passed its EOL date.
This documentation is no longer being maintained and may be removed. If you are running this version, we strongly advise you to upgrade. For the latest information, see the current release documentation.
HipChat Action
editHipChat Action
editUse the hipchat action to send messages to HipChat
rooms or users. To send HipChat messages, you must
configure at least one HipChat account in elasticsearch.yml.
Configuring HipChat Actions
editYou configure HipChat actions in a actions array. Action-specific attributes
are specified using the hipchat keyword. You must specify the message
attribute for all hipchat actions. If you omit the account attribute, the
message is sent using the default HipChat account configured in
elasticsearch.yml.
For example, the following action is configured to send messages using a HipChat account that uses the integration profile. Because this type of account can only send messages to a specific room, the only required attribute is the message itself:
"actions" : {
  "notify-hipchat" : {
    "transform" : { ... },
    "throttle_period" : "5m",
    "hipchat" : {
      "account" : "integration-account",
      "message" : {
        "body" : "Encountered  {{ctx.payload.hits.total}} errors in the last 5 minutes (facepalm)",
        "format" : "text",
        "color" : "red",
        "notify" : true
      }
    }
  }
}
|
The name of a HipChat account configured in |
|
|
The message you want to send to HipChat. |
To send messages with a HipChat account that uses the user
profile, you need to specify what rooms and users you want to send the message to.
For example, the following action is configured to send messages to the
mission-control and devops rooms as well as the user website-admin@example.com.
(To send to multiple users or rooms, specify an array of strings):
"actions" : {
  "notify-hipchat" : {
    "transform" : { ... },
    "throttle_period" : "5m",
    "hipchat" : {
      "account" : "user-account",
      "message" : {
        "room" : [ "mission-control", "devops" ],
        "user" : "website-admin@example.com",
        "body" : "Encountered  {{ctx.payload.hits.total}} errors in the last 5 minutes (facepalm)",
        "format" : "text",
        "color" : "red",
        "notify" : true
      }
    }
  }
}
To send messages with a HipChat account that uses the v1
profile, you need to specify what room or rooms you want to send the message to.
For example, the following action is configured to send messages to the
server-status room. (To send to multiple rooms, specify an array of strings.)
"actions" : {
  "notify-hipchat" : {
    "transform" : { ... },
    "throttle_period" : "5m",
    "hipchat" : {
      "account" : "v1-account",
      "message" : {
        "from" : "Watcher",
        "room" : [ "server-status", "infra-team" ],
        "body" : "Encountered  {{ctx.payload.hits.total}} errors in the last 5 minutes (facepalm)",
        "format" : "text",
        "color" : "red",
        "notify" : true
      }
    }
  }
}
HipChat Action Attributes
edit| Name | Required | Default | Description |
|---|---|---|---|
|
no |
Default account |
The HipChat account to use to send the message. |
|
no |
- |
The proxy host to use (only in combination with |
|
no |
- |
The proxy port to use (only in combination with |
|
yes |
- |
The message content. Can contain up to 1000 characters. |
|
no |
html |
The format of the message: |
|
no |
yellow |
The background color of the notification in the room:
|
|
no |
false |
Indicates whether people in the room should be actively notified |
|
no |
the watch ID |
The name that appears as the notification sender. Only valid for accounts that use the v1 profile. |
|
no |
- |
The rooms that the notification should go to. Accepts
a string value or an array of string values. Must be
specified when using the v1 profile. At least one room
or user must be specified when using the |
|
no |
- |
The users that the notification should go to. Accepts
a string value or an array of string values. At least
one room or user must be specified when using the |
Configuring HipChat Accounts
editYou configure the accounts Watcher can use to communicate with HipChat in the
xpack.notification.hipchat namespace in elasticsearch.yml. Both
v1 and
v2 HipChat APIs are supported.
Watcher provides three HipChat API profiles:
- integration
- Sends messages to a specific room using HipChat’s v2 API Send room notification.
- user
- Sends messages as a particular user through the HipChat v2 API. Enables you to send messages to arbitrary rooms or users.
- v1
-
Sends messages to rooms using HipChat’s v1 API rooms/message.
The
v1profile is provided because it is simple to set up and this API is familiar to many users. That said, HipChat has deprecated the v1 API and is encouraging users to migrate to v2. Both theintegrationanduserprofiles are based on the HipChat v2 API.
If you configure multiple HipChat accounts, you either need to set a default HipChat account or specify which account the notification should be sent with in the hipchat action.
xpack.notification.hipchat:
  default_account: team1
  account:
    team1:
      ...
    team2:
      ...
Using the Hipchat Integration Profile
editYou can use the integration profile to send messages to specific rooms. When
you set an account’s profile to integration, the messages are sent through
HipChat’s v2
Send room notification API.
When you use the integration profile, you need to configure a separate HipChat
account for each room you want to send messages—the account configuration
contains a room-specific authentication token. Alternatively, you can use the
user or v1 profile to send messages
to multiple rooms.
The integration profile only supports sending messages to rooms, it does
not support sending private messages. Use the user
profile to notify a particular HipChat user.
You need a room-specific authentication token to configure an integration
account. To generate an authentication token:
- Log in to hipchat.com or your HipChat server as a group administrator.
- Go to Group admin > Rooms.
- Click the name of the room you want to send messages to.
- Click the Tokens link.
-
Enter a name for the token in the Label field.
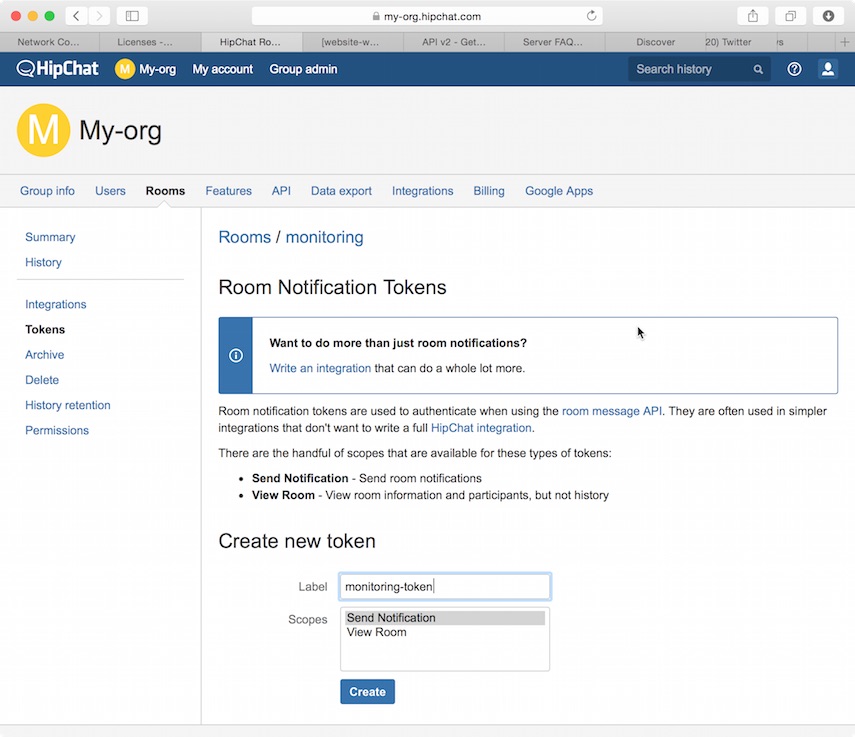
- Select the Send Notification scope.
- Click Create.
-
Copy the generated token so you can paste it into your HipChat account configuration in
elasticsearch.yml.
To configure a HipChat account that uses the integration profile:
-
Set the
typetointegration. -
Set
roomto the name of the room you want to send messages to. -
Set
auth_tokento the room-specific authentication token.
For example, the following snippet configures an account called
notify-monitoring that sends messages to the monitoring room:
xpack.notification.hipchat:
  account:
    notify-monitoring:
      profile: integration
      auth_token: 3eLB803Nyp7UBmegJwP1rMdUmzk5HqnzJCgflrhv
      room: monitoring
You can also specify defaults for the message attributes:
xpack.notification.hipchat:
  account:
    notify-monitoring:
      profile: integration
      auth_token: 3eLB803Nyp7UBmegJwP1rMdUmzk5HqnzJCgflrhv
      room: monitoring
      message:
        format: text
        color: blue
        notify: true
Using the HipChat User Profile
editYou can use the user profile to send messages to rooms as well as individual
HipChat users. When you set an account’s profile to user, Watcher sends
messages as a particular user through the HipChat v2 API.
Before you can configure a user account, you need to:
- Add a HipChat user for Watcher. When setting the user name, keep in mind that the messages are sent on behalf of this user.
-
Create an API token for the Watcher user:
- Log in to HipChat as the Watcher user.
-
Go to
https://<hipchat-server>/account/api. For example,https://www.hipchat.com/account/api. - Confirm the user password.
-
Enter a name for the token in the Label field.
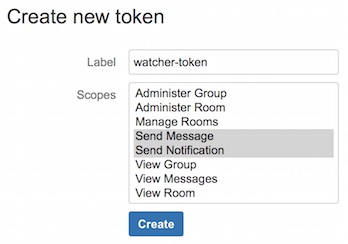
- Select the Send Notification and Send Message scopes.
- Click Create.
-
Copy the generated token so you can paste it into your HipChat account configuration in
elasticsearch.yml.
To configure a HipChat account that uses the user profile:
-
Set the
typetouser. -
Set
userto the email address associated with the Watcher user. -
Set
auth_tokento the Watcher user’s authentication token.
For example, the following configuration creates an account called
notify-monitoring that sends messages to the monitoring room:
xpack.notification.hipchat:
  account:
    notify-monitoring:
      profile: user
      user: watcher-user@example.com
      auth_token: 3eLB803Nyp7UBmegJwP1rMdUmzk5HqnzJCgflrhv
You can also specify defaults for the < message attributes:
xpack.notification.hipchat:
  account:
    notify-monitoring:
      profile: user
      user: watcher-user@example.com
      auth_token: 3eLB803Nyp7UBmegJwP1rMdUmzk5HqnzJCgflrhv
      message:
        format: text
        color: blue
        notify: true
Using the HipChat v1 Profile
editYou can use the v1 profile to send messages to particular rooms. When you set
an account’s profile to v1, messages are sent through HipChat’s v1
rooms/message API.
The v1 profile uses a deprecated API that is expected to be removed
by HipChat in the future.
The v1 profile only supports sending messages to rooms, it does not support
sending private messages. Use the user profile to send
private messages to HipChat users.
Before you can configure a v1 account, you need to generate a v1 API token:
- Log in to your HipChat server as a group admin.
-
Go to
https://<hipchat-server>/admin/api. For example,https://hipchat.com/admin/api. - Confirm your admin password.
-
Select the Notification type.
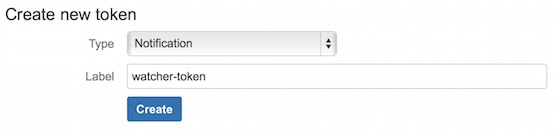
- Enter a name for the token in the Label field.
- Click Create.
-
Copy the generated token so you can paste it into your HipChat account configuration in
elasticsearch.yml.
To configure a HipChat account that uses the v1 profile:
-
Set the
typetov1. -
Set
auth_tokento the v1 authentication token you generated.
For example, the following configuration creates an account called
notify-monitoring:
xpack.notification.hipchat:
  account:
    notify-monitoring:
      profile: v1
      auth_token: 3eLB803Nyp7UBmegJwP1rMdUmzk5HqnzJCgflrhv
You can also specify defaults for the message attributes.
xpack.notification.hipchat:
  account:
    notify-monitoring:
      profile: v1
      auth_token: 3eLB803Nyp7UBmegJwP1rMdUmzk5HqnzJCgflrhv
      message:
        format: text
        color: blue
        notify: true