WARNING: Version 5.4 of the Elastic Stack has passed its EOL date.
This documentation is no longer being maintained and may be removed. If you are running this version, we strongly advise you to upgrade. For the latest information, see the current release documentation.
Installing X-Pack
editInstalling X-Pack
editTo use X-Pack you need:
- Elasticsearch 5.4.3 - Installing Elasticsearch
- Kibana 5.4.3 - Getting Kibana Up and Running
You must run the version of X-Pack that matches the version of Elasticsearch you are running.
X-Pack also provides a monitoring UI for Logstash.
If you are installing X-Pack for the first time on an existing cluster, you must perform a full cluster restart. Installing X-Pack enables security and security must be enabled on ALL nodes in a cluster for the cluster to operate correctly. When upgrading you can usually perform a rolling upgrade.
To install X-Pack:
-
Run
bin/elasticsearch-plugin installfromES_HOMEon each node in your cluster:bin/elasticsearch-plugin install x-pack
If you are using a DEB/RPM distribution of Elasticsearch, run the installation with superuser permissions. To perform an offline installation, download the X-Pack binaries.
-
Confirm that you want to grant X-Pack additional permissions.
Specify the
--batchoption when running the install command to automatically grant these permissions and bypass these install prompts.- X-Pack needs these permissions to set the threat context loader during install so Watcher can send email notifications.
@@@@@@@@@@@@@@@@@@@@@@@@@@@@@@@@@@@@@@@@@@@@@@@@@@@@@@@@@@@
@     WARNING: plugin requires additional permissions     @
@@@@@@@@@@@@@@@@@@@@@@@@@@@@@@@@@@@@@@@@@@@@@@@@@@@@@@@@@@@
* java.lang.RuntimePermission accessClassInPackage.com.sun.activation.registries
* java.lang.RuntimePermission getClassLoader
* java.lang.RuntimePermission setContextClassLoader
* java.lang.RuntimePermission setFactory
* java.security.SecurityPermission createPolicy.JavaPolicy
* java.security.SecurityPermission getPolicy
* java.security.SecurityPermission putProviderProperty.BC
* java.security.SecurityPermission setPolicy
* java.util.PropertyPermission * read,write
* java.util.PropertyPermission sun.nio.ch.bugLevel write
* javax.net.ssl.SSLPermission setHostnameVerifier
See http://docs.oracle.com/javase/8/docs/technotes/guides/security/permissions.html
for descriptions of what these permissions allow and the associated risks.

Continue with installation? [y/N]y
-
X-Pack requires permissions to enable Elasticsearch to launch the machine learning analytical engine. The native controller ensures that the launched process is a valid machine learning component. Once launched, communications between the machine learning processes and Elasticsearch are limited to the operating system user that Elasticsearch runs as.
@@@@@@@@@@@@@@@@@@@@@@@@@@@@@@@@@@@@@@@@@@@@@@@@@@@@@@@@@@@
@        WARNING: plugin forks a native controller        @
@@@@@@@@@@@@@@@@@@@@@@@@@@@@@@@@@@@@@@@@@@@@@@@@@@@@@@@@@@@
This plugin launches a native controller that is not subject to
the Java security manager nor to system call filters.

Continue with installation? [y/N]y
-
If you have disabled automatic index creation in Elasticsearch, configure
action.auto_create_indexinelasticsearch.ymlto allow X-Pack to create the following indices:action.auto_create_index: .security,.monitoring*,.watches,.triggered_watches,.watcher-history*,.ml*
-
Start Elasticsearch.
bin/elasticsearch
- Optional: Configure the Java Client.
-
Install X-Pack into Kibana by running
bin/kibana-pluginin your Kibana installation directory.bin/kibana-plugin install x-pack
-
Start Kibana.
bin/kibana
-
Install X-Pack on your Logstash nodes by running
bin/logstash-pluginin the Logstash installation directory.bin/logstash-plugin install x-pack
- Configure and start Logstash.
To verify X-Pack installation, point your web browser at http://localhost:5601/
to open Kibana. You should be prompted to log in to Kibana. To log in, you can
use the built-in elastic user and the password changeme.
SSL/TLS encryption is disabled by default, which means user credentials are passed in the clear. Do not deploy to production without enabling encryption! For more information, see {xpack-ref}/encrypting-communications.html[Encrypting Communications].
You must also change the passwords for the built-in elastic user and the
kibana user that enables Kibana to communicate with elasticsearch before
deploying to production. See {xpack-ref}/built-in-users.html[Built-in
Users] for more information.
Installing X-Pack on a DEB/RPM Package Installation
editIf you use the DEB/RPM packages to install Elasticsearch, by default Elasticsearch
is installed in /usr/share/elasticsearch and the configuration files are stored
in /etc/elasticsearch. (For the complete list of default paths, see
Debian Directory Layout and
RPM Directory Layout in the Elasticsearch Reference.)
To install X-Pack on a DEB/RPM package installation, you need to run
bin/plugin install from the /usr/share/elasticsearch directory with superuser
permissions:
cd /usr/share/elasticsearch
sudo bin/elasticsearch-plugin install x-pack
If the configuration files are not in /etc/elasticsearch you
need to specify the location of the configuration files by
setting the system property es.path.conf to the config path via
ES_JAVA_OPTS="-Des.path.conf=<path>" or by setting the
environment variable CONF_DIR via CONF_DIR=<path>.
Installing X-Pack on Offline Machines
editThe plugin install scripts require direct Internet access to download and install X-Pack. If your server doesn’t have Internet access, you can manually download and install X-Pack.
To install X-Pack on a machine that doesn’t have Internet access:
-
Manually download the X-Pack zip file:
https://artifacts.elastic.co/downloads/packs/x-pack/x-pack-5.4.3.zip(sha1) - Transfer the zip file to a temporary directory on the offline machine. (Do NOT put the file in the Elasticsearch plugins directory.)
-
Run
bin/elasticsearch-plugin installfrom the Elasticsearch install directory and specify the location of the X-Pack zip file. For example:bin/elasticsearch-plugin install file:///path/to/file/x-pack-5.4.3.zip
You must specify an absolute path to the zip file after the
file://protocol. -
Run
bin/kibana-plugin installfrom the Kibana install directory and specify the location of the X-Pack zip file. (The plugins for Elasticsearch, Kibana, and Logstash are included in the same zip file.) For example:bin/kibana-plugin install file:///path/to/file/x-pack-5.4.3.zip
-
Run
bin/logstash-plugin installfrom the Logstash install directory and specify the location of the X-Pack zip file. (The plugins for Elasticsearch, Kibana, and Logstash are included in the same zip file.) For example:bin/logstash-plugin install file:///path/to/file/x-pack-5.4.3.zip
Enabling and Disabling X-Pack Features
editBy default, all X-Pack features are enabled. You can explicitly enable or
disable X-Pack features in elasticsearch.yml and kibana.yml:
| Setting | Description |
|---|---|
|
Set to |
|
Set to |
|
Set to |
|
Set to |
|
Set to |
|
Set to |
For more information, see {xpack-ref}/xpack-settings.html[X-Pack Settings].
Upgrading X-Pack
editTo upgrade X-Pack:
- Stop Elasticsearch.
-
Uninstall X-Pack from Elasticsearch:
bin/elasticsearch-plugin remove x-pack
-
Install the new version of X-Pack into Elasticsearch.
bin/elasticsearch-plugin install x-pack
-
Restart Elasticsearch.
If you’re upgrading a production cluster, perform a rolling upgrade to ensure recovery is as quick as possible. Rolling upgrades are supported when upgrading to a new minor version. A full cluster restart is required when upgrading to a new major version.
-
Uninstall X-Pack from Kibana:
bin/kibana-plugin remove x-pack
-
Install the new version of X-Pack into Kibana.
bin/kibana-plugin install x-pack
- Restart Kibana.
Uninstalling X-Pack
editTo uninstall X-Pack:
- Stop Elasticsearch.
-
Remove X-Pack from Elasticsearch:
bin/elasticsearch-plugin remove x-pack
- Restart Elasticsearch.
-
Remove X-Pack from Kibana:
bin/kibana-plugin remove x-pack
- Restart Kibana.
-
Remove X-Pack from Logstash:
bin/logstash-plugin remove x-pack
- Restart Logstash.
Configuring X-Pack Java Clients
editIf you want to use a Java transport client with a cluster where X-Pack is installed, then you must download and configure the X-Pack transport client.
The TransportClient is aimed to be replaced by the Java High Level REST
Client, which executes HTTP requests instead of serialized Java requests. The
TransportClient will be deprecated in upcoming versions of Elasticsearch.
-
Add the X-Pack transport JAR file to your CLASSPATH. You can download the X-Pack distribution and extract the JAR file manually or you can get it from the Elasticsearch Maven repository.
As with any dependency, you will also need its transitive dependencies. Refer to the X-Pack POM file for your version when downloading for offline usage.
-
If you are using Maven, you need to add the X-Pack JAR file as a dependency in your project’s
pom.xmlfile:<project ...> <repositories> <!-- add the elasticsearch repo --> <repository> <id>elasticsearch-releases</id> <url>https://artifacts.elastic.co/maven</url> <releases> <enabled>true</enabled> </releases> <snapshots> <enabled>false</enabled> </snapshots> </repository> ... </repositories> ... <dependencies> <!-- add the x-pack jar as a dependency --> <dependency> <groupId>org.elasticsearch.client</groupId> <artifactId>x-pack-transport</artifactId> <version>{version}</version> </dependency> ... </dependencies> ... </project> -
If you are using Gradle, you need to add the X-Pack JAR file as a dependency in your
build.gradlefile:repositories { /* ... Any other repositories ... */ // Add the Elasticsearch Maven Repository maven { url "https://artifacts.elastic.co/maven" } } dependencies { compile "org.elasticsearch.client:x-pack-transport:{version}" /* ... */ } -
If you are using a repository manager such as Nexus OSS within your company, you need to add the repository as per the following screenshot:
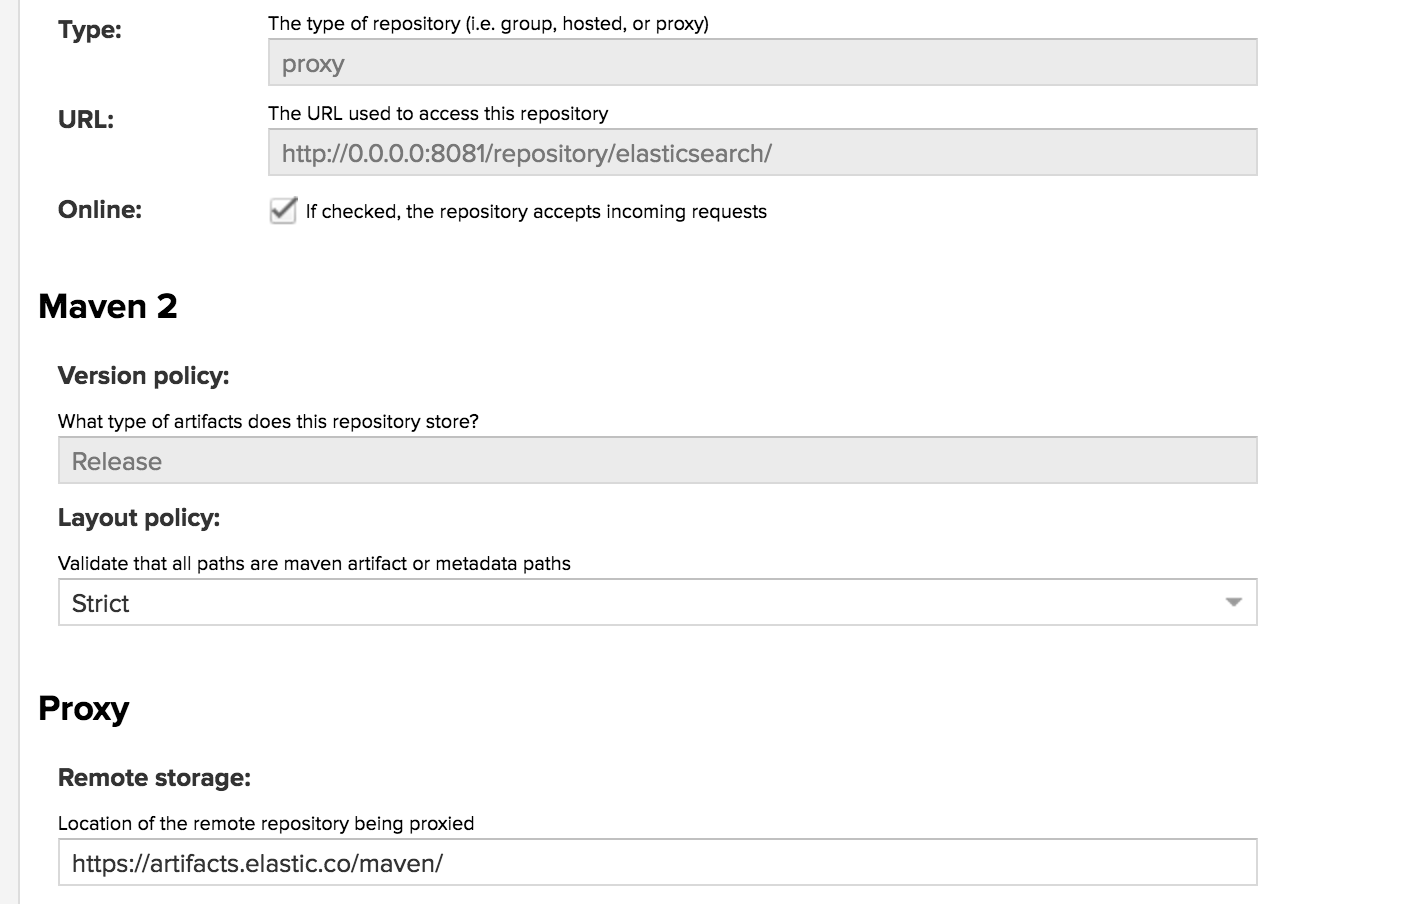
Then in your project’s
pom.xmlif using maven, add the following repositories and dependencies definitions:<dependencies> <dependency> <groupId>org.elasticsearch.client</groupId> <artifactId>x-pack-transport</artifactId> <version>{version}</version> </dependency> </dependencies> <repositories> <repository> <id>local-nexus</id> <name>Elastic Local Nexus</name> <url>http://0.0.0.0:8081/repository/elasticsearch/</url> <releases> <enabled>true</enabled> </releases> <snapshots> <enabled>false</enabled> </snapshots> </repository> </repositories> - If you are using X-Pack security, there are more configuration steps. See Java Client and Security.
