Run anomaly detection jobs
editRun anomaly detection jobs
editAnomaly detection jobs contain the configuration information and metadata necessary to perform the machine learning analysis. They can run for a specific time period or continuously against incoming data.
Set up the environment
editBefore you can use the Elastic Stack machine learning features, there are some configuration requirements (such as security privileges) that must be addressed. Refer to Setup and security.
If your data is located outside of Elasticsearch, you cannot use Kibana to create your jobs and you cannot use datafeeds to retrieve your data in real time. Posting data directly to anomaly detection jobs is deprecated, in a future major version a datafeed will be required.
Create an anomaly detection job
editYou can create anomaly detection jobs by using the create anomaly detection jobs API. Kibana also provides wizards to simplify the process, which vary depending on whether you are using the Machine Learning app, Elastic Security app or Observability apps. In Machine Learning > Anomaly Detection:

- The single metric wizard creates simple jobs that have a single detector. A detector applies an analytical function to specific fields in your data. In addition to limiting the number of detectors, the single metric wizard omits many of the more advanced configuration options.
- The multi-metric wizard creates jobs that can have more than one detector, which is more efficient than running multiple jobs against the same data.
- The population wizard creates jobs that detect activity that is unusual compared to the behavior of the population. For more information, see Performing population analysis.
-
The categorization wizard creates jobs that group log messages into categories
and use
countorrarefunctions to detect anomalies within them. See Detecting anomalous categories of data. - The advanced wizard creates jobs that can have multiple detectors and enables you to configure all job settings.
Kibana can also recognize certain types of data and provide specialized wizards for that context. For example, there are anomaly detection jobs for the sample eCommerce orders and sample web logs data sets, as well as for data generated by the Elastic Security and Observability solutions, Beats, and Elastic Agent Integrations. For a list of all the preconfigured jobs, see Supplied configurations.
When you create an anomaly detection job in Kibana, the job creation wizards can provide advice based on the characteristics of your data. By heeding these suggestions, you can create jobs that are more likely to produce insightful machine learning results. The most important concepts are covered here; for a description of all the job properties, see the create anomaly detection jobs API.
Bucket span
editThe machine learning features use the concept of a bucket to divide the time series into batches for processing.
The bucket span is part of the configuration information for an anomaly detection job. It defines the time interval that is used to summarize and model the data. This is typically between 5 minutes to 1 hour and it depends on your data characteristics. When you set the bucket span, take into account the granularity at which you want to analyze, the frequency of the input data, the typical duration of the anomalies, and the frequency at which alerting is required.
The bucket span must contain a valid time interval. When you create an anomaly detection job in Kibana, you can choose to estimate a bucket span value based on your data characteristics. If you choose a value that is larger than one day or is significantly different than the estimated value, you receive an informational message.
Detectors
editEach anomaly detection job must have one or more detectors. A detector defines the type of analysis that will occur and which fields to analyze.
Detectors can also contain properties that affect which types of entities or events are considered anomalous. For example, you can specify whether entities are analyzed relative to their own previous behavior or relative to other entities in a population. There are also multiple options for splitting the data into categories and partitions. Some of these more advanced job configurations are described in Examples.
If your job does not contain a detector or the detector does not contain a
valid function, you receive an error. If a job contains
duplicate detectors, you also receive an error. Detectors are
duplicates if they have the same function, field_name, by_field_name,
over_field_name and partition_field_name.
Influencers
editWhen anomalous events occur, we want to know why. To determine the cause, however, you often need a broader knowledge of the domain. If you have suspicions about which entities in your data set are likely causing irregularities, you can identify them as influencers in your anomaly detection jobs. That is to say, influencers are fields that you suspect contain information about someone or something that influences or contributes to anomalies in your data.
Influencers can be any field in your data. If you use datafeeds, however, the field must exist in your datafeed query or aggregation; otherwise it is not included in the job analysis. If you use a query in your datafeed, there is an additional requirement: influencer fields must exist in the query results in the same hit as the detector fields. Datafeeds process data by paging through the query results; since search hits cannot span multiple indices or documents, datafeeds have the same limitation.
Influencers do not need to be fields that are specified in your anomaly detection job
detectors, though they often are. If you use aggregations in your datafeed, it is
possible to use influencers that come from different indices than the detector
fields. However, both indices must have a date field with the same name, which you
specify in the data_description.time_field property for the datafeed.
Picking an influencer is strongly recommended for the following reasons:
- It allows you to more easily assign blame for anomalies
- It simplifies and aggregates the results
If you use Kibana, the job creation wizards can suggest which fields to use as influencers. The best influencer is the person or thing that you want to blame for the anomaly. In many cases, users or client IP addresses make excellent influencers.
As a best practice, do not pick too many influencers. For example, you generally do not need more than three. If you pick many influencers, the results can be overwhelming and there is a small overhead to the analysis.
Cardinality
editIf there are logical groupings of related entities in your data, machine learning analytics can make data models and generate results that take these groupings into consideration. For example, you might choose to split your data by user ID and detect when users are accessing resources differently than they usually do.
If the field that you use to split your data has many different values, the
job uses more memory resources. In Kibana, if the cardinality of the
by_field_name, over_field_name, or partition_field_name is greater than
1000, the job creation wizards advise that there might be high memory usage.
Likewise if you are performing population analysis and the cardinality of the
over_field_name is below 10, you are advised that this might not be a suitable
field to use.
Model memory limits
editFor each anomaly detection job, you can optionally specify a model_memory_limit, which
is the approximate maximum amount of memory resources that are required for
analytical processing. The default value is 1 GB. Once this limit is approached,
data pruning becomes more aggressive. Upon exceeding this limit, new entities
are not modeled.
You can also optionally specify the xpack.ml.max_model_memory_limit setting.
By default, it’s not set, which means there is no upper bound on the acceptable
model_memory_limit values in your jobs.
If you set the model_memory_limit too high, it will be impossible to open
the job; jobs cannot be allocated to nodes that have insufficient memory to run
them.
If the estimated model memory limit for an anomaly detection job is greater than the
model memory limit for the job or the maximum model memory limit for the cluster,
the job creation wizards in Kibana generate a warning. If the estimated memory
requirement is only a little higher than the model_memory_limit, the job will
probably produce useful results. Otherwise, the actions you take to address
these warnings vary depending on the resources available in your cluster:
-
If you are using the default value for the
model_memory_limitand the machine learning nodes in the cluster have lots of memory, the best course of action might be to simply increase the job’smodel_memory_limit. Before doing this, however, double-check that the chosen analysis makes sense. The defaultmodel_memory_limitis relatively low to avoid accidentally creating a job that uses a huge amount of memory. -
If the machine learning nodes in the cluster do not have sufficient memory to accommodate a job of the estimated size, the only options are:
- Add bigger machine learning nodes to the cluster, or
- Accept that the job will hit its memory limit and will not necessarily find all the anomalies it could otherwise find.
If you are using Elastic Cloud Enterprise or the hosted Elasticsearch Service on Elastic Cloud,
xpack.ml.max_model_memory_limit is set to prevent you from creating jobs
that cannot be allocated to any machine learning nodes in the cluster. If you find that you
cannot increase model_memory_limit for your machine learning jobs, the solution is to
increase the size of the machine learning nodes in your cluster.
Dedicated indices
editFor each anomaly detection job, you can optionally specify a dedicated index to store
the anomaly detection results. As anomaly detection jobs may produce a large amount
of results (for example, jobs with many time series, small bucket span, or with
long running period), it is recommended to use a dedicated results index by
choosing the Use dedicated index option in Kibana or specifying the
results_index_name via the Create anomaly detection jobs API.
Datafeeds
editIf you create anomaly detection jobs in Kibana, you must use datafeeds to retrieve data from Elasticsearch for analysis. When you create an anomaly detection job, you select a data view and Kibana configures the datafeed for you under the covers.
You can associate only one datafeed with each anomaly detection job. The datafeed contains
a query that runs at a defined interval (frequency). By default, this interval
is calculated relative to the bucket span of the anomaly detection job.
If you are concerned about delayed data, you can add a delay before the query
runs at each interval. See Handling delayed data.
Datafeeds can also aggregate data before sending it to the anomaly detection job. There are some limitations, however, and aggregations should generally be used only for low cardinality data. See Aggregating data for faster performance.
When the Elasticsearch security features are enabled, a datafeed stores the roles of the user who created or updated the datafeed at that time. This means that if those roles are updated, the datafeed subsequently runs with the new permissions that are associated with the roles. However, if the user’s roles are adjusted after creating or updating the datafeed, the datafeed continues to run with the permissions that were associated with the original roles.
One way to update the roles that are stored within the datafeed without changing any other settings is to submit an empty JSON document ({}) to the update datafeed API.
If the data that you want to analyze is not stored in Elasticsearch, you cannot use datafeeds. You can however send batches of data directly to the job by using the post data to jobs API. [7.11.0] Deprecated in 7.11.0.
Open the job
editAn anomaly detection job must be opened in order for it to be ready to receive and analyze data. It can be opened and closed multiple times throughout its lifecycle.
After you start the job, you can start the datafeed, which retrieves data from your cluster. A datafeed can be started and stopped multiple times throughout its lifecycle. When you start it, you can optionally specify start and end times. If you do not specify an end time, the datafeed runs continuously.
You can perform both these tasks in Kibana or use the open anomaly detection jobs and start datafeeds APIs.
Tune the job
editTypically after you open a job, the next step is to view the results. You might find that you need to alter the job configuration or settings.
Calendars and scheduled events
editSometimes there are periods when you expect unusual activity to take place, such as bank holidays, "Black Friday", or planned system outages. If you identify these events in advance, no anomalies are generated during that period. The machine learning model is not ill-affected and you do not receive spurious results.
You can create calendars and scheduled events in the Settings pane on the Machine Learning page in Kibana or by using Machine learning anomaly detection APIs.
A scheduled event must have a start time, end time, and description. In general, scheduled events are short in duration (typically lasting from a few hours to a day) and occur infrequently. If you have regularly occurring events, such as weekly maintenance periods, you do not need to create scheduled events for these circumstances; they are already handled by the machine learning analytics.
You can identify zero or more scheduled events in a calendar. Anomaly detection jobs can then subscribe to calendars and the machine learning analytics handle all subsequent scheduled events appropriately.
If you want to add multiple scheduled events at once, you can import an
iCalendar (.ics) file in Kibana or a JSON file in the
add events to calendar API.
- You must identify scheduled events before your anomaly detection job analyzes the data for that time period. Machine learning results are not updated retroactively.
- If your iCalendar file contains recurring events, only the first occurrence is imported.
- Bucket results are generated during scheduled events but they have an anomaly score of zero.
- If you use long or frequent scheduled events, it might take longer for the machine learning analytics to learn to model your data and some anomalous behavior might be missed.
Custom rules
editBy default, anomaly detection is unsupervised and the machine learning models have no awareness of the domain of your data. As a result, anomaly detection jobs might identify events that are statistically significant but are uninteresting when you know the larger context. Machine learning custom rules enable you to customize anomaly detection.
Custom rules – or job rules as Kibana refers to them – instruct anomaly detectors to change their behavior based on domain-specific knowledge that you provide. When you create a rule, you can specify conditions, scope, and actions. When the conditions of a rule are satisfied, its actions are triggered.
For example, if you have an anomaly detector that is analyzing CPU usage, you might decide you are only interested in anomalies where the CPU usage is greater than a certain threshold. You can define a rule with conditions and actions that instruct the detector to refrain from generating machine learning results when there are anomalous events related to low CPU usage. You might also decide to add a scope for the rule, such that it applies only to certain machines. The scope is defined by using machine learning filters.
Filters contain a list of values that you can use to include or exclude events from the machine learning analysis. You can use the same filter in multiple anomaly detection jobs.
If you are analyzing web traffic, you might create a filter that contains a list of IP addresses. For example, maybe they are IP addresses that you trust to upload data to your website or to send large amounts of data from behind your firewall. You can define the scope of a rule such that it triggers only when a specific field in your data matches one of the values in the filter. Alternatively, you can make it trigger only when the field value does not match one of the filter values. You therefore have much greater control over which anomalous events affect the machine learning model and appear in the machine learning results.
For more information, see Customizing detectors with custom rules.
Model snapshots
editElastic Stack machine learning features calculate baselines of normal behavior then extrapolate anomalous events. These baselines are accomplished by generating models of your data.
To ensure resilience in the event of a system failure, snapshots of the machine learning
model for each anomaly detection job are saved to an internal index within the Elasticsearch
cluster. The amount of time necessary to save these snapshots is proportional to
the size of the model in memory. By default, snapshots are captured
approximately every 3 to 4 hours. You can change this interval
(background_persist_interval) when you create or update a job.
To reduce the number of snapshots consuming space on your cluster, at the end of
each day, old snapshots are automatically deleted. The age of each snapshot is
calculated relative to the timestamp of the most recent snapshot. By default, if
there are snapshots over one day older than the newest snapshot, they are
deleted except for the first snapshot each day. As well, all snapshots over ten
days older than the newest snapshot are deleted. You can change these retention
settings (daily_model_snapshot_retention_after_days and
model_snapshot_retention_days) when you create or update a job. If you want to
exempt a specific snapshot from this clean up, use Kibana or the
update model snapshots API to set retain to
true.
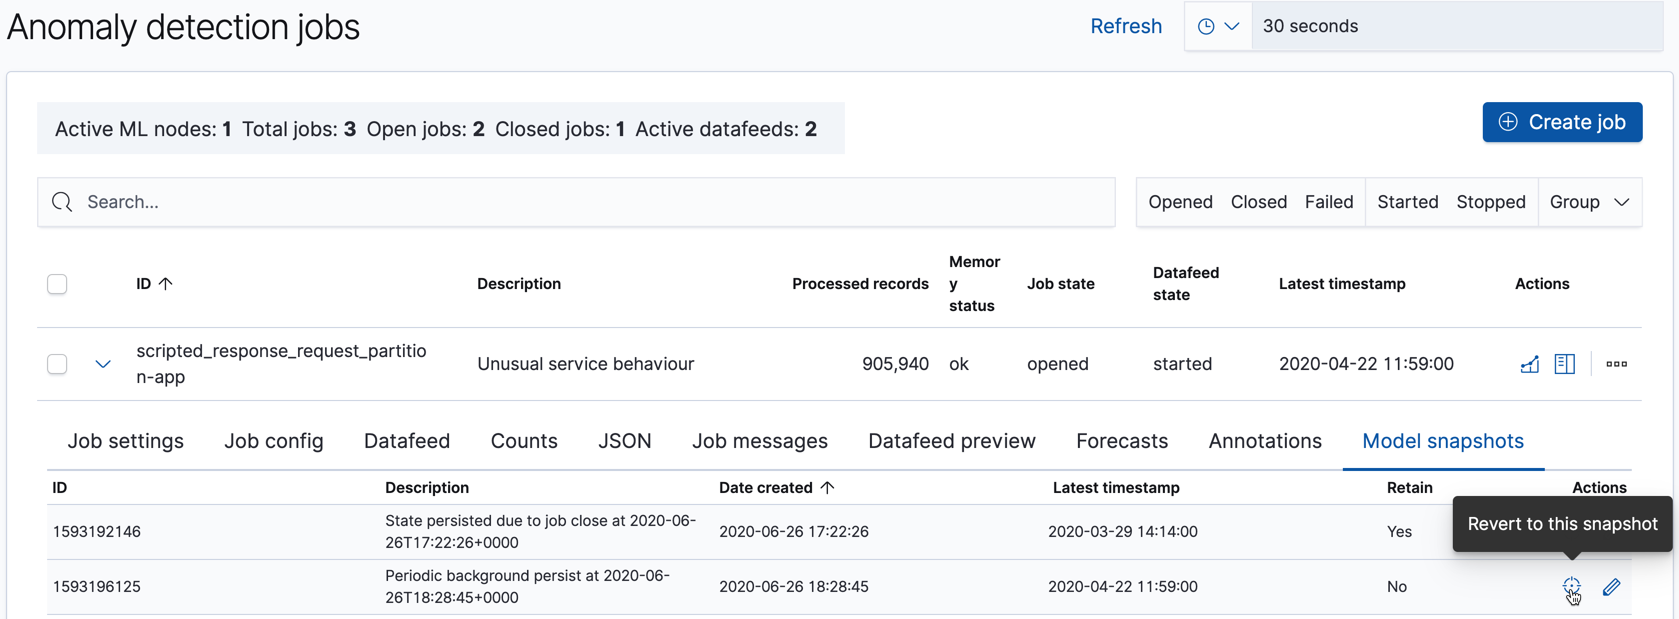
You can see the list of model snapshots for each job with the get model snapshots API or in the Model snapshots tab on the Job Management page in Kibana:
There are situations other than system failures where you might want to revert to using a specific model snapshot. The machine learning features react quickly to anomalous input and new behaviors in data. Highly anomalous input increases the variance in the models and machine learning analytics must determine whether it is a new step-change in behavior or a one-off event. In the case where you know this anomalous input is a one-off, it might be appropriate to reset the model state to a time before this event. For example, after a Black Friday sales day you might consider reverting to a saved snapshot. If you know about such events in advance, however, you can use calendars and scheduled events to avoid impacting your model.
Close the job
editWhen historical data is analyzed, there is no need to stop the datafeed and/or close the job as they are stopped and closed automatically when the end time is reached.
If you need to stop your anomaly detection job, an orderly shutdown ensures that:
- Datafeeds are stopped
- Buffers are flushed
- Model history is pruned
- Final results are calculated
- Model snapshots are saved
- Anomaly detection jobs are closed
This process ensures that jobs are in a consistent state in case you want to subsequently re-open them.
Stopping datafeeds
editWhen you stop a datafeed, it ceases to retrieve data from Elasticsearch. You can stop a
datafeed by using Kibana or the
stop datafeeds API. For example, the following
request stops the feed1 datafeed:
POST _ml/datafeeds/feed1/_stop
You must have manage_ml, or manage cluster privileges to stop datafeeds.
For more information, see Security privileges.
A datafeed can be started and stopped multiple times throughout its lifecycle.
Stopping all datafeeds
editIf you are upgrading your cluster, you can use the following request to stop all datafeeds:
POST _ml/datafeeds/_all/_stop
Closing anomaly detection jobs
editWhen you close an anomaly detection job, it cannot receive data or perform analysis
operations. You can close a job by using the
close anomaly detection job API. For example, the following
request closes the job1 job:
POST _ml/anomaly_detectors/job1/_close
You must have manage_ml, or manage cluster privileges to stop
anomaly detection jobs. For more information, see
Security privileges.
If you submit a request to close an anomaly detection job and its datafeed is running,
the request first tries to stop the datafeed. This behavior is equivalent to
calling the stop datafeeds API with the same
timeout and force parameters as the close job request.
Anomaly detection jobs can be opened and closed multiple times throughout their lifecycle.
Closing all anomaly detection jobs
editIf you are upgrading your cluster, you can use the following request to close all open anomaly detection jobs on the cluster:
POST _ml/anomaly_detectors/_all/_close