WARNING: Version 5.5 of Elasticsearch has passed its EOL date.
This documentation is no longer being maintained and may be removed. If you are running this version, we strongly advise you to upgrade. For the latest information, see the current release documentation.
Install Elasticsearch with Windows MSI Installer
editInstall Elasticsearch with Windows MSI Installer
editThis functionality is in beta and is subject to change. The design and code is less mature than official GA features and is being provided as-is with no warranties. Beta features are not subject to the support SLA of official GA features.
Elasticsearch can be installed on Windows using the .msi package. This can
install Elasticsearch as a Windows service or allow it to be run manually using
the included elasticsearch.exe executable.
Elasticsearch has historically been installed on Windows using the .zip archive.
You can continue using the .zip approach if you prefer.
The latest stable version of Elasticsearch can be found on the Download Elasticsearch page. Other versions can be found on the Past Releases page.
Elasticsearch requires Java 8 or later. Use the official Oracle distribution or an open-source distribution such as OpenJDK.
Download the .msi package
editDownload the .msi package for Elasticsearch v5.5.3 from https://artifacts.elastic.co/downloads/elasticsearch/elasticsearch-5.5.3.msi
Install using the graphical user interface (GUI)
editDouble-click the downloaded .msi package to launch a GUI wizard that will guide you through the
installation process. You can view help on any step by clicking the ? button, which reveals an
aside panel with additional information for each input:
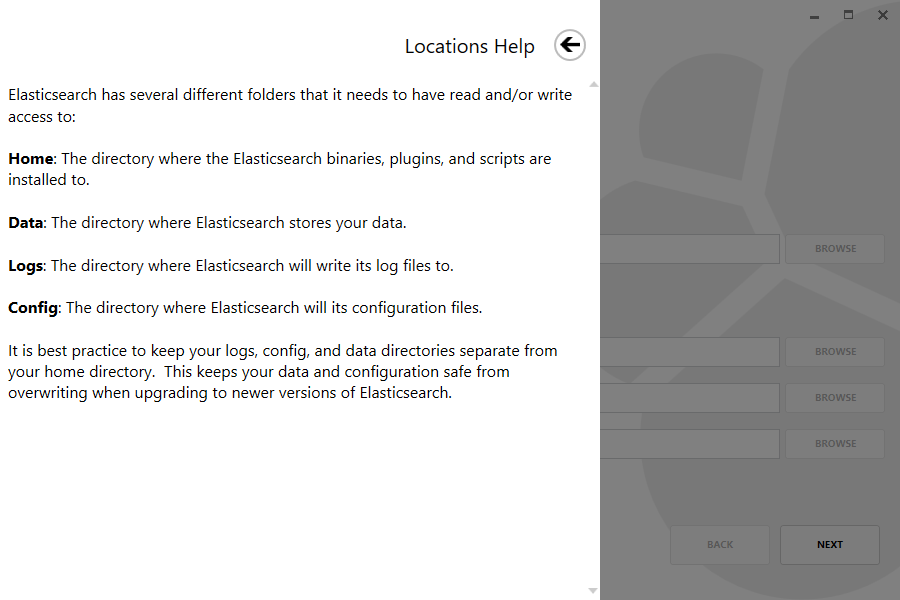
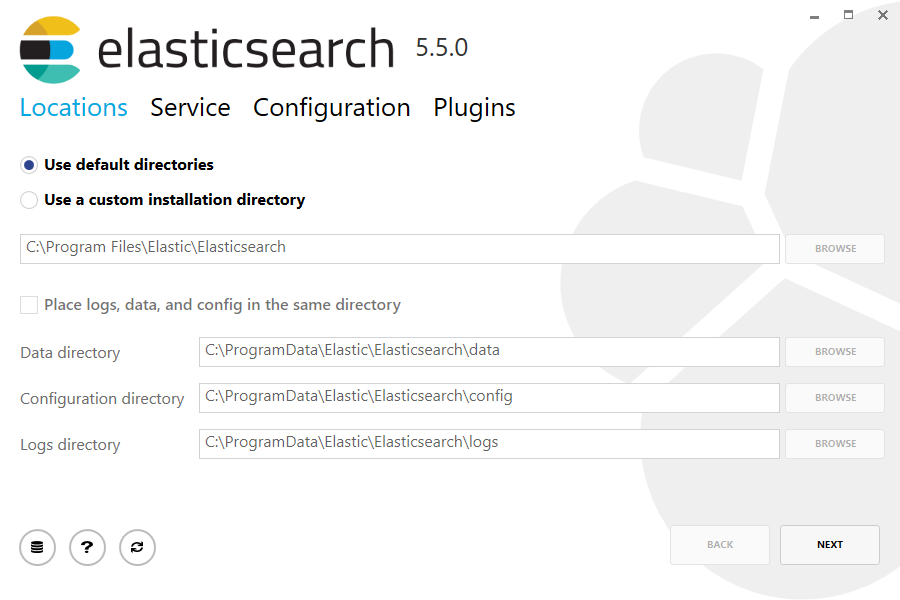
Within the first screen, select the directory for the installation. In addition, select directories for where data, logs and configuration will reside or roll with the default locations:
Then select whether to install as a service or start Elasticsearch manually as needed. When installing as a service, you can also decide which account to run the service under as well as whether the service should be started after installation and when Windows is started or restarted:
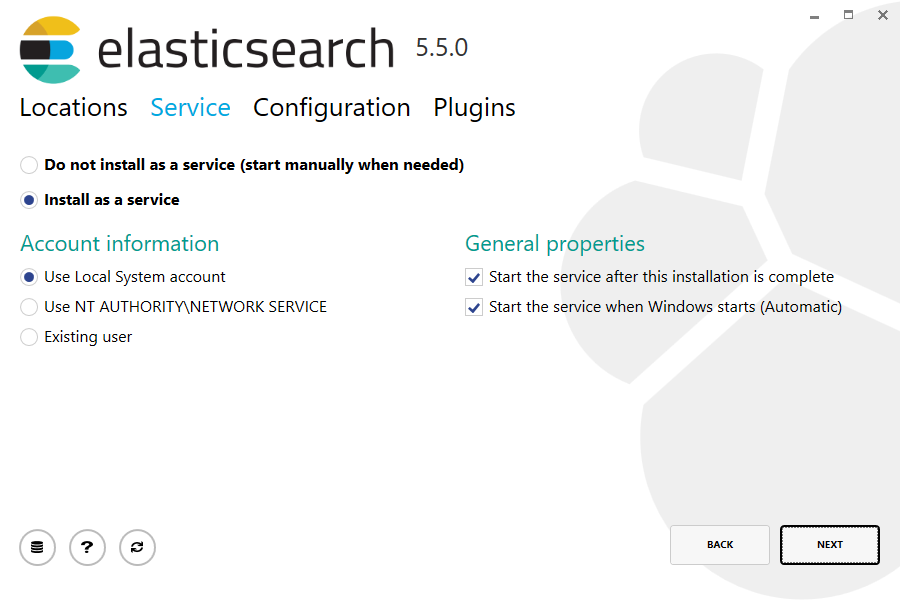
When selecting an account to run the service with, be sure that the chosen account has sufficient privileges to access the installation and other deployment directories chosen.
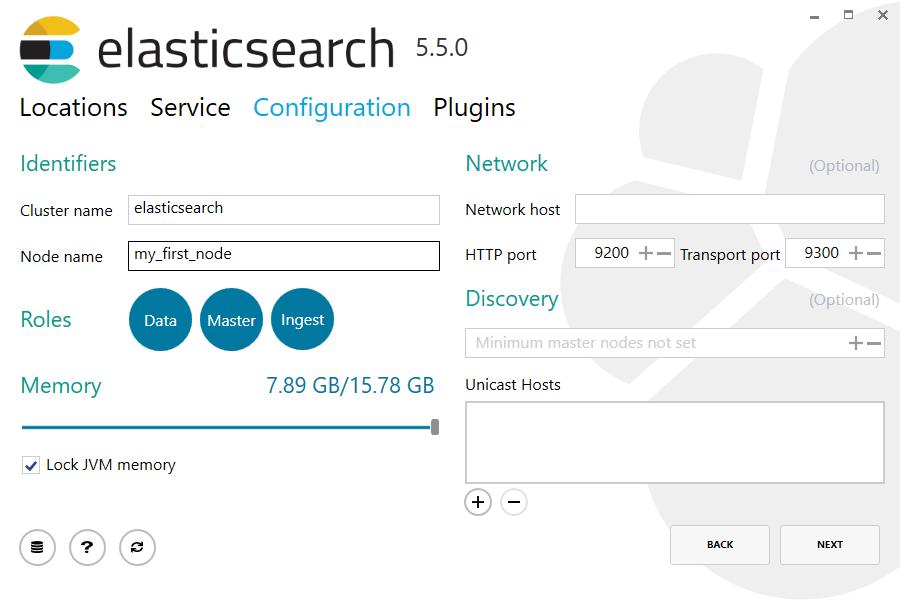
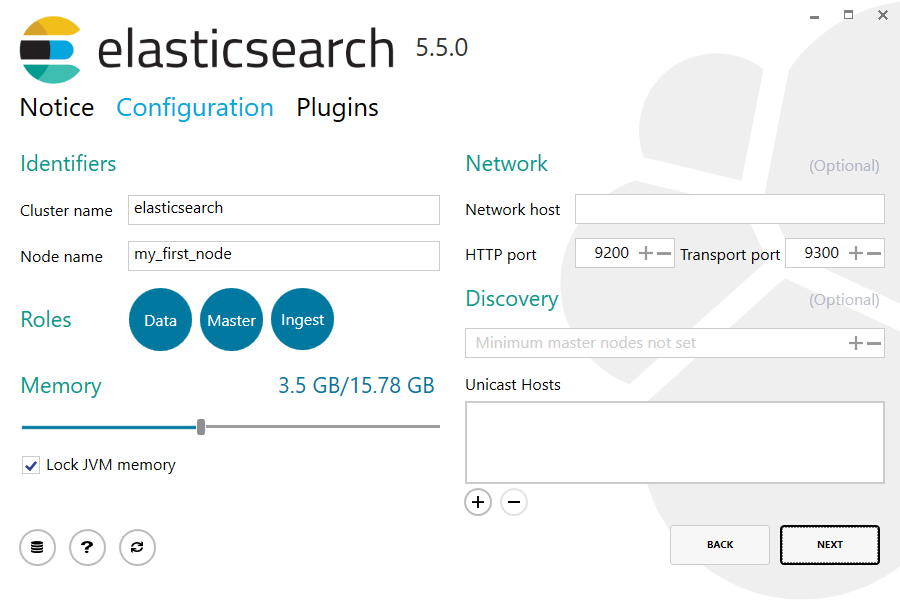
Common configuration settings are exposed within the Configuration section, allowing the cluster name, node name and roles to be set, in addition to memory and network settings:
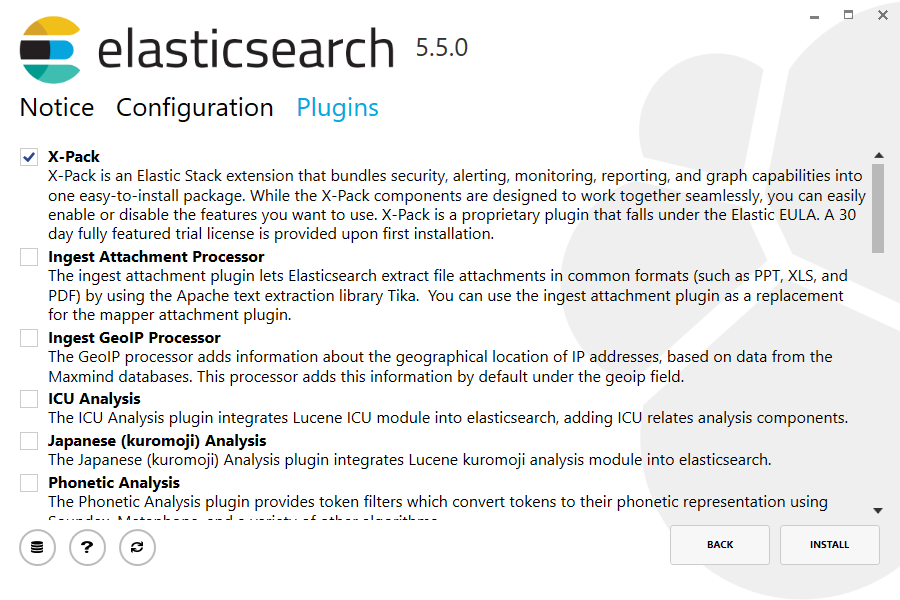
Finally, the installer provides a list of common plugins that can be downloaded and installed as part of the installation:
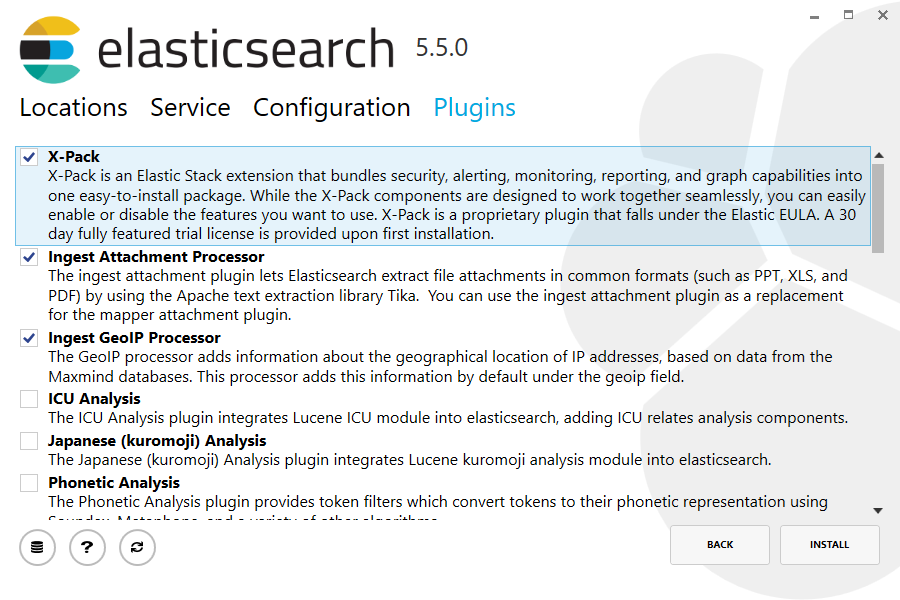
X-Pack includes a trial license for 30 days. After that, you can obtain one of the available subscriptions or disable Security. The Basic license is free and includes the Monitoring extension.
After clicking the install button, Elasticsearch will be installed:

Install using the command line
editThe .msi can also install Elasticsearch using the command line. The simplest installation
using the same defaults as the GUI is achieved by first navigating to the download directory,
then running:
msiexec.exe /i elasticsearch-5.5.3.msi /qn
By default, msiexec does not wait for the installation process to complete, since it runs in the
Windows subsystem. To wait on the process to finish and ensure that %ERRORLEVEL% is set
accordingly, it is recommended to use start /wait to create a process and wait for it to exit
start /wait msiexec.exe /i elasticsearch-5.5.3.msi /qn
As with any MSI installation package, a log file for the installation process can be found
within the %TEMP% directory, with a randomly generated name adhering to the format
MSI<random>.LOG. The path to a log file can be supplied using the /l command line argument
start /wait msiexec.exe /i elasticsearch-5.5.3.msi /qn /l install.log
Supported Windows Installer command line arguments can be viewed using
msiexec.exe /help
or by consulting the Windows Installer SDK Command-Line Options.
Command line options
editAll settings exposed within the GUI are also available as command line arguments (referred to as properties within Windows Installer documentation) that can be passed to msiexec:
|
|
The installation directory. Defaults to |
|
|
The directory in which to store your data.
Defaults to |
|
|
The directory in which to store your configuration.
Defaults to |
|
|
The directory in which to store your logs.
Defaults to |
|
|
Whether the data, configuration and logs directories
should be created under the installation directory. Defaults to |
|
|
Whether Elasticsearch is installed and configured as a Windows Service.
Defaults to |
|
|
Whether the Windows Service is started after installation finishes.
Defaults to |
|
|
Whether the Windows Service is started when Windows is started.
Defaults to |
|
|
Whether the Windows service runs under the LocalSystem Account.
Defaults to |
|
|
Whether the Windows service runs under the NetworkService Account. Defaults
to |
|
|
Whether the Windows service runs under a specified existing account. Defaults
to |
|
|
The username for the account under which the Windows service runs. Defaults to |
|
|
The password for the account under which the Windows service runs. Defaults to |
|
|
The name of the cluster. Defaults to |
|
|
The name of the node. Defaults to |
|
|
Whether Elasticsearch is configured as a master node. Defaults to |
|
|
Whether Elasticsearch is configured as a data node. Defaults to |
|
|
Whether Elasticsearch is configured as an ingest node. Defaults to |
|
|
The amount of memory to allocate to the JVM heap for Elasticsearch.
Defaults to |
|
|
Whether |
|
|
A comma separated list of hosts in the form |
|
|
The minimum number of master-eligible nodes that must be visible
in order to form a cluster. Defaults to |
|
|
The hostname or IP address to bind the node to and publish (advertise) this
host to other nodes in the cluster. Defaults to |
|
|
The port to use for exposing Elasticsearch APIs over HTTP. Defaults to |
|
|
The port to use for internal communication between nodes within the cluster.
Defaults to |
|
|
A comma separated list of the plugins to download and install as part of the installation. Defaults |
To pass a value, simply append the property name and value using the format <PROPERTYNAME>="<VALUE>" to
the installation command. For example, to use a different installation directory to the default one and to install X-Pack:
start /wait msiexec.exe /i elasticsearch-5.5.3.msi /qn INSTALLDIR="C:\Custom Install Directory" PLUGINS="x-pack"
Consult the Windows Installer SDK Command-Line Options for additional rules related to values containing quotation marks.
Running Elasticsearch from the command line
editOnce installed, Elasticsearch can be started from the command line, if not installed as a service and configured to start when installation completes, as follows:
.\bin\elasticsearch.exe
The command line terminal will display output similar to the following:
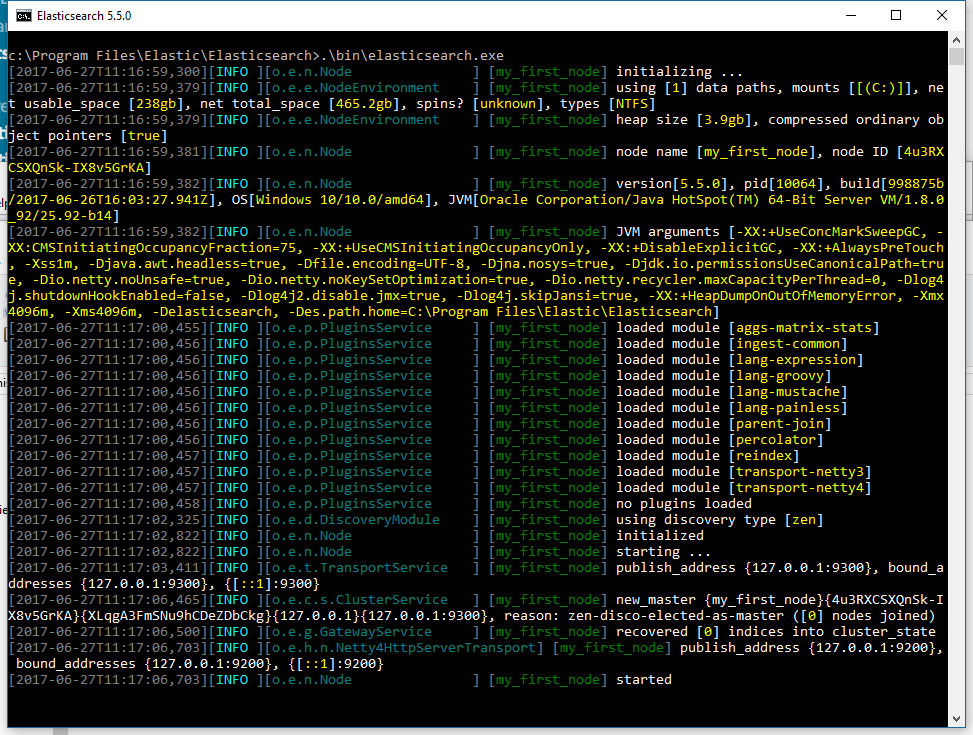
By default, Elasticsearch runs in the foreground, prints its logs to STDOUT in addition
to the <cluster name>.log file within LOGSDIRECTORY, and can be stopped by pressing Ctrl-C.
Configuring Elasticsearch on the command line
editElasticsearch loads its configuration from the %ES_HOME%\config\elasticsearch.yml
file by default. The format of this config file is explained in
Configuring Elasticsearch.
Any settings that can be specified in the config file can also be specified on
the command line, using the -E syntax as follows:
.\bin\elasticsearch.exe -E cluster.name=my_cluster -E node.name=node_1
Values that contain spaces must be surrounded with quotes. For instance -E path.logs="C:\My Logs\logs".
Typically, any cluster-wide settings (like cluster.name) should be
added to the elasticsearch.yml config file, while any node-specific settings
such as node.name could be specified on the command line.
Checking that Elasticsearch is running
editYou can test that your Elasticsearch node is running by sending an HTTP
request to port 9200 on localhost:
GET /
which should give you a response something like this:
{
  "name" : "Cp8oag6",
  "cluster_name" : "elasticsearch",
  "cluster_uuid" : "AT69_T_DTp-1qgIJlatQqA",
  "version" : {
    "number" : "5.5.3",
    "build_hash" : "f27399d",
    "build_date" : "2016-03-30T09:51:41.449Z",
    "build_snapshot" : false,
    "lucene_version" : "6.5.1"
  },
  "tagline" : "You Know, for Search"
}
Installing Elasticsearch as a Service on Windows
editElasticsearch can be installed as a service to run in the background or start automatically at boot time without any user interaction. This can be achieved upon installation using the following command line options
-
INSTALLASSERVICE=true -
STARTAFTERINSTALL=true -
STARTWHENWINDOWSSTARTS=true
Once installed, Elasticsearch will appear within the Services control panel:
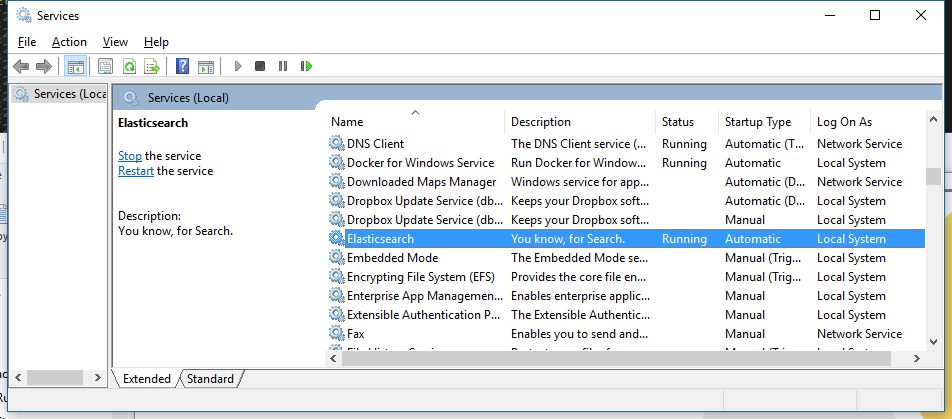
and can be stopped and restarted from within the control panel, or from the command line using:
with Command Prompt:
sc.exe stop Elasticsearch
sc.exe start Elasticsearch
with PowerShell:
Get-Service Elasticsearch | Stop-Service | Start-Service
Changes can be made to jvm.options and elasticsearch.yml configuration files to configure the service after installation. Most changes (like JVM settings) will require a restart of the service in order to take affect.
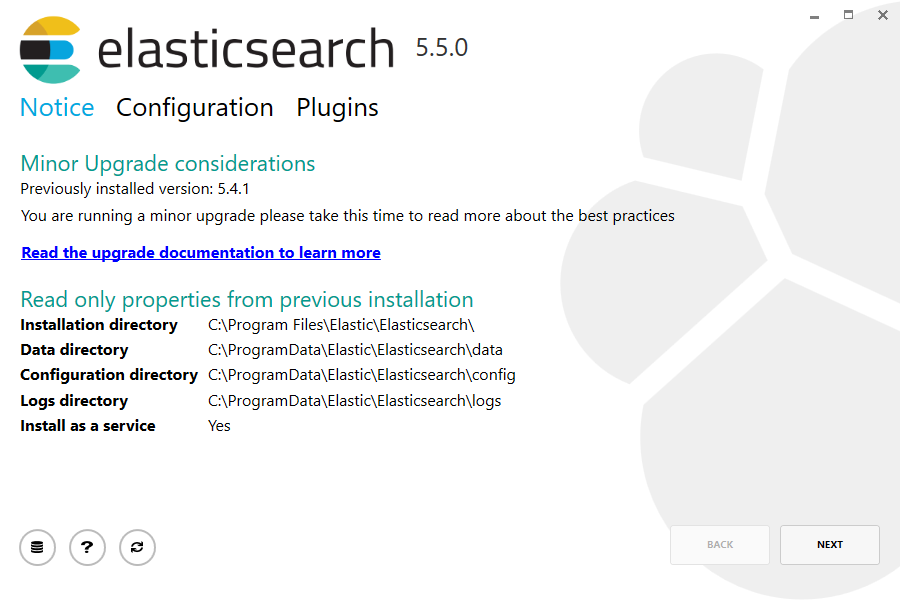
Upgrade using the graphical user interface (GUI)
editThe .msi package supports upgrading an installed version of Elasticsearch to a newer
version of Elasticsearch. The upgrade process through the GUI handles upgrading all
installed plugins as well as retaining both your data and configuration.
Downloading and clicking on a newer version of the .msi package will launch the GUI wizard.
The first step will list the read only properties from the previous installation:
The following configuration step allows certain configuration options to be changed:
Finally, the plugins step allows currently installed plugins to be upgraded or removed, and for plugins not currently installed, to be downloaded and installed:
Upgrade using the command line
editThe .msi can also upgrade Elasticsearch using the command line.
A command line upgrade requires passing the same command line properties as used at first install time; the Windows Installer does not remember these properties.
For example, if you originally installed with the command line options PLUGINS="x-pack" and
LOCKMEMORY="true", then you must pass these same values when performing an
upgrade from the command line.
The simplest upgrade, assuming Elasticsearch was installed using all defaults, is achieved by first navigating to the download directory, then running:
start /wait msiexec.exe /i elasticsearch-5.5.3.msi /qn
Similar to the install process, a path to a log file for the upgrade process can
be passed using the /l command line argument
start /wait msiexec.exe /i elasticsearch-5.5.3.msi /qn /l upgrade.log
Uninstall using Add/Remove Programs
editThe .msi package handles uninstallation of all directories and files added as part of installation.
Uninstallation will remove all directories and their contents created as part of installation, including data within the data directory. If you wish to retain your data upon uninstallation, it is recommended that you make a copy of the data directory before uninstallation.
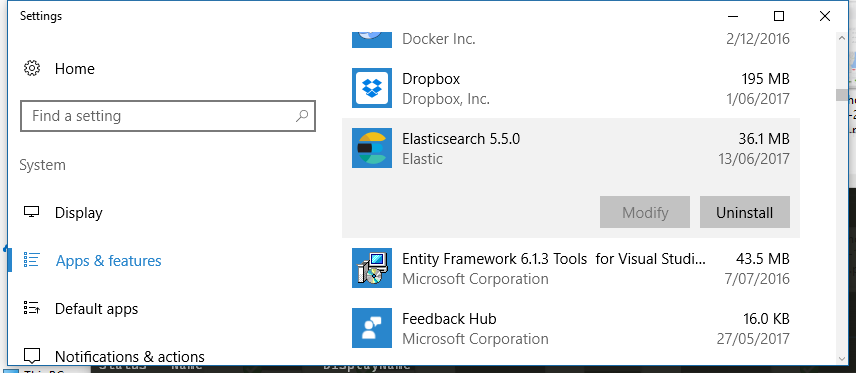
MSI installer packages do not provide a GUI for uninstallation. An installed program can be uninstalled
by pressing the Windows key and typing add or remove programs to open the system settings.
Once opened, find the Elasticsearch installation within the list of installed applications, click
and choose Uninstall:
This will launch the uninstallation process.
Uninstall using the command line
editUninstallation can also be performed from the command line by navigating to the directory
containing the .msi package and running:
start /wait msiexec.exe /x elasticsearch-5.5.3.msi /qn
Similar to the install process, a path to a log file for the uninstallation process can
be passed using the /l command line argument
start /wait msiexec.exe /x elasticsearch-5.5.3.msi /qn /l uninstall.log
Next steps
editYou now have a test Elasticsearch environment set up. Before you start serious development or go into production with Elasticsearch, you will need to do some additional setup:
- Learn how to configure Elasticsearch.
- Configure important Elasticsearch settings.
- Configure important system settings.