Webhook for Case Management
How to Use Kibana's new Webhook - Case Management connector with a third-party system


 Share on Twitter
Share on Twitter

 Share on LinkedIn
Share on LinkedIn

 Share on Facebook
Share on Facebook

 Share by Email
Share by Email

 Print this page
Print
In 8.4, a new Webhook - Case Management connector was introduced. The Webhook - Case Management connector uses axios to send POST, PUT, and GET requests to a case management RESTful API web service and integrates with the Kibana Cases feature.
In this blog post, we will demonstrate how to connect the Webhook - Case Management connector with a demo instance of Jira (a third-party case management system) and use it with the Kibana Cases feature. We will refer to the Jira API documentation in order to configure the connector.
Note: If you want to connect with Jira quickly, we recommend using the preconfigured Jira connector.
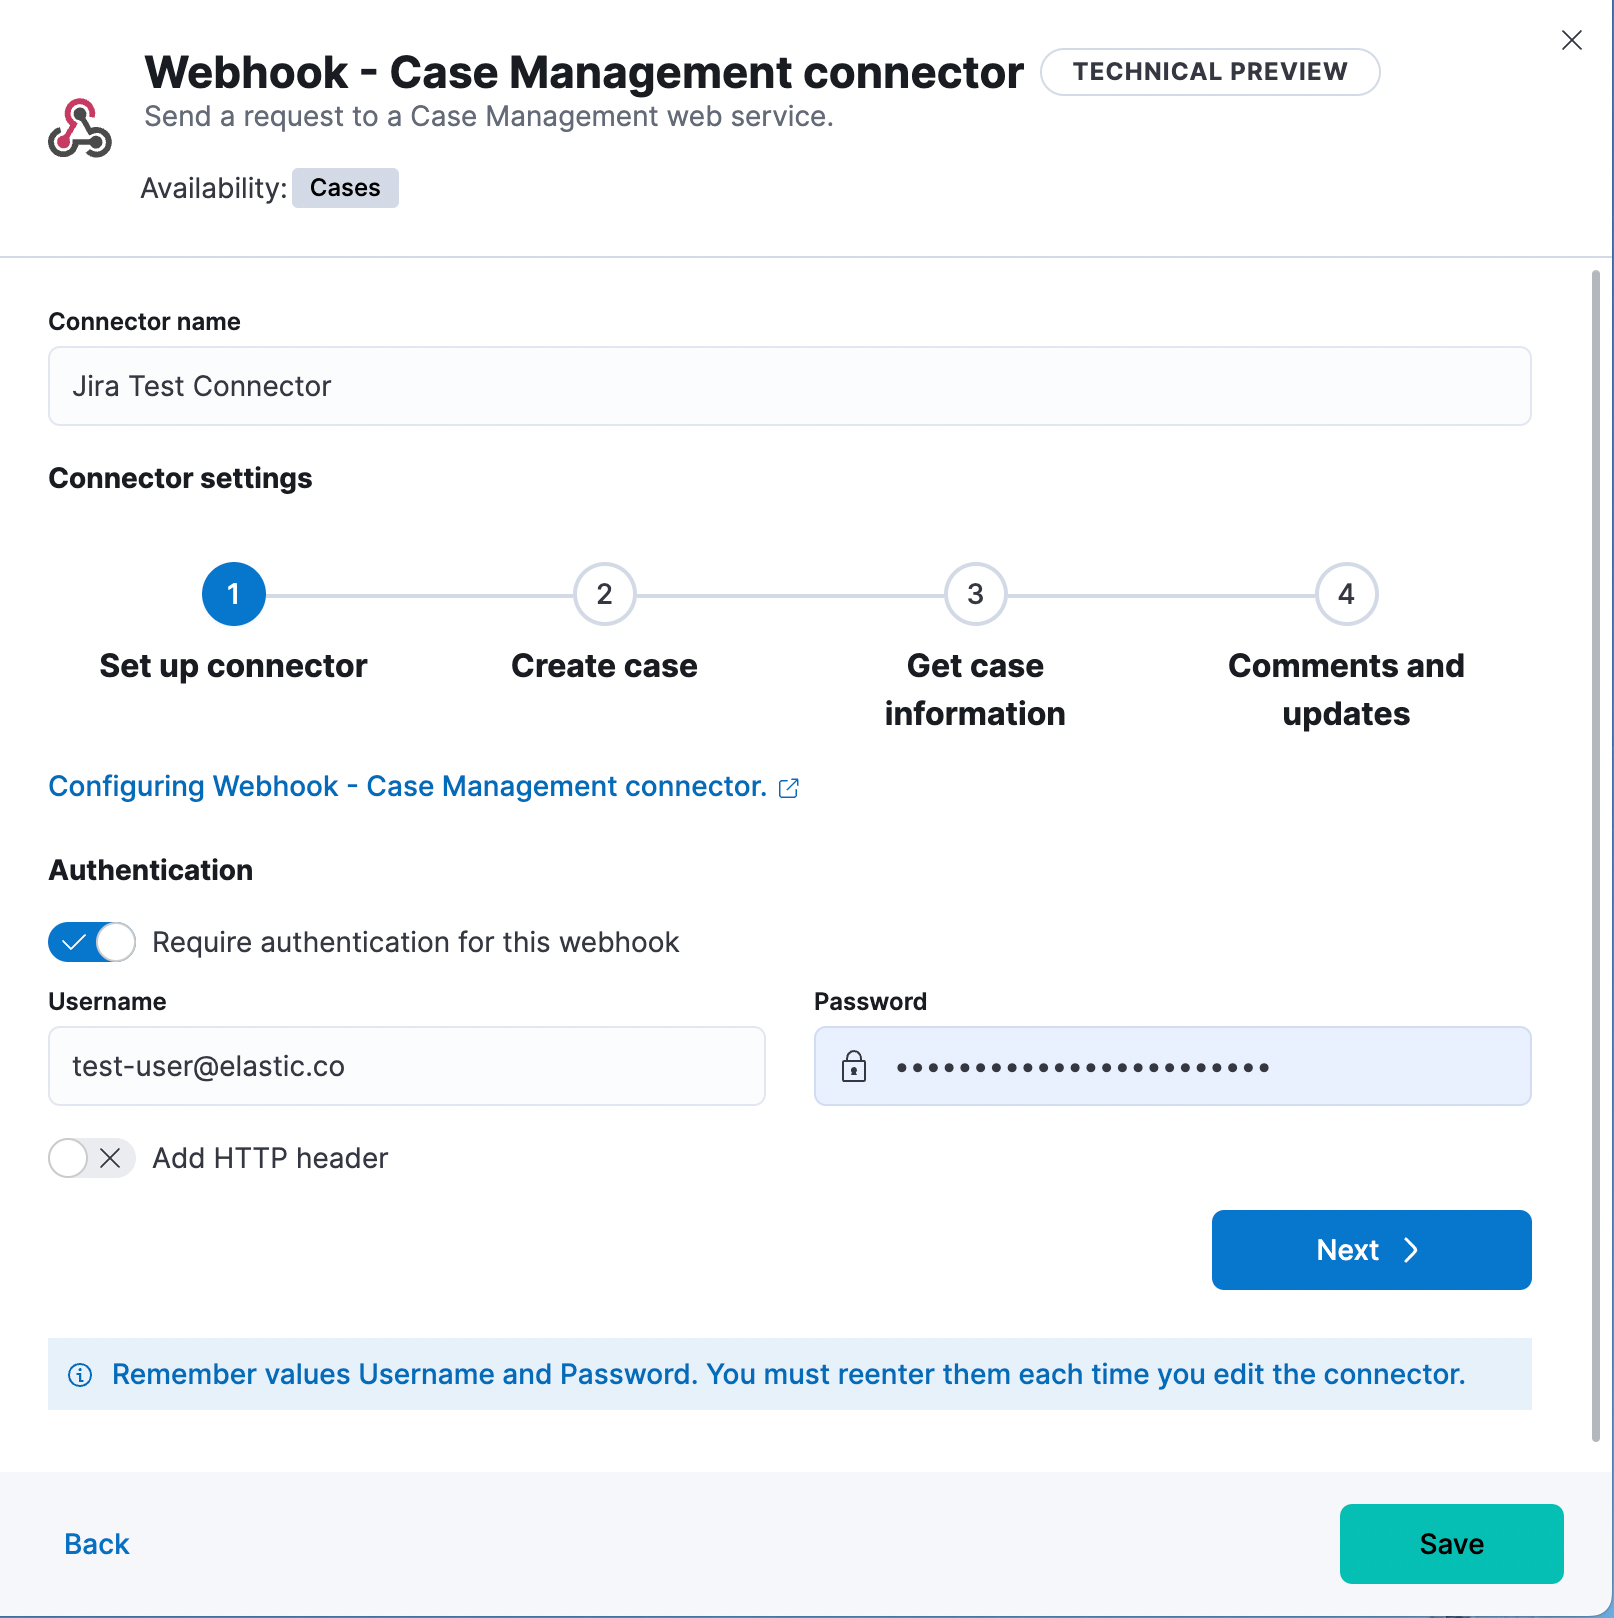
Step 1. Set up connector
In the Webhook - Case Management connector create flyout, begin by entering a connector Name — for example, Jira Test Connector. Basic authentication will be used in this example, so keep the Require authentication option selected and enter the Username and Password for the test instance — for example, test-user@elastic.co and notarealpassword. We will not set any Headers for the requests.
Step 2. Create case
To find the required values for this step, refer to the Jira create issue method documentation.
Jira create issue request method: POST
Jira create issue request URL: /rest/api/2/issue
Jira create issue request body:
{
    "fields": {
        "summary": "Main order flow broken",
        "description": "Order entry fails when selecting supplier.",
        "labels": ["bugfix",  "blitz_test"],
        "project":{"key":"PROJ-123"},
        "issuetype":{"id":"10000"}
    }
}Jira create issue response body:
{
  "id": "10000",
  "key": "ED-24",
  "self": "https://your-domain.atlassian.net/rest/api/2/issue/10000",
  "transition": {
    "status": 200,
    "errorCollection": {
      "errorMessages": [],
      "errors": {}
    }
  }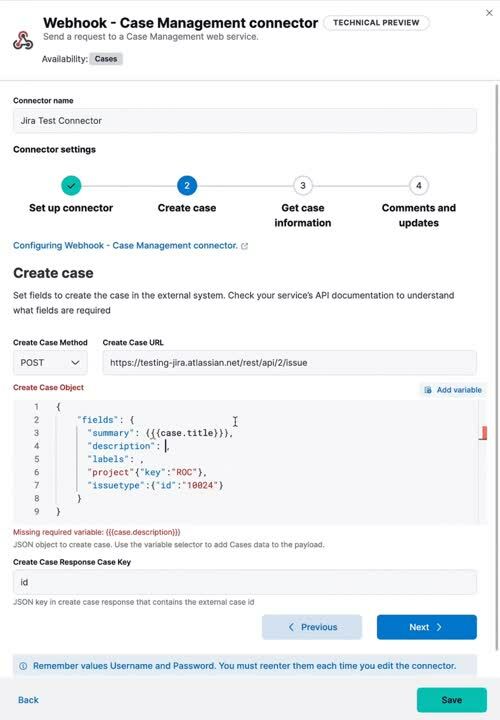
}In the following screen capture, we enter POST as the Create Case Method and https://testing-jira.atlassian.net/rest/api/2/issue as the Create Case Url. In our example Jira instance, the project key is "ROC" and the issuetype ID is "10024."
We have entered the Jira request JSON as the Create Case Object, updating the project key to "ROC" and the issuetype ID to "10024." We then use the Case variable selector to enter where we will map the Kibana case title, Kibana case description, and Kibana case tags. The Jira response body contains an ID with the JSON key of "id", so we enter id as the Create Case Response - Case ID Key.
Step 3. Get case information
Next we'll need to look at Jira's Get issue method documentation to find the values for this step. In the GET response JSON below, we thinned out some null and unrelated data so that we can focus on the fields we need.
Jira get issue request URL: /rest/api/2/issue/{issueIdOrKey}
Jira get issue response body:
{
    "id": "71964",
    "self": "https://testing-jira.atlassian.net/rest/api/2/issue/71964",
    "key": "ROC-584",
    "fields": {
        "issuetype": {
            "self": "https://testing-jira.atlassian.net/rest/api/2/issuetype/10024",
            "id": "10024",
            "description": "An improvement or enhancement to an existing feature or task.",
            "name": "Improvement",
            "subtask": false,
            "avatarId": 10310,
            "hierarchyLevel": 0
        },
        "project": {
            "self": "https://testing-jira.atlassian.net/rest/api/2/project/10021",
            "id": "10021",
            "key": "ROC",
            "name": "ResponseOps Cases",
            "projectTypeKey": "software",
            "simplified": false
        },
        "created": "2022-08-02T16:52:20.554+0300",
        "priority": {
            "name": "Medium",
            "id": "3"
        },
        "labels": ["kibanaTag"],
        "updated": "2022-08-02T16:52:20.554+0300",
        "status": {
            "self": "https://testing-jira.atlassian.net/rest/api/2/status/10003",
            "description": "",
            "name": "To Do",
            "id": "10003",
            "statusCategory": {
                "self": "https://testing-jira.atlassian.net/rest/api/2/statuscategory/2",
                "id": 2,
                "key": "new",
                "colorName": "blue-gray",
                "name": "To Do"
            }
        },
        "description": "Kibana Description",
        "summary": "Kibana Title",
        "creator": {
            "self": "https://testing-jira.atlassian.net/rest/api/2/user?accountId=12345",
            "accountId": "12345",
            "emailAddress": "test-user@elastic.co",
            "displayName": "MLR-QA",
            "active": true,
            "timeZone": "Europe/Athens",
            "accountType": "atlassian"
        },
        "reporter": {
            "self": "https://testing-jira.atlassian.net/rest/api/2/user?accountId=12345",
            "accountId": "12345",
            "emailAddress": "test-user@elastic.co",
            "displayName": "MLR-QA",
            "active": true,
            "timeZone": "Europe/Athens",
            "accountType": "atlassian"
        },
        "comment": {
            "comments": [],
            "self": "https://testing-jira.atlassian.net/rest/api/2/issue/71964/comment",
            "maxResults": 0,
            "total": 0,
            "startAt": 0
        }
    }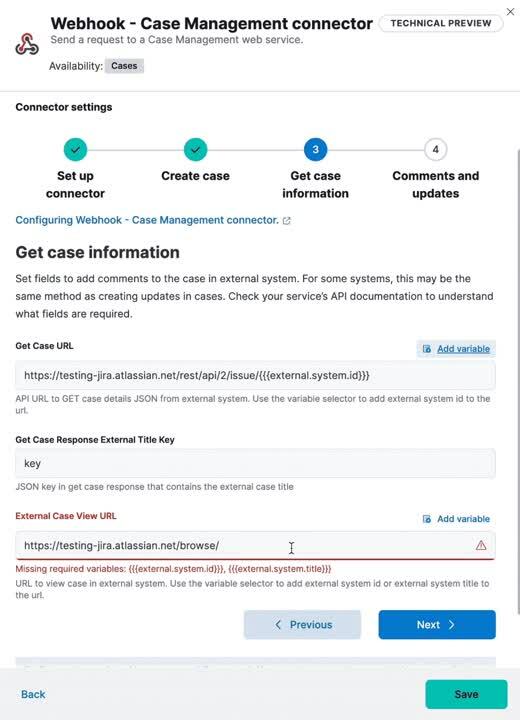
}To make the Get Case URL, we need /rest/api/2/issue/{issueIdOrKey}. We will fill in the value with the issue ID, which we stored in the last step as Create Case Response - Case ID Key. Using the variable selector on the Get Case URL input, we can see the issue ID is stored as a Mustache value {{{external.system.id}}}. So our value for Get Case URL will be https://testing-jira.atlassian.net/rest/api/2/issue/{{{external.system.id}}}.
In the response JSON, we can see the title of the case is "ROC-538." The key for this value is key, so we enter key as the Get Case Response External Title Key value.
We also need the External Case View URL. Jira's documentation instructs you to get the link from the issue itself. The format for this link looks like https://<user’s subdomain>.atlassian.net/browse/<issueKey>.
We mapped key to the Get Case Response External Title Key and using the variable selector on the External Case View URL input, we can see the issue key is stored as a Mustache value {{{external.system.title}}}. Using this, the value for External Case View URL is https://testing-jira.atlassian.net/browse/{{{external.system.title}}}.
Step 4. Comments and updates
During this step, we need to set the REST API data for updates and comments. Let's look at Jira's Edit issue documentation.
Jira update issue request method: PUT
Jira update issue request URL: /rest/api/2/issue/{issueIdOrKey}
Jira update issue request body:
{
    "fields": {
        "summary": "Main order flow broken",
        "description": "Order entry fails when selecting supplier.",
        "labels": ["bugfix",  "blitz_test"],
        "project":{"key":"PROJ-123"},
        "issuetype":{"id":"10000"}
    }
}In the screen capture below, on Step 4 we enter PUT as the Update Case Method and https://testing-jira.atlassian.net/rest/api/2/issue/{{{external.system.id}}} as the Update Case Url using the variable selector to insert the {{{external.system.id}}}. Just like the create case JSON, have entered the Jira request JSON as the Update Case Object, updating the project key to "ROC" and the issuetype ID to "10024." We then use the Case variable selector to enter where we will map the Kibana case title, Kibana case description, and Kibana case tags.

Lastly we will look at Jira's Add comment documentation to fill out the optional comment REST fields.
Jira create comment request method: POST
Jira create comment request URL: /rest/api/2/issue/{issueIdOrKey}/comment
Jira create comment request body:
{
    "body": "Lorem ipsum dolor sit amet."
}In the following screen capture, we enter POST as the Create Comment Method and https://testing-jira.atlassian.net/rest/api/2/issue/{{{external.system.id}}}/comment as the Create Comment Url using the variable selector to insert the {{{external.system.id}}}. We enter the Jira request JSON as the Create Comment Object, using the case variable selector to enter where we will map the case comment.

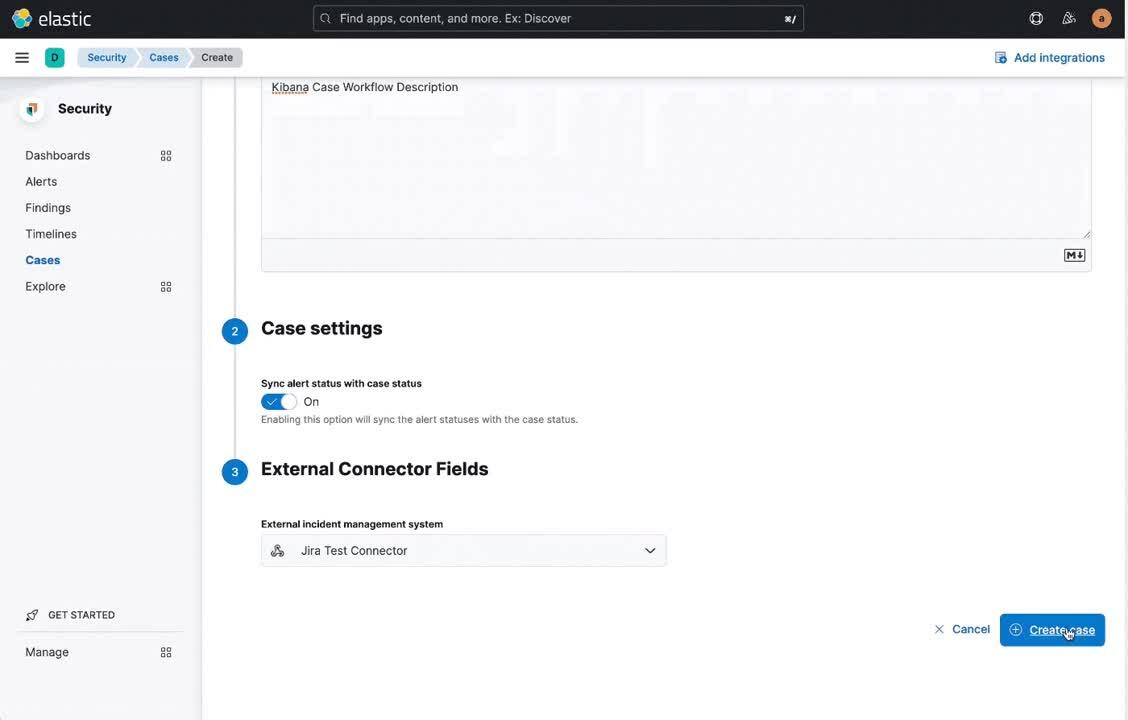
Implement the connector in Kibana Cases
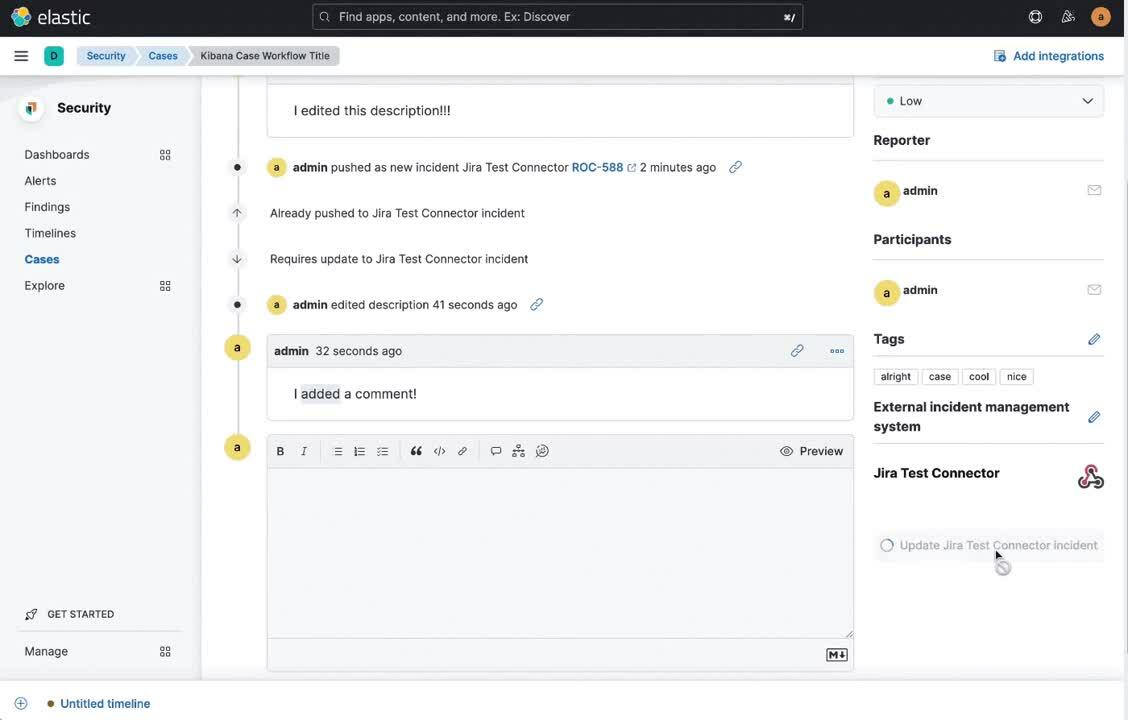
Let's take a look at how our new Webhook - Case Management connector works within the Kibana case workflow.
Create a case
Update and comment on a case
To learn more about the Webhook - Case Management connector and how to configure, please visit the Kibana documentation.
Share
- Share on Twitter
Share on Twitter
- Share on LinkedIn
Share on LinkedIn
- Share on Facebook
Share on Facebook
- Share by Email
Share by Email
- Print this page
Print